
Recommended
More Related Content
What's hot
What's hot (20)
Similar to Here are the steps to write a CNC part program using canned cycles for radial grooving, threading and axial drilling operations:1. Radial Grooving Operation using G75 cycle:O1234G99G28 U0 W0M06 T0101 (grooving tool)M03 S500G00 X30 Z5G75 R1 (retraction amount)G75 X10 Z-10 P1 Q5 R0.5 F0.1 (program lines, position data, radius, feed) 2. Threading Operation using G76 cycle: G76 P1 Q5 R0 (engage angle) Z-15 (depth) F
Similar to Here are the steps to write a CNC part program using canned cycles for radial grooving, threading and axial drilling operations:1. Radial Grooving Operation using G75 cycle:O1234G99G28 U0 W0M06 T0101 (grooving tool)M03 S500G00 X30 Z5G75 R1 (retraction amount)G75 X10 Z-10 P1 Q5 R0.5 F0.1 (program lines, position data, radius, feed) 2. Threading Operation using G76 cycle: G76 P1 Q5 R0 (engage angle) Z-15 (depth) F (20)
Recently uploaded
Recently uploaded (20)
Here are the steps to write a CNC part program using canned cycles for radial grooving, threading and axial drilling operations:1. Radial Grooving Operation using G75 cycle:O1234G99G28 U0 W0M06 T0101 (grooving tool)M03 S500G00 X30 Z5G75 R1 (retraction amount)G75 X10 Z-10 P1 Q5 R0.5 F0.1 (program lines, position data, radius, feed) 2. Threading Operation using G76 cycle: G76 P1 Q5 R0 (engage angle) Z-15 (depth) F
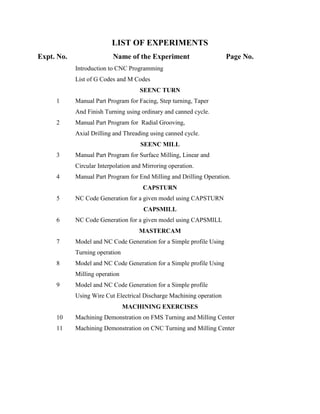
- 1. LIST OF EXPERIMENTS Expt. No. Name of the Experiment Page No. Introduction to CNC Programming List of G Codes and M Codes SEENC TURN 1 Manual Part Program for Facing, Step turning, Taper And Finish Turning using ordinary and canned cycle. 2 Manual Part Program for Radial Grooving, Axial Drilling and Threading using canned cycle. SEENC MILL 3 Manual Part Program for Surface Milling, Linear and Circular Interpolation and Mirroring operation. 4 Manual Part Program for End Milling and Drilling Operation. CAPSTURN 5 NC Code Generation for a given model using CAPSTURN CAPSMILL 6 NC Code Generation for a given model using CAPSMILL MASTERCAM 7 Model and NC Code Generation for a Simple profile Using Turning operation 8 Model and NC Code Generation for a Simple profile Using Milling operation 9 Model and NC Code Generation for a Simple profile Using Wire Cut Electrical Discharge Machining operation MACHINING EXERCISES 10 Machining Demonstration on FMS Turning and Milling Center 11 Machining Demonstration on CNC Turning and Milling Center
- 2. INTRODUCTION TO CNC PROGRAMING LIST OF G CODES CODES FUNCTION G00 Positioning rapid traverse G01 Linear interpolation (feed) G02 Circular interpolation CW G03 Circular interpolation CCW G04 Dwell G20 Inch unit G21 Metric unit G28 Automatic zero return G30 2nd reference point return G40 Tool nose radius compensation cancel G41 Tool nose radius compensation left G42 Tool nose radius compensation right G43 Tool length compensation G52 Local co-ordinate system G54 Work co-ordinate system 1 selection G55 Work co-ordinate system 2 selection G56 Work co-ordinate system 3 selection G57 Work co-ordinate system 4 selection G58 Work co-ordinate system 5 selection G59 Work co-ordinate system 6 selection G71 Rough Turning Cycle G72 Rough Facing Cycle G73 Pattern repeating Cycle G75 Radial Grooving Cycle G76 Thread Cutting Cycle G74 Axial Drilling Cycle G74 Left hand tapping cycle G76 Fine boring cycle G80 Canned cycle cancel
- 3. LIST OF M CODES CODES FUNCTION M00 Optional program stop automatic M01 Optional program stop request M02 Program end M03 Spindle ON clock wise (CW) M04 Spindle ON counter clock wise (CCW) M05 Spindle stop M06 Tool change M07 Mist coolant ON (coolant 1 ON) M08 Flood coolant ON (coolant 2 ON) M09 Coolant OFF M19 Spindle orientation M30 End of program, Reset to start M98 Sub program call M99 Sub program end G81 Drilling cycle G82 Drilling cycle with dwell G83 Peck drilling cycle / deep drill G84 Tapping cycle G85 Boring / Reaming cycle G86 Boring cycle G87 Back boring cycle G90 Absolute command G91 Incremental command G94 Feed per minute G95 Feed per revolution G98 Return to initial point in canned cycle G99 Return to R point in canned cycle
- 4. SEENC TURN Ex. No. 1 Date: Manual Part Program for Facing, Step turning, Taper And Finish Turning using ordinary and canned cycle Aim: To write a manual part program for facing, step turning, taper and finish turning using a) Using ordinary cycle b) Using canned (G71) cycle c) Using canned (G72) cycle Software used: CADEM/SeeNC Turn Pre Lab Questions: 1. Why facing is required? To ensure better flatness on face, this will be the reference from where the length of the workpiece is calculated. 2. Why we required G and M codes for CNC machines? Using these codes only we can able to communicate the CNC machine with post processor. 3. What is meant by normal cycle? It is the cycle involved with manual inputs about rapid traverse and linear traverse of the tool path 4. What is circular interpolation? A translation of linear axis positions into curved tool motions. Circular interpolation requires an endpoint, a feed rate, a center, a radius, and a direction of movement. 5. What is the difference between G00 and G01? G00 is the rapid tool traverse involves with no material removal G01 is the tool traverse involve with material removal at defined feed rate.
- 5. ` Blanksize:Ø52X120 All dimensions are in mm Procedure: i) Open the CADEM software by using start menu/programs/SeeNC Turn version 6.0. ii) Select the option create a new part from the start up dialog box. iii) Enter the program in program editor. iv) Select the blank from pull down menu. Enter the length, diameter and start point of Z for the blank. v) Select machine from pull down menu. Choose the machine type from the machine list. vi) Select syntax from pull down menu. Verify the syntax, if error occurs, check the error in the error description dialog box. vii) If the syntax is correct, automatically the configure dialog box open, double click the tool no, tool library opens, select the tool type and tool. viii) If you want to edit the tool, click the edit tool geometry button, edit the nomenclature of the tool and click ok. ix) Select simulate from pull down menu. In simulate menu, select solid mode. x) Once again select simulate from pull down menu, select start and verify the simulation of the program.
- 6. Syntax: Rapid Traverse – G00 N_ G00 X_ Z_ Linear Interpolation (Feed Traverse) - G01 N__ G01 X__ Z__ F__ Circular Interpolation (Feed Traverse) - G02/G03 N__ G02/G03 X__ Z__ R__F__ Canned Cycle – Rough Turning Cycle – G71 G71 U_ R_ G71 P_ Q_ U_ W_ F_ Canned Cycle –Finishing Cycle – G70 G70 P _ Q_ F _ Canned Cycle –Rough Facing Cycle – G72 G72 W_ R_ G72 P_ Q_ U_ W_ F_ Where, W - Depth of Cut in Z - Axis in ‘mm’ R - Retraction Amount in ‘mm’ P - Start Line of Program. Q - End Line of Program. U - Stock Left in X- Axis for Finishing Operation in ‘mm’. W - Stock Left in Z- Axis for Finishing Operation in ‘mm’. F - Feed rate in mm/Rev.
- 7. Program: (a).Ordinary cycle. O1234 G21 G99 G28 U0 W0 M06 T0101 M03 S1200 G00 X55 Z5 Z0 G01 X-1 F.1 G01 Z1 G00 X50 G01 Z-100 F.1 G01 X51 Z-100 G00 Z1 G00 X48 G01 Z-75 F.1 G01 X49 Z-75 G00 Z1 G00 X46 G01 Z-75 F.1 G01 X47 Z-75 G00 Z1 G00 X44 G01 Z-75 F.1 G01 X45 Z-75 G00 Z1 G00 X42 G01 Z-75 F.1 G01 X43 Z-75 G00 Z1 G00 X40 G01 Z-75 F.1 G01 X41 Z-75 G00 Z1 G00 X38 G01 Z-50 F.1 G01 X39 Z-50 G00 Z1 G00 X36 G01 Z-50 F.1 G01 X37 Z-50 G00 Z1 G00 X34 G01 Z-50 F.1 G01 X35 Z-50 G00 Z1 G00 X32 G01 Z-50 F.1 G01 X33 Z-50 G00 Z1 G00 X30 G01 Z-50 F.1 G01 X31 Z-50 G00 Z1 G00 X28 G01 Z-25 F.1 G01 X29 Z-25 G00 Z1 G00 X26 G01 Z-25 F.1 G01 X27 Z-25 G00 Z1 G00 X24 G01 Z-25 F.1 G01 X25 Z-25 G00 Z1 G00 X22 G01 Z-25 F.1 G01 X23 Z-25 G00 Z1 G00 X20 G01 Z-25 F.1 G01 X21 Z-25 G00 Z1 G00 X30 Z-25 G01 X30 Z-40 F.1 G01 X31 Z-40 G00 Z-25 G00 X26 G01 X30 Z-40 F.1 G01 X31 Z-40 G00 Z-25 G00 X24 G01 X30 Z-40 F.1 G01 X31 Z-40 G00 Z-25 G00 X22 G01 X30 Z-40 F.1 G01 X31 Z-40 G00 Z-25 G00 X20 G01 X30 Z-40 G01 X31 Z-40 G00 Z-25 G00 Z1 G28 U0 W0 M05 M30
- 8. b) Rough Turning cycle- Using canned (G71) cycle O1234 G21 G99 G28 U0 W0 M06 T0101 M03 S1200 G00 X55 Z2 Z0 G01 X-1 F.1 G01 Z1 G00 X52 G71 U0.5 R1 G71 P10 Q90 U.1 W.1 F.1 N10 G01 X20 Z0 F.1 N20 Z-25 N30 X30 Z-40 N40 Z-50 N50 X40 N60 Z-75 N70 X50 N80 Z-100 N90 X55 G28 U0 W0 M05 M06 T0202 M03 S2000 G00 X55 Z2 G70 P10 Q90 F0.05 G28 U0 W0 M05 M30 c) Rough Facing cycle- Using canned (G72) cycle G72 P10 Q90 U.1 W.1 F.1 N10 G01 X50 Z-100 F.1 N20 Z-75 N30 X40 N40 Z-50 N50 X30 N60 Z-40 N70 X20 Z-25 N80 Z0 N90 Z2 G28 U0 W0 M05 M06 T0202 M03 S2000 G00 X55 Z2 G70 P10 Q90 F0.1 G28 U0 W0 M05 M30 O1234 G21 G99 G28 U0 W0 M06 T0101 M03 S1200 G00 X55 Z2 Z0 G01 X-1 F.1 G01 Z1 G00 X55 G72 W0.5 R1
- 9. Post Lab Questions: 1. For roughing cycle why bigger tool nose radius required? For a revolution of work piece more material is removed for roughing with respect to feed rate and spindle speed. 2. For finishing cycle why smaller tool nose radius required? For a revolution of work piece less material is removed for finishing with respect to feed rate and spindle speed to improve better surface finish. 3. For roughing cycle how much feed rate is given when compared to finish cycle? For roughing, Feed rate must be higher than finishing cycle. 4. What is meant by G21? Coordinate values in millimetres. 5. What is meant by G28 U0 W0 Automatic zero return. Result: Thus a manual part program for facing, step turning, tapperand finish turning was written using a) Using ordinary cycle b) Using canned (G71) cycle c) Using canned (G72) cycle
- 10. Ex. No. 2 Date: Manual Part Program for Radial Grooving, Threading and Axial Drilling operation using canned cycle Aim: To write a manual part program using canned cycle for a) Radial Grooving Operation b) Threading Operation c) Axial Drilling Operation Software used: CADEM/SeeNC Turn Pre Lab Questions: 1. What is the code used to represent linear and circular interpolation? G01 and G02/G03 2. What is code used to represent rapid traverse? G00 3. What is drilling? Drilling is a cutting process that uses a drill bit to cut or enlarge a hole of circular cross- section in solid materials 4. What is grooving? The process of cutting a narrow channel or passageway into the outside diameter of a cylindrical workpiece 5. How to calculate spindle speed? V= 𝜋DN/1000 V= cutting speed in Meter/Minute
- 11. Procedure: i) Open the CADEM software by using start menu/programs/SeeNC Turn version 6.0. ii) Select the option create a new part from the start up dialog box. iii) Enter the program in program editor. iv) Select the blank from pull down menu. Enter the length, diameter and start point of Z for the blank. v) Select machine from pull down menu. Choose the machine type from the machine list. vi) Select syntax from pull down menu. Verify the syntax, if error occurs, check the error in the error description dialog box. vii) If the syntax is correct, automatically the configure dialog box open, double click the tool no, tool library opens, select the tool type and tool. viii) If you want to edit the tool, click the edit tool geometry button, edit the nomenclature of the tool and click ok. ix) Select simulate from pull down menu. In simulate menu, select solid mode. x) Once again select simulate from pull down menu, select start and verify the simulation of the program. Syntax: (2a) Canned Cycle –Radial Grooving Cycle–G75 G75 R_ G75 X_ Z_ P_ Q_ R_ F_ Where R - Retraction Amount in MM along X – Axis. X - Distance from the Center line to the Groove Surface in mm. Z - Final Depth of Z-Co-ordinate Value of Groove in mm. P - Peck increment on x-axis in microns Q - Depth of cut in Microns along Z – Axis. R - Relief Amount of the Tool at the Cutting Bottom. F - Feed rate in mm/Rev
- 12. Blanksize:Ø42X95 All dimensions are in mm
- 13. Program: a) Radial Grooving Operation. O1234 G21 G99 G28 U0 W0 M06 T0101 M03 S1200 G00 X45 Z5 Z0 G01 X-1 F0.1 Z2 G00 X42 G71 U0.5 R1 G71 P10 Q80 U0.2 W0.2 F0.1 N10 G01 X16 Z0 N20 X20 Z-2 N30 Z-33 N40 X30 Z-43 N50 Z-48 N60 G02 X40 Z-53 R5 N70 G01 Z-75 N80 X45 G28 U0 W0 M05 M06 T0202 M03 S2000 G00 X42 Z2 G70 P10 Q80 F0.1 G28 U0 W0 M05 M06 T0303 M03 S800 G00 X21 Z-33 G75 R1 G75 X15 Z-26 P1000 Q1000 R0 F0.1 G28 U0 W0 M05 M30
- 14. (2b) Canned Cycle – Threading Cycle – G76 G76 P [(m) (r) (a)] Q (d Min) R (d) G76 X_ Z_ P_ Q_ R_ F_ Where m - Number of Idle Passes. r - Chamfering Angle. a - Angle of Tool Tip d min - Minimum Thread Depth in Microns. d - Finishing Allowance in mm. X - Distance from the Centre line to the Root diameter in mm. Z - Length of the Thread in mm. R - Taper value (If the Thread Profile having Taper, then input Minus Value Otherwise input R0) P - Height of Thread in Microns. Q - Depth of cut in First Cut in Microns. F - Pitch or Lead of the Thread in mm . Canned Cycle –Threading Calculations Height of the Thread, h =0.61343xPitch or Lead Core Diameter, d=D-(2xh) Where d - Core Diameter of the Thread in mm . D - Major Diameter of the Thread in mm . H - Height of the Thread in mm. Lead: Lead = Pitch x Number of Starts. Where For Single Start thread, No. of Starts is 1 For Double Start Thread, No. of Starts is 2 For Treble Start Thread, No. of Starts is 3
- 15. Thread Terminology Calculations: Height of thread: 0.61343 X pitch or Lead (h) Core diameter : D-2h
- 16. Blanksize:Ø32X95 All dimensions are in mm
- 17. Threading Operation. O1234 G21 G99 G28 U0 W0 M06 T0101 M03 S1200 G00 X35 Z5 Z0 G01 X-1 F0.1 Z2 G00 X35 G71 U0.5 R1.0 G71 P10 Q80 U0.2 W0.2 F0.1 N10 G01 X12 Z0 N20 X16 Z-2 N30 Z-20 N40 X20 Z-25 N50 Z-35 N60 G03 X30 Z-40 R5 N70 G01 Z-75 N80 X35 G28 U0 W0 M05 M06 T0202 M03 S2000 G00 X35 Z2 G70 P10 Q80 F0.05 G28 U0 W0 M05 M06 T0303 M03 S800 G00 X35 Z-20 X17 G75 R1.0 G75 X10 Z-18 P1000 Q1000 F0.1 G00 X35 G28 U0 W0 M05 M06 T0404 M03 S500 G00 X16 Z5 G76 P031560 Q100 R0.1 G76 X14.16 Z-17 P920 Q200 R0 F1.5 G00 X17 G28 U0 W0 M05 M30
- 18. (2c) Canned cycle – Axial Drilling Cycle – G74 G74 R_ G74 Z_ Q_ F_ Where R - Retraction Amount in mm along Z - axis. Z - Overall drill depth in mm . Q - Pecking depth in Microns. F - Feed rate in mm/Rev. Blank size:Ø102X120 All dimensions are in mm
- 19. b) Axial Drilling Operation. O1238 G21 G99 G28 U0 W0 M06 T0101 M03 S1200 G00 X105 Z5 Z0 G01 X-1 F0.1 Z2 G00 X105 G70 P10 Q90 F0.05 G28 U0 W0 M05 M06 T0303 M03 S800 G00 X105 Z-40 G00 X41 G75 R1 G75 X30 Z-38 P1000 Q500 R0 F0.1 G00 X105 G28 U0 W0 M05 M06 T0404 M03 S500 G00 X40 Z50 G00 Z2 G76 P031560 Q100 R0.1 G76 X36.93 Z-37 P1533 Q200 F2.5 G00 X105 G28 U0 W0 M05 M06 T0505 M03 S700 G00 X0 Z50 Z2 G74 R1.0 G74 Z-30 Q1000 F0.1 G01 Z2 G28 U0 W0 M05 M30 G71 U0.5 R1.0 G71 P10 Q20 U0.1 W0.1 F0.1 N10 G01 X36 Z0 N20 X40 Z-2 N30 Z-40 N40 G03 X60 Z-50 R10 N50 G01 Z-65 N60 G02 X80 Z-75 R10 N70 G01 X100 N80 Z-100 N90 X105 G28 U0 W0 M05 M06 T0202 M03 S2000 G00 X105 Z5
- 20. Post Lab Questions: 1. Why canned cycle is required? To eliminate unnecessary mentioning of rapid tool traverse in program and all these are taken care by the software itself by this way canned cycle shortens the program length. 2. Where and how to change the depth of cut in X- axis in canned cycle? On the first line of G71 itself. 3. In canned cycle G71 U represents what? Depth of cut is X axis. 4. What is the advantage of multi start over single start? A multi-start thread permits a more rapid advance 5. What is meant by pitch of a thread? Distance for a screw thread to advance form one point to another. Result: A Manual Part Program was written using canned cycle for a) Radial Grooving Operation b) Threading Operation c) Axial Drilling Operation
- 21. SEENC MILL Ex. No. 3 Date: Manual Part Program for Surface Milling, Linear and Circular Interpolation and Mirroring operation Aim: To write a manual part program for a) Surface Milling, Linear and Circular Interpolation b) Mirroring Operation Software used: CADEM/SeeNC Mill Pre Lab Questions: 1. What is the difference between turn and milling center? In turning, tool is stationary, workpiece rotates In milling, work piece is stationary, tool rotates. 2. What is meant by cutter compensation? An offset used on the mill that accounts for variations in tool diameter. Cutter compensation is necessary only for tools that travel in the X- or Y-axes. 3. Define a face cutting edge? The edge on the end or bottom of a milling cutter that cuts metal. 4. What is meant by mirror mill? The variation of the axis sign is achieved through mirroring. 5. What is called a sub program? A program separate from the main program that executes a series of operations that occurs multiple times during the machining cycle. Subprograms shorten and simplify manual programming
- 23. Procedure: i) Open the Cadem software by using Start Menu / Programs / SeeNc Mill version 6.0 ii) Select the option create a new part from the start up dialog box. iii) Enter the program in program editor. iv) Select the blank from pull down menu .Enter Maximum X,Y values and minimum X,Y values and blank thickness and Z coordinate at the bottom. v) Select machine from pull down menu. Choose the machine type from the machine list. vi) Select syntax from pull down menu. Verify the syntax, if error occurs, check the error in the error description dialog box. vii) If the syntax is correct, automatically the configure dialog box open, double click the tool no, tool library opens, select the tool type and tool. viii) If you want to edit the tool, click the edit tool geometry button, edit the nomenclature of the tool and click ok. ix) Select simulate from pull down menu. In simulate menu, select solid mode. x) Once again select simulate from pull down menu, select start and verify the simulation of the program. Syntax: Rapid Traverse – G00 N_ G00 X__ Y__ Linear Interpolation (Feed Traverse) - G01 N__ G01 X__ Y__ F__ Circular Interpolation (Feed Traverse) - G02/G03 N__ G01/G03 X__ Y__ F__
- 24. Program: a) Surface Milling, Linear and Circular Interpolation O1234 G21 G98 G91 G28 Z0 G91 G28 X0 Y0 M06 T01 M03 S1200 G00 G55 G90 X0 Y0 G43 H1 Z100 Z2 G40 G00 X25 Y15.85 G01 Z-2.0 F20 G01 X12.5 Y37.5 F100 G01 X25.0 Y59.15 G01 X50.0 Y59.15 G01 X62.25 Y37.5 G01 X50.0 Y15.85 G01 X25.0 Y15.85 G02 X12.5 Y37.5 R12.5 G02 X25.0 Y59.15 R12.5 G02 X50.0 Y59.15 R12.5 G02 X62.5 Y37.5 R12.5 G02 X50.0 Y15.85 R12.5 G02 X25.0 Y15.85 R12.5 G01 Z2 G00 X22.5 Y37.5 G01 Z-2 F20 G02 X22.5 Y37.5 I15 J0 G01 Z2 G00 Z100 G91 G28 Z0 G91 G28 X0 Y0 M05 M30
- 25. (3b)MIRRORING
- 26. Commands for Mirroring Operation M98 Sub-Program Call M99 Sub-Program End M70 X-Mirror ON M71 Y-Mirror ON M80 X- Mirror Cancel M81 Y- Mirror Cancel b) Program for Mirroring Operation O1234 G21 G98 G00 G91 G28 Z0 G00 G91 G28 X0 Y0 M06 T01 G00 G90 G55 X0 Y0 G43 H1 Z100 M03 S1500 Z5 G01 Z0.0 F100 M98 P0014000 M70 M98 P0014000 M80 M71 M98 P0014000 M81 M70 M71 M98 P0014000 M80 M81 G00 G90 Z5 G00 G91 G28 Z0 G00 G91 G28 X0 Y0 M05 M30 O4000 G00 G90 X5 Y5 G01 G91 Z-0.5 F100 G01 G90 X5 Y15 G02 X15 Y25 R10 G01 X35 G03 X30 Y30 R5 G03 X25 Y35 R5 G01 Y15 G02 X15 Y5 R10 G01 X5 Y5 G01 X15 Y5 G01 Y15 G01 X5 G00 Z0 G00 X10 Y10 G01 G91 Z-0.5 F100 G00 G90 Z0 M99
- 27. Post Lab Questions: 1. What is G98? Return to initial point in canned cycle 2. What is G91? Incremental command. 3. What is G90? Absolute command. 4. What code is used to call a sub program? M98 5. How to cancel a sub program? M99 Result: A manual part program was written for a) Surface Milling, Linear and Circular Interpolation b) Mirroring Operation
- 28. Ex. No. 4 Date: Manual Part Program for End milling and Drilling operation Aim: To write a manual part program for End Milling and Drilling operation. Software used: CADEM/SeeNCMill Pre Lab Questions: 1. What code is used to cancel cutter radius compensation? G40 2. What code is used to provide tool length compensation? G43 3. What is drilling? The use of a rotating multi-point drill to cut a round hole into a workpiece. 4. What is reaming? The process of using a multi-point tool to smooth the interior surface of a hole. 5. Define an end mill cutter? An end mill is a type of milling cutter, a cutting tool used in industrial milling applications. It is distinguished from the drill bit in its application, geometry, and manufacture. While a drill bit can only cut in the axial direction, a milling bit can generally cut in all directions, though some cannot cut axially.
- 30. Procedure: i) Open the Cadem software by using Start Menu / Programs / SeeNc Mill version 6.0 ii) Select the option create a new part from the start up dialog box. iii) Enter the program in program editor. iv) Select the blank from pull down menu. Enter Maximum X,Y values and minimum X,Y values and blank thickness and Z coordinate at the bottom. v) Select machine from pull down menu. Choose the machine type from the machine list. vi) Select syntax from pull down menu. Verify the syntax, if error occurs, check the error in the error description dialog box. vii) If the syntax is correct, automatically the configure dialog box open, double click the tool no, tool library opens, select the tool type and tool. viii) If you want to edit the tool, click the edit tool geometry button, edit the nomenclature of the tool and click ok. ix) Select simulate from pull down menu. In simulate menu, select solid mode. x) Once again select simulate from pull down menu, select start and verify the simulation of the program. Syntax: Canned Cycles – Drilling Cycle–G81 and G83 N__ G98/99 G81 R__ Z__ F__ and N__ G98/99 G83 R__ Z__ Q__ F__ Where F - Infeed feed rate mm/min Q - Peck Depth Z - Final Depth R - Safe Height / R Point G81/83- Peck Drilling Cycle G98/99- Return Position Code N - Block Number
- 31. Program: End Milling and Drilling operation O2000 G21 G98 G91 G28 Z0 G91 G28 X0 Z0 M06 T1(Center Bit) G00 G90 G55 X37.5 Y17.5 G43 H1 Z100.0 M03 S2000 Z3.0 G99 G81 R3.0 Z-2.0 F100 X57.5 Y37.5 X37.5 Y57.5 X17.5 Y37.5 G00 G80 Z100.0 M06 T2 (Ø8 Twist drill) G00 G90 G55 X37.5 Y17.5 G43 H2 Z100.0 M03 S500 Z3.0 G99 G83 R3.0 Z-10.0 Q0.4 F30 X57.5 Y37.5 X37.5 Y57.5 X17.5 Y37.5 G00 G80 Z100.0 M06 T3(Ø12 Flat End Mill) G00 G90 G55 X-10.0 Y37.5 G43 H3 Z100.0 M03 S1000 Z5.0 G01 Z0.0 F100 M98P0102001 G00 G90 Z100.0 M05 M30 O2001 G01 G91 Z-0.5 F100 G01 G90 G41 D3 X5.0 Y37.5 Y65.0 G02 X10.0 Y70.0 R5.0 G01 X65.0 G02 X70.0 Y65.0 R5.0 G01 Y10.0 G02 X65.0 Y5.0 R5.0 G01 X10.0 G02 X5.0 Y10.0 R5.0 G01 Y46.0 G01 G40 X-10.0 G00 Y37.5 M99
- 32. Post Lab Questions: Explain the procedure for drilling? First locate a spot on the centre of the drill circle using centre bit tool. Then using proper drill tool to produce a drill . 1. What is called tapping? The process of cutting internal threads in a workpiece with a multi-point tool. 2. What is called counter sunk? The cutting of a beveled edge at the end of a hole so that the head of a screw can rest flush with the workpiece surface. 4. Explain the blank setting value of minimum Z? It should be mentioned the blank thickness along with negative value 5. What is the unit of feed rate value for milling? Feed in meter per minute Result: A manual part program was written for End Milling and Drilling operation.