This document discusses second order analysis of structures. It begins by introducing second order analysis as a particular case of nonlinear analysis where geometric nonlinearities due to large displacements are considered. It then covers various methods for conducting second order analysis, including simplified procedures. Examples are provided to illustrate second order analysis of frames and inclined beam frames. Key aspects like critical load values and the effect of member properties are also discussed.
2. STRUCTURAL ANALYSIS II
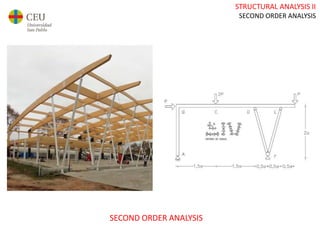
SECOND ORDER ANALYSIS
1.- ELASTIC ANALYSIS OF GRIDS
1.1.- COMPATIBILITY METHOD
1.2- SLOPE DEFLECTION METHOD
2.- PLASTIC ANALYSIS OF STRUCTURES
2.1- PLASTIC ANALYSIS OF BEAMS
2.2- PLASTIC ANALYSIS OF FRAMES
2.2.1- KINEMATIC METHOD
2.2.2- INCREMENTAL ANALYSIS. HINGE BY HINGE METHOD
3.- INTRODUCTION TO SECOND ORDER ANALYSIS OF STRUCTURES
2.3- PLASTIC ANALYSIS OF SLABS.
FEBRUARY
MARCH
APRIL
3. STRUCTURAL ANALYSIS II
SECOND ORDER ANALYSIS
SECOND ORDER ANALYSIS
It is a particular case of non-linear analysis of structures.
It consists on a Geometric non-linearity.
Elastic displacements are not small enough to ignore their effect
so we have to consider them in the system equilibrium.
This is, we should compute them to calculate the bending moment diagram
and the final displacements.
4. STRUCTURAL ANALYSIS II
SECOND ORDER ANALYSIS
SECOND ORDER ANALYSIS: When axial forces and bending moments are
combined, we consider how the vertical displacement in the middle of the span
modifies the bending moment diagram due to the axial forcé.
5. STRUCTURAL ANALYSIS II
SECOND ORDER ANALYSIS
SECOND ORDER ANALYSIS: we consider how the horizontal displacement caused
by buckling produces a bending moment effect due to the axial forcé along the bar
6. STRUCTURAL ANALYSIS II
SECOND ORDER ANALYSIS
ONE OF THE AIMS OF SECOND ORDER ANALYSIS IS FINDING THE VALUE OF THE
CRITICAL LOAD
When the load applied to a column is higher than the critical
load, the column is said to deflect laterally such that the
column will not remain in a stable position
7. STRUCTURAL ANALYSIS II
SECOND ORDER ANALYSIS
ONE OF THE AIMS OF SECOND ORDER ANALYSIS IS FINDING THE VALUE OF THE
CRITICAL LOAD
When the load applied to a column is higher than the critical
load, the column is said to deflect laterally such that the
column will not remain in a stable position
9. STRUCTURAL ANALYSIS II
SECOND ORDER ANALYSIS
LOCAL INSTABILITY: CRITICAL BUCKLING LOAD OF A SUPPORT
THE EFFECTIVE SUPPORT LENGTH DEPENDS ON THE SUPPORT BOUNDARIES
10. STRUCTURAL ANALYSIS II
SECOND ORDER ANALYSIS
F is the CRITICAL LOAD VALUE
E is a material parameter (Young Modulus)
I is a cross section shape parameter (Moment of Inertia)
(if the cross section is not symmetrical we have to check what happens in two
directions)
K is the effective length factor. Its value depends on the bar boundary conditions.
L is the bar length
KL is the effective length of the bar.
LOCAL INSTABILITY: CRITICAL BUCKLING LOAD OF A SUPPORT
11. STRUCTURAL ANALYSIS II
SECOND ORDER ANALYSIS
ONE OF THE AIMS OF SECOND ORDER ANALYSIS IS FINDING THE VALUE OF THE
CRITICAL LOAD
For SLENDER COLUMNS,
critical stress is usually lower
than yield stress, and in the
elastic range. In contrast, a
STOCKY COLUMN would have
a critical buckling stress higher
than the yield (it yields in
shortening prior the virtual
elastic buckling onset)
12. STRUCTURAL ANALYSIS II
SECOND ORDER ANALYSIS
SECOND ORDER ANALYSIS: we are going to consider how the horizontal
displacement at B modifies the bending moment diagram
13. STRUCTURAL ANALYSIS II
SECOND ORDER ANALYSIS
The codes tell us when a structure should be calculated
considering second order analysis effects.
ESTRUCTURA TRASLACIONAL (sway structures)
ESTRUCTURAL INTRASLACIONAL (non-sway structures) (braced structures)
ESTRUCTURAS ARRIOSTRADAS
14. STRUCTURAL ANALYSIS II
SECOND ORDER ANALYSIS
The simplified method we are going to study consists on:
1.- First order elastic analysis;
2.- Compute the displacements which could increase the value of the system
bending moments;
3.- Compute the bending moment increment produced by the displacements;
4.- Compute the final displacement and the final bending moment diagram;
5.- Compute the load critical value. If the load reaches that value, the
structure collapses.
15. STRUCTURAL ANALYSIS II
SECOND ORDER ANALYSIS
SECOND ORDER ANALYSIS: we are going to consider how the horizontal
displacement at B modifies the bending moment diagram
18. STRUCTURAL ANALYSIS II
SECOND ORDER ANALYSIS
SECOND ORDER ANALYSIS: simplified procedure I
1º STEP: FIRST ORDER ANALYSIS: HORIZONTAL DISPLACEMENT AT B
19. STRUCTURAL ANALYSIS II
SECOND ORDER ANALYSIS
SECOND ORDER ANALYSIS: simplified procedure 1
2º STEP: FIRST ORDER ANALYSIS: INCREMENT OF HORIZONTAL DISPLACEMENT AT B
20. STRUCTURAL ANALYSIS II
SECOND ORDER ANALYSIS
SECOND ORDER ANALYSIS: simplified procedure 1
3º STEP: WE CALCULATE u2 = u1 + Du and the CRITICAL LOAD
21. STRUCTURAL ANALYSIS II
SECOND ORDER ANALYSIS
SECOND ORDER ANALYSIS: simplified procedure 2
1º STEP: FIRST ORDER ANALYSIS: HORIZONTAL DISPLACEMENT AT B
22. STRUCTURAL ANALYSIS II
SECOND ORDER ANALYSIS
SECOND ORDER ANALYSIS: simplified procedure II
2º STEP: FIRST ORDER ANALYSIS: INCREMENT OF HORIZONTAL DISPLACEMENT AT B
23. STRUCTURAL ANALYSIS II
SECOND ORDER ANALYSIS
SECOND ORDER ANALYSIS: simplified procedure 2
3º STEP: WE CALCULATE u2 u2 = u1 + Du and the CRITICAL LOAD
28. STRUCTURAL ANALYSIS II
SECOND ORDER ANALYSIS
SECOND ORDER ANALYSIS: FRAME EXAMPLE
L
h
q L
8
2
A
B C
D
A
B C
D
1 ud
1 ud
h/L h/L
h
FIRSTORDERANALYSIS
BENDING MOMENTDIAGRAM BENDING MOMENTDIAGRAM
UNITY LOAD SYSTEM
(1 ud horizontalload applied at B)
u1 =
0+4
𝑞𝐿2
8
ℎ
2
+0
6𝐸𝐼
∙ 𝐿 =
𝑞∙𝐿3∙ℎ
24𝐸𝐼
30. STRUCTURAL ANALYSIS II
SECOND ORDER ANALYSIS
SECOND ORDER ANALYSIS: FRAME EXAMPLE
L
h
A
B C
D
A
B C
D
1 ud
1 ud
h/L h/L
h
BENDING MOMENTDIAGRAM
UNITY LOAD SYSTEM
(1 ud horizontalload applied at B)
D M option 1
R. u2 R. u2
42. STRUCTURAL ANALYSIS II
SECOND ORDER ANALYSIS
2st STEP: TRY TO RELATE EVERY
PARAMETER
SO ONLY ONE DISPLACEMENT IS USED IN
THE EXPRESSIONS.
3rd STEP: CALCULATE THE DISPLACEMENT
INCREMENT CAUSED BY THE BENDING
MOMENT INCREMENT
55. STRUCTURAL ANALYSIS II
SECOND ORDER ANALYSIS
CONCLUSIONS
THE LONGER THE BAR THE …………. THE CRITICAL LOAD
THE MORE FIXED THE BAR ENDS THE …………. THE CRITICAL LOAD
THE THICKER THE BAR THE …………. THE CRITICAL LOAD
THE MORE INDETERMINATE THE SYSTEM THE …………. THE CRITICAL LOAD
56. STRUCTURAL ANALYSIS II
SECOND ORDER ANALYSIS
CONCLUSIONS
THE LONGER THE BAR THE SMALLER THE CRITICAL LOAD
THE MORE FIXED THE BAR ENDS THE BIGGER THE CRITICAL LOAD
THE THICKER THE BAR THE BIGGER THE CRITICAL LOAD
THE MORE INDETERMINATE THE SYSTEM THE BIGGER THE CRITICAL LOAD