SlideShare a Scribd company logo
1 of 5
Download to read offline
© 2015 Cisco and/or its affiliates. All rights reserved. This document is Cisco Public. Page 1 of 5
Lab - Build and Test Network Cables
Introduction
In this lab, you will build and test straight-through and crossover Unshielded Twisted-Pair (UTP) Ethernet
network cables.
Note: With a straight-through cable, the color of wire used by pin 1 on one end is the same color used by pin
1 on the other end, and similarly for the remaining seven pins. The cable will be constructed using either
TIA/EIA T568A or T568B standards for Ethernet. This determines which color wire is to be used on each pin.
Straight-through cables are normally used to connect a host directly to a router, switch, or a wall plate in an
office area.
With a crossover cable, the second and third pairs on the connector at one end of the cable are reversed at
the other end. The pin-outs for the cable are the T568A standard on one end and the T568B standard on the
other end. Crossover cables are normally used to connect switches or they can be used to connect two hosts
directly together.
Recommended Equipment
• Two 2 to 3 ft. (0.6 to 0.9 meter) lengths of UTP cable, Category 5 or 5e
• A minimum of four RJ-45 connectors (more may be needed if mis-wiring occurs)
• An RJ-45 crimping tool
• Two computers with operating systems installed.
• Wire cutters
• Wire stripper
• Ethernet wire map tester
• Ethernet cable meter (optional)
• Ethernet certification meter (optional)
Wire Diagrams
Lab - Build and Test Network Cables
© 2015 Cisco and/or its affiliates. All rights reserved. This document is Cisco Public. Page 2 of 5
T568A Wiring Standard
Pin No. Pair No. Wire Color Function
1 3 White/Green Transmit
2 3 Green Transmit
3 2 White/Orange Receive
4 1 Blue Not used
5 1 White/Blue Not used
6 2 Orange Receive
7 4 White/Brown Not used
8 4 Brown Not used
T568B Wiring Standard
Pin No. Pair No. Wire Color Function
1 2 White/Orange Transmit
2 2 Orange Transmit
3 3 White/Green Receive
4 1 Blue Not used
5 1 White/Blue Not used
6 3 Green Receive
7 4 White/Brown Not used
8 4 Brown Not used
Lab - Build and Test Network Cables
© 2015 Cisco and/or its affiliates. All rights reserved. This document is Cisco Public. Page 3 of 5
Step 1: Obtain and prepare the cable.
a. Determine the length of cable required. This could be the distance from a computer to a switch or
between a device and an RJ-45 outlet jack. Add 12 in. (30.5 cm.) to the total distance. The TIA/EIA
standard states the maximum length is 16.4 ft. (5 m). Standard Ethernet cable lengths are usually 2 ft (0.6
m.), 6 ft. (1.8 m.), or 10 ft. (3m).
Which length of cable did you choose and why did you choose this length?
b. Cut a piece of cable to the desired length. Stranded UTP cable is commonly used for patch cables (the
cables between an end network device such as a PC and an RJ-45 connector) because it is more durable
when bent repeatedly. It is called stranded because each of the wires within the cable is made up of
many strands of fine copper wire, rather than a single solid wire. Solid wire is used for cable runs that are
between the RJ-45 jack and a wiring closet.
c. Using wire strippers, remove 2 in (5 cm.) of the cable jacket from both ends of the cable.
Step 2: Prepare and insert the wires.
a. Determine which wiring standard will be used. Circle the standard.
T568A T568B
b. Locate the correct table or figure from the Wire Diagrams based on the wiring standard used.
c. Spread the cable pairs and arrange them roughly in the desired order based on the standard chosen.
d. Untwist a short length of the pairs and arrange them in the exact order needed by the standard, moving
left to right starting with pin 1. It is very important to untwist as little as possible. The twists are
important because they provide noise cancellation.
e. Straighten and flatten the wires between your thumb and forefinger.
f. Ensure the cable wires are still in the correct order as the standard.
g. Cut the cable in a straight line to within 0.5 to .75 in. (1.25 to 1.9 cm.) from the edge of the cable jacket. If
it is longer than this, the cable will be susceptible to crosstalk (the interference of bits from one wire with
an adjacent wire).
h. The key (the prong that sticks out from the RJ-45 connector) should be on the underside pointing
downward when inserting the wires. Ensure the wires are in order from left to right starting with pin 1.
Insert the wires firmly into the RJ-45 connector until all wires are pushed to the end of the connector.
Key
Lab - Build and Test Network Cables
© 2015 Cisco and/or its affiliates. All rights reserved. This document is Cisco Public. Page 4 of 5
Step 3: Inspect, crimp, and re-inspect the connector.
a. Visually inspect the cable and ensure the right colors are aligned to the correct pins.
b. Visually inspect the end of the connector. The eight wires should be pressed firmly against the end of the
RJ-45 connector. Some of the cable jacket should be inside the first portion of the connector. This
provides strain relief for the cable. If the cable jacket is not far enough inside the connector, it may
eventually cause the cable to fail.
c. If everything is correctly aligned and inserted properly, place the RJ-45 connector and cable into the
crimper. The crimper will push two plungers down on the RJ-45 connector.
d. Visually re-inspect the connector. If improperly installed, cut the end off and repeat the process.
Step 4: Terminate the other cable end.
a. Attach an RJ-45 connector to the other end of the cable.
b. Visually re-inspect the connector. If improperly installed, cut the end off and repeat the process.
Which standard is used for patch cables in your school?
Step 5: Test the cable with a wiremap tester.
Turn on the tester and plug the cable into the jacks labeled with the wiring standard you used.
Note: If the tester does not have different jacks for different standards, refer to the documentation of the tester
to determine how to test your cable.
All green lights on both parts of the tester should sequence to indicate that each wire is terminated correctly
and in the proper order.
Any other lights indicate a wiring fault. Refer to the documentation of the tester to find which type of fault the
cable has.
What did the lights indicate when you connected your cable? Write down the faults and pairs where the faults
occurred if your cable did not pass.
Step 6: Test the cable using a cable meter or cable certification meter (Optional).
If your lab has a cable meter or cable certification meter, use it to validate your findings from the wiremap
tester. If possible, use the meter to determine the exact length of the cable.
Lab - Build and Test Network Cables
© 2015 Cisco and/or its affiliates. All rights reserved. This document is Cisco Public. Page 5 of 5
What were the findings from the cable meter or cable certification meter?
Step 7: Connect a computer using the cable.
a. Connect a PC to another computer, router, or switch.
b. Visually check the LED status lights on the NIC. If they are on (usually green or amber) the cable is
functional.
c. Open a command prompt on one of the computers.
d. Type ipconfig.
e. Write down the default gateway IP address.
From the command prompt, type ping default gateway IP address. If the cable is functional, the ping
should be successful (provided that no other network problem exists and the default gateway router is
connected and functional).
Was the ping successful?
If the ping fails, repeat the lab.
Step 8: Build the crossover cable.
Build a cable using the T568A wiring standard on one end and the T568B wiring standard on the other.
How are these wiring standards different?
Step 9: Test the crossover cable.
Turn on the tester and plug the ends of the cable into the same wiring standard indicated on both parts of the
tester. This is the same procedure as testing a straight-through cable.
What does the tester indicate?
If possible, test the crossover cable using a cable meter or cable certification meter. What does the meter
indicate about the cable?

More Related Content

What's hot

CSS L15 - CRIMPING ETHERNET CABLE AND RJ45
CSS L15 - CRIMPING ETHERNET CABLE AND RJ45CSS L15 - CRIMPING ETHERNET CABLE AND RJ45
CSS L15 - CRIMPING ETHERNET CABLE AND RJ45Marvin Bronoso
 
Computer Networking Lab File
Computer Networking Lab FileComputer Networking Lab File
Computer Networking Lab FileNitin Bhasin
 
Crimping and Testing
Crimping and TestingCrimping and Testing
Crimping and TestingSean Chia
 
Twisted pair cable
Twisted pair cableTwisted pair cable
Twisted pair cableilakkiya
 
Ethernet Cable Configuration PPT.pptx
Ethernet Cable Configuration PPT.pptxEthernet Cable Configuration PPT.pptx
Ethernet Cable Configuration PPT.pptxNitzEsplana1
 
Network cable
Network cableNetwork cable
Network cableFrya Lora
 
Topic: ISDN (Integrated Services Digital Network)
Topic: ISDN (Integrated Services Digital Network)Topic: ISDN (Integrated Services Digital Network)
Topic: ISDN (Integrated Services Digital Network)Dr Rajiv Srivastava
 
Networking Cables
Networking CablesNetworking Cables
Networking CablesNetwax Lab
 
network cabling
network cablingnetwork cabling
network cablingemad94
 
04 The Purpose of Straight-Through and Crossover Cables.pptx
04 The Purpose of Straight-Through and Crossover Cables.pptx04 The Purpose of Straight-Through and Crossover Cables.pptx
04 The Purpose of Straight-Through and Crossover Cables.pptxChellepia
 
networkmedia presentation1
networkmedia presentation1networkmedia presentation1
networkmedia presentation1uncleRhyme
 
Chapter 5 Network Configuration Basics.ppt
Chapter 5 Network Configuration Basics.pptChapter 5 Network Configuration Basics.ppt
Chapter 5 Network Configuration Basics.pptanwarkade1
 

What's hot (20)

CSS L15 - CRIMPING ETHERNET CABLE AND RJ45
CSS L15 - CRIMPING ETHERNET CABLE AND RJ45CSS L15 - CRIMPING ETHERNET CABLE AND RJ45
CSS L15 - CRIMPING ETHERNET CABLE AND RJ45
 
Computer Networking Lab File
Computer Networking Lab FileComputer Networking Lab File
Computer Networking Lab File
 
Network cabling
Network cablingNetwork cabling
Network cabling
 
Rj 45 connector
Rj 45 connectorRj 45 connector
Rj 45 connector
 
Crimping and Testing
Crimping and TestingCrimping and Testing
Crimping and Testing
 
Twisted pair cable
Twisted pair cableTwisted pair cable
Twisted pair cable
 
Ethernet Cable Configuration PPT.pptx
Ethernet Cable Configuration PPT.pptxEthernet Cable Configuration PPT.pptx
Ethernet Cable Configuration PPT.pptx
 
Network cables
Network cablesNetwork cables
Network cables
 
Data transmission
Data transmissionData transmission
Data transmission
 
Network cable
Network cableNetwork cable
Network cable
 
Topic: ISDN (Integrated Services Digital Network)
Topic: ISDN (Integrated Services Digital Network)Topic: ISDN (Integrated Services Digital Network)
Topic: ISDN (Integrated Services Digital Network)
 
Networking Cables
Networking CablesNetworking Cables
Networking Cables
 
LAN Cabling
LAN CablingLAN Cabling
LAN Cabling
 
LAN CABLING
LAN CABLING LAN CABLING
LAN CABLING
 
IPv4
IPv4IPv4
IPv4
 
network cabling
network cablingnetwork cabling
network cabling
 
04 The Purpose of Straight-Through and Crossover Cables.pptx
04 The Purpose of Straight-Through and Crossover Cables.pptx04 The Purpose of Straight-Through and Crossover Cables.pptx
04 The Purpose of Straight-Through and Crossover Cables.pptx
 
Creating Ethernet Cable
Creating Ethernet CableCreating Ethernet Cable
Creating Ethernet Cable
 
networkmedia presentation1
networkmedia presentation1networkmedia presentation1
networkmedia presentation1
 
Chapter 5 Network Configuration Basics.ppt
Chapter 5 Network Configuration Basics.pptChapter 5 Network Configuration Basics.ppt
Chapter 5 Network Configuration Basics.ppt
 

Similar to 7.3.2.6 lab build and test network cables

Cnlab ex.no.1
Cnlab ex.no.1Cnlab ex.no.1
Cnlab ex.no.1ISTEJCE
 
Straight&Cross-over cable connection
Straight&Cross-over cable connectionStraight&Cross-over cable connection
Straight&Cross-over cable connectionHoracio Aceveda
 
3. UTP AND FIBER CABLING.pptx
3. UTP AND FIBER CABLING.pptx3. UTP AND FIBER CABLING.pptx
3. UTP AND FIBER CABLING.pptxChellepia
 
Lesson #1 (creating ethernet cable)
Lesson #1 (creating ethernet cable)Lesson #1 (creating ethernet cable)
Lesson #1 (creating ethernet cable)Sophia Llorente
 
Network Cabling in set up computer system servicing.pptx
Network Cabling in set up computer system servicing.pptxNetwork Cabling in set up computer system servicing.pptx
Network Cabling in set up computer system servicing.pptxKevinKregelCampollo1
 
LO 02 Network Cabling.ppt
LO 02 Network Cabling.pptLO 02 Network Cabling.ppt
LO 02 Network Cabling.ppthailayhadush2
 
presentation-template-sample.pptx
presentation-template-sample.pptxpresentation-template-sample.pptx
presentation-template-sample.pptxAgripinoVerderaJr2
 
Creating an Ethernet Cable.pptx
Creating an Ethernet Cable.pptxCreating an Ethernet Cable.pptx
Creating an Ethernet Cable.pptxRaymondPuno1
 
Video lesson CSS10ccables.pptx
Video lesson CSS10ccables.pptxVideo lesson CSS10ccables.pptx
Video lesson CSS10ccables.pptxOrangeChavezMagune
 
Data Comm | Making Ethernet Cable
Data Comm | Making Ethernet CableData Comm | Making Ethernet Cable
Data Comm | Making Ethernet CableMaulen Bale
 
4. RJ45 Wiring Guide Diagram.ppt
4. RJ45 Wiring Guide Diagram.ppt4. RJ45 Wiring Guide Diagram.ppt
4. RJ45 Wiring Guide Diagram.pptChellepia
 
Different types of network cables
Different types of network cablesDifferent types of network cables
Different types of network cablesPrabhakarPremUpreti
 

Similar to 7.3.2.6 lab build and test network cables (20)

Cnlab ex.no.1
Cnlab ex.no.1Cnlab ex.no.1
Cnlab ex.no.1
 
TLE 10 (ICT): LAN Cabling
TLE 10 (ICT): LAN CablingTLE 10 (ICT): LAN Cabling
TLE 10 (ICT): LAN Cabling
 
LAN Cabling.pptx
LAN Cabling.pptxLAN Cabling.pptx
LAN Cabling.pptx
 
Straight&Cross-over cable connection
Straight&Cross-over cable connectionStraight&Cross-over cable connection
Straight&Cross-over cable connection
 
3. UTP AND FIBER CABLING.pptx
3. UTP AND FIBER CABLING.pptx3. UTP AND FIBER CABLING.pptx
3. UTP AND FIBER CABLING.pptx
 
Lesson #1 (creating ethernet cable)
Lesson #1 (creating ethernet cable)Lesson #1 (creating ethernet cable)
Lesson #1 (creating ethernet cable)
 
Crimping
CrimpingCrimping
Crimping
 
Network Cabling in set up computer system servicing.pptx
Network Cabling in set up computer system servicing.pptxNetwork Cabling in set up computer system servicing.pptx
Network Cabling in set up computer system servicing.pptx
 
LAN Cabling
LAN CablingLAN Cabling
LAN Cabling
 
LO 02 Network Cabling.ppt
LO 02 Network Cabling.pptLO 02 Network Cabling.ppt
LO 02 Network Cabling.ppt
 
Network Cabling
Network CablingNetwork Cabling
Network Cabling
 
presentation-template-sample.pptx
presentation-template-sample.pptxpresentation-template-sample.pptx
presentation-template-sample.pptx
 
Network_Cabling.ppt
Network_Cabling.pptNetwork_Cabling.ppt
Network_Cabling.ppt
 
Crimping - RJ45.pptx
Crimping - RJ45.pptxCrimping - RJ45.pptx
Crimping - RJ45.pptx
 
Creating an Ethernet Cable.pptx
Creating an Ethernet Cable.pptxCreating an Ethernet Cable.pptx
Creating an Ethernet Cable.pptx
 
Video lesson CSS10ccables.pptx
Video lesson CSS10ccables.pptxVideo lesson CSS10ccables.pptx
Video lesson CSS10ccables.pptx
 
CO1 - CSS.pptx
CO1 - CSS.pptxCO1 - CSS.pptx
CO1 - CSS.pptx
 
Data Comm | Making Ethernet Cable
Data Comm | Making Ethernet CableData Comm | Making Ethernet Cable
Data Comm | Making Ethernet Cable
 
4. RJ45 Wiring Guide Diagram.ppt
4. RJ45 Wiring Guide Diagram.ppt4. RJ45 Wiring Guide Diagram.ppt
4. RJ45 Wiring Guide Diagram.ppt
 
Different types of network cables
Different types of network cablesDifferent types of network cables
Different types of network cables
 

Recently uploaded

CELL CYCLE Division Science 8 quarter IV.pptx
CELL CYCLE Division Science 8 quarter IV.pptxCELL CYCLE Division Science 8 quarter IV.pptx
CELL CYCLE Division Science 8 quarter IV.pptxJiesonDelaCerna
 
History Class XII Ch. 3 Kinship, Caste and Class (1).pptx
History Class XII Ch. 3 Kinship, Caste and Class (1).pptxHistory Class XII Ch. 3 Kinship, Caste and Class (1).pptx
History Class XII Ch. 3 Kinship, Caste and Class (1).pptxsocialsciencegdgrohi
 
Capitol Tech U Doctoral Presentation - April 2024.pptx
Capitol Tech U Doctoral Presentation - April 2024.pptxCapitol Tech U Doctoral Presentation - April 2024.pptx
Capitol Tech U Doctoral Presentation - April 2024.pptxCapitolTechU
 
Introduction to AI in Higher Education_draft.pptx
Introduction to AI in Higher Education_draft.pptxIntroduction to AI in Higher Education_draft.pptx
Introduction to AI in Higher Education_draft.pptxpboyjonauth
 
Biting mechanism of poisonous snakes.pdf
Biting mechanism of poisonous snakes.pdfBiting mechanism of poisonous snakes.pdf
Biting mechanism of poisonous snakes.pdfadityarao40181
 
Software Engineering Methodologies (overview)
Software Engineering Methodologies (overview)Software Engineering Methodologies (overview)
Software Engineering Methodologies (overview)eniolaolutunde
 
How to Make a Pirate ship Primary Education.pptx
How to Make a Pirate ship Primary Education.pptxHow to Make a Pirate ship Primary Education.pptx
How to Make a Pirate ship Primary Education.pptxmanuelaromero2013
 
Incoming and Outgoing Shipments in 1 STEP Using Odoo 17
Incoming and Outgoing Shipments in 1 STEP Using Odoo 17Incoming and Outgoing Shipments in 1 STEP Using Odoo 17
Incoming and Outgoing Shipments in 1 STEP Using Odoo 17Celine George
 
ECONOMIC CONTEXT - PAPER 1 Q3: NEWSPAPERS.pptx
ECONOMIC CONTEXT - PAPER 1 Q3: NEWSPAPERS.pptxECONOMIC CONTEXT - PAPER 1 Q3: NEWSPAPERS.pptx
ECONOMIC CONTEXT - PAPER 1 Q3: NEWSPAPERS.pptxiammrhaywood
 
internship ppt on smartinternz platform as salesforce developer
internship ppt on smartinternz platform as salesforce developerinternship ppt on smartinternz platform as salesforce developer
internship ppt on smartinternz platform as salesforce developerunnathinaik
 
Framing an Appropriate Research Question 6b9b26d93da94caf993c038d9efcdedb.pdf
Framing an Appropriate Research Question 6b9b26d93da94caf993c038d9efcdedb.pdfFraming an Appropriate Research Question 6b9b26d93da94caf993c038d9efcdedb.pdf
Framing an Appropriate Research Question 6b9b26d93da94caf993c038d9efcdedb.pdfUjwalaBharambe
 
ECONOMIC CONTEXT - LONG FORM TV DRAMA - PPT
ECONOMIC CONTEXT - LONG FORM TV DRAMA - PPTECONOMIC CONTEXT - LONG FORM TV DRAMA - PPT
ECONOMIC CONTEXT - LONG FORM TV DRAMA - PPTiammrhaywood
 
18-04-UA_REPORT_MEDIALITERAСY_INDEX-DM_23-1-final-eng.pdf
18-04-UA_REPORT_MEDIALITERAСY_INDEX-DM_23-1-final-eng.pdf18-04-UA_REPORT_MEDIALITERAСY_INDEX-DM_23-1-final-eng.pdf
18-04-UA_REPORT_MEDIALITERAСY_INDEX-DM_23-1-final-eng.pdfssuser54595a
 
Enzyme, Pharmaceutical Aids, Miscellaneous Last Part of Chapter no 5th.pdf
Enzyme, Pharmaceutical Aids, Miscellaneous Last Part of Chapter no 5th.pdfEnzyme, Pharmaceutical Aids, Miscellaneous Last Part of Chapter no 5th.pdf
Enzyme, Pharmaceutical Aids, Miscellaneous Last Part of Chapter no 5th.pdfSumit Tiwari
 
EPANDING THE CONTENT OF AN OUTLINE using notes.pptx
EPANDING THE CONTENT OF AN OUTLINE using notes.pptxEPANDING THE CONTENT OF AN OUTLINE using notes.pptx
EPANDING THE CONTENT OF AN OUTLINE using notes.pptxRaymartEstabillo3
 
Computed Fields and api Depends in the Odoo 17
Computed Fields and api Depends in the Odoo 17Computed Fields and api Depends in the Odoo 17
Computed Fields and api Depends in the Odoo 17Celine George
 
Interactive Powerpoint_How to Master effective communication
Interactive Powerpoint_How to Master effective communicationInteractive Powerpoint_How to Master effective communication
Interactive Powerpoint_How to Master effective communicationnomboosow
 
Introduction to ArtificiaI Intelligence in Higher Education
Introduction to ArtificiaI Intelligence in Higher EducationIntroduction to ArtificiaI Intelligence in Higher Education
Introduction to ArtificiaI Intelligence in Higher Educationpboyjonauth
 

Recently uploaded (20)

CELL CYCLE Division Science 8 quarter IV.pptx
CELL CYCLE Division Science 8 quarter IV.pptxCELL CYCLE Division Science 8 quarter IV.pptx
CELL CYCLE Division Science 8 quarter IV.pptx
 
History Class XII Ch. 3 Kinship, Caste and Class (1).pptx
History Class XII Ch. 3 Kinship, Caste and Class (1).pptxHistory Class XII Ch. 3 Kinship, Caste and Class (1).pptx
History Class XII Ch. 3 Kinship, Caste and Class (1).pptx
 
Capitol Tech U Doctoral Presentation - April 2024.pptx
Capitol Tech U Doctoral Presentation - April 2024.pptxCapitol Tech U Doctoral Presentation - April 2024.pptx
Capitol Tech U Doctoral Presentation - April 2024.pptx
 
Introduction to AI in Higher Education_draft.pptx
Introduction to AI in Higher Education_draft.pptxIntroduction to AI in Higher Education_draft.pptx
Introduction to AI in Higher Education_draft.pptx
 
TataKelola dan KamSiber Kecerdasan Buatan v022.pdf
TataKelola dan KamSiber Kecerdasan Buatan v022.pdfTataKelola dan KamSiber Kecerdasan Buatan v022.pdf
TataKelola dan KamSiber Kecerdasan Buatan v022.pdf
 
Biting mechanism of poisonous snakes.pdf
Biting mechanism of poisonous snakes.pdfBiting mechanism of poisonous snakes.pdf
Biting mechanism of poisonous snakes.pdf
 
Software Engineering Methodologies (overview)
Software Engineering Methodologies (overview)Software Engineering Methodologies (overview)
Software Engineering Methodologies (overview)
 
How to Make a Pirate ship Primary Education.pptx
How to Make a Pirate ship Primary Education.pptxHow to Make a Pirate ship Primary Education.pptx
How to Make a Pirate ship Primary Education.pptx
 
Incoming and Outgoing Shipments in 1 STEP Using Odoo 17
Incoming and Outgoing Shipments in 1 STEP Using Odoo 17Incoming and Outgoing Shipments in 1 STEP Using Odoo 17
Incoming and Outgoing Shipments in 1 STEP Using Odoo 17
 
ECONOMIC CONTEXT - PAPER 1 Q3: NEWSPAPERS.pptx
ECONOMIC CONTEXT - PAPER 1 Q3: NEWSPAPERS.pptxECONOMIC CONTEXT - PAPER 1 Q3: NEWSPAPERS.pptx
ECONOMIC CONTEXT - PAPER 1 Q3: NEWSPAPERS.pptx
 
internship ppt on smartinternz platform as salesforce developer
internship ppt on smartinternz platform as salesforce developerinternship ppt on smartinternz platform as salesforce developer
internship ppt on smartinternz platform as salesforce developer
 
Framing an Appropriate Research Question 6b9b26d93da94caf993c038d9efcdedb.pdf
Framing an Appropriate Research Question 6b9b26d93da94caf993c038d9efcdedb.pdfFraming an Appropriate Research Question 6b9b26d93da94caf993c038d9efcdedb.pdf
Framing an Appropriate Research Question 6b9b26d93da94caf993c038d9efcdedb.pdf
 
ECONOMIC CONTEXT - LONG FORM TV DRAMA - PPT
ECONOMIC CONTEXT - LONG FORM TV DRAMA - PPTECONOMIC CONTEXT - LONG FORM TV DRAMA - PPT
ECONOMIC CONTEXT - LONG FORM TV DRAMA - PPT
 
18-04-UA_REPORT_MEDIALITERAСY_INDEX-DM_23-1-final-eng.pdf
18-04-UA_REPORT_MEDIALITERAСY_INDEX-DM_23-1-final-eng.pdf18-04-UA_REPORT_MEDIALITERAСY_INDEX-DM_23-1-final-eng.pdf
18-04-UA_REPORT_MEDIALITERAСY_INDEX-DM_23-1-final-eng.pdf
 
Model Call Girl in Tilak Nagar Delhi reach out to us at 🔝9953056974🔝
Model Call Girl in Tilak Nagar Delhi reach out to us at 🔝9953056974🔝Model Call Girl in Tilak Nagar Delhi reach out to us at 🔝9953056974🔝
Model Call Girl in Tilak Nagar Delhi reach out to us at 🔝9953056974🔝
 
Enzyme, Pharmaceutical Aids, Miscellaneous Last Part of Chapter no 5th.pdf
Enzyme, Pharmaceutical Aids, Miscellaneous Last Part of Chapter no 5th.pdfEnzyme, Pharmaceutical Aids, Miscellaneous Last Part of Chapter no 5th.pdf
Enzyme, Pharmaceutical Aids, Miscellaneous Last Part of Chapter no 5th.pdf
 
EPANDING THE CONTENT OF AN OUTLINE using notes.pptx
EPANDING THE CONTENT OF AN OUTLINE using notes.pptxEPANDING THE CONTENT OF AN OUTLINE using notes.pptx
EPANDING THE CONTENT OF AN OUTLINE using notes.pptx
 
Computed Fields and api Depends in the Odoo 17
Computed Fields and api Depends in the Odoo 17Computed Fields and api Depends in the Odoo 17
Computed Fields and api Depends in the Odoo 17
 
Interactive Powerpoint_How to Master effective communication
Interactive Powerpoint_How to Master effective communicationInteractive Powerpoint_How to Master effective communication
Interactive Powerpoint_How to Master effective communication
 
Introduction to ArtificiaI Intelligence in Higher Education
Introduction to ArtificiaI Intelligence in Higher EducationIntroduction to ArtificiaI Intelligence in Higher Education
Introduction to ArtificiaI Intelligence in Higher Education
 

7.3.2.6 lab build and test network cables

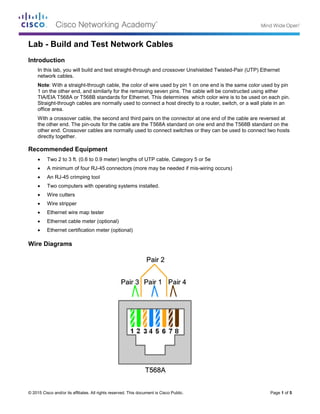
  • 1. © 2015 Cisco and/or its affiliates. All rights reserved. This document is Cisco Public. Page 1 of 5 Lab - Build and Test Network Cables Introduction In this lab, you will build and test straight-through and crossover Unshielded Twisted-Pair (UTP) Ethernet network cables. Note: With a straight-through cable, the color of wire used by pin 1 on one end is the same color used by pin 1 on the other end, and similarly for the remaining seven pins. The cable will be constructed using either TIA/EIA T568A or T568B standards for Ethernet. This determines which color wire is to be used on each pin. Straight-through cables are normally used to connect a host directly to a router, switch, or a wall plate in an office area. With a crossover cable, the second and third pairs on the connector at one end of the cable are reversed at the other end. The pin-outs for the cable are the T568A standard on one end and the T568B standard on the other end. Crossover cables are normally used to connect switches or they can be used to connect two hosts directly together. Recommended Equipment • Two 2 to 3 ft. (0.6 to 0.9 meter) lengths of UTP cable, Category 5 or 5e • A minimum of four RJ-45 connectors (more may be needed if mis-wiring occurs) • An RJ-45 crimping tool • Two computers with operating systems installed. • Wire cutters • Wire stripper • Ethernet wire map tester • Ethernet cable meter (optional) • Ethernet certification meter (optional) Wire Diagrams
  • 2. Lab - Build and Test Network Cables © 2015 Cisco and/or its affiliates. All rights reserved. This document is Cisco Public. Page 2 of 5 T568A Wiring Standard Pin No. Pair No. Wire Color Function 1 3 White/Green Transmit 2 3 Green Transmit 3 2 White/Orange Receive 4 1 Blue Not used 5 1 White/Blue Not used 6 2 Orange Receive 7 4 White/Brown Not used 8 4 Brown Not used T568B Wiring Standard Pin No. Pair No. Wire Color Function 1 2 White/Orange Transmit 2 2 Orange Transmit 3 3 White/Green Receive 4 1 Blue Not used 5 1 White/Blue Not used 6 3 Green Receive 7 4 White/Brown Not used 8 4 Brown Not used
  • 3. Lab - Build and Test Network Cables © 2015 Cisco and/or its affiliates. All rights reserved. This document is Cisco Public. Page 3 of 5 Step 1: Obtain and prepare the cable. a. Determine the length of cable required. This could be the distance from a computer to a switch or between a device and an RJ-45 outlet jack. Add 12 in. (30.5 cm.) to the total distance. The TIA/EIA standard states the maximum length is 16.4 ft. (5 m). Standard Ethernet cable lengths are usually 2 ft (0.6 m.), 6 ft. (1.8 m.), or 10 ft. (3m). Which length of cable did you choose and why did you choose this length? b. Cut a piece of cable to the desired length. Stranded UTP cable is commonly used for patch cables (the cables between an end network device such as a PC and an RJ-45 connector) because it is more durable when bent repeatedly. It is called stranded because each of the wires within the cable is made up of many strands of fine copper wire, rather than a single solid wire. Solid wire is used for cable runs that are between the RJ-45 jack and a wiring closet. c. Using wire strippers, remove 2 in (5 cm.) of the cable jacket from both ends of the cable. Step 2: Prepare and insert the wires. a. Determine which wiring standard will be used. Circle the standard. T568A T568B b. Locate the correct table or figure from the Wire Diagrams based on the wiring standard used. c. Spread the cable pairs and arrange them roughly in the desired order based on the standard chosen. d. Untwist a short length of the pairs and arrange them in the exact order needed by the standard, moving left to right starting with pin 1. It is very important to untwist as little as possible. The twists are important because they provide noise cancellation. e. Straighten and flatten the wires between your thumb and forefinger. f. Ensure the cable wires are still in the correct order as the standard. g. Cut the cable in a straight line to within 0.5 to .75 in. (1.25 to 1.9 cm.) from the edge of the cable jacket. If it is longer than this, the cable will be susceptible to crosstalk (the interference of bits from one wire with an adjacent wire). h. The key (the prong that sticks out from the RJ-45 connector) should be on the underside pointing downward when inserting the wires. Ensure the wires are in order from left to right starting with pin 1. Insert the wires firmly into the RJ-45 connector until all wires are pushed to the end of the connector. Key
  • 4. Lab - Build and Test Network Cables © 2015 Cisco and/or its affiliates. All rights reserved. This document is Cisco Public. Page 4 of 5 Step 3: Inspect, crimp, and re-inspect the connector. a. Visually inspect the cable and ensure the right colors are aligned to the correct pins. b. Visually inspect the end of the connector. The eight wires should be pressed firmly against the end of the RJ-45 connector. Some of the cable jacket should be inside the first portion of the connector. This provides strain relief for the cable. If the cable jacket is not far enough inside the connector, it may eventually cause the cable to fail. c. If everything is correctly aligned and inserted properly, place the RJ-45 connector and cable into the crimper. The crimper will push two plungers down on the RJ-45 connector. d. Visually re-inspect the connector. If improperly installed, cut the end off and repeat the process. Step 4: Terminate the other cable end. a. Attach an RJ-45 connector to the other end of the cable. b. Visually re-inspect the connector. If improperly installed, cut the end off and repeat the process. Which standard is used for patch cables in your school? Step 5: Test the cable with a wiremap tester. Turn on the tester and plug the cable into the jacks labeled with the wiring standard you used. Note: If the tester does not have different jacks for different standards, refer to the documentation of the tester to determine how to test your cable. All green lights on both parts of the tester should sequence to indicate that each wire is terminated correctly and in the proper order. Any other lights indicate a wiring fault. Refer to the documentation of the tester to find which type of fault the cable has. What did the lights indicate when you connected your cable? Write down the faults and pairs where the faults occurred if your cable did not pass. Step 6: Test the cable using a cable meter or cable certification meter (Optional). If your lab has a cable meter or cable certification meter, use it to validate your findings from the wiremap tester. If possible, use the meter to determine the exact length of the cable.
  • 5. Lab - Build and Test Network Cables © 2015 Cisco and/or its affiliates. All rights reserved. This document is Cisco Public. Page 5 of 5 What were the findings from the cable meter or cable certification meter? Step 7: Connect a computer using the cable. a. Connect a PC to another computer, router, or switch. b. Visually check the LED status lights on the NIC. If they are on (usually green or amber) the cable is functional. c. Open a command prompt on one of the computers. d. Type ipconfig. e. Write down the default gateway IP address. From the command prompt, type ping default gateway IP address. If the cable is functional, the ping should be successful (provided that no other network problem exists and the default gateway router is connected and functional). Was the ping successful? If the ping fails, repeat the lab. Step 8: Build the crossover cable. Build a cable using the T568A wiring standard on one end and the T568B wiring standard on the other. How are these wiring standards different? Step 9: Test the crossover cable. Turn on the tester and plug the ends of the cable into the same wiring standard indicated on both parts of the tester. This is the same procedure as testing a straight-through cable. What does the tester indicate? If possible, test the crossover cable using a cable meter or cable certification meter. What does the meter indicate about the cable?