SlideShare a Scribd company logo
1 of 230
Download to read offline
Preface, Contents
Part I Introduction
1
2
Part II Functions of the
Touch Panels
3
11
Part III Installation and
Commissioning
12
13
Part IV Device Description and
Maintenance
14
18
Part V Appendices
A
E
Glossary, Index
Release 01/00
TP27, TP37
Touch Panels
Equipment Manual
SIMATIC HMI
6AV3991–1AJ02–0AB0
www.dienhathe.vn
www.dienhathe.com
This manual contains notices which you should observe to ensure your own personal safety, as
well as to protect the product and connected equipment. These notices are highlighted in the
manual by a warning triangle and are marked as follows according to the level of danger:
!
Warning
indicates that death, severe personal injury or substantial property damage can result if proper
precautions are not taken.
!
Caution
indicates that minor personal injury or property damage can result if proper precautions are not
taken.
Note
draws your attention to particularly important information on the product, handling the product,
or to a particular part of the documentation.
Equipment may be commissioned and operated only by qualified personnel. Qualified person-
nel within the meaning of the safety notices in this manual are persons who are authorized to
commission, ground and identify equipment, systems and circuits in accordance with safety
engineering standards.
Note the following:
!
Warning
The equipment may be used only for the applications stipulated in the catalog and in the tech-
nical description and only in conjunction with other equipment and components recommended
or approved by Siemens.
Startup must not take place until it is established that the machine, which is to accommodate
this component, is in conformity with the guideline 89/392/EEC.
Faultless and safe operation of the product presupposes proper transportation, proper storage,
erection and installation as well as careful operation and maintenance.
The approvals that apply to the device are detailed in the Chapter Technical Data.
SIMATICR, SIMATIC HMIR, SIMATIC Multi PanelR, SIMATIC Multifunctional PanelR,
ProTool/LiteR, ProToolR, ProTool/ProR and MP270R are registered trademarks of Siemens
AG.
Some of the other designations used in these documents are also registered trademarks; the
owner’s rights may be violated if they are used be third parties for their own purposes.
Editor and Publisher: A&D PT1
We have checked the contents of this manual for agreement with
the hardware and software described. Since deviations cannot be
precluded entirely, we cannot guarantee full agreement. However,
the data in this manual are reviewed regularly and any necessary
corrections included in subsequent editions. Suggestions for im-
provement are welcomed.
Technical data subject to change.
E Siemens AG 1999
Disclaimer of LiabilityCopyright E Siemens AG 1999 All rights reserved
The reproduction, transmission or use of this document or its
contents is not permitted without express written authority.
Offenders will be liable for damages. All rights, including rights
created by patent grant or registration of a utility model or design,
are reserved.
Siemens AG,
Automation & Drives
SIMATIC Human Machine Interface
Postfach 4848, D-90327 Nuernberg
Siemens Aktiengesellschaft Order No. 6AV3991–1AJ02–0AB0
Safety Guidelines
Qualified Personnel
Correct Usage
Approvals
Trademarks
Impressum
www.dienhathe.vn
www.dienhathe.com
i
TP27, TP37 Equipment Manual
Release01/00
Preface
This equipment manual provides operation, installation, configuration and
system service personnel with information concerning functionality, opera-
tion and technical design of the Touch Panels TP27 and TP37.
The equipment manual Touch Panel TP27, TP37 is organized into five parts:
Part Chapters Contents
I 1 - 2 Overview of the Touch Panel and range of
functions in tabular form.
II 3 - 11 Step-by-step instructions on how to operate the
Touch Panel using the standard screens.
III 12 - 13 – Mechanical and electrical installation,
– Commissioning
– Touch Panel operating modes.
IV 14 - 18 Detailed information on the Touch Panel and
maintenance.
V Appendix – Technical data,
– Interface assignments,
– System messages,
– SIMATIC HMI documentation,
– ESD guidelines,
– Glossary of technical terms.
The following conventions are used throughout this manual:
Motor off Text in the Touch Panel display is presented in this
typewriter font.
Variable Symbolic names representing variable values on the
screen are presented in this italic typewriter font
Screens Functions selected by the user are presented in this
standard italic font.
ESC The labels of buttons are presented in a different
typeface.
Purpose
Organization of
the manual
Conventions
www.dienhathe.vn
www.dienhathe.com
ii
TP27,TP37 Equipment Manual
Release01/00
The various releases of the equipment manual correspond to the following
firmware and ProTool versions:
Release Remarks ProTool version
04/97 First release of the TP37 equipment
manual
V 3.0 and later
10/97 Inclusion of TP27,
inclusion of touch screen functionality
V 4.0 and later
V 4.0 and later
09/98 Inclusion of the TP27–10;
new standard screen for printing
messages
V 5.0
01/99 Inclusion of standard screens for
Status/Force and Clean Screen
V 5.1
01/00 Inclusion of the JEIDA/PCMCIA card
for the TP27–6.
V 5.2
History
Preface
www.dienhathe.vn
www.dienhathe.com
iii
TP27,TP37 Equipment Manual
Release01/00
In the case of technical queries, please contact your local Siemens in the sub-
sidiaries and branches responsible for your area.
SIMATIC Customer Support Hotline
Available worldwide, at all times:
Johnson City
Nuernberg
Singapur
Simatic Basic Hotline
Nuernberg
SIMATIC BASIC Hotline
Johnson City
SIMATIC BASIC Hotline
Singapur
SIMATIC BASIC Hotline
Local time:
Mon - Fri 8:00 to 18:00
Telephone:
+49 (911)895-7000
Fax: +49 (911)895-7002
E-Mail: simatic.support@
nbgm.siemens.de
Local time:
Mon - Fri 8:00 to 17:00
Telephone:
+1 423 461-2522
Fax: +1 423 461-2231
E-Mail: simatic.hotline@
sea.siemens.com
Local time:
Mon - Fri 8:00 to 17:30
Telephone:
+65740-7000
Fax: +65740-7001
E-Mail: simatic@
singnet.com.sg
SIMATIC Premium Hotline
(charged, only with
SIMATIC Card)
Time:
Mon - Fri 0:00 to 24:00
Telephone:
+49 (911)895-7777
Fax:
+49 (911)895-7001
Other support
Preface
www.dienhathe.vn
www.dienhathe.com
iv
TP27,TP37 Equipment Manual
Release01/00
SIMATIC Customer Online Services
SIMATIC Customer Support offers comprehensive additional information concerning
SIMATIC products through its Online services as follows:
S Up–to–date general information is provided
– in Internet under http://www.ad.siemens.de/simatic
– via Fax-Polling under 08765-93 02 77 95 00
S Up–to–date product information and downloads for practical use can be found:
– in Internet unter http://www.ad.siemens.de/support/
html–00/
– via the Bulletin Board System (BBS) in Nürnberg (SIMATIC Custo-
mer Support Mailbox) under +49 (911) 895–7100
In order to contact the mailbox, please use a modem with up to 28.8
kBaud (V.34) capacity. Set the parameters as follows: 8, N, 1, ANSI,
or dial for connection via ISDN (x.75, 64 kBit).
The abbreviations used in this equipment manual have the following
meaning:
AM Alarm Message
ANSI American National Standards Institute
AS511 Protocol of the PU interface to SIMATIC S5
ASCII American Standard Code for Information Interchange
CPI Control Panel Interface
CPU Central Processing Unit
DIL Dual-In-Line (package)
DP Decentral Periphery
DRAM Dynamic Random Access Memory
DKM Direct Key Module
EM Event message
ESD Electrostatic Sensitive Device
LCD Liquid Crystal Display
LED Light–Emitting Diode
MPI Multipoint Interface (SIMATIC S7)
PC
PLC
Personal Computer
Programmable Logic Controller
PU Programming Unit
PPI Point to Point Interface (SIMATIC S7)
SRAM Static Random Access Memory
STN Super Twisted Nematic
TFT Thin Film Transistor
TP Touch Panel
TTL Transistor-Transistor Logic
Abbreviations
Preface
www.dienhathe.vn
www.dienhathe.com
i
TP27, TP37 Equipment Manual
Release01/00
Contents
Part I INTRODUCTION
1 Product Description 1-1. . . . . . . . . . . . . . . . . . . . . . . . . . . . . . . . . . . . . . . . . . . . . . . . . . . .
1.1 Visualizing and Controlling Processes 1-3. . . . . . . . . . . . . . . . . . . . . . . . . . . . . .
1.2 The Touch Panels at a Glance 1-5. . . . . . . . . . . . . . . . . . . . . . . . . . . . . . . . . . . .
2 Functionality 2-1. . . . . . . . . . . . . . . . . . . . . . . . . . . . . . . . . . . . . . . . . . . . . . . . . . . . . . . . . . .
Part II FUNCTIONS OF THE TOUCH PANELS
3 General Operation 3-1. . . . . . . . . . . . . . . . . . . . . . . . . . . . . . . . . . . . . . . . . . . . . . . . . . . . . .
3.1 Operating Touch Elements 3-4. . . . . . . . . . . . . . . . . . . . . . . . . . . . . . . . . . . . . . . .
3.2 Entering Values 3-6. . . . . . . . . . . . . . . . . . . . . . . . . . . . . . . . . . . . . . . . . . . . . . . . .
3.2.1 Entering Numerical Values 3-6. . . . . . . . . . . . . . . . . . . . . . . . . . . . . . . . . . . . . . . .
3.2.2 Entering Alphanumeric Values 3-8. . . . . . . . . . . . . . . . . . . . . . . . . . . . . . . . . . . .
3.2.3 Entering Symbolic Values 3-10. . . . . . . . . . . . . . . . . . . . . . . . . . . . . . . . . . . . . . . .
3.3 Help Text 3-11. . . . . . . . . . . . . . . . . . . . . . . . . . . . . . . . . . . . . . . . . . . . . . . . . . . . . . .
4 Screens 4-1. . . . . . . . . . . . . . . . . . . . . . . . . . . . . . . . . . . . . . . . . . . . . . . . . . . . . . . . . . . . . . . .
4.1 Screen Elements 4-1. . . . . . . . . . . . . . . . . . . . . . . . . . . . . . . . . . . . . . . . . . . . . . . .
4.2 Standard Screens 4-3. . . . . . . . . . . . . . . . . . . . . . . . . . . . . . . . . . . . . . . . . . . . . . .
5 Password Protection 5-1. . . . . . . . . . . . . . . . . . . . . . . . . . . . . . . . . . . . . . . . . . . . . . . . . . .
5.1 Password Level and Access Permissions 5-1. . . . . . . . . . . . . . . . . . . . . . . . . . .
5.2 Login/Logout on the Touch Panel 5-3. . . . . . . . . . . . . . . . . . . . . . . . . . . . . . . . . .
5.3 Password Management 5-5. . . . . . . . . . . . . . . . . . . . . . . . . . . . . . . . . . . . . . . . . .
6 Messages 6-1. . . . . . . . . . . . . . . . . . . . . . . . . . . . . . . . . . . . . . . . . . . . . . . . . . . . . . . . . . . . . .
6.1 Types of Message 6-2. . . . . . . . . . . . . . . . . . . . . . . . . . . . . . . . . . . . . . . . . . . . . . .
6.1.1 Event Messages and Alarm Messages 6-2. . . . . . . . . . . . . . . . . . . . . . . . . . . . .
6.1.2 Alarm Messages 6-6. . . . . . . . . . . . . . . . . . . . . . . . . . . . . . . . . . . . . . . . . . . . . . . .
6.1.3 System Messages 6-8. . . . . . . . . . . . . . . . . . . . . . . . . . . . . . . . . . . . . . . . . . . . . . .
6.2 Displaying Messages 6-9. . . . . . . . . . . . . . . . . . . . . . . . . . . . . . . . . . . . . . . . . . . .
6.2.1 Opening a Message Page 6-11. . . . . . . . . . . . . . . . . . . . . . . . . . . . . . . . . . . . . . . .
6.2.2 Opening a Message Buffer 6-13. . . . . . . . . . . . . . . . . . . . . . . . . . . . . . . . . . . . . . .
6.3 Deleting Messages 6-14. . . . . . . . . . . . . . . . . . . . . . . . . . . . . . . . . . . . . . . . . . . . . .
www.dienhathe.vn
www.dienhathe.com
ii
TP27, TP37 Equipment Manual
Release01/00
6.4 Printing Messages 6-16. . . . . . . . . . . . . . . . . . . . . . . . . . . . . . . . . . . . . . . . . . . . . . .
6.5 ALARM_S Messages 6-18. . . . . . . . . . . . . . . . . . . . . . . . . . . . . . . . . . . . . . . . . . . .
6.5.1 Communication Sequence 6-19. . . . . . . . . . . . . . . . . . . . . . . . . . . . . . . . . . . . . . . .
6.5.2 Message Acknowledgement 6-20. . . . . . . . . . . . . . . . . . . . . . . . . . . . . . . . . . . . . .
6.5.3 Printing Messages 6-20. . . . . . . . . . . . . . . . . . . . . . . . . . . . . . . . . . . . . . . . . . . . . . .
6.5.4 Message Overload 6-21. . . . . . . . . . . . . . . . . . . . . . . . . . . . . . . . . . . . . . . . . . . . . .
6.5.5 Updating 6-22. . . . . . . . . . . . . . . . . . . . . . . . . . . . . . . . . . . . . . . . . . . . . . . . . . . . . . .
6.5.6 Buffer Overflow 6-23. . . . . . . . . . . . . . . . . . . . . . . . . . . . . . . . . . . . . . . . . . . . . . . . .
6.6 Standard Screens for Messages 6-24. . . . . . . . . . . . . . . . . . . . . . . . . . . . . . . . . . .
6.6.1 “Edit Message” Standard Screen 6-24. . . . . . . . . . . . . . . . . . . . . . . . . . . . . . . . . .
6.6.2 “Output Messages” Standard Screen 6-26. . . . . . . . . . . . . . . . . . . . . . . . . . . . . . .
6.6.3 “System Settings” Standard Screen 6-28. . . . . . . . . . . . . . . . . . . . . . . . . . . . . . . .
7 Printing 7-1. . . . . . . . . . . . . . . . . . . . . . . . . . . . . . . . . . . . . . . . . . . . . . . . . . . . . . . . . . . . . . . .
8 Recipes 8-1. . . . . . . . . . . . . . . . . . . . . . . . . . . . . . . . . . . . . . . . . . . . . . . . . . . . . . . . . . . . . . . .
8.1 Standard Screens for Recipes 8-3. . . . . . . . . . . . . . . . . . . . . . . . . . . . . . . . . . . .
8.1.1 Creating, Editing and Saving Data Records 8-8. . . . . . . . . . . . . . . . . . . . . . . . .
8.1.2 Transferring Data Records 8-13. . . . . . . . . . . . . . . . . . . . . . . . . . . . . . . . . . . . . . . .
8.2 Record Sets 8-15. . . . . . . . . . . . . . . . . . . . . . . . . . . . . . . . . . . . . . . . . . . . . . . . . . . .
9 Storing and Loading Data 9-1. . . . . . . . . . . . . . . . . . . . . . . . . . . . . . . . . . . . . . . . . . . . . . .
9.1 Data Types, Data Media and Storage Principle 9-1. . . . . . . . . . . . . . . . . . . . . .
9.2 Delete Storage Medium 9-3. . . . . . . . . . . . . . . . . . . . . . . . . . . . . . . . . . . . . . . . . .
9.3 Backup/Restore 9-5. . . . . . . . . . . . . . . . . . . . . . . . . . . . . . . . . . . . . . . . . . . . . . . . .
10 Status/Force Variable Using the TP 10-1. . . . . . . . . . . . . . . . . . . . . . . . . . . . . . . . . . . . . .
10.1 Status Variable 10-2. . . . . . . . . . . . . . . . . . . . . . . . . . . . . . . . . . . . . . . . . . . . . . . . . .
10.2 Force Variable 10-5. . . . . . . . . . . . . . . . . . . . . . . . . . . . . . . . . . . . . . . . . . . . . . . . . .
11 System Settings 11-1. . . . . . . . . . . . . . . . . . . . . . . . . . . . . . . . . . . . . . . . . . . . . . . . . . . . . . . .
11.1 Setting an Operating Mode 11-4. . . . . . . . . . . . . . . . . . . . . . . . . . . . . . . . . . . . . . .
11.2 Blanking the Screen 11-5. . . . . . . . . . . . . . . . . . . . . . . . . . . . . . . . . . . . . . . . . . . . .
11.3 Deactivate Touch Screen 11-6. . . . . . . . . . . . . . . . . . . . . . . . . . . . . . . . . . . . . . . . .
11.4 Calibrating the Touch Screen (TP37 and TP27-10 only) 11-7. . . . . . . . . . . . . . .
11.5 Other Settings 11-8. . . . . . . . . . . . . . . . . . . . . . . . . . . . . . . . . . . . . . . . . . . . . . . . . .
Part III INSTALLATION AND COMMISSIONING
12 Installation 12-1. . . . . . . . . . . . . . . . . . . . . . . . . . . . . . . . . . . . . . . . . . . . . . . . . . . . . . . . . . . . .
12.1 Mechanical Installation 12-2. . . . . . . . . . . . . . . . . . . . . . . . . . . . . . . . . . . . . . . . . . .
12.2 Electrical Installation 12-6. . . . . . . . . . . . . . . . . . . . . . . . . . . . . . . . . . . . . . . . . . . . .
12.2.1 Power Supply and Relay Contacts 12-7. . . . . . . . . . . . . . . . . . . . . . . . . . . . . . . . .
12.2.2 Connecting the Configuration Computer 12-8. . . . . . . . . . . . . . . . . . . . . . . . . . . .
12.2.3 Connecting the PLC 12-10. . . . . . . . . . . . . . . . . . . . . . . . . . . . . . . . . . . . . . . . . . . . .
12.2.4 Connecting a Printer 12-12. . . . . . . . . . . . . . . . . . . . . . . . . . . . . . . . . . . . . . . . . . . . .
Contents
www.dienhathe.vn
www.dienhathe.com
iii
TP27, TP37 Equipment Manual
Release01/00
13 Commissioning 13-1. . . . . . . . . . . . . . . . . . . . . . . . . . . . . . . . . . . . . . . . . . . . . . . . . . . . . . . .
13.1 Initial Startup 13-3. . . . . . . . . . . . . . . . . . . . . . . . . . . . . . . . . . . . . . . . . . . . . . . . . . .
13.2 Recommissioning 13-4. . . . . . . . . . . . . . . . . . . . . . . . . . . . . . . . . . . . . . . . . . . . . . .
13.3 Startup Behavior 13-8. . . . . . . . . . . . . . . . . . . . . . . . . . . . . . . . . . . . . . . . . . . . . . . .
13.4 Testing a Configuration in OFFLINE Mode 13-9. . . . . . . . . . . . . . . . . . . . . . . . . .
13.5 Testing the Configuration in Conjunction with the PLC 13-10. . . . . . . . . . . . . . . .
Part IV DEVICE DESCRIPTION AND MAINTENANCE
14 Unit Description TP27-6 14-1. . . . . . . . . . . . . . . . . . . . . . . . . . . . . . . . . . . . . . . . . . . . . . . . .
14.1 Dimensions 14-1. . . . . . . . . . . . . . . . . . . . . . . . . . . . . . . . . . . . . . . . . . . . . . . . . . . . .
14.2 Operating elements 14-2. . . . . . . . . . . . . . . . . . . . . . . . . . . . . . . . . . . . . . . . . . . . . .
14.3 Connection elements 14-2. . . . . . . . . . . . . . . . . . . . . . . . . . . . . . . . . . . . . . . . . . . .
14.4 Communication options 14-3. . . . . . . . . . . . . . . . . . . . . . . . . . . . . . . . . . . . . . . . . .
15 Unit Description TP27-10 15-1. . . . . . . . . . . . . . . . . . . . . . . . . . . . . . . . . . . . . . . . . . . . . . . .
15.1 Dimensions 15-2. . . . . . . . . . . . . . . . . . . . . . . . . . . . . . . . . . . . . . . . . . . . . . . . . . . . .
15.2 Operating elements 15-3. . . . . . . . . . . . . . . . . . . . . . . . . . . . . . . . . . . . . . . . . . . . . .
15.3 Connection Elements 15-3. . . . . . . . . . . . . . . . . . . . . . . . . . . . . . . . . . . . . . . . . . . .
15.4 Communication options 15-4. . . . . . . . . . . . . . . . . . . . . . . . . . . . . . . . . . . . . . . . . .
16 Unit Description TP37 16-1. . . . . . . . . . . . . . . . . . . . . . . . . . . . . . . . . . . . . . . . . . . . . . . . . . .
16.1 Dimensions 16-2. . . . . . . . . . . . . . . . . . . . . . . . . . . . . . . . . . . . . . . . . . . . . . . . . . . . .
16.2 Operating and Display Elements 16-3. . . . . . . . . . . . . . . . . . . . . . . . . . . . . . . . . .
16.3 Connection Elements 16-5. . . . . . . . . . . . . . . . . . . . . . . . . . . . . . . . . . . . . . . . . . . .
16.4 Communication options 16-6. . . . . . . . . . . . . . . . . . . . . . . . . . . . . . . . . . . . . . . . . .
17 Options 17-1. . . . . . . . . . . . . . . . . . . . . . . . . . . . . . . . . . . . . . . . . . . . . . . . . . . . . . . . . . . . . . . .
17.1 Direct Key Module 17-1. . . . . . . . . . . . . . . . . . . . . . . . . . . . . . . . . . . . . . . . . . . . . . .
17.1.1 Installing the Direct Key Module 17-2. . . . . . . . . . . . . . . . . . . . . . . . . . . . . . . . . . .
17.1.2 Connectors and Adjusters 17-4. . . . . . . . . . . . . . . . . . . . . . . . . . . . . . . . . . . . . . . .
17.2 Control Panel Interface 17-6. . . . . . . . . . . . . . . . . . . . . . . . . . . . . . . . . . . . . . . . . . .
17.2.1 Installing the Control Panel Interface 17-7. . . . . . . . . . . . . . . . . . . . . . . . . . . . . . .
17.2.2 Connectors 17-9. . . . . . . . . . . . . . . . . . . . . . . . . . . . . . . . . . . . . . . . . . . . . . . . . . . . .
18 Maintenance/Upkeep 18-1. . . . . . . . . . . . . . . . . . . . . . . . . . . . . . . . . . . . . . . . . . . . . . . . . . . .
18.1 Cleaning the Screen 18-1. . . . . . . . . . . . . . . . . . . . . . . . . . . . . . . . . . . . . . . . . . . . .
18.2 Replacing the Backup Battery 18-2. . . . . . . . . . . . . . . . . . . . . . . . . . . . . . . . . . . . .
18.3 Replacing the Back–Lighting (TP37 only) 18-4. . . . . . . . . . . . . . . . . . . . . . . . . . .
Contents
www.dienhathe.vn
www.dienhathe.com
iv
TP27, TP37 Equipment Manual
Release01/00
Part V APPENDICES
A Technical Data A-1. . . . . . . . . . . . . . . . . . . . . . . . . . . . . . . . . . . . . . . . . . . . . . . . . . . . . . . . .
A.1 Direct Key Module and Control Panel Interface A-5. . . . . . . . . . . . . . . . . . . . . .
A.2 Chemical Resistance of the Touch Panel A-8. . . . . . . . . . . . . . . . . . . . . . . . . . .
B Interface Assignments B-1. . . . . . . . . . . . . . . . . . . . . . . . . . . . . . . . . . . . . . . . . . . . . . . . . .
C System Messages C-1. . . . . . . . . . . . . . . . . . . . . . . . . . . . . . . . . . . . . . . . . . . . . . . . . . . . . .
D SIMATIC HMI Documentation D-1. . . . . . . . . . . . . . . . . . . . . . . . . . . . . . . . . . . . . . . . . . . .
E ESD Guidelines E-1. . . . . . . . . . . . . . . . . . . . . . . . . . . . . . . . . . . . . . . . . . . . . . . . . . . . . . . .
Glossary Glossary-1. . . . . . . . . . . . . . . . . . . . . . . . . . . . . . . . . . . . . . . . . . . . . . . . . . . . . . . . . . .
Index Index-1. . . . . . . . . . . . . . . . . . . . . . . . . . . . . . . . . . . . . . . . . . . . . . . . . . . . . . . . . . . . . . . . .
Contents
www.dienhathe.vn
www.dienhathe.com
INTRODUCTION
1 Product Description
2 Functionality
Part I
www.dienhathe.vn
www.dienhathe.com
-2
TP27,TP37 Equipment Manual
Release01/00
www.dienhathe.vn
www.dienhathe.com
1-1
TP27, TP37 Equipment Manual
Release 01/00
Product Description
By implementing the Touch Panels TP27 and TP37 operating statuses, current
process values and faults in respect of a connected PLC can be graphically
represented and the monitoring machine or system easily operated. This is
made possible by using the Touch Panels which have of a number of standard
functions for this purpose.
The method of display and operation of the Touch Panel can be customized
using the ProTool configuration software to achieve optimum results in respect
of process requirements.
The Touch Panel can be used to
S control and monitor the process by means of the menu system. In this way,
setpoints can be entered in the form of values or by touching configured
buttons, for example, or control positioning elements;
S display processes, machines and systems on full–graphic and semi–graphic
screens;
S visualize event messages and alarm messages, in addition to process
variables such as an output field, bar graph, trends or status display;
S intervene directly in the operation by means of the touch–sensitive screen.
The Touch Panels TP27 and TP37 have standard keyboards. The device is
operated intuitively by touching configured buttons and input fields on the
touch–sensitive screen, referred to in this manual as the “touch screen”.
The TP27 can be supplied in a range of variations. One variant is equipped
with a 6 inch display, available as monochrome and color versions. This
variant is subsequently referred to as TP27-6.
The second variant is the TP27, equipped with a 10 inch, color display. This
variant is subsequently referred to as TP27-10.
The TP37 is equipped with a 10 inch, color display.
The Touch Panels TP27 and TP37 are installation units for use directly at the
machine location. The degree of protection is high (front panel IP65), so the
devices are suitable for use in hostile industrial environments.
Use of TP27 and
TP37
Touch screen
Device variants
Installation
possibilities
1
www.dienhathe.vn
www.dienhathe.com
1-2
TP27, TP37 Equipment Manual
Release 01/00
Before commissioning, the Touch Panel must be prepared for the task of
visualizing data from the PLC. This means that data areas must be created in
the PLC memory in your configuration which are then used by the Touch Panel
to communicate with the PLC.
Graphics and texts to be displayed on the Touch Panel, together with the
properties and functionalities of the touch–sensitive operating elements, must
be created beforehand by means of a configuration computer (PC or PG) using
the configuration software ProTool. Before downloading the configuration data
to the Touch Panel, connect the configuration computer to the Touch Panel.
Once the configuration has been successfully downloaded, connect the Touch
Panel to the PLC. The Touch Panel now communicates with the PLC and
reacts to program execution on the PLC in accordance with the configured de-
fault values.
Figure 1-1 outlines the configuration and process control phase.
Touch Panel
Create configuration data
Save configuration data
Download configuration data
Connected to PLC
Configuration phase
Process control phase
PC or PU
PLC
Figure 1-1 Configuration and process control phase
Information regarding configuration of the Touch Panel is provided in the
User’s Guide ProTool – Configuring Graphics Displays.
The Communication User’s Guide provides information on connecting the
Touch Panel to the PLC.
Set up data areas
Configuration
using ProTool
Further
information
Product Description
www.dienhathe.vn
www.dienhathe.com
1-3
TP27, TP37 Equipment Manual
Release 01/00
1.1 Visualizing and Controlling Processes
The basic function of the Touch Panels TP27 and TP37 is the visualization of
process statuses and the operation of processes. The following display and
operating functions can be configured:
S screens
S input/output of process values
S bar graphs and trends
S text or graphic lists
S messages
S printout
S text
S help text
S recipes
S multiple languages
S password protection
S touch–sensitive operating elements.
Logically related process data from the PLC can be compiled, displayed on a
screen and individual parts of it modified. Screens may contain buttons,
graphics, text and values.
The Touch Panels can display machines and systems as full–graphics screens.
This makes it easier for the operator to find his way around.
Numeric, alphanumeric and symbolic values can be entered via touch–sensitive
input fields on the Touch Panel which are then transferred to the PLC. Current
values of the PLC are displayed in output fields.
Current process values can be output as numeric values, symbolic text,
symbolic graphs or in the form of bar graphs and trend curves.
S Bar graphs
represent a value as a rectangular area. Bar graphs can be used to display
fill levels or quantities, for example.
S Trends
display a value continuously. This display mode is useful when displaying
values that vary with time, variations in temperature or pressure,
for example.
Various graphic elements (bitmaps) or texts can be called into the display
depending on the process status. In this way, for example, the current setting of
a valve can be visualized on the Touch Panel by means of symbolic graphics
or text can be modified according to the situation.
Display and
operating
functions
Screens
Input/Output
Bar graphs and
trend curves
Symbol lists
Product Description
www.dienhathe.vn
www.dienhathe.com
1-4
TP27, TP37 Equipment Manual
Release 01/00
Messages appear on the Touch Panel in plain text. The message text may also
contain current process values. Incoming messages are stored in a message
buffer together with their date and time.
S Event messages
provide information and operating notes on current processes or machine
states, for example
Motor running at 3000 revs.
S Alarm messages
provide information on critical machine states, for example
Motor speed too high.
Alarm messages must be acknowledged on account of their urgency.
Messages are classified as event messages or alarm messages during configura-
tion.
All message events can be additionally recorded by being printed out in online
mode on a connected printer. Messages which have accumulated in the event
and alarm buffers can also be printed out.
Texts identify individual parts of the screen in order to be able to assign the
fields displayed to the process.
Help texts represent additional information and notes for the operator, which
can be configured, in respect of the screens, input fields and messages. The
help text relating to an alarm message, for example, may display information
on the cause of a malfunction and how to clear it.
Complete machine data records can be stored as recipes in a Touch Panel. A
recipe defines the data structure in a configuration. Data is assigned to the
configured structure on the Touch Panel.
The purpose of recipes is to transfer several items of data collectively to the
PLC. In this respect, it is immaterial whether actual recipes, specifications of
quantities, distances to be traversed or temperature variations are involved.
Message texts, texts in screens, help texts, system messages and button labels
may be stored in three languages simultaneously in the Touch Panel and
selected online.
The password protection feature prevents unauthorized operations of the Touch
Panel. Different passwords can be assigned to different users or user groups,
thus authorizing or prohibiting access to specific control functions by assigning
different password levels.
Direct intervention in the process operation is possible by using the
touch–sensitive buttons and input fields on the Touch Panel screen.
The structure of the Touch Panel user interface can be configured to suit indi-
vidual needs. Simply adjust the number, characteristics, positions and function-
ality of the operating elements for the specific application.
Messages
Recording
Texts
Help texts
Recipe
Multiple languages
Password
protection
Operating
elements
Product Description
www.dienhathe.vn
www.dienhathe.com
1-5
TP27, TP37 Equipment Manual
Release 01/00
1.2 The Touch Panels at a Glance
SIMATIC TP37
SIMATIC TP27
Hardware TP27-6
Monochrome
TP27-6
Color
TP27-10
Color
TP37
Color
Models Monochrome
display
Color display
4
–
–
4
Display Type STN1)-LCD TFT2)-LCD
Size 5.7” 10.3”
Touch screen Matrix 20 x 15 Analog, resistive
Resolution (pixels) 320 x 240 640 x 480
Colors 8
Grey shades
8
Back–lighting 4
Indicators LEDs for – TP on
Temperature limit
value reached
Write/read access to
memory card
Interfaces Serial interface to
connection
From PLC,
PC/PU, printer
2 x RS232/TTY
(active/passive)
1 x RS422/RS485
2 x RS232/TTY
(active/passive)
1 x RS422/RS485
1 x TTY (passive) /
RS422/RS485
Parallel interface for
connecting a printer
– 1 x TTL (Centronics)
1) passive drive
2) active drive
Product Description
www.dienhathe.vn
www.dienhathe.com
1-6
TP27, TP37 Equipment Manual
Release 01/00
TP37
Color
TP27-10
Color
TP27-6
Color
TP27-6
Monochrome
Hardware
Processor Type 80486 Pentium
Clock 33 MHz 100 MHz
Memory Flash EPROM for
firmware and user
data
1 MB 2 MB
Main memory
(DRAM)
2 MB 4 MB 8 MB
Special features Hardware clock
(battery–backed)
4
Relay output for
temperature monito-
ring
– 4
Module slot for
PCMCIA/Jeida
cards
4 Slot B
(Slot A not used)
Hardware TP27M-6 TP27C-6 TP27-10 TP37
direct key mo-
dule
Digital outputs,
drive via
configurable ports
8 16
Control Panel
Interface1)
Digital inputs/out-
puts
16 16/32
1) usable only in conjunction with SIMATIC S7 and Profibus-DP
Detailed information regarding the technical data of the Touch Panels TP27
and TP37 is provided in the Appendix A of this manual.
Further
information
Product Description
www.dienhathe.vn
www.dienhathe.com
2-1
TP27, TP37 Equipment Manual
Release 01/00
Functionality
The table below summarizes the functions of the Touch Panels TP27 and TP37. The values quoted are the
maximum values which can be managed by the Touch Panels. The values are limited by the size of the
user memory.
Functions TP27-6 TP27-10 TP37
Event messages Number 2000
Display On message line/message window
View all waiting messages on message page
Length message text per line 35 characters 70 characters
Lines per message 2 1
Process values in message text 8
Alarm messages Number 2000
Display In message window
Display type First value/last value, selectable
View all waiting messages On message page
Length message text per line 35 characters 70 characters
Lines per message 2 1
Process values in message text 8
Acknowledge individual alarm
messages
4
Acknowledge several alarm
messages simultaneously
16 acknowledgment groups
Message logging Output to printer 4
Message buffer Capacity 512 message events
View buffered event/alarm
messages
4
Delete 4
Buffer overflow warning 4
Automatic printout on buffer
overflow
4
Message events queued
simultaneously (max.)
S Event messages
S Alarm messages
500
250
2
www.dienhathe.vn
www.dienhathe.com
2-2
TP27, TP37 Equipment Manual
Release 01/00
TP37TP27-10TP27-6Functions
Message acquisition Time of occurrence Date and time
Message events Arrive, depart, acknowledge
Screens View 4
Printout 4
Static screen elements Pixel graphics
Text
Character graphics
Input/Output elements Input fields
Output fields
Combined input/output fields
Symbolic input fields
Symbolic output fields
Bar graphs
Trends
Buttons
light indicators
Operator prompting Buttons (dynamically modifiable)
light indicators
Symbolic input
Symbolic output
Fixed window 4
Limit value monitoring Inputs/outputs 4
Bar graphs and trends 4
Text attributes Display Flashing, inverse, underscore
Printer (messages) Bold, underscore
Help text Lines/characters 7/35
For messages 4
For input fields 4
For screens 4
Print functions Hardcopy of display contents
(screen dump)
4S character mode (ASCII)
S graphics mode
4
4
Direct message logging 4
Screen printout in character
mode (ASCII)
4
Graphics printout in graphics
mode
4
Password protection Number of passwords
Password levels
50
10 (0...9)
Functionality
www.dienhathe.vn
www.dienhathe.com
2-3
TP27, TP37 Equipment Manual
Release 01/00
TP37TP27-10TP27-6Functions
Recipes Number 255
Data records per recipe 500
Entries per data record 500
3000 (SIMATIC S7)
Save (create) data records PLCTP ! Data medium
Load data records Data medium ! TP/PLC
Delete data records On data medium
Modify (edit) data records On data medium
Transfer current values PLC ! TP
TP ! PLC
Transfer data records Data Medium ! TP
TP ! Data Medium
Record sets 4
Backup Backup/restore for memory
card
– 4
Online language change Number of languages 3
Loadable character sets per
language
3
Language–independent charac-
ter set (incl. character–graphic
characters)
1
Character size in pixels 8 x 8 to 64 x 64
Display Blank screen 4
Contrast 4 –
Audio volume adjustable 4 4 1)
Calibration not necessary 4
1) Can only be switched on/off
Functionality
www.dienhathe.vn
www.dienhathe.com
2-4
TP27, TP37 Equipment Manual
Release 01/00
TP37TP27-10TP27-6Functions
Communication SIMATIC S5
– AS511 4
– FAP 4
– PROFIBUS-DP 4
SIMATIC S7/M7
– PPI 4
– MPI 4
– PROFIBUS-DP 4
SIMATIC 500/505
– NITP 4
NATIVE driver
– AEG/Modicon (Modbus)
– Allen Bradley (DF1)O
– Mitsubishi (FX)
– Omron
– Telemecanique (Adjust,
Uni-Telway)
4
4
4
4
4
Functionality
www.dienhathe.vn
www.dienhathe.com
FUNCTIONS OF THE
TOUCH PANELS
3 General Operation
4 Screens
5 Password Protection
6 Messages
7 Printing
8 Recipes
9 Storing and Loading Data
10 Status/Force Tag Using the TP
11 System Settings
Part II
www.dienhathe.vn
www.dienhathe.com
2-2
TP27,TP37 Equipment Manual
Release01/00
www.dienhathe.vn
www.dienhathe.com
3-1
TP27, TP37 Equipment Manual
Release 01/00
General Operation
Using the Touch Panel screen, it is possible to observe the operating status of
the machine or system being monitored and, at the same time, to intervene di-
rectly in the process running simply by touching the buttons and input fields
displayed.
Operation of the Touch Panels TP27 and TP37 is intuitive to a large extent,
because
S operating elements can be positioned where they belong, from a functional
point of view,
S labeling of visible buttons is dynamic; in other words, labeling can be
changed online, according to the language required, or
language–independent bitmaps can be assigned to the buttons, for example,
S any sections of the system or process screen are rendered operable by su-
perimposing invisible buttons
S virtual keys for cursor functions and value input only appear when they can
actually be used: In input windows.
A screen occupies the entire display. An example of screen partitioning on the
TP37 display containing several open windows is illustrated in figure 3-1. The
TP27-6 has a smaller display, so that the operating elements are cascaded
(overlap).
Main area
Fixed window
Local button
System messages
Event and alarm
messages
Global button
Numeric input
window
Help window
Light indica-
tors
Message indicators
Figure 3-1 Screen partitioning on the TP37 (example)
Operating concept
Screen partitioning
3
www.dienhathe.vn
www.dienhathe.com
3-2
TP27, TP37 Equipment Manual
Release 01/00
The fixed window can be used to display important process magnitudes or date
and time, since the contents are not affected by the screen currently open.
The main area comprises the entire display. It is superimposed by all other
areas (fixed window, message window etc.). The main area contains the current
contents of the screen that is currently open.
The functions configured for the buttons have a local significance in the main
area. Buttons of local significance initiate different actions from screen to
screen on the Touch Panel or on the PLC, such as enabling and disabling Select
Screen, Language Switch or message logging. If buttons are positioned in the
fixed window, their functions are available globally. This means, for example,
that the current screen can be printed (Print Screen) or the system returned to
the main screen from any operating situation.
Buttons may have text or graphic labels. Examples:
Help
Light indicators are configurable, non–operable display elements. A light indi-
cator signals the status of a defined bit by assigning dynamic attributes, for
example a change of color or flashing text.
No function is assigned to a light indicator. Light indicators have thin borders
to distinguish them from user–operable buttons.
Temperature
Light indicators can be positioned locally in the main area or globally in the
fixed window.
Fixed window
Main area
Buttons
Light indicators
General Operation
www.dienhathe.vn
www.dienhathe.com
3-3
TP27, TP37 Equipment Manual
Release 01/00
Input window:
Regardless of the absolute position of the selected field, the input window al-
ways appears at the bottom right of the screen. After clicking on the top edge
of the window, it skips to the opposite edge of the screen (only with TP37 and
TP27-10)
Message window:
The system message window appears in the upper part of the screen. The posi-
tion of the event message window can be configured.
Help window:
The window for displaying configured Help texts is appears at the bottom left.
Several windows can be opened simultaneously on the Touch Panel, e.g. an
input window in the main area, an event message window, an alarm window
and a help window (figure 3-1). As soon as one of these windows is opened,
the input elements in the main area and fixed window can no longer be
accessed. All visible elements in the input and message windows remain
accessible.
The message indicator indicates that alarm messages have been received.
Not flashing: Alarm messages have been received which have been
acknowledged.
Flashing: Alarm messages have been received which have not been
acknowledged.
Window positions
Open windows
Message indicator
General Operation
www.dienhathe.vn
www.dienhathe.com
3-4
TP27, TP37 Equipment Manual
Release 01/00
3.1 Operating Touch Elements
Touch elements are contact–sensitive operating elements on the screen of the
Touch Panel, such as buttons, input fields, message windows and help win-
dows. Their operation is basically no different from pressing conventional
keys. Touch elements are operated by lightly touching them with your finger or
a pointer.
Note
S Never use pointed or sharp instruments to operate the Touch Panel to pre-
vent damage to the plastic surface of the touch screen.
S Touch only one point of the Touch Panel screen at a time. Do not touch
several touch elements simultaneously. If you do, an unintended action
may be initiated.
A function assigned to a button is normally triggered when the button is
touched. With some functions, it is possible to define the configuration so that
the function is not triggered until the button is released or its outlines remain
while being touched, e.g. the “Set Bit” function or the keypad in the input
window for numerical values. If the button has a repeater, keep touching the
button as long as the function in question is to be to repeated.
Not more than one touch element is activated per touch. Where an operating
function has still not been completed, e.g. entering a value, any successive at-
tempt to trigger a similar function is refused and a system message to this ef-
fect issued. Similar functions in this respect are Enter Setpoint and Edit Data
Record, for example.
When the Touch Panel detects contact on a valid touch element, it responds
with a visual or acoustic acknowledgement. An acknowledgment is indepen-
dent of communication with the PLC. It is not an indication of the required
action actually having been executed.
An acoustic signal is issued as long as the touch element is touched. The signal
tone can be enabled and disabled by means of the System Settings standard
screen (TP37) and the volume adjusted (TP27), see chapter 11.
Definition
Triggering
functions
Operation
acknowledgement
Acoustic
acknowledgment
General Operation
www.dienhathe.vn
www.dienhathe.com
3-5
TP27, TP37 Equipment Manual
Release 01/00
The type of visual operation acknowledgement is dependent on the operating
element touched.
S Visible buttons
The border color of the button touched changes:
Start
Start
Untouched
Touched
S Input fields
The foreground and background colors of a touched input field are inter-
changed. The change of color remains in effect until input is terminated or
canceled.
Untouched2500
2500 Touched
S Message windows and invisible buttons
A pointing hand, similar to that illustrated here, appears to the top left
of the operating element touched:
If the element touched is at the top border of the screen, the pointing hand
appears to the right and beneath the element in question.
Visual
acknowledgement
General Operation
www.dienhathe.vn
www.dienhathe.com
3-6
TP27, TP37 Equipment Manual
Release 01/00
3.2 Entering Values
Values can be entered in the input fields and combined input/output fields
which are then transferred to the PLC. To do so, touch the corresponding field.
The foreground and background colors of a selected input field are inter-
changed. Depending on the display type configured, the system opens one of
the input windows for
S numeric inputs,
S alphanumeric inputs,
S symbolic inputs.
The input window is closed following a valid input. The foreground and back-
ground colors of the field being edited are reset and the new value is applied to
the input field.
3.2.1 Entering Numerical Values
Enter numbers in the fields configured for pure numeric input, digit for digit,
using the numeric keypad of the input window illustrated in figure 3-2.
8 97
6
F
+/–.
CLR
BS
ESC
4
D
1
A
5
E
2
B
0
3
C
2500
HELP
HEX
MIN: MAX:0 999999
Figure 3-2 Window for entering numeric values
Principle
Input window
General Operation
www.dienhathe.vn
www.dienhathe.com
3-7
TP27, TP37 Equipment Manual
Release 01/00
Button Function Purpose
...0 9
Enter digits Enter digits 0 to 9.
...1 6
A F
Enter hexadecimal
numbers
Enter the hexadecimal numbers A to
F (after pressing HEX).
+/–
Change sign Change sign from + to – and back.
.
Enter decimal point Enter decimal point or comma.
HEX
Hexadecimal mode Change numbers 1 to 6 to characters
A to F.
HELP
Display help text
(Help)
Call Help text for the current input
field. The button is not displayed
unless the corresponding Help text
is configured.
BS
Delete character
(Backspace)
Delete character shown in reverse
video in the input line.
CLR
Delete input line
(Clear)
Delete all characters in the line, i.e.
clear the input line.
ESC
Cancel
(Escape)
Discard input and close window.
Enter Confirm input and close window.
Entries in numeric input fields begin aligned to the right. Entered digits are
moved to the left (pocket calculator format).
The current input position is displayed in reversed background/foreground col-
ors. Invalid characters, e.g. numbers greater than 1 in binary format, are re-
jected with an error message. If the entry is too long, the last character entered
is overwritten.
If limit valuers have been configured for the specifications to be entered, they
appear at the top edge of the input window. MIN indicates the lower limit value
and MAX the upper.
In order to enter the hexadecimal digits A to F, press the button HEX. An “h”
appears at the current input position. Press one of the buttons 1 to 6. The Touch
Panel reverts to decimal mode after each character.
Meanings of
buttons
Entering a value
Hexadecimal
mode
General Operation
www.dienhathe.vn
www.dienhathe.com
3-8
TP27, TP37 Equipment Manual
Release 01/00
After pressing the HELP button, the help text configured for the relevant input
field appears. See figure 3-5 on page 3-11 for an example.
Confirm the value entered by pressing the ENTER button, press ESC to cancel
the input process. The window is closed in both cases.
3.2.2 Entering Alphanumeric Values
Enter numbers in the fields configured for alphanumeric input, character for
character, using the alphanumeric keypad. Figure 3-3 illustrates the language–
independent keyboard template for the normal level. The keyboard template
for the Shift level of the alphanumeric keyboard varies according to the lan-
guage.
B CA
M
:
N
D
X
K
U
L
V
/
W
O
E
Y
G HF
R
%+
S
I
’
P
Z
Q
(
.
)
T
J
=
20 1 75 6
* – &
3 4 8 9
ESCShiftHelp
15.34.19
Figure 3-3 Entering alphanumeric values at the language–independent normal level
Button Function Purpose
...A 9
Enter characters Enter the characters using either the
normal or Shift level of the key-
board.
HELP
Display help text Call help text for the current input
field. The button is not displayed
unless the corresponding help text is
configured.
Help text
Terminate input
Input window
Meanings of
buttons
General Operation
www.dienhathe.vn
www.dienhathe.com
3-9
TP27, TP37 Equipment Manual
Release 01/00
PurposeFunctionButton
Shift
Keyboard levels Activate/Deactivate the keyboard
Shift level from normal level.
Cursor left Cursor moves one character to the
left.
Cursor right Cursor moves one character to the
right.
ESC
Cancel (Es-
cape)
Discard input and close window.
Enter Confirm input and close window.
Entries in alphanumeric input fields begin aligned to the left. Every time a
character is entered, the cursor moves to the right to the next input position.
Characters at the input position are overwritten.
The current input position is displayed in reversed background/foreground col-
ors. Invalid characters (e.g. values greater than 23 for the hour value in time)
are rejected and an error message issued. If the entry is too long, the last char-
acter entered is overwritten.
If a value already exists in the alphanumeric input field, this appears in inverse
colors when the field is activated and deleted on beginning a new entry. In or-
der to edit the old value, one of the cursor keys must be pressed as the first
entry. On pressing CURSOR LEFT, the cursor remains on the first character, and
on pressing CURSOR RIGHT it skips to the second character. In this case, the
value is no longer displayed in inverse colors and can be edited.
After pressing the HELP button the help text configured for the relevant input
field appears. See figure 3-5 on page 3-11 for an example.
The alphanumeric keyboard has two levels:
S Normal level: (see figure 3-3) is the same in all languages.
S Shift level: the keyboard template varies from language to language.
Use SHIFT to toggle between the two levels.
Confirm the value entered by pressing the ENTER button, press ESC to cancel
the input process. The window is closed in both cases.
Entering a value
Help text
Keyboard levels
Terminate input
General Operation
www.dienhathe.vn
www.dienhathe.com
3-10
TP27, TP37 Equipment Manual
Release 01/00
3.2.3 Entering Symbolic Values
Text is entered and displayed in symbolic input fields instead of a value. Select
the text from the configured text list. Figure 3-4 depicts the input window.
HELP
ESC
Selection 1
Selection 2
Selection 3
Selection 4
Selection 5
Selection 6
Selection 7
Selection 8
Selection 9
Figure 3-4 Window for entering symbolic values
Button Function Purpose
Scroll (Cursor) Scroll up and down one line at a
time through the text list.
HELP
Display Help text Call Help text for the current input
field. The button is not displayed
unless the corresponding Help text
is configured.
ESC
Cancel (Escape) Discard selection and close window.
Enter Confirm selection and close win-
dow.
Scroll through the text list using the cursor buttons or point directly to the entry
required. The current selection is displayed in reversed screen colors.
The cursor buttons have a repeat function. When pressed, their scroll function
is repeated after a short delay and continues until the button is released.
After pressing the HELP button the help text configured for the relevant input
field appears. See figure 3-5 on page 3-11 for an example.
Confirm the selection by pressing the ENTER button, press ESC to cancel the
input process. The window is closed in either case.
Input window
Meanings of
buttons
Select value
Help text
Terminate input
General Operation
www.dienhathe.vn
www.dienhathe.com
3-11
TP27, TP37 Equipment Manual
Release 01/00
3.3 Help Text
Help texts are created during configuration using ProTool and provide addi-
tional information on the respective subject in the language selected on the
Touch Panel. Help texts can be configured for
S event and alarm messages
S screens
S input and combined input/output fields.
Help texts can provide information to the user on the permissible range of val-
ues for the input field selected, for instance. Help texts referring to an alarm
message may, for example, contain supplementary details on possible causes
and on rectifying the problem.
The configured help text can be called to the screen by accessing the relevant
input field and pressing the HELP button. Figure 3-5 depicts an example of the
output window.
Enter temperature setpoint for Tank_1
(Range 40...80 _C)
Figure 3-5 Window with help text (example)
Touch the window to close it.
Purpose
Calling help texts
General Operation
www.dienhathe.vn
www.dienhathe.com
3-12
TP27, TP37 Equipment Manual
Release 01/00
General Operation
www.dienhathe.vn
www.dienhathe.com
4-1
TP27, TP37 Equipment Manual
Release 01/00
Screens
Processes (e.g. a processing machine or mixing station) are displayed on and
can be influenced by screens which appear on the Touch Panel. These screens
are created during configuration with ProTool for specific applications.
Logically related process values are acquired on screens and thus provide an
overview of a process or a system. Apart from this graphic mapping of pro-
cesses, screens provide an opportunity of entering new process values and thus
of controlling the process.
4.1 Screen Elements
Various screen elements are used to display and control screens:
S text
S graphics
S character graphics
S input fields for process values
S output fields for process values
S combined input/output fields
S bar graphs
S trends
S text or graphic lists
S buttons,
S light indicators.
The different screen elements are presented on the basis of the following exam-
ples.
Part of the contents of various tanks are filled and mixed in a mixing unit of a
fruit juice mixing system. The liquid levels in the tanks and in the mixer are
displayed. The intake valves can be opened and closed by means of operator
input on the Touch Panel. The motor for the mixer can be turned on and off in
a similar manner.
Process control
and monitoring
Screen sections
Example
4
www.dienhathe.vn
www.dienhathe.com
4-2
TP27, TP37 Equipment Manual
Release 01/00
Figure 4-1 illustrates how the configured screen may appear on the
Touch Panel.
¬ Text
­ Character graphic
® Numeric output field
¯ Bar graph (tank filling)
° Symbolic input field for opening and closing the valve
± Symbolic graphic indicates the valve status graphically (open/closed)
² Graphic
³ Button
Mixing Unit
Tank 1 Tank 2 Tank 3
Valve 4
Amount in
the mixer (l)
Valve
CLOSED
Valve
OPEN
Motor
OFF
Fill tank Selection
Main Screen
Motor
ON
44
Help
OPEN CLOSED
5300
¬
­
®
¯
°
±
²
³HELP
OPEN
Figure 4-1 Configured screen for a mixing unit (example)
Screens can be viewed, processed and printed via the Touch Panel. Before
these actions can be performed, however, the screen has to be selected. Select a
screen by means of a
S Button
The screen set in the configuration is opened by touching a button.
S Input field
Enter the number of the screen to be opened or select the name of the
screen from the pick list, if applicable.
S PLC job
The PLC calls a screen on the Touch Panel, depending on the status of the
process or the system.
Selecting a screen
Screens
www.dienhathe.vn
www.dienhathe.com
4-3
TP27, TP37 Equipment Manual
Release 01/00
4.2 Standard Screens
A standard configuration containing standard screens is supplied with the con-
figuration software ProTool for the respective Touch Panel. The functions
needed for basic operation of the Touch Panel have been implemented in the
standard screens. They include, for example, Call Message Buffer, Edit Pass-
words and Change Parameters Online. The individual functions are described
in this manual on the basis of the standard screens.
Process–specific implementation, such as event messages or screens for the
process, are not included in the standard screens.
The standard screens are called in via buttons on the main screen. The follow-
ing screen provides an example of the main screen of theTP37. The main
screen of the TP27 contains the same buttons.
1 2 6
Main Screen TP37
HELP
4 53
1 Edit Password (chapter 5)
2 Printer Settings (chapter 7)
3 System Settings (chapter 11)
4 Status/Control Tag (chapter 10)
5 Messages (chapter 6)
6 Help Text (section 3.3)
Figure 4-2 illustrates the standard screen hierarchy. Detailed information on the
functions and operation of standard screens is provided in the corresponding
sections of this manual.
Purpose
Main screen
Screens
www.dienhathe.vn
www.dienhathe.com
4-4
TP27, TP37 Equipment Manual
Release 01/00
Edit Password
Printer Settings
System Settings
Edit Message
Data Record Processing
and Transmission
Selective Data Record
Transmission
Main Screen
S Login/Logout
S View
S Edit
S General
S Hardcopy
S Assign Color
S Operating Mode
S Display Message
S Message Logging
S Buffer Overflow Warning
S Date and Time
S Language
S Backup/Restore
S Blank
S Audio Signal
S Contrast
S Calibrate Screen
S Clean Screen
S EM Window ON/OFF
S View Messages
S Print Messages
S Delete Buffer
S Save
S Load
S Delete
S Edit
S Select
S Sort
S PLC ³ TP
S TP ³ PLC
S Data Medium³ TP
S TP ³ Data Medium
S Select Data Record
S Sort
1)
1)
1) IIncluded in standard configuration but not linked
2) Not with TP27-6
3) Not with TP37
2)
3)
Status/Control Tag S Status Tag
S Control Tag 1)
Output Messages S Output Medium
S Message Event
S Priority
S Date
S Text
S Acknowledgement Group
S Print Messages with Filter
1)
Figure 4-2 Standard screen hierarchy
Screens
www.dienhathe.vn
www.dienhathe.com
4-5
TP27, TP37 Equipment Manual
Release 01/00
Functions are called in on the Touch Panel by means of configured buttons. To
prevent unauthorized access, some functions have to be protected beforehand
by means of a password at a specific password level (see chapter 5).
Configured help texts can be called int the standard screens by
pressing the button shown here. HELP
Calling functions
Calling Help texts
Screens
www.dienhathe.vn
www.dienhathe.com
4-6
TP27, TP37 Equipment Manual
Release 01/00
Screens
www.dienhathe.vn
www.dienhathe.com
5-1
TP27, TP37 Equipment Manual
Release 01/00
Password Protection
Password protection can be configured for buttons and input fields to prevent
operation of the Touch Panel by unauthorized personnel.
5.1 Password Level and Access Permissions
During the configuration phase with ProTool, the configurer assigns the but-
tons and input fields hierarchically ascending password levels from 0 to 9.
When a password is assigned to an individual user or to a whole user group,
the permission to execute functions at a specific level is assigned simulta-
neously.
After logging in with a password of a specific password level on the Touch
Panel, permission to execute functions is granted at that password level and
functions at lower levels.
If a function is configured with password level 0, no password need be entered
in order to execute this function. The functions assigned at this level, the low-
est in the hierarchy, have little or no effect on operation. These functions nor-
mally do not have input options; one example is Open Message Pages.
To call a password level 0 function, you do not have to enter a password. If you
call a function that is assigned to a higher level, the Touch Panel will prompt
you to enter a password.
Levels 1 to 8 should be assigned by the configurer according to the signifi-
cance of the respective function. The supervisor (superuser) is responsible for
assigning a password level to a password as part of his password management
duties.
Only the superuser has the rights to execute functions assigned password
level 9. The superuser has access to all the functions of the Touch Panel.
Only the superuser is authorized to perform password management on the
Touch Panel. Password management involves assigning and changing pass-
words.
Access protection
Password
hierarchy
Password level 0
Password level
1 – 8
Password level 9
5
www.dienhathe.vn
www.dienhathe.com
5-2
TP27, TP37 Equipment Manual
Release 01/00
The superuser password is defined during configuration. The default value in
the standard configuration is “100”. This setting can be changed using the
Touch Panel.
The passwords from levels 1 to 8 are not assigned during configuration but
during operation by using the Touch Panel. Use the standard screen Password
Processing to do this (refer to chapter 5.3).
The password must be a minimum of 1 character and may be a maximum of 8.
Alphanumeric characters are permissible. Leading zeroes are not permitted.
The Password Processing standard screen (figure 5-1) provides the following
functions:
S Login/logout on the Touch Panel,
S Change and delete passwords,
S View password list.
View password list
Exit from standard screen
Calling Help texts
Login:
Password Processing
Edit:
HELP ESC
Figure 5-1 Standard screen Password Processing
Superuser
password
Passwords from le-
vels 1 to 8
Format
Standard screen
Password
www.dienhathe.vn
www.dienhathe.com
5-3
TP27, TP37 Equipment Manual
Release 01/00
5.2 Login/Logout on the Touch Panel
Login on the Touch Panel
S using the Password Processing standard screen
S by calling a function for which the current password level is too low. In this
case, the Touch Panel automatically requests a password.
Step Action Result
1 Call the standard screen Pass-
word Processing.
The standard screen is displayed
(figure 5-1).
2 Touch the Login input field. The password input window
opens (figure 5-2). The possible
input positions are marked by
hash characters (#).
3 Enter your password by means
of the keypad.
Input commences flush left.
Each character entered is repres-
entedby an asterisk (∗).
4 Confirm the entry by
pressing
The input window is closed. If
the password is valid, the corre-
sponding password level is dis
Or cancel the input by
pressing ESC
sponding password level is dis-
played next to the Login input
field.
B CA
M
:
N
D
X
K
U
L
V
/
W
O
E
Y
G HF
R
%+
S
I
’
P
Z
Q
(
.
)
T
J
=
20 1 75 6
* – &
3 4 8 9
ESCShiftHelp
∗∗∗∗∗∗∗∗
Figure 5-2 Window for entering the password (example TP27-6)
Login
Logging in on
standard screen
Password
www.dienhathe.vn
www.dienhathe.com
5-4
TP27, TP37 Equipment Manual
Release 01/00
If a password level higher than the current one is required for a button or an
input field, the Touch Panel automatically requests the entry of an appropriate
password beforehand.
If the Touch Panel screen is not touched within a configured time, the current
password level is automatically reset to zero. This means that unauthorized
persons cannot gain access while the Touch Panel is unattended.
Itb is also possible to log out from the Touch Panel by using the Password
Processing standard screen. Carry out the following steps to do this:
Step Action Result
1 Call the standard screen Pass-
word Processing.
The standard screen is displayed
(figure 5-1).
2 Touch the Login input field. The password input window
opens (figure 5-2).
3 Enter an invalid password and
confirm by pressing
Once it has been applied, the ef-
fective current password level is
0.
Automatic call
Logout
Logging off on
standard screen
Password
www.dienhathe.vn
www.dienhathe.com
5-5
TP27, TP37 Equipment Manual
Release 01/00
5.3 Password Management
The Password Processing standard screen provides the following functions for
password management:
S create passwords and assign password levels,
S delete passwords,
S change passwords and password levels,
S view password list.
These functions can only be called in password level 9 (exception: view pass-
word list). Therefore, log in beforehand by means of the Login input field us-
ing the superuser password.
A maximum of 50 different passwords can be set up on the Touch Panel. Pass-
word level 9 (superuser) can be assigned once only.
Carry out the following steps to assign a password and password level:
Step Action Result
1 Touch the Edit input field. The password input window
opens.
2 Enter a password that has not
been previously issued and
confirm it by pressing
The password is transferred to
the Edit field.
3 Touch the input field behind the
Edit field.
The password level input win-
dow opens.
4 Enter a password level between
1 and 8 and confirm by pressing
The new password is saved on
the Touch Panel and protected
even in the event of a power
failure.
Functions
Creating a
password
Password
www.dienhathe.vn
www.dienhathe.com
5-6
TP27, TP37 Equipment Manual
Release 01/00
Step Action Result
1 Touch the Edit input field. The password input window
opens.
2 Enter the password to be deleted
in the input field Edit and con-
firm by pressing
If the password level in the ad-
jacent input field is set to 0, the
password has been deleted.
3 Otherwise, touch the input field
behind the Edit field.
The password level input win-
dow opens.
4 Overwrite the password level
with 0 and confirm by pressing
Once it has been transferred, the
password is deleted.
It is not possible to change a password on the Touch Panel directly. To change
a password, the existing one must be deleted and a new one entered.
Exception:
The superuser password can be changed by overwriting it directly.
Step Action Result
1 Touch the Edit input field. The password input window
opens.
2 Enter the password to be as-
signed a new level in the input
field Edit and confirm by press-
ing
The password level of the pass-
word entered appears in the in-
put field behind the field Edit.
3 Touch the input field behind the
Edit field.
The password level input win-
dow opens.
4 Overwrite the password level
with a new value and confirm
pressing
Once it has been transferred, the
new level is assigned to the
password.
Deleting a
password
Changing a
password
Changing
password levels
Password
www.dienhathe.vn
www.dienhathe.com
5-7
TP27, TP37 Equipment Manual
Release 01/00
The password list contains all the passwords set up on the Touch Panel. The
only passwords displayed are those with a password level lower or equal to
that with which the user logged in on the Touch Panel. The supervisor pass-
word is not displayed.
Call in the password list by pressing the button
Step Action Result
1 Touch the button The password list window
opens (figure 5-3).
2 Use the arrow keys, if neces-
sary, to scroll through the list
The password and password
level at the current cursor posi-
tion are displayed in inverse
screen colors.
3 Terminate the action by pressing
ESC
The password list window is
closed.
ESC
1 1049
2 19FF27
3 1A740K
4 22CE51
5 3D36M1Z7
6 723
7 97BC1
8 A0YC3
9 MIRROR
3
4
4
1
8
5
4
1
1
Serial number
Password Password level
Figure 5-3 Password list
Viewing the
password list
Action
Password
www.dienhathe.vn
www.dienhathe.com
5-8
TP27, TP37 Equipment Manual
Release 01/00
Password
www.dienhathe.vn
www.dienhathe.com
6-1
TP27, TP37 Equipment Manual
Release 01/00
Messages
Messages on the Touch Panel indicate events and statuses related to control
processes. A message consists of static text, at least. It may also contain tags.
The following types of message are displayed in plain text on the Touch Panel.
S event messages
S alarm messages
S system messages
Once issued, alarm messages and event messages are stored on the Touch
Panel in battery–backed message buffers, so they are protected against power
failures. Messages in the buffers may be called to the display and logged on the
attached printer. The Touch Panel can still be operated when messages are
waiting to be displayed.
Alarm and event messages may contain the following information:
S Arrived:
Denotes the occurrence of a message.
S Cleared:
The reason for the message no longer exists.
S Acknowledged (alarm messages only):
The message has been noted by the operator or the PLC, acknowledged and
confirmed.
A message status is accurately timed by the Touch Panel when it is recorded
and indicated when a message page or buffer is displayed.
Overview
Message states
6
www.dienhathe.vn
www.dienhathe.com
6-2
TP27, TP37 Equipment Manual
Release 01/00
6.1 Types of Message
Event and alarm messages must be configured. Event messages indicate a sta-
tus in the process, whereas alarm messages indicate faults or errors. Event mes-
sages and alarm messages are issued by the PLC. Alarm messages have to be
acknowledged on account of their significance.
System messages are triggered by the Touch Panel. They do not have to be
configured. System messages provide information on operating status of the
Touch Panel and on maloperations or malfunctions in communication.
6.1.1 Event Messages and Alarm Messages
The configuration defines whether a process status is indicated by an event
message or alarm message.
Messages referring to regular sequences of events or states should be catego-
rized as event messages; for example
0000031 10:53:27 04.04.97 11
Mixing operation completed
Filing level in mixer: 5000 l
Messages relating to disturbances of the process or status should be catego-
rized as alarm messages; for example
0000017 10:59:53 04.04.97 AGR 04 3
Bottling operation aborted
Bottling valve closed
Alarm messages have to be acknowledged on account of their urgency. By do-
ing so, the operator confirms that he has taken note of the alarm message.
Alarm messages can also be acknowledged by the PLC.
Operational hints can be configured as event messages or alarm messages, in
addition to status messages. If, for example, the machine operator wishes to
start the filling operation but has forgotten to open the bottling valve on the
mixer, he can be requested to rectify the error by means of an event message;
for example
0000037 11:01:02 04.04.97 11
Open bottling valve
Event and alarm
messages
System messages
Definition
Messages
www.dienhathe.vn
www.dienhathe.com
6-3
TP27, TP37 Equipment Manual
Release 01/00
Alarm and event messages can be configured so that text components flash in
order to distinguish them from other message texts.
Messages may contain text and tag fields. Tag fields display current PLC ac-
tual values in numeric form.
A sub–category of the event message is the standby message. The standby
message is the event message number 0. It is displayed when there are no event
messages on the Touch Panel.
A current event or alarm message can be displayed in either a message line or
message window. One of the following combinations can be defined in the
configuration:
S Window/window
Event messages and alarm mes-
sages are displayed in separate
windows.
The alarm message window is
opened automatically when an
alarm message arrives. When the
alarm message is acknowledged,
the alarm message window disap-
pears.
The event message window can
be opened only by activating a
button.
Event message
Alarm message
S Window/line
An event message is displayed in
the message line, whereas an
alarm message is displayed in the
message window. The alarm mes-
sage window is opened automati-
cally when an alarm message oc-
curs. When an alarm message is
acknowledged, the alarm message
window disappears if no other
alarm messages are waiting.
Alarm message
Event message
S Window/hide
An alarm message is displayed in
the message window. Event mes-
sages are not displayed.
When the alarm message is ac-
knowledged, the alarm message
window is closed.
Alarm message
Presentation
Standby message
Display mode
Messages
www.dienhathe.vn
www.dienhathe.com
6-4
TP27, TP37 Equipment Manual
Release 01/00
When a message line has been configured it is always displayed, regardless of
the screen selected. Only the latest message is displayed in the message line.
Messages in the configured message window contain additional information on
the message, such as message number and date/time the message arrived. The
alarm message window has extra buttons.
Alarm message window:
The alarm message window (figure 6-1) automatically appears whenever an
alarm message is issued.
0000048 11:34:02 27.03.97 2
Boiler 25: Temperature 156 degrees
Summon Shift Engineer. Tel.: 9456
Message number Date
Time
Number of unacknowledged
messages (TP37 only)
Process value
ACK HELP ESC
Figure 6-1 Alarm message window (example)
The buttons in the alarm message window have the following significance:
Button Function Purpose
ACK
Acknowledge alarm
message
When an alarm message is acknowl-
edged, the alarm message window
disappears if no other alarm mes-
sages are waiting.
HELP
Display help text Call help text concerning the alarm
message, if configured.
ESC
Cancel Set the alarm message window to
the background
Message line
Message window
Messages
www.dienhathe.vn
www.dienhathe.com
6-5
TP27, TP37 Equipment Manual
Release 01/00
Event message window:
The event message window must be selected by the operator or the PLC and
can also be deselected. If a current event message is not waiting, the standby
message is displayed.
Activate the event message window by touching the OPEN EVENT
MESSAGE WINDOW button on the Edit Message standard screen.
The button is inactive if the Line setting has been configured for
event messages.
Close the event message window by touching it.
Alarm and event messages are written in the Touch Panel message archive
when they arrive. The message archive is a message buffer, created by the op-
eratng system, in which all message events are eneterd in chronological order.
Message events consist of:
S arrival of a message
S acknowledgment of an alarm message
S clearing of a message.
The message archive is a FIFO buffer. When the buffer is full, the oldest mes-
sages are deleted.
During configuation, it is possible to define a remainder buffer size for the
message archive. As soon as this remaining buffer size is reached, the Touch
Panel automatically issues an overflow warning (system message). Messages
continue to be entered in the message archive even after the remaining buffer
size has been reached.
If the conditions for issuing a message have been fulfilled in the process cur-
rently running, a value has been reached, a bit is set in the data area by the PLC
application program for an event or alarm message. The Touch Panel reads the
data area after a configured polling time. In this way, a message is detected as
having “arrived”. The bit is reset by the PLC when the condition for issuing the
message no longer exists. The message is then regarded as having been
“cleared”.
Message archive
Overflow warning
Message bit
procedure
Messages
www.dienhathe.vn
www.dienhathe.com
6-6
TP27, TP37 Equipment Manual
Release 01/00
6.1.2 Alarm Messages
Alarm messages have to be acknowledged on account of their ur-
gency. This can be done manually or automatically by the PLC.
To acknowledge an alarm message manually, simply touch the
ACK button in the alarm message window (figure 6-1 on page
6-4).
If the error messages should be acknowledged by the PLC, conti-
nue to read the Communication User’s Manual.
If several alarm messages are waiting to be displayed, the next
alarm message is displayed after one has been acknowledged.
Each message must be acknowledge in turn.
ACK
During configuration, several alarm messages can be combined to so called
acknowledgment groups. This means that by acknowledging the first alarm
message, e.g. the cause of the malfunction, all the remaining alarm messages in
the same acknowledgment group are acknowledged simultaneously (conse-
quential malfunctions) without them being issued in succession for acknowl-
edgment on the Touch Panel (group acknowledgment). Up to 16 acknowledg-
ment groups can be configured.
If alarm messages are not assigned to an acknowledgment group, only the mes-
sage currently displayed is acknowledged when more than one are waiting.
As soon as a alarm message arrives, an alarm message window is
opened and the message indicator shown here appears as a button
on the screen.
The message indicator can assume one of two states:
S flashing,
as soon as at least one unacknowledged alarm message is wait-
ing.
S not flashing,
when all waiting alarm messages have been acknowledged, but
at least one has not yet been cleared.
After touching the message indicator, the alarm message page ap-
pears.
The message indicator does not disappear until all acknowledged
alarm messages have been cleared. This means that a pending
alarm message is not forgotten.
Acknowledging
alarm messages
Acknowledgment
groups, group
acknowledgement
Message indicator
Messages
www.dienhathe.vn
www.dienhathe.com
6-7
TP27, TP37 Equipment Manual
Release 01/00
The alarm message window can be set in the background so that if
there are numerous alarm messages pending, it is not necessary to
acknowledge them all before rectifying what may be a critical
system condition at the machine. Set the window in the back-
ground by touching the ESC button in the alarm message window
(figure 6-1 on page 6-4). The other touch elements on the screen
can then be used.
The alarm messages set in the background are re–displayed
S after touching the message indicator, or
S a new alarm message arrives.
If the alarm message is in the foreground, the alarm message
screen can be opened by touching the message indicator. Each
subsequent touch opens the alarm message buffer or alarm mes-
sage screen alternately.
ESC
Setting alarm
messages in the
background
Messages
www.dienhathe.vn
www.dienhathe.com
6-8
TP27, TP37 Equipment Manual
Release 01/00
6.1.3 System Messages
System messages indicate internal Touch Panel operating statuses. They indi-
cate, for example, maloperations or communication malfunctions. Touch the
system message window to close it.
A system message consists of a message number and text, e.g.:
222 AM remaining buffer reached
Message text may contain internal system tags for defining the cause of the
message more precisely. Some system messages expect an acknowledgement
or to make a decision. To determine the further course of events, two buttons
are displayed in the system message window; for example
559 Delete event buffer?
OK Yes / ESC No
ESCOK
System messages are catagorized into serious and non–serious messages. A
serious system message relates to an error which can be eliminated only by a
cold or warm restart of the Touch Panel. All other errors generate non–serious
system messages – for example, a configured limit value is not maintained on
entry or the current password level is too low for the operator input required. If
a non–serious system message is not hidden automatically after a short period
of time, hide it by touching the message window. Display can be terminated
automatically after a configurable display time expires.
A list of system messages, with explanations, is provided in Appendix C of this
manual.
Definition
Structure
Serious and
non–serious
system messages
Messages
www.dienhathe.vn
www.dienhathe.com
6-9
TP27, TP37 Equipment Manual
Release 01/00
6.2 Displaying Messages
All message events are written in the message archive in chronological order.
Message events are the arrival, clearing and acknowledgment of a message. A
maximum of 512 message events can be stored in the Touch Panel message ar-
chive. Every message event is stored with the following information:
S message number
S event identifier
(A for arrived, D for cleared, K for acknowledged),
S time of the event with date and time of day
S acknowledgment group (alarm messages)
S message text
S values of tags at the time of arrival or clearing.
If a message contains process values, the values stored in the message archive
are those which were available when the message event arrived or has been
cleared. The Touch Panel does not record any current process values for the
Acknowledged message status. The value is replaced by ### characters. Fi-
gure 6-2 shows the structure of the message archive.
0000049 A 11:32:00 27.03.97 AGR:01
Boiler pressure too high: 12,7 bar
0000049 AK 11:33:20 27.03.97 AGR:01
Kesseldruck zu hoch: #### bar
0000010 A 11:34:36 27.03.97 AGR:02
Oil supply stopped
0000010 AK 11:35:18 27.03.97 AGR:02
Oil supply stopped
Message number
Message status
Time and date (time of arrival)
Process value (time of arrival)
Acknowledgment group
Figure 6-2 Storing message events in the message archive
Message archive
Messages
www.dienhathe.vn
www.dienhathe.com
6-10
TP27, TP37 Equipment Manual
Release 01/00
The message events in the message archive can be filtered according to various
criteria and displayed on the Touch Panel (figure 6-3).
– All waiting event messages are displayed on the event message page.
– All message events for event messages are displayed in the event mes-
sage buffer. The events related to message events are Arrived and
Cleared.
– All waiting alarm messages are displayed on the alarm message screen.
– All message events for alarm messages are displayed in the alarm mes-
sage buffer. These message events are Arrived, Cleared and Acknowl-
edged.
A Event message 15
A Event message 16
A Alarm message 2
A Alarm message 3
K Alarm message 2
K Alarm message 3
D Event message 15
D Alarm message 3
Message archive
Event messages Alarm messages
A EM 16
A EM 15
A EM 16
D EM 15
A AM 2
A AM 2
A AM 3
K AM 2
K AM 3
D AM 3
Page
Buffer
Page
Buffer
Figure 6-3 Displaying message events on the Touch Panel
Within the alarm and event messages, it is possible to configure message prior-
ities according to their importance.
S 1 (low) to
S 16 (high).
If several messages having the same display priority are waiting, they are dis-
played according to their message priority – the highest first and the lowest
last.
Display
Priority
Messages
www.dienhathe.vn
www.dienhathe.com
6-11
TP27, TP37 Equipment Manual
Release 01/00
6.2.1 Opening a Message Page
An overview of the alarm and message events still pending on the Touch Panel
is provided from
S the alarm message screen and
S the event message page.
Open message pages are constantly updated.
In order to open an alarm message page, touch
S the message indicator
or
S the OPEN ALARM MESSAGE SCREEN button on the
Edit Message standard screen
To open the event message page, touch the OPEN EVENT MESSAGE
PAGE button on the Edit Message
standard screen
The event message screen is sorted chronologicaly. The sorted order of the
alarm message screen also depends on the First/Last parameters set on the
System Settings standard page. Figure 6-4 depicts an example of an alarm mes-
sage screen.
Depending on the setting, either the oldest (first) or latest (last) message is dis-
played where several messages are pending. This setting can be modified on-
line on the Touch Panel by means of the System Settings standard screen. To
do this, touch the MESSAGE DISPLAY field and select either the FIRST or LAST
parameter from the selection window.
Purpose
Alarm message
page
Event message
page
Structure
Displaying
first/last message
Messages
www.dienhathe.vn
www.dienhathe.com
6-12
TP27, TP37 Equipment Manual
Release 01/00
ESCHELP
0000049 A 11:32:00 27.03.97 AGR:01
Boiler pressure too high: 12.7 bar
0000049 AK 11:33:20 27.03.97 AGR:01
Boiler pressure too high: 10.3 bar
0000010 A 11:34:36 27.03.97 AGR:02
Oil supply stopped
0000010 AK 11:35:18 27.03.97 AGR:02
Oil supply stopped
Message indicator
Figure 6-4 Alarm message screen (example TP37 )
Button Function Purpose
Scroll Scroll backwards/forwards one line
at a time.
Jump Scroll backwards/forwards one
screen at a time
(TP37 only).
HELP
Display Help text Call help text for the marked
message, if configured.
Toggle Toggle back and forth between
alarm message screen and alarm
message buffer.
ESC
Cancel (Escape) Close message page.
Meanings of
buttons
Messages
www.dienhathe.vn
www.dienhathe.com
6-13
TP27, TP37 Equipment Manual
Release 01/00
6.2.2 Opening a Message Buffer
An overview of the message events which have arrived on the Touch Panel is
provided concerning the
S alarm message buffer
S event message buffer.
Open message buffers are constantly updated.
In order to open the alarm message buffer, touch
S the message indicator on the alarm message screen
or
S the OPEN ALARM MESSAGE BUFFER button on the
Edit Message standard screen
To open the event message buffer, touch the OPEN EVENT
MESSAGE BUFFER button on the Edit Message standard screen
The message buffers in the Touch Panel list all the message events which have
occurred in chronological order. The basic structure and the significance of the
buttons do not differ from those illustrated in the example alarm message
screen in figure 6-4.
Purpose
Alarm message
buffer
Event message
buffer
Structure
Messages
www.dienhathe.vn
www.dienhathe.com
6-14
TP27, TP37 Equipment Manual
Release 01/00
6.3 Deleting Messages
All message events from event and alarm messages are stored automatically in
the message archive. The message archive can contain as many as 512 message
events. Message events are deleted
S automatically in the case of buffer overflow
S by means of the Edit Message standard screen.
On reaching the configured remaining buffer size, (default setting 10%), an
overflow warning is issued by default. Issue of the the warning can be enabled
or disabled via the Touch Panel using the System Settings standard screen. To
do so, touch the BUFFER OVERFLOW WARNING field and select one of the two
parameters, OFF or ON, from the selection window.
If the message archive is no longer capable of recording more message events,
message events are automatically deleted until the capacity configured for the
remaining buffer size is reached. Deletion occurs in the following sequence:
S The oldest messages which have already been cleared.
The message events Arrived and Cleared for an event message which has
cleared are deleted. The message events Arrived, Cleared and Acknowl-
edged for an alarm message which has cleared are deleted.
S Messages still waiting.
If capacity is still not sufficient for new messages, the oldest waiting mes-
sages are deleted. This triggers the issue of a system message.
In the case of a buffer overflow, a printout of all the alarm and event messages
deleted is automatically triggered if
S “Printout on overflow” is configured,
S message logging is deactivated on the Touch Panel, and
S a printer, ready to operate, is connected.
Purpose
Overflow warning
Deleting on buffer
overflow
Automatic printout
Messages
www.dienhathe.vn
www.dienhathe.com
6-15
TP27, TP37 Equipment Manual
Release 01/00
The following messages can be deleted from the message archive via standard
screen Edit Message:
S all (not individual) acknowledged and cleared alarm messages
S all (not individual) arrived and cleared event messages.
Delete alarm messages by pressing the DELETE ALARM MESSAGE
BUFFER button.
Delete event messages by pressing the DELETE EVENTS BUFFER
button.
The message events for messages which have not been cleared remain in the
message archive.
Deleting via
standard screen
Messages
www.dienhathe.vn
www.dienhathe.com
6-16
TP27, TP37 Equipment Manual
Release 01/00
6.4 Printing Messages
Alarm and event messages can be printed out
S automatically following buffer overflow (see chapter 6.3),
S automatically as direct message logging,
S manually (see chapter 6.5.2).
Set the printer parameters in the Printer Settings standard screen. The standard
screen is described in chapter 7.
Note
If a flood of more than 20 messages arrive simultaneously causing the buffer
to overflow, it is possible that the messages will not be printed. If this happens
“****” appears in the printout instead of messages.
Alarm and event messages can be printed out directly on arrival and clearing
(alarm messages also on acknowledgement) when this has been defined in the
message configuration. System messages are not logged.
Message logging can be enabled/disabled online via the Touch Panel using the
System Settings standard screen. To do so, touch the MESSAGE LOGGING field
and select either of the parameters OFF or ON from the selection window.
The table shows the relationships between the settings on the Touch Panel and
the settings configured in ProTool.
Setting in ProTool Setting on Touch Panel
Message Logging ON Message Logging OFF
Messages Messages are logged Messages are not logged
Overflow Messages are logged Buffer overflow is printed
Off Messages are logged No effect
Note
If Asian character sets are used for messages, the messages are printed in
graphics mode.
How to print
Direct message
logging
Enabling/Disabling
direct message
logging
Messages
www.dienhathe.vn
www.dienhathe.com
6-17
TP27, TP37 Equipment Manual
Release 01/00
The buffer contents can be printed out in the following ways:
S The Edit Message standard screen (see chapter 6.6.1) has buttons to print
out alarm and event messages.
S The Output Messages standard screen (see chapter 6.6.2) has buttons to
print out alarm and event messages. In addition, it is possible to enter filter
criteria concerning the messages to be printed.
Manual printout of
buffer content
Messages
www.dienhathe.vn
www.dienhathe.com
6-18
TP27, TP37 Equipment Manual
Release 01/00
6.5 ALARM_S Messages
The STEP 7 option packages S7–PDIAG and S7–GRAPH only issue
ALARM_S messages. For that reason, the message number procedure
ALARM_S must be used for configuring process diagnosis in ProTool as well.
ALARM_S messages are not configured in ProTool but in STEP 7.
When configuring messages in STEP 7 the message text and attributes entered
are stored in the database shared with ProTool. During the process of compil-
ing the project, ProTool automatically imports the necessary data and subse-
quently downloads it to the operating unit.
Shared Database
Figure 6-5 Configuring and Downloading ALARM_S Messages
It is therefore important that the shared database is always up to date during the
compilation process and that data synchronization is active.
ALARM_S messages are configured in STEP 7. The data is then stored in a
shared database, imported during the process of compiling the ProTool project
and finally downloaded to the operating unit.
That means that ALARM_S messages use up resources on the operating unit.
The shorter the messages are, the less storage space they will require.
A maximum of 2000 event messages and 2000 alarm messages can be created.
It is of no consequence in this regard which message procedure is used.
Note
In STEP 7 there are restrictions regarding the number and size of tags that can
be used within a message. For more precise details, please consult your STEP
7 documentation.
Incorporating
ALARM_S
Messages
Use of Resources
Messages
www.dienhathe.vn
www.dienhathe.com
6-19
TP27, TP37 Equipment Manual
Release 01/00
6.5.1 Communication Sequence
More than one station (e.g. more than one OP, PU, etc.) on a network can log
on for ALARM_S messages. Each station that wants to display ALARM_S
messages logs on to the CPU for ALARM_S.
OP
S7
CPU
PUTP
CPU
S7
Figure 6-6 MPI Network
When a message–triggering event occurs, the CPU actively sends telegrams to
that effect to all stations that have logged on. The message number identifies
the corresponding message text that has previously been downloaded to the
operating unit.
This means that the CPU does not have to be actively scanned for messages by
regular polling as was the case with the message bit procedure. The operating
unit, CPU and network are completely relieved of that burden on the system.
With the ALARM_S procedure, the time stamp is not issued by the operating
unit but by the CPU. The messages are stored in chronological order on the
basis of their time stamp in the message buffer on the operating unit – even if
they originate from different CPUs.
The CPU stores not only the time of the message but also the status (arrived,
departed, acknowledged) and any process parameters. That information is re-
tained until a message has been completely processed, i.e. until it has arrived,
departed and been acknowledged. On the operating unit, the information in the
message buffer is kept even longer.
Logging On For
ALARM_S
When A Message
Event Occurs
Time Stamp
Information Stored
Messages
www.dienhathe.vn
www.dienhathe.com
6-20
TP27, TP37 Equipment Manual
Release 01/00
6.5.2 Message Acknowledgement
When a message is acknowledged by a station on the network, the CPU is im-
mediately notified. The CPU then distributes the acknowledgement to all con-
nected stations. It is only to this message that the operating unit responds, i.e.
only at this point does it enter the acknowledgement in the message buffer.
Note
The CPU issues a time stamp for the acknowledgement event but does not
store it. It is therefore not possible in the event of a subsequent update to de-
termine whether or when a message has been acknowledged.
In the case of those ALARM_S messages that although they are configured as
alarm messages do not require explicit acknowledgement by the user, the CPU
acknowledges the message automatically when it arrives. The acknowledged
event is then immediately entered in the message buffer along with the arrived
event.
6.5.3 Printing Messages
You specify which messages are to be printed in the usual way in ProTool by
choosing the menu option System → Messages → Settings.
If you do not specify any device–specific message settings in STEP 7, all mes-
sage events are automatically logged directly to the connected printer.
If you configure device–specific messages, you can specify separately for each
message whether it is to be logged or not.
If there are several CPUs in a network, this means that messages may not al-
ways be received in chronological order by the operating unit. Messages are
always printed in the order in which they are sent by the CPUs. This is also the
case with every synchronisation.
Printing of the message buffer contents in the event of a buffer overflow is car-
ried out in the same way as with the familiar message bit procedure. All mes-
sages are printed before being deleted.
ALARM_S
Messages
Requiring
Acknowledgement
ALARM_S
Messages Not
Requiring
Acknowledgement
Message Logging
Printing Messages
In the Event of a
Buffer Overflow
Messages
www.dienhathe.vn
www.dienhathe.com
6-21
TP27, TP37 Equipment Manual
Release 01/00
6.5.4 Message Overload
It can happen that a large number of ALARM_S messages are issued within a
short space of time. This can result in the build–up of processing backlogs.
If the time gap between the first occurrence of a message and a subsequent
occurrence is very short, it may be that the first message has not yet even been
sent. In that case, the CPU reports the current status, i.e. the most recent occur-
rence of the message. Every station, i.e. including the operating unit, is in-
formed at the same time, however, that at least one signal change that could not
be sent has occurred.
The message number appears on the operating unit in inverted type (light let-
ters on dark background) if multiple arrivals and departures of the message
have not been able to be recorded.
*1234567 A KGQ HH:MM:SS DD.MM.YYYY GRU00
Boiler 13: temperature 190 degrees
Inform shift supervisor Tel. 007
Figure 6-7 Multiple Arrivals and Departures Could Not Be Recorded
If there are more messages pending than the CPU can process, any new mes-
sages are discarded. Only when a message has been fully processed can a new
message be processed.
The date and time of a message appear on the operating unit in inverted type
(light letters on dark background) if it is the last message that could be ac-
cepted by the CPU message buffer.
*1234567 A KGQ HH:MM:SS DD.MM.YYYYGRU00
Boiler 13: temperature 190 degrees
Inform shift supervisor Tel. 007
Figure 6-8 Last Message Accepted by the CPU
An operating unit can process a maximum of approx. 200 simultaneously
pending messages (total number of event and alarm messages). If the operating
unit then receives more messages from the CPUs on the network, they can no
longer be displayed. A system message to that effect is then displayed on the
operating unit.
The maximum number of messages that could theoretically be simultaneously
pending on an operating unit is calculated from the sum of the maximum num-
bers possible on the connected CPUs.
Communication
Overload
CPU Memory
Overload
Operating Unit
Overload
Messages
www.dienhathe.vn
www.dienhathe.com
6-22
TP27, TP37 Equipment Manual
Release 01/00
Example:
A CPU 315 can process a maximum of 50 simultaneously pending messages.
Accordingly, an operating unit can handle a maximum of four CPU 315s send-
ing ALARM_S messages without overflow problems occurring.
6.5.5 Updating
Since the CPU stores the message information when a fault occurs, individual
network stations (e.g. an OP) can log on at a later date and obtain an update.
However, the CPU only stores information about pending messages. Once all
events (arrival, departure, acknowledgement) have occurred, the message is
deleted from the CPU.
When obtaining an update, therefore, the operating unit processes any missing
events automatically if a message is not known to the PLC but the arrival and
acknowledgement events are not entered on the operating unit.
The events are not entered in the message buffer in that case, however.
Events processed in this way are identified on the operating unit by displaying
the message status symbols in inverse type thus:
*1234567 A KGQ HH:MM:SS DD.MM.YYYYGRU00
Boiler 13: temperature 190 degrees
Inform shift supervisor Tel. 007
Figure 6-9 Automatically Processed Events
Messages
www.dienhathe.vn
www.dienhathe.com
6-23
TP27, TP37 Equipment Manual
Release 01/00
6.5.6 Buffer Overflow
All message events for event and alarm messages are automatically stored in a
message archive. The message archive can hold up to 512 message events.
When the remaining buffer capacity specified in ProTool (default setting 10%)
is reached, an overflow warning is automatically issued.
If the message archive has insufficient space to accept any more message
events, message events are automatically deleted until the specified remaining
buffer capacity is reached.
Deletion is carried out in the following order:
1. The oldest departed messages.
For departed event messages, the message events arrival and departure are
deleted. For departed alarm messages, the message events arrival, depar-
ture and acknowledged are deleted.
2. Pending messages.
The oldest pending messages are deleted to make space for the newly re-
ceived events.
If Buffer Overflow Message Logging has been specified and a printer is con-
nected and switched on, all deleted alarm and event messages are printed out in
the event of a buffer overflow.
Message Archive
Overflow Warning
Deleting Message
Events In the
Event of a Buffer
Overflow
Printout
Messages
www.dienhathe.vn
www.dienhathe.com
6-24
TP27, TP37 Equipment Manual
Release 01/00
6.6 Standard Screens for Messages
The two standard standard screens below are significant for messages:
S Edit Message
S Output messages
S System Settings
6.6.1 “Edit Message” Standard Screen
Functions are configured in the Edit Message standard screen which are neces-
sary to view, delete and print messages (figure 6-10).
Open the Edit Message standard screen from the main screen by pressing the
button
Help ESC
Edit Message
Figure 6-10 Standard screen Edit Message
Overview
Purpose
Structure
Messages
www.dienhathe.vn
www.dienhathe.com
6-25
TP27, TP37 Equipment Manual
Release 01/00
Open event message window
Open event message page
Open event message buffer
Delete event message buffer
Print event message buffer
Open alarm message screen
Open alarm message buffer
Delete alarm message buffer
Print alarm message buffer
Help
Call Help text on standard screen
ESC
Exit from standard screen
Meanings of
buttons
Messages
www.dienhathe.vn
www.dienhathe.com
6-26
TP27, TP37 Equipment Manual
Release 01/00
6.6.2 “Output Messages” Standard Screen
In order to select and print messages via the Touch Panel according to filter
criteria, the Output Messages standard screen must be integrated in the config-
uration.
The Output Messages standard screen enables the selection and printing of
messages according to various, user–defined filter criteria (figure 6-11).
ESC
Output Messages
Output medium:
Message event:
Priority:
Date:
Text:
Acknowledgment group:
Figure 6-11 Standard screen Output Messages
Condition
Purpose
Structure
Messages
www.dienhathe.vn
www.dienhathe.com
6-27
TP27, TP37 Equipment Manual
Release 01/00
Output medium PRINTER
The factory setting for output from units TP27
and TP37, is to a printer.
Message event ALL
All the alarm messages or event message
buffer contents are printed out. This includes
all message events which have Arrived,
Cleared or been Acknowledged.
ARRIVED ONLY
Only the Arrived message events stored in the
buffer are printed.
CLEARED ONLY
Only the Cleared message events stored in the
buffer are printed.
ACKNOWLEDGED ONLY
Only the Acknowledged message events stored
in the buffer are printed.
ARRIVED AND CLEARED
Only the Arrived and Cleared message events
stored in the buffer are printed.
ARRIVED AND ACKNOWLEDGED
Only the Arrived and Acknowledged message
events stored in the buffer are printed.
CLEARED AND ACKNOWLEDGED
Only the Cleared and Acknowledged message
events stored in the buffer are printed.
Priority 0 to 16
Only those message events are printed which
have at least the specified priority.
Date Only those message events with the specified
date are printed.
Text Only those message events are printed which
contain the specified character string. Upper/
lower case is not considered.
Acknowledgment group 0 to 16
Only those message events are printed which
belong to the specified acknowledgement
group.
Meaning of
operating elements
Messages
www.dienhathe.vn
www.dienhathe.com
Siemens catalog hmi-tp2737_e

More Related Content

What's hot

Điều khiển vị trí PLC họ FX
Điều khiển vị trí PLC họ FXĐiều khiển vị trí PLC họ FX
Điều khiển vị trí PLC họ FXquanglocbp
 
Ideapad u310 u410_ug_v1.0_english
Ideapad u310 u410_ug_v1.0_englishIdeapad u310 u410_ug_v1.0_english
Ideapad u310 u410_ug_v1.0_englishHardik Shah
 
Sequential Function Chart manual programming
Sequential Function Chart manual programmingSequential Function Chart manual programming
Sequential Function Chart manual programmingVictor Al
 
TLC_700_Controller_unit
TLC_700_Controller_unitTLC_700_Controller_unit
TLC_700_Controller_unitLindsey Sankey
 
ICT-104 bill acceptor protocol
ICT-104 bill acceptor protocolICT-104 bill acceptor protocol
ICT-104 bill acceptor protocolGergely Imreh
 
bizhub PRESS 2250P Security User's Guide
bizhub PRESS 2250P Security User's Guidebizhub PRESS 2250P Security User's Guide
bizhub PRESS 2250P Security User's GuideEyal Benedek
 
Tai lieu plc s7 1200
Tai lieu plc s7 1200Tai lieu plc s7 1200
Tai lieu plc s7 1200Bùi Thể
 
Intel Management Mode Firmware Runtime Update - OS Interface, revision 1.00
Intel Management Mode Firmware Runtime Update - OS Interface, revision 1.00Intel Management Mode Firmware Runtime Update - OS Interface, revision 1.00
Intel Management Mode Firmware Runtime Update - OS Interface, revision 1.00itsummaitsumma
 
Giao trinh-plc-s7-1200-easy book
Giao trinh-plc-s7-1200-easy bookGiao trinh-plc-s7-1200-easy book
Giao trinh-plc-s7-1200-easy bookBùi Thể
 
Operational Manual
Operational ManualOperational Manual
Operational ManualEXSign
 
10020253 turbo optic_oberflaeche_e
10020253 turbo optic_oberflaeche_e10020253 turbo optic_oberflaeche_e
10020253 turbo optic_oberflaeche_eAdrianaChirilBbu
 
Siemens s7 300-400-standard software for s7-300 and s7-400 pid control
Siemens s7 300-400-standard software for s7-300 and s7-400 pid controlSiemens s7 300-400-standard software for s7-300 and s7-400 pid control
Siemens s7 300-400-standard software for s7-300 and s7-400 pid controlDien Ha The
 

What's hot (20)

Điều khiển vị trí PLC họ FX
Điều khiển vị trí PLC họ FXĐiều khiển vị trí PLC họ FX
Điều khiển vị trí PLC họ FX
 
Readme
ReadmeReadme
Readme
 
Ideapad u310 u410_ug_v1.0_english
Ideapad u310 u410_ug_v1.0_englishIdeapad u310 u410_ug_v1.0_english
Ideapad u310 u410_ug_v1.0_english
 
Sequential Function Chart manual programming
Sequential Function Chart manual programmingSequential Function Chart manual programming
Sequential Function Chart manual programming
 
TLC_700_Controller_unit
TLC_700_Controller_unitTLC_700_Controller_unit
TLC_700_Controller_unit
 
ICT-104 bill acceptor protocol
ICT-104 bill acceptor protocolICT-104 bill acceptor protocol
ICT-104 bill acceptor protocol
 
bizhub PRESS 2250P Security User's Guide
bizhub PRESS 2250P Security User's Guidebizhub PRESS 2250P Security User's Guide
bizhub PRESS 2250P Security User's Guide
 
Tai lieu plc s7 1200
Tai lieu plc s7 1200Tai lieu plc s7 1200
Tai lieu plc s7 1200
 
Intel Management Mode Firmware Runtime Update - OS Interface, revision 1.00
Intel Management Mode Firmware Runtime Update - OS Interface, revision 1.00Intel Management Mode Firmware Runtime Update - OS Interface, revision 1.00
Intel Management Mode Firmware Runtime Update - OS Interface, revision 1.00
 
stvi070 wt 01
stvi070 wt 01stvi070 wt 01
stvi070 wt 01
 
Manuale wg yl007m2h-look_ing_2.0
Manuale wg yl007m2h-look_ing_2.0Manuale wg yl007m2h-look_ing_2.0
Manuale wg yl007m2h-look_ing_2.0
 
2009 Infiniti Navi
2009 Infiniti Navi2009 Infiniti Navi
2009 Infiniti Navi
 
Giao trinh-plc-s7-1200-easy book
Giao trinh-plc-s7-1200-easy bookGiao trinh-plc-s7-1200-easy book
Giao trinh-plc-s7-1200-easy book
 
Gsmae GSM Alarm System user's manual
Gsmae GSM Alarm System user's manualGsmae GSM Alarm System user's manual
Gsmae GSM Alarm System user's manual
 
Daugiau apie so machine programinę įrangą
Daugiau apie so machine programinę įrangąDaugiau apie so machine programinę įrangą
Daugiau apie so machine programinę įrangą
 
Operational Manual
Operational ManualOperational Manual
Operational Manual
 
10020253 turbo optic_oberflaeche_e
10020253 turbo optic_oberflaeche_e10020253 turbo optic_oberflaeche_e
10020253 turbo optic_oberflaeche_e
 
Siemens s7 300-400-standard software for s7-300 and s7-400 pid control
Siemens s7 300-400-standard software for s7-300 and s7-400 pid controlSiemens s7 300-400-standard software for s7-300 and s7-400 pid control
Siemens s7 300-400-standard software for s7-300 and s7-400 pid control
 
Dei viper 3002 install eng
Dei viper 3002 install engDei viper 3002 install eng
Dei viper 3002 install eng
 
U310 u410 ug_en
U310 u410 ug_enU310 u410 ug_en
U310 u410 ug_en
 

Similar to Siemens catalog hmi-tp2737_e

Siemens catalog hmi-tp070 touch panel
Siemens catalog hmi-tp070 touch panelSiemens catalog hmi-tp070 touch panel
Siemens catalog hmi-tp070 touch panelDien Ha The
 
Siemens catalog hmi-tp070_e
Siemens catalog hmi-tp070_eSiemens catalog hmi-tp070_e
Siemens catalog hmi-tp070_eDien Ha The
 
wincc_flexible_2008_sp4_smart_panels_enus.pdf
wincc_flexible_2008_sp4_smart_panels_enus.pdfwincc_flexible_2008_sp4_smart_panels_enus.pdf
wincc_flexible_2008_sp4_smart_panels_enus.pdfMarioHaguila
 
Triton rl1600-atm-owners-manual
Triton rl1600-atm-owners-manualTriton rl1600-atm-owners-manual
Triton rl1600-atm-owners-manualpdfshearing
 
Siemens catalog hmi-touch panel tp170 a, tp170 b operator panel op170 b
Siemens catalog hmi-touch panel tp170 a, tp170 b operator panel op170 bSiemens catalog hmi-touch panel tp170 a, tp170 b operator panel op170 b
Siemens catalog hmi-touch panel tp170 a, tp170 b operator panel op170 bDien Ha The
 
Siemens catalog hmi-tp170a_e
Siemens catalog hmi-tp170a_eSiemens catalog hmi-tp170a_e
Siemens catalog hmi-tp170a_eDien Ha The
 
Siemens s7 300-400-sm 338 ultrasonic position encoding module
Siemens s7 300-400-sm 338 ultrasonic position encoding moduleSiemens s7 300-400-sm 338 ultrasonic position encoding module
Siemens s7 300-400-sm 338 ultrasonic position encoding moduleDien Ha The
 
2711e um006 -en-p[1]
2711e um006 -en-p[1]2711e um006 -en-p[1]
2711e um006 -en-p[1]jonibonito
 
Automation tooluserguide v2_1_1_201610_en-us
Automation tooluserguide v2_1_1_201610_en-usAutomation tooluserguide v2_1_1_201610_en-us
Automation tooluserguide v2_1_1_201610_en-usYaamIIK
 
Siemens win cc manual simatic hmi options
Siemens win cc manual simatic hmi optionsSiemens win cc manual simatic hmi options
Siemens win cc manual simatic hmi optionsDien Ha The
 
Tmt88 v swum_03
Tmt88 v swum_03Tmt88 v swum_03
Tmt88 v swum_03Juan Pablo
 
Hướng dẫn sử dụng máy chấm công và kiểm soát cửa f18
Hướng dẫn sử dụng máy chấm công và kiểm soát cửa f18Hướng dẫn sử dụng máy chấm công và kiểm soát cửa f18
Hướng dẫn sử dụng máy chấm công và kiểm soát cửa f18Công Ty SHG Vietnam
 
EMERSON EDUARDO RODRIGUES Automating_with_SIMATIC_S7_400_inside_TIA_Portal.pdf
EMERSON EDUARDO RODRIGUES Automating_with_SIMATIC_S7_400_inside_TIA_Portal.pdfEMERSON EDUARDO RODRIGUES Automating_with_SIMATIC_S7_400_inside_TIA_Portal.pdf
EMERSON EDUARDO RODRIGUES Automating_with_SIMATIC_S7_400_inside_TIA_Portal.pdfEMERSON EDUARDO RODRIGUES
 
Analog module omron
Analog module omronAnalog module omron
Analog module omronAlain Hua
 

Similar to Siemens catalog hmi-tp2737_e (20)

Siemens catalog hmi-tp070 touch panel
Siemens catalog hmi-tp070 touch panelSiemens catalog hmi-tp070 touch panel
Siemens catalog hmi-tp070 touch panel
 
Siemens catalog hmi-tp070_e
Siemens catalog hmi-tp070_eSiemens catalog hmi-tp070_e
Siemens catalog hmi-tp070_e
 
wincc_flexible_2008_sp4_smart_panels_enus.pdf
wincc_flexible_2008_sp4_smart_panels_enus.pdfwincc_flexible_2008_sp4_smart_panels_enus.pdf
wincc_flexible_2008_sp4_smart_panels_enus.pdf
 
Triton rl1600-atm-owners-manual
Triton rl1600-atm-owners-manualTriton rl1600-atm-owners-manual
Triton rl1600-atm-owners-manual
 
Siemens catalog hmi-touch panel tp170 a, tp170 b operator panel op170 b
Siemens catalog hmi-touch panel tp170 a, tp170 b operator panel op170 bSiemens catalog hmi-touch panel tp170 a, tp170 b operator panel op170 b
Siemens catalog hmi-touch panel tp170 a, tp170 b operator panel op170 b
 
Siemens catalog hmi-tp170a_e
Siemens catalog hmi-tp170a_eSiemens catalog hmi-tp170a_e
Siemens catalog hmi-tp170a_e
 
Siemens s7 300-400-sm 338 ultrasonic position encoding module
Siemens s7 300-400-sm 338 ultrasonic position encoding moduleSiemens s7 300-400-sm 338 ultrasonic position encoding module
Siemens s7 300-400-sm 338 ultrasonic position encoding module
 
Beetle i8A operating manual (english)
Beetle i8A operating manual (english)Beetle i8A operating manual (english)
Beetle i8A operating manual (english)
 
Manual CLP Omron CP1H
Manual CLP Omron CP1HManual CLP Omron CP1H
Manual CLP Omron CP1H
 
172809159 sip
172809159 sip172809159 sip
172809159 sip
 
2711e um006 -en-p[1]
2711e um006 -en-p[1]2711e um006 -en-p[1]
2711e um006 -en-p[1]
 
Automation tooluserguide v2_1_1_201610_en-us
Automation tooluserguide v2_1_1_201610_en-usAutomation tooluserguide v2_1_1_201610_en-us
Automation tooluserguide v2_1_1_201610_en-us
 
Catalog 2017-eng
Catalog 2017-engCatalog 2017-eng
Catalog 2017-eng
 
Siemens win cc manual simatic hmi options
Siemens win cc manual simatic hmi optionsSiemens win cc manual simatic hmi options
Siemens win cc manual simatic hmi options
 
2746e usersguide
2746e usersguide2746e usersguide
2746e usersguide
 
Tmt88 v swum_03
Tmt88 v swum_03Tmt88 v swum_03
Tmt88 v swum_03
 
Hướng dẫn sử dụng máy chấm công và kiểm soát cửa f18
Hướng dẫn sử dụng máy chấm công và kiểm soát cửa f18Hướng dẫn sử dụng máy chấm công và kiểm soát cửa f18
Hướng dẫn sử dụng máy chấm công và kiểm soát cửa f18
 
ReadMe_STEP7_WinCC_V16_enUS.pdf
ReadMe_STEP7_WinCC_V16_enUS.pdfReadMe_STEP7_WinCC_V16_enUS.pdf
ReadMe_STEP7_WinCC_V16_enUS.pdf
 
EMERSON EDUARDO RODRIGUES Automating_with_SIMATIC_S7_400_inside_TIA_Portal.pdf
EMERSON EDUARDO RODRIGUES Automating_with_SIMATIC_S7_400_inside_TIA_Portal.pdfEMERSON EDUARDO RODRIGUES Automating_with_SIMATIC_S7_400_inside_TIA_Portal.pdf
EMERSON EDUARDO RODRIGUES Automating_with_SIMATIC_S7_400_inside_TIA_Portal.pdf
 
Analog module omron
Analog module omronAnalog module omron
Analog module omron
 

More from Dien Ha The

Vnd feb 2020 price list schneider (1)
Vnd feb 2020 price list schneider (1)Vnd feb 2020 price list schneider (1)
Vnd feb 2020 price list schneider (1)Dien Ha The
 
Resize bientanfuji-dienhathe.com
Resize bientanfuji-dienhathe.comResize bientanfuji-dienhathe.com
Resize bientanfuji-dienhathe.comDien Ha The
 
Fed e-quick-start-up-guide-bientanfuji-dienhathe.com
Fed e-quick-start-up-guide-bientanfuji-dienhathe.comFed e-quick-start-up-guide-bientanfuji-dienhathe.com
Fed e-quick-start-up-guide-bientanfuji-dienhathe.comDien Ha The
 
Fed e-quick-start-manual-bientanfuji-dienhathe.com
Fed e-quick-start-manual-bientanfuji-dienhathe.comFed e-quick-start-manual-bientanfuji-dienhathe.com
Fed e-quick-start-manual-bientanfuji-dienhathe.comDien Ha The
 
Ls bang gia ls ap dung 20 04-2019
Ls bang gia ls ap dung 20 04-2019Ls bang gia ls ap dung 20 04-2019
Ls bang gia ls ap dung 20 04-2019Dien Ha The
 
Mitsubishi graphic operation terminal got2000 series parts library book
Mitsubishi graphic operation terminal got2000 series parts library bookMitsubishi graphic operation terminal got2000 series parts library book
Mitsubishi graphic operation terminal got2000 series parts library bookDien Ha The
 
Mitsubishi inverter fr-a700-instruction-manualbasic-160425031653
Mitsubishi inverter fr-a700-instruction-manualbasic-160425031653Mitsubishi inverter fr-a700-instruction-manualbasic-160425031653
Mitsubishi inverter fr-a700-instruction-manualbasic-160425031653Dien Ha The
 
Mitsubishi graphic operation terminal got2000 series gt2103 new product release
Mitsubishi graphic operation terminal got2000 series gt2103 new product releaseMitsubishi graphic operation terminal got2000 series gt2103 new product release
Mitsubishi graphic operation terminal got2000 series gt2103 new product releaseDien Ha The
 
Mitsubishi graphic operation terminal got2000 series got mobile function quic...
Mitsubishi graphic operation terminal got2000 series got mobile function quic...Mitsubishi graphic operation terminal got2000 series got mobile function quic...
Mitsubishi graphic operation terminal got2000 series got mobile function quic...Dien Ha The
 
Mitsubishi graphic operation terminal got2000 series drive control interactiv...
Mitsubishi graphic operation terminal got2000 series drive control interactiv...Mitsubishi graphic operation terminal got2000 series drive control interactiv...
Mitsubishi graphic operation terminal got2000 series drive control interactiv...Dien Ha The
 
Mitsubishi inverter option catalog
Mitsubishi inverter option catalogMitsubishi inverter option catalog
Mitsubishi inverter option catalogDien Ha The
 
Mitsubishi low voltage ws-v series mccb and elcb
Mitsubishi low voltage ws-v series mccb and elcbMitsubishi low voltage ws-v series mccb and elcb
Mitsubishi low voltage ws-v series mccb and elcbDien Ha The
 
Mitsubishi graphic operation terminal got2000 series (concise)
Mitsubishi graphic operation terminal got2000 series (concise)Mitsubishi graphic operation terminal got2000 series (concise)
Mitsubishi graphic operation terminal got2000 series (concise)Dien Ha The
 
Mitsubishi low voltage ws-v series comparison of previous and new models
Mitsubishi low voltage ws-v series comparison of previous and new modelsMitsubishi low voltage ws-v series comparison of previous and new models
Mitsubishi low voltage ws-v series comparison of previous and new modelsDien Ha The
 
Mitsubishi inverter inverter family
Mitsubishi inverter inverter familyMitsubishi inverter inverter family
Mitsubishi inverter inverter familyDien Ha The
 
Mitsubishi low voltage miniature circuit breakers din series
Mitsubishi low voltage miniature circuit breakers din seriesMitsubishi low voltage miniature circuit breakers din series
Mitsubishi low voltage miniature circuit breakers din seriesDien Ha The
 
Mitsubishi inverter freqrol-hc2 series
Mitsubishi inverter freqrol-hc2 seriesMitsubishi inverter freqrol-hc2 series
Mitsubishi inverter freqrol-hc2 seriesDien Ha The
 
Mitsubishi low voltage mccb and elcb(ws-v series) y0720-version 1-mitsu
Mitsubishi low voltage mccb and elcb(ws-v series) y0720-version 1-mitsuMitsubishi low voltage mccb and elcb(ws-v series) y0720-version 1-mitsu
Mitsubishi low voltage mccb and elcb(ws-v series) y0720-version 1-mitsuDien Ha The
 
Mitsubishi inverter freqrol-f700 pj series
Mitsubishi inverter freqrol-f700 pj seriesMitsubishi inverter freqrol-f700 pj series
Mitsubishi inverter freqrol-f700 pj seriesDien Ha The
 
Mitsubishi inverter catalog-mitsubishi-inverter-option-160426021125
Mitsubishi inverter catalog-mitsubishi-inverter-option-160426021125Mitsubishi inverter catalog-mitsubishi-inverter-option-160426021125
Mitsubishi inverter catalog-mitsubishi-inverter-option-160426021125Dien Ha The
 

More from Dien Ha The (20)

Vnd feb 2020 price list schneider (1)
Vnd feb 2020 price list schneider (1)Vnd feb 2020 price list schneider (1)
Vnd feb 2020 price list schneider (1)
 
Resize bientanfuji-dienhathe.com
Resize bientanfuji-dienhathe.comResize bientanfuji-dienhathe.com
Resize bientanfuji-dienhathe.com
 
Fed e-quick-start-up-guide-bientanfuji-dienhathe.com
Fed e-quick-start-up-guide-bientanfuji-dienhathe.comFed e-quick-start-up-guide-bientanfuji-dienhathe.com
Fed e-quick-start-up-guide-bientanfuji-dienhathe.com
 
Fed e-quick-start-manual-bientanfuji-dienhathe.com
Fed e-quick-start-manual-bientanfuji-dienhathe.comFed e-quick-start-manual-bientanfuji-dienhathe.com
Fed e-quick-start-manual-bientanfuji-dienhathe.com
 
Ls bang gia ls ap dung 20 04-2019
Ls bang gia ls ap dung 20 04-2019Ls bang gia ls ap dung 20 04-2019
Ls bang gia ls ap dung 20 04-2019
 
Mitsubishi graphic operation terminal got2000 series parts library book
Mitsubishi graphic operation terminal got2000 series parts library bookMitsubishi graphic operation terminal got2000 series parts library book
Mitsubishi graphic operation terminal got2000 series parts library book
 
Mitsubishi inverter fr-a700-instruction-manualbasic-160425031653
Mitsubishi inverter fr-a700-instruction-manualbasic-160425031653Mitsubishi inverter fr-a700-instruction-manualbasic-160425031653
Mitsubishi inverter fr-a700-instruction-manualbasic-160425031653
 
Mitsubishi graphic operation terminal got2000 series gt2103 new product release
Mitsubishi graphic operation terminal got2000 series gt2103 new product releaseMitsubishi graphic operation terminal got2000 series gt2103 new product release
Mitsubishi graphic operation terminal got2000 series gt2103 new product release
 
Mitsubishi graphic operation terminal got2000 series got mobile function quic...
Mitsubishi graphic operation terminal got2000 series got mobile function quic...Mitsubishi graphic operation terminal got2000 series got mobile function quic...
Mitsubishi graphic operation terminal got2000 series got mobile function quic...
 
Mitsubishi graphic operation terminal got2000 series drive control interactiv...
Mitsubishi graphic operation terminal got2000 series drive control interactiv...Mitsubishi graphic operation terminal got2000 series drive control interactiv...
Mitsubishi graphic operation terminal got2000 series drive control interactiv...
 
Mitsubishi inverter option catalog
Mitsubishi inverter option catalogMitsubishi inverter option catalog
Mitsubishi inverter option catalog
 
Mitsubishi low voltage ws-v series mccb and elcb
Mitsubishi low voltage ws-v series mccb and elcbMitsubishi low voltage ws-v series mccb and elcb
Mitsubishi low voltage ws-v series mccb and elcb
 
Mitsubishi graphic operation terminal got2000 series (concise)
Mitsubishi graphic operation terminal got2000 series (concise)Mitsubishi graphic operation terminal got2000 series (concise)
Mitsubishi graphic operation terminal got2000 series (concise)
 
Mitsubishi low voltage ws-v series comparison of previous and new models
Mitsubishi low voltage ws-v series comparison of previous and new modelsMitsubishi low voltage ws-v series comparison of previous and new models
Mitsubishi low voltage ws-v series comparison of previous and new models
 
Mitsubishi inverter inverter family
Mitsubishi inverter inverter familyMitsubishi inverter inverter family
Mitsubishi inverter inverter family
 
Mitsubishi low voltage miniature circuit breakers din series
Mitsubishi low voltage miniature circuit breakers din seriesMitsubishi low voltage miniature circuit breakers din series
Mitsubishi low voltage miniature circuit breakers din series
 
Mitsubishi inverter freqrol-hc2 series
Mitsubishi inverter freqrol-hc2 seriesMitsubishi inverter freqrol-hc2 series
Mitsubishi inverter freqrol-hc2 series
 
Mitsubishi low voltage mccb and elcb(ws-v series) y0720-version 1-mitsu
Mitsubishi low voltage mccb and elcb(ws-v series) y0720-version 1-mitsuMitsubishi low voltage mccb and elcb(ws-v series) y0720-version 1-mitsu
Mitsubishi low voltage mccb and elcb(ws-v series) y0720-version 1-mitsu
 
Mitsubishi inverter freqrol-f700 pj series
Mitsubishi inverter freqrol-f700 pj seriesMitsubishi inverter freqrol-f700 pj series
Mitsubishi inverter freqrol-f700 pj series
 
Mitsubishi inverter catalog-mitsubishi-inverter-option-160426021125
Mitsubishi inverter catalog-mitsubishi-inverter-option-160426021125Mitsubishi inverter catalog-mitsubishi-inverter-option-160426021125
Mitsubishi inverter catalog-mitsubishi-inverter-option-160426021125
 

Recently uploaded

Sachpazis Costas: Geotechnical Engineering: A student's Perspective Introduction
Sachpazis Costas: Geotechnical Engineering: A student's Perspective IntroductionSachpazis Costas: Geotechnical Engineering: A student's Perspective Introduction
Sachpazis Costas: Geotechnical Engineering: A student's Perspective IntroductionDr.Costas Sachpazis
 
Introduction to Microprocesso programming and interfacing.pptx
Introduction to Microprocesso programming and interfacing.pptxIntroduction to Microprocesso programming and interfacing.pptx
Introduction to Microprocesso programming and interfacing.pptxvipinkmenon1
 
chaitra-1.pptx fake news detection using machine learning
chaitra-1.pptx  fake news detection using machine learningchaitra-1.pptx  fake news detection using machine learning
chaitra-1.pptx fake news detection using machine learningmisbanausheenparvam
 
GDSC ASEB Gen AI study jams presentation
GDSC ASEB Gen AI study jams presentationGDSC ASEB Gen AI study jams presentation
GDSC ASEB Gen AI study jams presentationGDSCAESB
 
CCS355 Neural Network & Deep Learning Unit II Notes with Question bank .pdf
CCS355 Neural Network & Deep Learning Unit II Notes with Question bank .pdfCCS355 Neural Network & Deep Learning Unit II Notes with Question bank .pdf
CCS355 Neural Network & Deep Learning Unit II Notes with Question bank .pdfAsst.prof M.Gokilavani
 
(ANVI) Koregaon Park Call Girls Just Call 7001035870 [ Cash on Delivery ] Pun...
(ANVI) Koregaon Park Call Girls Just Call 7001035870 [ Cash on Delivery ] Pun...(ANVI) Koregaon Park Call Girls Just Call 7001035870 [ Cash on Delivery ] Pun...
(ANVI) Koregaon Park Call Girls Just Call 7001035870 [ Cash on Delivery ] Pun...ranjana rawat
 
Biology for Computer Engineers Course Handout.pptx
Biology for Computer Engineers Course Handout.pptxBiology for Computer Engineers Course Handout.pptx
Biology for Computer Engineers Course Handout.pptxDeepakSakkari2
 
Sheet Pile Wall Design and Construction: A Practical Guide for Civil Engineer...
Sheet Pile Wall Design and Construction: A Practical Guide for Civil Engineer...Sheet Pile Wall Design and Construction: A Practical Guide for Civil Engineer...
Sheet Pile Wall Design and Construction: A Practical Guide for Civil Engineer...Dr.Costas Sachpazis
 
microprocessor 8085 and its interfacing
microprocessor 8085  and its interfacingmicroprocessor 8085  and its interfacing
microprocessor 8085 and its interfacingjaychoudhary37
 
Past, Present and Future of Generative AI
Past, Present and Future of Generative AIPast, Present and Future of Generative AI
Past, Present and Future of Generative AIabhishek36461
 
Call Girls Narol 7397865700 Independent Call Girls
Call Girls Narol 7397865700 Independent Call GirlsCall Girls Narol 7397865700 Independent Call Girls
Call Girls Narol 7397865700 Independent Call Girlsssuser7cb4ff
 
What are the advantages and disadvantages of membrane structures.pptx
What are the advantages and disadvantages of membrane structures.pptxWhat are the advantages and disadvantages of membrane structures.pptx
What are the advantages and disadvantages of membrane structures.pptxwendy cai
 
Call Girls Delhi {Jodhpur} 9711199012 high profile service
Call Girls Delhi {Jodhpur} 9711199012 high profile serviceCall Girls Delhi {Jodhpur} 9711199012 high profile service
Call Girls Delhi {Jodhpur} 9711199012 high profile servicerehmti665
 
VIP Call Girls Service Hitech City Hyderabad Call +91-8250192130
VIP Call Girls Service Hitech City Hyderabad Call +91-8250192130VIP Call Girls Service Hitech City Hyderabad Call +91-8250192130
VIP Call Girls Service Hitech City Hyderabad Call +91-8250192130Suhani Kapoor
 
(MEERA) Dapodi Call Girls Just Call 7001035870 [ Cash on Delivery ] Pune Escorts
(MEERA) Dapodi Call Girls Just Call 7001035870 [ Cash on Delivery ] Pune Escorts(MEERA) Dapodi Call Girls Just Call 7001035870 [ Cash on Delivery ] Pune Escorts
(MEERA) Dapodi Call Girls Just Call 7001035870 [ Cash on Delivery ] Pune Escortsranjana rawat
 
VIP Call Girls Service Kondapur Hyderabad Call +91-8250192130
VIP Call Girls Service Kondapur Hyderabad Call +91-8250192130VIP Call Girls Service Kondapur Hyderabad Call +91-8250192130
VIP Call Girls Service Kondapur Hyderabad Call +91-8250192130Suhani Kapoor
 
APPLICATIONS-AC/DC DRIVES-OPERATING CHARACTERISTICS
APPLICATIONS-AC/DC DRIVES-OPERATING CHARACTERISTICSAPPLICATIONS-AC/DC DRIVES-OPERATING CHARACTERISTICS
APPLICATIONS-AC/DC DRIVES-OPERATING CHARACTERISTICSKurinjimalarL3
 
College Call Girls Nashik Nehal 7001305949 Independent Escort Service Nashik
College Call Girls Nashik Nehal 7001305949 Independent Escort Service NashikCollege Call Girls Nashik Nehal 7001305949 Independent Escort Service Nashik
College Call Girls Nashik Nehal 7001305949 Independent Escort Service NashikCall Girls in Nagpur High Profile
 
Oxy acetylene welding presentation note.
Oxy acetylene welding presentation note.Oxy acetylene welding presentation note.
Oxy acetylene welding presentation note.eptoze12
 

Recently uploaded (20)

Sachpazis Costas: Geotechnical Engineering: A student's Perspective Introduction
Sachpazis Costas: Geotechnical Engineering: A student's Perspective IntroductionSachpazis Costas: Geotechnical Engineering: A student's Perspective Introduction
Sachpazis Costas: Geotechnical Engineering: A student's Perspective Introduction
 
Introduction to Microprocesso programming and interfacing.pptx
Introduction to Microprocesso programming and interfacing.pptxIntroduction to Microprocesso programming and interfacing.pptx
Introduction to Microprocesso programming and interfacing.pptx
 
chaitra-1.pptx fake news detection using machine learning
chaitra-1.pptx  fake news detection using machine learningchaitra-1.pptx  fake news detection using machine learning
chaitra-1.pptx fake news detection using machine learning
 
GDSC ASEB Gen AI study jams presentation
GDSC ASEB Gen AI study jams presentationGDSC ASEB Gen AI study jams presentation
GDSC ASEB Gen AI study jams presentation
 
CCS355 Neural Network & Deep Learning Unit II Notes with Question bank .pdf
CCS355 Neural Network & Deep Learning Unit II Notes with Question bank .pdfCCS355 Neural Network & Deep Learning Unit II Notes with Question bank .pdf
CCS355 Neural Network & Deep Learning Unit II Notes with Question bank .pdf
 
(ANVI) Koregaon Park Call Girls Just Call 7001035870 [ Cash on Delivery ] Pun...
(ANVI) Koregaon Park Call Girls Just Call 7001035870 [ Cash on Delivery ] Pun...(ANVI) Koregaon Park Call Girls Just Call 7001035870 [ Cash on Delivery ] Pun...
(ANVI) Koregaon Park Call Girls Just Call 7001035870 [ Cash on Delivery ] Pun...
 
Biology for Computer Engineers Course Handout.pptx
Biology for Computer Engineers Course Handout.pptxBiology for Computer Engineers Course Handout.pptx
Biology for Computer Engineers Course Handout.pptx
 
Sheet Pile Wall Design and Construction: A Practical Guide for Civil Engineer...
Sheet Pile Wall Design and Construction: A Practical Guide for Civil Engineer...Sheet Pile Wall Design and Construction: A Practical Guide for Civil Engineer...
Sheet Pile Wall Design and Construction: A Practical Guide for Civil Engineer...
 
microprocessor 8085 and its interfacing
microprocessor 8085  and its interfacingmicroprocessor 8085  and its interfacing
microprocessor 8085 and its interfacing
 
Past, Present and Future of Generative AI
Past, Present and Future of Generative AIPast, Present and Future of Generative AI
Past, Present and Future of Generative AI
 
Call Girls Narol 7397865700 Independent Call Girls
Call Girls Narol 7397865700 Independent Call GirlsCall Girls Narol 7397865700 Independent Call Girls
Call Girls Narol 7397865700 Independent Call Girls
 
What are the advantages and disadvantages of membrane structures.pptx
What are the advantages and disadvantages of membrane structures.pptxWhat are the advantages and disadvantages of membrane structures.pptx
What are the advantages and disadvantages of membrane structures.pptx
 
Call Girls Delhi {Jodhpur} 9711199012 high profile service
Call Girls Delhi {Jodhpur} 9711199012 high profile serviceCall Girls Delhi {Jodhpur} 9711199012 high profile service
Call Girls Delhi {Jodhpur} 9711199012 high profile service
 
VIP Call Girls Service Hitech City Hyderabad Call +91-8250192130
VIP Call Girls Service Hitech City Hyderabad Call +91-8250192130VIP Call Girls Service Hitech City Hyderabad Call +91-8250192130
VIP Call Girls Service Hitech City Hyderabad Call +91-8250192130
 
(MEERA) Dapodi Call Girls Just Call 7001035870 [ Cash on Delivery ] Pune Escorts
(MEERA) Dapodi Call Girls Just Call 7001035870 [ Cash on Delivery ] Pune Escorts(MEERA) Dapodi Call Girls Just Call 7001035870 [ Cash on Delivery ] Pune Escorts
(MEERA) Dapodi Call Girls Just Call 7001035870 [ Cash on Delivery ] Pune Escorts
 
VIP Call Girls Service Kondapur Hyderabad Call +91-8250192130
VIP Call Girls Service Kondapur Hyderabad Call +91-8250192130VIP Call Girls Service Kondapur Hyderabad Call +91-8250192130
VIP Call Girls Service Kondapur Hyderabad Call +91-8250192130
 
9953056974 Call Girls In South Ex, Escorts (Delhi) NCR.pdf
9953056974 Call Girls In South Ex, Escorts (Delhi) NCR.pdf9953056974 Call Girls In South Ex, Escorts (Delhi) NCR.pdf
9953056974 Call Girls In South Ex, Escorts (Delhi) NCR.pdf
 
APPLICATIONS-AC/DC DRIVES-OPERATING CHARACTERISTICS
APPLICATIONS-AC/DC DRIVES-OPERATING CHARACTERISTICSAPPLICATIONS-AC/DC DRIVES-OPERATING CHARACTERISTICS
APPLICATIONS-AC/DC DRIVES-OPERATING CHARACTERISTICS
 
College Call Girls Nashik Nehal 7001305949 Independent Escort Service Nashik
College Call Girls Nashik Nehal 7001305949 Independent Escort Service NashikCollege Call Girls Nashik Nehal 7001305949 Independent Escort Service Nashik
College Call Girls Nashik Nehal 7001305949 Independent Escort Service Nashik
 
Oxy acetylene welding presentation note.
Oxy acetylene welding presentation note.Oxy acetylene welding presentation note.
Oxy acetylene welding presentation note.
 

Siemens catalog hmi-tp2737_e

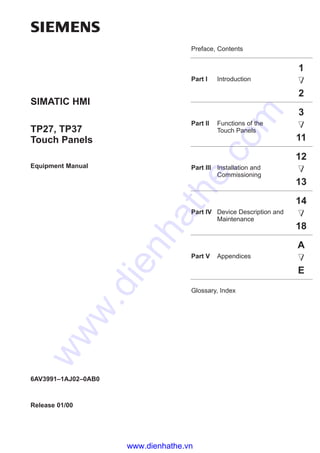
  • 1. Preface, Contents Part I Introduction 1 2 Part II Functions of the Touch Panels 3 11 Part III Installation and Commissioning 12 13 Part IV Device Description and Maintenance 14 18 Part V Appendices A E Glossary, Index Release 01/00 TP27, TP37 Touch Panels Equipment Manual SIMATIC HMI 6AV3991–1AJ02–0AB0 www.dienhathe.vn www.dienhathe.com
  • 2. This manual contains notices which you should observe to ensure your own personal safety, as well as to protect the product and connected equipment. These notices are highlighted in the manual by a warning triangle and are marked as follows according to the level of danger: ! Warning indicates that death, severe personal injury or substantial property damage can result if proper precautions are not taken. ! Caution indicates that minor personal injury or property damage can result if proper precautions are not taken. Note draws your attention to particularly important information on the product, handling the product, or to a particular part of the documentation. Equipment may be commissioned and operated only by qualified personnel. Qualified person- nel within the meaning of the safety notices in this manual are persons who are authorized to commission, ground and identify equipment, systems and circuits in accordance with safety engineering standards. Note the following: ! Warning The equipment may be used only for the applications stipulated in the catalog and in the tech- nical description and only in conjunction with other equipment and components recommended or approved by Siemens. Startup must not take place until it is established that the machine, which is to accommodate this component, is in conformity with the guideline 89/392/EEC. Faultless and safe operation of the product presupposes proper transportation, proper storage, erection and installation as well as careful operation and maintenance. The approvals that apply to the device are detailed in the Chapter Technical Data. SIMATICR, SIMATIC HMIR, SIMATIC Multi PanelR, SIMATIC Multifunctional PanelR, ProTool/LiteR, ProToolR, ProTool/ProR and MP270R are registered trademarks of Siemens AG. Some of the other designations used in these documents are also registered trademarks; the owner’s rights may be violated if they are used be third parties for their own purposes. Editor and Publisher: A&D PT1 We have checked the contents of this manual for agreement with the hardware and software described. Since deviations cannot be precluded entirely, we cannot guarantee full agreement. However, the data in this manual are reviewed regularly and any necessary corrections included in subsequent editions. Suggestions for im- provement are welcomed. Technical data subject to change. E Siemens AG 1999 Disclaimer of LiabilityCopyright E Siemens AG 1999 All rights reserved The reproduction, transmission or use of this document or its contents is not permitted without express written authority. Offenders will be liable for damages. All rights, including rights created by patent grant or registration of a utility model or design, are reserved. Siemens AG, Automation & Drives SIMATIC Human Machine Interface Postfach 4848, D-90327 Nuernberg Siemens Aktiengesellschaft Order No. 6AV3991–1AJ02–0AB0 Safety Guidelines Qualified Personnel Correct Usage Approvals Trademarks Impressum www.dienhathe.vn www.dienhathe.com
  • 3. i TP27, TP37 Equipment Manual Release01/00 Preface This equipment manual provides operation, installation, configuration and system service personnel with information concerning functionality, opera- tion and technical design of the Touch Panels TP27 and TP37. The equipment manual Touch Panel TP27, TP37 is organized into five parts: Part Chapters Contents I 1 - 2 Overview of the Touch Panel and range of functions in tabular form. II 3 - 11 Step-by-step instructions on how to operate the Touch Panel using the standard screens. III 12 - 13 – Mechanical and electrical installation, – Commissioning – Touch Panel operating modes. IV 14 - 18 Detailed information on the Touch Panel and maintenance. V Appendix – Technical data, – Interface assignments, – System messages, – SIMATIC HMI documentation, – ESD guidelines, – Glossary of technical terms. The following conventions are used throughout this manual: Motor off Text in the Touch Panel display is presented in this typewriter font. Variable Symbolic names representing variable values on the screen are presented in this italic typewriter font Screens Functions selected by the user are presented in this standard italic font. ESC The labels of buttons are presented in a different typeface. Purpose Organization of the manual Conventions www.dienhathe.vn www.dienhathe.com
  • 4. ii TP27,TP37 Equipment Manual Release01/00 The various releases of the equipment manual correspond to the following firmware and ProTool versions: Release Remarks ProTool version 04/97 First release of the TP37 equipment manual V 3.0 and later 10/97 Inclusion of TP27, inclusion of touch screen functionality V 4.0 and later V 4.0 and later 09/98 Inclusion of the TP27–10; new standard screen for printing messages V 5.0 01/99 Inclusion of standard screens for Status/Force and Clean Screen V 5.1 01/00 Inclusion of the JEIDA/PCMCIA card for the TP27–6. V 5.2 History Preface www.dienhathe.vn www.dienhathe.com
  • 5. iii TP27,TP37 Equipment Manual Release01/00 In the case of technical queries, please contact your local Siemens in the sub- sidiaries and branches responsible for your area. SIMATIC Customer Support Hotline Available worldwide, at all times: Johnson City Nuernberg Singapur Simatic Basic Hotline Nuernberg SIMATIC BASIC Hotline Johnson City SIMATIC BASIC Hotline Singapur SIMATIC BASIC Hotline Local time: Mon - Fri 8:00 to 18:00 Telephone: +49 (911)895-7000 Fax: +49 (911)895-7002 E-Mail: simatic.support@ nbgm.siemens.de Local time: Mon - Fri 8:00 to 17:00 Telephone: +1 423 461-2522 Fax: +1 423 461-2231 E-Mail: simatic.hotline@ sea.siemens.com Local time: Mon - Fri 8:00 to 17:30 Telephone: +65740-7000 Fax: +65740-7001 E-Mail: simatic@ singnet.com.sg SIMATIC Premium Hotline (charged, only with SIMATIC Card) Time: Mon - Fri 0:00 to 24:00 Telephone: +49 (911)895-7777 Fax: +49 (911)895-7001 Other support Preface www.dienhathe.vn www.dienhathe.com
  • 6. iv TP27,TP37 Equipment Manual Release01/00 SIMATIC Customer Online Services SIMATIC Customer Support offers comprehensive additional information concerning SIMATIC products through its Online services as follows: S Up–to–date general information is provided – in Internet under http://www.ad.siemens.de/simatic – via Fax-Polling under 08765-93 02 77 95 00 S Up–to–date product information and downloads for practical use can be found: – in Internet unter http://www.ad.siemens.de/support/ html–00/ – via the Bulletin Board System (BBS) in Nürnberg (SIMATIC Custo- mer Support Mailbox) under +49 (911) 895–7100 In order to contact the mailbox, please use a modem with up to 28.8 kBaud (V.34) capacity. Set the parameters as follows: 8, N, 1, ANSI, or dial for connection via ISDN (x.75, 64 kBit). The abbreviations used in this equipment manual have the following meaning: AM Alarm Message ANSI American National Standards Institute AS511 Protocol of the PU interface to SIMATIC S5 ASCII American Standard Code for Information Interchange CPI Control Panel Interface CPU Central Processing Unit DIL Dual-In-Line (package) DP Decentral Periphery DRAM Dynamic Random Access Memory DKM Direct Key Module EM Event message ESD Electrostatic Sensitive Device LCD Liquid Crystal Display LED Light–Emitting Diode MPI Multipoint Interface (SIMATIC S7) PC PLC Personal Computer Programmable Logic Controller PU Programming Unit PPI Point to Point Interface (SIMATIC S7) SRAM Static Random Access Memory STN Super Twisted Nematic TFT Thin Film Transistor TP Touch Panel TTL Transistor-Transistor Logic Abbreviations Preface www.dienhathe.vn www.dienhathe.com
  • 7. i TP27, TP37 Equipment Manual Release01/00 Contents Part I INTRODUCTION 1 Product Description 1-1. . . . . . . . . . . . . . . . . . . . . . . . . . . . . . . . . . . . . . . . . . . . . . . . . . . . 1.1 Visualizing and Controlling Processes 1-3. . . . . . . . . . . . . . . . . . . . . . . . . . . . . . 1.2 The Touch Panels at a Glance 1-5. . . . . . . . . . . . . . . . . . . . . . . . . . . . . . . . . . . . 2 Functionality 2-1. . . . . . . . . . . . . . . . . . . . . . . . . . . . . . . . . . . . . . . . . . . . . . . . . . . . . . . . . . . Part II FUNCTIONS OF THE TOUCH PANELS 3 General Operation 3-1. . . . . . . . . . . . . . . . . . . . . . . . . . . . . . . . . . . . . . . . . . . . . . . . . . . . . . 3.1 Operating Touch Elements 3-4. . . . . . . . . . . . . . . . . . . . . . . . . . . . . . . . . . . . . . . . 3.2 Entering Values 3-6. . . . . . . . . . . . . . . . . . . . . . . . . . . . . . . . . . . . . . . . . . . . . . . . . 3.2.1 Entering Numerical Values 3-6. . . . . . . . . . . . . . . . . . . . . . . . . . . . . . . . . . . . . . . . 3.2.2 Entering Alphanumeric Values 3-8. . . . . . . . . . . . . . . . . . . . . . . . . . . . . . . . . . . . 3.2.3 Entering Symbolic Values 3-10. . . . . . . . . . . . . . . . . . . . . . . . . . . . . . . . . . . . . . . . 3.3 Help Text 3-11. . . . . . . . . . . . . . . . . . . . . . . . . . . . . . . . . . . . . . . . . . . . . . . . . . . . . . . 4 Screens 4-1. . . . . . . . . . . . . . . . . . . . . . . . . . . . . . . . . . . . . . . . . . . . . . . . . . . . . . . . . . . . . . . . 4.1 Screen Elements 4-1. . . . . . . . . . . . . . . . . . . . . . . . . . . . . . . . . . . . . . . . . . . . . . . . 4.2 Standard Screens 4-3. . . . . . . . . . . . . . . . . . . . . . . . . . . . . . . . . . . . . . . . . . . . . . . 5 Password Protection 5-1. . . . . . . . . . . . . . . . . . . . . . . . . . . . . . . . . . . . . . . . . . . . . . . . . . . 5.1 Password Level and Access Permissions 5-1. . . . . . . . . . . . . . . . . . . . . . . . . . . 5.2 Login/Logout on the Touch Panel 5-3. . . . . . . . . . . . . . . . . . . . . . . . . . . . . . . . . . 5.3 Password Management 5-5. . . . . . . . . . . . . . . . . . . . . . . . . . . . . . . . . . . . . . . . . . 6 Messages 6-1. . . . . . . . . . . . . . . . . . . . . . . . . . . . . . . . . . . . . . . . . . . . . . . . . . . . . . . . . . . . . . 6.1 Types of Message 6-2. . . . . . . . . . . . . . . . . . . . . . . . . . . . . . . . . . . . . . . . . . . . . . . 6.1.1 Event Messages and Alarm Messages 6-2. . . . . . . . . . . . . . . . . . . . . . . . . . . . . 6.1.2 Alarm Messages 6-6. . . . . . . . . . . . . . . . . . . . . . . . . . . . . . . . . . . . . . . . . . . . . . . . 6.1.3 System Messages 6-8. . . . . . . . . . . . . . . . . . . . . . . . . . . . . . . . . . . . . . . . . . . . . . . 6.2 Displaying Messages 6-9. . . . . . . . . . . . . . . . . . . . . . . . . . . . . . . . . . . . . . . . . . . . 6.2.1 Opening a Message Page 6-11. . . . . . . . . . . . . . . . . . . . . . . . . . . . . . . . . . . . . . . . 6.2.2 Opening a Message Buffer 6-13. . . . . . . . . . . . . . . . . . . . . . . . . . . . . . . . . . . . . . . 6.3 Deleting Messages 6-14. . . . . . . . . . . . . . . . . . . . . . . . . . . . . . . . . . . . . . . . . . . . . . www.dienhathe.vn www.dienhathe.com
  • 8. ii TP27, TP37 Equipment Manual Release01/00 6.4 Printing Messages 6-16. . . . . . . . . . . . . . . . . . . . . . . . . . . . . . . . . . . . . . . . . . . . . . . 6.5 ALARM_S Messages 6-18. . . . . . . . . . . . . . . . . . . . . . . . . . . . . . . . . . . . . . . . . . . . 6.5.1 Communication Sequence 6-19. . . . . . . . . . . . . . . . . . . . . . . . . . . . . . . . . . . . . . . . 6.5.2 Message Acknowledgement 6-20. . . . . . . . . . . . . . . . . . . . . . . . . . . . . . . . . . . . . . 6.5.3 Printing Messages 6-20. . . . . . . . . . . . . . . . . . . . . . . . . . . . . . . . . . . . . . . . . . . . . . . 6.5.4 Message Overload 6-21. . . . . . . . . . . . . . . . . . . . . . . . . . . . . . . . . . . . . . . . . . . . . . 6.5.5 Updating 6-22. . . . . . . . . . . . . . . . . . . . . . . . . . . . . . . . . . . . . . . . . . . . . . . . . . . . . . . 6.5.6 Buffer Overflow 6-23. . . . . . . . . . . . . . . . . . . . . . . . . . . . . . . . . . . . . . . . . . . . . . . . . 6.6 Standard Screens for Messages 6-24. . . . . . . . . . . . . . . . . . . . . . . . . . . . . . . . . . . 6.6.1 “Edit Message” Standard Screen 6-24. . . . . . . . . . . . . . . . . . . . . . . . . . . . . . . . . . 6.6.2 “Output Messages” Standard Screen 6-26. . . . . . . . . . . . . . . . . . . . . . . . . . . . . . . 6.6.3 “System Settings” Standard Screen 6-28. . . . . . . . . . . . . . . . . . . . . . . . . . . . . . . . 7 Printing 7-1. . . . . . . . . . . . . . . . . . . . . . . . . . . . . . . . . . . . . . . . . . . . . . . . . . . . . . . . . . . . . . . . 8 Recipes 8-1. . . . . . . . . . . . . . . . . . . . . . . . . . . . . . . . . . . . . . . . . . . . . . . . . . . . . . . . . . . . . . . . 8.1 Standard Screens for Recipes 8-3. . . . . . . . . . . . . . . . . . . . . . . . . . . . . . . . . . . . 8.1.1 Creating, Editing and Saving Data Records 8-8. . . . . . . . . . . . . . . . . . . . . . . . . 8.1.2 Transferring Data Records 8-13. . . . . . . . . . . . . . . . . . . . . . . . . . . . . . . . . . . . . . . . 8.2 Record Sets 8-15. . . . . . . . . . . . . . . . . . . . . . . . . . . . . . . . . . . . . . . . . . . . . . . . . . . . 9 Storing and Loading Data 9-1. . . . . . . . . . . . . . . . . . . . . . . . . . . . . . . . . . . . . . . . . . . . . . . 9.1 Data Types, Data Media and Storage Principle 9-1. . . . . . . . . . . . . . . . . . . . . . 9.2 Delete Storage Medium 9-3. . . . . . . . . . . . . . . . . . . . . . . . . . . . . . . . . . . . . . . . . . 9.3 Backup/Restore 9-5. . . . . . . . . . . . . . . . . . . . . . . . . . . . . . . . . . . . . . . . . . . . . . . . . 10 Status/Force Variable Using the TP 10-1. . . . . . . . . . . . . . . . . . . . . . . . . . . . . . . . . . . . . . 10.1 Status Variable 10-2. . . . . . . . . . . . . . . . . . . . . . . . . . . . . . . . . . . . . . . . . . . . . . . . . . 10.2 Force Variable 10-5. . . . . . . . . . . . . . . . . . . . . . . . . . . . . . . . . . . . . . . . . . . . . . . . . . 11 System Settings 11-1. . . . . . . . . . . . . . . . . . . . . . . . . . . . . . . . . . . . . . . . . . . . . . . . . . . . . . . . 11.1 Setting an Operating Mode 11-4. . . . . . . . . . . . . . . . . . . . . . . . . . . . . . . . . . . . . . . 11.2 Blanking the Screen 11-5. . . . . . . . . . . . . . . . . . . . . . . . . . . . . . . . . . . . . . . . . . . . . 11.3 Deactivate Touch Screen 11-6. . . . . . . . . . . . . . . . . . . . . . . . . . . . . . . . . . . . . . . . . 11.4 Calibrating the Touch Screen (TP37 and TP27-10 only) 11-7. . . . . . . . . . . . . . . 11.5 Other Settings 11-8. . . . . . . . . . . . . . . . . . . . . . . . . . . . . . . . . . . . . . . . . . . . . . . . . . Part III INSTALLATION AND COMMISSIONING 12 Installation 12-1. . . . . . . . . . . . . . . . . . . . . . . . . . . . . . . . . . . . . . . . . . . . . . . . . . . . . . . . . . . . . 12.1 Mechanical Installation 12-2. . . . . . . . . . . . . . . . . . . . . . . . . . . . . . . . . . . . . . . . . . . 12.2 Electrical Installation 12-6. . . . . . . . . . . . . . . . . . . . . . . . . . . . . . . . . . . . . . . . . . . . . 12.2.1 Power Supply and Relay Contacts 12-7. . . . . . . . . . . . . . . . . . . . . . . . . . . . . . . . . 12.2.2 Connecting the Configuration Computer 12-8. . . . . . . . . . . . . . . . . . . . . . . . . . . . 12.2.3 Connecting the PLC 12-10. . . . . . . . . . . . . . . . . . . . . . . . . . . . . . . . . . . . . . . . . . . . . 12.2.4 Connecting a Printer 12-12. . . . . . . . . . . . . . . . . . . . . . . . . . . . . . . . . . . . . . . . . . . . . Contents www.dienhathe.vn www.dienhathe.com
  • 9. iii TP27, TP37 Equipment Manual Release01/00 13 Commissioning 13-1. . . . . . . . . . . . . . . . . . . . . . . . . . . . . . . . . . . . . . . . . . . . . . . . . . . . . . . . 13.1 Initial Startup 13-3. . . . . . . . . . . . . . . . . . . . . . . . . . . . . . . . . . . . . . . . . . . . . . . . . . . 13.2 Recommissioning 13-4. . . . . . . . . . . . . . . . . . . . . . . . . . . . . . . . . . . . . . . . . . . . . . . 13.3 Startup Behavior 13-8. . . . . . . . . . . . . . . . . . . . . . . . . . . . . . . . . . . . . . . . . . . . . . . . 13.4 Testing a Configuration in OFFLINE Mode 13-9. . . . . . . . . . . . . . . . . . . . . . . . . . 13.5 Testing the Configuration in Conjunction with the PLC 13-10. . . . . . . . . . . . . . . . Part IV DEVICE DESCRIPTION AND MAINTENANCE 14 Unit Description TP27-6 14-1. . . . . . . . . . . . . . . . . . . . . . . . . . . . . . . . . . . . . . . . . . . . . . . . . 14.1 Dimensions 14-1. . . . . . . . . . . . . . . . . . . . . . . . . . . . . . . . . . . . . . . . . . . . . . . . . . . . . 14.2 Operating elements 14-2. . . . . . . . . . . . . . . . . . . . . . . . . . . . . . . . . . . . . . . . . . . . . . 14.3 Connection elements 14-2. . . . . . . . . . . . . . . . . . . . . . . . . . . . . . . . . . . . . . . . . . . . 14.4 Communication options 14-3. . . . . . . . . . . . . . . . . . . . . . . . . . . . . . . . . . . . . . . . . . 15 Unit Description TP27-10 15-1. . . . . . . . . . . . . . . . . . . . . . . . . . . . . . . . . . . . . . . . . . . . . . . . 15.1 Dimensions 15-2. . . . . . . . . . . . . . . . . . . . . . . . . . . . . . . . . . . . . . . . . . . . . . . . . . . . . 15.2 Operating elements 15-3. . . . . . . . . . . . . . . . . . . . . . . . . . . . . . . . . . . . . . . . . . . . . . 15.3 Connection Elements 15-3. . . . . . . . . . . . . . . . . . . . . . . . . . . . . . . . . . . . . . . . . . . . 15.4 Communication options 15-4. . . . . . . . . . . . . . . . . . . . . . . . . . . . . . . . . . . . . . . . . . 16 Unit Description TP37 16-1. . . . . . . . . . . . . . . . . . . . . . . . . . . . . . . . . . . . . . . . . . . . . . . . . . . 16.1 Dimensions 16-2. . . . . . . . . . . . . . . . . . . . . . . . . . . . . . . . . . . . . . . . . . . . . . . . . . . . . 16.2 Operating and Display Elements 16-3. . . . . . . . . . . . . . . . . . . . . . . . . . . . . . . . . . 16.3 Connection Elements 16-5. . . . . . . . . . . . . . . . . . . . . . . . . . . . . . . . . . . . . . . . . . . . 16.4 Communication options 16-6. . . . . . . . . . . . . . . . . . . . . . . . . . . . . . . . . . . . . . . . . . 17 Options 17-1. . . . . . . . . . . . . . . . . . . . . . . . . . . . . . . . . . . . . . . . . . . . . . . . . . . . . . . . . . . . . . . . 17.1 Direct Key Module 17-1. . . . . . . . . . . . . . . . . . . . . . . . . . . . . . . . . . . . . . . . . . . . . . . 17.1.1 Installing the Direct Key Module 17-2. . . . . . . . . . . . . . . . . . . . . . . . . . . . . . . . . . . 17.1.2 Connectors and Adjusters 17-4. . . . . . . . . . . . . . . . . . . . . . . . . . . . . . . . . . . . . . . . 17.2 Control Panel Interface 17-6. . . . . . . . . . . . . . . . . . . . . . . . . . . . . . . . . . . . . . . . . . . 17.2.1 Installing the Control Panel Interface 17-7. . . . . . . . . . . . . . . . . . . . . . . . . . . . . . . 17.2.2 Connectors 17-9. . . . . . . . . . . . . . . . . . . . . . . . . . . . . . . . . . . . . . . . . . . . . . . . . . . . . 18 Maintenance/Upkeep 18-1. . . . . . . . . . . . . . . . . . . . . . . . . . . . . . . . . . . . . . . . . . . . . . . . . . . . 18.1 Cleaning the Screen 18-1. . . . . . . . . . . . . . . . . . . . . . . . . . . . . . . . . . . . . . . . . . . . . 18.2 Replacing the Backup Battery 18-2. . . . . . . . . . . . . . . . . . . . . . . . . . . . . . . . . . . . . 18.3 Replacing the Back–Lighting (TP37 only) 18-4. . . . . . . . . . . . . . . . . . . . . . . . . . . Contents www.dienhathe.vn www.dienhathe.com
  • 10. iv TP27, TP37 Equipment Manual Release01/00 Part V APPENDICES A Technical Data A-1. . . . . . . . . . . . . . . . . . . . . . . . . . . . . . . . . . . . . . . . . . . . . . . . . . . . . . . . . A.1 Direct Key Module and Control Panel Interface A-5. . . . . . . . . . . . . . . . . . . . . . A.2 Chemical Resistance of the Touch Panel A-8. . . . . . . . . . . . . . . . . . . . . . . . . . . B Interface Assignments B-1. . . . . . . . . . . . . . . . . . . . . . . . . . . . . . . . . . . . . . . . . . . . . . . . . . C System Messages C-1. . . . . . . . . . . . . . . . . . . . . . . . . . . . . . . . . . . . . . . . . . . . . . . . . . . . . . D SIMATIC HMI Documentation D-1. . . . . . . . . . . . . . . . . . . . . . . . . . . . . . . . . . . . . . . . . . . . E ESD Guidelines E-1. . . . . . . . . . . . . . . . . . . . . . . . . . . . . . . . . . . . . . . . . . . . . . . . . . . . . . . . Glossary Glossary-1. . . . . . . . . . . . . . . . . . . . . . . . . . . . . . . . . . . . . . . . . . . . . . . . . . . . . . . . . . . Index Index-1. . . . . . . . . . . . . . . . . . . . . . . . . . . . . . . . . . . . . . . . . . . . . . . . . . . . . . . . . . . . . . . . . Contents www.dienhathe.vn www.dienhathe.com
  • 11. INTRODUCTION 1 Product Description 2 Functionality Part I www.dienhathe.vn www.dienhathe.com
  • 13. 1-1 TP27, TP37 Equipment Manual Release 01/00 Product Description By implementing the Touch Panels TP27 and TP37 operating statuses, current process values and faults in respect of a connected PLC can be graphically represented and the monitoring machine or system easily operated. This is made possible by using the Touch Panels which have of a number of standard functions for this purpose. The method of display and operation of the Touch Panel can be customized using the ProTool configuration software to achieve optimum results in respect of process requirements. The Touch Panel can be used to S control and monitor the process by means of the menu system. In this way, setpoints can be entered in the form of values or by touching configured buttons, for example, or control positioning elements; S display processes, machines and systems on full–graphic and semi–graphic screens; S visualize event messages and alarm messages, in addition to process variables such as an output field, bar graph, trends or status display; S intervene directly in the operation by means of the touch–sensitive screen. The Touch Panels TP27 and TP37 have standard keyboards. The device is operated intuitively by touching configured buttons and input fields on the touch–sensitive screen, referred to in this manual as the “touch screen”. The TP27 can be supplied in a range of variations. One variant is equipped with a 6 inch display, available as monochrome and color versions. This variant is subsequently referred to as TP27-6. The second variant is the TP27, equipped with a 10 inch, color display. This variant is subsequently referred to as TP27-10. The TP37 is equipped with a 10 inch, color display. The Touch Panels TP27 and TP37 are installation units for use directly at the machine location. The degree of protection is high (front panel IP65), so the devices are suitable for use in hostile industrial environments. Use of TP27 and TP37 Touch screen Device variants Installation possibilities 1 www.dienhathe.vn www.dienhathe.com
  • 14. 1-2 TP27, TP37 Equipment Manual Release 01/00 Before commissioning, the Touch Panel must be prepared for the task of visualizing data from the PLC. This means that data areas must be created in the PLC memory in your configuration which are then used by the Touch Panel to communicate with the PLC. Graphics and texts to be displayed on the Touch Panel, together with the properties and functionalities of the touch–sensitive operating elements, must be created beforehand by means of a configuration computer (PC or PG) using the configuration software ProTool. Before downloading the configuration data to the Touch Panel, connect the configuration computer to the Touch Panel. Once the configuration has been successfully downloaded, connect the Touch Panel to the PLC. The Touch Panel now communicates with the PLC and reacts to program execution on the PLC in accordance with the configured de- fault values. Figure 1-1 outlines the configuration and process control phase. Touch Panel Create configuration data Save configuration data Download configuration data Connected to PLC Configuration phase Process control phase PC or PU PLC Figure 1-1 Configuration and process control phase Information regarding configuration of the Touch Panel is provided in the User’s Guide ProTool – Configuring Graphics Displays. The Communication User’s Guide provides information on connecting the Touch Panel to the PLC. Set up data areas Configuration using ProTool Further information Product Description www.dienhathe.vn www.dienhathe.com
  • 15. 1-3 TP27, TP37 Equipment Manual Release 01/00 1.1 Visualizing and Controlling Processes The basic function of the Touch Panels TP27 and TP37 is the visualization of process statuses and the operation of processes. The following display and operating functions can be configured: S screens S input/output of process values S bar graphs and trends S text or graphic lists S messages S printout S text S help text S recipes S multiple languages S password protection S touch–sensitive operating elements. Logically related process data from the PLC can be compiled, displayed on a screen and individual parts of it modified. Screens may contain buttons, graphics, text and values. The Touch Panels can display machines and systems as full–graphics screens. This makes it easier for the operator to find his way around. Numeric, alphanumeric and symbolic values can be entered via touch–sensitive input fields on the Touch Panel which are then transferred to the PLC. Current values of the PLC are displayed in output fields. Current process values can be output as numeric values, symbolic text, symbolic graphs or in the form of bar graphs and trend curves. S Bar graphs represent a value as a rectangular area. Bar graphs can be used to display fill levels or quantities, for example. S Trends display a value continuously. This display mode is useful when displaying values that vary with time, variations in temperature or pressure, for example. Various graphic elements (bitmaps) or texts can be called into the display depending on the process status. In this way, for example, the current setting of a valve can be visualized on the Touch Panel by means of symbolic graphics or text can be modified according to the situation. Display and operating functions Screens Input/Output Bar graphs and trend curves Symbol lists Product Description www.dienhathe.vn www.dienhathe.com
  • 16. 1-4 TP27, TP37 Equipment Manual Release 01/00 Messages appear on the Touch Panel in plain text. The message text may also contain current process values. Incoming messages are stored in a message buffer together with their date and time. S Event messages provide information and operating notes on current processes or machine states, for example Motor running at 3000 revs. S Alarm messages provide information on critical machine states, for example Motor speed too high. Alarm messages must be acknowledged on account of their urgency. Messages are classified as event messages or alarm messages during configura- tion. All message events can be additionally recorded by being printed out in online mode on a connected printer. Messages which have accumulated in the event and alarm buffers can also be printed out. Texts identify individual parts of the screen in order to be able to assign the fields displayed to the process. Help texts represent additional information and notes for the operator, which can be configured, in respect of the screens, input fields and messages. The help text relating to an alarm message, for example, may display information on the cause of a malfunction and how to clear it. Complete machine data records can be stored as recipes in a Touch Panel. A recipe defines the data structure in a configuration. Data is assigned to the configured structure on the Touch Panel. The purpose of recipes is to transfer several items of data collectively to the PLC. In this respect, it is immaterial whether actual recipes, specifications of quantities, distances to be traversed or temperature variations are involved. Message texts, texts in screens, help texts, system messages and button labels may be stored in three languages simultaneously in the Touch Panel and selected online. The password protection feature prevents unauthorized operations of the Touch Panel. Different passwords can be assigned to different users or user groups, thus authorizing or prohibiting access to specific control functions by assigning different password levels. Direct intervention in the process operation is possible by using the touch–sensitive buttons and input fields on the Touch Panel screen. The structure of the Touch Panel user interface can be configured to suit indi- vidual needs. Simply adjust the number, characteristics, positions and function- ality of the operating elements for the specific application. Messages Recording Texts Help texts Recipe Multiple languages Password protection Operating elements Product Description www.dienhathe.vn www.dienhathe.com
  • 17. 1-5 TP27, TP37 Equipment Manual Release 01/00 1.2 The Touch Panels at a Glance SIMATIC TP37 SIMATIC TP27 Hardware TP27-6 Monochrome TP27-6 Color TP27-10 Color TP37 Color Models Monochrome display Color display 4 – – 4 Display Type STN1)-LCD TFT2)-LCD Size 5.7” 10.3” Touch screen Matrix 20 x 15 Analog, resistive Resolution (pixels) 320 x 240 640 x 480 Colors 8 Grey shades 8 Back–lighting 4 Indicators LEDs for – TP on Temperature limit value reached Write/read access to memory card Interfaces Serial interface to connection From PLC, PC/PU, printer 2 x RS232/TTY (active/passive) 1 x RS422/RS485 2 x RS232/TTY (active/passive) 1 x RS422/RS485 1 x TTY (passive) / RS422/RS485 Parallel interface for connecting a printer – 1 x TTL (Centronics) 1) passive drive 2) active drive Product Description www.dienhathe.vn www.dienhathe.com
  • 18. 1-6 TP27, TP37 Equipment Manual Release 01/00 TP37 Color TP27-10 Color TP27-6 Color TP27-6 Monochrome Hardware Processor Type 80486 Pentium Clock 33 MHz 100 MHz Memory Flash EPROM for firmware and user data 1 MB 2 MB Main memory (DRAM) 2 MB 4 MB 8 MB Special features Hardware clock (battery–backed) 4 Relay output for temperature monito- ring – 4 Module slot for PCMCIA/Jeida cards 4 Slot B (Slot A not used) Hardware TP27M-6 TP27C-6 TP27-10 TP37 direct key mo- dule Digital outputs, drive via configurable ports 8 16 Control Panel Interface1) Digital inputs/out- puts 16 16/32 1) usable only in conjunction with SIMATIC S7 and Profibus-DP Detailed information regarding the technical data of the Touch Panels TP27 and TP37 is provided in the Appendix A of this manual. Further information Product Description www.dienhathe.vn www.dienhathe.com
  • 19. 2-1 TP27, TP37 Equipment Manual Release 01/00 Functionality The table below summarizes the functions of the Touch Panels TP27 and TP37. The values quoted are the maximum values which can be managed by the Touch Panels. The values are limited by the size of the user memory. Functions TP27-6 TP27-10 TP37 Event messages Number 2000 Display On message line/message window View all waiting messages on message page Length message text per line 35 characters 70 characters Lines per message 2 1 Process values in message text 8 Alarm messages Number 2000 Display In message window Display type First value/last value, selectable View all waiting messages On message page Length message text per line 35 characters 70 characters Lines per message 2 1 Process values in message text 8 Acknowledge individual alarm messages 4 Acknowledge several alarm messages simultaneously 16 acknowledgment groups Message logging Output to printer 4 Message buffer Capacity 512 message events View buffered event/alarm messages 4 Delete 4 Buffer overflow warning 4 Automatic printout on buffer overflow 4 Message events queued simultaneously (max.) S Event messages S Alarm messages 500 250 2 www.dienhathe.vn www.dienhathe.com
  • 20. 2-2 TP27, TP37 Equipment Manual Release 01/00 TP37TP27-10TP27-6Functions Message acquisition Time of occurrence Date and time Message events Arrive, depart, acknowledge Screens View 4 Printout 4 Static screen elements Pixel graphics Text Character graphics Input/Output elements Input fields Output fields Combined input/output fields Symbolic input fields Symbolic output fields Bar graphs Trends Buttons light indicators Operator prompting Buttons (dynamically modifiable) light indicators Symbolic input Symbolic output Fixed window 4 Limit value monitoring Inputs/outputs 4 Bar graphs and trends 4 Text attributes Display Flashing, inverse, underscore Printer (messages) Bold, underscore Help text Lines/characters 7/35 For messages 4 For input fields 4 For screens 4 Print functions Hardcopy of display contents (screen dump) 4S character mode (ASCII) S graphics mode 4 4 Direct message logging 4 Screen printout in character mode (ASCII) 4 Graphics printout in graphics mode 4 Password protection Number of passwords Password levels 50 10 (0...9) Functionality www.dienhathe.vn www.dienhathe.com
  • 21. 2-3 TP27, TP37 Equipment Manual Release 01/00 TP37TP27-10TP27-6Functions Recipes Number 255 Data records per recipe 500 Entries per data record 500 3000 (SIMATIC S7) Save (create) data records PLCTP ! Data medium Load data records Data medium ! TP/PLC Delete data records On data medium Modify (edit) data records On data medium Transfer current values PLC ! TP TP ! PLC Transfer data records Data Medium ! TP TP ! Data Medium Record sets 4 Backup Backup/restore for memory card – 4 Online language change Number of languages 3 Loadable character sets per language 3 Language–independent charac- ter set (incl. character–graphic characters) 1 Character size in pixels 8 x 8 to 64 x 64 Display Blank screen 4 Contrast 4 – Audio volume adjustable 4 4 1) Calibration not necessary 4 1) Can only be switched on/off Functionality www.dienhathe.vn www.dienhathe.com
  • 22. 2-4 TP27, TP37 Equipment Manual Release 01/00 TP37TP27-10TP27-6Functions Communication SIMATIC S5 – AS511 4 – FAP 4 – PROFIBUS-DP 4 SIMATIC S7/M7 – PPI 4 – MPI 4 – PROFIBUS-DP 4 SIMATIC 500/505 – NITP 4 NATIVE driver – AEG/Modicon (Modbus) – Allen Bradley (DF1)O – Mitsubishi (FX) – Omron – Telemecanique (Adjust, Uni-Telway) 4 4 4 4 4 Functionality www.dienhathe.vn www.dienhathe.com
  • 23. FUNCTIONS OF THE TOUCH PANELS 3 General Operation 4 Screens 5 Password Protection 6 Messages 7 Printing 8 Recipes 9 Storing and Loading Data 10 Status/Force Tag Using the TP 11 System Settings Part II www.dienhathe.vn www.dienhathe.com
  • 25. 3-1 TP27, TP37 Equipment Manual Release 01/00 General Operation Using the Touch Panel screen, it is possible to observe the operating status of the machine or system being monitored and, at the same time, to intervene di- rectly in the process running simply by touching the buttons and input fields displayed. Operation of the Touch Panels TP27 and TP37 is intuitive to a large extent, because S operating elements can be positioned where they belong, from a functional point of view, S labeling of visible buttons is dynamic; in other words, labeling can be changed online, according to the language required, or language–independent bitmaps can be assigned to the buttons, for example, S any sections of the system or process screen are rendered operable by su- perimposing invisible buttons S virtual keys for cursor functions and value input only appear when they can actually be used: In input windows. A screen occupies the entire display. An example of screen partitioning on the TP37 display containing several open windows is illustrated in figure 3-1. The TP27-6 has a smaller display, so that the operating elements are cascaded (overlap). Main area Fixed window Local button System messages Event and alarm messages Global button Numeric input window Help window Light indica- tors Message indicators Figure 3-1 Screen partitioning on the TP37 (example) Operating concept Screen partitioning 3 www.dienhathe.vn www.dienhathe.com
  • 26. 3-2 TP27, TP37 Equipment Manual Release 01/00 The fixed window can be used to display important process magnitudes or date and time, since the contents are not affected by the screen currently open. The main area comprises the entire display. It is superimposed by all other areas (fixed window, message window etc.). The main area contains the current contents of the screen that is currently open. The functions configured for the buttons have a local significance in the main area. Buttons of local significance initiate different actions from screen to screen on the Touch Panel or on the PLC, such as enabling and disabling Select Screen, Language Switch or message logging. If buttons are positioned in the fixed window, their functions are available globally. This means, for example, that the current screen can be printed (Print Screen) or the system returned to the main screen from any operating situation. Buttons may have text or graphic labels. Examples: Help Light indicators are configurable, non–operable display elements. A light indi- cator signals the status of a defined bit by assigning dynamic attributes, for example a change of color or flashing text. No function is assigned to a light indicator. Light indicators have thin borders to distinguish them from user–operable buttons. Temperature Light indicators can be positioned locally in the main area or globally in the fixed window. Fixed window Main area Buttons Light indicators General Operation www.dienhathe.vn www.dienhathe.com
  • 27. 3-3 TP27, TP37 Equipment Manual Release 01/00 Input window: Regardless of the absolute position of the selected field, the input window al- ways appears at the bottom right of the screen. After clicking on the top edge of the window, it skips to the opposite edge of the screen (only with TP37 and TP27-10) Message window: The system message window appears in the upper part of the screen. The posi- tion of the event message window can be configured. Help window: The window for displaying configured Help texts is appears at the bottom left. Several windows can be opened simultaneously on the Touch Panel, e.g. an input window in the main area, an event message window, an alarm window and a help window (figure 3-1). As soon as one of these windows is opened, the input elements in the main area and fixed window can no longer be accessed. All visible elements in the input and message windows remain accessible. The message indicator indicates that alarm messages have been received. Not flashing: Alarm messages have been received which have been acknowledged. Flashing: Alarm messages have been received which have not been acknowledged. Window positions Open windows Message indicator General Operation www.dienhathe.vn www.dienhathe.com
  • 28. 3-4 TP27, TP37 Equipment Manual Release 01/00 3.1 Operating Touch Elements Touch elements are contact–sensitive operating elements on the screen of the Touch Panel, such as buttons, input fields, message windows and help win- dows. Their operation is basically no different from pressing conventional keys. Touch elements are operated by lightly touching them with your finger or a pointer. Note S Never use pointed or sharp instruments to operate the Touch Panel to pre- vent damage to the plastic surface of the touch screen. S Touch only one point of the Touch Panel screen at a time. Do not touch several touch elements simultaneously. If you do, an unintended action may be initiated. A function assigned to a button is normally triggered when the button is touched. With some functions, it is possible to define the configuration so that the function is not triggered until the button is released or its outlines remain while being touched, e.g. the “Set Bit” function or the keypad in the input window for numerical values. If the button has a repeater, keep touching the button as long as the function in question is to be to repeated. Not more than one touch element is activated per touch. Where an operating function has still not been completed, e.g. entering a value, any successive at- tempt to trigger a similar function is refused and a system message to this ef- fect issued. Similar functions in this respect are Enter Setpoint and Edit Data Record, for example. When the Touch Panel detects contact on a valid touch element, it responds with a visual or acoustic acknowledgement. An acknowledgment is indepen- dent of communication with the PLC. It is not an indication of the required action actually having been executed. An acoustic signal is issued as long as the touch element is touched. The signal tone can be enabled and disabled by means of the System Settings standard screen (TP37) and the volume adjusted (TP27), see chapter 11. Definition Triggering functions Operation acknowledgement Acoustic acknowledgment General Operation www.dienhathe.vn www.dienhathe.com
  • 29. 3-5 TP27, TP37 Equipment Manual Release 01/00 The type of visual operation acknowledgement is dependent on the operating element touched. S Visible buttons The border color of the button touched changes: Start Start Untouched Touched S Input fields The foreground and background colors of a touched input field are inter- changed. The change of color remains in effect until input is terminated or canceled. Untouched2500 2500 Touched S Message windows and invisible buttons A pointing hand, similar to that illustrated here, appears to the top left of the operating element touched: If the element touched is at the top border of the screen, the pointing hand appears to the right and beneath the element in question. Visual acknowledgement General Operation www.dienhathe.vn www.dienhathe.com
  • 30. 3-6 TP27, TP37 Equipment Manual Release 01/00 3.2 Entering Values Values can be entered in the input fields and combined input/output fields which are then transferred to the PLC. To do so, touch the corresponding field. The foreground and background colors of a selected input field are inter- changed. Depending on the display type configured, the system opens one of the input windows for S numeric inputs, S alphanumeric inputs, S symbolic inputs. The input window is closed following a valid input. The foreground and back- ground colors of the field being edited are reset and the new value is applied to the input field. 3.2.1 Entering Numerical Values Enter numbers in the fields configured for pure numeric input, digit for digit, using the numeric keypad of the input window illustrated in figure 3-2. 8 97 6 F +/–. CLR BS ESC 4 D 1 A 5 E 2 B 0 3 C 2500 HELP HEX MIN: MAX:0 999999 Figure 3-2 Window for entering numeric values Principle Input window General Operation www.dienhathe.vn www.dienhathe.com
  • 31. 3-7 TP27, TP37 Equipment Manual Release 01/00 Button Function Purpose ...0 9 Enter digits Enter digits 0 to 9. ...1 6 A F Enter hexadecimal numbers Enter the hexadecimal numbers A to F (after pressing HEX). +/– Change sign Change sign from + to – and back. . Enter decimal point Enter decimal point or comma. HEX Hexadecimal mode Change numbers 1 to 6 to characters A to F. HELP Display help text (Help) Call Help text for the current input field. The button is not displayed unless the corresponding Help text is configured. BS Delete character (Backspace) Delete character shown in reverse video in the input line. CLR Delete input line (Clear) Delete all characters in the line, i.e. clear the input line. ESC Cancel (Escape) Discard input and close window. Enter Confirm input and close window. Entries in numeric input fields begin aligned to the right. Entered digits are moved to the left (pocket calculator format). The current input position is displayed in reversed background/foreground col- ors. Invalid characters, e.g. numbers greater than 1 in binary format, are re- jected with an error message. If the entry is too long, the last character entered is overwritten. If limit valuers have been configured for the specifications to be entered, they appear at the top edge of the input window. MIN indicates the lower limit value and MAX the upper. In order to enter the hexadecimal digits A to F, press the button HEX. An “h” appears at the current input position. Press one of the buttons 1 to 6. The Touch Panel reverts to decimal mode after each character. Meanings of buttons Entering a value Hexadecimal mode General Operation www.dienhathe.vn www.dienhathe.com
  • 32. 3-8 TP27, TP37 Equipment Manual Release 01/00 After pressing the HELP button, the help text configured for the relevant input field appears. See figure 3-5 on page 3-11 for an example. Confirm the value entered by pressing the ENTER button, press ESC to cancel the input process. The window is closed in both cases. 3.2.2 Entering Alphanumeric Values Enter numbers in the fields configured for alphanumeric input, character for character, using the alphanumeric keypad. Figure 3-3 illustrates the language– independent keyboard template for the normal level. The keyboard template for the Shift level of the alphanumeric keyboard varies according to the lan- guage. B CA M : N D X K U L V / W O E Y G HF R %+ S I ’ P Z Q ( . ) T J = 20 1 75 6 * – & 3 4 8 9 ESCShiftHelp 15.34.19 Figure 3-3 Entering alphanumeric values at the language–independent normal level Button Function Purpose ...A 9 Enter characters Enter the characters using either the normal or Shift level of the key- board. HELP Display help text Call help text for the current input field. The button is not displayed unless the corresponding help text is configured. Help text Terminate input Input window Meanings of buttons General Operation www.dienhathe.vn www.dienhathe.com
  • 33. 3-9 TP27, TP37 Equipment Manual Release 01/00 PurposeFunctionButton Shift Keyboard levels Activate/Deactivate the keyboard Shift level from normal level. Cursor left Cursor moves one character to the left. Cursor right Cursor moves one character to the right. ESC Cancel (Es- cape) Discard input and close window. Enter Confirm input and close window. Entries in alphanumeric input fields begin aligned to the left. Every time a character is entered, the cursor moves to the right to the next input position. Characters at the input position are overwritten. The current input position is displayed in reversed background/foreground col- ors. Invalid characters (e.g. values greater than 23 for the hour value in time) are rejected and an error message issued. If the entry is too long, the last char- acter entered is overwritten. If a value already exists in the alphanumeric input field, this appears in inverse colors when the field is activated and deleted on beginning a new entry. In or- der to edit the old value, one of the cursor keys must be pressed as the first entry. On pressing CURSOR LEFT, the cursor remains on the first character, and on pressing CURSOR RIGHT it skips to the second character. In this case, the value is no longer displayed in inverse colors and can be edited. After pressing the HELP button the help text configured for the relevant input field appears. See figure 3-5 on page 3-11 for an example. The alphanumeric keyboard has two levels: S Normal level: (see figure 3-3) is the same in all languages. S Shift level: the keyboard template varies from language to language. Use SHIFT to toggle between the two levels. Confirm the value entered by pressing the ENTER button, press ESC to cancel the input process. The window is closed in both cases. Entering a value Help text Keyboard levels Terminate input General Operation www.dienhathe.vn www.dienhathe.com
  • 34. 3-10 TP27, TP37 Equipment Manual Release 01/00 3.2.3 Entering Symbolic Values Text is entered and displayed in symbolic input fields instead of a value. Select the text from the configured text list. Figure 3-4 depicts the input window. HELP ESC Selection 1 Selection 2 Selection 3 Selection 4 Selection 5 Selection 6 Selection 7 Selection 8 Selection 9 Figure 3-4 Window for entering symbolic values Button Function Purpose Scroll (Cursor) Scroll up and down one line at a time through the text list. HELP Display Help text Call Help text for the current input field. The button is not displayed unless the corresponding Help text is configured. ESC Cancel (Escape) Discard selection and close window. Enter Confirm selection and close win- dow. Scroll through the text list using the cursor buttons or point directly to the entry required. The current selection is displayed in reversed screen colors. The cursor buttons have a repeat function. When pressed, their scroll function is repeated after a short delay and continues until the button is released. After pressing the HELP button the help text configured for the relevant input field appears. See figure 3-5 on page 3-11 for an example. Confirm the selection by pressing the ENTER button, press ESC to cancel the input process. The window is closed in either case. Input window Meanings of buttons Select value Help text Terminate input General Operation www.dienhathe.vn www.dienhathe.com
  • 35. 3-11 TP27, TP37 Equipment Manual Release 01/00 3.3 Help Text Help texts are created during configuration using ProTool and provide addi- tional information on the respective subject in the language selected on the Touch Panel. Help texts can be configured for S event and alarm messages S screens S input and combined input/output fields. Help texts can provide information to the user on the permissible range of val- ues for the input field selected, for instance. Help texts referring to an alarm message may, for example, contain supplementary details on possible causes and on rectifying the problem. The configured help text can be called to the screen by accessing the relevant input field and pressing the HELP button. Figure 3-5 depicts an example of the output window. Enter temperature setpoint for Tank_1 (Range 40...80 _C) Figure 3-5 Window with help text (example) Touch the window to close it. Purpose Calling help texts General Operation www.dienhathe.vn www.dienhathe.com
  • 36. 3-12 TP27, TP37 Equipment Manual Release 01/00 General Operation www.dienhathe.vn www.dienhathe.com
  • 37. 4-1 TP27, TP37 Equipment Manual Release 01/00 Screens Processes (e.g. a processing machine or mixing station) are displayed on and can be influenced by screens which appear on the Touch Panel. These screens are created during configuration with ProTool for specific applications. Logically related process values are acquired on screens and thus provide an overview of a process or a system. Apart from this graphic mapping of pro- cesses, screens provide an opportunity of entering new process values and thus of controlling the process. 4.1 Screen Elements Various screen elements are used to display and control screens: S text S graphics S character graphics S input fields for process values S output fields for process values S combined input/output fields S bar graphs S trends S text or graphic lists S buttons, S light indicators. The different screen elements are presented on the basis of the following exam- ples. Part of the contents of various tanks are filled and mixed in a mixing unit of a fruit juice mixing system. The liquid levels in the tanks and in the mixer are displayed. The intake valves can be opened and closed by means of operator input on the Touch Panel. The motor for the mixer can be turned on and off in a similar manner. Process control and monitoring Screen sections Example 4 www.dienhathe.vn www.dienhathe.com
  • 38. 4-2 TP27, TP37 Equipment Manual Release 01/00 Figure 4-1 illustrates how the configured screen may appear on the Touch Panel. ¬ Text ­ Character graphic ® Numeric output field ¯ Bar graph (tank filling) ° Symbolic input field for opening and closing the valve ± Symbolic graphic indicates the valve status graphically (open/closed) ² Graphic ³ Button Mixing Unit Tank 1 Tank 2 Tank 3 Valve 4 Amount in the mixer (l) Valve CLOSED Valve OPEN Motor OFF Fill tank Selection Main Screen Motor ON 44 Help OPEN CLOSED 5300 ¬ ­ ® ¯ ° ± ² ³HELP OPEN Figure 4-1 Configured screen for a mixing unit (example) Screens can be viewed, processed and printed via the Touch Panel. Before these actions can be performed, however, the screen has to be selected. Select a screen by means of a S Button The screen set in the configuration is opened by touching a button. S Input field Enter the number of the screen to be opened or select the name of the screen from the pick list, if applicable. S PLC job The PLC calls a screen on the Touch Panel, depending on the status of the process or the system. Selecting a screen Screens www.dienhathe.vn www.dienhathe.com
  • 39. 4-3 TP27, TP37 Equipment Manual Release 01/00 4.2 Standard Screens A standard configuration containing standard screens is supplied with the con- figuration software ProTool for the respective Touch Panel. The functions needed for basic operation of the Touch Panel have been implemented in the standard screens. They include, for example, Call Message Buffer, Edit Pass- words and Change Parameters Online. The individual functions are described in this manual on the basis of the standard screens. Process–specific implementation, such as event messages or screens for the process, are not included in the standard screens. The standard screens are called in via buttons on the main screen. The follow- ing screen provides an example of the main screen of theTP37. The main screen of the TP27 contains the same buttons. 1 2 6 Main Screen TP37 HELP 4 53 1 Edit Password (chapter 5) 2 Printer Settings (chapter 7) 3 System Settings (chapter 11) 4 Status/Control Tag (chapter 10) 5 Messages (chapter 6) 6 Help Text (section 3.3) Figure 4-2 illustrates the standard screen hierarchy. Detailed information on the functions and operation of standard screens is provided in the corresponding sections of this manual. Purpose Main screen Screens www.dienhathe.vn www.dienhathe.com
  • 40. 4-4 TP27, TP37 Equipment Manual Release 01/00 Edit Password Printer Settings System Settings Edit Message Data Record Processing and Transmission Selective Data Record Transmission Main Screen S Login/Logout S View S Edit S General S Hardcopy S Assign Color S Operating Mode S Display Message S Message Logging S Buffer Overflow Warning S Date and Time S Language S Backup/Restore S Blank S Audio Signal S Contrast S Calibrate Screen S Clean Screen S EM Window ON/OFF S View Messages S Print Messages S Delete Buffer S Save S Load S Delete S Edit S Select S Sort S PLC ³ TP S TP ³ PLC S Data Medium³ TP S TP ³ Data Medium S Select Data Record S Sort 1) 1) 1) IIncluded in standard configuration but not linked 2) Not with TP27-6 3) Not with TP37 2) 3) Status/Control Tag S Status Tag S Control Tag 1) Output Messages S Output Medium S Message Event S Priority S Date S Text S Acknowledgement Group S Print Messages with Filter 1) Figure 4-2 Standard screen hierarchy Screens www.dienhathe.vn www.dienhathe.com
  • 41. 4-5 TP27, TP37 Equipment Manual Release 01/00 Functions are called in on the Touch Panel by means of configured buttons. To prevent unauthorized access, some functions have to be protected beforehand by means of a password at a specific password level (see chapter 5). Configured help texts can be called int the standard screens by pressing the button shown here. HELP Calling functions Calling Help texts Screens www.dienhathe.vn www.dienhathe.com
  • 42. 4-6 TP27, TP37 Equipment Manual Release 01/00 Screens www.dienhathe.vn www.dienhathe.com
  • 43. 5-1 TP27, TP37 Equipment Manual Release 01/00 Password Protection Password protection can be configured for buttons and input fields to prevent operation of the Touch Panel by unauthorized personnel. 5.1 Password Level and Access Permissions During the configuration phase with ProTool, the configurer assigns the but- tons and input fields hierarchically ascending password levels from 0 to 9. When a password is assigned to an individual user or to a whole user group, the permission to execute functions at a specific level is assigned simulta- neously. After logging in with a password of a specific password level on the Touch Panel, permission to execute functions is granted at that password level and functions at lower levels. If a function is configured with password level 0, no password need be entered in order to execute this function. The functions assigned at this level, the low- est in the hierarchy, have little or no effect on operation. These functions nor- mally do not have input options; one example is Open Message Pages. To call a password level 0 function, you do not have to enter a password. If you call a function that is assigned to a higher level, the Touch Panel will prompt you to enter a password. Levels 1 to 8 should be assigned by the configurer according to the signifi- cance of the respective function. The supervisor (superuser) is responsible for assigning a password level to a password as part of his password management duties. Only the superuser has the rights to execute functions assigned password level 9. The superuser has access to all the functions of the Touch Panel. Only the superuser is authorized to perform password management on the Touch Panel. Password management involves assigning and changing pass- words. Access protection Password hierarchy Password level 0 Password level 1 – 8 Password level 9 5 www.dienhathe.vn www.dienhathe.com
  • 44. 5-2 TP27, TP37 Equipment Manual Release 01/00 The superuser password is defined during configuration. The default value in the standard configuration is “100”. This setting can be changed using the Touch Panel. The passwords from levels 1 to 8 are not assigned during configuration but during operation by using the Touch Panel. Use the standard screen Password Processing to do this (refer to chapter 5.3). The password must be a minimum of 1 character and may be a maximum of 8. Alphanumeric characters are permissible. Leading zeroes are not permitted. The Password Processing standard screen (figure 5-1) provides the following functions: S Login/logout on the Touch Panel, S Change and delete passwords, S View password list. View password list Exit from standard screen Calling Help texts Login: Password Processing Edit: HELP ESC Figure 5-1 Standard screen Password Processing Superuser password Passwords from le- vels 1 to 8 Format Standard screen Password www.dienhathe.vn www.dienhathe.com
  • 45. 5-3 TP27, TP37 Equipment Manual Release 01/00 5.2 Login/Logout on the Touch Panel Login on the Touch Panel S using the Password Processing standard screen S by calling a function for which the current password level is too low. In this case, the Touch Panel automatically requests a password. Step Action Result 1 Call the standard screen Pass- word Processing. The standard screen is displayed (figure 5-1). 2 Touch the Login input field. The password input window opens (figure 5-2). The possible input positions are marked by hash characters (#). 3 Enter your password by means of the keypad. Input commences flush left. Each character entered is repres- entedby an asterisk (∗). 4 Confirm the entry by pressing The input window is closed. If the password is valid, the corre- sponding password level is dis Or cancel the input by pressing ESC sponding password level is dis- played next to the Login input field. B CA M : N D X K U L V / W O E Y G HF R %+ S I ’ P Z Q ( . ) T J = 20 1 75 6 * – & 3 4 8 9 ESCShiftHelp ∗∗∗∗∗∗∗∗ Figure 5-2 Window for entering the password (example TP27-6) Login Logging in on standard screen Password www.dienhathe.vn www.dienhathe.com
  • 46. 5-4 TP27, TP37 Equipment Manual Release 01/00 If a password level higher than the current one is required for a button or an input field, the Touch Panel automatically requests the entry of an appropriate password beforehand. If the Touch Panel screen is not touched within a configured time, the current password level is automatically reset to zero. This means that unauthorized persons cannot gain access while the Touch Panel is unattended. Itb is also possible to log out from the Touch Panel by using the Password Processing standard screen. Carry out the following steps to do this: Step Action Result 1 Call the standard screen Pass- word Processing. The standard screen is displayed (figure 5-1). 2 Touch the Login input field. The password input window opens (figure 5-2). 3 Enter an invalid password and confirm by pressing Once it has been applied, the ef- fective current password level is 0. Automatic call Logout Logging off on standard screen Password www.dienhathe.vn www.dienhathe.com
  • 47. 5-5 TP27, TP37 Equipment Manual Release 01/00 5.3 Password Management The Password Processing standard screen provides the following functions for password management: S create passwords and assign password levels, S delete passwords, S change passwords and password levels, S view password list. These functions can only be called in password level 9 (exception: view pass- word list). Therefore, log in beforehand by means of the Login input field us- ing the superuser password. A maximum of 50 different passwords can be set up on the Touch Panel. Pass- word level 9 (superuser) can be assigned once only. Carry out the following steps to assign a password and password level: Step Action Result 1 Touch the Edit input field. The password input window opens. 2 Enter a password that has not been previously issued and confirm it by pressing The password is transferred to the Edit field. 3 Touch the input field behind the Edit field. The password level input win- dow opens. 4 Enter a password level between 1 and 8 and confirm by pressing The new password is saved on the Touch Panel and protected even in the event of a power failure. Functions Creating a password Password www.dienhathe.vn www.dienhathe.com
  • 48. 5-6 TP27, TP37 Equipment Manual Release 01/00 Step Action Result 1 Touch the Edit input field. The password input window opens. 2 Enter the password to be deleted in the input field Edit and con- firm by pressing If the password level in the ad- jacent input field is set to 0, the password has been deleted. 3 Otherwise, touch the input field behind the Edit field. The password level input win- dow opens. 4 Overwrite the password level with 0 and confirm by pressing Once it has been transferred, the password is deleted. It is not possible to change a password on the Touch Panel directly. To change a password, the existing one must be deleted and a new one entered. Exception: The superuser password can be changed by overwriting it directly. Step Action Result 1 Touch the Edit input field. The password input window opens. 2 Enter the password to be as- signed a new level in the input field Edit and confirm by press- ing The password level of the pass- word entered appears in the in- put field behind the field Edit. 3 Touch the input field behind the Edit field. The password level input win- dow opens. 4 Overwrite the password level with a new value and confirm pressing Once it has been transferred, the new level is assigned to the password. Deleting a password Changing a password Changing password levels Password www.dienhathe.vn www.dienhathe.com
  • 49. 5-7 TP27, TP37 Equipment Manual Release 01/00 The password list contains all the passwords set up on the Touch Panel. The only passwords displayed are those with a password level lower or equal to that with which the user logged in on the Touch Panel. The supervisor pass- word is not displayed. Call in the password list by pressing the button Step Action Result 1 Touch the button The password list window opens (figure 5-3). 2 Use the arrow keys, if neces- sary, to scroll through the list The password and password level at the current cursor posi- tion are displayed in inverse screen colors. 3 Terminate the action by pressing ESC The password list window is closed. ESC 1 1049 2 19FF27 3 1A740K 4 22CE51 5 3D36M1Z7 6 723 7 97BC1 8 A0YC3 9 MIRROR 3 4 4 1 8 5 4 1 1 Serial number Password Password level Figure 5-3 Password list Viewing the password list Action Password www.dienhathe.vn www.dienhathe.com
  • 50. 5-8 TP27, TP37 Equipment Manual Release 01/00 Password www.dienhathe.vn www.dienhathe.com
  • 51. 6-1 TP27, TP37 Equipment Manual Release 01/00 Messages Messages on the Touch Panel indicate events and statuses related to control processes. A message consists of static text, at least. It may also contain tags. The following types of message are displayed in plain text on the Touch Panel. S event messages S alarm messages S system messages Once issued, alarm messages and event messages are stored on the Touch Panel in battery–backed message buffers, so they are protected against power failures. Messages in the buffers may be called to the display and logged on the attached printer. The Touch Panel can still be operated when messages are waiting to be displayed. Alarm and event messages may contain the following information: S Arrived: Denotes the occurrence of a message. S Cleared: The reason for the message no longer exists. S Acknowledged (alarm messages only): The message has been noted by the operator or the PLC, acknowledged and confirmed. A message status is accurately timed by the Touch Panel when it is recorded and indicated when a message page or buffer is displayed. Overview Message states 6 www.dienhathe.vn www.dienhathe.com
  • 52. 6-2 TP27, TP37 Equipment Manual Release 01/00 6.1 Types of Message Event and alarm messages must be configured. Event messages indicate a sta- tus in the process, whereas alarm messages indicate faults or errors. Event mes- sages and alarm messages are issued by the PLC. Alarm messages have to be acknowledged on account of their significance. System messages are triggered by the Touch Panel. They do not have to be configured. System messages provide information on operating status of the Touch Panel and on maloperations or malfunctions in communication. 6.1.1 Event Messages and Alarm Messages The configuration defines whether a process status is indicated by an event message or alarm message. Messages referring to regular sequences of events or states should be catego- rized as event messages; for example 0000031 10:53:27 04.04.97 11 Mixing operation completed Filing level in mixer: 5000 l Messages relating to disturbances of the process or status should be catego- rized as alarm messages; for example 0000017 10:59:53 04.04.97 AGR 04 3 Bottling operation aborted Bottling valve closed Alarm messages have to be acknowledged on account of their urgency. By do- ing so, the operator confirms that he has taken note of the alarm message. Alarm messages can also be acknowledged by the PLC. Operational hints can be configured as event messages or alarm messages, in addition to status messages. If, for example, the machine operator wishes to start the filling operation but has forgotten to open the bottling valve on the mixer, he can be requested to rectify the error by means of an event message; for example 0000037 11:01:02 04.04.97 11 Open bottling valve Event and alarm messages System messages Definition Messages www.dienhathe.vn www.dienhathe.com
  • 53. 6-3 TP27, TP37 Equipment Manual Release 01/00 Alarm and event messages can be configured so that text components flash in order to distinguish them from other message texts. Messages may contain text and tag fields. Tag fields display current PLC ac- tual values in numeric form. A sub–category of the event message is the standby message. The standby message is the event message number 0. It is displayed when there are no event messages on the Touch Panel. A current event or alarm message can be displayed in either a message line or message window. One of the following combinations can be defined in the configuration: S Window/window Event messages and alarm mes- sages are displayed in separate windows. The alarm message window is opened automatically when an alarm message arrives. When the alarm message is acknowledged, the alarm message window disap- pears. The event message window can be opened only by activating a button. Event message Alarm message S Window/line An event message is displayed in the message line, whereas an alarm message is displayed in the message window. The alarm mes- sage window is opened automati- cally when an alarm message oc- curs. When an alarm message is acknowledged, the alarm message window disappears if no other alarm messages are waiting. Alarm message Event message S Window/hide An alarm message is displayed in the message window. Event mes- sages are not displayed. When the alarm message is ac- knowledged, the alarm message window is closed. Alarm message Presentation Standby message Display mode Messages www.dienhathe.vn www.dienhathe.com
  • 54. 6-4 TP27, TP37 Equipment Manual Release 01/00 When a message line has been configured it is always displayed, regardless of the screen selected. Only the latest message is displayed in the message line. Messages in the configured message window contain additional information on the message, such as message number and date/time the message arrived. The alarm message window has extra buttons. Alarm message window: The alarm message window (figure 6-1) automatically appears whenever an alarm message is issued. 0000048 11:34:02 27.03.97 2 Boiler 25: Temperature 156 degrees Summon Shift Engineer. Tel.: 9456 Message number Date Time Number of unacknowledged messages (TP37 only) Process value ACK HELP ESC Figure 6-1 Alarm message window (example) The buttons in the alarm message window have the following significance: Button Function Purpose ACK Acknowledge alarm message When an alarm message is acknowl- edged, the alarm message window disappears if no other alarm mes- sages are waiting. HELP Display help text Call help text concerning the alarm message, if configured. ESC Cancel Set the alarm message window to the background Message line Message window Messages www.dienhathe.vn www.dienhathe.com
  • 55. 6-5 TP27, TP37 Equipment Manual Release 01/00 Event message window: The event message window must be selected by the operator or the PLC and can also be deselected. If a current event message is not waiting, the standby message is displayed. Activate the event message window by touching the OPEN EVENT MESSAGE WINDOW button on the Edit Message standard screen. The button is inactive if the Line setting has been configured for event messages. Close the event message window by touching it. Alarm and event messages are written in the Touch Panel message archive when they arrive. The message archive is a message buffer, created by the op- eratng system, in which all message events are eneterd in chronological order. Message events consist of: S arrival of a message S acknowledgment of an alarm message S clearing of a message. The message archive is a FIFO buffer. When the buffer is full, the oldest mes- sages are deleted. During configuation, it is possible to define a remainder buffer size for the message archive. As soon as this remaining buffer size is reached, the Touch Panel automatically issues an overflow warning (system message). Messages continue to be entered in the message archive even after the remaining buffer size has been reached. If the conditions for issuing a message have been fulfilled in the process cur- rently running, a value has been reached, a bit is set in the data area by the PLC application program for an event or alarm message. The Touch Panel reads the data area after a configured polling time. In this way, a message is detected as having “arrived”. The bit is reset by the PLC when the condition for issuing the message no longer exists. The message is then regarded as having been “cleared”. Message archive Overflow warning Message bit procedure Messages www.dienhathe.vn www.dienhathe.com
  • 56. 6-6 TP27, TP37 Equipment Manual Release 01/00 6.1.2 Alarm Messages Alarm messages have to be acknowledged on account of their ur- gency. This can be done manually or automatically by the PLC. To acknowledge an alarm message manually, simply touch the ACK button in the alarm message window (figure 6-1 on page 6-4). If the error messages should be acknowledged by the PLC, conti- nue to read the Communication User’s Manual. If several alarm messages are waiting to be displayed, the next alarm message is displayed after one has been acknowledged. Each message must be acknowledge in turn. ACK During configuration, several alarm messages can be combined to so called acknowledgment groups. This means that by acknowledging the first alarm message, e.g. the cause of the malfunction, all the remaining alarm messages in the same acknowledgment group are acknowledged simultaneously (conse- quential malfunctions) without them being issued in succession for acknowl- edgment on the Touch Panel (group acknowledgment). Up to 16 acknowledg- ment groups can be configured. If alarm messages are not assigned to an acknowledgment group, only the mes- sage currently displayed is acknowledged when more than one are waiting. As soon as a alarm message arrives, an alarm message window is opened and the message indicator shown here appears as a button on the screen. The message indicator can assume one of two states: S flashing, as soon as at least one unacknowledged alarm message is wait- ing. S not flashing, when all waiting alarm messages have been acknowledged, but at least one has not yet been cleared. After touching the message indicator, the alarm message page ap- pears. The message indicator does not disappear until all acknowledged alarm messages have been cleared. This means that a pending alarm message is not forgotten. Acknowledging alarm messages Acknowledgment groups, group acknowledgement Message indicator Messages www.dienhathe.vn www.dienhathe.com
  • 57. 6-7 TP27, TP37 Equipment Manual Release 01/00 The alarm message window can be set in the background so that if there are numerous alarm messages pending, it is not necessary to acknowledge them all before rectifying what may be a critical system condition at the machine. Set the window in the back- ground by touching the ESC button in the alarm message window (figure 6-1 on page 6-4). The other touch elements on the screen can then be used. The alarm messages set in the background are re–displayed S after touching the message indicator, or S a new alarm message arrives. If the alarm message is in the foreground, the alarm message screen can be opened by touching the message indicator. Each subsequent touch opens the alarm message buffer or alarm mes- sage screen alternately. ESC Setting alarm messages in the background Messages www.dienhathe.vn www.dienhathe.com
  • 58. 6-8 TP27, TP37 Equipment Manual Release 01/00 6.1.3 System Messages System messages indicate internal Touch Panel operating statuses. They indi- cate, for example, maloperations or communication malfunctions. Touch the system message window to close it. A system message consists of a message number and text, e.g.: 222 AM remaining buffer reached Message text may contain internal system tags for defining the cause of the message more precisely. Some system messages expect an acknowledgement or to make a decision. To determine the further course of events, two buttons are displayed in the system message window; for example 559 Delete event buffer? OK Yes / ESC No ESCOK System messages are catagorized into serious and non–serious messages. A serious system message relates to an error which can be eliminated only by a cold or warm restart of the Touch Panel. All other errors generate non–serious system messages – for example, a configured limit value is not maintained on entry or the current password level is too low for the operator input required. If a non–serious system message is not hidden automatically after a short period of time, hide it by touching the message window. Display can be terminated automatically after a configurable display time expires. A list of system messages, with explanations, is provided in Appendix C of this manual. Definition Structure Serious and non–serious system messages Messages www.dienhathe.vn www.dienhathe.com
  • 59. 6-9 TP27, TP37 Equipment Manual Release 01/00 6.2 Displaying Messages All message events are written in the message archive in chronological order. Message events are the arrival, clearing and acknowledgment of a message. A maximum of 512 message events can be stored in the Touch Panel message ar- chive. Every message event is stored with the following information: S message number S event identifier (A for arrived, D for cleared, K for acknowledged), S time of the event with date and time of day S acknowledgment group (alarm messages) S message text S values of tags at the time of arrival or clearing. If a message contains process values, the values stored in the message archive are those which were available when the message event arrived or has been cleared. The Touch Panel does not record any current process values for the Acknowledged message status. The value is replaced by ### characters. Fi- gure 6-2 shows the structure of the message archive. 0000049 A 11:32:00 27.03.97 AGR:01 Boiler pressure too high: 12,7 bar 0000049 AK 11:33:20 27.03.97 AGR:01 Kesseldruck zu hoch: #### bar 0000010 A 11:34:36 27.03.97 AGR:02 Oil supply stopped 0000010 AK 11:35:18 27.03.97 AGR:02 Oil supply stopped Message number Message status Time and date (time of arrival) Process value (time of arrival) Acknowledgment group Figure 6-2 Storing message events in the message archive Message archive Messages www.dienhathe.vn www.dienhathe.com
  • 60. 6-10 TP27, TP37 Equipment Manual Release 01/00 The message events in the message archive can be filtered according to various criteria and displayed on the Touch Panel (figure 6-3). – All waiting event messages are displayed on the event message page. – All message events for event messages are displayed in the event mes- sage buffer. The events related to message events are Arrived and Cleared. – All waiting alarm messages are displayed on the alarm message screen. – All message events for alarm messages are displayed in the alarm mes- sage buffer. These message events are Arrived, Cleared and Acknowl- edged. A Event message 15 A Event message 16 A Alarm message 2 A Alarm message 3 K Alarm message 2 K Alarm message 3 D Event message 15 D Alarm message 3 Message archive Event messages Alarm messages A EM 16 A EM 15 A EM 16 D EM 15 A AM 2 A AM 2 A AM 3 K AM 2 K AM 3 D AM 3 Page Buffer Page Buffer Figure 6-3 Displaying message events on the Touch Panel Within the alarm and event messages, it is possible to configure message prior- ities according to their importance. S 1 (low) to S 16 (high). If several messages having the same display priority are waiting, they are dis- played according to their message priority – the highest first and the lowest last. Display Priority Messages www.dienhathe.vn www.dienhathe.com
  • 61. 6-11 TP27, TP37 Equipment Manual Release 01/00 6.2.1 Opening a Message Page An overview of the alarm and message events still pending on the Touch Panel is provided from S the alarm message screen and S the event message page. Open message pages are constantly updated. In order to open an alarm message page, touch S the message indicator or S the OPEN ALARM MESSAGE SCREEN button on the Edit Message standard screen To open the event message page, touch the OPEN EVENT MESSAGE PAGE button on the Edit Message standard screen The event message screen is sorted chronologicaly. The sorted order of the alarm message screen also depends on the First/Last parameters set on the System Settings standard page. Figure 6-4 depicts an example of an alarm mes- sage screen. Depending on the setting, either the oldest (first) or latest (last) message is dis- played where several messages are pending. This setting can be modified on- line on the Touch Panel by means of the System Settings standard screen. To do this, touch the MESSAGE DISPLAY field and select either the FIRST or LAST parameter from the selection window. Purpose Alarm message page Event message page Structure Displaying first/last message Messages www.dienhathe.vn www.dienhathe.com
  • 62. 6-12 TP27, TP37 Equipment Manual Release 01/00 ESCHELP 0000049 A 11:32:00 27.03.97 AGR:01 Boiler pressure too high: 12.7 bar 0000049 AK 11:33:20 27.03.97 AGR:01 Boiler pressure too high: 10.3 bar 0000010 A 11:34:36 27.03.97 AGR:02 Oil supply stopped 0000010 AK 11:35:18 27.03.97 AGR:02 Oil supply stopped Message indicator Figure 6-4 Alarm message screen (example TP37 ) Button Function Purpose Scroll Scroll backwards/forwards one line at a time. Jump Scroll backwards/forwards one screen at a time (TP37 only). HELP Display Help text Call help text for the marked message, if configured. Toggle Toggle back and forth between alarm message screen and alarm message buffer. ESC Cancel (Escape) Close message page. Meanings of buttons Messages www.dienhathe.vn www.dienhathe.com
  • 63. 6-13 TP27, TP37 Equipment Manual Release 01/00 6.2.2 Opening a Message Buffer An overview of the message events which have arrived on the Touch Panel is provided concerning the S alarm message buffer S event message buffer. Open message buffers are constantly updated. In order to open the alarm message buffer, touch S the message indicator on the alarm message screen or S the OPEN ALARM MESSAGE BUFFER button on the Edit Message standard screen To open the event message buffer, touch the OPEN EVENT MESSAGE BUFFER button on the Edit Message standard screen The message buffers in the Touch Panel list all the message events which have occurred in chronological order. The basic structure and the significance of the buttons do not differ from those illustrated in the example alarm message screen in figure 6-4. Purpose Alarm message buffer Event message buffer Structure Messages www.dienhathe.vn www.dienhathe.com
  • 64. 6-14 TP27, TP37 Equipment Manual Release 01/00 6.3 Deleting Messages All message events from event and alarm messages are stored automatically in the message archive. The message archive can contain as many as 512 message events. Message events are deleted S automatically in the case of buffer overflow S by means of the Edit Message standard screen. On reaching the configured remaining buffer size, (default setting 10%), an overflow warning is issued by default. Issue of the the warning can be enabled or disabled via the Touch Panel using the System Settings standard screen. To do so, touch the BUFFER OVERFLOW WARNING field and select one of the two parameters, OFF or ON, from the selection window. If the message archive is no longer capable of recording more message events, message events are automatically deleted until the capacity configured for the remaining buffer size is reached. Deletion occurs in the following sequence: S The oldest messages which have already been cleared. The message events Arrived and Cleared for an event message which has cleared are deleted. The message events Arrived, Cleared and Acknowl- edged for an alarm message which has cleared are deleted. S Messages still waiting. If capacity is still not sufficient for new messages, the oldest waiting mes- sages are deleted. This triggers the issue of a system message. In the case of a buffer overflow, a printout of all the alarm and event messages deleted is automatically triggered if S “Printout on overflow” is configured, S message logging is deactivated on the Touch Panel, and S a printer, ready to operate, is connected. Purpose Overflow warning Deleting on buffer overflow Automatic printout Messages www.dienhathe.vn www.dienhathe.com
  • 65. 6-15 TP27, TP37 Equipment Manual Release 01/00 The following messages can be deleted from the message archive via standard screen Edit Message: S all (not individual) acknowledged and cleared alarm messages S all (not individual) arrived and cleared event messages. Delete alarm messages by pressing the DELETE ALARM MESSAGE BUFFER button. Delete event messages by pressing the DELETE EVENTS BUFFER button. The message events for messages which have not been cleared remain in the message archive. Deleting via standard screen Messages www.dienhathe.vn www.dienhathe.com
  • 66. 6-16 TP27, TP37 Equipment Manual Release 01/00 6.4 Printing Messages Alarm and event messages can be printed out S automatically following buffer overflow (see chapter 6.3), S automatically as direct message logging, S manually (see chapter 6.5.2). Set the printer parameters in the Printer Settings standard screen. The standard screen is described in chapter 7. Note If a flood of more than 20 messages arrive simultaneously causing the buffer to overflow, it is possible that the messages will not be printed. If this happens “****” appears in the printout instead of messages. Alarm and event messages can be printed out directly on arrival and clearing (alarm messages also on acknowledgement) when this has been defined in the message configuration. System messages are not logged. Message logging can be enabled/disabled online via the Touch Panel using the System Settings standard screen. To do so, touch the MESSAGE LOGGING field and select either of the parameters OFF or ON from the selection window. The table shows the relationships between the settings on the Touch Panel and the settings configured in ProTool. Setting in ProTool Setting on Touch Panel Message Logging ON Message Logging OFF Messages Messages are logged Messages are not logged Overflow Messages are logged Buffer overflow is printed Off Messages are logged No effect Note If Asian character sets are used for messages, the messages are printed in graphics mode. How to print Direct message logging Enabling/Disabling direct message logging Messages www.dienhathe.vn www.dienhathe.com
  • 67. 6-17 TP27, TP37 Equipment Manual Release 01/00 The buffer contents can be printed out in the following ways: S The Edit Message standard screen (see chapter 6.6.1) has buttons to print out alarm and event messages. S The Output Messages standard screen (see chapter 6.6.2) has buttons to print out alarm and event messages. In addition, it is possible to enter filter criteria concerning the messages to be printed. Manual printout of buffer content Messages www.dienhathe.vn www.dienhathe.com
  • 68. 6-18 TP27, TP37 Equipment Manual Release 01/00 6.5 ALARM_S Messages The STEP 7 option packages S7–PDIAG and S7–GRAPH only issue ALARM_S messages. For that reason, the message number procedure ALARM_S must be used for configuring process diagnosis in ProTool as well. ALARM_S messages are not configured in ProTool but in STEP 7. When configuring messages in STEP 7 the message text and attributes entered are stored in the database shared with ProTool. During the process of compil- ing the project, ProTool automatically imports the necessary data and subse- quently downloads it to the operating unit. Shared Database Figure 6-5 Configuring and Downloading ALARM_S Messages It is therefore important that the shared database is always up to date during the compilation process and that data synchronization is active. ALARM_S messages are configured in STEP 7. The data is then stored in a shared database, imported during the process of compiling the ProTool project and finally downloaded to the operating unit. That means that ALARM_S messages use up resources on the operating unit. The shorter the messages are, the less storage space they will require. A maximum of 2000 event messages and 2000 alarm messages can be created. It is of no consequence in this regard which message procedure is used. Note In STEP 7 there are restrictions regarding the number and size of tags that can be used within a message. For more precise details, please consult your STEP 7 documentation. Incorporating ALARM_S Messages Use of Resources Messages www.dienhathe.vn www.dienhathe.com
  • 69. 6-19 TP27, TP37 Equipment Manual Release 01/00 6.5.1 Communication Sequence More than one station (e.g. more than one OP, PU, etc.) on a network can log on for ALARM_S messages. Each station that wants to display ALARM_S messages logs on to the CPU for ALARM_S. OP S7 CPU PUTP CPU S7 Figure 6-6 MPI Network When a message–triggering event occurs, the CPU actively sends telegrams to that effect to all stations that have logged on. The message number identifies the corresponding message text that has previously been downloaded to the operating unit. This means that the CPU does not have to be actively scanned for messages by regular polling as was the case with the message bit procedure. The operating unit, CPU and network are completely relieved of that burden on the system. With the ALARM_S procedure, the time stamp is not issued by the operating unit but by the CPU. The messages are stored in chronological order on the basis of their time stamp in the message buffer on the operating unit – even if they originate from different CPUs. The CPU stores not only the time of the message but also the status (arrived, departed, acknowledged) and any process parameters. That information is re- tained until a message has been completely processed, i.e. until it has arrived, departed and been acknowledged. On the operating unit, the information in the message buffer is kept even longer. Logging On For ALARM_S When A Message Event Occurs Time Stamp Information Stored Messages www.dienhathe.vn www.dienhathe.com
  • 70. 6-20 TP27, TP37 Equipment Manual Release 01/00 6.5.2 Message Acknowledgement When a message is acknowledged by a station on the network, the CPU is im- mediately notified. The CPU then distributes the acknowledgement to all con- nected stations. It is only to this message that the operating unit responds, i.e. only at this point does it enter the acknowledgement in the message buffer. Note The CPU issues a time stamp for the acknowledgement event but does not store it. It is therefore not possible in the event of a subsequent update to de- termine whether or when a message has been acknowledged. In the case of those ALARM_S messages that although they are configured as alarm messages do not require explicit acknowledgement by the user, the CPU acknowledges the message automatically when it arrives. The acknowledged event is then immediately entered in the message buffer along with the arrived event. 6.5.3 Printing Messages You specify which messages are to be printed in the usual way in ProTool by choosing the menu option System → Messages → Settings. If you do not specify any device–specific message settings in STEP 7, all mes- sage events are automatically logged directly to the connected printer. If you configure device–specific messages, you can specify separately for each message whether it is to be logged or not. If there are several CPUs in a network, this means that messages may not al- ways be received in chronological order by the operating unit. Messages are always printed in the order in which they are sent by the CPUs. This is also the case with every synchronisation. Printing of the message buffer contents in the event of a buffer overflow is car- ried out in the same way as with the familiar message bit procedure. All mes- sages are printed before being deleted. ALARM_S Messages Requiring Acknowledgement ALARM_S Messages Not Requiring Acknowledgement Message Logging Printing Messages In the Event of a Buffer Overflow Messages www.dienhathe.vn www.dienhathe.com
  • 71. 6-21 TP27, TP37 Equipment Manual Release 01/00 6.5.4 Message Overload It can happen that a large number of ALARM_S messages are issued within a short space of time. This can result in the build–up of processing backlogs. If the time gap between the first occurrence of a message and a subsequent occurrence is very short, it may be that the first message has not yet even been sent. In that case, the CPU reports the current status, i.e. the most recent occur- rence of the message. Every station, i.e. including the operating unit, is in- formed at the same time, however, that at least one signal change that could not be sent has occurred. The message number appears on the operating unit in inverted type (light let- ters on dark background) if multiple arrivals and departures of the message have not been able to be recorded. *1234567 A KGQ HH:MM:SS DD.MM.YYYY GRU00 Boiler 13: temperature 190 degrees Inform shift supervisor Tel. 007 Figure 6-7 Multiple Arrivals and Departures Could Not Be Recorded If there are more messages pending than the CPU can process, any new mes- sages are discarded. Only when a message has been fully processed can a new message be processed. The date and time of a message appear on the operating unit in inverted type (light letters on dark background) if it is the last message that could be ac- cepted by the CPU message buffer. *1234567 A KGQ HH:MM:SS DD.MM.YYYYGRU00 Boiler 13: temperature 190 degrees Inform shift supervisor Tel. 007 Figure 6-8 Last Message Accepted by the CPU An operating unit can process a maximum of approx. 200 simultaneously pending messages (total number of event and alarm messages). If the operating unit then receives more messages from the CPUs on the network, they can no longer be displayed. A system message to that effect is then displayed on the operating unit. The maximum number of messages that could theoretically be simultaneously pending on an operating unit is calculated from the sum of the maximum num- bers possible on the connected CPUs. Communication Overload CPU Memory Overload Operating Unit Overload Messages www.dienhathe.vn www.dienhathe.com
  • 72. 6-22 TP27, TP37 Equipment Manual Release 01/00 Example: A CPU 315 can process a maximum of 50 simultaneously pending messages. Accordingly, an operating unit can handle a maximum of four CPU 315s send- ing ALARM_S messages without overflow problems occurring. 6.5.5 Updating Since the CPU stores the message information when a fault occurs, individual network stations (e.g. an OP) can log on at a later date and obtain an update. However, the CPU only stores information about pending messages. Once all events (arrival, departure, acknowledgement) have occurred, the message is deleted from the CPU. When obtaining an update, therefore, the operating unit processes any missing events automatically if a message is not known to the PLC but the arrival and acknowledgement events are not entered on the operating unit. The events are not entered in the message buffer in that case, however. Events processed in this way are identified on the operating unit by displaying the message status symbols in inverse type thus: *1234567 A KGQ HH:MM:SS DD.MM.YYYYGRU00 Boiler 13: temperature 190 degrees Inform shift supervisor Tel. 007 Figure 6-9 Automatically Processed Events Messages www.dienhathe.vn www.dienhathe.com
  • 73. 6-23 TP27, TP37 Equipment Manual Release 01/00 6.5.6 Buffer Overflow All message events for event and alarm messages are automatically stored in a message archive. The message archive can hold up to 512 message events. When the remaining buffer capacity specified in ProTool (default setting 10%) is reached, an overflow warning is automatically issued. If the message archive has insufficient space to accept any more message events, message events are automatically deleted until the specified remaining buffer capacity is reached. Deletion is carried out in the following order: 1. The oldest departed messages. For departed event messages, the message events arrival and departure are deleted. For departed alarm messages, the message events arrival, depar- ture and acknowledged are deleted. 2. Pending messages. The oldest pending messages are deleted to make space for the newly re- ceived events. If Buffer Overflow Message Logging has been specified and a printer is con- nected and switched on, all deleted alarm and event messages are printed out in the event of a buffer overflow. Message Archive Overflow Warning Deleting Message Events In the Event of a Buffer Overflow Printout Messages www.dienhathe.vn www.dienhathe.com
  • 74. 6-24 TP27, TP37 Equipment Manual Release 01/00 6.6 Standard Screens for Messages The two standard standard screens below are significant for messages: S Edit Message S Output messages S System Settings 6.6.1 “Edit Message” Standard Screen Functions are configured in the Edit Message standard screen which are neces- sary to view, delete and print messages (figure 6-10). Open the Edit Message standard screen from the main screen by pressing the button Help ESC Edit Message Figure 6-10 Standard screen Edit Message Overview Purpose Structure Messages www.dienhathe.vn www.dienhathe.com
  • 75. 6-25 TP27, TP37 Equipment Manual Release 01/00 Open event message window Open event message page Open event message buffer Delete event message buffer Print event message buffer Open alarm message screen Open alarm message buffer Delete alarm message buffer Print alarm message buffer Help Call Help text on standard screen ESC Exit from standard screen Meanings of buttons Messages www.dienhathe.vn www.dienhathe.com
  • 76. 6-26 TP27, TP37 Equipment Manual Release 01/00 6.6.2 “Output Messages” Standard Screen In order to select and print messages via the Touch Panel according to filter criteria, the Output Messages standard screen must be integrated in the config- uration. The Output Messages standard screen enables the selection and printing of messages according to various, user–defined filter criteria (figure 6-11). ESC Output Messages Output medium: Message event: Priority: Date: Text: Acknowledgment group: Figure 6-11 Standard screen Output Messages Condition Purpose Structure Messages www.dienhathe.vn www.dienhathe.com
  • 77. 6-27 TP27, TP37 Equipment Manual Release 01/00 Output medium PRINTER The factory setting for output from units TP27 and TP37, is to a printer. Message event ALL All the alarm messages or event message buffer contents are printed out. This includes all message events which have Arrived, Cleared or been Acknowledged. ARRIVED ONLY Only the Arrived message events stored in the buffer are printed. CLEARED ONLY Only the Cleared message events stored in the buffer are printed. ACKNOWLEDGED ONLY Only the Acknowledged message events stored in the buffer are printed. ARRIVED AND CLEARED Only the Arrived and Cleared message events stored in the buffer are printed. ARRIVED AND ACKNOWLEDGED Only the Arrived and Acknowledged message events stored in the buffer are printed. CLEARED AND ACKNOWLEDGED Only the Cleared and Acknowledged message events stored in the buffer are printed. Priority 0 to 16 Only those message events are printed which have at least the specified priority. Date Only those message events with the specified date are printed. Text Only those message events are printed which contain the specified character string. Upper/ lower case is not considered. Acknowledgment group 0 to 16 Only those message events are printed which belong to the specified acknowledgement group. Meaning of operating elements Messages www.dienhathe.vn www.dienhathe.com