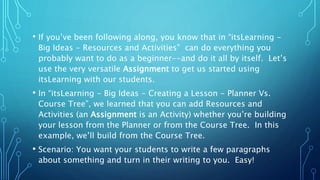
This document provides instructions for creating lessons in itsLearning. There are two main ways to create a lesson: using the planner or directly in the course tree. Both methods allow adding resources and activities, which are the most important elements as they provide content for students and allow them to submit assignments. An example is given of creating a simple writing assignment activity that students can submit work to. Teachers are then instructed to spend 10-15 minutes creating their own courses and assignments for students to work independently.
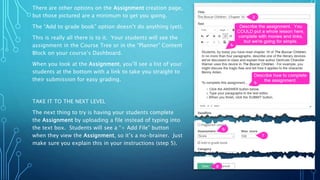
![THERE ARE TWO WAYS YOU CAN CREATE A
LESSON (A PLAN IN ITSLEARNING LINGO).
• The Planner is a more formal or systematic way of creating a lesson. It’s more like lesson
“planning”.
• Using the Planner has more options and may be the better way to make lessons. For
example, scheduling when lessons become active (visible to students) is easier when you
use the Planner.
• Things you create in the Planner automatically appear in the Course Tree. The reverse is
not true.
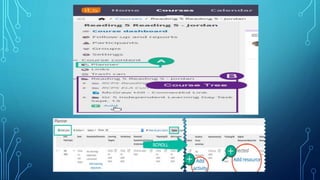
• To Create a Lesson (a Plan) in the Planner
• Click Planner in the left pane. [Sorry, this next small point is much easier to see than to explain…] In
the Planner, you may or may not be using “Topics”, which may have been renamed “Subject/Course”.
These are just folders to hold groups of lessons. If you are using these, go into the desired
Topic/Subject/Course/folder so you create your lesson in the right place.
• Click “+ Add plan”…](https://image.slidesharecdn.com/itslearningmodule-180416083147/85/Its-learning-module-2-320.jpg)


![How Big Brands are Taking Your Traffic in Alberta [Data Inside].pptx](https://cdn.slidesharecdn.com/ss_thumbnails/howbigbrandsaretakingyourtrafficinalbertadatainside-260123180142-42d276f3-thumbnail.jpg?width=640&height=640&fit=bounds)