SlideShare a Scribd company logo
1 of 112
Download to read offline
Microcontrollers 10ES42
Department of EEE, SJBIT Page 1
MICROCONTROLLERS
(Common to EC/TC/EE/IT/BM/ML)
Sub Code: 10ES42 IA Marks: 25
Hrs/ Week: 04 Exam Hours: 03
Total Hrs. 52 Exam Marks: 100
PART-A
UNIT 1:
Microprocessors and microcontroller. Introduction, Microprocessors and Microcontrollers, RISC
& CISC CPU Architectures, Harvard & Von- Neumann CPU architecture, Computer software.
The 8051 Architecture: Introduction, Architecture of 8051, Pin diagram of 8051, Memory
organization, External Memory interfacing, Stacks.
6 Hrs
UNIT 2:
Addressing Modes: Introduction, Instruction syntax, Data types, Subroutines, Addressing modes:
Immediate addressing , Register addressing, Direct addressing, Indirect addressing, relative
addressing, Absolute addressing, Long addressing, Indexed addressing, Bit inherent addressing,
bit direct addressing. Instruction set: Instruction timings, 8051 instructions: Data transfer
instructions, Arithmetic instructions, Logical instructions, Branch instructions, Subroutine
instructions, Bit manipulation instruction. 6 Hrs
UNIT 3:
8051 programming: Assembler directives, Assembly language programs and Time delay
calculations.
6 Hrs
UNIT 4:
8051 Interfacing and Applications: Basics of I/O concepts, I/O Port Operation, Interfacing 8051
to LCD, Keyboard, parallel and serial ADC, DAC, Stepper motor interfacing and DC motor
interfacing and programming
7 Hrs
PART-B
UNIT 5:
8051 Interrupts and Timers/counters: Basics of interrupts, 8051 interrupt structure, Timers and
Counters, 8051 timers/counters, programming 8051 timers in assembly and C.
6 Hrs
Microcontrollers 10ES42
Department of EEE, SJBIT Page 2
UNIT 6:
8051 Serial Communication: Data communication, Basics of Serial Data Communication, 8051
Serial Communication, connections to RS-232, Serial communication Programming in assembly
and C.
8255A Programmable Peripheral Interface:, Architecture of 8255A, I/O addressing,, I/O devices
interfacing with 8051 using 8255A.
6 Hrs
Course Aim – The MSP430 microcontroller is ideally suited for development of low-power
embedded systems that must run on batteries for many years. There are also applications where
MSP430 microcontroller must operate on energy harvested from the environment. This is possible
due to the ultra-low power operation of MSP430 and the fact that it provides a complete system
solution including a RISC CPU, flash memory, on-chip data converters and on-chip peripherals.
UNIT 7:
Motivation for MSP430microcontrollers – Low Power embedded systems, On-chip peripherals
(analog and digital), low-power RF capabilities. Target applications (Single-chip, low cost, low
power, high performance system design).
2 Hrs
MSP430 RISC CPU architecture, Compiler-friendly features, Instruction set, Clock system,
Memory subsystem. Key differentiating factors between different MSP430 families.
2 Hrs
Introduction to Code Composer Studio (CCS v4). Understanding how to use CCS for Assembly,
C, Assembly+C projects for MSP430 microcontrollers. Interrupt programming.
3 Hrs
Digital I/O – I/O ports programming using C and assembly, Understanding the muxing scheme of
the MSP430 pins.
2 Hrs
UNIT 8:
On-chip peripherals. Watchdog Timer, Comparator, Op-Amp, Basic Timer, Real Time Clock
(RTC), ADC, DAC, SD16, LCD, DMA.
2 Hrs
Microcontrollers 10ES42
Department of EEE, SJBIT Page 3
Using the Low-power features of MSP430. Clock system, low-power modes, Clock request
feature, Low-power programming and Interrupt.
2 Hrs
Interfacing LED, LCD, External memory. Seven segment LED modules interfacing. Example –
Real-time clock.
2 Hrs
Case Studies of applications of MSP430 - Data acquisition system, Wired Sensor network,
Wireless sensor network with Chipcon RF interfaces.
3 Hrs
TEXT BOOKS:
1. “The 8051 Microcontroller and Embedded Systems – using assembly and C ”-, Muhammad Ali
Mazidi and Janice Gillespie Mazidi and Rollin D. McKinlay; PHI, 2006 / Pearson, 2006
2. “MSP430 Microcontroller Basics”, John Davies, Elsevier, 2010 (Indian edition available)
REFERENCE BOOKS:
1. “The 8051 Microcontroller Architecture, Programming & Applications”, 2e Kenneth
J.Ayala , Penram International, 1996 / Thomson Learning 2005.
2. “The 8051 Microcontroller”, V.Udayashankar and MalikarjunaSwamy, TMH, 2009
3. MSP430 Teaching CD-ROM, Texas Instruments, 2008 (can be requested
http://www.uniti.in )
4. Microcontrollers: Architecture, Programming, Interfacing and System Design”,Raj Kamal,
“Pearson Education, 2005
Microcontrollers 10ES42
Department of EEE, SJBIT Page 4
INDEX SHEET
Unit TOPIC PAGE NO.
1 Microprocessors and microcontroller: Introduction,
6 to 30
Microprocessors and Microcontrollers, RISC & CISC CPU
Architectures, Harvard & Von- Neumann CPU architecture,
Computer software.
The 8051 Architecture: Introduction, Architecture of 8051,
Pin diagram of 8051, Memory organization, External
Memory interfacing, Stacks.
2
Addressing Modes: Introduction, Instruction syntax, Data
types, Subroutines,
31 to 59
Addressing modes: Immediate addressing, Register
addressing, Direct addressing, Indirect addressing, relative
addressing, Absolute addressing, Long addressing, Indexed
addressing, Bit inherent addressing, and bit direct addressing.
Instruction set: Instruction timings, 8051 instructions: Data
transfer instructions, Arithmetic instructions, Logical
instructions, Branch instructions, Subroutine instructions, Bit
manipulation instruction
3
8051 programming: Assembler directives, Assembly
language programs and Time delay calculations.
60 to 62
4
8051 Interfacing and Applications: Basics of I/O concepts,
I/O Port Operation, Interfacing 8051 to LCD, Keyboard,
parallel and serial ADC, DAC, Stepper motor interfacing and
DC motor interfacing and programming
63 to 90
5
8051 Interrupts and Timers/counters: Basics of interrupts,
8051 interrupt structure, Timers and Counters, 8051
timers/counters, programming 8051 timers in assembly and
C.
6
8051 Serial Communication: Data communication, Basics of
Serial Data Communication, 8051 Serial Communication,
connections to RS-232, Serial communication Programming
in assembly and C.
8255A Programmable Peripheral Interface:, Architecture of
8255A, I/O addressing,, I/O devices interfacing with 8051
using 8255A.
91 to 101
7
Motivation for MSP430microcontrollers – Low Power
embedded systems, On-chip peripherals (analog and digital),
low-power RF capabilities. Target applications (Single-chip,
low cost, low power, high performance system design).
101 to 110
MSP430 RISC CPU architecture, Compiler-friendly features,
Instruction set, Clock system, Memory subsystem. Key
differentiating factors between different MSP430 families.
Introduction to Code Composer Studio (CCS v4).
Understanding how to use CCS for Assembly, C,
Microcontrollers 10ES42
Department of EEE, SJBIT Page 5
Assembly+C projects for MSP430 microcontrollers. Interrupt
programming.
Digital I/O – I/O ports programming using C and assembly,
Understanding the muxing scheme of the MSP430 pins.
8
On-chip peripherals. Watchdog Timer, Comparator, Op-
Amp, Basic Timer, Real Time Clock (RTC), ADC, DAC,
SD16, LCD, DMA.
Using the Low-power features of MSP430. Clock
system, low-power modes, Clock request feature, Low-power
programming and Interrupt.
Interfacing LED, LCD, External memory. Seven
segment LED modules interfacing. Example – Real-time
clock.
Case Studies of applications of MSP430 -
Data acquisition system, Wired Sensor network, Wireless
sensor network with Chipcon RF interfaces.
Microcontrollers 10ES42
Department of EEE, SJBIT Page 6
UNIT 1:
Microprocessors and microcontroller.
Introduction, Microprocessors and Microcontrollers, RISC & CISC CPU Architectures, Harvard
& Von- Neumann CPU architecture, Computer software.
The 8051 Architecture: Introduction, Architecture of 8051, Pin diagram of 8051, Memory
organization, External Memory interfacing, Stacks.
Computer: A computer is a multipurpose programmable machine that reads binary
instructions from its memory , accepts binary data as input ,processes the data according to those
instructions and provides results as output. It is a programmable device made up of both
hardware and software. The various components of the computer are called hardware. A set of
instructions written for the computer to solve a specific task is called program and collection of
programs is called software .
The computer hardware consists of four main components. The central processing unit which
acts as computer‟s brain. Input unit through which program and data can be entered to computer,
output unit on which the results of the computations can be displayed. Memory in which data and
programs are stored.
Fig 1. Block diagram of a microcomputer
A computer that is designed using a microprocessor as its CPU , is known as a microcomputer.
Microprocessor or „Computer on Chip‟ first became a commercial reality in 1971 with the
introduction of the 4 bit 4004 by Intel. A byproduct of Microprocessor development was
Microcontroller. The same fabrication technology and programming concept that make the
general purpose microprocessor also yielded the Microcontroller.
Microcontrollers 10ES42
Department of EEE, SJBIT Page 7
Microprocessors:
A microprocessor is a general purpose digital computer central processing unit (CPU). Although
known as a „Computer on Chip‟ the Microprocessor in no sense a complete digital computer.
Block diagram of a Microprocessor CPU which contains ALU; Program counter (PC), a stack
pointer (SP) ,some working registers , a clock timing circuit and interrupt circuit s is shown in the
following figure
Fig.2.Block Diagram of a Microprocessor
To make a computer microcomputer one must add memory usually RAM and ROM,
memory decoders , an oscillator and a number of Input ,Output devices such as serial and parallel
ports. In addition special purpose devices such as interrupt handler and counters may be added to
relieve the CPU from time consuming counting or timing cores. When the Microcomputer is
equipped with mass storage devices , I/O peripherals such as a key board and a display CRT it
yields a small computer that can be applied to a range of general purpose applications.
The hardware design of a microprocessor is arranged such that a very small or very large
system can be configured around the CPU as the application demands as shown in Fig1. The
prime use of the Microprocessor is to read data , perform extensive calculations on that data, and
store those calculations in a mass storage device or display the results for human use. The
programs used by microprocessor are stored in the mass storage device and loaded into RAM as
user directs. A few microprocessor program are stored in ROM . The ROM based programs are
primarily small fixed programs that operate peripherals and other fixed devices that are connected
to the system.
Microcontroller: A Microcontroller is a programmable digital processor with necessary
peripherals. Both microcontrollers and microprocessors are complex sequential digital circuits
meant to carry out job according to the program / instructions. Sometimes analog input/output
interface makes a part of microcontroller circuit as mixed mode(both analog and digital) in nature.
A microcontroller can be compared to a Swiss knife with multiple functions incorporated
in the same Integrated Circuits. Block diagram of a typical Microcontroller which is a true
Arithmetic and Logic
Unit
Accumulator
Working Register
Program Counter
Clock Circuit
Stack Pointer
Interrupt Circuits
Microcontrollers 10ES42
Department of EEE, SJBIT Page 8
computer on a chip is shown below. The design incorporates all the features found in
microprocessor CPU : ALU,PC, SP and registers. It also has other features needed to make a
complete computer: ROM, RAM, Parallel I/O, serial I/O, Counters and clock circuits. Like the
microprocessor , a microcontroller is a general purpose device, but one that is meant to read
data, perform limited calculations on that data and control its environment based on those
calculations. The prime use of microcontroller is to control the operation of a machine using a
fixed program that is stored in ROM and that does not change over the lifetime of the system.
Fig3. Block diagram of a single chip computer
Complex Instruction Set Computer (CISC):
Memory in those days was expensive. Bigger programs required more storage which
included more money . There was a need to reduce the number of instructions per program .
This was achieved by having multiple operations within single instruction. Multiple
operations lead to many different kinds of instructions .Access to memory in turn makes the
instruction length variable and fetch-decode execute time unpredictable – making it more
complex. Thus hardware was made to understand the complexity of instruction set. The
computer having such instruction set was named as Complex Instruction Set Computer
(CISC). Intel 8051 is an example for CISC architecture.
Reduced Instruction Set Computer (RISC):
In applications which require more of input , output related operations having few simple
instructions that are of the same length allows memory access only with explicit load and
store instructions. Hence each instruction performs less work but instruction execution time
among different instructions is consistent. This would lead to instruction execution by
hardware including multiple number of registers inside CPU. The computer using such
instructions is called Reduced Instruction Set Computer (RISC). PIC microcontroller
manufactured by Microchip Company is an example for RISC architecture.
Vonneumann (Princeton) and Harvard Architecture :
Intel‟s 8051 employs Harvard architecture. A microcontroller has some embedded
peripherals and Input/Output (I/O) devices. The data transfer to these devices takes place
through I/O registers.
In a microprocessor, input /output (I/O) devices are externally interfaced and are mapped
either to memory address (memory mapped I/O) or a separate I/O address space (I/O mapped
I/O). There are two possible architectures one is Princeton (Von Neumann) and another is
Microcontrollers 10ES42
Department of EEE, SJBIT Page 9
Harvard .I/O Registers space in Princeton architecture have only one memory interface for
program memory (ROM) and data memory (RAM). One option is to map the I/O Register as a
part of data memory or variable RAM area ( memory mapped I/O). Alternatively a separate
I/O register space can be assigned (I/O Mapped I/O) . Both the arrangements are shown in
Fig.4.
Fig 4. Input/Output Registers in Princeton Architecture
As shown in Fig 4. Program memory and Data memory are together in both the arrangements.
The Princeton or Von neumann architecture one bus is used to carry the address and data with
an appropriate multiplexing technique ,which in turn reduces the cost. But Harvard
architecture which 8051 employs has separate Data memory and separate Code or Program
memory . The Fig. 5 and Fig .6 show the need for separate address and data bus for each
Program and Data memory in Harvard architecture. Since there are separate bus for access the
operation of fetching the code and data can happen simultaneously which increases the speed
of operation of execution inside CPU.
Fig. 5.Organization of I/O registers in Harvard Architecture
Microcontrollers 10ES42
Department of EEE, SJBIT Page 10
In Fig. 5, the first option is difficult to implement as there is no means to write to program
ROM area. It is also complicated to have a separate I/O space as shown in (3). Hence the
second option where I/O registers are placed in the register space is widely used in Harvard
architecture.
Fig6. Harvard Architecture
Computer Software: A set of instructions written in a specific sequence for computer to
solve a specific task is called a program, and software is collection of programs. The program
stored in the computer memory in the form of 0s and 1sand it is called as machine level
instructions. Since it would be difficult to remember machine codes in the form of binary
numbers an intermediate level of language for programming, between higher and machine
level was developed and is known as assembly level language . Assembly language programs
are written using assembly instructions known as mnemonics.
For example in CLR A, instruction CLR means clear and A means accumulator. The program
mnemonics are converted to machine codes in the form of binary by a software called
Assembler.
The Assembly language programming requires a detailed knowledge of the architecture
with which the program is executed. In order to overcome the drawback of assembly language
programming Higher level language like C,C++ are introduced where an interpreter or a
compiler takes care of translating a higher level source code into machine codes.
Development/Classification of microcontrollers : Microcontrollers have gone through a
silent evolution (invisible). The evolution can be rightly termed as silent as the impact or
application of a microcontroller is not well known to a common user, although
microcontroller technology has undergone significant change since early 1970's. Development
of some popular microcontrollers is given as follows.
Intel 4004
4 bit (2300 PMOS trans, 108
kHz)
1971
Intel 8048 8 bit 1976
Intel 8031 8 bit (ROM-less) .
Intel 8051 8 bit (Mask ROM) 1980
C
P
U
Data
Memory
Program
Memory
Data
Addres
s
Addres
s
Data
Microcontrollers 10ES42
Department of EEE, SJBIT Page 11
Microchip PIC16C64 8 bit 1985
Motorola 68HC11 8 bit (on chip ADC) .
Intel 80C196 16 bit 1982
Atmel AT89C51 8 bit (Flash memory) .
Microchip PIC 16F877 8 bit (Flash memory + ADC) .
We use more number of microcontrollers compared to microprocessors. Microprocessors are
primarily used for computational purpose, whereas microcontrollers find wide application in
devices needing real time processing and control. Application of microcontrollers are numerous.
Starting from domestic applications such as in washing machines, TVs, air conditioners,
microcontrollers are used in automobiles, process control industries , cell phones, electrical
drives, robotics and in space applications.
Fig. 7. Internal Structure of a typical Microcontroller
The one we are studying is a 8 bit Embedded Microcontroller introduced by Intel, 8051.
8051 ARCHITECTURE:
Microcontrollers 10ES42
Department of EEE, SJBIT Page 12
Fig 8. Block diagram of 8051 Microcontroller
Salient Features
• Eight bit CPU with registers A (Accumulator) and B
• Sixteen bit Program counter (PC) and a data pointer (DPTR)
• 8 Bit Program Status Word (PSW)
• 8 Bit Stack Pointer
• 4K Code Memory
• Internal Memory of 128 Bytes
• 32 I/O Pins arranged as 4 , 8 Bit ports
• Two 16 Bit Timer/Counter :T0, T1
• Full Duplex serial data receiver/transmitter
• Control Registers : TCON,TMOD,SCON,PCON,IP and IE
• Two External and Internal Interrupt sources
• Oscillator and clock circuits
The programming model of 8051 shows the 8051 as the collection of 8 and 16 bit registers and 8
bit memory locations. These registers and memory locations can be made to operate using
software instructions that are incorporated as part of the program instructions. The pin
configuration of 8051 is shown in Fig.9.
ALU PSW
A B
SFR
GPR & RAM
ROM
PC DPTR
DPH
DPL
Port
0
Port
2
Port
3
Port
1
I/O
A0-A7
D0-D7
I/O
I/O
A8-A15
I/O
INT
CNTR
SERIAL
RD/WR
Microcontrollers 10ES42
Department of EEE, SJBIT Page 13
Fig.9 Pin configuration of 8051
8051 Clock and Instruction Cycle:
The heart of 8051 is the circuitry that generates the clock pulses by which all internal operations
are synchronised. Pins XTAL1 and XTAL2 are provided for connecting resonator to form an
oscillator. The crystal frequency is the basic internal frequency of the microcontroller. 8051 is
designed to operate between 1MHz to 16MHz and generally operates with a crystal frequency
11.04962 MHz.
The oscillator formed by the crystal , capacitor and an on-chip inverter generates a pulse train at
the frequency of the crystal. The clock frequency f establishes the smallest interval to accomplish
any simple instruction. The time taken to complete any instruction is called as machine cycle or
instruction cycle. In 8051 one instruction cycle consists of 6 states or 12 clock cycles, instruction
cycle is also referred as Machine
Microcontroller Chips :
Broad Classification of different microcontroller chips could be as follows:
Embedded (Self -Contained) 8 - bit Microcontroller
16 to 32 Microcontrollers
Digital Signal Processors
Microcontrollers 10ES42
Department of EEE, SJBIT Page 14
cycle.
Fig. 10 Instruction cycle of 8051(Instruction cycle has six states (S 1 - S 6 ). Each state has two
pulses (P1 and P2))
Processor Architectures:
Fig 11.Basic 8051 Architecture
Internal Memory:
A functioning computer memory for program code bytes , commonly in ROM, and RAM
memory for variable data that can be altered as the program runs.. Additional memory can be
added externally using suitable circuits.
Unlike microcontrollers with Von- Neumann architectures, which can use a single memory
address for either program code or data, but not for both, the 8051 has Harvard architecture which
uses the same address in different memories for code and data The internal circuitry accesses the
current memory based on the nature of operation in the program.
Internal RAM: The 128 bytes internal RAM is organized into 3 distinct areas.
1. 32 bytes from address 00h to 1fh that make up 32 working registers organized as 4
memory banks of 8 registers each. The 4 register banks are numbered 0 to 3 and are made
Microcontrollers 10ES42
Department of EEE, SJBIT Page 15
up of 8 registers named R0 to R7. Each register can be addressed by name or by its RAM
addresses. Thus R0 of bank3 is R0 (if bank3 is selected) or address 18h (where bank3 is
selected). Bits RS0 and RS1 in the PSW determine which bank of registers is currently in
use at any time when program is running. Register banks not selected can be used as
general purpose RAM. Bank0 is selected by default on reset..
2. A bit addressable area of 16 bytes occupies RAM byte addresses 20h to 2fh, forming total
of 128 bits. An addressable bit may be specified by its bit address of 00h to 7fh or 8 bits
may form any byte address from 20h to 2fh.For example bit address 4fh is also bit 7 of
byte address 29h. Addressable bits are useful when the program need only remember a
binary event.
3. A general purpose RAM area above the bit area from 30h to 7f h, addressable as byte.
Fig.12. Internal RAM structure
The Stack and Stack pointer:
The stack refers to an area of internal RAM that is used in conjunction with certain opcodes
to store and retrieve data quickly. The 8 bit Stack Pointer (SP) register is used by the 8051 to
hold internal RAM address that is called the top of the stack. The address in SP register is the
location in internal RAM where the last byte of the data was stored by stack operation.
When data is to be placed on the stack , the SP increments before storing data on the stack so
that the stack grows up as data is stored. Whenever data is retrieved from the stack, the byte is
Microcontrollers 10ES42
Department of EEE, SJBIT Page 16
read from the stack and then the SP decrements to point to the next available byte of stored
data.
Operation of the Stack and Stack Pointer: Operation of the stack is shown in the above
figure. The SP is set to 07 when the 8051 is reset and can be changed to any internal RAM
address by the programmer. The stack is limited in height to the size of internal RAM. The
stack can overwrite valuable data in register banks, bit addressable RAM and scratched pad
RAM areas.It is programmer‟s responsibility to make it sure that the stack does not grow
beyond predefined bounds. The stack is normally placed high in the internal RAM by an
appropriate choice of the number placed in SP register, to avoid conflict with registers or
RAM.
Special Function Registers (SFRs):
The 8051 operations that do not use the internal RAM addresses from 00h to 7fh are done by
a group of specific internal registers each called a specific function register (SFR) which may
be addressed much like internal RAM using addresses from 80h to ffh.
Some SFRs are also bit addressable as is the case for the bit area of RAM. This feature allows
the programmer the programmer to change only what needs to be altered leaving the
remaining bits in that SFR unchanged. Not all of the addresses from 80h to ffh are used for
SFRs . Only the addressed ones can be used in programming SFRs and equivalent internal
RAM addresses are shown in Fig.10.
SFR Map: The set of Special Function Registers (SFRs) contain important registers such as
Accumulator, Register B, I/O Port latch registers, Stack pointer, Data Pointer, Processor
Status Word (PSW) and various control registers. Some of these registers are bit addressable
(they are marked with a * in the Fig. 13 below). The detailed map of various registers is
shown in the following figure.
The PC is not part of the SFR 0e0h or 8ch. and has no internal RAM address. SFRs are
named in certain opcodes by their function names as A, TH0 and can also be referred by their
addresses such as
Address
F8H
F0H B*
E8H
E0H ACC*
D8H
D0H PSW*
C8H (T2CON)* (RCAP2L) (RCAP2H) (TL2) (TH2)
C0H
B8H IP*
B0H P3*
A8H IE*
A0H P2*
98H SCON* SBUF
Microcontrollers 10ES42
Department of EEE, SJBIT Page 17
90H P1*
88H TCON* TMOD TL0 TL1 TH0 TH1
80H P0* SP DPL DPH PCON
Fig.13 Special Function Registers and the addresses
Internal ROM
8051 is organized so that data memory and program code memory can be two entirely
different physical memory entities. Each has the same address ranges. The internal program
ROM occupies code address space 000h to 0fffh. The PC is normally used to address program
code bytes from address 0000h to ffffh. Program addresses higher than offfh which exceed the
internal ROM capacity will cause the 8051 to automatically fetch code bytes from external
memory, addresses 00h to ffffh by connecting the external access pin (EA) to ground.
I/O Port pins, Ports and Circuits:One major feature of a microcontroller is versatility built
into the I/O circuits that connect the 8051 to the outside world. Out of 40 pins 24 pins may
each be used for one of two entirely different functions yielding a total pin configuration of
64.But the port pins have been multiplexed to perform different functions to make 8051 as 40
Pin IC.
The port pin circuitry is as shown below.
Fig. 14 Port -0
Port -0 has 8 pins (P0.0-P0.7).The structure of a Port-0 pin is shown in fig 13.Port-0 can be
configured as a normal bidirectional I/O port or it can be used for address/data interfacing for
Microcontrollers 10ES42
Department of EEE, SJBIT Page 18
accessing external memory. When control is '1', the port is used for address/data interfacing.
When the control is '0', the port can be used as a normal bidirectional I/O port.
Let us assume that control is '0'. When the port is used as an input port, '1' is written to the
latch. In this situation both the output MOSFETs are 'off'. Hence the output pin floats. This
high impedance pin can be pulled up or low by an external source. When the port is used as an
output port, a '1' written to the latch again turns 'off' both the output MOSFETs and causes the
output pin to float. An external pull-up is required to output a '1'. But when '0' is written to the
latch, the pin is pulled down by the lower MOSFET. Hence the output becomes zero.
When the control is '1', address/data bus controls the output driver MOSFETs. If the
address/data bus (internal) is '0', the upper MOSFET is 'off' and the lower MOSFET is 'on'.
The output becomes '0'. If the address/data bus is '1', the upper transistor is 'on' and the lower
transistor is 'off'. Hence the output is '1'. Hence for normal address/data interfacing (for
external memory access) no pull-up resistors are required. Port-0 latch is written to with 1's
when used for external memory access.
Port-1 Pin Structure:
Port-1 has 8 pins (P1.1-P1.7) .The structure of a port-1 pin is shown in fig 15
Fig 15. Port 1 Structure
Port-1 does not have any alternate function i.e. it is dedicated solely for I/O interfacing. When
used as output port, the pin is pulled up or down through internal pull-up. To use port-1 as
input port, '1' has to be written to the latch. In this input mode when '1' is written to the pin by
the external device then it reads fine. But when '0' is written to the pin by the external device
then the external source must sink current due to internal pull-up. If the external device is not
able to sink the current the pin voltage may rise, leading to a possible wrong reading.
Microcontrollers 10ES42
Department of EEE, SJBIT Page 19
Port-2 Pin Structure:
Port-2 has 8-pins (P2.0-P2.7) . The structure of a port-2 pin is shown in fig 14.
Fig. 16.PORT 2 Pin Structure
Port-2 is used for higher external address byte or a normal input/output port. The I/O
operation is similar to Port-1. Port-2 latch remains stable when Port-2 pin are used for external
memory access. Here again due to internal pull-up there is limited current driving capability.
Port-3 Pin Structure:
Microcontrollers 10ES42
Department of EEE, SJBIT Page 20
Fig. 17.PORT 3 Pin Structure:
Each pin of Port-3 can be individually programmed for I/O operation or for alternate function.
The alternate function can be activated only if the corresponding latch has been written to '1'.
To use the port as input port, '1' should be written to the latch. This port also has internal pull-
up and limited current driving capability.
Alternate functions of Port-3 pins –
Note:
1. Port 1, 2, 3 each can drive 4 LS TTL inputs.
2. Port-0 can drive 8 LS TTL inputs in address /data mode. For digital output port, it needs
external pull-up resistors.
3. Ports-1,2and 3 pins can also be driven by open-collector or open-drain outputs.
Each Port 3 bit can be configured either as a normal I/O or as a special function bit. Reading a
port (port-pins) versus reading a latch. There is a subtle difference between reading a latch
and reading the output port pin.
P3.0 RxD
P3.1 TxD
P3.2
P3.3
P3.4 T0
P3.5 T1
P3.6
P3.7
Microcontrollers 10ES42
Department of EEE, SJBIT Page 21
The status of the output port pin is sometimes dependant on the connected load. For instance
if a port is configured as an output port and a '1' is written to the latch, the output pin should
also show '1'. If the output is used to drive the base of a transistor, the transistor turns 'on'. If
the port pin is read, the value will be '0' which is corresponding to the base-emitter voltage of
the transistor. Reading a latch: Usually the instructions that read the latch, read a value,
possibly change it, and then rewrite it to the latch. These are called "read-modify-write"
instructions. Examples of a few instructions are-
ORL P2, A; P2 <-- P2 or A
MOV P2.1, C; Move carry bit to PX.Y bit
In this the latch value of P2 is read, is modified such that P2.1 is the same as Carry and is
then written back to P2 latch.
Reading a Pin: Examples of a few instructions that read port pin, are-
MOV A, P0; Move port-0 pin values to A
MOV A, P1; Move port-1 pin values to A
Connecting External Memory: The following figure shows the connection between an
8051 and external memory
Interfacing External Memory: The system designer is not limited by the amount of
internal ROM and RAM available on chip. Two separate external memory spaces are
made available by the 16 bit Program Counter PC and DPTR and by different control pins
for enabling the external ROM and RAM chips.
Internal control entry accesses the correct physical memory , depending on the machine
cycle state and opcode being executed . There are several reasons for adding external
memory, particularly Program Memory, when applying the 8051 in a system. When
project is in the prototype stage, having a masked internal ROM for each program “try” is
prohibitive. To help the programmer the manufacturers make available an EPROM
version, the 8751, which has 4K of on-chip EPROM that may be programmed and erased
as needed as the program is developed
If external program/data memory are to be interfaced, they are interfaced in the following
way.
Microcontrollers 10ES42
Department of EEE, SJBIT Page 22
Fig.18.Diagram for Interfacing of External Memory
External program memory is fetched if either of the following two conditions are satisfied.
1. Enable Address) is low. The microcontroller by default starts searching for program
from external program memory.
2. PC is higher than FFFH for 8051 or 1FFFH for 8052.
3. tells the outside world whether the external memory fetched is program memory or
data memory. is user configurable. is processor controlled.
Accessing external memory: Access to external program memory uses the signal
(Program store enable) as the read strobe. Access to external data memory uses
(alternate function of P3.7 and P3.6).
For external program memory, always 16 bit address is used. For example –Access to external
data memory can be either 8-bit address or 16-bit address - 8-bit address- MOVX A, @Rp
where Rp is either R0 or R1
MOVX @Rp, A
16 bit address- MOVX A,@DPTR
MOV X @DPTR, A.The external memory access in 8051 can be shown by a schematic
diagram as given in fig 19.
Microcontrollers 10ES42
Department of EEE, SJBIT Page 23
Fig 19. Schematic diagram of external memory access
If an 8-bit external address is used for data memory (i.e. MOVX @Rp) then the content of Port-2
SFR remains at Port-2 pins throughout the external memory cycle. This facilitates memory paging
as the upper 8 bit address remains fixed.
During any access to external memory, the CPU writes FFH to Port-0 latch (SFR). If the user
writes to Port-0 during an external memory fetch, the incoming byte is corrupted.
External program memory is accessed under the following condition.
1. Whenever is low, or whenever PC contains a number higher than 0FFFH (for 8051) or
1FFF (for 8052).
Some typical use of code/program memory access: External program memory can be not only
used to store the code, but also for lookup table of various functions required for a particular
application. Mathematical functions such as Sine, Square root, Exponential, etc. can be stored in
the program memory (Internal or external) and these functions can be accessed using MOVC
instruction.
Timers / Counters :
8051 has two 16-bit programmable UP timers/counters. They can be configured to operate either
as timers or as event counters. The names of the two counters are T0 and T1 respectively. The
timer content is available in four 8-bit special function registers, viz, TL0,TH0,TL1 and TH1
respectively.
In the "timer" function mode, the counter is incremented in every machine cycle. Thus, one can
think of it as counting machine cycles. Hence the clock rate is 1/12 th
of the oscillator frequency.
Microcontrollers 10ES42
Department of EEE, SJBIT Page 24
In the "counter" function mode, the register is incremented in response to a 1 to 0 transition at its
corresponding external input pin (T0 or T1). It requires 2 machine cycles to detect a high to low
transition. Hence maximum count rate is 1/24 th
of oscillator frequency.
The operation of the timers/counters is controlled by two special function registers, TMOD and
TCON respectively.
Timer Mode control (TMOD) Special Function Register:
TMOD register is not bit addressable.
TMOD Address: 89 H
Various bits of TMOD are described as follows –Gate: This is an OR Gate enabled bit which
controls the effect of on START/STOP of Timer. It is set to one ('1') by the program to
enable the interrupt to start/stop the timer. If TR1/0 in TCON is set and signal on pin is high
then the timer starts counting using either internal clock (timer mode) or external pulses (counter
mode).
It is used for the selection of Counter/Timer mode.
Mode Select Bits:
M1 and M0 are mode select bits.
Timer/ Counter control logic:
Microcontrollers 10ES42
Department of EEE, SJBIT Page 25
Fig .20. Timer/Counter Control Logic
Timer control (TCON) Special function register:
TCON is bit addressable. The address of TCON is 88H. It is partly related to Timer and partly to
interrupt.
Fig. 20. TCON Register
The various bits of TCON are as follows. TF1 : Timer1 overflow flag. It is set when timer rolls
from all 1s to 0s. It is cleared when processor vectors to execute ISR located at address 001BH.
TR1:Timer1 run control bit. Set to1tostartthe timer / counter.
TF0:Timer0overflowflag.(SimilartoTF1)TR0:Timer0 run control bit.
IE1 : Interrupt1 edge flag. Set by hardware when an external interrupt edge is detected. It is
interrupt is processed.
IE0:Interrupt0edgeflag.(SimilartoIE1)
IT1 : Interrupt1 type control bit. Set/ cleared by software to specify falling edge / low level
triggered external interrupt.
IT0 : Interrupt0 type control bit. (Similar to IT1)
As mentioned earlier, Timers can operate in four different modes. They are as follows
Timer Mode-0:
In this mode, the timer is used as a 13-bit UP counter as follows.
Microcontrollers 10ES42
Department of EEE, SJBIT Page 26
Fig. 21. Operation of Timer on Mode-0
The lower 5 bits of TLX and 8 bits of THX are used for the 13 bit count.Upper 3 bits of TLX are
ignored. When the counter rolls over from all 0's to all 1's, TFX flag is set and an interrupt is
generated.
The input pulse is obtained from the previous stage. If TR1/0 bit is 1 and Gate bit is 0, the counter
continues counting up. If TR1/0 bit is 1 and Gate bit is 1, then the operation of the counter is
controlled by input. This mode is useful to measure the width of a given pulse fed to
input.
Timer Mode-1:
This mode is similar to mode-0 except for the fact that the Timer operates in 16-bit mode.
.
Fig .22of Timer in Mode 1
Timer Mode-2: (Auto-Reload Mode)
This is a 8 bit counter/timer operation. Counting is performed in TLX while THX stores a
constant value. In this mode when the timer overflows i.e. TLX becomes FFH, it is fed with the
value stored in THX. For example if we load THX with 50H then the timer in mode 2 will count
from 50H to FFH. After that 50H is again reloaded. This mode is useful in applications like fixed
time sampling.
Fig .23. Operation of Timer in Mode 2
Timer Mode-3:
Microcontrollers 10ES42
Department of EEE, SJBIT Page 27
Timer 1 in mode-3 simply holds its count. The effect is same as setting TR1=0. Timer0 in mode-3
establishes TL0 and TH0 as two separate counters.
Fig. 24. Operation of Timer in Mode 3
Control bits TR1 and TF1 are used by Timer-0 (higher 8 bits) (TH0) in Mode-3 while TR0 and
TF0 are available to Timer-0 lower 8 bits(TL0).
Serial Interface
The serial port of 8051 is full duplex, i.e., it can transmit and receive simultaneously. The register
SBUF is used to hold the data. The special function register SBUF is physically two registers.
One is, write-only and is used to hold data to be transmitted out of the 8051 via TXD. The other
is, read-only and holds the received data from external sources via RXD. Both mutually exclusive
registers have the same address 099H.
Serial Port Control Register (SCON)
Register SCON controls serial data communication.
Address: 098H (Bit addressable)
Mode select bits
Microcontrollers 10ES42
Department of EEE, SJBIT Page 28
SM2:multi processor communication bit
REN: Receive enable bit
TB8: Transmitted bit 8 (Normally we have 0-7 bits transmitted/received)
RB8: Received bit 8
TI: Transmit interrupt flag
RI: Receive interrupt flag
Power Mode control Register
Register PCON controls processor powerdown, sleep modes and serial data bandrate. Only one
bit of PCON is used with respect to serial communication. The seventh bit (b7)(SMOD) is used to
generate the baud rate of serial communication.
Address: 87H
SMOD: Serial baud rate modify bit
GF1: General purpose user flag bit 1
GF0: General purpose user flag bit 0
PD: Power down bit
IDL: Idle mode bit
Data Transmission :Transmission of serial data begins at any time when data is written to SBUF.
Pin P3.1 (Alternate function bit TXD) is used to transmit data to the serial data network. TI is set
to 1 when data has been transmitted. This signifies that SBUF is empty so that another byte can be
sent
Data Reception: Reception of serial data begins if the receive enable bit is set to 1 for all modes.
Pin P3.0 (Alternate function bit RXD) is used to receive data from the serial data network.
Receive interrupt flag, RI, is set after the data has been received in all modes. The data gets stored
in SBUF register from where it can be read
Serial Data Transmission Modes:
Mode-0: In this mode, the serial port works like a shift register and the data transmission works
synchronously with a clock frequency of fosc /12. Serial data is received and transmitted through
RXD. 8 bits are transmitted/ received aty a time. Pin TXD outputs the shift clock pulses of
frequency fosc /12, which is connected to the external circuitry for synchronization. The shift
frequency or baud rate is always 1/12 of the oscillator frequency
Microcontrollers 10ES42
Department of EEE, SJBIT Page 29
Fig .25. Data transmission/reception in Mode-0
Mode-1 (standard UART mode) :
In mode-1, the serial port functions as a standard Universal Asynchronous Receiver Transmitter
(UART) mode. 10 bits are transmitted through TXD or received through RXD. The 10 bits
consist of one start bit (which is usually '0'), 8 data bits (LSB is sent first/received first), and a
stop bit (which is usually '1'). Once received, the stop bit goes into RB8 in the special function
register SCON. The baud rate is variable.
The following figure shows the way the bits are transmitted/ received.
Fig .26. Data transmission format in UART mode
Bit time= 1/fbaud
In receiving mode, data bits are shifted into the receiver at the programmed baud rate. The data
word (8-bits) will be loaded to SBUF if the following conditions are true.
1. RI must be zero. (i.e., the previously received byte has been cleared from SBUF)
Mode bit SM2 = 0 or stop bit = 1.
After the data is received and the data byte has been loaded into SBUF, RI becomes one.
Mode-1 baud rate generation:
Microcontrollers 10ES42
Department of EEE, SJBIT Page 30
Timer-1 is used to generate baud rate for mode-1 serial communication by using overflow flag of
the timer to determine the baud frequency. Timer-1 is used in timer mode-2 as an auto-reload 8-
bit timer. The data rate is generated by timer-1 using the following formula.
Where, SMOD is the 7th
bit of PCON register
fosc is the crystal oscillator frequency of the microcontroller
It can be noted that fosc/ (12 X [256- (TH1)]) is the timer overflow frequency in timer mode-2,
which is the auto-reload mode.
If timer-1 is not run in mode-2, then the baud rate is,
Timer-1 can be run using the internal clock,
fosc/12 (timer mode) or from any external source via pin T1 (P3.5) (Counter mode).
Example: If standard baud rate is desired, then 11.0592 MHz crystal could be selected. To get a
standard 9600 baud rate, the setting of TH1 is calculated as follows.
Assuming SMOD to be '0'
Or,
Or,
In mode-1, if SM2 is set to 1, no receive interrupt (RI) is generated unless a valid stop bit is
received.
Interrupts:
8051 provides 5 vectored interrupts. They are-
1.
2. TF0
3.
4. TF1
5. RI/TI
Out of these, and are external interrupts whereas Timer and Serial port interrupts are
generated internally. The external interrupts could be negative edge triggered or low level triggered.
All these interrupt, when activated, set the corresponding interrupt flags. Except for serial interrupt,
the interrupt flags are cleared when the processor branches to the Interrupt Service Routine (ISR).
The external interrupt flags are cleared on branching to Interrupt Service Routine (ISR), provided
the interrupt is negative edge triggered. For low level triggered external interrupt as well as for
serial interrupt, the corresponding flags have to be cleared by software by the programmer.
Microcontrollers 10ES42
Department of EEE, SJBIT Page 31
UNIT 2:
Addressing Modes: Introduction, Instruction syntax, Data types, Subroutines, Addressing modes:
Immediate addressing , Register addressing, Direct addressing, Indirect addressing, relative
addressing, Absolute addressing, Long addressing, Indexed addressing, Bit inherent addressing,
bit direct addressing. Instruction set: Instruction timings, 8051 instructions: Data transfer
instructions, Arithmetic instructions, Logical instructions, Branch instructions, Subroutine
instructions, Bit manipulation instruction.
Instruction set of 8051
1. Data transfer instructions
a. MOV <dest-byte>,<src-byte>-
Function: Move byte variable
Description: The byte variable indicated by the second operand is copied into the
location specified by the first operand. The source byte is not affected. No other
register or flag is affected.
1. mov direct , A
2. mov A, @Ri
3. mov A, Rn
4. mov direct, direct
5. mov A, #data
EX: MOV 30h, A
MOV A,@R0 ; moves the content of memory pointed to by Ro into A
MOV A, R1; ;moves the content of Register R1 to Accumulator A
MOV 20h,30h;moves the content of memory location 30h to 20h
MOV A,#45h;moves 45h to Accumulator A
MOV <dest-bit>,<src-bit>
Function: Move bit data
Description: MOV <dest-bit>,<src-bit> copies the Boolean variable indicated by the
second operand into the location specified by the first operand. One of the operands must
be the carry flag; the other may be any directly addressable bit. No other register or flag
is affected.
Example: MOV P1.3,C; moves the carry bit to 3rd
bit of port1
C. MOV DPTR,#data16
Microcontrollers 10ES42
Department of EEE, SJBIT Page 32
Function: Load Data Pointer with a 16-bit constant
Description: MOV DPTR,#data16 loads the Data Pointer with the 16-bit constant indicated. The
16-bit constant is loaded into the second and third bytes of the instruction. The second byte (DPH)
is the high-order byte, while the third byte
(DPL) holds the lower-order byte. No flags are affected.
This is the only instruction which moves 16 bits of data at once.
Example: The instruction, MOV DPTR, # 4567H
loads the value 4567H into the Data Pointer. DPH holds 45H, and DPL holds 67H.
d. MOVC A,@A+ <base-reg>
Function: Move Code byte
Description: The MOVC instructions load the Accumulator with a code byte or constant from
program memory. The address of the byte fetched is the sum of the original unsigned 8-bit
Accumulator contents and the contents of a 16-bit base register, which may be either the Data
Pointer or the PC. In the latter case, the PC is incremented to the address of the following
instruction before being added with the Accumulator; otherwise the base register is not altered.
Sixteen-bit addition is performed so a carry-out from the low-order eight bits may propagate
through higher-order bits. No flags are affected.
e. MOVC A,@A+PC
(PC) (PC) + 1
(A) ((A) + (PC))
f. MOVX <dest-byte>,<src-byte>
Function: Move External
Description: The MOVX instructions transfer data between the Accumulator and a byte of
external data memory, which is why “X” is appended to MOV. There are two types of
instructions, differing in whether they provide an 8-bit or 16-bit indirect address to the external
data RAM.
In the first type, the contents of R0 or R1 in the current register bank provide an 8-bit address
multiplexed with data on P0. Eight bits are sufficient for external I/O expansion decoding or for a
relatively small RAM array. For somewhat larger arrays, any output port pins can be used to
output higher-order address bits. These pins are
controlled by an output instruction preceding the MOVX.
Microcontrollers 10ES42
Department of EEE, SJBIT Page 33
In the second type of MOVX instruction, the Data Pointer generates a 16-bit address. P2 outputs
the high-order eight address bits (the contents of DPH), while P0 multiplexes the low-order eight
bits (DPL) with data. The P2 Special Function Register retains its previous contents, while the P2
output buffers emit the contents of DPH.
This form of MOVX is faster and more efficient when accessing very large data arrays (up to 64K
bytes), since no additional instructions are needed to set up the output ports.
It is possible to use both MOVX types in some situations. A large RAM array with its high-order
address lines driven by P2 can be addressed via the Data Pointer, or with code to output high-
order address bits to P2, followed by a MOVX instruction using R0 or R1.
Example: An external 256 byte RAM using multiplexed address/data lines is connected to the
8051 Port 0. Port 3 provides control lines for the external RAM. Ports 1 and 2 are used for normal
I/O. Registers 0 and 1 contain 12H and 34H. Location 34H of the external RAM holds the value
56H. The instruction sequence,
MOVX A,@R1
MOVX @R0,A
copies the value 56H into both the Accumulator and external RAM location 12H.
MOVX A,@DPTR
((DPTR))
PUSH direct
Function: Push onto stack
Description: The Stack Pointer is incremented by one. The contents of the indicated variable is
then copied into the internal RAM location addressed by the Stack Pointer. No flags are affected.
Example: On entering an interrupt routine, the Stack Pointer contains 09H. The Data Pointer
holds the value 0123H. The
following instruction sequence,
PUSH DPL
PUSH DPH
leaves the Stack Pointer set to 0BH and stores 23H and 01H in internal RAM locations 0AH and
0BH,
respectively.
Microcontrollers 10ES42
Department of EEE, SJBIT Page 34
POP direct
Function: Pop from stack.
Description: The contents of the internal RAM location addressed by the Stack Pointer is read,
and the Stack Pointer is decremented by one. The value read is then transferred to the directly
addressed byte indicated. No flags are affected.
Example: The Stack Pointer originally contains the value 32H, and internal RAM locations 30H
through 32H contain the values 20H, 23H, and 01H, respectively. The following instruction
sequence,
POP DPH
POP DPL
leaves the Stack Pointer equal to the value 30H and sets the Data Pointer to 0123H.
2. Arithmetic Group of Instructions
a. ADD A,<src-byte>
Function: Add
Description: ADD adds the byte variable indicated to the Accumulator, leaving the result in the
Accumulator. The carry and auxiliary-carry flags are set, respectively, if there is a carry-out from
bit 7 or bit 3, and cleared otherwise. When adding unsigned integers, the carry flag indicates an
overflow occurred.
OV is set if there is a carry-out of bit 6 but not out of bit 7, or a carry-out of bit 7 but not bit 6;
otherwise, OV is cleared. When adding signed integers, OV indicates a negative number
produced as the sum of two positive operands, or a positive sum from two negative operands.
Four source operand addressing modes are allowed: register, direct, register-indirect, or
immediate.
Example: The Accumulator holds 0C3H (1100001lB), and register 0 holds 0AAH (10101010B).
The following instruction,
ADD A,R0
leaves 6DH (01101101B) in the Accumulator with the AC flag cleared and both the carry flag and
OV set to 1.
ADD A, direct
Microcontrollers 10ES42
Department of EEE, SJBIT Page 35
(A)
ADD A, @Ri
(A) (A) + data
ADDC A, <src-byte>
Function: Add with Carry
Description: ADDC simultaneously adds the byte variable indicated, the carry flag and the
Accumulator contents, leaving the result in the Accumulator. The carry and auxiliary-carry flags
are set respectively, if there is a carry-out from bit 7 or bit 3, and cleared otherwise. When adding
unsigned integers, the carry flag indicates an overflow occurred.
OV is set if there is a carry-out of bit 6 but not out of bit 7, or a carry-out of bit 7 but not out of bit
6; otherwise OV is cleared. When adding signed integers, OV indicates a negative number
produced as the sum of two positive operands or a positive sum from two negative operands.
Four source operand addressing modes are allowed: register, direct, register-indirect, or
immediate.
Example: The Accumulator holds 0C3H (11000011B) and register 0 holds 0AAH (10101010B)
with the carry flag set. The following instruction,
ADDC A,R0
leaves 6EH (01101110B) in the Accumulator with AC cleared and both the Carry flag and OV set
to 1.
ADDC A,Rn Operation: ADDC
(A)
ADDC A, direct Operation: ADDC
(A) (A) + (C) + (direct)
ADDC A, @Ri Operation: ADDC
(A) + (C) + ((Ri))
ADDC A, #data Operation: ADDC (A) (A) + (C) + #data
SUBB A,<src-byte>
Function: Subtract with borrow
Microcontrollers 10ES42
Department of EEE, SJBIT Page 36
Description: SUBB subtracts the indicated variable and the carry flag together from the
Accumulator, leaving the result in the Accumulator. SUBB sets the carry (borrow) flag if a
borrow is needed for bit 7 and clears C otherwise. (If C was set before executing a SUBB
instruction, this indicates that a borrow was needed for the previous step in a
multiple-precision subtraction, so the carry is subtracted from the Accumulator along with the
source operand.)
AC is set if a borrow is needed for bit 3 and cleared otherwise. OV is set if a borrow is needed
into bit 6, but not into bit 7, or into bit 7, but not bit 6.
When subtracting signed integers, OV indicates a negative number produced when a negative
value is subtracted from a positive value, or a positive result when a positive number is subtracted
from a negative number.
The source operand allows four addressing modes: register, direct, register-indirect, or immediate.
Example: The Accumulator holds 0C9H (11001001B), register 2 holds 54H (01010100B), and
the carry flag is set. The instruction,
SUBB A,R2
will leave the value 74H (01110100B) in the accumulator, with the carry flag and AC cleared but
OV set.
Instructions OpCode Bytes Flags
SUBB A,#data 0x94 2 C, AC, OV
SUBB A,iram addr 0x95 2 C, AC, OV
SUBB A,@R0 0x96 1 C, AC, OV
SUBB A,@R1 0x97 1 C, AC, OV
SUBB A,R0 0x98 1 C, AC, OV
SUBB A,R1 0x99 1 C, AC, OV
SUBB A,R2 0x9A 1 C, AC, OV
SUBB A,R3 0x9B 1 C, AC, OV
SUBB A,R4 0x9C 1 C, AC, OV
SUBB A,R5 0x9D 1 C, AC, OV
SUBB A,R6 0x9E 1 C, AC, OV
Microcontrollers 10ES42
Department of EEE, SJBIT Page 37
SUBB A,R7 0x9F 1 C, AC, OV
SUBB A,Rn
Operation: SUBB
(A) - (C) - (Rn)
SUBB A, direct
Operation: SUBB
(A) - (C) - (direct)
SUBB A,@Ri
Operation: SUBB
(A) - (C) - ((Ri))
SWAP A
Function: Swap nibbles within the Accumulator
Description: SWAP A interchanges the low- and high-order nibbles (four-bit fields) of the
Accumulator (bits 3 through 0 and bits 7 through 4). The operation can also be thought of as a 4-
bit rotate instruction. No flags are affected.
Example: The Accumulator holds the value 0C5H (11000101B). The instruction,
SWAP A
leaves the Accumulator holding the value 5CH (01011100B
Operation: SWAP
(A3-0) D (A7-4)
XCH A,<byte>
Function: Exchange Accumulator with byte variable
Description: XCH loads the Accumulator with the contents of the indicated variable, at the same
time writing the original Accumulator contents to the indicated variable. The source/destination
operand can use register, direct, or register-indirect addressing.
Microcontrollers 10ES42
Department of EEE, SJBIT Page 38
Example: R0 contains the address 20H. The Accumulator holds the value 3FH (0011111lB).
Internal RAM location 20H holds the value 75H (01110101B).
The following instruction,
XCH A,@R0
leaves RAM location 20H holding the values 3FH (00111111B) and 75H (01110101B) in the
accumulator.
XCHD A,@Ri
Function: Exchange Digit
Description: XCHD exchanges the low-order nibble of the Accumulator (bits 3 through 0),
generally representing a hexadecimal or BCD digit, with that of the internal RAM location
indirectly addressed by the specified register.
The high-order nibbles (bits 7-4) of each register are not affected. No flags are affected.
Example: R0 contains the address 20H. The Accumulator holds the value 36H (00110110B).
Internal RAM location 20H holds the value 75H (01110101B).
The following instruction,
XCHD A,@R0
leaves RAM location 20H holding the value 76H (01110110B) and 35H (00110101B) in the
Accumulator.
CPL A
Function: Complement Accumulator
Description: CPLA logically complements each bit of the Accumulator (one‟s complement). Bits
which previously contained a 1 are changed to a 0 and vice-versa. No flags are affected.
Example: The Accumulator contains 5CH (01011100B).
The following instruction,
CPL A
leaves the Accumulator set to 0A3H (10100011B).
CPL bit
Microcontrollers 10ES42
Department of EEE, SJBIT Page 39
Function: Complement bit
Description: CPL bit complements the bit variable specified. A bit that had been a 1 is changed
to 0 and vice-versa. No other flags are affected. CLR can operate on the carry or any directly
addressable bit.
Example: Port 1 has previously been written with 5BH (01011101B). The following instruction
sequence, CPL P1.1CPL
P1.2 leaves the port set to 5BH (01011011B).
DA A
Function: Decimal-adjust Accumulator for Addition
Description: DA A adjusts the eight-bit value in the Accumulator resulting from the earlier
addition of two variables (each in packed-BCD format), producing two four-bit digits. Any ADD
or ADDC instruction may have been used to perform the addition.
If Accumulator bits 3 through 0 are greater than nine or if the AC flag is one, six is added to the
Accumulator producing the proper BCD digit in the low-order nibble. This internal addition sets
the carry flag if a carry-out of the low-order four-bit field propagates through all high-order bits,
but it does not clear the carry flag otherwise.
If the carry flag is now set, or if the four high-order bits now exceed nine, these high-order bits
are incremented by six, producing the proper BCD digit in the high-order nibble. Again, this sets
the carry flag if there is a carry-out of the high-order bits, but does not clear the carry. The carry
flag thus indicates if the sum of the original two BCD variables is greater than 100, allowing
multiple precision decimal addition. OV is not affected.
DEC byte
Function: Decrement
Description: DEC byte decrements the variable indicated by 1. An original value of 00H
underflows to 0FFH. No flags are affected.
Example: Register 0 contains 7FH (01111111B). Internal RAM locations 7EH and 7FH contain
00H and 40H, respectively.
The following instruction sequence,
DEC @R0
DEC R0
DEC @R0
Microcontrollers 10ES42
Department of EEE, SJBIT Page 40
leaves register 0 set to 7EH and internal RAM locations 7EH and 7FH set to 0FFH and 3FH.
DEC A
DEC Rn
DEC direct
DEC @Ri
DIV AB
Function: Divide
Description: DIV AB divides the unsigned eight-bit integer in the Accumulator by the unsigned
eight-bit integer in register B.
The Accumulator receives the integer part of the quotient; register B receives the integer
remainder. The carry and OV flags are cleared.
Exception: if B had originally contained 00H, the values returned in the Accumulator and B-
register are undefined and the overflow flag are set. The carry flag is cleared in any case.
Example: The Accumulator contains 251 (0FBH or 11111011B) and B contains 18 (12H or
00010010B). The following instruction,
DIV AB
leaves 13 in the Accumulator (0DH or 00001101B) and the value 17 (11H or 00010001B) in B,
since
251 = (13 x 18) + 17. Carry and OV are both cleared.
INC <byte>
Function: Increment
Description: INC increments the indicated variable by 1. An original value of 0FFH overflows to
00H. No flags are affected.
Example: Register 0 contains 7EH (011111110B). Internal RAM locations 7EH and 7FH contain
0FFH and 40H,
respectively. The following instruction sequence,
INC @R0
Microcontrollers 10ES42
Department of EEE, SJBIT Page 41
INC R0
INC @R0
leaves register 0 set to 7FH and internal RAM locations 7EH and 7FH holding 00H and 41H,
respectively.
INC A
Operation: INC
(A)
INC DPTR
Function: Increment Data Pointer
Description: INC DPTR increments the 16-bit data pointer by 1. A 16-bit increment (modulo
216) is performed, and an overflow of the low-order byte of the data pointer (DPL) from 0FFH to
00H increments the high-order byte (DPH).
No flags are affected.
This is the only 16-bit register which can be incremented.
Example: Registers DPH and DPL contain 12H and 0FEH, respectively. The following
instruction sequence,
INC DPTR
INC DPTR
INC DPTR
changes DPH and DPL to 13H and 01H.
MUL AB
Function: Multiply
Description: MUL AB multiplies the unsigned 8-bit integers in the Accumulator and register B.
The low-order byte of the 16-bit product is left in the Accumulator, and the high-order byte in B.
If the product is greater than 255 (0FFH), the overflow flag is set; otherwise it is cleared. The
carry flag is always cleared.
Example: Originally the Accumulator holds the value 80 (50H). Register B holds the value 160
(0A0H). The instruction,
Microcontrollers 10ES42
Department of EEE, SJBIT Page 42
MUL AB
will give the product 12,800 (3200H), so B is changed to 32H (00110010B) and the Accumulator
is cleared. The overflow flag is set, carry is cleared.
NOP
Function: No Operation
Description: Execution continues at the following instruction. Other than the PC, no registers or
flags are affected.
Logical instructions
ANL <dest-byte>,<src-byte>
Function: Logical-AND for byte variables
Description: ANL performs the bitwise logical-AND operation between the variables indicated
and stores the results in the destination variable. No flags are affected.
The two operands allow six addressing mode combinations. When the destination is the
Accumulator, the source can use register, direct, register-indirect, or immediate addressing; when
the destination is a direct address, the source can be the Accumulator or immediate data.
.Example: If the Accumulator holds 0C3H (1100001lB), and register 0 holds 55H (01010101B),
then the following instruction,
ANL A,R0
leaves 41H (01000001B) in the Accumulator.
When the destination is a directly addressed byte, this instruction clears combinations of bits in
any RAM location or hardware register. The mask byte determining the pattern of bits to be
cleared would either be a constant contained in the instruction or a value computed in the
Accumulator at run-time. The following instruction,
ANL P1,#01110011B
clears bits 7, 3, and 2 of output port 1.
Instructions OpCode Bytes Flags
ANL iram addr,A 0x52 2 None
ANL iram addr,#data 0x53 3 None
ANL A,#data 0x54 2 None
Microcontrollers 10ES42
Department of EEE, SJBIT Page 43
ANL A,iram addr 0x55 2 None
ANL A,@R0 0x56 1 None
ANL A,@R1 0x57 1 None
ANL A,R0 0x58 1 None
ANL A,R1 0x59 1 None
ANL A,R2 0x5A 1 None
ANL A,R3 0x5B 1 None
ANL A,R4 0x5C 1 None
ANL A,R5 0x5D 1 None
ANL A,R6 0x5E 1 None
ANL A,R7 0x5F 1 None
ANL C,bit addr 0x82 2 C
ANL C,/bit addr 0xB0 2 C
ANL A,Rn
Operation: ANL
ANL A,@Ri
Operation: ANL
(A)
ANL direct,#data
Operation: ANL
ORL <dest-byte> <src-byte>
Function: Logical-OR for byte variables
Microcontrollers 10ES42
Department of EEE, SJBIT Page 44
Description: ORL performs the bitwise logical-OR operation between the indicated variables,
storing the results in the destination byte. No flags are affected.
Example: If the Accumulator holds 0C3H (11000011B) and R0 holds 55H (01010101B) then the
following instruction,
ORL A,R0
leaves the Accumulator holding the value 0D7H (1101011lB).
The instruction,
ORL P1,#00110010B
sets bits 5, 4, and 1 of output Port 1.
ORL A, Rn ; or the content of Accumulator and Register Rn and store the
result in Accumulator
ORL A, direct ; or the content of Accumulator and the memory and store the
result in Accumulator
ORL A, @Ri ; or the content of accumulator and the memory location whose
address is specified in Ri
ORL C,<src-bit>
Function: Logical-OR for bit variables
Description: Set the carry flag if the Boolean value is a logical 1; leave the carry in its current
state otherwise. A slash ( / ) preceding the operand in the assembly language indicates that the
logical complement of the addressed bit is used as the source value, but the source bit itself is not
affected. No other flags are affected.
Example:
ORL C, ACC.7 ;OR CARRY WITH THE ACC. BIT 7
ORL C, /OV ;OR CARRY WITH THE INVERSE OF OV.
SETB
Microcontrollers 10ES42
Department of EEE, SJBIT Page 45
Operation: SETB
Function: Set Bit
Syntax: SETB bit addr
Description: Sets the specified bit.
XRL <dest-byte>,<src-byte>
Function: Logical Exclusive-OR for byte variables
Description: XRL performs the bitwise logical Exclusive-OR operation between the indicated
variables, storing the results in the destination. No flags are affected.
The two operands allow six addressing mode combinations. When the destination is the
Accumulator, the source can use register, direct, register-indirect, or immediate addressing; when
the destination is a direct address, the source can be the Accumulator or immediate data.
Example: If the Accumulator holds 0C3H (1100001lB) and register 0 holds 0AAH (10101010B)
then the instruction,
XRL A,R0
leaves the Accumulator holding the value 69H (01101001B).
Instructions OpCode Bytes Flags
XRL iram addr,A 0x62 2 None
XRL iram addr,#data 0x63 3 None
XRL A,#data 0x64 2 None
XRL A,iram addr 0x65 2 None
XRL A,@R0 0x66 1 None
XRL A,@R1 0x67 1 None
XRL A,R0 0x68 1 None
XRL A,R1 0x69 1 None
XRL A,R2 0x6A 1 None
XRL A,R3 0x6B 1 None
XRL A,R4 0x6C 1 None
XRL A,R5 0x6D 1 None
XRL A,R6 0x6E 1 None
Microcontrollers 10ES42
Department of EEE, SJBIT Page 46
XRL A,R7 0x6F 1 None
Rotate Instructions
RL A
Function: Rotate Accumulator Left
Description: The eight bits in the Accumulator are rotated one bit to the left. Bit 7 is rotated into
the bit 0 position. No flags are affected.
Example: The Accumulator holds the value 0C5H (11000101B). The following instruction,
RL A
leaves the Accumulator holding the value 8BH (10001011B) with the carry unaffected.
RLC A
Function: Rotate Accumulator Left through the Carry flag
Description: The eight bits in the Accumulator and the carry flag are together rotated one bit to
the left. Bit 7 moves into the carry flag; the original state of the carry flag moves into the bit 0
position. No other flags are affected.
Example: The Accumulator holds the value 0C5H(11000101B), and the carry is zero. The
following instruction,
RLC A
leaves the Accumulator holding the value 8BH (10001010B) with the carry set.
RRC A
Function: Rotate Accumulator Right through Carry flag
Description: The eight bits in the Accumulator and the carry flag are together rotated one bit to
the right. Bit 0 moves into the carry flag; the original value of the carry flag moves into the bit 7
position. No other flags are affected.
Example: The Accumulator holds the value 0C5H (11000101B), the carry is zero. The following
instruction,
RRC A
leaves the Accumulator holding the value 62 (01100010B) with the carry set.
Microcontrollers 10ES42
Department of EEE, SJBIT Page 47
3. Branch instructions
Unconditional Branch Instructions
Operation: AJMP
Function: Absolute Jump Within 2K Block
Syntax:
AJMP code address
Instructions OpCode Bytes Flags
AJMP page0 0x01 2 None
AJMP page1 0x21 2 None
AJMP page2 0x41 2 None
AJMP page3 0x61 2 None
AJMP page4 0x81 2 None
AJMP page5 0xA1 2 None
AJMP page6 0xC1 2 None
AJMP page7 0xE1 2 None
Description: AJMP unconditionally jumps to the indicated code address. The new value for the
Program Counter is calculated by replacing the least-significant-byte of the Program Counter with
the second byte of the AJMP instruction, and replacing bits 0-2 of the most-significant-byte of the
Program Counter with 3 bits that indicate the page of the byte following the AJMP instruction.
Bits 3-7 of the most-significant-byte of the Program Counter remain unchanged.
Since only 11 bits of the Program Counter are affected by AJMP, jumps may only be made to
code located within the same 2k block as the first byte that follows AJMP.
Operation: LJMP
Function: Long Jump
Syntax: LJMP code address.
Description: LJMP jumps unconditionally to the specified code address.
Operation: SJMP
Function: Short Jump
Syntax: SJMP reladdr
Microcontrollers 10ES42
Department of EEE, SJBIT Page 48
Description: SJMP jumps unconditionally to the address specified reladdr. Reladdr must be
within -128 or +127 bytes of the instruction that follows the SJMP instruction
Conditional Branch Instructions
Operation: JNC
Function: Jump if Carry Not Set
Syntax: JNC reladdr
Description: JNC branches to the address indicated by reladdr if the carry bit is not set. If the
carry bit is set program execution continues with the instruction following the JNB instruction.
Operation: JC
Function: Jump if Carry Set
Syntax: JC reladdr
Description: JC will branch to the address indicated by reladdr if the Carry Bit is set. If the Carry
Bit is not set program execution continues with the instruction following the JC instruction.
Operation: JNB
Function: Jump if Bit Not Set
Syntax: JNB bit addr,reladdr
Description: JNB will branch to the address indicated by reladdress if the indicated bit is not set.
If the bit is set program execution continues with the instruction following the JNB instruction.
Operation: JB
Function: Jump if Bit Set
Syntax: JB bit addr, reladdr
Description: JB branches to the address indicated by reladdr if the bit indicated by bit addr is set.
If the bit is not set program execution continues with the instruction following the JB instruction.
Operation: JNZ
Function: Jump if Accumulator Not Zero
Syntax: JNZ reladdr
Description: JNZ will branch to the address indicated by reladdr if the Accumulator contains any
value except 0. If the value of the Accumulator is zero program execution continues with the
instruction following the JNZ instruction.
Operation: JZ
Function: Jump if Accumulator Zero
Microcontrollers 10ES42
Department of EEE, SJBIT Page 49
Syntax: JNZ reladdr
Description: JZ branches to the address indicated by reladdr if the Accumulator contains the
value 0. If the value of the Accumulator is non-zero program execution continues with the
instruction following the JNZ instruction.
Operation: DJNZ
Function: Decrement and Jump if Not Zero
Syntax:
DJNZ register, reladdr
Instructions OpCode Bytes Flags
DJNZ iram addr,reladdr 0xD5 3 None
DJNZ R0,reladdr 0xD8 2 None
DJNZ R1,reladdr 0xD9 2 None
DJNZ R2,reladdr 0xDA 2 None
DJNZ R3,reladdr 0xDB 2 None
DJNZ R4,reladdr 0xDC 2 None
DJNZ R5,reladdr 0xDD 2 None
DJNZ R6,reladdr 0xDE 2 None
DJNZ R7,reladdr 0xDF 2 None
Description: DJNZ decrements the value of register by 1. If the initial value of register is 0,
decrementing the value will cause it to reset to 255 (0xFF Hex). If the new value of register is not
0 the program will branch to the address indicated by relative addr. If the new value of register is
0 program flow continues with the instruction following the DJNZ instruction.
Operation: CJNE
Function: Compare and Jump If Not Equal
Syntax: CJNE operand1,operand2,reladdr
Instructions OpCode Bytes Flags
CJNE A,#data, reladdr 0xB4 3 C
CJNE A,iram addr,reladdr 0xB5 3 C
CJNE @R0,#data,reladdr 0xB6 3 C
CJNE @R1,#data,reladdr 0xB7 3 C
Microcontrollers 10ES42
Department of EEE, SJBIT Page 50
CJNE R0,#data,reladdr 0xB8 3 C
CJNE R1,#data,reladdr 0xB9 3 C
CJNE R2,#data,reladdr 0xBA 3 C
CJNE R3,#data,reladdr 0xBB 3 C
CJNE R4,#data,reladdr 0xBC 3 C
CJNE R5,#data,reladdr 0xBD 3 C
CJNE R6,#data,reladdr 0xBE 3 C
CJNE R7,#data,reladdr 0xBF 3 C
Description: CJNE compares the value of operand1 and operand2 and branches to the indicated
relative address if operand1 and operand2 are not equal. If the two operands are equal program
flow continues with the instruction following the CJNE instruction.
The Carry bit (C) is set if operand1 is less than operand2, otherwise it is cleared.
Microcontrollers 10ES42
Department of EEE, SJBIT Page 51
Microcontrollers 10ES42
Department of EEE, SJBIT Page 52
Microcontrollers 10ES42
Department of EEE, SJBIT Page 53
Microcontrollers 10ES42
Department of EEE, SJBIT Page 54
Microcontrollers 10ES42
Department of EEE, SJBIT Page 55
Microcontrollers 10ES42
Department of EEE, SJBIT Page 56
Microcontrollers 10ES42
Department of EEE, SJBIT Page 57
Microcontrollers 10ES42
Department of EEE, SJBIT Page 58
Microcontrollers 10ES42
Department of EEE, SJBIT Page 59
Microcontrollers 10ES42
Department of EEE, SJBIT Page 60
UNIT 3:
8051 programming: Assembler directives, Assembly language programs and Time delay
calculations.
Introduction:
8051 micro controller has one data type. It is 8-bit and size of each register is also 8-bit. It
is job of programmer to break down data larger than 8 bits (00 to FFH, 0 to 255 in decimal) to be
processed by CPU.
Data byte (DB) directive: The DB directive is most widely used data directive in assembler It is
used to define 8-bit data. When DB is used to define data, the number can be in decimal, binary,
hex or ASCII formats. The assembler will convert the number into hex. The assembler will assign
the ASCII code for the numbers or characters automatically. The DB directive is only directive
that can be used to define ASCII strings larger than two characters Therefore, it should be used
for all ASCII data definitions.
The most widely used Assembler directives are ORG Directive
EQU Directive & END Directive
Delay calculations:
Delay Calculations Code Remarks
50mS
Xtal freq
=11.0592MHz
50mS/1.085uS
= 46082.9
46082.9/255 = 180.7
Its an Odd Value, so
round off the result
i.e. 180.7 to the
nearest even number
i.e 182
46082.9 / x =182 Find value of x
46082.9 / 253 = 182
We’ll load 253 in the
inner most loop
182 / 2 = 91
Always do this, so its
result will be our
outer loop
Delay:Mov R0, #91
Here1:Mov R1, #253
Here:DJNZ R1, here
DJNZ R0, here1
RET
500mS
Xtal freq
=11.0592MHz
500mS/1.085uS =
460829.5
460829.5 / 255 =
1807.1
Odd number does not
account as its not less
than 255, innermost
Microcontrollers 10ES42
Department of EEE, SJBIT Page 61
loop = 255
1807.1 / 255 = 7.086
Round off to nearest
higher even i.e 8
1807.1 / x = 8
1807.1 / 226 = 8 Inner loop = 226
8 / 2 = 4 Outer loop = 4
Delay:Mov R0,#4
Here2:Mov R1, #226
Here1:Mov R2, #255
Here:DJNZ R2, Here
DJNZ R1, Here1
DJNZ R0,Here2
End
1Second
Xtal freq=
20MHz
1 / 0.6uS =
1.6 x 10e6
1.6 x 10e6 / 255 =
6536
Innermost loop= 255
6536 / 255 =
25.6
Not Even so make it
even i.e. 26
6536 / x = 26
6536 / 251 = 26 Inner loop 251
26/2 = 13 Outer loop = 13
Delay:Mov R0, # 13
Here2: Mov R1, # 251
Here1: Mov R2, #255
Here: DJNZ R2, Here
DJNZ R1, Here1
DJNZ R0, Here2
Ret
Microcontrollers 10ES42
Department of EEE, SJBIT Page 62
UNIT 4:
8051 Interfacing and Applications: Basics of I/O concepts, I/O Port Operation, Interfacing
051
to LCD, Keyboard, parallel and serial ADC, DAC, Stepper motor interfacing and DC
motor interfacing and programming.
Objectives:
At the end of this chapter, we will be able to:
List the different devices that can be interfaced with 8051
Understand the working principle.
Develop the following applications using assembly and C
- Stepper motor interface
- DC motor interfacing and PWM
- Digital-to-Analog interfacing
- Analog-to-Digital interfacing
- LCD interface
- Keyboard interface
This chapter basically gives an insight into the study of different interfacings listed above.
Further we will also study and understand their operation that is the working principle. We will
further discuss on how to develop these interfaces using assembly and C.
Microcontrollers 10ES42
Department of EEE, SJBIT Page 63
Stepper Motor Interfacing:
Stepper motor is a widely used device that translates electrical pulses into mechanical movement.
Stepper motor is used in applications such as; disk drives, dot matrix printer, robotics etc,. The
construction of the motor is as shown in figure 1 below.
Figure 1: Structure of stepper motor
It has a permanent magnet rotor called the shaft which is surrounded by a stator. Commonly used
stepper motors have four stator windings that are paired with a center – tapped common. Such
motors are called as four-phase or unipolar stepper motor.
The stator is a magnet over which the electric coil is wound. One end of the coil are connected
commonly either to ground or +5V. The other end is provided with a fixed sequence such that the
motor rotates in a particular direction. Stepper motor shaft moves in a fixed repeatable increment,
which allows one to move it to a precise position. Direction of the rotation is dictated by the stator
poles. Stator poles are determined by the current sent through the wire coils.
Step angle:
Step angle is defined as the minimum degree of rotation with a single step.
No of steps per revolution = 360° / step angle
Steps per second = (rpm x steps per revolution) / 60
Example: step angle = 2°
No of steps per revolution = 180
Microcontrollers 10ES42
Department of EEE, SJBIT Page 64
Switching Sequence of Motor:
As discussed earlier the coils need to be energized for the rotation. This can be done by sending a
bits sequence to one end of the coil while the other end is commonly connected. The bit sequence
sent can make either one phase ON or two phase ON for a full step sequence or it can be a
combination of one and two phase ON for half step sequence. Both are tabulated below.
Full Step:
Two Phase ON
One Phase ON
Half Step (8 – sequence):
The sequence is tabulated as below:
8051 Connection to Stepper Motor: (explanation of the diagram can be done)
Microcontrollers 10ES42
Department of EEE, SJBIT Page 65
Figure 2: 8051 interfaces to stepper motor
The following example 1 to example 6 shown below will elaborate on the discussion done above:
Example 1: Write an ALP to rotate the stepper motor clockwise / anticlockwise
continuously with full step sequence.
Program:
MOV A,#66H
BACK: MOV P1,A
RR A
ACALL DELAY
SJMP BACK
DELAY: MOV R1,#100
UP1: MOV R2,#50
UP: DJNZ R2,UP
DJNZ R1,UP1
RET
Note: motor to rotate in anticlockwise use instruction RL A instead of RR A
Microcontrollers 10ES42
Department of EEE, SJBIT Page 66
Example 2: A switch is connected to pin P2.7. Write an ALP to monitor the status
of the SW. If SW = 0, motor moves clockwise and if SW = 1, motor moves
anticlockwise.
Program:
ORG 0000H
SETB P2.7
MOV A, #66H
MOV P1,A
TURN: JNB P2.7, CW
RL A
ACALL DELAY
MOV P1,A
SJMP TURN
CW: RR A
ACALL DELAY
MOV P1,A
SJMP TURN
DELAY: as previous example
Example 3: Write an ALP to rotate a motor 90° clockwise. Step angle of motor is
2°.
Solution:
Step angle = 2°
Steps per revolution = 180
No of rotor teeth = 45
For 90° rotation the no of steps is 45
Program:
ORG 0000H
MOV A, #66H
MOV R0, #45
BACK: RR A
MOV P1, A
ACALL DELAY
DJNZ R0, BACK
END
Microcontrollers 10ES42
Department of EEE, SJBIT Page 67
Programming Stepper Motor with 8051 C
The following examples 5 and 6 will show the programming of stepper motor using 8051 C.
Example 4: Rotate the stepper motor continuously clockwise using half-step 8-step
sequence. Say the sequence is in ROM locations.
Program:
ORG 0000H
START: MOV R0, #08
MOV DPTR, #HALFSTEP
RPT: CLR A
MOVC A, @A+DPTR
MOV P1, A
ACALL DELAY
INC DPTR
DJNZ R0, RPT
SJMP START
ORG 0200H
HALFSTEP DB 09, 08, 0CH, 04, 06, 02, 03, 01
END
Example 5: Problem definition is same as example 1.
Program:
#include <reg51.h>
void main ()
{
while (1)
{
P1=0x66;
MSDELAY (200);
P1=0x33;
MSDELAY (200);
P1=0x99;
MSDELAY (200);
P1=0xCC;
MSDELAY (200);
}
}
void MSDELAY (unsigned char value)
{
unsigned int x,y;
for(x=0;x<1275;x++)
for(y=0;y<value;y++);
}
Microcontrollers 10ES42
Department of EEE, SJBIT Page 68
Example 6: Problem definition is same as example 2.
Program:
#include <reg51.h>
sbit SW=P2^7;
void main ()
{
SW=1;
while (1)
{
if(SW==0){
P1=0x66;
MSDELAY (100);
P1=0x33;
MSDELAY (100);
P1=0x99;
MSDELAY (100);
P1=0xCC;
MSDELAY (100);
}
else {
P1=0x66;
MSDELAY (100);
P1=0xCC;
MSDELAY (100);
P1=0x99;
MSDELAY (100);
P1=0x33;
MSDELAY (100);
}
void MSDELAY (unsigned char value)
{
unsigned int x,y;
for(x=0;x<1275;x++)
for(y=0;y<value;y++);
}
Microcontrollers 10ES42
Department of EEE, SJBIT Page 69
DC Motor Interfacing with 8051:
The DC motor is another widely used device that translates electrical pulses into mechanical
movement. Motor has 2 leads +ve and – ve , connecting them to a DC voltage supply moves the
motor in one direction. On reversing the polarity rotates the motor in the reverse direction. Basic
difference between Stepper and DC motor is stepper motor moves in steps while DC motor moves
continuously. Another difference is with stepper motor the number of steps can be counted while
it is not possible in DC motor. Maximum speed of a DC motor is indicated in rpm. The rpm is
either with no load it is few thousands to tens of thousands or with load rpm decreases with
increase in load.
Voltage and current rating : Nominal voltage is the voltage for a motor under normal condition. It
ranges from 1V to 150V. As voltage increases, rpm goes up. Current rating is the current
consumption when the nominal voltage is applied with no load that is 25mA to a few amperes. As
load increases, rpm increases, unless voltage or current increases implies torque increases. With
fixed voltage, as load increases, power consumption of a DC motor is increased.
Unidirectional Control:
Figure 3 shows the rotation of the DC motor in clockwise and anticlockwise direction.
Figure 3: DC motor rotation
Bidirectional Control:
(a) Motor not running (b) Clockwise direction
Microcontrollers 10ES42
Department of EEE, SJBIT Page 70
(c) Counter clockwise direction (d) Invalid state (short circuit)
Figure 4: H-Bridge Motor Configuration
Figure 4 shows the H-Bridge motor configuration. It consists of four switches and based on the
closing and opening of these switches the motor either rotates in clockwise or anti-clockwise
direction.
As seen in figure 4a, all the switches are open hence the motor is not running. In b, turning of the
motor is in one direction when the switches 1 and 4 are closed that is clockwise direction.
Similarly, in c the switches 2 and 3 are closed so the motor rotates in anticlockwise direction,
while in figure 4d all the switches are closed which indicates a invalid state or a short circuit.
The interfacing diagram of 8051 to bidirectional motor control can be referred to fig 17-18 from
text prescribed.
Example 6: A switch is connected to pin P2.7. Write an ALP to monitor the status of the
SW. If SW = 0, DC motor moves clockwise and if SW = 1, DC motor moves
anticlockwise.
Program:
ORG 0000H
CLR P1.0
CLR P1.1
CLR P1.2
CLR P1.3
SETB P2.7
MONITOR: JNB P2.7, CLOCK
SETB P1.0
CLR P1.1
CLR P1.2
SETB P1.3
SJMP MONITOR
CLOCK: CLR P1.0
SETB P1.1
SETB P1.2
CLR P1.3
SJMP MONITOR
END
Microcontrollers 10ES42
Department of EEE, SJBIT Page 71
Pulse Width Modulation (PWM):
The speed of the motor depends on 3 parameters: load, voltage and current. For a given load, we
can maintain a steady speed by using PWM. By changing the width of the pulse applied to DC
motor, power provided can either be increased or decreased. Though voltage has fixed amplitude,
has a variable duty cycle. The wider the pulse, higher the speed obtained. One of the reasons as to
why dc motor are referred over ac is, the ability to control the speed of the DC motor using PWM.
The speed of the ac motor is dictated by the ac frequency of voltage applied to the motor and is
generally fixed. Hence, speed of the AC motors cannot be controlled when load is increased.
Figure 5 below shows the pulse width modulation comparison.
Figure 5: PWM comparison
Example 7: A switch is connected to pin P2.7. Write a C to monitor the status of the SW.
If SW = 0, DC motor moves clockwise and if SW = 1, DC motor moves anticlockwise.
Program:
# include <reg51.h>
sbit SW =P2^7;
sbit Enable = P1^0;
sbit MTR_1 = P1^1;
sbit MTR_2 = P1^2;
void main ( )
{
SW=1;
Enable = 0;
MTR_1=0;
MTR_2=0;
while( )
{
Enable =1;
if( SW==1)
{ MTR_1=1;
MTR_2=0;
}
else
{ MTR_1=0;
MTR_2=1;
}}}
Microcontrollers 10ES42
Department of EEE, SJBIT Page 72
The interfacing diagrams for the above examples can be referred to the text.
Digital-to-Analog (DAC) converter:
The DAC is a device widely used to convert digital pulses to analog signals. In this section we
will discuss the basics of interfacing a DAC to 8051.
The two method of creating a DAC is binary weighted and R/2R ladder.
The Binary Weighted DAC, which contains one resistor or current source for each bit of the DAC
connected to a summing point. These precise voltages or currents sum to the correct output value.
This is one of the fastest conversion methods but suffers from poor accuracy because of the high
precision required for each individual voltage or current. Such high-precision resistors and
current-sources are expensive, so this type of converter is usually limited to 8-bit resolution or
less.
Example 8: A switch is connected to pin P2.7. Write an C to monitor the status of the SW.
If SW = 0, DC motor moves 50% duty cycle pulse and if SW = 1, DC motor moves with
25% duty cycle pulse.
Program:
# include <reg51.h>
sbit SW =P2^7;
sbit MTR = P1^0;
void main ( )
{
SW=1;
MTR=0;
while( )
{
if( SW==1)
{ MTR=1;
Msdelay(25);
MTR=0;
Msdelay(75);
}
else
{ MTR=1;
Msdelay(50);
MTR=0;
Msdelay(50);
}
}
}
Microcontrollers 10ES42
Department of EEE, SJBIT Page 73
The R-2R ladder DAC, which is a binary weighted DAC that uses a repeating cascaded structure
of resistor values R and 2R. This improves the precision due to the relative ease of producing
equal valued matched resistors (or current sources). However, wide converters perform slowly
due to increasingly large RC-constants for each added R-2R link.
The first criterion for judging a DAC is its resolution, which is a function of the number of binary
inputs. The common ones are 8, 10, and 12 bits. The number of data bit inputs decides the
resolution of the DAC since the number of analog output levels is equal to 2n
, where n is the
number of data bit inputs.
DAC0808:
The digital inputs are converter to current Iout, and by connecting a resistor to the Iout pin, we can
convert the result to voltage. The total current Iout is a function of the binary numbers at the D0-
D7 inputs of the DAC0808 and the reference current Iref , and is as follows:
Usually reference current is 2mA. Ideally we connect the output pin to a resistor, convert this
current to voltage, and monitor the output on the scope. But this can cause inaccuracy; hence an
opamp is used to convert the output current to voltage. The 8051 connection to DAC0808 is as
shown in the figure 6 below.
Figure 6: 8051 connections to DAC0808
The following examples 9, 10 and 11 will show the generation of waveforms using DAC0808.
Example 9: Write an ALP to generate a triangular waveform.
Program:
MOV A, #00H
INCR: MOV P1, A
INC A
CJNE A, #255, INCR
DECR: MOV P1, A
DEC A
CJNE A, #00, DECR
SJMP INCR
END
Microcontrollers 10ES42
Department of EEE, SJBIT Page 74
Example 10: Write an ALP to generate a sine waveform.
Vout = 5V(1+sinθ)
Solution: Calculate the decimal values for every 10 degree of the sine wave. These
values can be maintained in a table and simply the values can be sent to port P1. The
sinewave can be observed on the CRO.
Program:
ORG 0000H
AGAIN: MOV DPTR, #SINETABLE
MOV R3, #COUNT
UP: CLR A
MOVC A, @A+DPTR
MOV P1, A
INC DPTR
DJNZ R3, UP
SJMP AGAIN
ORG 0300H
SINETABLE DB 128, 192, 238, 255, 238, 192, 128, 64, 17, 0, 17, 64, 128
END
Note: to get a better wave regenerate the values of the table per 2 degree.
Example 10: Write a C program to generate a sine waveform.
Vout = 5V(1+sinθ)
Program:
#include<reg51.h>
sfr dacdata=P1;
void main( )
{
unsigned char sinetable[12]={ 128, 192, 238, 255, 238, 192,
128, 64, 17, 0, 17, 64};
unsigned char x;
while (1)
{
for(x=0;x<12;x++)
{
dacdata = sinetable[x];
}
}
}
Microcontrollers 10ES42
Department of EEE, SJBIT Page 75
Analog-to-digital converter (ADC) interfacing:
ADCs (analog-to-digital converters) are among the most widely used devices for data acquisition.
A physical quantity, like temperature, pressure, humidity, and velocity, etc., is converted to
electrical (voltage, current) signals using a device called a transducer, or sensor. We need an
analog-to-digital converter to translate the analog signals to digital numbers, so microcontroller
can read them.
ADC804 chip:
ADC804 IC is an analog-to-digital converter. It works with +5 volts and has a resolution of 8 bits.
Conversion time is another major factor in judging an ADC. Conversion time is defined as the
time it takes the ADC to convert the analog input to a digital (binary) number. In ADC804
conversion time varies depending on the clocking signals applied to CLK R and CLK IN pins, but
it cannot be faster than 110μs.
Pin Description of ADC804:
Figure 7: Pin out of ADC0804
 CLK IN and CLK R: CLK IN is an input pin connected to an external clock source. To use
the internal clock generator (also called self-clocking), CLK IN and CLK R pins are
connected to a capacitor and a resistor and the clock frequency is determined by:
Microcontrollers 10ES42
Department of EEE, SJBIT Page 76
Typical values are R = 10K ohms and C =150pF. We get f = 606 kHz and the conversion
time is 110μs.
 Vref/2 : It is used for the reference voltage. If this pin is open (not connected), the analog
input voltage is in the range of 0 to 5 volts (the same as the Vcc pin). If the analog input
range needs to be 0 to 4 volts, Vref/2 is connected to 2 volts. Step size is the smallest
change can be discerned by an ADC
Vref/2 Relation to Vin Range
 D0-D7: The digital data output pins. These are tri-state buffered. The converted data is
accessed only when CS =0 and RD is forced low. To calculate the output voltage, use the
following formula
Dout = digital data output (in decimal),
Vin = analog voltage, and
step size (resolution) is the smallest change
 Analog ground and digital ground: Analog ground is connected to the ground of the analog
Vin and digital ground is connected to the ground of the Vcc pin. To isolate the analog
Vin signal from transient voltages caused by digital switching of the output D0 – D7. This
contributes to the accuracy of the digital data output.
 Vin(+) & Vin(-): Differential analog inputs where Vin = Vin (+) – Vin (-). Vin (-) is
connected to ground and Vin (+) is used as the analog input to be converted.
 RD: Is “output enable” a high-to-low RD pulse is used to get the 8-bit converted data out of
ADC804.
 INTR: It is “end of conversion” When the conversion is finished, it goes low to signal the
CPU that the converted data is ready to be picked up.
 WR: It is “start conversion” When WR makes a low-to-high transition, ADC804 starts
converting the analog input value of Vin to an 8- bit digital number.
 CS: It is an active low input used to activate ADC804.
Microcontrollers 10ES42
Department of EEE, SJBIT Page 77
The following steps must be followed for data conversion by the ADC804 chip:
1. Make CS= 0 and send a L-to-H pulse to pin WR to start conversion.
2. Monitor the INTR pin, if high keep polling but if low, conversion is complete, go to next step.
3. Make CS= 0 and send a H-to-L pulse to pin RD to get the data out
Figure 8 shows the read and write timing for ADC804. Figure 9 and 10 shows the self clocking
with the RC component for frequency and the external frequency connected to XTAL2 of 8051.
Figure 8: Read and Write timing for ADC0804
Figure 9: 8051 Connection to ADC0804 with Self-clocking
Microcontrollers 10ES42
Department of EEE, SJBIT Page 78
Figure 10: 8051 Connection to ADC0804 with Clock from XTAL2 of 8051
Now let us see how we write assembly as well as C program for the interfacing diagram shown in
figure 10.
Programming ADC0804 in assembly
MYDATA EQU P1
MOV P1, #0FFH
SETB P2.7
BACK: CLR P2.6
SETB P2.6
HERE: JB P2.7, HERE
CLR P2.5
MOV A, MYDATA
SETB P2.5
SJMP BACK
Programming ADC0804 in C
#include<reg51.h>
Sbit RD=P2^5;
Sbit WR=P2^6;
Sbit INTR=P2^7;
Sfr Mydata=P1;
Void main ( )
{
Unsigned char value;
Mydata =0xFF;
INTR=1;
RD=1;
WR=1;
While (1)
{
WR=0;
WR=1;
While (INTR == 1);
RD=0;
Value =Mydata;
RD=1;
}
Microcontrollers 10ES42
Department of EEE, SJBIT Page 79
ADC0808/0809 chip:
ADC808 has 8 analog inputs. It allows us to monitor up to 8 different transducers using only
single chip. The chip has 8-bit data output just like the ADC804. The 8 analog input channels are
multiplexed and selected according to the values given to the three address pins, A, B, and C. that
is; if CBA=000, CH0 is selected; CBA=011, CH3 is selected and so on. The pin details of
ADC0808 are as shown in the figure 11 below. (Explanation can be done as is with ADC0804).
Figure 11: Pin out of ADC0808
Steps to Program ADC0808/0809
1. Select an analog channel by providing bits to A, B, and C addresses.
2. Activate the ALE pin. It needs an L-to-H pulse to latch in the address.
3. Activate SC (start conversion) by an H-to-L pulse to initiate conversion.
4. Monitor EOC (end of conversion) to see whether conversion is finished.
5. Activate OE (output enable) to read data out of the ADC chip. An H-to-L pulse to the OE pin
will bring digital data out of the chip.
Let us write an assembly and C program for the interfacing of 8051 to ADC0808 as shown in
figure 12
Programming ADC0808/0809 in assembly
MYDATA EQU P1
ORG 0000H
MOV MYDATA, #0FFH
SETB P2.7
CLR P2.4
CLR P2.6
CLR P2.5
BACK: CLR P2.0
CLR P2.1
SETB P2.2
ACALL DELAY
SETB P2.4
ACALL DELAY
SETB P2.6
ACALL DELAY
CLR P2.4
Microcontrollers 10ES42
Department of EEE, SJBIT Page 80
below.(Figure 12 can be referred from the text prescribed.)
Note: replace the assembly instructions with equivalent C statements for programming ADC0808
in C
LCD Interfacing:
LCD is finding widespread use replacing LEDs for the following reasons:
The declining prices of LCD
The ability to display numbers, characters, and graphics
Incorporation of a refreshing controller into the LCD, thereby relieving the CPU of the
task of refreshing the LCD
Ease of programming for characters and graphics
Pin Description:
LCD Command Codes:
Microcontrollers 10ES42
Department of EEE, SJBIT Page 81
LCD timing diagram for reading and writing is as shown in figure 14 and 15.
Figure 14: LCD timing for read
Microcontrollers 10ES42
Department of EEE, SJBIT Page 82
Figure 15: LCD timing for write
Sending Data/ Commands to LCDs with Time Delay:
To send any of the commands to the LCD, make pin RS=0. For data, make RS=1. Then send a
high-to-low pulse to the E pin to enable the internal latch of the LCD. This is shown in the code
below. The interfacing diagram of LCD to 8051 is as shown in the figure 16.
Example 11: Write an ALP to initialize the LCD and display message “YES”. Say the command to be
given is :38H (2 lines ,5x7 matrix), 0EH (LCD on, cursor on), 01H (clear LCD), 06H (shift cursor right),
86H (cursor: line 1, pos. 6)
Program:
;calls a time delay before sending next data/command ;P1.0-P1.7 are connected to LCD data pins D0-D7
;P2.0 is connected to RS pin of LCD ;P2.1 is connected to R/W pin of LCD ;P2.2 is connected to E pin
of LCD
ORG 0H
MOV A,#38H ;INIT. LCD 2 LINES, 5X7 MATRIX
ACALL COMNWRT ;call command subroutine
ACALL DELAY ;give LCD some time
MOV A,#0EH ;display on, cursor on
ACALL COMNWRT ;call command subroutine
ACALL DELAY ;give LCD some time
MOV A,#01 ;clear LCD
ACALL COMNWRT ;call command subroutine
ACALL DELAY ;give LCD some time
MOV A,#06H ;shift cursor right
ACALL COMNWRT ;call command subroutine
ACALL DELAY ;give LCD some time
MOV A,#86H ;cursor at line 1, pos. 6
ACALL COMNWRT ;call command subroutine
ACALL DELAY ;give LCD some time
Microcontrollers 10ES42
Department of EEE, SJBIT Page 83
Figure 16: 8051 Connection to LCD
MOV A,#‟Y‟ ;display letter Y
ACALL DATAWRT ;call display subroutine
ACALL DELAY ;give LCD some time
MOV A,#‟E‟ ;display letter E
ACALL DATAWRT ;call display subroutine
ACALL DELAY ;give LCD some time
MOV A,#‟S‟ ;display letter S
ACALL DATAWRT ;call display subroutine
AGAIN: SJMP AGAIN ;stay here
COMNWRT: ;send command to LCD
MOV P1,A ;copy reg A to port 1
CLR P2.0 ;RS=0 for command
CLR P2.1 ;R/W=0 for write
SETB P2.2 ;E=1 for high pulse
ACALL DELAY ;give LCD some time
CLR P2.2 ;E=0 for H-to-L pulse
RET
DATAWRT: ;write data to LCD
MOV P1,A ;copy reg A to port 1
SETB P2.0 ;RS=1 for data
CLR P2.1 ;R/W=0 for write
SETB P2.2 ;E=1 for high pulse
ACALL DELAY ;give LCD some time
CLR P2.2 ;E=0 for H-to-L pulse
RET
DELAY:
MOV R3,#50 ;50 or higher for fast CPUs
HERE2: MOV R4,#255 ;R4 = 255
HERE: DJNZ R4,HERE ;stay until R4 becomes 0
DJNZ R3,HERE2
RET
END
Microcontrollers 10ES42
Department of EEE, SJBIT Page 84
Sending Data/ Commands to LCDs checking the Busy Flag
Example 12: Modify example 11, to check for the busy flag (D7=>P1.7), then send the
command and hence display message “NO”.
;Check busy flag before sending data, command to LCD;p1=data pin ;P2.0 connected to RS
pin ;P2.1 connected to R/W pin ;P2.2 connected to E pin
ORG 0H
MOV A,#38H ;init. LCD 2 lines ,5x7 matrix
ACALL COMMAND ;issue command
MOV A,#0EH ;LCD on, cursor on
ACALL COMMAND ;issue command
MOV A,#01H ;clear LCD command
ACALL COMMAND ;issue command
MOV A,#06H ;shift cursor right
ACALL COMMAND issue command
MOV A,#86H ;cursor: line 1, pos. 6
ACALL COMMAND ;command subroutine
MOV A,#‟N‟ ;display letter N
ACALL DATA_DISPLAY
MOV A,#‟O‟ ;display letter O
ACALL DATA_DISPLAY
HERE: SJMP HERE ;STAY HERE
COMMAND:
ACALL READY ;is LCD ready?
MOV P1,A ;issue command code
CLR P2.0 ;RS=0 for command
CLR P2.1 ;R/W=0 to write to LCD
SETB P2.2 ;E=1 for H-to-L pulse
CLR P2.2 ;E=0,latch in
RET
DATA_DISPLAY:
ACALL READY ;is LCD ready?
MOV P1,A ;issue data
SETB P2.0 ;RS=1 for data
CLR P2.1 ;R/W =0 to write to LCD
SETB P2.2 ;E=1 for H-to-L pulse
CLR P2.2 ;E=0,latch in
RET
READY:
SETB P1.7 ;make P1.7 input port
CLR P2.0 ;RS=0 access command reg
SETB P2.1 ;R/W=1 read command reg ;
BACK:SETB P2.2 ;E=1 for H-to-L pulse
CLR P2.2 ;E=0 H-to-L pulse
JB P1.7,BACK ;stay until busy flag=0
RET
END
Microcontrollers 10ES42
Department of EEE, SJBIT Page 85
Programming LCD in C
Example 13: Write an 8051 C program to send letters „P‟, „I‟, and „C‟ to the LCD using
the busy flag method.
Solution:
#include <reg51.h>
sfr ldata = 0x90; //P1=LCD data pins
sbit rs = P2^0;
sbit rw = P2^1;
sbit en = P2^2;
sbit busy = P1^7;
void main(){
lcdcmd(0x38);
lcdcmd(0x0E);
lcdcmd(0x01);
lcdcmd(0x06);
lcdcmd(0x86); //line 1, position 6
lcddata(„P‟);
lcddata(„I‟);
lcddata(„C‟);
}
void lcdcmd(unsigned char value){
lcdready(); //check the LCD busy flag
ldata = value; //put the value on the pins
rs = 0;
rw = 0;
en = 1; //strobe the enable pin
MSDelay(1);
Microcontrollers 10ES42
Department of EEE, SJBIT Page 86
Keyboard Interfacing:
Keyboards are organized in a matrix of rows and columns. The CPU accesses both rows and
columns through ports. Therefore, with two 8-bit ports, an 8 x 8 matrix of keys can be connected
to a microprocessor. When a key is pressed, a row and a column make a contact. Otherwise, there
is no connection between rows and columns. A 4x4 matrix connected to two ports. The rows are
connected to an output port and the columns are connected to an input port.
Scanning and Identifying the Key:
void lcdready(){
busy = 1; //make the busy pin at input
rs = 0;
rw = 1;
while(busy==1){ //wait here for busy flag
en = 0; //strobe the enable pin
MSDelay(1);
en = 1;
}
}
void Msdelay(unsigned int itime){
unsigned int i, j;
for(i=0;i<itime;i++)
for(j=0;j<1275;j++);
}
Microcontrollers 10ES42: Introduction to Microprocessors and Microcontrollers

More Related Content

What's hot

Introduction to Embedded System I : Chapter 2 (3rd portion)
Introduction to Embedded System I : Chapter 2 (3rd portion)Introduction to Embedded System I : Chapter 2 (3rd portion)
Introduction to Embedded System I : Chapter 2 (3rd portion)Moe Moe Myint
 
Introduction to Embedded Systems I: Chapter 2 (1st portion)
Introduction to Embedded Systems I: Chapter 2 (1st portion)Introduction to Embedded Systems I: Chapter 2 (1st portion)
Introduction to Embedded Systems I: Chapter 2 (1st portion)Moe Moe Myint
 
Introduction to-microprocessors
Introduction to-microprocessorsIntroduction to-microprocessors
Introduction to-microprocessorsmudulin
 
Training Report on embedded Systems and Robotics
Training Report on embedded  Systems and RoboticsTraining Report on embedded  Systems and Robotics
Training Report on embedded Systems and RoboticsNIT Raipur
 
Embedded system design using arduino
Embedded system design using arduinoEmbedded system design using arduino
Embedded system design using arduinoSantosh Verma
 
Designing of telecommand system using system on chip soc for spacecraft contr...
Designing of telecommand system using system on chip soc for spacecraft contr...Designing of telecommand system using system on chip soc for spacecraft contr...
Designing of telecommand system using system on chip soc for spacecraft contr...IAEME Publication
 
Chapter 4 Embedded System: Application and Domain Specific
Chapter 4 Embedded System: Application and Domain SpecificChapter 4 Embedded System: Application and Domain Specific
Chapter 4 Embedded System: Application and Domain SpecificMoe Moe Myint
 
Evolution Of Microprocessor
Evolution Of MicroprocessorEvolution Of Microprocessor
Evolution Of Microprocessorguest3870d0
 
Microprocessor and Microcontroller - ITVoyagers
Microprocessor and Microcontroller - ITVoyagersMicroprocessor and Microcontroller - ITVoyagers
Microprocessor and Microcontroller - ITVoyagersITVoyagers
 
Sybsc cs sem 3 physical computing and iot programming unit 1
Sybsc cs sem 3 physical computing and iot programming unit 1Sybsc cs sem 3 physical computing and iot programming unit 1
Sybsc cs sem 3 physical computing and iot programming unit 1WE-IT TUTORIALS
 
Report on evolution of processor by sandesh agrawal
Report on evolution of processor by sandesh agrawalReport on evolution of processor by sandesh agrawal
Report on evolution of processor by sandesh agrawalSandesh Agrawal
 
ETHERNET PACKET PROCESSOR FOR SOC APPLICATION
ETHERNET PACKET PROCESSOR FOR SOC APPLICATIONETHERNET PACKET PROCESSOR FOR SOC APPLICATION
ETHERNET PACKET PROCESSOR FOR SOC APPLICATIONcscpconf
 
Chapter 3 Charateristics and Quality Attributes of Embedded System
Chapter 3 Charateristics and Quality Attributes of Embedded SystemChapter 3 Charateristics and Quality Attributes of Embedded System
Chapter 3 Charateristics and Quality Attributes of Embedded SystemMoe Moe Myint
 
Embedded system (Chapter 1)
Embedded system (Chapter 1)Embedded system (Chapter 1)
Embedded system (Chapter 1)Ikhwan_Fakrudin
 
Micro controller and dsp processor
Micro controller and dsp processorMicro controller and dsp processor
Micro controller and dsp processorShubhamMishra485
 

What's hot (19)

Introduction to Embedded System I : Chapter 2 (3rd portion)
Introduction to Embedded System I : Chapter 2 (3rd portion)Introduction to Embedded System I : Chapter 2 (3rd portion)
Introduction to Embedded System I : Chapter 2 (3rd portion)
 
Introduction to Embedded Systems I: Chapter 2 (1st portion)
Introduction to Embedded Systems I: Chapter 2 (1st portion)Introduction to Embedded Systems I: Chapter 2 (1st portion)
Introduction to Embedded Systems I: Chapter 2 (1st portion)
 
Introduction to-microprocessors
Introduction to-microprocessorsIntroduction to-microprocessors
Introduction to-microprocessors
 
Training Report on embedded Systems and Robotics
Training Report on embedded  Systems and RoboticsTraining Report on embedded  Systems and Robotics
Training Report on embedded Systems and Robotics
 
Embedded system design using arduino
Embedded system design using arduinoEmbedded system design using arduino
Embedded system design using arduino
 
Designing of telecommand system using system on chip soc for spacecraft contr...
Designing of telecommand system using system on chip soc for spacecraft contr...Designing of telecommand system using system on chip soc for spacecraft contr...
Designing of telecommand system using system on chip soc for spacecraft contr...
 
Chapter 4 Embedded System: Application and Domain Specific
Chapter 4 Embedded System: Application and Domain SpecificChapter 4 Embedded System: Application and Domain Specific
Chapter 4 Embedded System: Application and Domain Specific
 
Microprocessors
MicroprocessorsMicroprocessors
Microprocessors
 
Evolution Of Microprocessor
Evolution Of MicroprocessorEvolution Of Microprocessor
Evolution Of Microprocessor
 
Embedded system
Embedded systemEmbedded system
Embedded system
 
Microprocessor and Microcontroller - ITVoyagers
Microprocessor and Microcontroller - ITVoyagersMicroprocessor and Microcontroller - ITVoyagers
Microprocessor and Microcontroller - ITVoyagers
 
Sybsc cs sem 3 physical computing and iot programming unit 1
Sybsc cs sem 3 physical computing and iot programming unit 1Sybsc cs sem 3 physical computing and iot programming unit 1
Sybsc cs sem 3 physical computing and iot programming unit 1
 
Report on evolution of processor by sandesh agrawal
Report on evolution of processor by sandesh agrawalReport on evolution of processor by sandesh agrawal
Report on evolution of processor by sandesh agrawal
 
Microprocessor Systems
Microprocessor Systems Microprocessor Systems
Microprocessor Systems
 
ETHERNET PACKET PROCESSOR FOR SOC APPLICATION
ETHERNET PACKET PROCESSOR FOR SOC APPLICATIONETHERNET PACKET PROCESSOR FOR SOC APPLICATION
ETHERNET PACKET PROCESSOR FOR SOC APPLICATION
 
Chapter 3 Charateristics and Quality Attributes of Embedded System
Chapter 3 Charateristics and Quality Attributes of Embedded SystemChapter 3 Charateristics and Quality Attributes of Embedded System
Chapter 3 Charateristics and Quality Attributes of Embedded System
 
Embedded system (Chapter 1)
Embedded system (Chapter 1)Embedded system (Chapter 1)
Embedded system (Chapter 1)
 
Micro controller and dsp processor
Micro controller and dsp processorMicro controller and dsp processor
Micro controller and dsp processor
 
Introduction to Microprocessor
Introduction to MicroprocessorIntroduction to Microprocessor
Introduction to Microprocessor
 

Similar to Microcontrollers 10ES42: Introduction to Microprocessors and Microcontrollers

Microcontrollers 8051 MSP430 notes
Microcontrollers 8051 MSP430 notesMicrocontrollers 8051 MSP430 notes
Microcontrollers 8051 MSP430 notesNiteesh Shanbog
 
MergeResult_2023_04_02_05_26_56.pptx
MergeResult_2023_04_02_05_26_56.pptxMergeResult_2023_04_02_05_26_56.pptx
MergeResult_2023_04_02_05_26_56.pptxbhaveshagrawal35
 
microprocessor
microprocessormicroprocessor
microprocessorillpa
 
8051 microcontroller
8051 microcontroller8051 microcontroller
8051 microcontrollersnehapvs
 
The 8051 microcontroler based embedded systems
The 8051 microcontroler based embedded systemsThe 8051 microcontroler based embedded systems
The 8051 microcontroler based embedded systemsmanishpatel_79
 
Microcontroller pic 16f877 architecture and basics
Microcontroller pic 16f877 architecture and basicsMicrocontroller pic 16f877 architecture and basics
Microcontroller pic 16f877 architecture and basicsNilesh Bhaskarrao Bahadure
 
Introductiontomsp430 180105110420
Introductiontomsp430 180105110420Introductiontomsp430 180105110420
Introductiontomsp430 180105110420DrRenumadhavi
 
Introduction to msp430
Introduction to msp430Introduction to msp430
Introduction to msp430Harsha herle
 
Sudhir tms 320 f 2812
Sudhir tms 320 f 2812 Sudhir tms 320 f 2812
Sudhir tms 320 f 2812 vijaydeepakg
 
An introduction to digital signal processors 1
An introduction to digital signal processors 1An introduction to digital signal processors 1
An introduction to digital signal processors 1Hossam Hassan
 
Designing of telecommand system using system on chip soc for spacecraft contr...
Designing of telecommand system using system on chip soc for spacecraft contr...Designing of telecommand system using system on chip soc for spacecraft contr...
Designing of telecommand system using system on chip soc for spacecraft contr...IAEME Publication
 
A micro chip could be a pc processor which contains the functions of.pdf
A micro chip could be a pc processor which contains the functions of.pdfA micro chip could be a pc processor which contains the functions of.pdf
A micro chip could be a pc processor which contains the functions of.pdfangelnxcom
 
Project report on embedded system using 8051 microcontroller
Project  report on embedded system using 8051 microcontrollerProject  report on embedded system using 8051 microcontroller
Project report on embedded system using 8051 microcontrollerVandna Sambyal
 

Similar to Microcontrollers 10ES42: Introduction to Microprocessors and Microcontrollers (20)

Microcontrollers 8051 MSP430 notes
Microcontrollers 8051 MSP430 notesMicrocontrollers 8051 MSP430 notes
Microcontrollers 8051 MSP430 notes
 
MergeResult_2023_04_02_05_26_56.pptx
MergeResult_2023_04_02_05_26_56.pptxMergeResult_2023_04_02_05_26_56.pptx
MergeResult_2023_04_02_05_26_56.pptx
 
microprocessor
microprocessormicroprocessor
microprocessor
 
8051 microcontroller
8051 microcontroller8051 microcontroller
8051 microcontroller
 
The 8051 microcontroler based embedded systems
The 8051 microcontroler based embedded systemsThe 8051 microcontroler based embedded systems
The 8051 microcontroler based embedded systems
 
Microcontroller pic 16f877 architecture and basics
Microcontroller pic 16f877 architecture and basicsMicrocontroller pic 16f877 architecture and basics
Microcontroller pic 16f877 architecture and basics
 
Introductiontomsp430 180105110420
Introductiontomsp430 180105110420Introductiontomsp430 180105110420
Introductiontomsp430 180105110420
 
Introduction to msp430
Introduction to msp430Introduction to msp430
Introduction to msp430
 
Sudhir tms 320 f 2812
Sudhir tms 320 f 2812 Sudhir tms 320 f 2812
Sudhir tms 320 f 2812
 
EEE226a.ppt
EEE226a.pptEEE226a.ppt
EEE226a.ppt
 
Unit I_MT2301.pdf
Unit I_MT2301.pdfUnit I_MT2301.pdf
Unit I_MT2301.pdf
 
An introduction to digital signal processors 1
An introduction to digital signal processors 1An introduction to digital signal processors 1
An introduction to digital signal processors 1
 
Computer Evolution
Computer EvolutionComputer Evolution
Computer Evolution
 
Designing of telecommand system using system on chip soc for spacecraft contr...
Designing of telecommand system using system on chip soc for spacecraft contr...Designing of telecommand system using system on chip soc for spacecraft contr...
Designing of telecommand system using system on chip soc for spacecraft contr...
 
Vinod ppt on es31 08 15
Vinod ppt on es31 08 15Vinod ppt on es31 08 15
Vinod ppt on es31 08 15
 
ritesh (3)
ritesh (3)ritesh (3)
ritesh (3)
 
A micro chip could be a pc processor which contains the functions of.pdf
A micro chip could be a pc processor which contains the functions of.pdfA micro chip could be a pc processor which contains the functions of.pdf
A micro chip could be a pc processor which contains the functions of.pdf
 
Embedded system
Embedded systemEmbedded system
Embedded system
 
Embeddedsystem
EmbeddedsystemEmbeddedsystem
Embeddedsystem
 
Project report on embedded system using 8051 microcontroller
Project  report on embedded system using 8051 microcontrollerProject  report on embedded system using 8051 microcontroller
Project report on embedded system using 8051 microcontroller
 

More from Gopinath.B.L Naidu

More from Gopinath.B.L Naidu (10)

Hdllab1
Hdllab1Hdllab1
Hdllab1
 
Aec manual2017 imp
Aec manual2017 impAec manual2017 imp
Aec manual2017 imp
 
Eee iv-microcontrollers [10 es42]-assignment
Eee iv-microcontrollers [10 es42]-assignmentEee iv-microcontrollers [10 es42]-assignment
Eee iv-microcontrollers [10 es42]-assignment
 
Dsp lab manual 15 11-2016
Dsp lab manual 15 11-2016Dsp lab manual 15 11-2016
Dsp lab manual 15 11-2016
 
Gopi's mcs lab man
Gopi's mcs lab manGopi's mcs lab man
Gopi's mcs lab man
 
Capacitors (2)
Capacitors (2)Capacitors (2)
Capacitors (2)
 
Aeroschsyll7
Aeroschsyll7Aeroschsyll7
Aeroschsyll7
 
Btl control system-lab-manual-10 eel68
Btl control system-lab-manual-10 eel68Btl control system-lab-manual-10 eel68
Btl control system-lab-manual-10 eel68
 
Ee2259 lab-manual
Ee2259 lab-manualEe2259 lab-manual
Ee2259 lab-manual
 
90981041 control-system-lab-manual
90981041 control-system-lab-manual90981041 control-system-lab-manual
90981041 control-system-lab-manual
 

Recently uploaded

Introduction to IEEE STANDARDS and its different types.pptx
Introduction to IEEE STANDARDS and its different types.pptxIntroduction to IEEE STANDARDS and its different types.pptx
Introduction to IEEE STANDARDS and its different types.pptxupamatechverse
 
(ANVI) Koregaon Park Call Girls Just Call 7001035870 [ Cash on Delivery ] Pun...
(ANVI) Koregaon Park Call Girls Just Call 7001035870 [ Cash on Delivery ] Pun...(ANVI) Koregaon Park Call Girls Just Call 7001035870 [ Cash on Delivery ] Pun...
(ANVI) Koregaon Park Call Girls Just Call 7001035870 [ Cash on Delivery ] Pun...ranjana rawat
 
APPLICATIONS-AC/DC DRIVES-OPERATING CHARACTERISTICS
APPLICATIONS-AC/DC DRIVES-OPERATING CHARACTERISTICSAPPLICATIONS-AC/DC DRIVES-OPERATING CHARACTERISTICS
APPLICATIONS-AC/DC DRIVES-OPERATING CHARACTERISTICSKurinjimalarL3
 
chaitra-1.pptx fake news detection using machine learning
chaitra-1.pptx  fake news detection using machine learningchaitra-1.pptx  fake news detection using machine learning
chaitra-1.pptx fake news detection using machine learningmisbanausheenparvam
 
the ladakh protest in leh ladakh 2024 sonam wangchuk.pptx
the ladakh protest in leh ladakh 2024 sonam wangchuk.pptxthe ladakh protest in leh ladakh 2024 sonam wangchuk.pptx
the ladakh protest in leh ladakh 2024 sonam wangchuk.pptxhumanexperienceaaa
 
Decoding Kotlin - Your guide to solving the mysterious in Kotlin.pptx
Decoding Kotlin - Your guide to solving the mysterious in Kotlin.pptxDecoding Kotlin - Your guide to solving the mysterious in Kotlin.pptx
Decoding Kotlin - Your guide to solving the mysterious in Kotlin.pptxJoão Esperancinha
 
Gfe Mayur Vihar Call Girls Service WhatsApp -> 9999965857 Available 24x7 ^ De...
Gfe Mayur Vihar Call Girls Service WhatsApp -> 9999965857 Available 24x7 ^ De...Gfe Mayur Vihar Call Girls Service WhatsApp -> 9999965857 Available 24x7 ^ De...
Gfe Mayur Vihar Call Girls Service WhatsApp -> 9999965857 Available 24x7 ^ De...srsj9000
 
SPICE PARK APR2024 ( 6,793 SPICE Models )
SPICE PARK APR2024 ( 6,793 SPICE Models )SPICE PARK APR2024 ( 6,793 SPICE Models )
SPICE PARK APR2024 ( 6,793 SPICE Models )Tsuyoshi Horigome
 
OSVC_Meta-Data based Simulation Automation to overcome Verification Challenge...
OSVC_Meta-Data based Simulation Automation to overcome Verification Challenge...OSVC_Meta-Data based Simulation Automation to overcome Verification Challenge...
OSVC_Meta-Data based Simulation Automation to overcome Verification Challenge...Soham Mondal
 
High Profile Call Girls Nagpur Meera Call 7001035870 Meet With Nagpur Escorts
High Profile Call Girls Nagpur Meera Call 7001035870 Meet With Nagpur EscortsHigh Profile Call Girls Nagpur Meera Call 7001035870 Meet With Nagpur Escorts
High Profile Call Girls Nagpur Meera Call 7001035870 Meet With Nagpur EscortsCall Girls in Nagpur High Profile
 
MANUFACTURING PROCESS-II UNIT-5 NC MACHINE TOOLS
MANUFACTURING PROCESS-II UNIT-5 NC MACHINE TOOLSMANUFACTURING PROCESS-II UNIT-5 NC MACHINE TOOLS
MANUFACTURING PROCESS-II UNIT-5 NC MACHINE TOOLSSIVASHANKAR N
 
High Profile Call Girls Nagpur Isha Call 7001035870 Meet With Nagpur Escorts
High Profile Call Girls Nagpur Isha Call 7001035870 Meet With Nagpur EscortsHigh Profile Call Girls Nagpur Isha Call 7001035870 Meet With Nagpur Escorts
High Profile Call Girls Nagpur Isha Call 7001035870 Meet With Nagpur Escortsranjana rawat
 
Call for Papers - African Journal of Biological Sciences, E-ISSN: 2663-2187, ...
Call for Papers - African Journal of Biological Sciences, E-ISSN: 2663-2187, ...Call for Papers - African Journal of Biological Sciences, E-ISSN: 2663-2187, ...
Call for Papers - African Journal of Biological Sciences, E-ISSN: 2663-2187, ...Christo Ananth
 
Introduction to Multiple Access Protocol.pptx
Introduction to Multiple Access Protocol.pptxIntroduction to Multiple Access Protocol.pptx
Introduction to Multiple Access Protocol.pptxupamatechverse
 
VIP Call Girls Service Kondapur Hyderabad Call +91-8250192130
VIP Call Girls Service Kondapur Hyderabad Call +91-8250192130VIP Call Girls Service Kondapur Hyderabad Call +91-8250192130
VIP Call Girls Service Kondapur Hyderabad Call +91-8250192130Suhani Kapoor
 
(PRIYA) Rajgurunagar Call Girls Just Call 7001035870 [ Cash on Delivery ] Pun...
(PRIYA) Rajgurunagar Call Girls Just Call 7001035870 [ Cash on Delivery ] Pun...(PRIYA) Rajgurunagar Call Girls Just Call 7001035870 [ Cash on Delivery ] Pun...
(PRIYA) Rajgurunagar Call Girls Just Call 7001035870 [ Cash on Delivery ] Pun...ranjana rawat
 
(SHREYA) Chakan Call Girls Just Call 7001035870 [ Cash on Delivery ] Pune Esc...
(SHREYA) Chakan Call Girls Just Call 7001035870 [ Cash on Delivery ] Pune Esc...(SHREYA) Chakan Call Girls Just Call 7001035870 [ Cash on Delivery ] Pune Esc...
(SHREYA) Chakan Call Girls Just Call 7001035870 [ Cash on Delivery ] Pune Esc...ranjana rawat
 
What are the advantages and disadvantages of membrane structures.pptx
What are the advantages and disadvantages of membrane structures.pptxWhat are the advantages and disadvantages of membrane structures.pptx
What are the advantages and disadvantages of membrane structures.pptxwendy cai
 

Recently uploaded (20)

Introduction to IEEE STANDARDS and its different types.pptx
Introduction to IEEE STANDARDS and its different types.pptxIntroduction to IEEE STANDARDS and its different types.pptx
Introduction to IEEE STANDARDS and its different types.pptx
 
(ANVI) Koregaon Park Call Girls Just Call 7001035870 [ Cash on Delivery ] Pun...
(ANVI) Koregaon Park Call Girls Just Call 7001035870 [ Cash on Delivery ] Pun...(ANVI) Koregaon Park Call Girls Just Call 7001035870 [ Cash on Delivery ] Pun...
(ANVI) Koregaon Park Call Girls Just Call 7001035870 [ Cash on Delivery ] Pun...
 
APPLICATIONS-AC/DC DRIVES-OPERATING CHARACTERISTICS
APPLICATIONS-AC/DC DRIVES-OPERATING CHARACTERISTICSAPPLICATIONS-AC/DC DRIVES-OPERATING CHARACTERISTICS
APPLICATIONS-AC/DC DRIVES-OPERATING CHARACTERISTICS
 
chaitra-1.pptx fake news detection using machine learning
chaitra-1.pptx  fake news detection using machine learningchaitra-1.pptx  fake news detection using machine learning
chaitra-1.pptx fake news detection using machine learning
 
the ladakh protest in leh ladakh 2024 sonam wangchuk.pptx
the ladakh protest in leh ladakh 2024 sonam wangchuk.pptxthe ladakh protest in leh ladakh 2024 sonam wangchuk.pptx
the ladakh protest in leh ladakh 2024 sonam wangchuk.pptx
 
Decoding Kotlin - Your guide to solving the mysterious in Kotlin.pptx
Decoding Kotlin - Your guide to solving the mysterious in Kotlin.pptxDecoding Kotlin - Your guide to solving the mysterious in Kotlin.pptx
Decoding Kotlin - Your guide to solving the mysterious in Kotlin.pptx
 
Gfe Mayur Vihar Call Girls Service WhatsApp -> 9999965857 Available 24x7 ^ De...
Gfe Mayur Vihar Call Girls Service WhatsApp -> 9999965857 Available 24x7 ^ De...Gfe Mayur Vihar Call Girls Service WhatsApp -> 9999965857 Available 24x7 ^ De...
Gfe Mayur Vihar Call Girls Service WhatsApp -> 9999965857 Available 24x7 ^ De...
 
SPICE PARK APR2024 ( 6,793 SPICE Models )
SPICE PARK APR2024 ( 6,793 SPICE Models )SPICE PARK APR2024 ( 6,793 SPICE Models )
SPICE PARK APR2024 ( 6,793 SPICE Models )
 
OSVC_Meta-Data based Simulation Automation to overcome Verification Challenge...
OSVC_Meta-Data based Simulation Automation to overcome Verification Challenge...OSVC_Meta-Data based Simulation Automation to overcome Verification Challenge...
OSVC_Meta-Data based Simulation Automation to overcome Verification Challenge...
 
High Profile Call Girls Nagpur Meera Call 7001035870 Meet With Nagpur Escorts
High Profile Call Girls Nagpur Meera Call 7001035870 Meet With Nagpur EscortsHigh Profile Call Girls Nagpur Meera Call 7001035870 Meet With Nagpur Escorts
High Profile Call Girls Nagpur Meera Call 7001035870 Meet With Nagpur Escorts
 
9953056974 Call Girls In South Ex, Escorts (Delhi) NCR.pdf
9953056974 Call Girls In South Ex, Escorts (Delhi) NCR.pdf9953056974 Call Girls In South Ex, Escorts (Delhi) NCR.pdf
9953056974 Call Girls In South Ex, Escorts (Delhi) NCR.pdf
 
MANUFACTURING PROCESS-II UNIT-5 NC MACHINE TOOLS
MANUFACTURING PROCESS-II UNIT-5 NC MACHINE TOOLSMANUFACTURING PROCESS-II UNIT-5 NC MACHINE TOOLS
MANUFACTURING PROCESS-II UNIT-5 NC MACHINE TOOLS
 
Call Us -/9953056974- Call Girls In Vikaspuri-/- Delhi NCR
Call Us -/9953056974- Call Girls In Vikaspuri-/- Delhi NCRCall Us -/9953056974- Call Girls In Vikaspuri-/- Delhi NCR
Call Us -/9953056974- Call Girls In Vikaspuri-/- Delhi NCR
 
High Profile Call Girls Nagpur Isha Call 7001035870 Meet With Nagpur Escorts
High Profile Call Girls Nagpur Isha Call 7001035870 Meet With Nagpur EscortsHigh Profile Call Girls Nagpur Isha Call 7001035870 Meet With Nagpur Escorts
High Profile Call Girls Nagpur Isha Call 7001035870 Meet With Nagpur Escorts
 
Call for Papers - African Journal of Biological Sciences, E-ISSN: 2663-2187, ...
Call for Papers - African Journal of Biological Sciences, E-ISSN: 2663-2187, ...Call for Papers - African Journal of Biological Sciences, E-ISSN: 2663-2187, ...
Call for Papers - African Journal of Biological Sciences, E-ISSN: 2663-2187, ...
 
Introduction to Multiple Access Protocol.pptx
Introduction to Multiple Access Protocol.pptxIntroduction to Multiple Access Protocol.pptx
Introduction to Multiple Access Protocol.pptx
 
VIP Call Girls Service Kondapur Hyderabad Call +91-8250192130
VIP Call Girls Service Kondapur Hyderabad Call +91-8250192130VIP Call Girls Service Kondapur Hyderabad Call +91-8250192130
VIP Call Girls Service Kondapur Hyderabad Call +91-8250192130
 
(PRIYA) Rajgurunagar Call Girls Just Call 7001035870 [ Cash on Delivery ] Pun...
(PRIYA) Rajgurunagar Call Girls Just Call 7001035870 [ Cash on Delivery ] Pun...(PRIYA) Rajgurunagar Call Girls Just Call 7001035870 [ Cash on Delivery ] Pun...
(PRIYA) Rajgurunagar Call Girls Just Call 7001035870 [ Cash on Delivery ] Pun...
 
(SHREYA) Chakan Call Girls Just Call 7001035870 [ Cash on Delivery ] Pune Esc...
(SHREYA) Chakan Call Girls Just Call 7001035870 [ Cash on Delivery ] Pune Esc...(SHREYA) Chakan Call Girls Just Call 7001035870 [ Cash on Delivery ] Pune Esc...
(SHREYA) Chakan Call Girls Just Call 7001035870 [ Cash on Delivery ] Pune Esc...
 
What are the advantages and disadvantages of membrane structures.pptx
What are the advantages and disadvantages of membrane structures.pptxWhat are the advantages and disadvantages of membrane structures.pptx
What are the advantages and disadvantages of membrane structures.pptx
 

Microcontrollers 10ES42: Introduction to Microprocessors and Microcontrollers

  • 1. Microcontrollers 10ES42 Department of EEE, SJBIT Page 1 MICROCONTROLLERS (Common to EC/TC/EE/IT/BM/ML) Sub Code: 10ES42 IA Marks: 25 Hrs/ Week: 04 Exam Hours: 03 Total Hrs. 52 Exam Marks: 100 PART-A UNIT 1: Microprocessors and microcontroller. Introduction, Microprocessors and Microcontrollers, RISC & CISC CPU Architectures, Harvard & Von- Neumann CPU architecture, Computer software. The 8051 Architecture: Introduction, Architecture of 8051, Pin diagram of 8051, Memory organization, External Memory interfacing, Stacks. 6 Hrs UNIT 2: Addressing Modes: Introduction, Instruction syntax, Data types, Subroutines, Addressing modes: Immediate addressing , Register addressing, Direct addressing, Indirect addressing, relative addressing, Absolute addressing, Long addressing, Indexed addressing, Bit inherent addressing, bit direct addressing. Instruction set: Instruction timings, 8051 instructions: Data transfer instructions, Arithmetic instructions, Logical instructions, Branch instructions, Subroutine instructions, Bit manipulation instruction. 6 Hrs UNIT 3: 8051 programming: Assembler directives, Assembly language programs and Time delay calculations. 6 Hrs UNIT 4: 8051 Interfacing and Applications: Basics of I/O concepts, I/O Port Operation, Interfacing 8051 to LCD, Keyboard, parallel and serial ADC, DAC, Stepper motor interfacing and DC motor interfacing and programming 7 Hrs PART-B UNIT 5: 8051 Interrupts and Timers/counters: Basics of interrupts, 8051 interrupt structure, Timers and Counters, 8051 timers/counters, programming 8051 timers in assembly and C. 6 Hrs
  • 2. Microcontrollers 10ES42 Department of EEE, SJBIT Page 2 UNIT 6: 8051 Serial Communication: Data communication, Basics of Serial Data Communication, 8051 Serial Communication, connections to RS-232, Serial communication Programming in assembly and C. 8255A Programmable Peripheral Interface:, Architecture of 8255A, I/O addressing,, I/O devices interfacing with 8051 using 8255A. 6 Hrs Course Aim – The MSP430 microcontroller is ideally suited for development of low-power embedded systems that must run on batteries for many years. There are also applications where MSP430 microcontroller must operate on energy harvested from the environment. This is possible due to the ultra-low power operation of MSP430 and the fact that it provides a complete system solution including a RISC CPU, flash memory, on-chip data converters and on-chip peripherals. UNIT 7: Motivation for MSP430microcontrollers – Low Power embedded systems, On-chip peripherals (analog and digital), low-power RF capabilities. Target applications (Single-chip, low cost, low power, high performance system design). 2 Hrs MSP430 RISC CPU architecture, Compiler-friendly features, Instruction set, Clock system, Memory subsystem. Key differentiating factors between different MSP430 families. 2 Hrs Introduction to Code Composer Studio (CCS v4). Understanding how to use CCS for Assembly, C, Assembly+C projects for MSP430 microcontrollers. Interrupt programming. 3 Hrs Digital I/O – I/O ports programming using C and assembly, Understanding the muxing scheme of the MSP430 pins. 2 Hrs UNIT 8: On-chip peripherals. Watchdog Timer, Comparator, Op-Amp, Basic Timer, Real Time Clock (RTC), ADC, DAC, SD16, LCD, DMA. 2 Hrs
  • 3. Microcontrollers 10ES42 Department of EEE, SJBIT Page 3 Using the Low-power features of MSP430. Clock system, low-power modes, Clock request feature, Low-power programming and Interrupt. 2 Hrs Interfacing LED, LCD, External memory. Seven segment LED modules interfacing. Example – Real-time clock. 2 Hrs Case Studies of applications of MSP430 - Data acquisition system, Wired Sensor network, Wireless sensor network with Chipcon RF interfaces. 3 Hrs TEXT BOOKS: 1. “The 8051 Microcontroller and Embedded Systems – using assembly and C ”-, Muhammad Ali Mazidi and Janice Gillespie Mazidi and Rollin D. McKinlay; PHI, 2006 / Pearson, 2006 2. “MSP430 Microcontroller Basics”, John Davies, Elsevier, 2010 (Indian edition available) REFERENCE BOOKS: 1. “The 8051 Microcontroller Architecture, Programming & Applications”, 2e Kenneth J.Ayala , Penram International, 1996 / Thomson Learning 2005. 2. “The 8051 Microcontroller”, V.Udayashankar and MalikarjunaSwamy, TMH, 2009 3. MSP430 Teaching CD-ROM, Texas Instruments, 2008 (can be requested http://www.uniti.in ) 4. Microcontrollers: Architecture, Programming, Interfacing and System Design”,Raj Kamal, “Pearson Education, 2005
  • 4. Microcontrollers 10ES42 Department of EEE, SJBIT Page 4 INDEX SHEET Unit TOPIC PAGE NO. 1 Microprocessors and microcontroller: Introduction, 6 to 30 Microprocessors and Microcontrollers, RISC & CISC CPU Architectures, Harvard & Von- Neumann CPU architecture, Computer software. The 8051 Architecture: Introduction, Architecture of 8051, Pin diagram of 8051, Memory organization, External Memory interfacing, Stacks. 2 Addressing Modes: Introduction, Instruction syntax, Data types, Subroutines, 31 to 59 Addressing modes: Immediate addressing, Register addressing, Direct addressing, Indirect addressing, relative addressing, Absolute addressing, Long addressing, Indexed addressing, Bit inherent addressing, and bit direct addressing. Instruction set: Instruction timings, 8051 instructions: Data transfer instructions, Arithmetic instructions, Logical instructions, Branch instructions, Subroutine instructions, Bit manipulation instruction 3 8051 programming: Assembler directives, Assembly language programs and Time delay calculations. 60 to 62 4 8051 Interfacing and Applications: Basics of I/O concepts, I/O Port Operation, Interfacing 8051 to LCD, Keyboard, parallel and serial ADC, DAC, Stepper motor interfacing and DC motor interfacing and programming 63 to 90 5 8051 Interrupts and Timers/counters: Basics of interrupts, 8051 interrupt structure, Timers and Counters, 8051 timers/counters, programming 8051 timers in assembly and C. 6 8051 Serial Communication: Data communication, Basics of Serial Data Communication, 8051 Serial Communication, connections to RS-232, Serial communication Programming in assembly and C. 8255A Programmable Peripheral Interface:, Architecture of 8255A, I/O addressing,, I/O devices interfacing with 8051 using 8255A. 91 to 101 7 Motivation for MSP430microcontrollers – Low Power embedded systems, On-chip peripherals (analog and digital), low-power RF capabilities. Target applications (Single-chip, low cost, low power, high performance system design). 101 to 110 MSP430 RISC CPU architecture, Compiler-friendly features, Instruction set, Clock system, Memory subsystem. Key differentiating factors between different MSP430 families. Introduction to Code Composer Studio (CCS v4). Understanding how to use CCS for Assembly, C,
  • 5. Microcontrollers 10ES42 Department of EEE, SJBIT Page 5 Assembly+C projects for MSP430 microcontrollers. Interrupt programming. Digital I/O – I/O ports programming using C and assembly, Understanding the muxing scheme of the MSP430 pins. 8 On-chip peripherals. Watchdog Timer, Comparator, Op- Amp, Basic Timer, Real Time Clock (RTC), ADC, DAC, SD16, LCD, DMA. Using the Low-power features of MSP430. Clock system, low-power modes, Clock request feature, Low-power programming and Interrupt. Interfacing LED, LCD, External memory. Seven segment LED modules interfacing. Example – Real-time clock. Case Studies of applications of MSP430 - Data acquisition system, Wired Sensor network, Wireless sensor network with Chipcon RF interfaces.
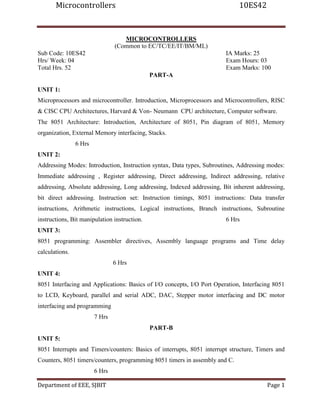
  • 6. Microcontrollers 10ES42 Department of EEE, SJBIT Page 6 UNIT 1: Microprocessors and microcontroller. Introduction, Microprocessors and Microcontrollers, RISC & CISC CPU Architectures, Harvard & Von- Neumann CPU architecture, Computer software. The 8051 Architecture: Introduction, Architecture of 8051, Pin diagram of 8051, Memory organization, External Memory interfacing, Stacks. Computer: A computer is a multipurpose programmable machine that reads binary instructions from its memory , accepts binary data as input ,processes the data according to those instructions and provides results as output. It is a programmable device made up of both hardware and software. The various components of the computer are called hardware. A set of instructions written for the computer to solve a specific task is called program and collection of programs is called software . The computer hardware consists of four main components. The central processing unit which acts as computer‟s brain. Input unit through which program and data can be entered to computer, output unit on which the results of the computations can be displayed. Memory in which data and programs are stored. Fig 1. Block diagram of a microcomputer A computer that is designed using a microprocessor as its CPU , is known as a microcomputer. Microprocessor or „Computer on Chip‟ first became a commercial reality in 1971 with the introduction of the 4 bit 4004 by Intel. A byproduct of Microprocessor development was Microcontroller. The same fabrication technology and programming concept that make the general purpose microprocessor also yielded the Microcontroller.
  • 7. Microcontrollers 10ES42 Department of EEE, SJBIT Page 7 Microprocessors: A microprocessor is a general purpose digital computer central processing unit (CPU). Although known as a „Computer on Chip‟ the Microprocessor in no sense a complete digital computer. Block diagram of a Microprocessor CPU which contains ALU; Program counter (PC), a stack pointer (SP) ,some working registers , a clock timing circuit and interrupt circuit s is shown in the following figure Fig.2.Block Diagram of a Microprocessor To make a computer microcomputer one must add memory usually RAM and ROM, memory decoders , an oscillator and a number of Input ,Output devices such as serial and parallel ports. In addition special purpose devices such as interrupt handler and counters may be added to relieve the CPU from time consuming counting or timing cores. When the Microcomputer is equipped with mass storage devices , I/O peripherals such as a key board and a display CRT it yields a small computer that can be applied to a range of general purpose applications. The hardware design of a microprocessor is arranged such that a very small or very large system can be configured around the CPU as the application demands as shown in Fig1. The prime use of the Microprocessor is to read data , perform extensive calculations on that data, and store those calculations in a mass storage device or display the results for human use. The programs used by microprocessor are stored in the mass storage device and loaded into RAM as user directs. A few microprocessor program are stored in ROM . The ROM based programs are primarily small fixed programs that operate peripherals and other fixed devices that are connected to the system. Microcontroller: A Microcontroller is a programmable digital processor with necessary peripherals. Both microcontrollers and microprocessors are complex sequential digital circuits meant to carry out job according to the program / instructions. Sometimes analog input/output interface makes a part of microcontroller circuit as mixed mode(both analog and digital) in nature. A microcontroller can be compared to a Swiss knife with multiple functions incorporated in the same Integrated Circuits. Block diagram of a typical Microcontroller which is a true Arithmetic and Logic Unit Accumulator Working Register Program Counter Clock Circuit Stack Pointer Interrupt Circuits
  • 8. Microcontrollers 10ES42 Department of EEE, SJBIT Page 8 computer on a chip is shown below. The design incorporates all the features found in microprocessor CPU : ALU,PC, SP and registers. It also has other features needed to make a complete computer: ROM, RAM, Parallel I/O, serial I/O, Counters and clock circuits. Like the microprocessor , a microcontroller is a general purpose device, but one that is meant to read data, perform limited calculations on that data and control its environment based on those calculations. The prime use of microcontroller is to control the operation of a machine using a fixed program that is stored in ROM and that does not change over the lifetime of the system. Fig3. Block diagram of a single chip computer Complex Instruction Set Computer (CISC): Memory in those days was expensive. Bigger programs required more storage which included more money . There was a need to reduce the number of instructions per program . This was achieved by having multiple operations within single instruction. Multiple operations lead to many different kinds of instructions .Access to memory in turn makes the instruction length variable and fetch-decode execute time unpredictable – making it more complex. Thus hardware was made to understand the complexity of instruction set. The computer having such instruction set was named as Complex Instruction Set Computer (CISC). Intel 8051 is an example for CISC architecture. Reduced Instruction Set Computer (RISC): In applications which require more of input , output related operations having few simple instructions that are of the same length allows memory access only with explicit load and store instructions. Hence each instruction performs less work but instruction execution time among different instructions is consistent. This would lead to instruction execution by hardware including multiple number of registers inside CPU. The computer using such instructions is called Reduced Instruction Set Computer (RISC). PIC microcontroller manufactured by Microchip Company is an example for RISC architecture. Vonneumann (Princeton) and Harvard Architecture : Intel‟s 8051 employs Harvard architecture. A microcontroller has some embedded peripherals and Input/Output (I/O) devices. The data transfer to these devices takes place through I/O registers. In a microprocessor, input /output (I/O) devices are externally interfaced and are mapped either to memory address (memory mapped I/O) or a separate I/O address space (I/O mapped I/O). There are two possible architectures one is Princeton (Von Neumann) and another is
  • 9. Microcontrollers 10ES42 Department of EEE, SJBIT Page 9 Harvard .I/O Registers space in Princeton architecture have only one memory interface for program memory (ROM) and data memory (RAM). One option is to map the I/O Register as a part of data memory or variable RAM area ( memory mapped I/O). Alternatively a separate I/O register space can be assigned (I/O Mapped I/O) . Both the arrangements are shown in Fig.4. Fig 4. Input/Output Registers in Princeton Architecture As shown in Fig 4. Program memory and Data memory are together in both the arrangements. The Princeton or Von neumann architecture one bus is used to carry the address and data with an appropriate multiplexing technique ,which in turn reduces the cost. But Harvard architecture which 8051 employs has separate Data memory and separate Code or Program memory . The Fig. 5 and Fig .6 show the need for separate address and data bus for each Program and Data memory in Harvard architecture. Since there are separate bus for access the operation of fetching the code and data can happen simultaneously which increases the speed of operation of execution inside CPU. Fig. 5.Organization of I/O registers in Harvard Architecture
  • 10. Microcontrollers 10ES42 Department of EEE, SJBIT Page 10 In Fig. 5, the first option is difficult to implement as there is no means to write to program ROM area. It is also complicated to have a separate I/O space as shown in (3). Hence the second option where I/O registers are placed in the register space is widely used in Harvard architecture. Fig6. Harvard Architecture Computer Software: A set of instructions written in a specific sequence for computer to solve a specific task is called a program, and software is collection of programs. The program stored in the computer memory in the form of 0s and 1sand it is called as machine level instructions. Since it would be difficult to remember machine codes in the form of binary numbers an intermediate level of language for programming, between higher and machine level was developed and is known as assembly level language . Assembly language programs are written using assembly instructions known as mnemonics. For example in CLR A, instruction CLR means clear and A means accumulator. The program mnemonics are converted to machine codes in the form of binary by a software called Assembler. The Assembly language programming requires a detailed knowledge of the architecture with which the program is executed. In order to overcome the drawback of assembly language programming Higher level language like C,C++ are introduced where an interpreter or a compiler takes care of translating a higher level source code into machine codes. Development/Classification of microcontrollers : Microcontrollers have gone through a silent evolution (invisible). The evolution can be rightly termed as silent as the impact or application of a microcontroller is not well known to a common user, although microcontroller technology has undergone significant change since early 1970's. Development of some popular microcontrollers is given as follows. Intel 4004 4 bit (2300 PMOS trans, 108 kHz) 1971 Intel 8048 8 bit 1976 Intel 8031 8 bit (ROM-less) . Intel 8051 8 bit (Mask ROM) 1980 C P U Data Memory Program Memory Data Addres s Addres s Data
  • 11. Microcontrollers 10ES42 Department of EEE, SJBIT Page 11 Microchip PIC16C64 8 bit 1985 Motorola 68HC11 8 bit (on chip ADC) . Intel 80C196 16 bit 1982 Atmel AT89C51 8 bit (Flash memory) . Microchip PIC 16F877 8 bit (Flash memory + ADC) . We use more number of microcontrollers compared to microprocessors. Microprocessors are primarily used for computational purpose, whereas microcontrollers find wide application in devices needing real time processing and control. Application of microcontrollers are numerous. Starting from domestic applications such as in washing machines, TVs, air conditioners, microcontrollers are used in automobiles, process control industries , cell phones, electrical drives, robotics and in space applications. Fig. 7. Internal Structure of a typical Microcontroller The one we are studying is a 8 bit Embedded Microcontroller introduced by Intel, 8051. 8051 ARCHITECTURE:
  • 12. Microcontrollers 10ES42 Department of EEE, SJBIT Page 12 Fig 8. Block diagram of 8051 Microcontroller Salient Features • Eight bit CPU with registers A (Accumulator) and B • Sixteen bit Program counter (PC) and a data pointer (DPTR) • 8 Bit Program Status Word (PSW) • 8 Bit Stack Pointer • 4K Code Memory • Internal Memory of 128 Bytes • 32 I/O Pins arranged as 4 , 8 Bit ports • Two 16 Bit Timer/Counter :T0, T1 • Full Duplex serial data receiver/transmitter • Control Registers : TCON,TMOD,SCON,PCON,IP and IE • Two External and Internal Interrupt sources • Oscillator and clock circuits The programming model of 8051 shows the 8051 as the collection of 8 and 16 bit registers and 8 bit memory locations. These registers and memory locations can be made to operate using software instructions that are incorporated as part of the program instructions. The pin configuration of 8051 is shown in Fig.9. ALU PSW A B SFR GPR & RAM ROM PC DPTR DPH DPL Port 0 Port 2 Port 3 Port 1 I/O A0-A7 D0-D7 I/O I/O A8-A15 I/O INT CNTR SERIAL RD/WR
  • 13. Microcontrollers 10ES42 Department of EEE, SJBIT Page 13 Fig.9 Pin configuration of 8051 8051 Clock and Instruction Cycle: The heart of 8051 is the circuitry that generates the clock pulses by which all internal operations are synchronised. Pins XTAL1 and XTAL2 are provided for connecting resonator to form an oscillator. The crystal frequency is the basic internal frequency of the microcontroller. 8051 is designed to operate between 1MHz to 16MHz and generally operates with a crystal frequency 11.04962 MHz. The oscillator formed by the crystal , capacitor and an on-chip inverter generates a pulse train at the frequency of the crystal. The clock frequency f establishes the smallest interval to accomplish any simple instruction. The time taken to complete any instruction is called as machine cycle or instruction cycle. In 8051 one instruction cycle consists of 6 states or 12 clock cycles, instruction cycle is also referred as Machine Microcontroller Chips : Broad Classification of different microcontroller chips could be as follows: Embedded (Self -Contained) 8 - bit Microcontroller 16 to 32 Microcontrollers Digital Signal Processors
  • 14. Microcontrollers 10ES42 Department of EEE, SJBIT Page 14 cycle. Fig. 10 Instruction cycle of 8051(Instruction cycle has six states (S 1 - S 6 ). Each state has two pulses (P1 and P2)) Processor Architectures: Fig 11.Basic 8051 Architecture Internal Memory: A functioning computer memory for program code bytes , commonly in ROM, and RAM memory for variable data that can be altered as the program runs.. Additional memory can be added externally using suitable circuits. Unlike microcontrollers with Von- Neumann architectures, which can use a single memory address for either program code or data, but not for both, the 8051 has Harvard architecture which uses the same address in different memories for code and data The internal circuitry accesses the current memory based on the nature of operation in the program. Internal RAM: The 128 bytes internal RAM is organized into 3 distinct areas. 1. 32 bytes from address 00h to 1fh that make up 32 working registers organized as 4 memory banks of 8 registers each. The 4 register banks are numbered 0 to 3 and are made
  • 15. Microcontrollers 10ES42 Department of EEE, SJBIT Page 15 up of 8 registers named R0 to R7. Each register can be addressed by name or by its RAM addresses. Thus R0 of bank3 is R0 (if bank3 is selected) or address 18h (where bank3 is selected). Bits RS0 and RS1 in the PSW determine which bank of registers is currently in use at any time when program is running. Register banks not selected can be used as general purpose RAM. Bank0 is selected by default on reset.. 2. A bit addressable area of 16 bytes occupies RAM byte addresses 20h to 2fh, forming total of 128 bits. An addressable bit may be specified by its bit address of 00h to 7fh or 8 bits may form any byte address from 20h to 2fh.For example bit address 4fh is also bit 7 of byte address 29h. Addressable bits are useful when the program need only remember a binary event. 3. A general purpose RAM area above the bit area from 30h to 7f h, addressable as byte. Fig.12. Internal RAM structure The Stack and Stack pointer: The stack refers to an area of internal RAM that is used in conjunction with certain opcodes to store and retrieve data quickly. The 8 bit Stack Pointer (SP) register is used by the 8051 to hold internal RAM address that is called the top of the stack. The address in SP register is the location in internal RAM where the last byte of the data was stored by stack operation. When data is to be placed on the stack , the SP increments before storing data on the stack so that the stack grows up as data is stored. Whenever data is retrieved from the stack, the byte is
  • 16. Microcontrollers 10ES42 Department of EEE, SJBIT Page 16 read from the stack and then the SP decrements to point to the next available byte of stored data. Operation of the Stack and Stack Pointer: Operation of the stack is shown in the above figure. The SP is set to 07 when the 8051 is reset and can be changed to any internal RAM address by the programmer. The stack is limited in height to the size of internal RAM. The stack can overwrite valuable data in register banks, bit addressable RAM and scratched pad RAM areas.It is programmer‟s responsibility to make it sure that the stack does not grow beyond predefined bounds. The stack is normally placed high in the internal RAM by an appropriate choice of the number placed in SP register, to avoid conflict with registers or RAM. Special Function Registers (SFRs): The 8051 operations that do not use the internal RAM addresses from 00h to 7fh are done by a group of specific internal registers each called a specific function register (SFR) which may be addressed much like internal RAM using addresses from 80h to ffh. Some SFRs are also bit addressable as is the case for the bit area of RAM. This feature allows the programmer the programmer to change only what needs to be altered leaving the remaining bits in that SFR unchanged. Not all of the addresses from 80h to ffh are used for SFRs . Only the addressed ones can be used in programming SFRs and equivalent internal RAM addresses are shown in Fig.10. SFR Map: The set of Special Function Registers (SFRs) contain important registers such as Accumulator, Register B, I/O Port latch registers, Stack pointer, Data Pointer, Processor Status Word (PSW) and various control registers. Some of these registers are bit addressable (they are marked with a * in the Fig. 13 below). The detailed map of various registers is shown in the following figure. The PC is not part of the SFR 0e0h or 8ch. and has no internal RAM address. SFRs are named in certain opcodes by their function names as A, TH0 and can also be referred by their addresses such as Address F8H F0H B* E8H E0H ACC* D8H D0H PSW* C8H (T2CON)* (RCAP2L) (RCAP2H) (TL2) (TH2) C0H B8H IP* B0H P3* A8H IE* A0H P2* 98H SCON* SBUF
  • 17. Microcontrollers 10ES42 Department of EEE, SJBIT Page 17 90H P1* 88H TCON* TMOD TL0 TL1 TH0 TH1 80H P0* SP DPL DPH PCON Fig.13 Special Function Registers and the addresses Internal ROM 8051 is organized so that data memory and program code memory can be two entirely different physical memory entities. Each has the same address ranges. The internal program ROM occupies code address space 000h to 0fffh. The PC is normally used to address program code bytes from address 0000h to ffffh. Program addresses higher than offfh which exceed the internal ROM capacity will cause the 8051 to automatically fetch code bytes from external memory, addresses 00h to ffffh by connecting the external access pin (EA) to ground. I/O Port pins, Ports and Circuits:One major feature of a microcontroller is versatility built into the I/O circuits that connect the 8051 to the outside world. Out of 40 pins 24 pins may each be used for one of two entirely different functions yielding a total pin configuration of 64.But the port pins have been multiplexed to perform different functions to make 8051 as 40 Pin IC. The port pin circuitry is as shown below. Fig. 14 Port -0 Port -0 has 8 pins (P0.0-P0.7).The structure of a Port-0 pin is shown in fig 13.Port-0 can be configured as a normal bidirectional I/O port or it can be used for address/data interfacing for
  • 18. Microcontrollers 10ES42 Department of EEE, SJBIT Page 18 accessing external memory. When control is '1', the port is used for address/data interfacing. When the control is '0', the port can be used as a normal bidirectional I/O port. Let us assume that control is '0'. When the port is used as an input port, '1' is written to the latch. In this situation both the output MOSFETs are 'off'. Hence the output pin floats. This high impedance pin can be pulled up or low by an external source. When the port is used as an output port, a '1' written to the latch again turns 'off' both the output MOSFETs and causes the output pin to float. An external pull-up is required to output a '1'. But when '0' is written to the latch, the pin is pulled down by the lower MOSFET. Hence the output becomes zero. When the control is '1', address/data bus controls the output driver MOSFETs. If the address/data bus (internal) is '0', the upper MOSFET is 'off' and the lower MOSFET is 'on'. The output becomes '0'. If the address/data bus is '1', the upper transistor is 'on' and the lower transistor is 'off'. Hence the output is '1'. Hence for normal address/data interfacing (for external memory access) no pull-up resistors are required. Port-0 latch is written to with 1's when used for external memory access. Port-1 Pin Structure: Port-1 has 8 pins (P1.1-P1.7) .The structure of a port-1 pin is shown in fig 15 Fig 15. Port 1 Structure Port-1 does not have any alternate function i.e. it is dedicated solely for I/O interfacing. When used as output port, the pin is pulled up or down through internal pull-up. To use port-1 as input port, '1' has to be written to the latch. In this input mode when '1' is written to the pin by the external device then it reads fine. But when '0' is written to the pin by the external device then the external source must sink current due to internal pull-up. If the external device is not able to sink the current the pin voltage may rise, leading to a possible wrong reading.
  • 19. Microcontrollers 10ES42 Department of EEE, SJBIT Page 19 Port-2 Pin Structure: Port-2 has 8-pins (P2.0-P2.7) . The structure of a port-2 pin is shown in fig 14. Fig. 16.PORT 2 Pin Structure Port-2 is used for higher external address byte or a normal input/output port. The I/O operation is similar to Port-1. Port-2 latch remains stable when Port-2 pin are used for external memory access. Here again due to internal pull-up there is limited current driving capability. Port-3 Pin Structure:
  • 20. Microcontrollers 10ES42 Department of EEE, SJBIT Page 20 Fig. 17.PORT 3 Pin Structure: Each pin of Port-3 can be individually programmed for I/O operation or for alternate function. The alternate function can be activated only if the corresponding latch has been written to '1'. To use the port as input port, '1' should be written to the latch. This port also has internal pull- up and limited current driving capability. Alternate functions of Port-3 pins – Note: 1. Port 1, 2, 3 each can drive 4 LS TTL inputs. 2. Port-0 can drive 8 LS TTL inputs in address /data mode. For digital output port, it needs external pull-up resistors. 3. Ports-1,2and 3 pins can also be driven by open-collector or open-drain outputs. Each Port 3 bit can be configured either as a normal I/O or as a special function bit. Reading a port (port-pins) versus reading a latch. There is a subtle difference between reading a latch and reading the output port pin. P3.0 RxD P3.1 TxD P3.2 P3.3 P3.4 T0 P3.5 T1 P3.6 P3.7
  • 21. Microcontrollers 10ES42 Department of EEE, SJBIT Page 21 The status of the output port pin is sometimes dependant on the connected load. For instance if a port is configured as an output port and a '1' is written to the latch, the output pin should also show '1'. If the output is used to drive the base of a transistor, the transistor turns 'on'. If the port pin is read, the value will be '0' which is corresponding to the base-emitter voltage of the transistor. Reading a latch: Usually the instructions that read the latch, read a value, possibly change it, and then rewrite it to the latch. These are called "read-modify-write" instructions. Examples of a few instructions are- ORL P2, A; P2 <-- P2 or A MOV P2.1, C; Move carry bit to PX.Y bit In this the latch value of P2 is read, is modified such that P2.1 is the same as Carry and is then written back to P2 latch. Reading a Pin: Examples of a few instructions that read port pin, are- MOV A, P0; Move port-0 pin values to A MOV A, P1; Move port-1 pin values to A Connecting External Memory: The following figure shows the connection between an 8051 and external memory Interfacing External Memory: The system designer is not limited by the amount of internal ROM and RAM available on chip. Two separate external memory spaces are made available by the 16 bit Program Counter PC and DPTR and by different control pins for enabling the external ROM and RAM chips. Internal control entry accesses the correct physical memory , depending on the machine cycle state and opcode being executed . There are several reasons for adding external memory, particularly Program Memory, when applying the 8051 in a system. When project is in the prototype stage, having a masked internal ROM for each program “try” is prohibitive. To help the programmer the manufacturers make available an EPROM version, the 8751, which has 4K of on-chip EPROM that may be programmed and erased as needed as the program is developed If external program/data memory are to be interfaced, they are interfaced in the following way.
  • 22. Microcontrollers 10ES42 Department of EEE, SJBIT Page 22 Fig.18.Diagram for Interfacing of External Memory External program memory is fetched if either of the following two conditions are satisfied. External program memory is fetched if either of the following two conditions are satisfied. 1. Enable Address) is low. The microcontroller by default starts searching for program from external program memory. 2. PC is higher than FFFH for 8051 or 1FFFH for 8052. 3. tells the outside world whether the external memory fetched is program memory or data memory. is user configurable. is processor controlled. Accessing external memory: Access to external program memory uses the signal (Program store enable) as the read strobe. Access to external data memory uses (alternate function of P3.7 and P3.6). For external program memory, always 16 bit address is used. For example –Access to external data memory can be either 8-bit address or 16-bit address - 8-bit address- MOVX A, @Rp where Rp is either R0 or R1 MOVX @Rp, A 16 bit address- MOVX A,@DPTR MOV X @DPTR, A.The external memory access in 8051 can be shown by a schematic diagram as given in fig 19.
  • 23. Microcontrollers 10ES42 Department of EEE, SJBIT Page 23 Fig 19. Schematic diagram of external memory access If an 8-bit external address is used for data memory (i.e. MOVX @Rp) then the content of Port-2 SFR remains at Port-2 pins throughout the external memory cycle. This facilitates memory paging as the upper 8 bit address remains fixed. During any access to external memory, the CPU writes FFH to Port-0 latch (SFR). If the user writes to Port-0 during an external memory fetch, the incoming byte is corrupted. External program memory is accessed under the following condition. 1. Whenever is low, or whenever PC contains a number higher than 0FFFH (for 8051) or 1FFF (for 8052). Some typical use of code/program memory access: External program memory can be not only used to store the code, but also for lookup table of various functions required for a particular application. Mathematical functions such as Sine, Square root, Exponential, etc. can be stored in the program memory (Internal or external) and these functions can be accessed using MOVC instruction. Timers / Counters : 8051 has two 16-bit programmable UP timers/counters. They can be configured to operate either as timers or as event counters. The names of the two counters are T0 and T1 respectively. The timer content is available in four 8-bit special function registers, viz, TL0,TH0,TL1 and TH1 respectively. In the "timer" function mode, the counter is incremented in every machine cycle. Thus, one can think of it as counting machine cycles. Hence the clock rate is 1/12 th of the oscillator frequency.
  • 24. Microcontrollers 10ES42 Department of EEE, SJBIT Page 24 In the "counter" function mode, the register is incremented in response to a 1 to 0 transition at its corresponding external input pin (T0 or T1). It requires 2 machine cycles to detect a high to low transition. Hence maximum count rate is 1/24 th of oscillator frequency. The operation of the timers/counters is controlled by two special function registers, TMOD and TCON respectively. Timer Mode control (TMOD) Special Function Register: TMOD register is not bit addressable. TMOD Address: 89 H Various bits of TMOD are described as follows –Gate: This is an OR Gate enabled bit which controls the effect of on START/STOP of Timer. It is set to one ('1') by the program to enable the interrupt to start/stop the timer. If TR1/0 in TCON is set and signal on pin is high then the timer starts counting using either internal clock (timer mode) or external pulses (counter mode). It is used for the selection of Counter/Timer mode. Mode Select Bits: M1 and M0 are mode select bits. Timer/ Counter control logic:
  • 25. Microcontrollers 10ES42 Department of EEE, SJBIT Page 25 Fig .20. Timer/Counter Control Logic Timer control (TCON) Special function register: TCON is bit addressable. The address of TCON is 88H. It is partly related to Timer and partly to interrupt. Fig. 20. TCON Register The various bits of TCON are as follows. TF1 : Timer1 overflow flag. It is set when timer rolls from all 1s to 0s. It is cleared when processor vectors to execute ISR located at address 001BH. TR1:Timer1 run control bit. Set to1tostartthe timer / counter. TF0:Timer0overflowflag.(SimilartoTF1)TR0:Timer0 run control bit. IE1 : Interrupt1 edge flag. Set by hardware when an external interrupt edge is detected. It is interrupt is processed. IE0:Interrupt0edgeflag.(SimilartoIE1) IT1 : Interrupt1 type control bit. Set/ cleared by software to specify falling edge / low level triggered external interrupt. IT0 : Interrupt0 type control bit. (Similar to IT1) As mentioned earlier, Timers can operate in four different modes. They are as follows Timer Mode-0: In this mode, the timer is used as a 13-bit UP counter as follows.
  • 26. Microcontrollers 10ES42 Department of EEE, SJBIT Page 26 Fig. 21. Operation of Timer on Mode-0 The lower 5 bits of TLX and 8 bits of THX are used for the 13 bit count.Upper 3 bits of TLX are ignored. When the counter rolls over from all 0's to all 1's, TFX flag is set and an interrupt is generated. The input pulse is obtained from the previous stage. If TR1/0 bit is 1 and Gate bit is 0, the counter continues counting up. If TR1/0 bit is 1 and Gate bit is 1, then the operation of the counter is controlled by input. This mode is useful to measure the width of a given pulse fed to input. Timer Mode-1: This mode is similar to mode-0 except for the fact that the Timer operates in 16-bit mode. . Fig .22of Timer in Mode 1 Timer Mode-2: (Auto-Reload Mode) This is a 8 bit counter/timer operation. Counting is performed in TLX while THX stores a constant value. In this mode when the timer overflows i.e. TLX becomes FFH, it is fed with the value stored in THX. For example if we load THX with 50H then the timer in mode 2 will count from 50H to FFH. After that 50H is again reloaded. This mode is useful in applications like fixed time sampling. Fig .23. Operation of Timer in Mode 2 Timer Mode-3:
  • 27. Microcontrollers 10ES42 Department of EEE, SJBIT Page 27 Timer 1 in mode-3 simply holds its count. The effect is same as setting TR1=0. Timer0 in mode-3 establishes TL0 and TH0 as two separate counters. Fig. 24. Operation of Timer in Mode 3 Control bits TR1 and TF1 are used by Timer-0 (higher 8 bits) (TH0) in Mode-3 while TR0 and TF0 are available to Timer-0 lower 8 bits(TL0). Serial Interface The serial port of 8051 is full duplex, i.e., it can transmit and receive simultaneously. The register SBUF is used to hold the data. The special function register SBUF is physically two registers. One is, write-only and is used to hold data to be transmitted out of the 8051 via TXD. The other is, read-only and holds the received data from external sources via RXD. Both mutually exclusive registers have the same address 099H. Serial Port Control Register (SCON) Register SCON controls serial data communication. Address: 098H (Bit addressable) Mode select bits
  • 28. Microcontrollers 10ES42 Department of EEE, SJBIT Page 28 SM2:multi processor communication bit REN: Receive enable bit TB8: Transmitted bit 8 (Normally we have 0-7 bits transmitted/received) RB8: Received bit 8 TI: Transmit interrupt flag RI: Receive interrupt flag Power Mode control Register Register PCON controls processor powerdown, sleep modes and serial data bandrate. Only one bit of PCON is used with respect to serial communication. The seventh bit (b7)(SMOD) is used to generate the baud rate of serial communication. Address: 87H SMOD: Serial baud rate modify bit GF1: General purpose user flag bit 1 GF0: General purpose user flag bit 0 PD: Power down bit IDL: Idle mode bit Data Transmission :Transmission of serial data begins at any time when data is written to SBUF. Pin P3.1 (Alternate function bit TXD) is used to transmit data to the serial data network. TI is set to 1 when data has been transmitted. This signifies that SBUF is empty so that another byte can be sent Data Reception: Reception of serial data begins if the receive enable bit is set to 1 for all modes. Pin P3.0 (Alternate function bit RXD) is used to receive data from the serial data network. Receive interrupt flag, RI, is set after the data has been received in all modes. The data gets stored in SBUF register from where it can be read Serial Data Transmission Modes: Mode-0: In this mode, the serial port works like a shift register and the data transmission works synchronously with a clock frequency of fosc /12. Serial data is received and transmitted through RXD. 8 bits are transmitted/ received aty a time. Pin TXD outputs the shift clock pulses of frequency fosc /12, which is connected to the external circuitry for synchronization. The shift frequency or baud rate is always 1/12 of the oscillator frequency
  • 29. Microcontrollers 10ES42 Department of EEE, SJBIT Page 29 Fig .25. Data transmission/reception in Mode-0 Mode-1 (standard UART mode) : In mode-1, the serial port functions as a standard Universal Asynchronous Receiver Transmitter (UART) mode. 10 bits are transmitted through TXD or received through RXD. The 10 bits consist of one start bit (which is usually '0'), 8 data bits (LSB is sent first/received first), and a stop bit (which is usually '1'). Once received, the stop bit goes into RB8 in the special function register SCON. The baud rate is variable. The following figure shows the way the bits are transmitted/ received. Fig .26. Data transmission format in UART mode Bit time= 1/fbaud In receiving mode, data bits are shifted into the receiver at the programmed baud rate. The data word (8-bits) will be loaded to SBUF if the following conditions are true. 1. RI must be zero. (i.e., the previously received byte has been cleared from SBUF) Mode bit SM2 = 0 or stop bit = 1. After the data is received and the data byte has been loaded into SBUF, RI becomes one. Mode-1 baud rate generation:
  • 30. Microcontrollers 10ES42 Department of EEE, SJBIT Page 30 Timer-1 is used to generate baud rate for mode-1 serial communication by using overflow flag of the timer to determine the baud frequency. Timer-1 is used in timer mode-2 as an auto-reload 8- bit timer. The data rate is generated by timer-1 using the following formula. Where, SMOD is the 7th bit of PCON register fosc is the crystal oscillator frequency of the microcontroller It can be noted that fosc/ (12 X [256- (TH1)]) is the timer overflow frequency in timer mode-2, which is the auto-reload mode. If timer-1 is not run in mode-2, then the baud rate is, Timer-1 can be run using the internal clock, fosc/12 (timer mode) or from any external source via pin T1 (P3.5) (Counter mode). Example: If standard baud rate is desired, then 11.0592 MHz crystal could be selected. To get a standard 9600 baud rate, the setting of TH1 is calculated as follows. Assuming SMOD to be '0' Or, Or, In mode-1, if SM2 is set to 1, no receive interrupt (RI) is generated unless a valid stop bit is received. Interrupts: 8051 provides 5 vectored interrupts. They are- 1. 2. TF0 3. 4. TF1 5. RI/TI Out of these, and are external interrupts whereas Timer and Serial port interrupts are generated internally. The external interrupts could be negative edge triggered or low level triggered. All these interrupt, when activated, set the corresponding interrupt flags. Except for serial interrupt, the interrupt flags are cleared when the processor branches to the Interrupt Service Routine (ISR). The external interrupt flags are cleared on branching to Interrupt Service Routine (ISR), provided the interrupt is negative edge triggered. For low level triggered external interrupt as well as for serial interrupt, the corresponding flags have to be cleared by software by the programmer.
  • 31. Microcontrollers 10ES42 Department of EEE, SJBIT Page 31 UNIT 2: Addressing Modes: Introduction, Instruction syntax, Data types, Subroutines, Addressing modes: Immediate addressing , Register addressing, Direct addressing, Indirect addressing, relative addressing, Absolute addressing, Long addressing, Indexed addressing, Bit inherent addressing, bit direct addressing. Instruction set: Instruction timings, 8051 instructions: Data transfer instructions, Arithmetic instructions, Logical instructions, Branch instructions, Subroutine instructions, Bit manipulation instruction. Instruction set of 8051 1. Data transfer instructions a. MOV <dest-byte>,<src-byte>- Function: Move byte variable Description: The byte variable indicated by the second operand is copied into the location specified by the first operand. The source byte is not affected. No other register or flag is affected. 1. mov direct , A 2. mov A, @Ri 3. mov A, Rn 4. mov direct, direct 5. mov A, #data EX: MOV 30h, A MOV A,@R0 ; moves the content of memory pointed to by Ro into A MOV A, R1; ;moves the content of Register R1 to Accumulator A MOV 20h,30h;moves the content of memory location 30h to 20h MOV A,#45h;moves 45h to Accumulator A MOV <dest-bit>,<src-bit> Function: Move bit data Description: MOV <dest-bit>,<src-bit> copies the Boolean variable indicated by the second operand into the location specified by the first operand. One of the operands must be the carry flag; the other may be any directly addressable bit. No other register or flag is affected. Example: MOV P1.3,C; moves the carry bit to 3rd bit of port1 C. MOV DPTR,#data16
  • 32. Microcontrollers 10ES42 Department of EEE, SJBIT Page 32 Function: Load Data Pointer with a 16-bit constant Description: MOV DPTR,#data16 loads the Data Pointer with the 16-bit constant indicated. The 16-bit constant is loaded into the second and third bytes of the instruction. The second byte (DPH) is the high-order byte, while the third byte (DPL) holds the lower-order byte. No flags are affected. This is the only instruction which moves 16 bits of data at once. Example: The instruction, MOV DPTR, # 4567H loads the value 4567H into the Data Pointer. DPH holds 45H, and DPL holds 67H. d. MOVC A,@A+ <base-reg> Function: Move Code byte Description: The MOVC instructions load the Accumulator with a code byte or constant from program memory. The address of the byte fetched is the sum of the original unsigned 8-bit Accumulator contents and the contents of a 16-bit base register, which may be either the Data Pointer or the PC. In the latter case, the PC is incremented to the address of the following instruction before being added with the Accumulator; otherwise the base register is not altered. Sixteen-bit addition is performed so a carry-out from the low-order eight bits may propagate through higher-order bits. No flags are affected. e. MOVC A,@A+PC (PC) (PC) + 1 (A) ((A) + (PC)) f. MOVX <dest-byte>,<src-byte> Function: Move External Description: The MOVX instructions transfer data between the Accumulator and a byte of external data memory, which is why “X” is appended to MOV. There are two types of instructions, differing in whether they provide an 8-bit or 16-bit indirect address to the external data RAM. In the first type, the contents of R0 or R1 in the current register bank provide an 8-bit address multiplexed with data on P0. Eight bits are sufficient for external I/O expansion decoding or for a relatively small RAM array. For somewhat larger arrays, any output port pins can be used to output higher-order address bits. These pins are controlled by an output instruction preceding the MOVX.
  • 33. Microcontrollers 10ES42 Department of EEE, SJBIT Page 33 In the second type of MOVX instruction, the Data Pointer generates a 16-bit address. P2 outputs the high-order eight address bits (the contents of DPH), while P0 multiplexes the low-order eight bits (DPL) with data. The P2 Special Function Register retains its previous contents, while the P2 output buffers emit the contents of DPH. This form of MOVX is faster and more efficient when accessing very large data arrays (up to 64K bytes), since no additional instructions are needed to set up the output ports. It is possible to use both MOVX types in some situations. A large RAM array with its high-order address lines driven by P2 can be addressed via the Data Pointer, or with code to output high- order address bits to P2, followed by a MOVX instruction using R0 or R1. Example: An external 256 byte RAM using multiplexed address/data lines is connected to the 8051 Port 0. Port 3 provides control lines for the external RAM. Ports 1 and 2 are used for normal I/O. Registers 0 and 1 contain 12H and 34H. Location 34H of the external RAM holds the value 56H. The instruction sequence, MOVX A,@R1 MOVX @R0,A copies the value 56H into both the Accumulator and external RAM location 12H. MOVX A,@DPTR ((DPTR)) PUSH direct Function: Push onto stack Description: The Stack Pointer is incremented by one. The contents of the indicated variable is then copied into the internal RAM location addressed by the Stack Pointer. No flags are affected. Example: On entering an interrupt routine, the Stack Pointer contains 09H. The Data Pointer holds the value 0123H. The following instruction sequence, PUSH DPL PUSH DPH leaves the Stack Pointer set to 0BH and stores 23H and 01H in internal RAM locations 0AH and 0BH, respectively.
  • 34. Microcontrollers 10ES42 Department of EEE, SJBIT Page 34 POP direct Function: Pop from stack. Description: The contents of the internal RAM location addressed by the Stack Pointer is read, and the Stack Pointer is decremented by one. The value read is then transferred to the directly addressed byte indicated. No flags are affected. Example: The Stack Pointer originally contains the value 32H, and internal RAM locations 30H through 32H contain the values 20H, 23H, and 01H, respectively. The following instruction sequence, POP DPH POP DPL leaves the Stack Pointer equal to the value 30H and sets the Data Pointer to 0123H. 2. Arithmetic Group of Instructions a. ADD A,<src-byte> Function: Add Description: ADD adds the byte variable indicated to the Accumulator, leaving the result in the Accumulator. The carry and auxiliary-carry flags are set, respectively, if there is a carry-out from bit 7 or bit 3, and cleared otherwise. When adding unsigned integers, the carry flag indicates an overflow occurred. OV is set if there is a carry-out of bit 6 but not out of bit 7, or a carry-out of bit 7 but not bit 6; otherwise, OV is cleared. When adding signed integers, OV indicates a negative number produced as the sum of two positive operands, or a positive sum from two negative operands. Four source operand addressing modes are allowed: register, direct, register-indirect, or immediate. Example: The Accumulator holds 0C3H (1100001lB), and register 0 holds 0AAH (10101010B). The following instruction, ADD A,R0 leaves 6DH (01101101B) in the Accumulator with the AC flag cleared and both the carry flag and OV set to 1. ADD A, direct
  • 35. Microcontrollers 10ES42 Department of EEE, SJBIT Page 35 (A) ADD A, @Ri (A) (A) + data ADDC A, <src-byte> Function: Add with Carry Description: ADDC simultaneously adds the byte variable indicated, the carry flag and the Accumulator contents, leaving the result in the Accumulator. The carry and auxiliary-carry flags are set respectively, if there is a carry-out from bit 7 or bit 3, and cleared otherwise. When adding unsigned integers, the carry flag indicates an overflow occurred. OV is set if there is a carry-out of bit 6 but not out of bit 7, or a carry-out of bit 7 but not out of bit 6; otherwise OV is cleared. When adding signed integers, OV indicates a negative number produced as the sum of two positive operands or a positive sum from two negative operands. Four source operand addressing modes are allowed: register, direct, register-indirect, or immediate. Example: The Accumulator holds 0C3H (11000011B) and register 0 holds 0AAH (10101010B) with the carry flag set. The following instruction, ADDC A,R0 leaves 6EH (01101110B) in the Accumulator with AC cleared and both the Carry flag and OV set to 1. ADDC A,Rn Operation: ADDC (A) ADDC A, direct Operation: ADDC (A) (A) + (C) + (direct) ADDC A, @Ri Operation: ADDC (A) + (C) + ((Ri)) ADDC A, #data Operation: ADDC (A) (A) + (C) + #data SUBB A,<src-byte> Function: Subtract with borrow
  • 36. Microcontrollers 10ES42 Department of EEE, SJBIT Page 36 Description: SUBB subtracts the indicated variable and the carry flag together from the Accumulator, leaving the result in the Accumulator. SUBB sets the carry (borrow) flag if a borrow is needed for bit 7 and clears C otherwise. (If C was set before executing a SUBB instruction, this indicates that a borrow was needed for the previous step in a multiple-precision subtraction, so the carry is subtracted from the Accumulator along with the source operand.) AC is set if a borrow is needed for bit 3 and cleared otherwise. OV is set if a borrow is needed into bit 6, but not into bit 7, or into bit 7, but not bit 6. When subtracting signed integers, OV indicates a negative number produced when a negative value is subtracted from a positive value, or a positive result when a positive number is subtracted from a negative number. The source operand allows four addressing modes: register, direct, register-indirect, or immediate. Example: The Accumulator holds 0C9H (11001001B), register 2 holds 54H (01010100B), and the carry flag is set. The instruction, SUBB A,R2 will leave the value 74H (01110100B) in the accumulator, with the carry flag and AC cleared but OV set. Instructions OpCode Bytes Flags SUBB A,#data 0x94 2 C, AC, OV SUBB A,iram addr 0x95 2 C, AC, OV SUBB A,@R0 0x96 1 C, AC, OV SUBB A,@R1 0x97 1 C, AC, OV SUBB A,R0 0x98 1 C, AC, OV SUBB A,R1 0x99 1 C, AC, OV SUBB A,R2 0x9A 1 C, AC, OV SUBB A,R3 0x9B 1 C, AC, OV SUBB A,R4 0x9C 1 C, AC, OV SUBB A,R5 0x9D 1 C, AC, OV SUBB A,R6 0x9E 1 C, AC, OV
  • 37. Microcontrollers 10ES42 Department of EEE, SJBIT Page 37 SUBB A,R7 0x9F 1 C, AC, OV SUBB A,Rn Operation: SUBB (A) - (C) - (Rn) SUBB A, direct Operation: SUBB (A) - (C) - (direct) SUBB A,@Ri Operation: SUBB (A) - (C) - ((Ri)) SWAP A Function: Swap nibbles within the Accumulator Description: SWAP A interchanges the low- and high-order nibbles (four-bit fields) of the Accumulator (bits 3 through 0 and bits 7 through 4). The operation can also be thought of as a 4- bit rotate instruction. No flags are affected. Example: The Accumulator holds the value 0C5H (11000101B). The instruction, SWAP A leaves the Accumulator holding the value 5CH (01011100B Operation: SWAP (A3-0) D (A7-4) XCH A,<byte> Function: Exchange Accumulator with byte variable Description: XCH loads the Accumulator with the contents of the indicated variable, at the same time writing the original Accumulator contents to the indicated variable. The source/destination operand can use register, direct, or register-indirect addressing.
  • 38. Microcontrollers 10ES42 Department of EEE, SJBIT Page 38 Example: R0 contains the address 20H. The Accumulator holds the value 3FH (0011111lB). Internal RAM location 20H holds the value 75H (01110101B). The following instruction, XCH A,@R0 leaves RAM location 20H holding the values 3FH (00111111B) and 75H (01110101B) in the accumulator. XCHD A,@Ri Function: Exchange Digit Description: XCHD exchanges the low-order nibble of the Accumulator (bits 3 through 0), generally representing a hexadecimal or BCD digit, with that of the internal RAM location indirectly addressed by the specified register. The high-order nibbles (bits 7-4) of each register are not affected. No flags are affected. Example: R0 contains the address 20H. The Accumulator holds the value 36H (00110110B). Internal RAM location 20H holds the value 75H (01110101B). The following instruction, XCHD A,@R0 leaves RAM location 20H holding the value 76H (01110110B) and 35H (00110101B) in the Accumulator. CPL A Function: Complement Accumulator Description: CPLA logically complements each bit of the Accumulator (one‟s complement). Bits which previously contained a 1 are changed to a 0 and vice-versa. No flags are affected. Example: The Accumulator contains 5CH (01011100B). The following instruction, CPL A leaves the Accumulator set to 0A3H (10100011B). CPL bit
  • 39. Microcontrollers 10ES42 Department of EEE, SJBIT Page 39 Function: Complement bit Description: CPL bit complements the bit variable specified. A bit that had been a 1 is changed to 0 and vice-versa. No other flags are affected. CLR can operate on the carry or any directly addressable bit. Example: Port 1 has previously been written with 5BH (01011101B). The following instruction sequence, CPL P1.1CPL P1.2 leaves the port set to 5BH (01011011B). DA A Function: Decimal-adjust Accumulator for Addition Description: DA A adjusts the eight-bit value in the Accumulator resulting from the earlier addition of two variables (each in packed-BCD format), producing two four-bit digits. Any ADD or ADDC instruction may have been used to perform the addition. If Accumulator bits 3 through 0 are greater than nine or if the AC flag is one, six is added to the Accumulator producing the proper BCD digit in the low-order nibble. This internal addition sets the carry flag if a carry-out of the low-order four-bit field propagates through all high-order bits, but it does not clear the carry flag otherwise. If the carry flag is now set, or if the four high-order bits now exceed nine, these high-order bits are incremented by six, producing the proper BCD digit in the high-order nibble. Again, this sets the carry flag if there is a carry-out of the high-order bits, but does not clear the carry. The carry flag thus indicates if the sum of the original two BCD variables is greater than 100, allowing multiple precision decimal addition. OV is not affected. DEC byte Function: Decrement Description: DEC byte decrements the variable indicated by 1. An original value of 00H underflows to 0FFH. No flags are affected. Example: Register 0 contains 7FH (01111111B). Internal RAM locations 7EH and 7FH contain 00H and 40H, respectively. The following instruction sequence, DEC @R0 DEC R0 DEC @R0
  • 40. Microcontrollers 10ES42 Department of EEE, SJBIT Page 40 leaves register 0 set to 7EH and internal RAM locations 7EH and 7FH set to 0FFH and 3FH. DEC A DEC Rn DEC direct DEC @Ri DIV AB Function: Divide Description: DIV AB divides the unsigned eight-bit integer in the Accumulator by the unsigned eight-bit integer in register B. The Accumulator receives the integer part of the quotient; register B receives the integer remainder. The carry and OV flags are cleared. Exception: if B had originally contained 00H, the values returned in the Accumulator and B- register are undefined and the overflow flag are set. The carry flag is cleared in any case. Example: The Accumulator contains 251 (0FBH or 11111011B) and B contains 18 (12H or 00010010B). The following instruction, DIV AB leaves 13 in the Accumulator (0DH or 00001101B) and the value 17 (11H or 00010001B) in B, since 251 = (13 x 18) + 17. Carry and OV are both cleared. INC <byte> Function: Increment Description: INC increments the indicated variable by 1. An original value of 0FFH overflows to 00H. No flags are affected. Example: Register 0 contains 7EH (011111110B). Internal RAM locations 7EH and 7FH contain 0FFH and 40H, respectively. The following instruction sequence, INC @R0
  • 41. Microcontrollers 10ES42 Department of EEE, SJBIT Page 41 INC R0 INC @R0 leaves register 0 set to 7FH and internal RAM locations 7EH and 7FH holding 00H and 41H, respectively. INC A Operation: INC (A) INC DPTR Function: Increment Data Pointer Description: INC DPTR increments the 16-bit data pointer by 1. A 16-bit increment (modulo 216) is performed, and an overflow of the low-order byte of the data pointer (DPL) from 0FFH to 00H increments the high-order byte (DPH). No flags are affected. This is the only 16-bit register which can be incremented. Example: Registers DPH and DPL contain 12H and 0FEH, respectively. The following instruction sequence, INC DPTR INC DPTR INC DPTR changes DPH and DPL to 13H and 01H. MUL AB Function: Multiply Description: MUL AB multiplies the unsigned 8-bit integers in the Accumulator and register B. The low-order byte of the 16-bit product is left in the Accumulator, and the high-order byte in B. If the product is greater than 255 (0FFH), the overflow flag is set; otherwise it is cleared. The carry flag is always cleared. Example: Originally the Accumulator holds the value 80 (50H). Register B holds the value 160 (0A0H). The instruction,
  • 42. Microcontrollers 10ES42 Department of EEE, SJBIT Page 42 MUL AB will give the product 12,800 (3200H), so B is changed to 32H (00110010B) and the Accumulator is cleared. The overflow flag is set, carry is cleared. NOP Function: No Operation Description: Execution continues at the following instruction. Other than the PC, no registers or flags are affected. Logical instructions ANL <dest-byte>,<src-byte> Function: Logical-AND for byte variables Description: ANL performs the bitwise logical-AND operation between the variables indicated and stores the results in the destination variable. No flags are affected. The two operands allow six addressing mode combinations. When the destination is the Accumulator, the source can use register, direct, register-indirect, or immediate addressing; when the destination is a direct address, the source can be the Accumulator or immediate data. .Example: If the Accumulator holds 0C3H (1100001lB), and register 0 holds 55H (01010101B), then the following instruction, ANL A,R0 leaves 41H (01000001B) in the Accumulator. When the destination is a directly addressed byte, this instruction clears combinations of bits in any RAM location or hardware register. The mask byte determining the pattern of bits to be cleared would either be a constant contained in the instruction or a value computed in the Accumulator at run-time. The following instruction, ANL P1,#01110011B clears bits 7, 3, and 2 of output port 1. Instructions OpCode Bytes Flags ANL iram addr,A 0x52 2 None ANL iram addr,#data 0x53 3 None ANL A,#data 0x54 2 None
  • 43. Microcontrollers 10ES42 Department of EEE, SJBIT Page 43 ANL A,iram addr 0x55 2 None ANL A,@R0 0x56 1 None ANL A,@R1 0x57 1 None ANL A,R0 0x58 1 None ANL A,R1 0x59 1 None ANL A,R2 0x5A 1 None ANL A,R3 0x5B 1 None ANL A,R4 0x5C 1 None ANL A,R5 0x5D 1 None ANL A,R6 0x5E 1 None ANL A,R7 0x5F 1 None ANL C,bit addr 0x82 2 C ANL C,/bit addr 0xB0 2 C ANL A,Rn Operation: ANL ANL A,@Ri Operation: ANL (A) ANL direct,#data Operation: ANL ORL <dest-byte> <src-byte> Function: Logical-OR for byte variables
  • 44. Microcontrollers 10ES42 Department of EEE, SJBIT Page 44 Description: ORL performs the bitwise logical-OR operation between the indicated variables, storing the results in the destination byte. No flags are affected. Example: If the Accumulator holds 0C3H (11000011B) and R0 holds 55H (01010101B) then the following instruction, ORL A,R0 leaves the Accumulator holding the value 0D7H (1101011lB). The instruction, ORL P1,#00110010B sets bits 5, 4, and 1 of output Port 1. ORL A, Rn ; or the content of Accumulator and Register Rn and store the result in Accumulator ORL A, direct ; or the content of Accumulator and the memory and store the result in Accumulator ORL A, @Ri ; or the content of accumulator and the memory location whose address is specified in Ri ORL C,<src-bit> Function: Logical-OR for bit variables Description: Set the carry flag if the Boolean value is a logical 1; leave the carry in its current state otherwise. A slash ( / ) preceding the operand in the assembly language indicates that the logical complement of the addressed bit is used as the source value, but the source bit itself is not affected. No other flags are affected. Example: ORL C, ACC.7 ;OR CARRY WITH THE ACC. BIT 7 ORL C, /OV ;OR CARRY WITH THE INVERSE OF OV. SETB
  • 45. Microcontrollers 10ES42 Department of EEE, SJBIT Page 45 Operation: SETB Function: Set Bit Syntax: SETB bit addr Description: Sets the specified bit. XRL <dest-byte>,<src-byte> Function: Logical Exclusive-OR for byte variables Description: XRL performs the bitwise logical Exclusive-OR operation between the indicated variables, storing the results in the destination. No flags are affected. The two operands allow six addressing mode combinations. When the destination is the Accumulator, the source can use register, direct, register-indirect, or immediate addressing; when the destination is a direct address, the source can be the Accumulator or immediate data. Example: If the Accumulator holds 0C3H (1100001lB) and register 0 holds 0AAH (10101010B) then the instruction, XRL A,R0 leaves the Accumulator holding the value 69H (01101001B). Instructions OpCode Bytes Flags XRL iram addr,A 0x62 2 None XRL iram addr,#data 0x63 3 None XRL A,#data 0x64 2 None XRL A,iram addr 0x65 2 None XRL A,@R0 0x66 1 None XRL A,@R1 0x67 1 None XRL A,R0 0x68 1 None XRL A,R1 0x69 1 None XRL A,R2 0x6A 1 None XRL A,R3 0x6B 1 None XRL A,R4 0x6C 1 None XRL A,R5 0x6D 1 None XRL A,R6 0x6E 1 None
  • 46. Microcontrollers 10ES42 Department of EEE, SJBIT Page 46 XRL A,R7 0x6F 1 None Rotate Instructions RL A Function: Rotate Accumulator Left Description: The eight bits in the Accumulator are rotated one bit to the left. Bit 7 is rotated into the bit 0 position. No flags are affected. Example: The Accumulator holds the value 0C5H (11000101B). The following instruction, RL A leaves the Accumulator holding the value 8BH (10001011B) with the carry unaffected. RLC A Function: Rotate Accumulator Left through the Carry flag Description: The eight bits in the Accumulator and the carry flag are together rotated one bit to the left. Bit 7 moves into the carry flag; the original state of the carry flag moves into the bit 0 position. No other flags are affected. Example: The Accumulator holds the value 0C5H(11000101B), and the carry is zero. The following instruction, RLC A leaves the Accumulator holding the value 8BH (10001010B) with the carry set. RRC A Function: Rotate Accumulator Right through Carry flag Description: The eight bits in the Accumulator and the carry flag are together rotated one bit to the right. Bit 0 moves into the carry flag; the original value of the carry flag moves into the bit 7 position. No other flags are affected. Example: The Accumulator holds the value 0C5H (11000101B), the carry is zero. The following instruction, RRC A leaves the Accumulator holding the value 62 (01100010B) with the carry set.
  • 47. Microcontrollers 10ES42 Department of EEE, SJBIT Page 47 3. Branch instructions Unconditional Branch Instructions Operation: AJMP Function: Absolute Jump Within 2K Block Syntax: AJMP code address Instructions OpCode Bytes Flags AJMP page0 0x01 2 None AJMP page1 0x21 2 None AJMP page2 0x41 2 None AJMP page3 0x61 2 None AJMP page4 0x81 2 None AJMP page5 0xA1 2 None AJMP page6 0xC1 2 None AJMP page7 0xE1 2 None Description: AJMP unconditionally jumps to the indicated code address. The new value for the Program Counter is calculated by replacing the least-significant-byte of the Program Counter with the second byte of the AJMP instruction, and replacing bits 0-2 of the most-significant-byte of the Program Counter with 3 bits that indicate the page of the byte following the AJMP instruction. Bits 3-7 of the most-significant-byte of the Program Counter remain unchanged. Since only 11 bits of the Program Counter are affected by AJMP, jumps may only be made to code located within the same 2k block as the first byte that follows AJMP. Operation: LJMP Function: Long Jump Syntax: LJMP code address. Description: LJMP jumps unconditionally to the specified code address. Operation: SJMP Function: Short Jump Syntax: SJMP reladdr
  • 48. Microcontrollers 10ES42 Department of EEE, SJBIT Page 48 Description: SJMP jumps unconditionally to the address specified reladdr. Reladdr must be within -128 or +127 bytes of the instruction that follows the SJMP instruction Conditional Branch Instructions Operation: JNC Function: Jump if Carry Not Set Syntax: JNC reladdr Description: JNC branches to the address indicated by reladdr if the carry bit is not set. If the carry bit is set program execution continues with the instruction following the JNB instruction. Operation: JC Function: Jump if Carry Set Syntax: JC reladdr Description: JC will branch to the address indicated by reladdr if the Carry Bit is set. If the Carry Bit is not set program execution continues with the instruction following the JC instruction. Operation: JNB Function: Jump if Bit Not Set Syntax: JNB bit addr,reladdr Description: JNB will branch to the address indicated by reladdress if the indicated bit is not set. If the bit is set program execution continues with the instruction following the JNB instruction. Operation: JB Function: Jump if Bit Set Syntax: JB bit addr, reladdr Description: JB branches to the address indicated by reladdr if the bit indicated by bit addr is set. If the bit is not set program execution continues with the instruction following the JB instruction. Operation: JNZ Function: Jump if Accumulator Not Zero Syntax: JNZ reladdr Description: JNZ will branch to the address indicated by reladdr if the Accumulator contains any value except 0. If the value of the Accumulator is zero program execution continues with the instruction following the JNZ instruction. Operation: JZ Function: Jump if Accumulator Zero
  • 49. Microcontrollers 10ES42 Department of EEE, SJBIT Page 49 Syntax: JNZ reladdr Description: JZ branches to the address indicated by reladdr if the Accumulator contains the value 0. If the value of the Accumulator is non-zero program execution continues with the instruction following the JNZ instruction. Operation: DJNZ Function: Decrement and Jump if Not Zero Syntax: DJNZ register, reladdr Instructions OpCode Bytes Flags DJNZ iram addr,reladdr 0xD5 3 None DJNZ R0,reladdr 0xD8 2 None DJNZ R1,reladdr 0xD9 2 None DJNZ R2,reladdr 0xDA 2 None DJNZ R3,reladdr 0xDB 2 None DJNZ R4,reladdr 0xDC 2 None DJNZ R5,reladdr 0xDD 2 None DJNZ R6,reladdr 0xDE 2 None DJNZ R7,reladdr 0xDF 2 None Description: DJNZ decrements the value of register by 1. If the initial value of register is 0, decrementing the value will cause it to reset to 255 (0xFF Hex). If the new value of register is not 0 the program will branch to the address indicated by relative addr. If the new value of register is 0 program flow continues with the instruction following the DJNZ instruction. Operation: CJNE Function: Compare and Jump If Not Equal Syntax: CJNE operand1,operand2,reladdr Instructions OpCode Bytes Flags CJNE A,#data, reladdr 0xB4 3 C CJNE A,iram addr,reladdr 0xB5 3 C CJNE @R0,#data,reladdr 0xB6 3 C CJNE @R1,#data,reladdr 0xB7 3 C
  • 50. Microcontrollers 10ES42 Department of EEE, SJBIT Page 50 CJNE R0,#data,reladdr 0xB8 3 C CJNE R1,#data,reladdr 0xB9 3 C CJNE R2,#data,reladdr 0xBA 3 C CJNE R3,#data,reladdr 0xBB 3 C CJNE R4,#data,reladdr 0xBC 3 C CJNE R5,#data,reladdr 0xBD 3 C CJNE R6,#data,reladdr 0xBE 3 C CJNE R7,#data,reladdr 0xBF 3 C Description: CJNE compares the value of operand1 and operand2 and branches to the indicated relative address if operand1 and operand2 are not equal. If the two operands are equal program flow continues with the instruction following the CJNE instruction. The Carry bit (C) is set if operand1 is less than operand2, otherwise it is cleared.
  • 60. Microcontrollers 10ES42 Department of EEE, SJBIT Page 60 UNIT 3: 8051 programming: Assembler directives, Assembly language programs and Time delay calculations. Introduction: 8051 micro controller has one data type. It is 8-bit and size of each register is also 8-bit. It is job of programmer to break down data larger than 8 bits (00 to FFH, 0 to 255 in decimal) to be processed by CPU. Data byte (DB) directive: The DB directive is most widely used data directive in assembler It is used to define 8-bit data. When DB is used to define data, the number can be in decimal, binary, hex or ASCII formats. The assembler will convert the number into hex. The assembler will assign the ASCII code for the numbers or characters automatically. The DB directive is only directive that can be used to define ASCII strings larger than two characters Therefore, it should be used for all ASCII data definitions. The most widely used Assembler directives are ORG Directive EQU Directive & END Directive Delay calculations: Delay Calculations Code Remarks 50mS Xtal freq =11.0592MHz 50mS/1.085uS = 46082.9 46082.9/255 = 180.7 Its an Odd Value, so round off the result i.e. 180.7 to the nearest even number i.e 182 46082.9 / x =182 Find value of x 46082.9 / 253 = 182 We’ll load 253 in the inner most loop 182 / 2 = 91 Always do this, so its result will be our outer loop Delay:Mov R0, #91 Here1:Mov R1, #253 Here:DJNZ R1, here DJNZ R0, here1 RET 500mS Xtal freq =11.0592MHz 500mS/1.085uS = 460829.5 460829.5 / 255 = 1807.1 Odd number does not account as its not less than 255, innermost
  • 61. Microcontrollers 10ES42 Department of EEE, SJBIT Page 61 loop = 255 1807.1 / 255 = 7.086 Round off to nearest higher even i.e 8 1807.1 / x = 8 1807.1 / 226 = 8 Inner loop = 226 8 / 2 = 4 Outer loop = 4 Delay:Mov R0,#4 Here2:Mov R1, #226 Here1:Mov R2, #255 Here:DJNZ R2, Here DJNZ R1, Here1 DJNZ R0,Here2 End 1Second Xtal freq= 20MHz 1 / 0.6uS = 1.6 x 10e6 1.6 x 10e6 / 255 = 6536 Innermost loop= 255 6536 / 255 = 25.6 Not Even so make it even i.e. 26 6536 / x = 26 6536 / 251 = 26 Inner loop 251 26/2 = 13 Outer loop = 13 Delay:Mov R0, # 13 Here2: Mov R1, # 251 Here1: Mov R2, #255 Here: DJNZ R2, Here DJNZ R1, Here1 DJNZ R0, Here2 Ret
  • 62. Microcontrollers 10ES42 Department of EEE, SJBIT Page 62 UNIT 4: 8051 Interfacing and Applications: Basics of I/O concepts, I/O Port Operation, Interfacing 051 to LCD, Keyboard, parallel and serial ADC, DAC, Stepper motor interfacing and DC motor interfacing and programming. Objectives: At the end of this chapter, we will be able to: List the different devices that can be interfaced with 8051 Understand the working principle. Develop the following applications using assembly and C - Stepper motor interface - DC motor interfacing and PWM - Digital-to-Analog interfacing - Analog-to-Digital interfacing - LCD interface - Keyboard interface This chapter basically gives an insight into the study of different interfacings listed above. Further we will also study and understand their operation that is the working principle. We will further discuss on how to develop these interfaces using assembly and C.
  • 63. Microcontrollers 10ES42 Department of EEE, SJBIT Page 63 Stepper Motor Interfacing: Stepper motor is a widely used device that translates electrical pulses into mechanical movement. Stepper motor is used in applications such as; disk drives, dot matrix printer, robotics etc,. The construction of the motor is as shown in figure 1 below. Figure 1: Structure of stepper motor It has a permanent magnet rotor called the shaft which is surrounded by a stator. Commonly used stepper motors have four stator windings that are paired with a center – tapped common. Such motors are called as four-phase or unipolar stepper motor. The stator is a magnet over which the electric coil is wound. One end of the coil are connected commonly either to ground or +5V. The other end is provided with a fixed sequence such that the motor rotates in a particular direction. Stepper motor shaft moves in a fixed repeatable increment, which allows one to move it to a precise position. Direction of the rotation is dictated by the stator poles. Stator poles are determined by the current sent through the wire coils. Step angle: Step angle is defined as the minimum degree of rotation with a single step. No of steps per revolution = 360° / step angle Steps per second = (rpm x steps per revolution) / 60 Example: step angle = 2° No of steps per revolution = 180
  • 64. Microcontrollers 10ES42 Department of EEE, SJBIT Page 64 Switching Sequence of Motor: As discussed earlier the coils need to be energized for the rotation. This can be done by sending a bits sequence to one end of the coil while the other end is commonly connected. The bit sequence sent can make either one phase ON or two phase ON for a full step sequence or it can be a combination of one and two phase ON for half step sequence. Both are tabulated below. Full Step: Two Phase ON One Phase ON Half Step (8 – sequence): The sequence is tabulated as below: 8051 Connection to Stepper Motor: (explanation of the diagram can be done)
  • 65. Microcontrollers 10ES42 Department of EEE, SJBIT Page 65 Figure 2: 8051 interfaces to stepper motor The following example 1 to example 6 shown below will elaborate on the discussion done above: Example 1: Write an ALP to rotate the stepper motor clockwise / anticlockwise continuously with full step sequence. Program: MOV A,#66H BACK: MOV P1,A RR A ACALL DELAY SJMP BACK DELAY: MOV R1,#100 UP1: MOV R2,#50 UP: DJNZ R2,UP DJNZ R1,UP1 RET Note: motor to rotate in anticlockwise use instruction RL A instead of RR A
  • 66. Microcontrollers 10ES42 Department of EEE, SJBIT Page 66 Example 2: A switch is connected to pin P2.7. Write an ALP to monitor the status of the SW. If SW = 0, motor moves clockwise and if SW = 1, motor moves anticlockwise. Program: ORG 0000H SETB P2.7 MOV A, #66H MOV P1,A TURN: JNB P2.7, CW RL A ACALL DELAY MOV P1,A SJMP TURN CW: RR A ACALL DELAY MOV P1,A SJMP TURN DELAY: as previous example Example 3: Write an ALP to rotate a motor 90° clockwise. Step angle of motor is 2°. Solution: Step angle = 2° Steps per revolution = 180 No of rotor teeth = 45 For 90° rotation the no of steps is 45 Program: ORG 0000H MOV A, #66H MOV R0, #45 BACK: RR A MOV P1, A ACALL DELAY DJNZ R0, BACK END
  • 67. Microcontrollers 10ES42 Department of EEE, SJBIT Page 67 Programming Stepper Motor with 8051 C The following examples 5 and 6 will show the programming of stepper motor using 8051 C. Example 4: Rotate the stepper motor continuously clockwise using half-step 8-step sequence. Say the sequence is in ROM locations. Program: ORG 0000H START: MOV R0, #08 MOV DPTR, #HALFSTEP RPT: CLR A MOVC A, @A+DPTR MOV P1, A ACALL DELAY INC DPTR DJNZ R0, RPT SJMP START ORG 0200H HALFSTEP DB 09, 08, 0CH, 04, 06, 02, 03, 01 END Example 5: Problem definition is same as example 1. Program: #include <reg51.h> void main () { while (1) { P1=0x66; MSDELAY (200); P1=0x33; MSDELAY (200); P1=0x99; MSDELAY (200); P1=0xCC; MSDELAY (200); } } void MSDELAY (unsigned char value) { unsigned int x,y; for(x=0;x<1275;x++) for(y=0;y<value;y++); }
  • 68. Microcontrollers 10ES42 Department of EEE, SJBIT Page 68 Example 6: Problem definition is same as example 2. Program: #include <reg51.h> sbit SW=P2^7; void main () { SW=1; while (1) { if(SW==0){ P1=0x66; MSDELAY (100); P1=0x33; MSDELAY (100); P1=0x99; MSDELAY (100); P1=0xCC; MSDELAY (100); } else { P1=0x66; MSDELAY (100); P1=0xCC; MSDELAY (100); P1=0x99; MSDELAY (100); P1=0x33; MSDELAY (100); } void MSDELAY (unsigned char value) { unsigned int x,y; for(x=0;x<1275;x++) for(y=0;y<value;y++); }
  • 69. Microcontrollers 10ES42 Department of EEE, SJBIT Page 69 DC Motor Interfacing with 8051: The DC motor is another widely used device that translates electrical pulses into mechanical movement. Motor has 2 leads +ve and – ve , connecting them to a DC voltage supply moves the motor in one direction. On reversing the polarity rotates the motor in the reverse direction. Basic difference between Stepper and DC motor is stepper motor moves in steps while DC motor moves continuously. Another difference is with stepper motor the number of steps can be counted while it is not possible in DC motor. Maximum speed of a DC motor is indicated in rpm. The rpm is either with no load it is few thousands to tens of thousands or with load rpm decreases with increase in load. Voltage and current rating : Nominal voltage is the voltage for a motor under normal condition. It ranges from 1V to 150V. As voltage increases, rpm goes up. Current rating is the current consumption when the nominal voltage is applied with no load that is 25mA to a few amperes. As load increases, rpm increases, unless voltage or current increases implies torque increases. With fixed voltage, as load increases, power consumption of a DC motor is increased. Unidirectional Control: Figure 3 shows the rotation of the DC motor in clockwise and anticlockwise direction. Figure 3: DC motor rotation Bidirectional Control: (a) Motor not running (b) Clockwise direction
  • 70. Microcontrollers 10ES42 Department of EEE, SJBIT Page 70 (c) Counter clockwise direction (d) Invalid state (short circuit) Figure 4: H-Bridge Motor Configuration Figure 4 shows the H-Bridge motor configuration. It consists of four switches and based on the closing and opening of these switches the motor either rotates in clockwise or anti-clockwise direction. As seen in figure 4a, all the switches are open hence the motor is not running. In b, turning of the motor is in one direction when the switches 1 and 4 are closed that is clockwise direction. Similarly, in c the switches 2 and 3 are closed so the motor rotates in anticlockwise direction, while in figure 4d all the switches are closed which indicates a invalid state or a short circuit. The interfacing diagram of 8051 to bidirectional motor control can be referred to fig 17-18 from text prescribed. Example 6: A switch is connected to pin P2.7. Write an ALP to monitor the status of the SW. If SW = 0, DC motor moves clockwise and if SW = 1, DC motor moves anticlockwise. Program: ORG 0000H CLR P1.0 CLR P1.1 CLR P1.2 CLR P1.3 SETB P2.7 MONITOR: JNB P2.7, CLOCK SETB P1.0 CLR P1.1 CLR P1.2 SETB P1.3 SJMP MONITOR CLOCK: CLR P1.0 SETB P1.1 SETB P1.2 CLR P1.3 SJMP MONITOR END
  • 71. Microcontrollers 10ES42 Department of EEE, SJBIT Page 71 Pulse Width Modulation (PWM): The speed of the motor depends on 3 parameters: load, voltage and current. For a given load, we can maintain a steady speed by using PWM. By changing the width of the pulse applied to DC motor, power provided can either be increased or decreased. Though voltage has fixed amplitude, has a variable duty cycle. The wider the pulse, higher the speed obtained. One of the reasons as to why dc motor are referred over ac is, the ability to control the speed of the DC motor using PWM. The speed of the ac motor is dictated by the ac frequency of voltage applied to the motor and is generally fixed. Hence, speed of the AC motors cannot be controlled when load is increased. Figure 5 below shows the pulse width modulation comparison. Figure 5: PWM comparison Example 7: A switch is connected to pin P2.7. Write a C to monitor the status of the SW. If SW = 0, DC motor moves clockwise and if SW = 1, DC motor moves anticlockwise. Program: # include <reg51.h> sbit SW =P2^7; sbit Enable = P1^0; sbit MTR_1 = P1^1; sbit MTR_2 = P1^2; void main ( ) { SW=1; Enable = 0; MTR_1=0; MTR_2=0; while( ) { Enable =1; if( SW==1) { MTR_1=1; MTR_2=0; } else { MTR_1=0; MTR_2=1; }}}
  • 72. Microcontrollers 10ES42 Department of EEE, SJBIT Page 72 The interfacing diagrams for the above examples can be referred to the text. Digital-to-Analog (DAC) converter: The DAC is a device widely used to convert digital pulses to analog signals. In this section we will discuss the basics of interfacing a DAC to 8051. The two method of creating a DAC is binary weighted and R/2R ladder. The Binary Weighted DAC, which contains one resistor or current source for each bit of the DAC connected to a summing point. These precise voltages or currents sum to the correct output value. This is one of the fastest conversion methods but suffers from poor accuracy because of the high precision required for each individual voltage or current. Such high-precision resistors and current-sources are expensive, so this type of converter is usually limited to 8-bit resolution or less. Example 8: A switch is connected to pin P2.7. Write an C to monitor the status of the SW. If SW = 0, DC motor moves 50% duty cycle pulse and if SW = 1, DC motor moves with 25% duty cycle pulse. Program: # include <reg51.h> sbit SW =P2^7; sbit MTR = P1^0; void main ( ) { SW=1; MTR=0; while( ) { if( SW==1) { MTR=1; Msdelay(25); MTR=0; Msdelay(75); } else { MTR=1; Msdelay(50); MTR=0; Msdelay(50); } } }
  • 73. Microcontrollers 10ES42 Department of EEE, SJBIT Page 73 The R-2R ladder DAC, which is a binary weighted DAC that uses a repeating cascaded structure of resistor values R and 2R. This improves the precision due to the relative ease of producing equal valued matched resistors (or current sources). However, wide converters perform slowly due to increasingly large RC-constants for each added R-2R link. The first criterion for judging a DAC is its resolution, which is a function of the number of binary inputs. The common ones are 8, 10, and 12 bits. The number of data bit inputs decides the resolution of the DAC since the number of analog output levels is equal to 2n , where n is the number of data bit inputs. DAC0808: The digital inputs are converter to current Iout, and by connecting a resistor to the Iout pin, we can convert the result to voltage. The total current Iout is a function of the binary numbers at the D0- D7 inputs of the DAC0808 and the reference current Iref , and is as follows: Usually reference current is 2mA. Ideally we connect the output pin to a resistor, convert this current to voltage, and monitor the output on the scope. But this can cause inaccuracy; hence an opamp is used to convert the output current to voltage. The 8051 connection to DAC0808 is as shown in the figure 6 below. Figure 6: 8051 connections to DAC0808 The following examples 9, 10 and 11 will show the generation of waveforms using DAC0808. Example 9: Write an ALP to generate a triangular waveform. Program: MOV A, #00H INCR: MOV P1, A INC A CJNE A, #255, INCR DECR: MOV P1, A DEC A CJNE A, #00, DECR SJMP INCR END
  • 74. Microcontrollers 10ES42 Department of EEE, SJBIT Page 74 Example 10: Write an ALP to generate a sine waveform. Vout = 5V(1+sinθ) Solution: Calculate the decimal values for every 10 degree of the sine wave. These values can be maintained in a table and simply the values can be sent to port P1. The sinewave can be observed on the CRO. Program: ORG 0000H AGAIN: MOV DPTR, #SINETABLE MOV R3, #COUNT UP: CLR A MOVC A, @A+DPTR MOV P1, A INC DPTR DJNZ R3, UP SJMP AGAIN ORG 0300H SINETABLE DB 128, 192, 238, 255, 238, 192, 128, 64, 17, 0, 17, 64, 128 END Note: to get a better wave regenerate the values of the table per 2 degree. Example 10: Write a C program to generate a sine waveform. Vout = 5V(1+sinθ) Program: #include<reg51.h> sfr dacdata=P1; void main( ) { unsigned char sinetable[12]={ 128, 192, 238, 255, 238, 192, 128, 64, 17, 0, 17, 64}; unsigned char x; while (1) { for(x=0;x<12;x++) { dacdata = sinetable[x]; } } }
  • 75. Microcontrollers 10ES42 Department of EEE, SJBIT Page 75 Analog-to-digital converter (ADC) interfacing: ADCs (analog-to-digital converters) are among the most widely used devices for data acquisition. A physical quantity, like temperature, pressure, humidity, and velocity, etc., is converted to electrical (voltage, current) signals using a device called a transducer, or sensor. We need an analog-to-digital converter to translate the analog signals to digital numbers, so microcontroller can read them. ADC804 chip: ADC804 IC is an analog-to-digital converter. It works with +5 volts and has a resolution of 8 bits. Conversion time is another major factor in judging an ADC. Conversion time is defined as the time it takes the ADC to convert the analog input to a digital (binary) number. In ADC804 conversion time varies depending on the clocking signals applied to CLK R and CLK IN pins, but it cannot be faster than 110μs. Pin Description of ADC804: Figure 7: Pin out of ADC0804  CLK IN and CLK R: CLK IN is an input pin connected to an external clock source. To use the internal clock generator (also called self-clocking), CLK IN and CLK R pins are connected to a capacitor and a resistor and the clock frequency is determined by:
  • 76. Microcontrollers 10ES42 Department of EEE, SJBIT Page 76 Typical values are R = 10K ohms and C =150pF. We get f = 606 kHz and the conversion time is 110μs.  Vref/2 : It is used for the reference voltage. If this pin is open (not connected), the analog input voltage is in the range of 0 to 5 volts (the same as the Vcc pin). If the analog input range needs to be 0 to 4 volts, Vref/2 is connected to 2 volts. Step size is the smallest change can be discerned by an ADC Vref/2 Relation to Vin Range  D0-D7: The digital data output pins. These are tri-state buffered. The converted data is accessed only when CS =0 and RD is forced low. To calculate the output voltage, use the following formula Dout = digital data output (in decimal), Vin = analog voltage, and step size (resolution) is the smallest change  Analog ground and digital ground: Analog ground is connected to the ground of the analog Vin and digital ground is connected to the ground of the Vcc pin. To isolate the analog Vin signal from transient voltages caused by digital switching of the output D0 – D7. This contributes to the accuracy of the digital data output.  Vin(+) & Vin(-): Differential analog inputs where Vin = Vin (+) – Vin (-). Vin (-) is connected to ground and Vin (+) is used as the analog input to be converted.  RD: Is “output enable” a high-to-low RD pulse is used to get the 8-bit converted data out of ADC804.  INTR: It is “end of conversion” When the conversion is finished, it goes low to signal the CPU that the converted data is ready to be picked up.  WR: It is “start conversion” When WR makes a low-to-high transition, ADC804 starts converting the analog input value of Vin to an 8- bit digital number.  CS: It is an active low input used to activate ADC804.
  • 77. Microcontrollers 10ES42 Department of EEE, SJBIT Page 77 The following steps must be followed for data conversion by the ADC804 chip: 1. Make CS= 0 and send a L-to-H pulse to pin WR to start conversion. 2. Monitor the INTR pin, if high keep polling but if low, conversion is complete, go to next step. 3. Make CS= 0 and send a H-to-L pulse to pin RD to get the data out Figure 8 shows the read and write timing for ADC804. Figure 9 and 10 shows the self clocking with the RC component for frequency and the external frequency connected to XTAL2 of 8051. Figure 8: Read and Write timing for ADC0804 Figure 9: 8051 Connection to ADC0804 with Self-clocking
  • 78. Microcontrollers 10ES42 Department of EEE, SJBIT Page 78 Figure 10: 8051 Connection to ADC0804 with Clock from XTAL2 of 8051 Now let us see how we write assembly as well as C program for the interfacing diagram shown in figure 10. Programming ADC0804 in assembly MYDATA EQU P1 MOV P1, #0FFH SETB P2.7 BACK: CLR P2.6 SETB P2.6 HERE: JB P2.7, HERE CLR P2.5 MOV A, MYDATA SETB P2.5 SJMP BACK Programming ADC0804 in C #include<reg51.h> Sbit RD=P2^5; Sbit WR=P2^6; Sbit INTR=P2^7; Sfr Mydata=P1; Void main ( ) { Unsigned char value; Mydata =0xFF; INTR=1; RD=1; WR=1; While (1) { WR=0; WR=1; While (INTR == 1); RD=0; Value =Mydata; RD=1; }
  • 79. Microcontrollers 10ES42 Department of EEE, SJBIT Page 79 ADC0808/0809 chip: ADC808 has 8 analog inputs. It allows us to monitor up to 8 different transducers using only single chip. The chip has 8-bit data output just like the ADC804. The 8 analog input channels are multiplexed and selected according to the values given to the three address pins, A, B, and C. that is; if CBA=000, CH0 is selected; CBA=011, CH3 is selected and so on. The pin details of ADC0808 are as shown in the figure 11 below. (Explanation can be done as is with ADC0804). Figure 11: Pin out of ADC0808 Steps to Program ADC0808/0809 1. Select an analog channel by providing bits to A, B, and C addresses. 2. Activate the ALE pin. It needs an L-to-H pulse to latch in the address. 3. Activate SC (start conversion) by an H-to-L pulse to initiate conversion. 4. Monitor EOC (end of conversion) to see whether conversion is finished. 5. Activate OE (output enable) to read data out of the ADC chip. An H-to-L pulse to the OE pin will bring digital data out of the chip. Let us write an assembly and C program for the interfacing of 8051 to ADC0808 as shown in figure 12 Programming ADC0808/0809 in assembly MYDATA EQU P1 ORG 0000H MOV MYDATA, #0FFH SETB P2.7 CLR P2.4 CLR P2.6 CLR P2.5 BACK: CLR P2.0 CLR P2.1 SETB P2.2 ACALL DELAY SETB P2.4 ACALL DELAY SETB P2.6 ACALL DELAY CLR P2.4
  • 80. Microcontrollers 10ES42 Department of EEE, SJBIT Page 80 below.(Figure 12 can be referred from the text prescribed.) Note: replace the assembly instructions with equivalent C statements for programming ADC0808 in C LCD Interfacing: LCD is finding widespread use replacing LEDs for the following reasons: The declining prices of LCD The ability to display numbers, characters, and graphics Incorporation of a refreshing controller into the LCD, thereby relieving the CPU of the task of refreshing the LCD Ease of programming for characters and graphics Pin Description: LCD Command Codes:
  • 81. Microcontrollers 10ES42 Department of EEE, SJBIT Page 81 LCD timing diagram for reading and writing is as shown in figure 14 and 15. Figure 14: LCD timing for read
  • 82. Microcontrollers 10ES42 Department of EEE, SJBIT Page 82 Figure 15: LCD timing for write Sending Data/ Commands to LCDs with Time Delay: To send any of the commands to the LCD, make pin RS=0. For data, make RS=1. Then send a high-to-low pulse to the E pin to enable the internal latch of the LCD. This is shown in the code below. The interfacing diagram of LCD to 8051 is as shown in the figure 16. Example 11: Write an ALP to initialize the LCD and display message “YES”. Say the command to be given is :38H (2 lines ,5x7 matrix), 0EH (LCD on, cursor on), 01H (clear LCD), 06H (shift cursor right), 86H (cursor: line 1, pos. 6) Program: ;calls a time delay before sending next data/command ;P1.0-P1.7 are connected to LCD data pins D0-D7 ;P2.0 is connected to RS pin of LCD ;P2.1 is connected to R/W pin of LCD ;P2.2 is connected to E pin of LCD ORG 0H MOV A,#38H ;INIT. LCD 2 LINES, 5X7 MATRIX ACALL COMNWRT ;call command subroutine ACALL DELAY ;give LCD some time MOV A,#0EH ;display on, cursor on ACALL COMNWRT ;call command subroutine ACALL DELAY ;give LCD some time MOV A,#01 ;clear LCD ACALL COMNWRT ;call command subroutine ACALL DELAY ;give LCD some time MOV A,#06H ;shift cursor right ACALL COMNWRT ;call command subroutine ACALL DELAY ;give LCD some time MOV A,#86H ;cursor at line 1, pos. 6 ACALL COMNWRT ;call command subroutine ACALL DELAY ;give LCD some time
  • 83. Microcontrollers 10ES42 Department of EEE, SJBIT Page 83 Figure 16: 8051 Connection to LCD MOV A,#‟Y‟ ;display letter Y ACALL DATAWRT ;call display subroutine ACALL DELAY ;give LCD some time MOV A,#‟E‟ ;display letter E ACALL DATAWRT ;call display subroutine ACALL DELAY ;give LCD some time MOV A,#‟S‟ ;display letter S ACALL DATAWRT ;call display subroutine AGAIN: SJMP AGAIN ;stay here COMNWRT: ;send command to LCD MOV P1,A ;copy reg A to port 1 CLR P2.0 ;RS=0 for command CLR P2.1 ;R/W=0 for write SETB P2.2 ;E=1 for high pulse ACALL DELAY ;give LCD some time CLR P2.2 ;E=0 for H-to-L pulse RET DATAWRT: ;write data to LCD MOV P1,A ;copy reg A to port 1 SETB P2.0 ;RS=1 for data CLR P2.1 ;R/W=0 for write SETB P2.2 ;E=1 for high pulse ACALL DELAY ;give LCD some time CLR P2.2 ;E=0 for H-to-L pulse RET DELAY: MOV R3,#50 ;50 or higher for fast CPUs HERE2: MOV R4,#255 ;R4 = 255 HERE: DJNZ R4,HERE ;stay until R4 becomes 0 DJNZ R3,HERE2 RET END
  • 84. Microcontrollers 10ES42 Department of EEE, SJBIT Page 84 Sending Data/ Commands to LCDs checking the Busy Flag Example 12: Modify example 11, to check for the busy flag (D7=>P1.7), then send the command and hence display message “NO”. ;Check busy flag before sending data, command to LCD;p1=data pin ;P2.0 connected to RS pin ;P2.1 connected to R/W pin ;P2.2 connected to E pin ORG 0H MOV A,#38H ;init. LCD 2 lines ,5x7 matrix ACALL COMMAND ;issue command MOV A,#0EH ;LCD on, cursor on ACALL COMMAND ;issue command MOV A,#01H ;clear LCD command ACALL COMMAND ;issue command MOV A,#06H ;shift cursor right ACALL COMMAND issue command MOV A,#86H ;cursor: line 1, pos. 6 ACALL COMMAND ;command subroutine MOV A,#‟N‟ ;display letter N ACALL DATA_DISPLAY MOV A,#‟O‟ ;display letter O ACALL DATA_DISPLAY HERE: SJMP HERE ;STAY HERE COMMAND: ACALL READY ;is LCD ready? MOV P1,A ;issue command code CLR P2.0 ;RS=0 for command CLR P2.1 ;R/W=0 to write to LCD SETB P2.2 ;E=1 for H-to-L pulse CLR P2.2 ;E=0,latch in RET DATA_DISPLAY: ACALL READY ;is LCD ready? MOV P1,A ;issue data SETB P2.0 ;RS=1 for data CLR P2.1 ;R/W =0 to write to LCD SETB P2.2 ;E=1 for H-to-L pulse CLR P2.2 ;E=0,latch in RET READY: SETB P1.7 ;make P1.7 input port CLR P2.0 ;RS=0 access command reg SETB P2.1 ;R/W=1 read command reg ; BACK:SETB P2.2 ;E=1 for H-to-L pulse CLR P2.2 ;E=0 H-to-L pulse JB P1.7,BACK ;stay until busy flag=0 RET END
  • 85. Microcontrollers 10ES42 Department of EEE, SJBIT Page 85 Programming LCD in C Example 13: Write an 8051 C program to send letters „P‟, „I‟, and „C‟ to the LCD using the busy flag method. Solution: #include <reg51.h> sfr ldata = 0x90; //P1=LCD data pins sbit rs = P2^0; sbit rw = P2^1; sbit en = P2^2; sbit busy = P1^7; void main(){ lcdcmd(0x38); lcdcmd(0x0E); lcdcmd(0x01); lcdcmd(0x06); lcdcmd(0x86); //line 1, position 6 lcddata(„P‟); lcddata(„I‟); lcddata(„C‟); } void lcdcmd(unsigned char value){ lcdready(); //check the LCD busy flag ldata = value; //put the value on the pins rs = 0; rw = 0; en = 1; //strobe the enable pin MSDelay(1);
  • 86. Microcontrollers 10ES42 Department of EEE, SJBIT Page 86 Keyboard Interfacing: Keyboards are organized in a matrix of rows and columns. The CPU accesses both rows and columns through ports. Therefore, with two 8-bit ports, an 8 x 8 matrix of keys can be connected to a microprocessor. When a key is pressed, a row and a column make a contact. Otherwise, there is no connection between rows and columns. A 4x4 matrix connected to two ports. The rows are connected to an output port and the columns are connected to an input port. Scanning and Identifying the Key: void lcdready(){ busy = 1; //make the busy pin at input rs = 0; rw = 1; while(busy==1){ //wait here for busy flag en = 0; //strobe the enable pin MSDelay(1); en = 1; } } void Msdelay(unsigned int itime){ unsigned int i, j; for(i=0;i<itime;i++) for(j=0;j<1275;j++); }