SlideShare a Scribd company logo
1 of 137
Download to read offline
CAESAR II®
Statics Video Training Series
The Quick Build Model
A look at using repetitive geometry to speed up
your modeling process.
Copyright© 2015 CAD Training Technologies, LLC All Rights Reserved
No duplication permitted without express written consent
PipingDesignOnline Video Training
CAESAR II Statics: Quick Build Model
CAESAR II Statics: Quick Build Model Video One
(Reference Video: C2_S_Quick_Build_V1)
1. In this session, we are going to review developing input in CAESAR II and trying to get efficient
in the way we develop the model. I usually encourage users to put node numbers on their
drawings before they start developing their input in CAESAR II. This way, they can develop
strategies on creating the proper sequence in the system and finding points where they have
to return. For example, at a T where you have to pick up off another line. It's good to get these
notes set on the drawing before you get started. You might see certain patterns that you wish
to use in duplication when you build your model.
2. Before we get involved with that, I want to review something regarding the units. You are going
to be using the configuration file and the units file that we ship with this training series. Let’s
take a look at what we get with CAESAR II when we start off with a new folder.
3. From the Home tab of CAESAR II, we are going to build a new folder underneath the current
CAESAR II models. Right now, I'm looking at the model called Simple. If you click Piping Input,
the Simple model displays.
4. Before we do that, let’s create a new folder.
Click Open.
1
Copyright© 2015 All Rights Reserved CAD Training Technologies, LLC
PipingDesignOnline Video Training
CAESAR II Statics: Quick Build Model
We now see all the files in the current folder, the CAESAR II Models folder.
Right-click > New > Folder.
The new folder places in the CAESAR II Models folder. No need to change the name, we're
just going to use this for today’s exercise.
Click Cancel.
2
Copyright© 2015 All Rights Reserved CAD Training Technologies, LLC
PipingDesignOnline Video Training
CAESAR II Statics: Quick Build Model
5. We now want to change our folder. Click File.
We see an option in the File menu called Set Default Data
Directory. We want to point to that new folder. On your
machine, it might not show this menu item. If it does not show,
there should be a down arrow or chevron at the bottom of the
screen. Click on that chevron, and it shows you the entire
window.
6. Click Set Default Data Directory.
7. Click the Browse ellipsis and navigate to:
CAESAR_II_Statics_Support_Files > CAESAR II Models > New Folder.
3
Copyright© 2015 All Rights Reserved CAD Training Technologies, LLC
PipingDesignOnline Video Training
CAESAR II Statics: Quick Build Model
8. Click OK.
We are now pointing to the folder where we can complete the session.
9. Click OK.
10.The CAESAR II title bar now shows the following:
CAESAR_II_STATICS_SUPPORT_FILES/CAESAR_II_MODELS/NEW FOLDER_UNTITLED.
There is no declared file in this folder, so it just read untiled. We now want to create a new file.
Click New.
11.Type quick build in the Enter the name for the NEW job file box.
You can have space in the name; however, we have a limit on the number of characters. We
should also be concerned on the length of the folder name, the path to that folder.
12.Click OK.
4
Copyright© 2015 All Rights Reserved CAD Training Technologies, LLC
PipingDesignOnline Video Training
CAESAR II Statics: Quick Build Model
13.Clicking OK creates a CAESAR II piping input file in this folder.
14.The first thing CAESAR II does when you create a new piping input file is to bring up the units
that you are using for this model. Remember, we are using a brand new folder, so there is
nothing in this folder to indicate what units we should use in CAESAR II. The file that holds that
information is stored in the configuration file. Right now, we have no configuration file in New
Folder, so it's showing the default configuration, which are English units.
15.Here we see the internal units that are used by CAESAR II for every dimension.
• Length is in inches.
• Diameter is in inches.
• Uniform load is lb./in (pounds per inch).
5
Copyright© 2015 All Rights Reserved CAD Training Technologies, LLC
PipingDesignOnline Video Training
CAESAR II Statics: Quick Build Model
These are the internal units used by CAESAR II. Whatever you type in, no matter what units
that you use, or whatever you view on the output side is translated by these constants shown
in this file.
The user units here are in inches. The value to convert to inches is 1.
For compound length, it's the footage format. It has inches as the internal units, so it has to
multiply all the numbers that you type in by 12 in order to get to those internal inches units.
Here it's the inverse of that, 1/12.
16.These units are not what we want to use, so we can back out now.
Click OK, and CAESAR II starts the input processor assuming we wanted those US units.
• If you hover the mouse over the DX field, you can see it
reads in.
• If you hover over temperature, Fahrenheit. That's not what
we want.
• Hover over Allowable stress, pounds per square inch.
17.Click Close to start over at the Main screen.
18.Click Configure.
6
Copyright© 2015 All Rights Reserved CAD Training Technologies, LLC
PipingDesignOnline Video Training
CAESAR II Statics: Quick Build Model
19.We want to view the configuration file that will now be built in our new folder. You can now see
all the switch settings for this specific folder location. Taking a close look through this list, we
don't see any bolded items. That means these are all the defaults.
20.On the left under Categories we have a tree structure. The list shows all the branches of that
tree. Right now, we have Computational Control selected. This is where we can set things like
New Job Ambient Temperature, 70 degrees Fahrenheit.
7
Copyright© 2015 All Rights Reserved CAD Training Technologies, LLC
PipingDesignOnline Video Training
CAESAR II Statics: Quick Build Model
21.Click SIFs and Stresses, and you can see that the default piping code is 31.3.
22.If we are always running 31.1, I could change this setting to 31.1, and any new job I build after
starts with 31.1.
Select Default Piping Code, click the drop-down arrow and then select B31.1.
23.Notice how the 31.1 changed to bold, which means it's not the default setting any longer. Let’s
stick with 31.3.
Select Default Piping Code, click the drop-down arrow and then select B31.3.
24.You have these switches available to you that adjust how CAESAR II operates, and adjusts
the default settings of CAESAR II.
8
Copyright© 2015 All Rights Reserved CAD Training Technologies, LLC
PipingDesignOnline Video Training
CAESAR II Statics: Quick Build Model
25.The one we want to work with is Database Definitions.
Click Database Definitions, and you see Units File Name and the default ENGLISH.FIL.
26.Select Units File Name and then click the drop-down arrow to see all the different files
available for you to use.
27.Notice that these are all preceded with an asterisk or star. This means these files are all
located in the System folder. There are no units files in our current New Folder folder. The
program only has these available in the System folder. This option shows me every units file
that is in the local folder and in the system folder.
28.I don't want to use any of these files, but the MM.FIL one looks useful. That one’s going to be
close to what we want. I know enough about that file to say that I don't like the structure of that
file or the units that are in that file. We are going to want to use our own units. We are going to
create a new listing to appear in this Units File Name.
29.Click Close.
30.Click No and we are back at the main menu
of CAESAR II.
9
Copyright© 2015 All Rights Reserved CAD Training Technologies, LLC
PipingDesignOnline Video Training
CAESAR II Statics: Quick Build Model
31.Click Utilities.
In Utilities we have two different unit options :
• Create/Review Units, which reviews existing units on the file in the machine. This is the
one we are going to use later.
• Change Model Units, which can change units in existing models.
32.CAESAR II assigns units for a new job, and those units stay with that input file no matter when
or where you open it. You could move it to another machine that did not even have your units,
but those units belong to that file. Output is always displayed in the current units of the folder
that you're working. We see now our current units are English units, so even the models that
we created earlier in the sessions would appear in English units.
33.What we're going to do is we're going to introduce a new set of units. Before we do that, we
need to do one other thing.
34.In the Utilities tab, click Open System Folder.
Remember, that the program holds all these other units files. Let's take a look at that folder.
35.We are looking in the System folder in CAESAR II, and we need to sort by Type.
Click Type.
36.Scroll to see a stack of .FIL files.
10
Copyright© 2015 All Rights Reserved CAD Training Technologies, LLC
PipingDesignOnline Video Training
CAESAR II Statics: Quick Build Model
37.These are the units files that we ship with CAESAR II, the ones that had the star in front of
them when you looked at the units files available. These are the ones that are available to any
folder that is working with this installation of CAESAR II.
38.We don't want to use any of these; we want to build our own units.
39.Close Windows Explorer and you are back at Utilities. We are going to use Create/Review
Units.
40.Before we do that, let's take a break and you can catch. When we come back, we can build
those units for this file.
11
Copyright© 2015 All Rights Reserved CAD Training Technologies, LLC
PipingDesignOnline Video Training
CAESAR II Statics: Quick Build Model
CAESAR II Statics: Quick Build Model Video Two
(Reference Video: C2_S_Quick_Build_V2)
1. In this session, we're going to continue on with developing our own set of units for using
CAESAR II.
2. We are currently pointing at the Utilities tab from the main menu and as you can see we are in
a new folder, and we want to introduce our own set of units to that folder.
3. Click Create/Review Units.
4. Clicking Create /Review Units opens the CAESAR II – Units Maintenance window.
12
Copyright© 2015 All Rights Reserved CAD Training Technologies, LLC
PipingDesignOnline Video Training
CAESAR II Statics: Quick Build Model
5. First, we want to review the existing units files.
Click Review Existing Units Files and the Existing File to Review cell becomes available.
6. Select the drop down arrow to expand the list.
You see the same list of units files that from the system
folder. All the files from the system folder have that star in
front of them.
7. Select *MM.FIL to review that units file.
8. Click View / Edit File. The CAESAR II – Units File Review opens.
CAESAR II first lists the internal units used for every dimension. We have the constant that is
multiplied by those internal units to get to the user units. If I have one inch, it is 25.4 MM. If I
have 1 pound, it's 4.45 N, and so on.
9. These units displayed here are pretty much what we want to use. However, I notice that there
are a few listed that I do not want to use.
13
Copyright© 2015 All Rights Reserved CAD Training Technologies, LLC
PipingDesignOnline Video Training
CAESAR II Statics: Quick Build Model
10.For instance, Stress and KPa, where I would rather see MPa. On Pressure, I also don’t want to
see KPa, I want to see bar.
11.Besides these few instances this Units file is in pretty good shape.
Click OK.
12.We have now viewed them and want to create a new units file.
Click Create a New Units File and the Existing File to Start From cell becomes available.
13.Click the drop-down arrow and then select *MM.FIL for
the starting point.
14.We are going to call the new units file, Metric, not MM.
Type Metric in the New Units File Name box.
15.Click View / Edit File to edit the file.
We now see the same window as before. However, we now have access to edit those cells.
14
Copyright© 2015 All Rights Reserved CAD Training Technologies, LLC
PipingDesignOnline Video Training
CAESAR II Statics: Quick Build Model
16.You have the ability to change the constant and the label that appears in the output files and in
the input files.
17.If you are using CAESAR II in a different language, perhaps you want to get ahead of this by
changing some of these values that are more typical for your use.
18.We want to change two things: Stress and Pressure.
19.We want to change Stress from KPa to MPa. We know if it's 6.8946 KPa per psi, we can just
type in 0.006 and divide by 1,000. That then gives me MPa.
20.Let's make it a little easier for you.
Click the drop-down arrow by KPa, and we can see several other
terms. Notice that the terms in the list also have their related or
complementary conversion value listed as well.
21.Unfortunately, we don't see MPa here. However, we do see N./sq.mm,
which is a MPa. Select N./sq.mm (Newton per square millimeter).
22.You now see Stress is 0.006, which confirms we got the right conversion.
23.The n slash sqmm for Stress looks clunky.
Highlight N./sq.mm and then type MPa.
Now, MPa is the value that will appear in the input processor and also in
the output listings.
24.We also wanted to change Pressure to bars.
Click the drop-down arrow of Pressure by KPa, and then select bars,
and then remove the s, so that it says bar.
15
Copyright© 2015 All Rights Reserved CAD Training Technologies, LLC
PipingDesignOnline Video Training
CAESAR II Statics: Quick Build Model
So Pressure is now 0.06 bar per psi.
25.Let’s also change Elastic Modulus to make it consistently with the others.
Click the drop-down arrow for Elastic Modulus by KPa, and then
select N./sq.mm (Newton per square millimeter).
26.You can now see our changed values as we need them reflected.
27.Let’s also change the memo field.
Type video training in the Units File Label box.
The Units File Label will appear in several places in CAESAR II to show you what units you are
using.
28.Something to note is Nominals, which is set to ON. This works with any units you're running. If
Nominals is turned on and you're using, for example ANSI pipe sizes, you type in 10 that's 10-
inch pipe, which is 10.75 times whatever conversion to get to your user units. We can still
reference those named pipe sizes.
Click OK in Units File Maintenance, and then click Cancel in Units Maintenance.
29.We have now built a units file. Click Home and since we already declared this Quick Build,
click Piping Input the Quick Build job.
We selected
N./sq.mm and it
gave us the
conversion for that.
We then changed
the label.
We selected bars,
and it gave us a
conversion, and we
adjusted the label
In this one we just used N./sq.mm, and we got our conversion.
16
Copyright© 2015 All Rights Reserved CAD Training Technologies, LLC
PipingDesignOnline Video Training
CAESAR II Statics: Quick Build Model
30.CEASER II displays our units. Strangely we see the old English units. What happened? How
come CAESAR II is not using that units file that we just built?
We didn't tell the program to use it yet.
31.Click OK to close out, because these are still US units here.
You can see inches in the direction boxes. We have to first declare
these units with CAESAR II.
32.How do you do that? Configuration. Click Configure.
17
Copyright© 2015 All Rights Reserved CAD Training Technologies, LLC
PipingDesignOnline Video Training
CAESAR II Statics: Quick Build Model
33.Select Database Definitions, because it's a database we built, and then select Units File
Name.
34.Click ENGLISH.FIL, and then select the drop-down arrow to see all the files with the
stars in front of them.
35.Notice that there is one selection that does not have a star in front of it, which means it is in a
local folder. That's our METRIC.FIL.
Click METRIC.FIL.
That's the file we just built. It is available in this folder only, but every model we build now in
this folder starts with this units file since we set that in our configuration file.
Click Save.
36.Click Piping Input. When we go back to my input, hopefully for the last time, we can see the
units that we want: MM for length, MPa for stress, bar for pressure, video training as the label.
Click OK.
18
Copyright© 2015 All Rights Reserved CAD Training Technologies, LLC
PipingDesignOnline Video Training
CAESAR II Statics: Quick Build Model
37.And now we can begin with our process. So here we are in our layout, working with our very
first piece of pipe 10 to 20. Get your model to this state. And we'll review the data that we're
going to build and then start building this model.
Before we do that, let's take a break and you can catch up. When we come back, we will build
those units for this file.
19
Copyright© 2015 All Rights Reserved CAD Training Technologies, LLC
PipingDesignOnline Video Training
CAESAR II Statics: Quick Build Model
CAESAR II Statics: Quick Build Model Video Three
(Reference Video: C2_S_Quick_Build_V3)
1. In the previous video, we were working with the units for the model we are going to build today.
2. If I go to Configuration to review that, we can look to see that we are using the metric units file.
Click CAESAR II Configuration.
Click Database Definitions, and you can see the Metric units file.
3. We can also confirm the units by looking at our fly out help. You
can see that it is in mm.
Close the Configuration Editor and hover over the DX box to
see the units.
20
Copyright© 2015 All Rights Reserved CAD Training Technologies, LLC
PipingDesignOnline Video Training
CAESAR II Statics: Quick Build Model
There's pressure in bar:
Stress in MPa:
Elastic modulus in N./sq.mm:
Those are the terms that we were expecting.
4. Let's go back to the system we wish to analyze. If you look below, you see an illustration of the
piping system.
5. This rack is consistently laid out with 6m spans between the bents. There are, however, three
additional expansions/loops put into this system. Do to our temperature change, we have to
add flexibility.
We're going to run this line from
this anchor into the rack…
Then down this
long run of rack
Then back out to
another anchor
21
Copyright© 2015 All Rights Reserved CAD Training Technologies, LLC
PipingDesignOnline Video Training
CAESAR II Statics: Quick Build Model
6. Taking a look at another picture you see the entire model.
7. There are also some other guides in the system and some line stops or axle restraints along
this long run.
8. We want to develop a model relatively quickly. We could just start at the beginning of the line
and call it node 10, 20, 30, 40, and 50. Then, just keep going down the line putting in node
numbers in CAESAR II’s default node increment of 10. We want to take advantage of the
repetition in this line. I see that all these racks are equally spaced.
9. You can see in the original picture that there is 6 m between all the supports.
We see in the image that we have a Y support at each one of those rack supports, and we
also have a guide at each one of those rack supports.
22
Copyright© 2015 All Rights Reserved CAD Training Technologies, LLC
PipingDesignOnline Video Training
CAESAR II Statics: Quick Build Model
10.I can run a node from that first rack to this last rack as one long run and use the Break
command in CAESAR II. The Break command adds these extra nodes and puts all those extra
restraints in automatically.
We are going to cut in the loops after we draw the long run straight through. We are first going
to run from the anchor down to the first rack, then create one long piece of pipe down to the
last rack, before we then exit out. Then we're going to cut it up, adding the extra supports, and
then drop in our loops. We'll see how fast we can do this without missing any of the details.
11.Back in CAESAR II, you see the first element, node 10 to 20.
12.The first element is in the Z direction going 6m. We actually skip over that first support point. If
you recall in the model (seen blow) there's supposed to be a support on the first pipe. The pipe
is 6m right from that anchor to the elbow. We are just roughing it all in and then coming back
and bringing in the details.
23
Copyright© 2015 All Rights Reserved CAD Training Technologies, LLC
PipingDesignOnline Video Training
CAESAR II Statics: Quick Build Model
13.Type 6000 in the DZ box to go positive 6 m in the Z direction.
14.Type 8 in the Diameter box for an 8 in. diameter, which
converts to 219.0750.
15.Type S for a standard wall thickness, which converts to
8.1788
16.You do not need to specify Corrosion, and Pipe Density comes
in with the material, so we can ignore that.
17.We are going to file the pipe with water, so that's one SG.
Type 1sg in the Fluid Den 1 box, which converts to 0.00100.
My units are kg./cu.cm, so it's 0.001 for the dead weight of
water.
18.We are going to run just one temperature set, or one temperature
scenario for this system. Type 225 in the Temp 1 box for 225
degrees Centigrade.
You can view the ambient temperature in the Special Execution options.
Click Special execution options.
Our ambient temperature is 21.1 degrees Centigrade, basically seven degrees Fahrenheit.
And we're going from that 21 up to 225 with this line.
24
Copyright© 2015 All Rights Reserved CAD Training Technologies, LLC
PipingDesignOnline Video Training
CAESAR II Statics: Quick Build Model
19.Our pressure, again, the units here are bar.
Type 26 in the Pressure 1 box.
20.I have a bend at node 20.
Click Bend.
21.I have an anchor at node 10.
Double-click Restraints.
Click the Type drop-down arrow and select ANC for
Anchor.
22.For the other information here, we're pretty clear.
23.For Material, we are going to make it A106 grade B. If you use CAESAR II, you know that the
index number for A106 B is 106.
24.If you didn't know that, you just type in a106
and you don't even have to add the B.
Type a106 in the Material box.
25.We want the list, so press ENTER, and it gives us three possible selections.
We see the material that we want, 106. That's the index number that we stored in CAESAR II.
The material is named A106 B.
Double-click A106B, and it brings it in.
25
Copyright© 2015 All Rights Reserved CAD Training Technologies, LLC
PipingDesignOnline Video Training
CAESAR II Statics: Quick Build Model
26.CAESAR II automatically checks the Allowable Stress box because we have to specify our
piping code (B31.3), and the hot (SH1) and cold (SC) allowable stresses for this analysis or
stress evaluation.
27.You can also see we have our yield stress (Sy).
28.If we were doing a hydro stress check, it would be based on yield rather than hot or cold
allowable.
29.We are not expecting many cycles out of this, so I'm going to ignore the cyclic factor F. If I
leave F1 blank and <f> Allowed Maximum of 1.2 is not checked to use the 1.2, then CAESAR
II Cyclic Factor defaults to 1.0.
30.When we specify the material, we got the Allowable Stresses information, but we also got the
entire temperature table.
Double-click the Temp 1 chevron, and the entire temperature table flies out.
26
Copyright© 2015 All Rights Reserved CAD Training Technologies, LLC
PipingDesignOnline Video Training
CAESAR II Statics: Quick Build Model
31.Notice that in the Classic Piping Input we only show the first
three temperatures. However, you can see in the temperature
table that there are nine that you can specify in CAESAR II.
32.We typed in 225 for Temp 1 and can now see it in the Temperature list. You can also see that
since we have a material specified CAESAR II has dropped in the strain rate of 0.002 mm per
mm.
33.Along with the material data, we also have the density of our pipe, Young's modulus, and
Poisson ratio.
34.We also have insulation on this piping system, so we are
going to put in 50 mm of insulation. Type 50 in the Insul.
Thk. box.
35.For the Insulation Density, we can select it from the Insulation Density list.
Click the Insulation Density drop-down arrow and select calcium silicate, so that we
have calcium silicate in this line.
27
Copyright© 2015 All Rights Reserved CAD Training Technologies, LLC
PipingDesignOnline Video Training
CAESAR II Statics: Quick Build Model
36.The density of the calcium silicate is 0.00018 kg./cu.cm.
37.That's my first piece of pipe.
38.We want to now go down to the rack below it.
39.Click Continue to go to element 20 to 30.
40.Type -2000 in the DY box to go in the Y direction minus
2,000 mm.
41.You can see the plot display with the data as we enter this information.
Click Bend to add a bend to this piping.
28
Copyright© 2015 All Rights Reserved CAD Training Technologies, LLC
PipingDesignOnline Video Training
CAESAR II Statics: Quick Build Model
42.We now want to go to node 40, which will be the first support point. If I pull up the drawing
again, node 40 is the point indicated below, so 10, 20, 30, 40.
43.Click Continue to go to node 30 to 40.
44.Type 2000 in the DX box to go in the X direction 2,000 mm.
45.We want to specify our restraint at 40.
Double-click Restraints.
Select +Y from the Type list to place a plus Y restraint at node 40.
Type 40 in the second Node box, and then select guide. You
could also select the global direction Z, but let’s stick with the guide.
We have the two restraints, and the two vectors, a vertical and a
horizontal vector.
40
30
20
10
29
Copyright© 2015 All Rights Reserved CAD Training Technologies, LLC
PipingDesignOnline Video Training
CAESAR II Statics: Quick Build Model
46.It's important to get these details in now, because we need something to duplicate later on
when we add all of the other rack details in there. Right now, review your data. Make sure you
have a model that looks like the image below.
Click Length to add the dimensions on it as seen below.
47.Get your model like this and we'll continue on in the next session.
2000
2000
6000
30
Copyright© 2015 All Rights Reserved CAD Training Technologies, LLC
PipingDesignOnline Video Training
CAESAR II Statics: Quick Build Model
CAESAR II Statics: Quick Build Model Video Four
(Reference Video: C2_S_Quick_Build_V4)
1. You now have your model looking like the image below:
2. Click to turn the dimensions off.
3. Click to turn the node numbers on.
10
20
30
40
31
Copyright© 2015 All Rights Reserved CAD Training Technologies, LLC
PipingDesignOnline Video Training
CAESAR II Statics: Quick Build Model
4. We are ready to continue working with the long run that takes us all the way to that other rack.
You can see the model in the image below.
5. Highlighted below is node 40.
6. You might say this should be 50 then numbered all around the loop.
32
Copyright© 2015 All Rights Reserved CAD Training Technologies, LLC
PipingDesignOnline Video Training
CAESAR II Statics: Quick Build Model
7. By the time you get to the end, you do not know the node number. We are just going to go
from 40 (highlighted below) all the way down to the bend at the end.
How many are there? They are 6 M long. So, there's-- 1, 2, 3, 4, 5, 6, 7, 8, 9, 10, 11, 12, 13,
14, 15, 16, 17-- 17 times our spacing of 6 M.
8. Click Classic Piping Input.
9. We are going to add our next element, node 50.
10.Click Continue for nodes 40 to 50.
33
Copyright© 2015 All Rights Reserved CAD Training Technologies, LLC
PipingDesignOnline Video Training
CAESAR II Statics: Quick Build Model
11.Type 17*6000 in the DX box for the x direction. This comes out to 102 M.
=
12.We are saying that that is 102 M from the top highlighted column or bent to the bottom-
highlighted column, or bent.
13.We are going to come back later and add in all these extra nodes. Because we know, we are
going to have a plus y support and a guide at each one of these locations.
14.So there we are 40 to 50.
15.To see the model select in the upper right-hand corner of the Classic Piping Input.
There is not much to see in the model right now. We need to finish out the rest, and then go
back and start working on the main run.
102M
34
Copyright© 2015 All Rights Reserved CAD Training Technologies, LLC
PipingDesignOnline Video Training
CAESAR II Statics: Quick Build Model
16.So at 50 we continue on to 60.
Click Continue.
17.Type 2,000 in the DX box for the positive x direction to an elbow.
18.Click Bend.
19.Click Continue for 60 to 70.
20.Type 2000 in the DY box to go up in the y direction.
21.Click Bend.
35
Copyright© 2015 All Rights Reserved CAD Training Technologies, LLC
PipingDesignOnline Video Training
CAESAR II Statics: Quick Build Model
22.I would like to show you one other thing here. You can zoom in on the section that we are
interested in by using one these three magnifying glasses.
23.If I click on this current selection one, it is going to zoom into 60 to 70.
24.Draw a box around the area with nodes 50, 60, and 70 and you can see exactly where we are
building the model.
25.When you build a new model, the program always shows you the extents of the model. Every
time you update data in the Classic Piping Input, it automatically shows you the entire model.
We want to build the last piece of pipe in the model, but we do not want to show the entire
model, because we lose the detail.
There is a way to turn off the always zoom out feature.
You can use Reset View, which looks like this:
26.If you cannot find that button quickly on your machine, you can navigate to
Environment > Reset View on Refresh, and then turn that off.
27.You do not want to reset the view when you refresh the state of the machine. An interesting
fact about Reset View is that it is automatically on for every new model that you build. After
you save the model or close it and open it again, it is turned off on your second entry into the
processor. That would explain why sometimes it is zooming and sometimes it is not.
That's what we are doing right
now, zooming to the extents of
this model.
36
Copyright© 2015 All Rights Reserved CAD Training Technologies, LLC
PipingDesignOnline Video Training
CAESAR II Statics: Quick Build Model
28.
29.Click Reset View to turn off the refresh of the view.
30.Click Continue to go to 70 to 80.
31.Type -6,000 in the DZ box for the z direction.
My plot stays put and I can just watch what is going on in this area.
This is nice when you are building a new model and you are working around a very tight
system like a control station or something similar. You do not want to see the whole plot
anymore, because you want to stay focused on what is interesting to you.
32.Double-click Restraints.
37
Copyright© 2015 All Rights Reserved CAD Training Technologies, LLC
PipingDesignOnline Video Training
CAESAR II Statics: Quick Build Model
33.Select ANC from the Type list in Restraints to set an anchor at node 80.
34.We need to fix node 50 because we forgot to put the plus y support and guide at node 50.
Click the element coming into 50, to specify the information there.
35.You can specify the additional data on any spreadsheet. I could define on this element the
restraints and put a restraint at node 70, but it makes sense to develop the data on your first
entry to that node. The best place, I believe, for me to specify the restraint at 50 is when I go to
50 on the first time.
36.Double-click Restraints.
37.Select +Y from the Type list to specify that plus y support at node 50.
38
Copyright© 2015 All Rights Reserved CAD Training Technologies, LLC
PipingDesignOnline Video Training
CAESAR II Statics: Quick Build Model
38.Type 50 in the Node box and then select Guide from the Type list to specify a guide for
node 50.
39.We are not specifying any gaps on the guide or any friction in this model. We take that up in a
different subject.
40.There's my bulk model.
41.Click Zoom to Extents to see the whole model.
42.You can now see the long run.
That is 17 times 6 M from one end to the other.
39
Copyright© 2015 All Rights Reserved CAD Training Technologies, LLC
PipingDesignOnline Video Training
CAESAR II Statics: Quick Build Model
43.That's our model at this point. In our next video, we go ahead and drop in these extra nodes.
That is a useful tool, so we will save that for a separate discussion.
Click Zoom to Window and zoom to the 50, 60, and 70 section we can see the
element that we just put in.
44.We have the long run over to the other end (the long pipe highlighted yellow).
45.Notice that you can use the mouse to pan.
We are using Zoom to Window , but if you push the mouse wheel in, it changes to
Pan and you can just then pan without having to click the Pan command.
If you roll the mouse wheel, you zoom in and zoom out. These are some of the different
options available to you in reviewing the model.
Get your model to this point, and then we drop in all that extra work that you are doing.
40
Copyright© 2015 All Rights Reserved CAD Training Technologies, LLC
PipingDesignOnline Video Training
CAESAR II Statics: Quick Build Model
CAESAR II Statics: Quick Build Model Video Five
(Reference Video: C2_S_Quick_Build_V5)
1. You should have your model looking like the image below. We are going to be working with the
long run, which is the yellow highlighted section and the current element.
We want to break the long element to drop in support points along the run.
41
Copyright© 2015 All Rights Reserved CAD Training Technologies, LLC
PipingDesignOnline Video Training
CAESAR II Statics: Quick Build Model
2. We are trying to take advantage of the repetition in this model, so we do not have to trot along
this piping system from one node to the next.
3. Select the long run to highlight the element, and then click Classic Piping Input to see
that the yellow pipe is the current element at 40 to 50. We are looking at the 102 M long
run.
4. Click to see the plot and the data.
What we want to use is the Break command. We have a series of buttons here to manipulate
our existing data.
We have Insert An Element--
either before or after the
current element
Delete the current
element
Break The Current Element is what we
want. We want to break this long
element into 17 equal elements.
42
Copyright© 2015 All Rights Reserved CAD Training Technologies, LLC
PipingDesignOnline Video Training
CAESAR II Statics: Quick Build Model
5. Click Break.
6. The Break command has two different areas.
7. We want to put in multiple nodes in the model, so we are going to use the Insert Multiple
Nodes option. These radio buttons control the single node and multiple node options.
8. Click Insert Multiple Nodes to activate the bottom section of cells.
9. When you want to add extra nodes, there are two ways to do that.
We have the top area if I
want to add a single node on
the run, a single node
anywhere along the run.
I can use the bottom part of
the screen if I want to add
several nodes, add one more
node, or more nodes, all
equally spaced along the
run.
43
Copyright© 2015 All Rights Reserved CAD Training Technologies, LLC
PipingDesignOnline Video Training
CAESAR II Statics: Quick Build Model
10.You can either specify the total number you want to break this into-- I want to break the 102 M
long run into x number of elements
11. Alternatively, I can use a Node Step.
12.Using the Node Step is not going to help us, because the node step references the From and
To node of the element. If I say 40 to 50, my smallest node step is one. I could put 41, 42, 43,
and up to 50. That can break this one element into 10 elements. I want 17, so the node step
does not work for this situation.
13.Type 17 in the Total Number of Break Elements box.
14.When I select elsewhere on the screen CAESAR II automatically inserts the Node Step. It also
automatically inserts the Length of each element.
15.We use the Length of each element option to make sure that we got the right count.
16.When we use the multiple node information, the nodes are all equally spaced. If I wanted to
put a node in the mid span of a run between two supports, I can use multiple insert and break
it into two. This automatically places it at the middle of the run making this a very useful tool.
17.Select another point on the screen such as the Node Step box.
18.The Node Step came out as zero because CASEAR II could not give a node step that fit
between the nodes evenly. However, we see that the length of each element is 6M. This is
exactly what we want, because I counted 17 bays between those vents.
44
Copyright© 2015 All Rights Reserved CAD Training Technologies, LLC
PipingDesignOnline Video Training
CAESAR II Statics: Quick Build Model
19.We now need to take care of our support nodes, which are very important. If you recall, we put
in the restraints at node 40 and at node 50. We want to duplicate them at every support. What
if it is at 40? I want to use it at all of these new nodes.
20.Type 40 in the Get Support From Node.
21.Click OK.
22.CAESAR II now gives us all these extra nodes. It goes by ones from 40, 41, 42, 43 and just
keeps on going. Notice, however, that it has to skip over 50, since we used 50 in the model.
The nodes keep on going one node at a time in sequence to 57, and then we get to 50.
23.There are 17 new elements in the model. Zoom in to see all the restraints in the model. I
did not have to go around by hand and add these extra restraints.
45
Copyright© 2015 All Rights Reserved CAD Training Technologies, LLC
PipingDesignOnline Video Training
CAESAR II Statics: Quick Build Model
24.This is the layout of this line, but we still have to drop in three expansion loops. We are going
to add a loop after the second support. The loops are at the second, then at the fourth, then at
the sixth.
25.Now, we are going to build it at the right point. When we build the loops, we want to use the
Insert command. Zoom in.
26.You can see here a different picture of the same thing.
So, it is the second full bay
One
Two Three
The fourth after that
Two
Three
Four
Five
One
The sixth
Here we are
coming down
There is node 40
That is node 41
46
Copyright© 2015 All Rights Reserved CAD Training Technologies, LLC
PipingDesignOnline Video Training
CAESAR II Statics: Quick Build Model
27.I want to put in this loop in the model so that it is after 41.
28.We are calling this 41, but let us look at it a different way. We are going to have to add the pipe
up, over, and back. We are going to be out of sequence. It is OK to be like that, but I want to
be able to use sequential numbers.
29.Zoom to see the entire model.
47
Copyright© 2015 All Rights Reserved CAD Training Technologies, LLC
PipingDesignOnline Video Training
CAESAR II Statics: Quick Build Model
30.We want to select the entire model.
There are two options to select components in CAESAR II:
• We have an arrow to select an individual element.
• We have an arrow with a box behind it, to select a group of elements.
We want to select a group of elements.
Click Select Group.
Select the whole model by clicking, and then dragging the blue box around the entire
model.
48
Copyright© 2015 All Rights Reserved CAD Training Technologies, LLC
PipingDesignOnline Video Training
CAESAR II Statics: Quick Build Model
31.We now want to use the Renumber command. There is a list of buttons to the right to
Rotate, Duplicate, Delete, Renumber, Invert, and Change sequence. I want to
Renumber.
32.You can also navigate to Global > Nodes. Then, select Renumber in the Block
Renumber dialog box.
33.Type 10 in the Start Node box to start from node 10, then
type 10 in the Node Increment box to increment by tens,
and then click OK.
34.We now have nice clean numbering in our model. What used to be node 41 is now node 50.
We want to drop the first loop in between 50 and 60.
35.Get your model to this point, and we can continue with the loops.
49
Copyright© 2015 All Rights Reserved CAD Training Technologies, LLC
PipingDesignOnline Video Training
CAESAR II Statics: Quick Build Model
CAESAR II Statics: Quick Build Model Video Six
(Reference Video: C2_S_Quick_Build_V6)
1. We have our simple line and we want to drop in our loop. We drop in our first loop after 50--
between 50 and 60.
2. The loop appears like this.
40
50
60
50
Copyright© 2015 All Rights Reserved CAD Training Technologies, LLC
PipingDesignOnline Video Training
CAESAR II Statics: Quick Build Model
3. I am going to use a different sequence. I am going to call it 150, 160, 170, 180, 190, 200, and
then go back to node 60.
4. We say that we are going to use 200, but we have to make sure we did not use 200
elsewhere. Let’s look back at the layout.
5. We cannot use 200 because we have 200 near the end of the long
run. We need to watch out for the node numbers throughout the
model. We are going to work our way through it. Let’s go back to 50
and 60.
6. There are several ways to make this loop. Let’s take a look at our drawing.
7. These measurements place the loop right in the middle of that bay.
160
170
180
190150
200 60
50
We are going to come off
the support and go in only
750 MM
Then up 1 M
Then back 3,750
Across 4,500
Then back
down and in
51
Copyright© 2015 All Rights Reserved CAD Training Technologies, LLC
PipingDesignOnline Video Training
CAESAR II Statics: Quick Build Model
8. We want to break the pipe, and add a single node right at the new node.
9. Click to select the element between 50 and 60.
10. Let’s put in that first corner.
Click Break.
11.We want to insert a single node. We do not want to insert multiple nodes because that option
puts them equally spaced all along this run. Instead, we want to locate a single node.
Type 350 in the New Node Number box. I know I did not use 350 anywhere else in the
model.
12.The distance in MM from node 50 is 750 MM. Type 750 in the Distance in (mm.) box.
52
Copyright© 2015 All Rights Reserved CAD Training Technologies, LLC
PipingDesignOnline Video Training
CAESAR II Statics: Quick Build Model
13.Click OK.
14.You can now see node 350 in the model. That is of course right where we want it to be.
15.Next, we want insert a new element after this element. We are currently pointing at 50 to 350.
Click Insert.
16.We can insert an element either before or after the current element.
Select After to go from 350 up to 360, and then click OK.
17.Click Classic Piping Input.
18.You can see that we have 350 in the From node, but we do not have
the To node. Type 360 in the To box.
53
Copyright© 2015 All Rights Reserved CAD Training Technologies, LLC
PipingDesignOnline Video Training
CAESAR II Statics: Quick Build Model
19.Type 1000 in the DY box to go 1 M in the y direction.
20.If you look at your drawing, it looks like we created a T, which we did. We go from 50 to 350,
350 to 60, with a branch to go from 350 to 360.
21.We are going to take care of the tee later. Right now, we want to create the run going back to
an elbow on the back of the loop. Basically creating what you see in the image below:
Click Insert.
Select After to go from 360 up to 370, and then click OK.
22.Instead of using the Continue command, we use the Insert command because we are inserting
new elements into existing streams.
54
Copyright© 2015 All Rights Reserved CAD Training Technologies, LLC
PipingDesignOnline Video Training
CAESAR II Statics: Quick Build Model
23.Notice that the Insert command does not automatically give us new
node numbers. Type 370 in the To box.
24.Type -3750 in the DZ box to go in the z direction.
25.If we are watching the drawing change we can see that this last work placed a square corner
at 360. We need to go fix that.
26.Click the single selection tool , and then click the 350 to 360 element.
27.In the current element, 350 to 360 specify the bend by clicking Bend.
28.We now have a bend at 360. You always specify the bend for the To node. I have a bend at
360.
29.Click Next Element to go to 360 to 370.
55
Copyright© 2015 All Rights Reserved CAD Training Technologies, LLC
PipingDesignOnline Video Training
CAESAR II Statics: Quick Build Model
30.Also though, we want a bend at 370 as well. Click Bend.
31.When we continue off of 370 we then see the bend in the model right away.
Click Insert.
Select After to go from 370 over to 380, and then click OK.
Type 380 in the To box.
Type 4500 in the DX box to go in the x direction.
32.What we are looking at is a system where we have 750 MM, 4 and 1/2 M, and 750 MM. That
gets me through the total 6 M run. Let's get back to our element.
56
Copyright© 2015 All Rights Reserved CAD Training Technologies, LLC
PipingDesignOnline Video Training
CAESAR II Statics: Quick Build Model
33.Click the 370 to 380 element and then click Bend.
Click Insert.
Select After to go from 380 down to 390, and then click OK.
Type 390 in the To box.
Type 3750 in the DZ box to go in the positive z direction.
Click Bend.
34.Now we want to go downwards to another new node.
Click Insert.
57
Copyright© 2015 All Rights Reserved CAD Training Technologies, LLC
PipingDesignOnline Video Training
CAESAR II Statics: Quick Build Model
Select After to go from 390 down to 400, and then click OK.
Type 400 in the To box.
Type -1000 in the DZ box to go in the y direction minus 1 M.
Click Bend.
35.The piping looks like it's connected, but don't let the looks drive your model.
58
Copyright© 2015 All Rights Reserved CAD Training Technologies, LLC
PipingDesignOnline Video Training
CAESAR II Statics: Quick Build Model
36.Click and then zoom in on the section as seen below.
37.This area looks like it is connecting, but that is just a free end at 400. Let’s finish the run. We
have one more element to go.
Click Bend to add a bend at 400.
Click Insert.
Select After to go from 390 down to 400, and then click OK.
59
Copyright© 2015 All Rights Reserved CAD Training Technologies, LLC
PipingDesignOnline Video Training
CAESAR II Statics: Quick Build Model
Type 60 in the To box.
Type 750 in the DX box to go in in the x direction 750 MM.
38.Click on the element that was holding the space. This spacer element is 350 to 60. I want to
delete that element.
Click Delete Element.
Click Yes.
60
Copyright© 2015 All Rights Reserved CAD Training Technologies, LLC
PipingDesignOnline Video Training
CAESAR II Statics: Quick Build Model
39.We now have our loop.
40.Looking at this model, we see that there is a missing elbow, as indicated above. So, we want
to make some final changes in this model.
41.In fact, if we miss this, CAESAR II actually gives us a warning when we run the Error Check.
Click Start Run.
42.The Errors and Warnings says:
• The node 350 goes to a CHANGE IN DIRECTION that is not an intersection and that is not
specified as a bend. Please check for missing bend definition.
Now that's kind of a long bit of text. Notice that it also says it's on element 50 to 350. If I double
click on this number 1 here, it'll take me right to that element.
43.Double click Number 1 in the Errors and Warnings, and it takes us right to the spreadsheet.
You can now see that is where we are missing a bend. Click Bend.
Missing Elbow
61
Copyright© 2015 All Rights Reserved CAD Training Technologies, LLC
PipingDesignOnline Video Training
CAESAR II Statics: Quick Build Model
44.Now we see the bend added to the model. Using CAESAR II’s error checker was a useful way
to help find problems.
45.Notice something else here we did in the model when we created the new element, at 400 to
60. We deleted the spacer element that went to 60 and are missing the restraints. Let's clean
that up.
46.We are going to add the restraints in by hand on the element, 400 to 60.
Select the 400 to 60 element.
47.Double-click Restraints.
48.Select +Y from the Type list to make node 60 a plus y.
49.Type 60 in the second Node box and then select Guide from
the Type list.
62
Copyright© 2015 All Rights Reserved CAD Training Technologies, LLC
PipingDesignOnline Video Training
CAESAR II Statics: Quick Build Model
50.So there's our first loop, and we have to add the other supports. Get your model like this, and
we are going to then use this one, and plop it down at other sections of the line.
63
Copyright© 2015 All Rights Reserved CAD Training Technologies, LLC
PipingDesignOnline Video Training
CAESAR II Statics: Quick Build Model
CAESAR II Statics: Quick Build Model Video Seven
(Reference Video: C2_S_Quick_Build_V7)
1. Your model should now look like the image below:
2. We have our new loop added in between 50 and 60. This is the first of three loops. Looking at
the drawing, we create two more loops. They have the same width. I have different lengths of
these loops.
These support points that you see here are three
meters back from the main run. This is 3 meters.
These loops are little bit bigger than the first loop. We
are not going to worry about that now. I just want to
get these loops into the model. Then we can
manipulate them once they are there.
This is 50 to 60.
This is 90 to 100.
64
Copyright© 2015 All Rights Reserved CAD Training Technologies, LLC
PipingDesignOnline Video Training
CAESAR II Statics: Quick Build Model
3. We want to drop the second loop between 90 and 100. We can do this duplication in a couple
of ways. We want to use the list processor to work through the list of data. We can also do it
graphically.
Now there are two ways bring up the list.
• Find the single piece of paper, click on the
drop-down arrow by it, and select Elements. That is
what we want.
Click on the piece of paper itself, you are going to get
all these lists at one time. We do not need all those
lists. You can now see all the lists. You see the element
list. You see the materials list. You see the Bends list.
There is a lot of stuff in the lists.
Now clean it back up. To get rid of all these extra lists,
click the drop-down arrow, and then click Close All
Lists. Then, click the drop-down arrow and click
Elements.
On my machine, because of the way I set it up in the
previous sessions, I have these lists tabbed together.
You see the Classic Piping Input and Elements tabs.
• You can also navigate to Edit > List Elements.
Turn on your element list and review your data. You
might have to open up the width of some of these
columns to see the entire number.
Click the single piece of paper and you
receive the list as seen here.
65
Copyright© 2015 All Rights Reserved CAD Training Technologies, LLC
PipingDesignOnline Video Training
CAESAR II Statics: Quick Build Model
4. Highlight the section below in the Elements list and you see the first loop from elements 50 to
60 with measurements 750 at 50 to 350, 1,000 up at 350 to 360, and 3,750 back at 360 to 370
and then so on back to 60.
The highlighted model displays to the right.
5. We want to move that group or duplicate that and put it between 90 and 100.
6. Let's prepare this block of data for duplication. You have highlighted row 5 through 11. You
can click on 5, and then SHIFT+click on 11. You can also click on 5 and drag my mouse down
to row 11.
7. You might not notice it, but row 5 here has a dotted line around the 5.
8. If I use my down arrow key on the keyboard, not the mouse in any way, but just down arrow,
you notice that it showed me node number five highlighted.
66
Copyright© 2015 All Rights Reserved CAD Training Technologies, LLC
PipingDesignOnline Video Training
CAESAR II Statics: Quick Build Model
9. If you click over here on the plot, you notice that the highlight left the element list. That means
we are working in the plot. Any command that you type in now is working with the plot.
10.We want to move the indicator to the Elements list. Click on the Element list.
11. Now that we refocused, we can move the dotted line I talked about earlier.
Use the down arrow to move the dotted line to row 14.
Row 14 highlights. We use this because duplication allows me three different points of
insertion for the new block:
• At the end of the existing block
• At the end of the input
• At this highlighted element
Row 14 is 80 to 90, so the duplication drops right before 90 to 100.
12.That’s our preset now to start the duplication.
Right-click on the block, and then navigate to Block Operation > Duplicate.
67
Copyright© 2015 All Rights Reserved CAD Training Technologies, LLC
PipingDesignOnline Video Training
CAESAR II Statics: Quick Build Model
The block duplicate window displays, and you can see we have several different options.
Let’s look at Insert Copy Block. Remember, we can set at the end of the current block
between rows 11 and 12, at the end the input after row 29, or after element 80 to 90.
13.Now since there are other elbows in here, we should not break up any elbow pair. Note 80 is
an elbow, we cannot stick it one row up higher.
14.Be sure you get the right insertion point.
Select After element 80 to 90, to place the new block of data.
68
Copyright© 2015 All Rights Reserved CAD Training Technologies, LLC
PipingDesignOnline Video Training
CAESAR II Statics: Quick Build Model
15.On the options, we are going to have the loop fade out in the same direction as the original
one in the negative z direction. Which in this case is the Identical option. This is the plot
direction, but we want the negative z in the C2 model.
If we wanted to go in the positive z direction, it is as if we put a mirror in front of the pipe, and
the mirror's plane is XY. In other words, all the negative z's go to positive z. Keep that in mind
if you have a common pattern, but one sign is changed. You can always use these mirrors in
order to flip the model over.
16.We now have to specify a node increment. Do not confuse this node increment with the From-
To increment as in from 10 to 20. That is an increment of 10 to 20 to 30 to 40. We are using
that for the whole model.
17.The Node Increment we use is the increment between the existing block node numbers and
the new block node numbers.
18.We want to pick a large number for node increment. We
are going to clean up our numbers later on anyway. Let’s
add 1,000 to all these nodes. Type 1000 in the Node
Increment box.
19.We are going to add a new block 1,050 to 1,350 all the way through to 1,060, and it's going to
put it after row 14.
20.Click OK. This adds seven elements.
The original negative Z direction
The plot direction
69
Copyright© 2015 All Rights Reserved CAD Training Technologies, LLC
PipingDesignOnline Video Training
CAESAR II Statics: Quick Build Model
21.The Duplication Status also shows all the new data that adds. Click OK.
22.We now have our new block after row 14. You can see 1050 to 1350-- added 1,000 to those
nodes-- and, finally, 1060.
23.Let’s look back at our plot.
24.Click Reset or Zoom to Extents to reset the plot.
70
Copyright© 2015 All Rights Reserved CAD Training Technologies, LLC
PipingDesignOnline Video Training
CAESAR II Statics: Quick Build Model
25.You can see we have a lot of noise in the model.
26.Click Node Numbers to turn off the node numbers, so we do not have so
much clutter on the plot.
27.You can see CAESAR II placed the new section completely up in the left corner. Why did it do
that? Well, there is not a common node between the new block and the old block.
28.Let’s look at the new block nodes.
Click Row 15 and then Shift+click row 21.
None of the nodes in this set repeats anywhere else in the model. CAESAR II, not knowing
where to put it, drops it back at the origin, which is the first node we defined-- node 10. That's
0, 0, 0 globally. So CAESAR II places it where you see it now.
71
Copyright© 2015 All Rights Reserved CAD Training Technologies, LLC
PipingDesignOnline Video Training
CAESAR II Statics: Quick Build Model
We cannot run the model like that, because we are going to get some complaints by CAESAR
II. We still have to remove that other segment at 90 to 100.
We want to first button the model up properly.
29.Click the Elements list.
30.We did not specify any special data at 50. It's just the support.
Click row 5, and then select the Classic Piping Input tab.
You see we are at 50 to 350.
We have a bend at 350, but there is no other data specified for 50.
31.Click Elements list, then click row 15, and type 90 in the From Node column for the
1050.This sets 15 at 90 to 1350, the plot updates.
32.The model now sits where we want to see it. It might look nice here as far as displacement,
but we did not button up the other end.
33.Click row 21, and type 100 in the To Node column for the 1060.
72
Copyright© 2015 All Rights Reserved CAD Training Technologies, LLC
PipingDesignOnline Video Training
CAESAR II Statics: Quick Build Model
34.We have reestablished the connection on that loop, and the cursor jumps to the next line at
element 90 to 100. We want to delete this element, which was our old placeholder.
Right-click, and then select Block Operation > Delete.
Click Yes to confirm delete of the one element.
The rest of model now hangs together properly.
73
Copyright© 2015 All Rights Reserved CAD Training Technologies, LLC
PipingDesignOnline Video Training
CAESAR II Statics: Quick Build Model
35.You see 80 to 90 to the new set, 100, and throughout the rest.
36.Let’s check element 1400 to 100 to make sure we did not miss anything.
Click row 21 and then click Classic Piping Input.
37.We need to make one more change on node 1400 to 100. We
changed this To node to 100, so we need to update the restraints on
this element.
Type 100 in the Node boxes for the restraints.
38.If you change node numbers in the list, be sure you are not missing other things like restraints
in this case or bends. You should update those other node numbers mentioned as well.
When CAESAR II does not renumber by a command, it renumbers all these elements. When
you do it by hand, you have to be careful to change all these data.
39.We would eventually receive an error message from CAESAR II that there was node 1,060
defined in the model.
74
Copyright© 2015 All Rights Reserved CAD Training Technologies, LLC
PipingDesignOnline Video Training
CAESAR II Statics: Quick Build Model
40.That is our second loop and we have one more loop to add in the model. Then, we clean it up,
and we are done with this model
41.So, get your second loop in the model. Many minor things went on in that session, but you
have to get them all right in order to use this capability. There are many different ways to
accomplish this, but get your model looking like the image above and then we are going to
drop in our third loop down the line.
75
Copyright© 2015 All Rights Reserved CAD Training Technologies, LLC
PipingDesignOnline Video Training
CAESAR II Statics: Quick Build Model
CAESAR II Statics: Quick Build Model Video Eight
(Reference Video: C2_S_Quick_Build_V8)
1. We have loop one, and loop two and we need to insert the third loop, which is going to come in
around the section indicated below down here between nodes 150 and 160. So, you have 50
to 69, 90 to 100, and then 150 to 160.
2. We want to drop in the loop the same way we did it before, except we are going to do this one
graphically.
Roll your mouse wheel to zoom in. This group of elements is the ones we want to duplicate.
50
60
90
100
150
160
76
Copyright© 2015 All Rights Reserved CAD Training Technologies, LLC
PipingDesignOnline Video Training
CAESAR II Statics: Quick Build Model
3. How do you select a group of elements graphically? We use the Select commands. We have
two selection options we can choose from:
• One is an arrow without a box behind it called Select Element
• The second one has an arrow with a box behind it called Select Group. The box in the
image indicates that this is used to select a group.
You can select a single element. Click Single Element and then select the element as
indicated below:
4. You can see the element selected.
Click Classic Piping Input to see the element is element 1360 to
1370.
Select the piping indicated below and then click Classic
Piping Input.
5. Select Element is a very easy way to identify, on the plot, an element that you wish to learn
more about by looking at the input.
77
Copyright© 2015 All Rights Reserved CAD Training Technologies, LLC
PipingDesignOnline Video Training
CAESAR II Statics: Quick Build Model
6. We however, want to select a group.
Click Select Group.
7. We are not in a great position to select a group now, because if I select a group, I draw a box
around it. It does not matter whether you go left to right, or right to left.
8. I want to select all the elements, but not too many elements. I can also shift-click other
elements.
Click and drag the mouse to select the elements as indicated below:
9. We need one more element in the drawing, so we shift click on the piece of pipe.
SHIFT-click and select the element as indicated below:
10.We now have our group of elements. We have a group defined.
Notice in the images to the left that the section
between the elbow and the restraint is not
highlighted until after the SHIFT Click
78
Copyright© 2015 All Rights Reserved CAD Training Technologies, LLC
PipingDesignOnline Video Training
CAESAR II Statics: Quick Build Model
11.Notice that we do not have all the node numbers available that we saw in the list option, but we
can use the following options to do what we need to do:
12.We want to duplicate this loop.
Click Duplicate.
We see that same Block Duplicate window, but it does not have the other two selections. This
is why it is preferable to use the List function, because it gives us that extra flexibility. Right
now, when we do this block duplicate, the only place CAESAR II can place the new block of
data is at the end of the input.
Missing the other two selections that are
available in the List feature
Only able to insert the new
block of data At End of Input
79
Copyright© 2015 All Rights Reserved CAD Training Technologies, LLC
PipingDesignOnline Video Training
CAESAR II Statics: Quick Build Model
13.Type 1000 in the Node Increment box.
Remember, we added 1000 to get to this loop in the model, so we're going to add 1000 to the
next set to get. Our largest node inside the blocks is 1,400. Now it's going to go to 2,400.
14.Click OK. So where is our new loop? Well the loop was duplicated, but we have a bigger
model, and so it is going to be at the beginning, if there is no node to match, or it's going to be
somewhere down the line.
15.Click Zoom Extents.
16.As expected, the loop inserted at the beginning of the system, because there's no common
node number between this new group and the existing system.
17.This loop appears in the beginning of the model, because that's the origin. However, if we turn
the element list back on the data is at the bottom of the list.
Click Classic Piping Input, and then click to display the Elements list at the bottom.
80
Copyright© 2015 All Rights Reserved CAD Training Technologies, LLC
PipingDesignOnline Video Training
CAESAR II Statics: Quick Build Model
18.Click Elements.
19.Look at the bottom of the list to see the new loop 1,090 to 1,100, because we were duplicating
90 to 100.
20.Our issue now is that we need to push this back to where it belongs in our model. We can, at
this point, duplicate it again and drop it. We move the cursor up to the row above 150 to 160,
right there at row 26 which is 140 to 150.
Use the up arrow key to move the dotted box around 36 to box 26.
21.So we have changed our insertion point to 140 to 150.
Right-click the highlighted block, and then navigate to Block Operation > Change
Sequence.
81
Copyright© 2015 All Rights Reserved CAD Training Technologies, LLC
PipingDesignOnline Video Training
CAESAR II Statics: Quick Build Model
What this does is basically move the block to a new location.
22.We can either have the block Follow an element or Precede an element.
Click Follow.
23.You receive a crosshair.
24.Using this crosshair we just click on the row we want to follow.
Click row 26, and you should see the block move up below 26.
So as you can see it moved below row 26, which is 140 to 150. Row 27 Is 1,090, row 33 is
1,100, and at row 34 is that other element that we will eventually delete.
25.Let's button up some of these details. Row 27 is not 1090, but instead, 150.
Type 150 in the From Node column for row 27.
26.Click OK for the Global Coordinates.
82
Copyright© 2015 All Rights Reserved CAD Training Technologies, LLC
PipingDesignOnline Video Training
CAESAR II Statics: Quick Build Model
27.Make sure that we don't have any data on that line
that we should change nodes, out here. What else
is going on at 150? We have our elbow at 2,350, with
these extra nodes, but those are not affected by
changing this node, 150. Click Classic Piping
Input.
28.Click 1100 to look at the other end and that one should be
160. Let’s go to the Classic Piping Input to change instead.
Click Classic Piping Input.
We want to change this element to end at 160. Notice that 1100 already has restraints and it
is up to us to change the restrains to 160. That's the nice thing of using these commands in
CAESAR II.
Type 160 in the To box, the Node box for the +Y support, and the Node box for the Guide
support, respectively.
29.If you use a re-number command and it changes these numbers, it'll automatically update
these, as well. But we're doing this one by hand, so we added that in there. Just like we did in
the other cases, we have to come in and delete an element. This one is the one between 150
and 160.
Extra nodes at 2350
83
Copyright© 2015 All Rights Reserved CAD Training Technologies, LLC
PipingDesignOnline Video Training
CAESAR II Statics: Quick Build Model
30.Select Row 34.
31.We could also do this graphically, it's already highlighted. Also we could select it with the
Select Element tool. Since it is already highlighted let’s just use the Delete command.
Click Delete.
Click Yes to delete the element.
32.We now have our model with the three loops.
We are not done with this model, but let’s quickly look at it and make sure it makes some
sense. Close the windows and use the mouse wheel to scroll out and review the model.
33.That looks about right.
84
Copyright© 2015 All Rights Reserved CAD Training Technologies, LLC
PipingDesignOnline Video Training
CAESAR II Statics: Quick Build Model
34.Click Start Run to run an error check and make sure we didn't cause
any errors in this work. We are just running the error check; we are not
going to run the model.
35.We can see that there a not any errors, or warnings. We just have this one note, the center of
gravity report. For your information, my total dead weight of the system right now is 119,162N.
36.If our numbers don't match, one of us might be wrong. With that, we can then go to one more
step where we are going to finish it out. In the next session we are going to change the loop
size in the second and third loops, and we are going to add some extra restraints. So get your
model to this point, and we can continue.
85
Copyright© 2015 All Rights Reserved CAD Training Technologies, LLC
PipingDesignOnline Video Training
CAESAR II Statics: Quick Build Model
CAESAR II Statics: Quick Build Model Video Nine
(Reference Video: C2_S_Quick_Build_V9)
1. We now have our three loops in the model, and we are at the point in the build where we can
renumber our system and make it consistent from one to the other.
2. We could do that graphically. We could highlight the entire model to select the entire model.
However, we are going to use the List feature.
3. Click Classic Piping input and then click to set the Classic
Piping input to the left.
4. Right now, we only have the Classic Piping Input, but we want to show the Element list.
Navigate to Edit > List > Elements.
86
Copyright© 2015 All Rights Reserved CAD Training Technologies, LLC
PipingDesignOnline Video Training
CAESAR II Statics: Quick Build Model
5. You can see the entire model in the element list. The first element is 10 to 20. You can see
the loops in here 350 to 400, 1350 to 1400, and 2350 to 2400.
6. We want to highlight the entire model.
Click Row 1, and then scroll to the last line.
7. SHIFT-click line 41.
87
Copyright© 2015 All Rights Reserved CAD Training Technologies, LLC
PipingDesignOnline Video Training
CAESAR II Statics: Quick Build Model
8. We have the block highlighted.
9. Right-click, and then select Block Operation > Nodes.
88
Copyright© 2015 All Rights Reserved CAD Training Technologies, LLC
PipingDesignOnline Video Training
CAESAR II Statics: Quick Build Model
10.We are now looking at the Block Renumber window. We do not want to increment the
numbers and we do not want to add or subtract a number from all these numbers. Instead, we
want to renumber the entire sequence.
Select Renumber, and we now have available to us both the Start Node, and the
Increment Node.
11.We are going to start at Node 10 and we want to increment by 10.
Type 10 in the Start Node and then type 10 in the Node Increment.
This is going to make it number in order 10 to 20, 20 to 30, and so on.
Click OK.
89
Copyright© 2015 All Rights Reserved CAD Training Technologies, LLC
PipingDesignOnline Video Training
CAESAR II Statics: Quick Build Model
12.The model has not changed. What did change was the node
numbers. So now, we have 10 to 20, 20 to 30, 30 to 40, and so
on.
13.This did not just change the main point, but all the node numbers
for the elbows, and the restraints changed as well.
14.Click , and then click to turn the node
numbers back on back on.
We now see 10, 20, 30, 40, 50, 60, and so on.
15.Let's take a look at the two loops. The first loop is 3,750 to the back corner
90
Copyright© 2015 All Rights Reserved CAD Training Technologies, LLC
PipingDesignOnline Video Training
CAESAR II Statics: Quick Build Model
16.The second loop is also 3,750 to the back corner.
17.However, this second loop though is a little bit larger it should be 4,500. There are a few ways
we could change this length.
18.We could go back to Classic Piping Input, delete the 3750, and then type minus 4500.
Select the 170 to 180 pipe, and then click Classic Piping Input.
Type -4500 in the DZ box. That element is now 4,500.
91
Copyright© 2015 All Rights Reserved CAD Training Technologies, LLC
PipingDesignOnline Video Training
CAESAR II Statics: Quick Build Model
19.If we look at my plot from the top, we can see the changes.
Click Top.
Scroll in to the second loop using the mouse wheel to see the change in lengths.
20.We see that the whole run moved up on the trailing end, so we have to change that one well
as.
Select the 190 to 200 pipe, and then click Classic Piping Input.
Type 4500 in the DZ box. This loop is now full size.
92
Copyright© 2015 All Rights Reserved CAD Training Technologies, LLC
PipingDesignOnline Video Training
CAESAR II Statics: Quick Build Model
21.Move down the line to the next loop.
22.We are going to this last loop differently. We are looking down from the top, down the y-axis.
23. We have an interactive feature in CAESAR II that allows us to move
geometry. The buttons we want to use are going to be the Move Geometry
group shown below.
24.Element 290 to 300 is 3,750, and element 310 to 320 is 3,750.
93
Copyright© 2015 All Rights Reserved CAD Training Technologies, LLC
PipingDesignOnline Video Training
CAESAR II Statics: Quick Build Model
25.We could change these two individual element lengths either through the Classic Piping Input
or through the List feature. Instead, we are going to use the Move Geometry feature.
26.Move Geometry works like this:
• We get to a view where we can easily stretch the loop out. We are going to go from 3,750
up to 5,000. Therefore, we want to increase the loop by 1,250. It is convenient for us to
look down the y-axis if we want to stretch it in the negative z direction.
27.Click Move Geometry.
28.We are going to move the red targets that you see below:
29.These targets are at every node in the piping system. We clicked Move
Geometry, but if you notice, CAESAR II activated the second button
Move Geometry (X-Axis). This button means we can move in the x direction.
30.If we want to move in the y direction, we click Move Geometry (Y-Axis) to highlight it. If we
want to move in the z direction, we click Move Geometry (Z-Axis).
31.We want to move geometry in the z direction. Click Move Geometry (Z-Axis).
32.Click and drag your mouse to draw a box around the two targets at nodes 300 and 310
to highlight the two of those.
94
Copyright© 2015 All Rights Reserved CAD Training Technologies, LLC
PipingDesignOnline Video Training
CAESAR II Statics: Quick Build Model
33.You can see that they change color to yellow.
34.Click the target at 300, let go of the mouse, and then push your mouse in the negative z
direction. You can see the increment that we are getting is in mm.
35.We want to add 1250 to the line, so we could either find 1250 by hand, or type in minus 1,250.
Type -1250 and then press Enter.
36.CAESAR II drops the line 1250mm back.
95
Copyright© 2015 All Rights Reserved CAD Training Technologies, LLC
PipingDesignOnline Video Training
CAESAR II Statics: Quick Build Model
37.CAESAR II pulled the two nodes back in the element between them. If we hover over the pipe
with the Selection tool, we can see it is now 5,000.
Click the Selection Tool, and then hover over the 290 to 300 element.
38.This 5000 is the length we want. You can see that this is just one of the ways you can stretch
your model. If we had 20 elements in here, they all would have come with us. It is a very nice
way to pull around your geometry. You could also reorient the loop, or you could make it a
vertical loop by changing not just the z direction, but also the z and the y direction in a single
step.
39.If we wanted to go in more than one direction, we just separate the three numbers by commas.
So it would be x, y, z. That's my loop.
40.Let's go back to our original view. Click SE Iso.
96
Copyright© 2015 All Rights Reserved CAD Training Technologies, LLC
PipingDesignOnline Video Training
CAESAR II Statics: Quick Build Model
41.Click to turn off the node numbers.
42.You can now see that we have different sizes of loops in the model.
43.Now, there are a few more things to do to clean up this model. We have to add a couple more
restraints. We do not have a restraint on run 10 to 20, and we have to support our loops.
44.One final change will be to add some line stops in the system. Use the Stretch command or
just type in the changes. Remember the parameters for the loops are:
• First loop is 3,750
• Second loop is 4,500
• Third loop is 5,000
45.Get those three loop lengths in the model, and then come back to the videos, and we will drop
in the remaining restraints.
97
Copyright© 2015 All Rights Reserved CAD Training Technologies, LLC
PipingDesignOnline Video Training
CAESAR II Statics: Quick Build Model
CAESAR II Statics: Quick Build Model Video Ten
(Reference Video: C2_S_Quick_Build_V10)
1. We now have our three loops of different sizes in the model, we have reset our node numbers
throughout, but we want to add some other supports. We have to support the runs in the Z
direction. We never added them on the runs indicated below, including on our loops.
2. Click the first piece of pipe as indicated below.
3. Click Zoom to Selection to focus on the selected piece of pipe.
98
Copyright© 2015 All Rights Reserved CAD Training Technologies, LLC
PipingDesignOnline Video Training
CAESAR II Statics: Quick Build Model
4. This piece of pipe is six meters long, and we wish to drop in a support at the midpoint.
5. There are two ways to put a node in there in order to put the support, by using the Break
command.
Click Break.
• We can insert a single node at any point along the run and give it the new number to
find the distance from either the From end or the To end.
• We can use Insert Multiple Nodes. It now allows us to add several nodes in this run,
equally spaced. Since I said we wanted to put the node in the midpoint, we can make
two elements out of this, and get a midpoint mode.
99
Copyright© 2015 All Rights Reserved CAD Training Technologies, LLC
PipingDesignOnline Video Training
CAESAR II Statics: Quick Build Model
6. The Insert Multiple Nodes option provides the simplest way to do it. We do not have to worry
about the math of how far from one end or the other.
7. Select Insert Multiple Nodes.
8. Type 2 in the Total Number of Break Elements box.
9. Click elsewhere and CAESAR II automatically
specifies the Node Step.
So based on the node step it is going to go from 10 to 15 to 20.
10.We can use the option to Get Support From
Node in the piping system.
We are going to put a y support and a guide on the line.
We want to get a support from another node in the
system that has a y support and a guide. Node 50
has both of those. Therefore, we want to get
support from node 50.
Type 50 in the Get Support From Node box.
The support is not taken from that support; it is duplicating that support point. Now you can
see the guide and the y in the drawing.
11.If I look at Node 50, it is in the Z direction. While the support we just entered is in the x
direction. So you might ask yourself, how can that be the same support?
50
100
Copyright© 2015 All Rights Reserved CAD Training Technologies, LLC
PipingDesignOnline Video Training
CAESAR II Statics: Quick Build Model
12.We said duplicate the support on the element shown below.
Select the element shown below.
Click Classic Piping Input.
Notice that we did not call it a z support we called it a guide. A
guide is always perpendicular to the pipe. This was a fortunate
outcome because we have the guide perpendicular to the pipe.
The new one is in the x direction, and the old one is in the z
direction.
13.Let's go to the other end of the system, and take a look at that element.
Click Last Element.
Click Zoom to Selection.
You should now see the last element. This element is also six meters long. Indicated below
are the From node and the To node.
From
Node
To
Node
101
Copyright© 2015 All Rights Reserved CAD Training Technologies, LLC
PipingDesignOnline Video Training
CAESAR II Statics: Quick Build Model
Click Node Numbers , so we can confirm the From to To nodes. You can see
it is from 410 to 420.
We want to put 415 in the middle of the run, so we are again going to use the Break command.
These are also available by navigating to Model > Break. You will also notice that
CTRL+B, a hot key does the same thing.
14.So we can see the feature, we are going to do it by hand using the Single option.
Select Insert a Single Node.
Type 415 in the New Node Number box.
The distance from either 410 or 420 – let’s use 410 -- is 3,000.
Type 3000 in the Distance in (mm.) box.
102
Copyright© 2015 All Rights Reserved CAD Training Technologies, LLC
PipingDesignOnline Video Training
CAESAR II Statics: Quick Build Model
15.Now, go to the bottom of the window, and
type 50 in the Get Support From Node box.
16.Click OK and there's my restrainer of 415.
17.We need to put some more supports in the model, and this is where we could have improved
our duplication. We could have added the extra supports on the loops before we duplicated
anything. They are all going to have the same support point, three meters back on these runs.
103
Copyright© 2015 All Rights Reserved CAD Training Technologies, LLC
PipingDesignOnline Video Training
CAESAR II Statics: Quick Build Model
18.Let's quickly do it on the 70 to 80 run.
Click on element 70 to 80.
Click Break.
Use Insert Single Node.
Type 75 in the New Node Number box.
Type 3000 in the Distance from (mm.) box.
This time it is important, because this line is
not the same length as the other loop over.
Type 50 in the Get Support From Node box.
Click OK.
19.You can now see that we get the y support and the guide.
20.We need to remove the guide from this element, because we do not want guides in the loop.
Guides cannot grow the way we want them to.
104
Copyright© 2015 All Rights Reserved CAD Training Technologies, LLC
PipingDesignOnline Video Training
CAESAR II Statics: Quick Build Model
21.Click element 70 to 75, because that is the element where this restraint appears.
22.We normally put the action when you first get to that node. 75 is the first element, which
highlights 75. Click Classic Piping Input.
23.Delete the node and the type on the Guide, and then click elsewhere to change the
focus to confirm that the type removed.
24.I can duplicate 75 from now on. All I get is the y support.
25.Click element 90 to 100. Remember we are going in the positive z direction.
Click Break. I mentioned there is a button to break, using the Model menu to break,
or even CTRL+B to break. You find these little synonyms throughout CAESAR II.
Use Insert Single Node.
105
Copyright© 2015 All Rights Reserved CAD Training Technologies, LLC
PipingDesignOnline Video Training
CAESAR II Statics: Quick Build Model
Type 95 in the New Node Number box.
Distance from 100? That is easier. That is
the 3,000. These dimensions are unsigned.
It is not a vector it is just a length. So, that
is 3,000, positive or negative. Type 3000 in
the Distance from (mm.) box.
Type 75 in the Get Support From Node box.
Click OK.
26.Go down to the next loop.
27.You can see now why it would have been better if we put those on initially, because the
restraints would already be duplicated if we took that time.
28.Click the 4,500 length run 170 to 180.
Click Break.
Use Insert Single Node.
Type 175 in the New Node Number box.
Type 3000 in the Distance from (mm.) box.
Type 75 in the Get Support From Node box.
Click OK.
106
Copyright© 2015 All Rights Reserved CAD Training Technologies, LLC
PipingDesignOnline Video Training
CAESAR II Statics: Quick Build Model
29.Click element 190 to 200.
Click Break.
Use Insert Single Node.
Type 195 in the New Node Number box.
Distance from 200 is a number I know.
That's the 3000. Select From Node 200 and
then type 3000 in the Distance from (mm.)
box.
Type 75 in the Get Support From Node box.
Click OK.
30.Then the last two and we are done with this, and we will take a break, and then we'll finish up
this model.
31.Click element 290 to 300, which is five meters long.
107
Copyright© 2015 All Rights Reserved CAD Training Technologies, LLC
PipingDesignOnline Video Training
CAESAR II Statics: Quick Build Model
Press CTRL+B.
Use Insert Single Node.
Type 295 in the New Node Number box.
Distance from 290-- that's the right direction,
290 to 300 is 3,000. Type 3000 in the
Distance from (mm.) box.
Type 75 in the Get Support From Node box.
Click OK.
32.Now, the last one. Click element 310 to 320.
Click Break.
Use Insert Single Node.
Type 315 in the New Node Number box.
Distance from 320, coming back, is 3,000.
Select From Node 320 and then type 3000
in the Distance from (mm.) box.
Type 75 in the Get Support From Node box.
Click OK.
108
Copyright© 2015 All Rights Reserved CAD Training Technologies, LLC
PipingDesignOnline Video Training
CAESAR II Statics: Quick Build Model
33.So all of these supports are three meters off of the main run. Let’s take a look down the global
x-axis.
Click Right, and then click Node Numbers to turn off the node numbers.
34.Notice that all the supports should line up.
35.Note that we roll the mouse wheel to zoom in and zoom out. Notice that the vanishing point is
where the mouse cursor is in the screen. If you put it up in the right-hand part of the screen it
is going to vanish towards that point.
36.If you are going to use a mouse wheel to zoom, place your mouse where you want it on the
screen, at your center of your zoom in, or zoom out. That’s out model.
37.Let's reset our plot.
38.We have just one more thing to do. We are going to add some line stops on this line. We do
not have any axial supports on the main run, so we might need that for preventing large motion
for any kind of hammer event that happens to the system. Get the supports in the run, and
we'll get ready to wrap this up.
The support on the main run
The rack supports
So the anchor's out to the loops,
and then back out the other end.
109
Copyright© 2015 All Rights Reserved CAD Training Technologies, LLC
PipingDesignOnline Video Training
CAESAR II Statics: Quick Build Model
CAESAR II Statics: Quick Build Model Video Eleven
(Reference Video: C2_S_Quick_Build_V11)
1. Our task now is to add the extra line stops in this model. We want to put a line stop on the
third vent before the loop. We are going to put line stops at both nodes indicated below. We
can just drop them in as we get to those nodes.
2. At node 130, we are going to put a line stop. Select the element from node 120 to 130.
110
Copyright© 2015 All Rights Reserved CAD Training Technologies, LLC
PipingDesignOnline Video Training
CAESAR II Statics: Quick Build Model
3. A line stop is an axial restraint, so it is going to be in the x direction. We have highlighted the
element and we know that we are specifying restraints when we get to that node for the first
time. Click Classic Piping Input and we see the restraints at 130.
4. We want to add another restraint at 130 in the axial direction. Now we
know that is going to be in the global x direction, so we can type in x.
However, we get a more flexibility by calling it limit stop, or line stop.
Type 130 in the third Node, and then select LIM from the Type list.
5. This places an axial restraint on the run. This element goes in the x
direction; therefore, the new restraint is in the x direction.
6. If we go back to the model, we ask, “Where’s my restraint?” The restraint is on the centerline
and we cannot see it. However, if we go translucent with the pipe, which right now we are
showing the fancy shaded rendered view, but we can also add Translucent Objects to make it
translucent, and can now see inside the pipe.
Click Translucent Objects to see the restraint in the middle of the pipe.
7. Click Translucent Objects to turn it back off.
If you do not remember about Translucent Objects, you can change
the size of the restraint. The restraints are active right now, because
Show Restraints is on.
111
Copyright© 2015 All Rights Reserved CAD Training Technologies, LLC
PipingDesignOnline Video Training
CAESAR II Statics: Quick Build Model
Notice that we have a little drop-down arrow where you can change the size.
Click Largest to make them bigger and to see the restraints.
They are overly large, but that is just one other way you could modify that.
8. Move down the line to the other one, and click element 240 to 250.
112
Copyright© 2015 All Rights Reserved CAD Training Technologies, LLC
PipingDesignOnline Video Training
CAESAR II Statics: Quick Build Model
9. Click Classic Piping Input to view node 240 to 250.
10.Type 250 in the third Node box and then select LIM from the
Type list.
11.Go back to the model and look inside the pipe.
Click Translucent Object.
12.You can now see the line stop.
13.We have our system built, so let's do the error check for this model.
Click Start Run.
You see that this is a very clean model. There are no missing bends. CAESAR II does not
know if we are going in the right direction, but this is the first step in making sure we have a
good model. My total dead weight now is 122,391.4 N.
We break it down into pipe alone, insulation alone, refractory alone, fluid alone, and then we
add them up.
113
Copyright© 2015 All Rights Reserved CAD Training Technologies, LLC
PipingDesignOnline Video Training
CAESAR II Statics: Quick Build Model
The x,y,z coordinates are based on the origin of the piping system.
If we just wanted to pick a pure pipe alone over my entire model, which would be the center of
gravity. We have to go to that point in space, and grab that one point, then we can lift it up,
and it will not fall over. This is just the balancing point, the center of gravity.
14.We can run this model now. We are not that interested in the results for this exercise. This
exercise was using input capabilities efficiently to build models quicker. We are going to run it,
so we have some numbers to work with for use later on in this series. Let’s look at the load
cases.
15.Click Edit Static Load Case.
Our default load cases, the recommended load cases are the
operating case (weight (w) + temperature (T1) +, pressure (P))
and the installed case of weight plus pressure.
We also see our sustained
stress calculations.
Finally, the difference between these
two load cases, L1 and L2, will be the
strain range for the system. We'll call it
the expansion stress check.
114
Copyright© 2015 All Rights Reserved CAD Training Technologies, LLC
PipingDesignOnline Video Training
CAESAR II Statics: Quick Build Model
16.Load cases one and two we use for their structural information.
• The system and operation system (L1)
• The system, basically, at installation, with some pressure in it (L2)
• The third case is the expansion stress range (L3)
The first cases we use for structural response, load on the equipment, and position of the
piping system. The second two load cases we use for the code defined stress calculations.
17.Click Run the Analysis, and CAESAR II brings us to the
output processor.
18.Click 1 (OPE) W=T1+P1, and then select 3D Plot to look at the 3D plot of the operating
case.
115
Copyright© 2015 All Rights Reserved CAD Training Technologies, LLC
PipingDesignOnline Video Training
CAESAR II Statics: Quick Build Model
19.Roll the mouse wheel until your view is similar to the image below:
20.Click Deflected shape to see the deflected shape of the system.
21.The bronze colored pipe is the deflected shape, and the blue pipe is the original position.
116
Copyright© 2015 All Rights Reserved CAD Training Technologies, LLC
PipingDesignOnline Video Training
CAESAR II Statics: Quick Build Model
22.Now if you have trouble seeing any magnitude in the model you can increase the magnification
of the distorted shape. This is not to scale.
Click the drop-down arrow and then select Adjust Deflection Scale.
You can see the Displacement Scale Factor is 3.28. If we double that, it will doubly amplify
this result. Type 7, which is about twice that, in the Displacement Scale Factor box.
Yes, we could say that it increased.
You have different tools like this in CAESAR II. We are not going to review this data right now.
23.Use your mouse to move to the third loop with the longer run coming off it.
117
Copyright© 2015 All Rights Reserved CAD Training Technologies, LLC
PipingDesignOnline Video Training
CAESAR II Statics: Quick Build Model
24.Notice we are shoving it out a little more.
25.The guides at the end of the line prevent it from kicking out in the positive x direction.
26.So, that is our system.
27.Before we go on, we want to get a good list of these node numbers. In fact, now I realize that
we should have re-numbered the whole system one more time. Review this plot, or also, if you
wish, go back and look at some of the numbers, if you want to look at the numbers.
28.Click the inside x to close, because we want to stay in the output processor, but we just
want to get out of the plot processor.
118
Copyright© 2015 All Rights Reserved CAD Training Technologies, LLC
PipingDesignOnline Video Training
CAESAR II Statics: Quick Build Model
29.You can look at some of the other numbers. The first solution is Displacements, and then we
get our loads in the system from the final position, and then the stress from that. You can look
at those reports.
30.Notice, we also have an animation.
Click View Animation.
The DynPlot screen to view animation appears.
Click Maximize to make it full screen.
Scroll in to zoom in a little, and we are going to animate this model.
31.Listed are two ways to animate the model
• We have animate the center line (Motion)
• Or animate the volume (Volume Motion)
Click Volume Motion to animate the volume to look at the load case, the operating case.
119
Copyright© 2015 All Rights Reserved CAD Training Technologies, LLC
PipingDesignOnline Video Training
CAESAR II Statics: Quick Build Model
This other system is greatly exaggerated, but we get a good trend of what is happening in the
system. In the video, you see the three loops collapsing. Below an image represents these
collapsing loops.
32.You can see above that the third one collapsed the most, because of the longer runs at either
end. We can see the first line grows axially, and being bent out a little bit, because it is guided,
so it cannot slide out evenly.
33.We see a nice model that does not sag at all. We do not have any nodes in the midpoints to
see any sag. We just have our support points, so we are relying on good support spacing here
to make sure there is not excessive sag between these support points. Get your model to this
point, and then we will do one more session.
34.In the next session, we reset all the node numbers in the model, and then create an isometric
to record all those node numbers. We have a piece of paper in front of me with the node
numbers that we can reference when we look at the output. If we give the results to a
structures engineer, he will want to know where those node numbers are in his model. Finish
out this session with one more video, and then we will move on to the next job.
120
Copyright© 2015 All Rights Reserved CAD Training Technologies, LLC
PipingDesignOnline Video Training
CAESAR II Statics: Quick Build Model
CAESAR II Statics: Quick Build Model Video Twelve
(Reference Video: C2_S_Quick_Build_V12)
1. We now need to do one more item on this model. I typically put node numbers on the drawing
before I start the input session. It is good to know where all these nodes are going to be.
However, we were using some of these duplication features in CAESAR II, allowing CAESAR
II to enter its own nodes and kind of lost control of our node sequencing. In fact, we added
some more breakpoints in this model and we want to get those lined up.
2. What we want to do now is reset the node numbers throughout the system, make it nice and
clean, and then create a hard copy as a reference of those node numbers using Isogen. We
are going to create a drawing, a DWG file, with the node numbers on the drawing and then
print out a copy of that model.
3. The first step is to renumber the entire system. We want to use one of the selection arrows,
called Select Group.
Click Select Group.
Added Breakpoints
121
Copyright© 2015 All Rights Reserved CAD Training Technologies, LLC
PipingDesignOnline Video Training
CAESAR II Statics: Quick Build Model
4. Use your mouse to drag a box to select the entire model. Make sure you get it all.
5. Click Renumber.
6. We do not want Increment, we want to Renumber.
Select Renumber under Action in the Block Renumber dialog box.
7. We are going to start at 10 again and go by 10's, so 10 to
20 to 30 to 40, and so on.
Type 10 in the Start Node box, and then type 10 in the
Node Increment box.
122
Copyright© 2015 All Rights Reserved CAD Training Technologies, LLC
PipingDesignOnline Video Training
CAESAR II Statics: Quick Build Model
8. Click OK.
9. Select the drop-down arrow next to the single piece of paper, and then select Elements.
123
Copyright© 2015 All Rights Reserved CAD Training Technologies, LLC
PipingDesignOnline Video Training
CAESAR II Statics: Quick Build Model
10.Now you can see the nice clean data, 10, 20, 30. Remember we had node 15 in there, so this
is a very clean model. However, now we do not know where our nodes are.
11.Let's take a couple points in the list that are useful to put on our plot. Well, let's put the first
node—we should write down some of these node numbers-- node ten is our origin. We want to
show that on our plot.
124
Copyright© 2015 All Rights Reserved CAD Training Technologies, LLC
PipingDesignOnline Video Training
CAESAR II Statics: Quick Build Model
12.We are just going to come in to the points on either end of the loop, so node 60 begins that
loop and node 150 ends that first loop.
13.You get the drift. We are going to drop in the very last node in the model at node 500.
14.Let us go to a quick plot capability we have in CAESAR II. Save this model
by error checking it. Click Start Run. This automatically saves the model.
Make sure there are no errors. Yes, we can see this is the same model.
125
Copyright© 2015 All Rights Reserved CAD Training Technologies, LLC
PipingDesignOnline Video Training
CAESAR II Statics: Quick Build Model
15.Close the Piping Input window and go back to the main menu of CAESAR II.
16.Click Generate Stress Isometrics in the main menu.
This opens the C2Isogen - (QUICK BUILD) window.
126
Copyright© 2015 All Rights Reserved CAD Training Technologies, LLC
PipingDesignOnline Video Training
CAESAR II Statics: Quick Build Model
17.Let's assume you know nothing about Isogen, but you see the Create Isometric Drawing
button. Click Create Isometric Drawing.
18.We are going to Use Default Style (1). CAESAR II has already created a PCF, a piping
component file. Isogen reads the PCF file to create the plot, that nice drawing (2) of our model.
CAESAR II has a copy of personal Isogen shipped with it, so you can do this as well. We are
not going to edit the PCF; we are just going to use it (3). Select Use Default Style and then
click OK.
19.Now Isogen creates a DWG, a drawing file that we can review and annotate. Isogen actually
gave me three different drawing files, QUICK BUILD.DWG, QUICK BUILDA.DWG, and QUICK
BUILDB.DWG.
1
2
3
127
Copyright© 2015 All Rights Reserved CAD Training Technologies, LLC
PipingDesignOnline Video Training
CAESAR II Statics: Quick Build Model
20.Shift+click and select the third one to select them all.
21.Click View to view those files.
22.The machine I am using has AutoCAD installed on it, so it's going open up AutoCAD, because
it's associated with DWG files, and show me those three drawings. I am working with a two-
monitor system. I am just going to take these drawing files and lay them on top of this screen.
You now have opened the three drawing files. The one you see now is the third one.
23.Zoom into the tail end of the system on the right. You can see the anchor, the guide and
the y support.
Anchor
Guide
Y Support
128
Copyright© 2015 All Rights Reserved CAD Training Technologies, LLC
Libraries quick build_model

More Related Content

Viewers also liked

Fatigue analysis using caesar ii
Fatigue analysis using caesar iiFatigue analysis using caesar ii
Fatigue analysis using caesar iiRem Elems
 
Determination of Maximum Span Between Pipe Supports Using Maximum Bending Str...
Determination of Maximum Span Between Pipe Supports Using Maximum Bending Str...Determination of Maximum Span Between Pipe Supports Using Maximum Bending Str...
Determination of Maximum Span Between Pipe Supports Using Maximum Bending Str...IDES Editor
 
Tutorial caesars II
Tutorial caesars IITutorial caesars II
Tutorial caesars IImanuedlf
 
Piping design and flexibility analysis
Piping design and flexibility analysisPiping design and flexibility analysis
Piping design and flexibility analysisSarath Krishnakumar
 
[Point] pipe stress analysis by computer-caesar ii
[Point] pipe stress analysis by computer-caesar ii[Point] pipe stress analysis by computer-caesar ii
[Point] pipe stress analysis by computer-caesar iiLuis Luis
 
178680732 pipe-hanger-design
178680732 pipe-hanger-design178680732 pipe-hanger-design
178680732 pipe-hanger-designTiago Farinhas
 
Stress analysis method
Stress analysis methodStress analysis method
Stress analysis methodDavid Cohen
 
End of Session 2 Presentation 11-29-16 Corey Harpe EXTERNAL
End of Session 2 Presentation 11-29-16 Corey Harpe EXTERNALEnd of Session 2 Presentation 11-29-16 Corey Harpe EXTERNAL
End of Session 2 Presentation 11-29-16 Corey Harpe EXTERNALCorey Harpe
 
54414198 tutorial-pv-elite-2005 2
54414198 tutorial-pv-elite-2005 254414198 tutorial-pv-elite-2005 2
54414198 tutorial-pv-elite-2005 2Muhammad Iqbal
 
3D Modeling and Piping Stress Analysis for Heaters
3D Modeling and Piping Stress Analysis for Heaters3D Modeling and Piping Stress Analysis for Heaters
3D Modeling and Piping Stress Analysis for HeatersRishabh Engineering Services
 
Piping Stress Analysis of a Hypothetical Oil Refinery Plant Having Separate S...
Piping Stress Analysis of a Hypothetical Oil Refinery Plant Having Separate S...Piping Stress Analysis of a Hypothetical Oil Refinery Plant Having Separate S...
Piping Stress Analysis of a Hypothetical Oil Refinery Plant Having Separate S...IJSRD
 
2805_Worland-2805 - The Interoperability Advantage
2805_Worland-2805 - The Interoperability Advantage2805_Worland-2805 - The Interoperability Advantage
2805_Worland-2805 - The Interoperability AdvantageMatt Worland
 
Maximum Temperatures and Pressures to Run
Maximum Temperatures and Pressures to RunMaximum Temperatures and Pressures to Run
Maximum Temperatures and Pressures to RunEdgar Perez
 

Viewers also liked (18)

Fatigue analysis using caesar ii
Fatigue analysis using caesar iiFatigue analysis using caesar ii
Fatigue analysis using caesar ii
 
Determination of Maximum Span Between Pipe Supports Using Maximum Bending Str...
Determination of Maximum Span Between Pipe Supports Using Maximum Bending Str...Determination of Maximum Span Between Pipe Supports Using Maximum Bending Str...
Determination of Maximum Span Between Pipe Supports Using Maximum Bending Str...
 
Tutorial caesars II
Tutorial caesars IITutorial caesars II
Tutorial caesars II
 
Piping design and flexibility analysis
Piping design and flexibility analysisPiping design and flexibility analysis
Piping design and flexibility analysis
 
[Point] pipe stress analysis by computer-caesar ii
[Point] pipe stress analysis by computer-caesar ii[Point] pipe stress analysis by computer-caesar ii
[Point] pipe stress analysis by computer-caesar ii
 
178680732 pipe-hanger-design
178680732 pipe-hanger-design178680732 pipe-hanger-design
178680732 pipe-hanger-design
 
Engineering & Design of Pipe Supports
Engineering & Design of Pipe SupportsEngineering & Design of Pipe Supports
Engineering & Design of Pipe Supports
 
Stress analysis method
Stress analysis methodStress analysis method
Stress analysis method
 
Basic piping
Basic pipingBasic piping
Basic piping
 
End of Session 2 Presentation 11-29-16 Corey Harpe EXTERNAL
End of Session 2 Presentation 11-29-16 Corey Harpe EXTERNALEnd of Session 2 Presentation 11-29-16 Corey Harpe EXTERNAL
End of Session 2 Presentation 11-29-16 Corey Harpe EXTERNAL
 
Pv elite v8
Pv elite v8 Pv elite v8
Pv elite v8
 
54414198 tutorial-pv-elite-2005 2
54414198 tutorial-pv-elite-2005 254414198 tutorial-pv-elite-2005 2
54414198 tutorial-pv-elite-2005 2
 
3D Modeling and Piping Stress Analysis for Heaters
3D Modeling and Piping Stress Analysis for Heaters3D Modeling and Piping Stress Analysis for Heaters
3D Modeling and Piping Stress Analysis for Heaters
 
Vessel design
Vessel designVessel design
Vessel design
 
Piping Stress Analysis of a Hypothetical Oil Refinery Plant Having Separate S...
Piping Stress Analysis of a Hypothetical Oil Refinery Plant Having Separate S...Piping Stress Analysis of a Hypothetical Oil Refinery Plant Having Separate S...
Piping Stress Analysis of a Hypothetical Oil Refinery Plant Having Separate S...
 
2805_Worland-2805 - The Interoperability Advantage
2805_Worland-2805 - The Interoperability Advantage2805_Worland-2805 - The Interoperability Advantage
2805_Worland-2805 - The Interoperability Advantage
 
Base ring analysis
Base ring analysisBase ring analysis
Base ring analysis
 
Maximum Temperatures and Pressures to Run
Maximum Temperatures and Pressures to RunMaximum Temperatures and Pressures to Run
Maximum Temperatures and Pressures to Run
 

Similar to Libraries quick build_model

Advanced catia
Advanced catiaAdvanced catia
Advanced catiazvin
 
Data Warehousing (Practical Questions Paper) [CBSGS - 75:25 Pattern] {2015 Ma...
Data Warehousing (Practical Questions Paper) [CBSGS - 75:25 Pattern] {2015 Ma...Data Warehousing (Practical Questions Paper) [CBSGS - 75:25 Pattern] {2015 Ma...
Data Warehousing (Practical Questions Paper) [CBSGS - 75:25 Pattern] {2015 Ma...Mumbai B.Sc.IT Study
 
Installation of PC-Lint and its using in Visual Studio 2005
Installation of PC-Lint and its using in Visual Studio 2005Installation of PC-Lint and its using in Visual Studio 2005
Installation of PC-Lint and its using in Visual Studio 2005PVS-Studio
 
Part 4 working with databases
Part 4 working with databasesPart 4 working with databases
Part 4 working with databasestechbed
 
Connect Azure Data Factory (ADF) With Azure DevOps
Connect Azure Data Factory (ADF) With Azure DevOpsConnect Azure Data Factory (ADF) With Azure DevOps
Connect Azure Data Factory (ADF) With Azure DevOpskomal chauhan
 
Virtual CD4PE Workshop
Virtual CD4PE WorkshopVirtual CD4PE Workshop
Virtual CD4PE WorkshopPuppet
 
setting up client user.pdf
setting up client user.pdfsetting up client user.pdf
setting up client user.pdfMuhamad Badar
 
building-a-fdm-application-for-a-hfm-target
 building-a-fdm-application-for-a-hfm-target building-a-fdm-application-for-a-hfm-target
building-a-fdm-application-for-a-hfm-targetSid Mehta
 
Solid works tutorial08_bearingpuller_english_08_lr
Solid works tutorial08_bearingpuller_english_08_lrSolid works tutorial08_bearingpuller_english_08_lr
Solid works tutorial08_bearingpuller_english_08_lrAkira Tamashiro
 
TFS_Presenttation
TFS_PresenttationTFS_Presenttation
TFS_Presenttationaqtran2000
 
Diving into VS 2015 Day5
Diving into VS 2015 Day5Diving into VS 2015 Day5
Diving into VS 2015 Day5Akhil Mittal
 
VB.NET programming
VB.NET programmingVB.NET programming
VB.NET programmingElrey Belga
 
Improving Your Admin Image
Improving Your Admin ImageImproving Your Admin Image
Improving Your Admin Imageelisemoss
 
CIC_Manual.pdf
CIC_Manual.pdfCIC_Manual.pdf
CIC_Manual.pdfRMani7
 

Similar to Libraries quick build_model (20)

Advanced catia
Advanced catiaAdvanced catia
Advanced catia
 
Data Warehousing (Practical Questions Paper) [CBSGS - 75:25 Pattern] {2015 Ma...
Data Warehousing (Practical Questions Paper) [CBSGS - 75:25 Pattern] {2015 Ma...Data Warehousing (Practical Questions Paper) [CBSGS - 75:25 Pattern] {2015 Ma...
Data Warehousing (Practical Questions Paper) [CBSGS - 75:25 Pattern] {2015 Ma...
 
Installation of PC-Lint and its using in Visual Studio 2005
Installation of PC-Lint and its using in Visual Studio 2005Installation of PC-Lint and its using in Visual Studio 2005
Installation of PC-Lint and its using in Visual Studio 2005
 
Part 4 working with databases
Part 4 working with databasesPart 4 working with databases
Part 4 working with databases
 
Connect Azure Data Factory (ADF) With Azure DevOps
Connect Azure Data Factory (ADF) With Azure DevOpsConnect Azure Data Factory (ADF) With Azure DevOps
Connect Azure Data Factory (ADF) With Azure DevOps
 
Virtual CD4PE Workshop
Virtual CD4PE WorkshopVirtual CD4PE Workshop
Virtual CD4PE Workshop
 
Vhdl design flow
Vhdl design flowVhdl design flow
Vhdl design flow
 
setting up client user.pdf
setting up client user.pdfsetting up client user.pdf
setting up client user.pdf
 
Gitops Hands On
Gitops Hands OnGitops Hands On
Gitops Hands On
 
ID E's features
ID E's featuresID E's features
ID E's features
 
Easyeda tutorial
Easyeda tutorialEasyeda tutorial
Easyeda tutorial
 
MDT Step public
MDT Step publicMDT Step public
MDT Step public
 
Netbeans gui tutorial
Netbeans gui tutorialNetbeans gui tutorial
Netbeans gui tutorial
 
building-a-fdm-application-for-a-hfm-target
 building-a-fdm-application-for-a-hfm-target building-a-fdm-application-for-a-hfm-target
building-a-fdm-application-for-a-hfm-target
 
Solid works tutorial08_bearingpuller_english_08_lr
Solid works tutorial08_bearingpuller_english_08_lrSolid works tutorial08_bearingpuller_english_08_lr
Solid works tutorial08_bearingpuller_english_08_lr
 
TFS_Presenttation
TFS_PresenttationTFS_Presenttation
TFS_Presenttation
 
Diving into VS 2015 Day5
Diving into VS 2015 Day5Diving into VS 2015 Day5
Diving into VS 2015 Day5
 
VB.NET programming
VB.NET programmingVB.NET programming
VB.NET programming
 
Improving Your Admin Image
Improving Your Admin ImageImproving Your Admin Image
Improving Your Admin Image
 
CIC_Manual.pdf
CIC_Manual.pdfCIC_Manual.pdf
CIC_Manual.pdf
 

Recently uploaded

Introduction to IEEE STANDARDS and its different types.pptx
Introduction to IEEE STANDARDS and its different types.pptxIntroduction to IEEE STANDARDS and its different types.pptx
Introduction to IEEE STANDARDS and its different types.pptxupamatechverse
 
Current Transformer Drawing and GTP for MSETCL
Current Transformer Drawing and GTP for MSETCLCurrent Transformer Drawing and GTP for MSETCL
Current Transformer Drawing and GTP for MSETCLDeelipZope
 
Software Development Life Cycle By Team Orange (Dept. of Pharmacy)
Software Development Life Cycle By  Team Orange (Dept. of Pharmacy)Software Development Life Cycle By  Team Orange (Dept. of Pharmacy)
Software Development Life Cycle By Team Orange (Dept. of Pharmacy)Suman Mia
 
Introduction to Multiple Access Protocol.pptx
Introduction to Multiple Access Protocol.pptxIntroduction to Multiple Access Protocol.pptx
Introduction to Multiple Access Protocol.pptxupamatechverse
 
Processing & Properties of Floor and Wall Tiles.pptx
Processing & Properties of Floor and Wall Tiles.pptxProcessing & Properties of Floor and Wall Tiles.pptx
Processing & Properties of Floor and Wall Tiles.pptxpranjaldaimarysona
 
Call Girls Delhi {Jodhpur} 9711199012 high profile service
Call Girls Delhi {Jodhpur} 9711199012 high profile serviceCall Girls Delhi {Jodhpur} 9711199012 high profile service
Call Girls Delhi {Jodhpur} 9711199012 high profile servicerehmti665
 
High Profile Call Girls Nashik Megha 7001305949 Independent Escort Service Na...
High Profile Call Girls Nashik Megha 7001305949 Independent Escort Service Na...High Profile Call Girls Nashik Megha 7001305949 Independent Escort Service Na...
High Profile Call Girls Nashik Megha 7001305949 Independent Escort Service Na...Call Girls in Nagpur High Profile
 
Sheet Pile Wall Design and Construction: A Practical Guide for Civil Engineer...
Sheet Pile Wall Design and Construction: A Practical Guide for Civil Engineer...Sheet Pile Wall Design and Construction: A Practical Guide for Civil Engineer...
Sheet Pile Wall Design and Construction: A Practical Guide for Civil Engineer...Dr.Costas Sachpazis
 
Model Call Girl in Narela Delhi reach out to us at 🔝8264348440🔝
Model Call Girl in Narela Delhi reach out to us at 🔝8264348440🔝Model Call Girl in Narela Delhi reach out to us at 🔝8264348440🔝
Model Call Girl in Narela Delhi reach out to us at 🔝8264348440🔝soniya singh
 
(MEERA) Dapodi Call Girls Just Call 7001035870 [ Cash on Delivery ] Pune Escorts
(MEERA) Dapodi Call Girls Just Call 7001035870 [ Cash on Delivery ] Pune Escorts(MEERA) Dapodi Call Girls Just Call 7001035870 [ Cash on Delivery ] Pune Escorts
(MEERA) Dapodi Call Girls Just Call 7001035870 [ Cash on Delivery ] Pune Escortsranjana rawat
 
High Profile Call Girls Nagpur Meera Call 7001035870 Meet With Nagpur Escorts
High Profile Call Girls Nagpur Meera Call 7001035870 Meet With Nagpur EscortsHigh Profile Call Girls Nagpur Meera Call 7001035870 Meet With Nagpur Escorts
High Profile Call Girls Nagpur Meera Call 7001035870 Meet With Nagpur EscortsCall Girls in Nagpur High Profile
 
Study on Air-Water & Water-Water Heat Exchange in a Finned Tube Exchanger
Study on Air-Water & Water-Water Heat Exchange in a Finned Tube ExchangerStudy on Air-Water & Water-Water Heat Exchange in a Finned Tube Exchanger
Study on Air-Water & Water-Water Heat Exchange in a Finned Tube ExchangerAnamika Sarkar
 
VIP Call Girls Service Hitech City Hyderabad Call +91-8250192130
VIP Call Girls Service Hitech City Hyderabad Call +91-8250192130VIP Call Girls Service Hitech City Hyderabad Call +91-8250192130
VIP Call Girls Service Hitech City Hyderabad Call +91-8250192130Suhani Kapoor
 
MANUFACTURING PROCESS-II UNIT-2 LATHE MACHINE
MANUFACTURING PROCESS-II UNIT-2 LATHE MACHINEMANUFACTURING PROCESS-II UNIT-2 LATHE MACHINE
MANUFACTURING PROCESS-II UNIT-2 LATHE MACHINESIVASHANKAR N
 
HARMONY IN THE NATURE AND EXISTENCE - Unit-IV
HARMONY IN THE NATURE AND EXISTENCE - Unit-IVHARMONY IN THE NATURE AND EXISTENCE - Unit-IV
HARMONY IN THE NATURE AND EXISTENCE - Unit-IVRajaP95
 
Introduction and different types of Ethernet.pptx
Introduction and different types of Ethernet.pptxIntroduction and different types of Ethernet.pptx
Introduction and different types of Ethernet.pptxupamatechverse
 
ZXCTN 5804 / ZTE PTN / ZTE POTN / ZTE 5804 PTN / ZTE POTN 5804 ( 100/200 GE Z...
ZXCTN 5804 / ZTE PTN / ZTE POTN / ZTE 5804 PTN / ZTE POTN 5804 ( 100/200 GE Z...ZXCTN 5804 / ZTE PTN / ZTE POTN / ZTE 5804 PTN / ZTE POTN 5804 ( 100/200 GE Z...
ZXCTN 5804 / ZTE PTN / ZTE POTN / ZTE 5804 PTN / ZTE POTN 5804 ( 100/200 GE Z...ZTE
 
What are the advantages and disadvantages of membrane structures.pptx
What are the advantages and disadvantages of membrane structures.pptxWhat are the advantages and disadvantages of membrane structures.pptx
What are the advantages and disadvantages of membrane structures.pptxwendy cai
 
GDSC ASEB Gen AI study jams presentation
GDSC ASEB Gen AI study jams presentationGDSC ASEB Gen AI study jams presentation
GDSC ASEB Gen AI study jams presentationGDSCAESB
 

Recently uploaded (20)

Introduction to IEEE STANDARDS and its different types.pptx
Introduction to IEEE STANDARDS and its different types.pptxIntroduction to IEEE STANDARDS and its different types.pptx
Introduction to IEEE STANDARDS and its different types.pptx
 
Current Transformer Drawing and GTP for MSETCL
Current Transformer Drawing and GTP for MSETCLCurrent Transformer Drawing and GTP for MSETCL
Current Transformer Drawing and GTP for MSETCL
 
Software Development Life Cycle By Team Orange (Dept. of Pharmacy)
Software Development Life Cycle By  Team Orange (Dept. of Pharmacy)Software Development Life Cycle By  Team Orange (Dept. of Pharmacy)
Software Development Life Cycle By Team Orange (Dept. of Pharmacy)
 
Introduction to Multiple Access Protocol.pptx
Introduction to Multiple Access Protocol.pptxIntroduction to Multiple Access Protocol.pptx
Introduction to Multiple Access Protocol.pptx
 
Processing & Properties of Floor and Wall Tiles.pptx
Processing & Properties of Floor and Wall Tiles.pptxProcessing & Properties of Floor and Wall Tiles.pptx
Processing & Properties of Floor and Wall Tiles.pptx
 
Exploring_Network_Security_with_JA3_by_Rakesh Seal.pptx
Exploring_Network_Security_with_JA3_by_Rakesh Seal.pptxExploring_Network_Security_with_JA3_by_Rakesh Seal.pptx
Exploring_Network_Security_with_JA3_by_Rakesh Seal.pptx
 
Call Girls Delhi {Jodhpur} 9711199012 high profile service
Call Girls Delhi {Jodhpur} 9711199012 high profile serviceCall Girls Delhi {Jodhpur} 9711199012 high profile service
Call Girls Delhi {Jodhpur} 9711199012 high profile service
 
High Profile Call Girls Nashik Megha 7001305949 Independent Escort Service Na...
High Profile Call Girls Nashik Megha 7001305949 Independent Escort Service Na...High Profile Call Girls Nashik Megha 7001305949 Independent Escort Service Na...
High Profile Call Girls Nashik Megha 7001305949 Independent Escort Service Na...
 
Sheet Pile Wall Design and Construction: A Practical Guide for Civil Engineer...
Sheet Pile Wall Design and Construction: A Practical Guide for Civil Engineer...Sheet Pile Wall Design and Construction: A Practical Guide for Civil Engineer...
Sheet Pile Wall Design and Construction: A Practical Guide for Civil Engineer...
 
Model Call Girl in Narela Delhi reach out to us at 🔝8264348440🔝
Model Call Girl in Narela Delhi reach out to us at 🔝8264348440🔝Model Call Girl in Narela Delhi reach out to us at 🔝8264348440🔝
Model Call Girl in Narela Delhi reach out to us at 🔝8264348440🔝
 
(MEERA) Dapodi Call Girls Just Call 7001035870 [ Cash on Delivery ] Pune Escorts
(MEERA) Dapodi Call Girls Just Call 7001035870 [ Cash on Delivery ] Pune Escorts(MEERA) Dapodi Call Girls Just Call 7001035870 [ Cash on Delivery ] Pune Escorts
(MEERA) Dapodi Call Girls Just Call 7001035870 [ Cash on Delivery ] Pune Escorts
 
High Profile Call Girls Nagpur Meera Call 7001035870 Meet With Nagpur Escorts
High Profile Call Girls Nagpur Meera Call 7001035870 Meet With Nagpur EscortsHigh Profile Call Girls Nagpur Meera Call 7001035870 Meet With Nagpur Escorts
High Profile Call Girls Nagpur Meera Call 7001035870 Meet With Nagpur Escorts
 
Study on Air-Water & Water-Water Heat Exchange in a Finned Tube Exchanger
Study on Air-Water & Water-Water Heat Exchange in a Finned Tube ExchangerStudy on Air-Water & Water-Water Heat Exchange in a Finned Tube Exchanger
Study on Air-Water & Water-Water Heat Exchange in a Finned Tube Exchanger
 
VIP Call Girls Service Hitech City Hyderabad Call +91-8250192130
VIP Call Girls Service Hitech City Hyderabad Call +91-8250192130VIP Call Girls Service Hitech City Hyderabad Call +91-8250192130
VIP Call Girls Service Hitech City Hyderabad Call +91-8250192130
 
MANUFACTURING PROCESS-II UNIT-2 LATHE MACHINE
MANUFACTURING PROCESS-II UNIT-2 LATHE MACHINEMANUFACTURING PROCESS-II UNIT-2 LATHE MACHINE
MANUFACTURING PROCESS-II UNIT-2 LATHE MACHINE
 
HARMONY IN THE NATURE AND EXISTENCE - Unit-IV
HARMONY IN THE NATURE AND EXISTENCE - Unit-IVHARMONY IN THE NATURE AND EXISTENCE - Unit-IV
HARMONY IN THE NATURE AND EXISTENCE - Unit-IV
 
Introduction and different types of Ethernet.pptx
Introduction and different types of Ethernet.pptxIntroduction and different types of Ethernet.pptx
Introduction and different types of Ethernet.pptx
 
ZXCTN 5804 / ZTE PTN / ZTE POTN / ZTE 5804 PTN / ZTE POTN 5804 ( 100/200 GE Z...
ZXCTN 5804 / ZTE PTN / ZTE POTN / ZTE 5804 PTN / ZTE POTN 5804 ( 100/200 GE Z...ZXCTN 5804 / ZTE PTN / ZTE POTN / ZTE 5804 PTN / ZTE POTN 5804 ( 100/200 GE Z...
ZXCTN 5804 / ZTE PTN / ZTE POTN / ZTE 5804 PTN / ZTE POTN 5804 ( 100/200 GE Z...
 
What are the advantages and disadvantages of membrane structures.pptx
What are the advantages and disadvantages of membrane structures.pptxWhat are the advantages and disadvantages of membrane structures.pptx
What are the advantages and disadvantages of membrane structures.pptx
 
GDSC ASEB Gen AI study jams presentation
GDSC ASEB Gen AI study jams presentationGDSC ASEB Gen AI study jams presentation
GDSC ASEB Gen AI study jams presentation
 

Libraries quick build_model

  • 1. CAESAR II® Statics Video Training Series The Quick Build Model A look at using repetitive geometry to speed up your modeling process. Copyright© 2015 CAD Training Technologies, LLC All Rights Reserved No duplication permitted without express written consent
  • 2. PipingDesignOnline Video Training CAESAR II Statics: Quick Build Model CAESAR II Statics: Quick Build Model Video One (Reference Video: C2_S_Quick_Build_V1) 1. In this session, we are going to review developing input in CAESAR II and trying to get efficient in the way we develop the model. I usually encourage users to put node numbers on their drawings before they start developing their input in CAESAR II. This way, they can develop strategies on creating the proper sequence in the system and finding points where they have to return. For example, at a T where you have to pick up off another line. It's good to get these notes set on the drawing before you get started. You might see certain patterns that you wish to use in duplication when you build your model. 2. Before we get involved with that, I want to review something regarding the units. You are going to be using the configuration file and the units file that we ship with this training series. Let’s take a look at what we get with CAESAR II when we start off with a new folder. 3. From the Home tab of CAESAR II, we are going to build a new folder underneath the current CAESAR II models. Right now, I'm looking at the model called Simple. If you click Piping Input, the Simple model displays. 4. Before we do that, let’s create a new folder. Click Open. 1 Copyright© 2015 All Rights Reserved CAD Training Technologies, LLC
  • 3. PipingDesignOnline Video Training CAESAR II Statics: Quick Build Model We now see all the files in the current folder, the CAESAR II Models folder. Right-click > New > Folder. The new folder places in the CAESAR II Models folder. No need to change the name, we're just going to use this for today’s exercise. Click Cancel. 2 Copyright© 2015 All Rights Reserved CAD Training Technologies, LLC
  • 4. PipingDesignOnline Video Training CAESAR II Statics: Quick Build Model 5. We now want to change our folder. Click File. We see an option in the File menu called Set Default Data Directory. We want to point to that new folder. On your machine, it might not show this menu item. If it does not show, there should be a down arrow or chevron at the bottom of the screen. Click on that chevron, and it shows you the entire window. 6. Click Set Default Data Directory. 7. Click the Browse ellipsis and navigate to: CAESAR_II_Statics_Support_Files > CAESAR II Models > New Folder. 3 Copyright© 2015 All Rights Reserved CAD Training Technologies, LLC
  • 5. PipingDesignOnline Video Training CAESAR II Statics: Quick Build Model 8. Click OK. We are now pointing to the folder where we can complete the session. 9. Click OK. 10.The CAESAR II title bar now shows the following: CAESAR_II_STATICS_SUPPORT_FILES/CAESAR_II_MODELS/NEW FOLDER_UNTITLED. There is no declared file in this folder, so it just read untiled. We now want to create a new file. Click New. 11.Type quick build in the Enter the name for the NEW job file box. You can have space in the name; however, we have a limit on the number of characters. We should also be concerned on the length of the folder name, the path to that folder. 12.Click OK. 4 Copyright© 2015 All Rights Reserved CAD Training Technologies, LLC
  • 6. PipingDesignOnline Video Training CAESAR II Statics: Quick Build Model 13.Clicking OK creates a CAESAR II piping input file in this folder. 14.The first thing CAESAR II does when you create a new piping input file is to bring up the units that you are using for this model. Remember, we are using a brand new folder, so there is nothing in this folder to indicate what units we should use in CAESAR II. The file that holds that information is stored in the configuration file. Right now, we have no configuration file in New Folder, so it's showing the default configuration, which are English units. 15.Here we see the internal units that are used by CAESAR II for every dimension. • Length is in inches. • Diameter is in inches. • Uniform load is lb./in (pounds per inch). 5 Copyright© 2015 All Rights Reserved CAD Training Technologies, LLC
  • 7. PipingDesignOnline Video Training CAESAR II Statics: Quick Build Model These are the internal units used by CAESAR II. Whatever you type in, no matter what units that you use, or whatever you view on the output side is translated by these constants shown in this file. The user units here are in inches. The value to convert to inches is 1. For compound length, it's the footage format. It has inches as the internal units, so it has to multiply all the numbers that you type in by 12 in order to get to those internal inches units. Here it's the inverse of that, 1/12. 16.These units are not what we want to use, so we can back out now. Click OK, and CAESAR II starts the input processor assuming we wanted those US units. • If you hover the mouse over the DX field, you can see it reads in. • If you hover over temperature, Fahrenheit. That's not what we want. • Hover over Allowable stress, pounds per square inch. 17.Click Close to start over at the Main screen. 18.Click Configure. 6 Copyright© 2015 All Rights Reserved CAD Training Technologies, LLC
  • 8. PipingDesignOnline Video Training CAESAR II Statics: Quick Build Model 19.We want to view the configuration file that will now be built in our new folder. You can now see all the switch settings for this specific folder location. Taking a close look through this list, we don't see any bolded items. That means these are all the defaults. 20.On the left under Categories we have a tree structure. The list shows all the branches of that tree. Right now, we have Computational Control selected. This is where we can set things like New Job Ambient Temperature, 70 degrees Fahrenheit. 7 Copyright© 2015 All Rights Reserved CAD Training Technologies, LLC
  • 9. PipingDesignOnline Video Training CAESAR II Statics: Quick Build Model 21.Click SIFs and Stresses, and you can see that the default piping code is 31.3. 22.If we are always running 31.1, I could change this setting to 31.1, and any new job I build after starts with 31.1. Select Default Piping Code, click the drop-down arrow and then select B31.1. 23.Notice how the 31.1 changed to bold, which means it's not the default setting any longer. Let’s stick with 31.3. Select Default Piping Code, click the drop-down arrow and then select B31.3. 24.You have these switches available to you that adjust how CAESAR II operates, and adjusts the default settings of CAESAR II. 8 Copyright© 2015 All Rights Reserved CAD Training Technologies, LLC
  • 10. PipingDesignOnline Video Training CAESAR II Statics: Quick Build Model 25.The one we want to work with is Database Definitions. Click Database Definitions, and you see Units File Name and the default ENGLISH.FIL. 26.Select Units File Name and then click the drop-down arrow to see all the different files available for you to use. 27.Notice that these are all preceded with an asterisk or star. This means these files are all located in the System folder. There are no units files in our current New Folder folder. The program only has these available in the System folder. This option shows me every units file that is in the local folder and in the system folder. 28.I don't want to use any of these files, but the MM.FIL one looks useful. That one’s going to be close to what we want. I know enough about that file to say that I don't like the structure of that file or the units that are in that file. We are going to want to use our own units. We are going to create a new listing to appear in this Units File Name. 29.Click Close. 30.Click No and we are back at the main menu of CAESAR II. 9 Copyright© 2015 All Rights Reserved CAD Training Technologies, LLC
  • 11. PipingDesignOnline Video Training CAESAR II Statics: Quick Build Model 31.Click Utilities. In Utilities we have two different unit options : • Create/Review Units, which reviews existing units on the file in the machine. This is the one we are going to use later. • Change Model Units, which can change units in existing models. 32.CAESAR II assigns units for a new job, and those units stay with that input file no matter when or where you open it. You could move it to another machine that did not even have your units, but those units belong to that file. Output is always displayed in the current units of the folder that you're working. We see now our current units are English units, so even the models that we created earlier in the sessions would appear in English units. 33.What we're going to do is we're going to introduce a new set of units. Before we do that, we need to do one other thing. 34.In the Utilities tab, click Open System Folder. Remember, that the program holds all these other units files. Let's take a look at that folder. 35.We are looking in the System folder in CAESAR II, and we need to sort by Type. Click Type. 36.Scroll to see a stack of .FIL files. 10 Copyright© 2015 All Rights Reserved CAD Training Technologies, LLC
  • 12. PipingDesignOnline Video Training CAESAR II Statics: Quick Build Model 37.These are the units files that we ship with CAESAR II, the ones that had the star in front of them when you looked at the units files available. These are the ones that are available to any folder that is working with this installation of CAESAR II. 38.We don't want to use any of these; we want to build our own units. 39.Close Windows Explorer and you are back at Utilities. We are going to use Create/Review Units. 40.Before we do that, let's take a break and you can catch. When we come back, we can build those units for this file. 11 Copyright© 2015 All Rights Reserved CAD Training Technologies, LLC
  • 13. PipingDesignOnline Video Training CAESAR II Statics: Quick Build Model CAESAR II Statics: Quick Build Model Video Two (Reference Video: C2_S_Quick_Build_V2) 1. In this session, we're going to continue on with developing our own set of units for using CAESAR II. 2. We are currently pointing at the Utilities tab from the main menu and as you can see we are in a new folder, and we want to introduce our own set of units to that folder. 3. Click Create/Review Units. 4. Clicking Create /Review Units opens the CAESAR II – Units Maintenance window. 12 Copyright© 2015 All Rights Reserved CAD Training Technologies, LLC
  • 14. PipingDesignOnline Video Training CAESAR II Statics: Quick Build Model 5. First, we want to review the existing units files. Click Review Existing Units Files and the Existing File to Review cell becomes available. 6. Select the drop down arrow to expand the list. You see the same list of units files that from the system folder. All the files from the system folder have that star in front of them. 7. Select *MM.FIL to review that units file. 8. Click View / Edit File. The CAESAR II – Units File Review opens. CAESAR II first lists the internal units used for every dimension. We have the constant that is multiplied by those internal units to get to the user units. If I have one inch, it is 25.4 MM. If I have 1 pound, it's 4.45 N, and so on. 9. These units displayed here are pretty much what we want to use. However, I notice that there are a few listed that I do not want to use. 13 Copyright© 2015 All Rights Reserved CAD Training Technologies, LLC
  • 15. PipingDesignOnline Video Training CAESAR II Statics: Quick Build Model 10.For instance, Stress and KPa, where I would rather see MPa. On Pressure, I also don’t want to see KPa, I want to see bar. 11.Besides these few instances this Units file is in pretty good shape. Click OK. 12.We have now viewed them and want to create a new units file. Click Create a New Units File and the Existing File to Start From cell becomes available. 13.Click the drop-down arrow and then select *MM.FIL for the starting point. 14.We are going to call the new units file, Metric, not MM. Type Metric in the New Units File Name box. 15.Click View / Edit File to edit the file. We now see the same window as before. However, we now have access to edit those cells. 14 Copyright© 2015 All Rights Reserved CAD Training Technologies, LLC
  • 16. PipingDesignOnline Video Training CAESAR II Statics: Quick Build Model 16.You have the ability to change the constant and the label that appears in the output files and in the input files. 17.If you are using CAESAR II in a different language, perhaps you want to get ahead of this by changing some of these values that are more typical for your use. 18.We want to change two things: Stress and Pressure. 19.We want to change Stress from KPa to MPa. We know if it's 6.8946 KPa per psi, we can just type in 0.006 and divide by 1,000. That then gives me MPa. 20.Let's make it a little easier for you. Click the drop-down arrow by KPa, and we can see several other terms. Notice that the terms in the list also have their related or complementary conversion value listed as well. 21.Unfortunately, we don't see MPa here. However, we do see N./sq.mm, which is a MPa. Select N./sq.mm (Newton per square millimeter). 22.You now see Stress is 0.006, which confirms we got the right conversion. 23.The n slash sqmm for Stress looks clunky. Highlight N./sq.mm and then type MPa. Now, MPa is the value that will appear in the input processor and also in the output listings. 24.We also wanted to change Pressure to bars. Click the drop-down arrow of Pressure by KPa, and then select bars, and then remove the s, so that it says bar. 15 Copyright© 2015 All Rights Reserved CAD Training Technologies, LLC
  • 17. PipingDesignOnline Video Training CAESAR II Statics: Quick Build Model So Pressure is now 0.06 bar per psi. 25.Let’s also change Elastic Modulus to make it consistently with the others. Click the drop-down arrow for Elastic Modulus by KPa, and then select N./sq.mm (Newton per square millimeter). 26.You can now see our changed values as we need them reflected. 27.Let’s also change the memo field. Type video training in the Units File Label box. The Units File Label will appear in several places in CAESAR II to show you what units you are using. 28.Something to note is Nominals, which is set to ON. This works with any units you're running. If Nominals is turned on and you're using, for example ANSI pipe sizes, you type in 10 that's 10- inch pipe, which is 10.75 times whatever conversion to get to your user units. We can still reference those named pipe sizes. Click OK in Units File Maintenance, and then click Cancel in Units Maintenance. 29.We have now built a units file. Click Home and since we already declared this Quick Build, click Piping Input the Quick Build job. We selected N./sq.mm and it gave us the conversion for that. We then changed the label. We selected bars, and it gave us a conversion, and we adjusted the label In this one we just used N./sq.mm, and we got our conversion. 16 Copyright© 2015 All Rights Reserved CAD Training Technologies, LLC
  • 18. PipingDesignOnline Video Training CAESAR II Statics: Quick Build Model 30.CEASER II displays our units. Strangely we see the old English units. What happened? How come CAESAR II is not using that units file that we just built? We didn't tell the program to use it yet. 31.Click OK to close out, because these are still US units here. You can see inches in the direction boxes. We have to first declare these units with CAESAR II. 32.How do you do that? Configuration. Click Configure. 17 Copyright© 2015 All Rights Reserved CAD Training Technologies, LLC
  • 19. PipingDesignOnline Video Training CAESAR II Statics: Quick Build Model 33.Select Database Definitions, because it's a database we built, and then select Units File Name. 34.Click ENGLISH.FIL, and then select the drop-down arrow to see all the files with the stars in front of them. 35.Notice that there is one selection that does not have a star in front of it, which means it is in a local folder. That's our METRIC.FIL. Click METRIC.FIL. That's the file we just built. It is available in this folder only, but every model we build now in this folder starts with this units file since we set that in our configuration file. Click Save. 36.Click Piping Input. When we go back to my input, hopefully for the last time, we can see the units that we want: MM for length, MPa for stress, bar for pressure, video training as the label. Click OK. 18 Copyright© 2015 All Rights Reserved CAD Training Technologies, LLC
  • 20. PipingDesignOnline Video Training CAESAR II Statics: Quick Build Model 37.And now we can begin with our process. So here we are in our layout, working with our very first piece of pipe 10 to 20. Get your model to this state. And we'll review the data that we're going to build and then start building this model. Before we do that, let's take a break and you can catch up. When we come back, we will build those units for this file. 19 Copyright© 2015 All Rights Reserved CAD Training Technologies, LLC
  • 21. PipingDesignOnline Video Training CAESAR II Statics: Quick Build Model CAESAR II Statics: Quick Build Model Video Three (Reference Video: C2_S_Quick_Build_V3) 1. In the previous video, we were working with the units for the model we are going to build today. 2. If I go to Configuration to review that, we can look to see that we are using the metric units file. Click CAESAR II Configuration. Click Database Definitions, and you can see the Metric units file. 3. We can also confirm the units by looking at our fly out help. You can see that it is in mm. Close the Configuration Editor and hover over the DX box to see the units. 20 Copyright© 2015 All Rights Reserved CAD Training Technologies, LLC
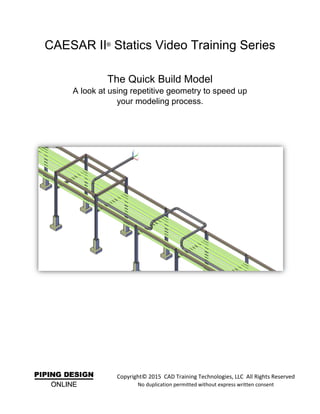
  • 22. PipingDesignOnline Video Training CAESAR II Statics: Quick Build Model There's pressure in bar: Stress in MPa: Elastic modulus in N./sq.mm: Those are the terms that we were expecting. 4. Let's go back to the system we wish to analyze. If you look below, you see an illustration of the piping system. 5. This rack is consistently laid out with 6m spans between the bents. There are, however, three additional expansions/loops put into this system. Do to our temperature change, we have to add flexibility. We're going to run this line from this anchor into the rack… Then down this long run of rack Then back out to another anchor 21 Copyright© 2015 All Rights Reserved CAD Training Technologies, LLC
  • 23. PipingDesignOnline Video Training CAESAR II Statics: Quick Build Model 6. Taking a look at another picture you see the entire model. 7. There are also some other guides in the system and some line stops or axle restraints along this long run. 8. We want to develop a model relatively quickly. We could just start at the beginning of the line and call it node 10, 20, 30, 40, and 50. Then, just keep going down the line putting in node numbers in CAESAR II’s default node increment of 10. We want to take advantage of the repetition in this line. I see that all these racks are equally spaced. 9. You can see in the original picture that there is 6 m between all the supports. We see in the image that we have a Y support at each one of those rack supports, and we also have a guide at each one of those rack supports. 22 Copyright© 2015 All Rights Reserved CAD Training Technologies, LLC
  • 24. PipingDesignOnline Video Training CAESAR II Statics: Quick Build Model 10.I can run a node from that first rack to this last rack as one long run and use the Break command in CAESAR II. The Break command adds these extra nodes and puts all those extra restraints in automatically. We are going to cut in the loops after we draw the long run straight through. We are first going to run from the anchor down to the first rack, then create one long piece of pipe down to the last rack, before we then exit out. Then we're going to cut it up, adding the extra supports, and then drop in our loops. We'll see how fast we can do this without missing any of the details. 11.Back in CAESAR II, you see the first element, node 10 to 20. 12.The first element is in the Z direction going 6m. We actually skip over that first support point. If you recall in the model (seen blow) there's supposed to be a support on the first pipe. The pipe is 6m right from that anchor to the elbow. We are just roughing it all in and then coming back and bringing in the details. 23 Copyright© 2015 All Rights Reserved CAD Training Technologies, LLC
  • 25. PipingDesignOnline Video Training CAESAR II Statics: Quick Build Model 13.Type 6000 in the DZ box to go positive 6 m in the Z direction. 14.Type 8 in the Diameter box for an 8 in. diameter, which converts to 219.0750. 15.Type S for a standard wall thickness, which converts to 8.1788 16.You do not need to specify Corrosion, and Pipe Density comes in with the material, so we can ignore that. 17.We are going to file the pipe with water, so that's one SG. Type 1sg in the Fluid Den 1 box, which converts to 0.00100. My units are kg./cu.cm, so it's 0.001 for the dead weight of water. 18.We are going to run just one temperature set, or one temperature scenario for this system. Type 225 in the Temp 1 box for 225 degrees Centigrade. You can view the ambient temperature in the Special Execution options. Click Special execution options. Our ambient temperature is 21.1 degrees Centigrade, basically seven degrees Fahrenheit. And we're going from that 21 up to 225 with this line. 24 Copyright© 2015 All Rights Reserved CAD Training Technologies, LLC
  • 26. PipingDesignOnline Video Training CAESAR II Statics: Quick Build Model 19.Our pressure, again, the units here are bar. Type 26 in the Pressure 1 box. 20.I have a bend at node 20. Click Bend. 21.I have an anchor at node 10. Double-click Restraints. Click the Type drop-down arrow and select ANC for Anchor. 22.For the other information here, we're pretty clear. 23.For Material, we are going to make it A106 grade B. If you use CAESAR II, you know that the index number for A106 B is 106. 24.If you didn't know that, you just type in a106 and you don't even have to add the B. Type a106 in the Material box. 25.We want the list, so press ENTER, and it gives us three possible selections. We see the material that we want, 106. That's the index number that we stored in CAESAR II. The material is named A106 B. Double-click A106B, and it brings it in. 25 Copyright© 2015 All Rights Reserved CAD Training Technologies, LLC
  • 27. PipingDesignOnline Video Training CAESAR II Statics: Quick Build Model 26.CAESAR II automatically checks the Allowable Stress box because we have to specify our piping code (B31.3), and the hot (SH1) and cold (SC) allowable stresses for this analysis or stress evaluation. 27.You can also see we have our yield stress (Sy). 28.If we were doing a hydro stress check, it would be based on yield rather than hot or cold allowable. 29.We are not expecting many cycles out of this, so I'm going to ignore the cyclic factor F. If I leave F1 blank and <f> Allowed Maximum of 1.2 is not checked to use the 1.2, then CAESAR II Cyclic Factor defaults to 1.0. 30.When we specify the material, we got the Allowable Stresses information, but we also got the entire temperature table. Double-click the Temp 1 chevron, and the entire temperature table flies out. 26 Copyright© 2015 All Rights Reserved CAD Training Technologies, LLC
  • 28. PipingDesignOnline Video Training CAESAR II Statics: Quick Build Model 31.Notice that in the Classic Piping Input we only show the first three temperatures. However, you can see in the temperature table that there are nine that you can specify in CAESAR II. 32.We typed in 225 for Temp 1 and can now see it in the Temperature list. You can also see that since we have a material specified CAESAR II has dropped in the strain rate of 0.002 mm per mm. 33.Along with the material data, we also have the density of our pipe, Young's modulus, and Poisson ratio. 34.We also have insulation on this piping system, so we are going to put in 50 mm of insulation. Type 50 in the Insul. Thk. box. 35.For the Insulation Density, we can select it from the Insulation Density list. Click the Insulation Density drop-down arrow and select calcium silicate, so that we have calcium silicate in this line. 27 Copyright© 2015 All Rights Reserved CAD Training Technologies, LLC
  • 29. PipingDesignOnline Video Training CAESAR II Statics: Quick Build Model 36.The density of the calcium silicate is 0.00018 kg./cu.cm. 37.That's my first piece of pipe. 38.We want to now go down to the rack below it. 39.Click Continue to go to element 20 to 30. 40.Type -2000 in the DY box to go in the Y direction minus 2,000 mm. 41.You can see the plot display with the data as we enter this information. Click Bend to add a bend to this piping. 28 Copyright© 2015 All Rights Reserved CAD Training Technologies, LLC
  • 30. PipingDesignOnline Video Training CAESAR II Statics: Quick Build Model 42.We now want to go to node 40, which will be the first support point. If I pull up the drawing again, node 40 is the point indicated below, so 10, 20, 30, 40. 43.Click Continue to go to node 30 to 40. 44.Type 2000 in the DX box to go in the X direction 2,000 mm. 45.We want to specify our restraint at 40. Double-click Restraints. Select +Y from the Type list to place a plus Y restraint at node 40. Type 40 in the second Node box, and then select guide. You could also select the global direction Z, but let’s stick with the guide. We have the two restraints, and the two vectors, a vertical and a horizontal vector. 40 30 20 10 29 Copyright© 2015 All Rights Reserved CAD Training Technologies, LLC
  • 31. PipingDesignOnline Video Training CAESAR II Statics: Quick Build Model 46.It's important to get these details in now, because we need something to duplicate later on when we add all of the other rack details in there. Right now, review your data. Make sure you have a model that looks like the image below. Click Length to add the dimensions on it as seen below. 47.Get your model like this and we'll continue on in the next session. 2000 2000 6000 30 Copyright© 2015 All Rights Reserved CAD Training Technologies, LLC
  • 32. PipingDesignOnline Video Training CAESAR II Statics: Quick Build Model CAESAR II Statics: Quick Build Model Video Four (Reference Video: C2_S_Quick_Build_V4) 1. You now have your model looking like the image below: 2. Click to turn the dimensions off. 3. Click to turn the node numbers on. 10 20 30 40 31 Copyright© 2015 All Rights Reserved CAD Training Technologies, LLC
  • 33. PipingDesignOnline Video Training CAESAR II Statics: Quick Build Model 4. We are ready to continue working with the long run that takes us all the way to that other rack. You can see the model in the image below. 5. Highlighted below is node 40. 6. You might say this should be 50 then numbered all around the loop. 32 Copyright© 2015 All Rights Reserved CAD Training Technologies, LLC
  • 34. PipingDesignOnline Video Training CAESAR II Statics: Quick Build Model 7. By the time you get to the end, you do not know the node number. We are just going to go from 40 (highlighted below) all the way down to the bend at the end. How many are there? They are 6 M long. So, there's-- 1, 2, 3, 4, 5, 6, 7, 8, 9, 10, 11, 12, 13, 14, 15, 16, 17-- 17 times our spacing of 6 M. 8. Click Classic Piping Input. 9. We are going to add our next element, node 50. 10.Click Continue for nodes 40 to 50. 33 Copyright© 2015 All Rights Reserved CAD Training Technologies, LLC
  • 35. PipingDesignOnline Video Training CAESAR II Statics: Quick Build Model 11.Type 17*6000 in the DX box for the x direction. This comes out to 102 M. = 12.We are saying that that is 102 M from the top highlighted column or bent to the bottom- highlighted column, or bent. 13.We are going to come back later and add in all these extra nodes. Because we know, we are going to have a plus y support and a guide at each one of these locations. 14.So there we are 40 to 50. 15.To see the model select in the upper right-hand corner of the Classic Piping Input. There is not much to see in the model right now. We need to finish out the rest, and then go back and start working on the main run. 102M 34 Copyright© 2015 All Rights Reserved CAD Training Technologies, LLC
  • 36. PipingDesignOnline Video Training CAESAR II Statics: Quick Build Model 16.So at 50 we continue on to 60. Click Continue. 17.Type 2,000 in the DX box for the positive x direction to an elbow. 18.Click Bend. 19.Click Continue for 60 to 70. 20.Type 2000 in the DY box to go up in the y direction. 21.Click Bend. 35 Copyright© 2015 All Rights Reserved CAD Training Technologies, LLC
  • 37. PipingDesignOnline Video Training CAESAR II Statics: Quick Build Model 22.I would like to show you one other thing here. You can zoom in on the section that we are interested in by using one these three magnifying glasses. 23.If I click on this current selection one, it is going to zoom into 60 to 70. 24.Draw a box around the area with nodes 50, 60, and 70 and you can see exactly where we are building the model. 25.When you build a new model, the program always shows you the extents of the model. Every time you update data in the Classic Piping Input, it automatically shows you the entire model. We want to build the last piece of pipe in the model, but we do not want to show the entire model, because we lose the detail. There is a way to turn off the always zoom out feature. You can use Reset View, which looks like this: 26.If you cannot find that button quickly on your machine, you can navigate to Environment > Reset View on Refresh, and then turn that off. 27.You do not want to reset the view when you refresh the state of the machine. An interesting fact about Reset View is that it is automatically on for every new model that you build. After you save the model or close it and open it again, it is turned off on your second entry into the processor. That would explain why sometimes it is zooming and sometimes it is not. That's what we are doing right now, zooming to the extents of this model. 36 Copyright© 2015 All Rights Reserved CAD Training Technologies, LLC
  • 38. PipingDesignOnline Video Training CAESAR II Statics: Quick Build Model 28. 29.Click Reset View to turn off the refresh of the view. 30.Click Continue to go to 70 to 80. 31.Type -6,000 in the DZ box for the z direction. My plot stays put and I can just watch what is going on in this area. This is nice when you are building a new model and you are working around a very tight system like a control station or something similar. You do not want to see the whole plot anymore, because you want to stay focused on what is interesting to you. 32.Double-click Restraints. 37 Copyright© 2015 All Rights Reserved CAD Training Technologies, LLC
  • 39. PipingDesignOnline Video Training CAESAR II Statics: Quick Build Model 33.Select ANC from the Type list in Restraints to set an anchor at node 80. 34.We need to fix node 50 because we forgot to put the plus y support and guide at node 50. Click the element coming into 50, to specify the information there. 35.You can specify the additional data on any spreadsheet. I could define on this element the restraints and put a restraint at node 70, but it makes sense to develop the data on your first entry to that node. The best place, I believe, for me to specify the restraint at 50 is when I go to 50 on the first time. 36.Double-click Restraints. 37.Select +Y from the Type list to specify that plus y support at node 50. 38 Copyright© 2015 All Rights Reserved CAD Training Technologies, LLC
  • 40. PipingDesignOnline Video Training CAESAR II Statics: Quick Build Model 38.Type 50 in the Node box and then select Guide from the Type list to specify a guide for node 50. 39.We are not specifying any gaps on the guide or any friction in this model. We take that up in a different subject. 40.There's my bulk model. 41.Click Zoom to Extents to see the whole model. 42.You can now see the long run. That is 17 times 6 M from one end to the other. 39 Copyright© 2015 All Rights Reserved CAD Training Technologies, LLC
  • 41. PipingDesignOnline Video Training CAESAR II Statics: Quick Build Model 43.That's our model at this point. In our next video, we go ahead and drop in these extra nodes. That is a useful tool, so we will save that for a separate discussion. Click Zoom to Window and zoom to the 50, 60, and 70 section we can see the element that we just put in. 44.We have the long run over to the other end (the long pipe highlighted yellow). 45.Notice that you can use the mouse to pan. We are using Zoom to Window , but if you push the mouse wheel in, it changes to Pan and you can just then pan without having to click the Pan command. If you roll the mouse wheel, you zoom in and zoom out. These are some of the different options available to you in reviewing the model. Get your model to this point, and then we drop in all that extra work that you are doing. 40 Copyright© 2015 All Rights Reserved CAD Training Technologies, LLC
  • 42. PipingDesignOnline Video Training CAESAR II Statics: Quick Build Model CAESAR II Statics: Quick Build Model Video Five (Reference Video: C2_S_Quick_Build_V5) 1. You should have your model looking like the image below. We are going to be working with the long run, which is the yellow highlighted section and the current element. We want to break the long element to drop in support points along the run. 41 Copyright© 2015 All Rights Reserved CAD Training Technologies, LLC
  • 43. PipingDesignOnline Video Training CAESAR II Statics: Quick Build Model 2. We are trying to take advantage of the repetition in this model, so we do not have to trot along this piping system from one node to the next. 3. Select the long run to highlight the element, and then click Classic Piping Input to see that the yellow pipe is the current element at 40 to 50. We are looking at the 102 M long run. 4. Click to see the plot and the data. What we want to use is the Break command. We have a series of buttons here to manipulate our existing data. We have Insert An Element-- either before or after the current element Delete the current element Break The Current Element is what we want. We want to break this long element into 17 equal elements. 42 Copyright© 2015 All Rights Reserved CAD Training Technologies, LLC
  • 44. PipingDesignOnline Video Training CAESAR II Statics: Quick Build Model 5. Click Break. 6. The Break command has two different areas. 7. We want to put in multiple nodes in the model, so we are going to use the Insert Multiple Nodes option. These radio buttons control the single node and multiple node options. 8. Click Insert Multiple Nodes to activate the bottom section of cells. 9. When you want to add extra nodes, there are two ways to do that. We have the top area if I want to add a single node on the run, a single node anywhere along the run. I can use the bottom part of the screen if I want to add several nodes, add one more node, or more nodes, all equally spaced along the run. 43 Copyright© 2015 All Rights Reserved CAD Training Technologies, LLC
  • 45. PipingDesignOnline Video Training CAESAR II Statics: Quick Build Model 10.You can either specify the total number you want to break this into-- I want to break the 102 M long run into x number of elements 11. Alternatively, I can use a Node Step. 12.Using the Node Step is not going to help us, because the node step references the From and To node of the element. If I say 40 to 50, my smallest node step is one. I could put 41, 42, 43, and up to 50. That can break this one element into 10 elements. I want 17, so the node step does not work for this situation. 13.Type 17 in the Total Number of Break Elements box. 14.When I select elsewhere on the screen CAESAR II automatically inserts the Node Step. It also automatically inserts the Length of each element. 15.We use the Length of each element option to make sure that we got the right count. 16.When we use the multiple node information, the nodes are all equally spaced. If I wanted to put a node in the mid span of a run between two supports, I can use multiple insert and break it into two. This automatically places it at the middle of the run making this a very useful tool. 17.Select another point on the screen such as the Node Step box. 18.The Node Step came out as zero because CASEAR II could not give a node step that fit between the nodes evenly. However, we see that the length of each element is 6M. This is exactly what we want, because I counted 17 bays between those vents. 44 Copyright© 2015 All Rights Reserved CAD Training Technologies, LLC
  • 46. PipingDesignOnline Video Training CAESAR II Statics: Quick Build Model 19.We now need to take care of our support nodes, which are very important. If you recall, we put in the restraints at node 40 and at node 50. We want to duplicate them at every support. What if it is at 40? I want to use it at all of these new nodes. 20.Type 40 in the Get Support From Node. 21.Click OK. 22.CAESAR II now gives us all these extra nodes. It goes by ones from 40, 41, 42, 43 and just keeps on going. Notice, however, that it has to skip over 50, since we used 50 in the model. The nodes keep on going one node at a time in sequence to 57, and then we get to 50. 23.There are 17 new elements in the model. Zoom in to see all the restraints in the model. I did not have to go around by hand and add these extra restraints. 45 Copyright© 2015 All Rights Reserved CAD Training Technologies, LLC
  • 47. PipingDesignOnline Video Training CAESAR II Statics: Quick Build Model 24.This is the layout of this line, but we still have to drop in three expansion loops. We are going to add a loop after the second support. The loops are at the second, then at the fourth, then at the sixth. 25.Now, we are going to build it at the right point. When we build the loops, we want to use the Insert command. Zoom in. 26.You can see here a different picture of the same thing. So, it is the second full bay One Two Three The fourth after that Two Three Four Five One The sixth Here we are coming down There is node 40 That is node 41 46 Copyright© 2015 All Rights Reserved CAD Training Technologies, LLC
  • 48. PipingDesignOnline Video Training CAESAR II Statics: Quick Build Model 27.I want to put in this loop in the model so that it is after 41. 28.We are calling this 41, but let us look at it a different way. We are going to have to add the pipe up, over, and back. We are going to be out of sequence. It is OK to be like that, but I want to be able to use sequential numbers. 29.Zoom to see the entire model. 47 Copyright© 2015 All Rights Reserved CAD Training Technologies, LLC
  • 49. PipingDesignOnline Video Training CAESAR II Statics: Quick Build Model 30.We want to select the entire model. There are two options to select components in CAESAR II: • We have an arrow to select an individual element. • We have an arrow with a box behind it, to select a group of elements. We want to select a group of elements. Click Select Group. Select the whole model by clicking, and then dragging the blue box around the entire model. 48 Copyright© 2015 All Rights Reserved CAD Training Technologies, LLC
  • 50. PipingDesignOnline Video Training CAESAR II Statics: Quick Build Model 31.We now want to use the Renumber command. There is a list of buttons to the right to Rotate, Duplicate, Delete, Renumber, Invert, and Change sequence. I want to Renumber. 32.You can also navigate to Global > Nodes. Then, select Renumber in the Block Renumber dialog box. 33.Type 10 in the Start Node box to start from node 10, then type 10 in the Node Increment box to increment by tens, and then click OK. 34.We now have nice clean numbering in our model. What used to be node 41 is now node 50. We want to drop the first loop in between 50 and 60. 35.Get your model to this point, and we can continue with the loops. 49 Copyright© 2015 All Rights Reserved CAD Training Technologies, LLC
  • 51. PipingDesignOnline Video Training CAESAR II Statics: Quick Build Model CAESAR II Statics: Quick Build Model Video Six (Reference Video: C2_S_Quick_Build_V6) 1. We have our simple line and we want to drop in our loop. We drop in our first loop after 50-- between 50 and 60. 2. The loop appears like this. 40 50 60 50 Copyright© 2015 All Rights Reserved CAD Training Technologies, LLC
  • 52. PipingDesignOnline Video Training CAESAR II Statics: Quick Build Model 3. I am going to use a different sequence. I am going to call it 150, 160, 170, 180, 190, 200, and then go back to node 60. 4. We say that we are going to use 200, but we have to make sure we did not use 200 elsewhere. Let’s look back at the layout. 5. We cannot use 200 because we have 200 near the end of the long run. We need to watch out for the node numbers throughout the model. We are going to work our way through it. Let’s go back to 50 and 60. 6. There are several ways to make this loop. Let’s take a look at our drawing. 7. These measurements place the loop right in the middle of that bay. 160 170 180 190150 200 60 50 We are going to come off the support and go in only 750 MM Then up 1 M Then back 3,750 Across 4,500 Then back down and in 51 Copyright© 2015 All Rights Reserved CAD Training Technologies, LLC
  • 53. PipingDesignOnline Video Training CAESAR II Statics: Quick Build Model 8. We want to break the pipe, and add a single node right at the new node. 9. Click to select the element between 50 and 60. 10. Let’s put in that first corner. Click Break. 11.We want to insert a single node. We do not want to insert multiple nodes because that option puts them equally spaced all along this run. Instead, we want to locate a single node. Type 350 in the New Node Number box. I know I did not use 350 anywhere else in the model. 12.The distance in MM from node 50 is 750 MM. Type 750 in the Distance in (mm.) box. 52 Copyright© 2015 All Rights Reserved CAD Training Technologies, LLC
  • 54. PipingDesignOnline Video Training CAESAR II Statics: Quick Build Model 13.Click OK. 14.You can now see node 350 in the model. That is of course right where we want it to be. 15.Next, we want insert a new element after this element. We are currently pointing at 50 to 350. Click Insert. 16.We can insert an element either before or after the current element. Select After to go from 350 up to 360, and then click OK. 17.Click Classic Piping Input. 18.You can see that we have 350 in the From node, but we do not have the To node. Type 360 in the To box. 53 Copyright© 2015 All Rights Reserved CAD Training Technologies, LLC
  • 55. PipingDesignOnline Video Training CAESAR II Statics: Quick Build Model 19.Type 1000 in the DY box to go 1 M in the y direction. 20.If you look at your drawing, it looks like we created a T, which we did. We go from 50 to 350, 350 to 60, with a branch to go from 350 to 360. 21.We are going to take care of the tee later. Right now, we want to create the run going back to an elbow on the back of the loop. Basically creating what you see in the image below: Click Insert. Select After to go from 360 up to 370, and then click OK. 22.Instead of using the Continue command, we use the Insert command because we are inserting new elements into existing streams. 54 Copyright© 2015 All Rights Reserved CAD Training Technologies, LLC
  • 56. PipingDesignOnline Video Training CAESAR II Statics: Quick Build Model 23.Notice that the Insert command does not automatically give us new node numbers. Type 370 in the To box. 24.Type -3750 in the DZ box to go in the z direction. 25.If we are watching the drawing change we can see that this last work placed a square corner at 360. We need to go fix that. 26.Click the single selection tool , and then click the 350 to 360 element. 27.In the current element, 350 to 360 specify the bend by clicking Bend. 28.We now have a bend at 360. You always specify the bend for the To node. I have a bend at 360. 29.Click Next Element to go to 360 to 370. 55 Copyright© 2015 All Rights Reserved CAD Training Technologies, LLC
  • 57. PipingDesignOnline Video Training CAESAR II Statics: Quick Build Model 30.Also though, we want a bend at 370 as well. Click Bend. 31.When we continue off of 370 we then see the bend in the model right away. Click Insert. Select After to go from 370 over to 380, and then click OK. Type 380 in the To box. Type 4500 in the DX box to go in the x direction. 32.What we are looking at is a system where we have 750 MM, 4 and 1/2 M, and 750 MM. That gets me through the total 6 M run. Let's get back to our element. 56 Copyright© 2015 All Rights Reserved CAD Training Technologies, LLC
  • 58. PipingDesignOnline Video Training CAESAR II Statics: Quick Build Model 33.Click the 370 to 380 element and then click Bend. Click Insert. Select After to go from 380 down to 390, and then click OK. Type 390 in the To box. Type 3750 in the DZ box to go in the positive z direction. Click Bend. 34.Now we want to go downwards to another new node. Click Insert. 57 Copyright© 2015 All Rights Reserved CAD Training Technologies, LLC
  • 59. PipingDesignOnline Video Training CAESAR II Statics: Quick Build Model Select After to go from 390 down to 400, and then click OK. Type 400 in the To box. Type -1000 in the DZ box to go in the y direction minus 1 M. Click Bend. 35.The piping looks like it's connected, but don't let the looks drive your model. 58 Copyright© 2015 All Rights Reserved CAD Training Technologies, LLC
  • 60. PipingDesignOnline Video Training CAESAR II Statics: Quick Build Model 36.Click and then zoom in on the section as seen below. 37.This area looks like it is connecting, but that is just a free end at 400. Let’s finish the run. We have one more element to go. Click Bend to add a bend at 400. Click Insert. Select After to go from 390 down to 400, and then click OK. 59 Copyright© 2015 All Rights Reserved CAD Training Technologies, LLC
  • 61. PipingDesignOnline Video Training CAESAR II Statics: Quick Build Model Type 60 in the To box. Type 750 in the DX box to go in in the x direction 750 MM. 38.Click on the element that was holding the space. This spacer element is 350 to 60. I want to delete that element. Click Delete Element. Click Yes. 60 Copyright© 2015 All Rights Reserved CAD Training Technologies, LLC
  • 62. PipingDesignOnline Video Training CAESAR II Statics: Quick Build Model 39.We now have our loop. 40.Looking at this model, we see that there is a missing elbow, as indicated above. So, we want to make some final changes in this model. 41.In fact, if we miss this, CAESAR II actually gives us a warning when we run the Error Check. Click Start Run. 42.The Errors and Warnings says: • The node 350 goes to a CHANGE IN DIRECTION that is not an intersection and that is not specified as a bend. Please check for missing bend definition. Now that's kind of a long bit of text. Notice that it also says it's on element 50 to 350. If I double click on this number 1 here, it'll take me right to that element. 43.Double click Number 1 in the Errors and Warnings, and it takes us right to the spreadsheet. You can now see that is where we are missing a bend. Click Bend. Missing Elbow 61 Copyright© 2015 All Rights Reserved CAD Training Technologies, LLC
  • 63. PipingDesignOnline Video Training CAESAR II Statics: Quick Build Model 44.Now we see the bend added to the model. Using CAESAR II’s error checker was a useful way to help find problems. 45.Notice something else here we did in the model when we created the new element, at 400 to 60. We deleted the spacer element that went to 60 and are missing the restraints. Let's clean that up. 46.We are going to add the restraints in by hand on the element, 400 to 60. Select the 400 to 60 element. 47.Double-click Restraints. 48.Select +Y from the Type list to make node 60 a plus y. 49.Type 60 in the second Node box and then select Guide from the Type list. 62 Copyright© 2015 All Rights Reserved CAD Training Technologies, LLC
  • 64. PipingDesignOnline Video Training CAESAR II Statics: Quick Build Model 50.So there's our first loop, and we have to add the other supports. Get your model like this, and we are going to then use this one, and plop it down at other sections of the line. 63 Copyright© 2015 All Rights Reserved CAD Training Technologies, LLC
  • 65. PipingDesignOnline Video Training CAESAR II Statics: Quick Build Model CAESAR II Statics: Quick Build Model Video Seven (Reference Video: C2_S_Quick_Build_V7) 1. Your model should now look like the image below: 2. We have our new loop added in between 50 and 60. This is the first of three loops. Looking at the drawing, we create two more loops. They have the same width. I have different lengths of these loops. These support points that you see here are three meters back from the main run. This is 3 meters. These loops are little bit bigger than the first loop. We are not going to worry about that now. I just want to get these loops into the model. Then we can manipulate them once they are there. This is 50 to 60. This is 90 to 100. 64 Copyright© 2015 All Rights Reserved CAD Training Technologies, LLC
  • 66. PipingDesignOnline Video Training CAESAR II Statics: Quick Build Model 3. We want to drop the second loop between 90 and 100. We can do this duplication in a couple of ways. We want to use the list processor to work through the list of data. We can also do it graphically. Now there are two ways bring up the list. • Find the single piece of paper, click on the drop-down arrow by it, and select Elements. That is what we want. Click on the piece of paper itself, you are going to get all these lists at one time. We do not need all those lists. You can now see all the lists. You see the element list. You see the materials list. You see the Bends list. There is a lot of stuff in the lists. Now clean it back up. To get rid of all these extra lists, click the drop-down arrow, and then click Close All Lists. Then, click the drop-down arrow and click Elements. On my machine, because of the way I set it up in the previous sessions, I have these lists tabbed together. You see the Classic Piping Input and Elements tabs. • You can also navigate to Edit > List Elements. Turn on your element list and review your data. You might have to open up the width of some of these columns to see the entire number. Click the single piece of paper and you receive the list as seen here. 65 Copyright© 2015 All Rights Reserved CAD Training Technologies, LLC
  • 67. PipingDesignOnline Video Training CAESAR II Statics: Quick Build Model 4. Highlight the section below in the Elements list and you see the first loop from elements 50 to 60 with measurements 750 at 50 to 350, 1,000 up at 350 to 360, and 3,750 back at 360 to 370 and then so on back to 60. The highlighted model displays to the right. 5. We want to move that group or duplicate that and put it between 90 and 100. 6. Let's prepare this block of data for duplication. You have highlighted row 5 through 11. You can click on 5, and then SHIFT+click on 11. You can also click on 5 and drag my mouse down to row 11. 7. You might not notice it, but row 5 here has a dotted line around the 5. 8. If I use my down arrow key on the keyboard, not the mouse in any way, but just down arrow, you notice that it showed me node number five highlighted. 66 Copyright© 2015 All Rights Reserved CAD Training Technologies, LLC
  • 68. PipingDesignOnline Video Training CAESAR II Statics: Quick Build Model 9. If you click over here on the plot, you notice that the highlight left the element list. That means we are working in the plot. Any command that you type in now is working with the plot. 10.We want to move the indicator to the Elements list. Click on the Element list. 11. Now that we refocused, we can move the dotted line I talked about earlier. Use the down arrow to move the dotted line to row 14. Row 14 highlights. We use this because duplication allows me three different points of insertion for the new block: • At the end of the existing block • At the end of the input • At this highlighted element Row 14 is 80 to 90, so the duplication drops right before 90 to 100. 12.That’s our preset now to start the duplication. Right-click on the block, and then navigate to Block Operation > Duplicate. 67 Copyright© 2015 All Rights Reserved CAD Training Technologies, LLC
  • 69. PipingDesignOnline Video Training CAESAR II Statics: Quick Build Model The block duplicate window displays, and you can see we have several different options. Let’s look at Insert Copy Block. Remember, we can set at the end of the current block between rows 11 and 12, at the end the input after row 29, or after element 80 to 90. 13.Now since there are other elbows in here, we should not break up any elbow pair. Note 80 is an elbow, we cannot stick it one row up higher. 14.Be sure you get the right insertion point. Select After element 80 to 90, to place the new block of data. 68 Copyright© 2015 All Rights Reserved CAD Training Technologies, LLC
  • 70. PipingDesignOnline Video Training CAESAR II Statics: Quick Build Model 15.On the options, we are going to have the loop fade out in the same direction as the original one in the negative z direction. Which in this case is the Identical option. This is the plot direction, but we want the negative z in the C2 model. If we wanted to go in the positive z direction, it is as if we put a mirror in front of the pipe, and the mirror's plane is XY. In other words, all the negative z's go to positive z. Keep that in mind if you have a common pattern, but one sign is changed. You can always use these mirrors in order to flip the model over. 16.We now have to specify a node increment. Do not confuse this node increment with the From- To increment as in from 10 to 20. That is an increment of 10 to 20 to 30 to 40. We are using that for the whole model. 17.The Node Increment we use is the increment between the existing block node numbers and the new block node numbers. 18.We want to pick a large number for node increment. We are going to clean up our numbers later on anyway. Let’s add 1,000 to all these nodes. Type 1000 in the Node Increment box. 19.We are going to add a new block 1,050 to 1,350 all the way through to 1,060, and it's going to put it after row 14. 20.Click OK. This adds seven elements. The original negative Z direction The plot direction 69 Copyright© 2015 All Rights Reserved CAD Training Technologies, LLC
  • 71. PipingDesignOnline Video Training CAESAR II Statics: Quick Build Model 21.The Duplication Status also shows all the new data that adds. Click OK. 22.We now have our new block after row 14. You can see 1050 to 1350-- added 1,000 to those nodes-- and, finally, 1060. 23.Let’s look back at our plot. 24.Click Reset or Zoom to Extents to reset the plot. 70 Copyright© 2015 All Rights Reserved CAD Training Technologies, LLC
  • 72. PipingDesignOnline Video Training CAESAR II Statics: Quick Build Model 25.You can see we have a lot of noise in the model. 26.Click Node Numbers to turn off the node numbers, so we do not have so much clutter on the plot. 27.You can see CAESAR II placed the new section completely up in the left corner. Why did it do that? Well, there is not a common node between the new block and the old block. 28.Let’s look at the new block nodes. Click Row 15 and then Shift+click row 21. None of the nodes in this set repeats anywhere else in the model. CAESAR II, not knowing where to put it, drops it back at the origin, which is the first node we defined-- node 10. That's 0, 0, 0 globally. So CAESAR II places it where you see it now. 71 Copyright© 2015 All Rights Reserved CAD Training Technologies, LLC
  • 73. PipingDesignOnline Video Training CAESAR II Statics: Quick Build Model We cannot run the model like that, because we are going to get some complaints by CAESAR II. We still have to remove that other segment at 90 to 100. We want to first button the model up properly. 29.Click the Elements list. 30.We did not specify any special data at 50. It's just the support. Click row 5, and then select the Classic Piping Input tab. You see we are at 50 to 350. We have a bend at 350, but there is no other data specified for 50. 31.Click Elements list, then click row 15, and type 90 in the From Node column for the 1050.This sets 15 at 90 to 1350, the plot updates. 32.The model now sits where we want to see it. It might look nice here as far as displacement, but we did not button up the other end. 33.Click row 21, and type 100 in the To Node column for the 1060. 72 Copyright© 2015 All Rights Reserved CAD Training Technologies, LLC
  • 74. PipingDesignOnline Video Training CAESAR II Statics: Quick Build Model 34.We have reestablished the connection on that loop, and the cursor jumps to the next line at element 90 to 100. We want to delete this element, which was our old placeholder. Right-click, and then select Block Operation > Delete. Click Yes to confirm delete of the one element. The rest of model now hangs together properly. 73 Copyright© 2015 All Rights Reserved CAD Training Technologies, LLC
  • 75. PipingDesignOnline Video Training CAESAR II Statics: Quick Build Model 35.You see 80 to 90 to the new set, 100, and throughout the rest. 36.Let’s check element 1400 to 100 to make sure we did not miss anything. Click row 21 and then click Classic Piping Input. 37.We need to make one more change on node 1400 to 100. We changed this To node to 100, so we need to update the restraints on this element. Type 100 in the Node boxes for the restraints. 38.If you change node numbers in the list, be sure you are not missing other things like restraints in this case or bends. You should update those other node numbers mentioned as well. When CAESAR II does not renumber by a command, it renumbers all these elements. When you do it by hand, you have to be careful to change all these data. 39.We would eventually receive an error message from CAESAR II that there was node 1,060 defined in the model. 74 Copyright© 2015 All Rights Reserved CAD Training Technologies, LLC
  • 76. PipingDesignOnline Video Training CAESAR II Statics: Quick Build Model 40.That is our second loop and we have one more loop to add in the model. Then, we clean it up, and we are done with this model 41.So, get your second loop in the model. Many minor things went on in that session, but you have to get them all right in order to use this capability. There are many different ways to accomplish this, but get your model looking like the image above and then we are going to drop in our third loop down the line. 75 Copyright© 2015 All Rights Reserved CAD Training Technologies, LLC
  • 77. PipingDesignOnline Video Training CAESAR II Statics: Quick Build Model CAESAR II Statics: Quick Build Model Video Eight (Reference Video: C2_S_Quick_Build_V8) 1. We have loop one, and loop two and we need to insert the third loop, which is going to come in around the section indicated below down here between nodes 150 and 160. So, you have 50 to 69, 90 to 100, and then 150 to 160. 2. We want to drop in the loop the same way we did it before, except we are going to do this one graphically. Roll your mouse wheel to zoom in. This group of elements is the ones we want to duplicate. 50 60 90 100 150 160 76 Copyright© 2015 All Rights Reserved CAD Training Technologies, LLC
  • 78. PipingDesignOnline Video Training CAESAR II Statics: Quick Build Model 3. How do you select a group of elements graphically? We use the Select commands. We have two selection options we can choose from: • One is an arrow without a box behind it called Select Element • The second one has an arrow with a box behind it called Select Group. The box in the image indicates that this is used to select a group. You can select a single element. Click Single Element and then select the element as indicated below: 4. You can see the element selected. Click Classic Piping Input to see the element is element 1360 to 1370. Select the piping indicated below and then click Classic Piping Input. 5. Select Element is a very easy way to identify, on the plot, an element that you wish to learn more about by looking at the input. 77 Copyright© 2015 All Rights Reserved CAD Training Technologies, LLC
  • 79. PipingDesignOnline Video Training CAESAR II Statics: Quick Build Model 6. We however, want to select a group. Click Select Group. 7. We are not in a great position to select a group now, because if I select a group, I draw a box around it. It does not matter whether you go left to right, or right to left. 8. I want to select all the elements, but not too many elements. I can also shift-click other elements. Click and drag the mouse to select the elements as indicated below: 9. We need one more element in the drawing, so we shift click on the piece of pipe. SHIFT-click and select the element as indicated below: 10.We now have our group of elements. We have a group defined. Notice in the images to the left that the section between the elbow and the restraint is not highlighted until after the SHIFT Click 78 Copyright© 2015 All Rights Reserved CAD Training Technologies, LLC
  • 80. PipingDesignOnline Video Training CAESAR II Statics: Quick Build Model 11.Notice that we do not have all the node numbers available that we saw in the list option, but we can use the following options to do what we need to do: 12.We want to duplicate this loop. Click Duplicate. We see that same Block Duplicate window, but it does not have the other two selections. This is why it is preferable to use the List function, because it gives us that extra flexibility. Right now, when we do this block duplicate, the only place CAESAR II can place the new block of data is at the end of the input. Missing the other two selections that are available in the List feature Only able to insert the new block of data At End of Input 79 Copyright© 2015 All Rights Reserved CAD Training Technologies, LLC
  • 81. PipingDesignOnline Video Training CAESAR II Statics: Quick Build Model 13.Type 1000 in the Node Increment box. Remember, we added 1000 to get to this loop in the model, so we're going to add 1000 to the next set to get. Our largest node inside the blocks is 1,400. Now it's going to go to 2,400. 14.Click OK. So where is our new loop? Well the loop was duplicated, but we have a bigger model, and so it is going to be at the beginning, if there is no node to match, or it's going to be somewhere down the line. 15.Click Zoom Extents. 16.As expected, the loop inserted at the beginning of the system, because there's no common node number between this new group and the existing system. 17.This loop appears in the beginning of the model, because that's the origin. However, if we turn the element list back on the data is at the bottom of the list. Click Classic Piping Input, and then click to display the Elements list at the bottom. 80 Copyright© 2015 All Rights Reserved CAD Training Technologies, LLC
  • 82. PipingDesignOnline Video Training CAESAR II Statics: Quick Build Model 18.Click Elements. 19.Look at the bottom of the list to see the new loop 1,090 to 1,100, because we were duplicating 90 to 100. 20.Our issue now is that we need to push this back to where it belongs in our model. We can, at this point, duplicate it again and drop it. We move the cursor up to the row above 150 to 160, right there at row 26 which is 140 to 150. Use the up arrow key to move the dotted box around 36 to box 26. 21.So we have changed our insertion point to 140 to 150. Right-click the highlighted block, and then navigate to Block Operation > Change Sequence. 81 Copyright© 2015 All Rights Reserved CAD Training Technologies, LLC
  • 83. PipingDesignOnline Video Training CAESAR II Statics: Quick Build Model What this does is basically move the block to a new location. 22.We can either have the block Follow an element or Precede an element. Click Follow. 23.You receive a crosshair. 24.Using this crosshair we just click on the row we want to follow. Click row 26, and you should see the block move up below 26. So as you can see it moved below row 26, which is 140 to 150. Row 27 Is 1,090, row 33 is 1,100, and at row 34 is that other element that we will eventually delete. 25.Let's button up some of these details. Row 27 is not 1090, but instead, 150. Type 150 in the From Node column for row 27. 26.Click OK for the Global Coordinates. 82 Copyright© 2015 All Rights Reserved CAD Training Technologies, LLC
  • 84. PipingDesignOnline Video Training CAESAR II Statics: Quick Build Model 27.Make sure that we don't have any data on that line that we should change nodes, out here. What else is going on at 150? We have our elbow at 2,350, with these extra nodes, but those are not affected by changing this node, 150. Click Classic Piping Input. 28.Click 1100 to look at the other end and that one should be 160. Let’s go to the Classic Piping Input to change instead. Click Classic Piping Input. We want to change this element to end at 160. Notice that 1100 already has restraints and it is up to us to change the restrains to 160. That's the nice thing of using these commands in CAESAR II. Type 160 in the To box, the Node box for the +Y support, and the Node box for the Guide support, respectively. 29.If you use a re-number command and it changes these numbers, it'll automatically update these, as well. But we're doing this one by hand, so we added that in there. Just like we did in the other cases, we have to come in and delete an element. This one is the one between 150 and 160. Extra nodes at 2350 83 Copyright© 2015 All Rights Reserved CAD Training Technologies, LLC
  • 85. PipingDesignOnline Video Training CAESAR II Statics: Quick Build Model 30.Select Row 34. 31.We could also do this graphically, it's already highlighted. Also we could select it with the Select Element tool. Since it is already highlighted let’s just use the Delete command. Click Delete. Click Yes to delete the element. 32.We now have our model with the three loops. We are not done with this model, but let’s quickly look at it and make sure it makes some sense. Close the windows and use the mouse wheel to scroll out and review the model. 33.That looks about right. 84 Copyright© 2015 All Rights Reserved CAD Training Technologies, LLC
  • 86. PipingDesignOnline Video Training CAESAR II Statics: Quick Build Model 34.Click Start Run to run an error check and make sure we didn't cause any errors in this work. We are just running the error check; we are not going to run the model. 35.We can see that there a not any errors, or warnings. We just have this one note, the center of gravity report. For your information, my total dead weight of the system right now is 119,162N. 36.If our numbers don't match, one of us might be wrong. With that, we can then go to one more step where we are going to finish it out. In the next session we are going to change the loop size in the second and third loops, and we are going to add some extra restraints. So get your model to this point, and we can continue. 85 Copyright© 2015 All Rights Reserved CAD Training Technologies, LLC
  • 87. PipingDesignOnline Video Training CAESAR II Statics: Quick Build Model CAESAR II Statics: Quick Build Model Video Nine (Reference Video: C2_S_Quick_Build_V9) 1. We now have our three loops in the model, and we are at the point in the build where we can renumber our system and make it consistent from one to the other. 2. We could do that graphically. We could highlight the entire model to select the entire model. However, we are going to use the List feature. 3. Click Classic Piping input and then click to set the Classic Piping input to the left. 4. Right now, we only have the Classic Piping Input, but we want to show the Element list. Navigate to Edit > List > Elements. 86 Copyright© 2015 All Rights Reserved CAD Training Technologies, LLC
  • 88. PipingDesignOnline Video Training CAESAR II Statics: Quick Build Model 5. You can see the entire model in the element list. The first element is 10 to 20. You can see the loops in here 350 to 400, 1350 to 1400, and 2350 to 2400. 6. We want to highlight the entire model. Click Row 1, and then scroll to the last line. 7. SHIFT-click line 41. 87 Copyright© 2015 All Rights Reserved CAD Training Technologies, LLC
  • 89. PipingDesignOnline Video Training CAESAR II Statics: Quick Build Model 8. We have the block highlighted. 9. Right-click, and then select Block Operation > Nodes. 88 Copyright© 2015 All Rights Reserved CAD Training Technologies, LLC
  • 90. PipingDesignOnline Video Training CAESAR II Statics: Quick Build Model 10.We are now looking at the Block Renumber window. We do not want to increment the numbers and we do not want to add or subtract a number from all these numbers. Instead, we want to renumber the entire sequence. Select Renumber, and we now have available to us both the Start Node, and the Increment Node. 11.We are going to start at Node 10 and we want to increment by 10. Type 10 in the Start Node and then type 10 in the Node Increment. This is going to make it number in order 10 to 20, 20 to 30, and so on. Click OK. 89 Copyright© 2015 All Rights Reserved CAD Training Technologies, LLC
  • 91. PipingDesignOnline Video Training CAESAR II Statics: Quick Build Model 12.The model has not changed. What did change was the node numbers. So now, we have 10 to 20, 20 to 30, 30 to 40, and so on. 13.This did not just change the main point, but all the node numbers for the elbows, and the restraints changed as well. 14.Click , and then click to turn the node numbers back on back on. We now see 10, 20, 30, 40, 50, 60, and so on. 15.Let's take a look at the two loops. The first loop is 3,750 to the back corner 90 Copyright© 2015 All Rights Reserved CAD Training Technologies, LLC
  • 92. PipingDesignOnline Video Training CAESAR II Statics: Quick Build Model 16.The second loop is also 3,750 to the back corner. 17.However, this second loop though is a little bit larger it should be 4,500. There are a few ways we could change this length. 18.We could go back to Classic Piping Input, delete the 3750, and then type minus 4500. Select the 170 to 180 pipe, and then click Classic Piping Input. Type -4500 in the DZ box. That element is now 4,500. 91 Copyright© 2015 All Rights Reserved CAD Training Technologies, LLC
  • 93. PipingDesignOnline Video Training CAESAR II Statics: Quick Build Model 19.If we look at my plot from the top, we can see the changes. Click Top. Scroll in to the second loop using the mouse wheel to see the change in lengths. 20.We see that the whole run moved up on the trailing end, so we have to change that one well as. Select the 190 to 200 pipe, and then click Classic Piping Input. Type 4500 in the DZ box. This loop is now full size. 92 Copyright© 2015 All Rights Reserved CAD Training Technologies, LLC
  • 94. PipingDesignOnline Video Training CAESAR II Statics: Quick Build Model 21.Move down the line to the next loop. 22.We are going to this last loop differently. We are looking down from the top, down the y-axis. 23. We have an interactive feature in CAESAR II that allows us to move geometry. The buttons we want to use are going to be the Move Geometry group shown below. 24.Element 290 to 300 is 3,750, and element 310 to 320 is 3,750. 93 Copyright© 2015 All Rights Reserved CAD Training Technologies, LLC
  • 95. PipingDesignOnline Video Training CAESAR II Statics: Quick Build Model 25.We could change these two individual element lengths either through the Classic Piping Input or through the List feature. Instead, we are going to use the Move Geometry feature. 26.Move Geometry works like this: • We get to a view where we can easily stretch the loop out. We are going to go from 3,750 up to 5,000. Therefore, we want to increase the loop by 1,250. It is convenient for us to look down the y-axis if we want to stretch it in the negative z direction. 27.Click Move Geometry. 28.We are going to move the red targets that you see below: 29.These targets are at every node in the piping system. We clicked Move Geometry, but if you notice, CAESAR II activated the second button Move Geometry (X-Axis). This button means we can move in the x direction. 30.If we want to move in the y direction, we click Move Geometry (Y-Axis) to highlight it. If we want to move in the z direction, we click Move Geometry (Z-Axis). 31.We want to move geometry in the z direction. Click Move Geometry (Z-Axis). 32.Click and drag your mouse to draw a box around the two targets at nodes 300 and 310 to highlight the two of those. 94 Copyright© 2015 All Rights Reserved CAD Training Technologies, LLC
  • 96. PipingDesignOnline Video Training CAESAR II Statics: Quick Build Model 33.You can see that they change color to yellow. 34.Click the target at 300, let go of the mouse, and then push your mouse in the negative z direction. You can see the increment that we are getting is in mm. 35.We want to add 1250 to the line, so we could either find 1250 by hand, or type in minus 1,250. Type -1250 and then press Enter. 36.CAESAR II drops the line 1250mm back. 95 Copyright© 2015 All Rights Reserved CAD Training Technologies, LLC
  • 97. PipingDesignOnline Video Training CAESAR II Statics: Quick Build Model 37.CAESAR II pulled the two nodes back in the element between them. If we hover over the pipe with the Selection tool, we can see it is now 5,000. Click the Selection Tool, and then hover over the 290 to 300 element. 38.This 5000 is the length we want. You can see that this is just one of the ways you can stretch your model. If we had 20 elements in here, they all would have come with us. It is a very nice way to pull around your geometry. You could also reorient the loop, or you could make it a vertical loop by changing not just the z direction, but also the z and the y direction in a single step. 39.If we wanted to go in more than one direction, we just separate the three numbers by commas. So it would be x, y, z. That's my loop. 40.Let's go back to our original view. Click SE Iso. 96 Copyright© 2015 All Rights Reserved CAD Training Technologies, LLC
  • 98. PipingDesignOnline Video Training CAESAR II Statics: Quick Build Model 41.Click to turn off the node numbers. 42.You can now see that we have different sizes of loops in the model. 43.Now, there are a few more things to do to clean up this model. We have to add a couple more restraints. We do not have a restraint on run 10 to 20, and we have to support our loops. 44.One final change will be to add some line stops in the system. Use the Stretch command or just type in the changes. Remember the parameters for the loops are: • First loop is 3,750 • Second loop is 4,500 • Third loop is 5,000 45.Get those three loop lengths in the model, and then come back to the videos, and we will drop in the remaining restraints. 97 Copyright© 2015 All Rights Reserved CAD Training Technologies, LLC
  • 99. PipingDesignOnline Video Training CAESAR II Statics: Quick Build Model CAESAR II Statics: Quick Build Model Video Ten (Reference Video: C2_S_Quick_Build_V10) 1. We now have our three loops of different sizes in the model, we have reset our node numbers throughout, but we want to add some other supports. We have to support the runs in the Z direction. We never added them on the runs indicated below, including on our loops. 2. Click the first piece of pipe as indicated below. 3. Click Zoom to Selection to focus on the selected piece of pipe. 98 Copyright© 2015 All Rights Reserved CAD Training Technologies, LLC
  • 100. PipingDesignOnline Video Training CAESAR II Statics: Quick Build Model 4. This piece of pipe is six meters long, and we wish to drop in a support at the midpoint. 5. There are two ways to put a node in there in order to put the support, by using the Break command. Click Break. • We can insert a single node at any point along the run and give it the new number to find the distance from either the From end or the To end. • We can use Insert Multiple Nodes. It now allows us to add several nodes in this run, equally spaced. Since I said we wanted to put the node in the midpoint, we can make two elements out of this, and get a midpoint mode. 99 Copyright© 2015 All Rights Reserved CAD Training Technologies, LLC
  • 101. PipingDesignOnline Video Training CAESAR II Statics: Quick Build Model 6. The Insert Multiple Nodes option provides the simplest way to do it. We do not have to worry about the math of how far from one end or the other. 7. Select Insert Multiple Nodes. 8. Type 2 in the Total Number of Break Elements box. 9. Click elsewhere and CAESAR II automatically specifies the Node Step. So based on the node step it is going to go from 10 to 15 to 20. 10.We can use the option to Get Support From Node in the piping system. We are going to put a y support and a guide on the line. We want to get a support from another node in the system that has a y support and a guide. Node 50 has both of those. Therefore, we want to get support from node 50. Type 50 in the Get Support From Node box. The support is not taken from that support; it is duplicating that support point. Now you can see the guide and the y in the drawing. 11.If I look at Node 50, it is in the Z direction. While the support we just entered is in the x direction. So you might ask yourself, how can that be the same support? 50 100 Copyright© 2015 All Rights Reserved CAD Training Technologies, LLC
  • 102. PipingDesignOnline Video Training CAESAR II Statics: Quick Build Model 12.We said duplicate the support on the element shown below. Select the element shown below. Click Classic Piping Input. Notice that we did not call it a z support we called it a guide. A guide is always perpendicular to the pipe. This was a fortunate outcome because we have the guide perpendicular to the pipe. The new one is in the x direction, and the old one is in the z direction. 13.Let's go to the other end of the system, and take a look at that element. Click Last Element. Click Zoom to Selection. You should now see the last element. This element is also six meters long. Indicated below are the From node and the To node. From Node To Node 101 Copyright© 2015 All Rights Reserved CAD Training Technologies, LLC
  • 103. PipingDesignOnline Video Training CAESAR II Statics: Quick Build Model Click Node Numbers , so we can confirm the From to To nodes. You can see it is from 410 to 420. We want to put 415 in the middle of the run, so we are again going to use the Break command. These are also available by navigating to Model > Break. You will also notice that CTRL+B, a hot key does the same thing. 14.So we can see the feature, we are going to do it by hand using the Single option. Select Insert a Single Node. Type 415 in the New Node Number box. The distance from either 410 or 420 – let’s use 410 -- is 3,000. Type 3000 in the Distance in (mm.) box. 102 Copyright© 2015 All Rights Reserved CAD Training Technologies, LLC
  • 104. PipingDesignOnline Video Training CAESAR II Statics: Quick Build Model 15.Now, go to the bottom of the window, and type 50 in the Get Support From Node box. 16.Click OK and there's my restrainer of 415. 17.We need to put some more supports in the model, and this is where we could have improved our duplication. We could have added the extra supports on the loops before we duplicated anything. They are all going to have the same support point, three meters back on these runs. 103 Copyright© 2015 All Rights Reserved CAD Training Technologies, LLC
  • 105. PipingDesignOnline Video Training CAESAR II Statics: Quick Build Model 18.Let's quickly do it on the 70 to 80 run. Click on element 70 to 80. Click Break. Use Insert Single Node. Type 75 in the New Node Number box. Type 3000 in the Distance from (mm.) box. This time it is important, because this line is not the same length as the other loop over. Type 50 in the Get Support From Node box. Click OK. 19.You can now see that we get the y support and the guide. 20.We need to remove the guide from this element, because we do not want guides in the loop. Guides cannot grow the way we want them to. 104 Copyright© 2015 All Rights Reserved CAD Training Technologies, LLC
  • 106. PipingDesignOnline Video Training CAESAR II Statics: Quick Build Model 21.Click element 70 to 75, because that is the element where this restraint appears. 22.We normally put the action when you first get to that node. 75 is the first element, which highlights 75. Click Classic Piping Input. 23.Delete the node and the type on the Guide, and then click elsewhere to change the focus to confirm that the type removed. 24.I can duplicate 75 from now on. All I get is the y support. 25.Click element 90 to 100. Remember we are going in the positive z direction. Click Break. I mentioned there is a button to break, using the Model menu to break, or even CTRL+B to break. You find these little synonyms throughout CAESAR II. Use Insert Single Node. 105 Copyright© 2015 All Rights Reserved CAD Training Technologies, LLC
  • 107. PipingDesignOnline Video Training CAESAR II Statics: Quick Build Model Type 95 in the New Node Number box. Distance from 100? That is easier. That is the 3,000. These dimensions are unsigned. It is not a vector it is just a length. So, that is 3,000, positive or negative. Type 3000 in the Distance from (mm.) box. Type 75 in the Get Support From Node box. Click OK. 26.Go down to the next loop. 27.You can see now why it would have been better if we put those on initially, because the restraints would already be duplicated if we took that time. 28.Click the 4,500 length run 170 to 180. Click Break. Use Insert Single Node. Type 175 in the New Node Number box. Type 3000 in the Distance from (mm.) box. Type 75 in the Get Support From Node box. Click OK. 106 Copyright© 2015 All Rights Reserved CAD Training Technologies, LLC
  • 108. PipingDesignOnline Video Training CAESAR II Statics: Quick Build Model 29.Click element 190 to 200. Click Break. Use Insert Single Node. Type 195 in the New Node Number box. Distance from 200 is a number I know. That's the 3000. Select From Node 200 and then type 3000 in the Distance from (mm.) box. Type 75 in the Get Support From Node box. Click OK. 30.Then the last two and we are done with this, and we will take a break, and then we'll finish up this model. 31.Click element 290 to 300, which is five meters long. 107 Copyright© 2015 All Rights Reserved CAD Training Technologies, LLC
  • 109. PipingDesignOnline Video Training CAESAR II Statics: Quick Build Model Press CTRL+B. Use Insert Single Node. Type 295 in the New Node Number box. Distance from 290-- that's the right direction, 290 to 300 is 3,000. Type 3000 in the Distance from (mm.) box. Type 75 in the Get Support From Node box. Click OK. 32.Now, the last one. Click element 310 to 320. Click Break. Use Insert Single Node. Type 315 in the New Node Number box. Distance from 320, coming back, is 3,000. Select From Node 320 and then type 3000 in the Distance from (mm.) box. Type 75 in the Get Support From Node box. Click OK. 108 Copyright© 2015 All Rights Reserved CAD Training Technologies, LLC
  • 110. PipingDesignOnline Video Training CAESAR II Statics: Quick Build Model 33.So all of these supports are three meters off of the main run. Let’s take a look down the global x-axis. Click Right, and then click Node Numbers to turn off the node numbers. 34.Notice that all the supports should line up. 35.Note that we roll the mouse wheel to zoom in and zoom out. Notice that the vanishing point is where the mouse cursor is in the screen. If you put it up in the right-hand part of the screen it is going to vanish towards that point. 36.If you are going to use a mouse wheel to zoom, place your mouse where you want it on the screen, at your center of your zoom in, or zoom out. That’s out model. 37.Let's reset our plot. 38.We have just one more thing to do. We are going to add some line stops on this line. We do not have any axial supports on the main run, so we might need that for preventing large motion for any kind of hammer event that happens to the system. Get the supports in the run, and we'll get ready to wrap this up. The support on the main run The rack supports So the anchor's out to the loops, and then back out the other end. 109 Copyright© 2015 All Rights Reserved CAD Training Technologies, LLC
  • 111. PipingDesignOnline Video Training CAESAR II Statics: Quick Build Model CAESAR II Statics: Quick Build Model Video Eleven (Reference Video: C2_S_Quick_Build_V11) 1. Our task now is to add the extra line stops in this model. We want to put a line stop on the third vent before the loop. We are going to put line stops at both nodes indicated below. We can just drop them in as we get to those nodes. 2. At node 130, we are going to put a line stop. Select the element from node 120 to 130. 110 Copyright© 2015 All Rights Reserved CAD Training Technologies, LLC
  • 112. PipingDesignOnline Video Training CAESAR II Statics: Quick Build Model 3. A line stop is an axial restraint, so it is going to be in the x direction. We have highlighted the element and we know that we are specifying restraints when we get to that node for the first time. Click Classic Piping Input and we see the restraints at 130. 4. We want to add another restraint at 130 in the axial direction. Now we know that is going to be in the global x direction, so we can type in x. However, we get a more flexibility by calling it limit stop, or line stop. Type 130 in the third Node, and then select LIM from the Type list. 5. This places an axial restraint on the run. This element goes in the x direction; therefore, the new restraint is in the x direction. 6. If we go back to the model, we ask, “Where’s my restraint?” The restraint is on the centerline and we cannot see it. However, if we go translucent with the pipe, which right now we are showing the fancy shaded rendered view, but we can also add Translucent Objects to make it translucent, and can now see inside the pipe. Click Translucent Objects to see the restraint in the middle of the pipe. 7. Click Translucent Objects to turn it back off. If you do not remember about Translucent Objects, you can change the size of the restraint. The restraints are active right now, because Show Restraints is on. 111 Copyright© 2015 All Rights Reserved CAD Training Technologies, LLC
  • 113. PipingDesignOnline Video Training CAESAR II Statics: Quick Build Model Notice that we have a little drop-down arrow where you can change the size. Click Largest to make them bigger and to see the restraints. They are overly large, but that is just one other way you could modify that. 8. Move down the line to the other one, and click element 240 to 250. 112 Copyright© 2015 All Rights Reserved CAD Training Technologies, LLC
  • 114. PipingDesignOnline Video Training CAESAR II Statics: Quick Build Model 9. Click Classic Piping Input to view node 240 to 250. 10.Type 250 in the third Node box and then select LIM from the Type list. 11.Go back to the model and look inside the pipe. Click Translucent Object. 12.You can now see the line stop. 13.We have our system built, so let's do the error check for this model. Click Start Run. You see that this is a very clean model. There are no missing bends. CAESAR II does not know if we are going in the right direction, but this is the first step in making sure we have a good model. My total dead weight now is 122,391.4 N. We break it down into pipe alone, insulation alone, refractory alone, fluid alone, and then we add them up. 113 Copyright© 2015 All Rights Reserved CAD Training Technologies, LLC
  • 115. PipingDesignOnline Video Training CAESAR II Statics: Quick Build Model The x,y,z coordinates are based on the origin of the piping system. If we just wanted to pick a pure pipe alone over my entire model, which would be the center of gravity. We have to go to that point in space, and grab that one point, then we can lift it up, and it will not fall over. This is just the balancing point, the center of gravity. 14.We can run this model now. We are not that interested in the results for this exercise. This exercise was using input capabilities efficiently to build models quicker. We are going to run it, so we have some numbers to work with for use later on in this series. Let’s look at the load cases. 15.Click Edit Static Load Case. Our default load cases, the recommended load cases are the operating case (weight (w) + temperature (T1) +, pressure (P)) and the installed case of weight plus pressure. We also see our sustained stress calculations. Finally, the difference between these two load cases, L1 and L2, will be the strain range for the system. We'll call it the expansion stress check. 114 Copyright© 2015 All Rights Reserved CAD Training Technologies, LLC
  • 116. PipingDesignOnline Video Training CAESAR II Statics: Quick Build Model 16.Load cases one and two we use for their structural information. • The system and operation system (L1) • The system, basically, at installation, with some pressure in it (L2) • The third case is the expansion stress range (L3) The first cases we use for structural response, load on the equipment, and position of the piping system. The second two load cases we use for the code defined stress calculations. 17.Click Run the Analysis, and CAESAR II brings us to the output processor. 18.Click 1 (OPE) W=T1+P1, and then select 3D Plot to look at the 3D plot of the operating case. 115 Copyright© 2015 All Rights Reserved CAD Training Technologies, LLC
  • 117. PipingDesignOnline Video Training CAESAR II Statics: Quick Build Model 19.Roll the mouse wheel until your view is similar to the image below: 20.Click Deflected shape to see the deflected shape of the system. 21.The bronze colored pipe is the deflected shape, and the blue pipe is the original position. 116 Copyright© 2015 All Rights Reserved CAD Training Technologies, LLC
  • 118. PipingDesignOnline Video Training CAESAR II Statics: Quick Build Model 22.Now if you have trouble seeing any magnitude in the model you can increase the magnification of the distorted shape. This is not to scale. Click the drop-down arrow and then select Adjust Deflection Scale. You can see the Displacement Scale Factor is 3.28. If we double that, it will doubly amplify this result. Type 7, which is about twice that, in the Displacement Scale Factor box. Yes, we could say that it increased. You have different tools like this in CAESAR II. We are not going to review this data right now. 23.Use your mouse to move to the third loop with the longer run coming off it. 117 Copyright© 2015 All Rights Reserved CAD Training Technologies, LLC
  • 119. PipingDesignOnline Video Training CAESAR II Statics: Quick Build Model 24.Notice we are shoving it out a little more. 25.The guides at the end of the line prevent it from kicking out in the positive x direction. 26.So, that is our system. 27.Before we go on, we want to get a good list of these node numbers. In fact, now I realize that we should have re-numbered the whole system one more time. Review this plot, or also, if you wish, go back and look at some of the numbers, if you want to look at the numbers. 28.Click the inside x to close, because we want to stay in the output processor, but we just want to get out of the plot processor. 118 Copyright© 2015 All Rights Reserved CAD Training Technologies, LLC
  • 120. PipingDesignOnline Video Training CAESAR II Statics: Quick Build Model 29.You can look at some of the other numbers. The first solution is Displacements, and then we get our loads in the system from the final position, and then the stress from that. You can look at those reports. 30.Notice, we also have an animation. Click View Animation. The DynPlot screen to view animation appears. Click Maximize to make it full screen. Scroll in to zoom in a little, and we are going to animate this model. 31.Listed are two ways to animate the model • We have animate the center line (Motion) • Or animate the volume (Volume Motion) Click Volume Motion to animate the volume to look at the load case, the operating case. 119 Copyright© 2015 All Rights Reserved CAD Training Technologies, LLC
  • 121. PipingDesignOnline Video Training CAESAR II Statics: Quick Build Model This other system is greatly exaggerated, but we get a good trend of what is happening in the system. In the video, you see the three loops collapsing. Below an image represents these collapsing loops. 32.You can see above that the third one collapsed the most, because of the longer runs at either end. We can see the first line grows axially, and being bent out a little bit, because it is guided, so it cannot slide out evenly. 33.We see a nice model that does not sag at all. We do not have any nodes in the midpoints to see any sag. We just have our support points, so we are relying on good support spacing here to make sure there is not excessive sag between these support points. Get your model to this point, and then we will do one more session. 34.In the next session, we reset all the node numbers in the model, and then create an isometric to record all those node numbers. We have a piece of paper in front of me with the node numbers that we can reference when we look at the output. If we give the results to a structures engineer, he will want to know where those node numbers are in his model. Finish out this session with one more video, and then we will move on to the next job. 120 Copyright© 2015 All Rights Reserved CAD Training Technologies, LLC
  • 122. PipingDesignOnline Video Training CAESAR II Statics: Quick Build Model CAESAR II Statics: Quick Build Model Video Twelve (Reference Video: C2_S_Quick_Build_V12) 1. We now need to do one more item on this model. I typically put node numbers on the drawing before I start the input session. It is good to know where all these nodes are going to be. However, we were using some of these duplication features in CAESAR II, allowing CAESAR II to enter its own nodes and kind of lost control of our node sequencing. In fact, we added some more breakpoints in this model and we want to get those lined up. 2. What we want to do now is reset the node numbers throughout the system, make it nice and clean, and then create a hard copy as a reference of those node numbers using Isogen. We are going to create a drawing, a DWG file, with the node numbers on the drawing and then print out a copy of that model. 3. The first step is to renumber the entire system. We want to use one of the selection arrows, called Select Group. Click Select Group. Added Breakpoints 121 Copyright© 2015 All Rights Reserved CAD Training Technologies, LLC
  • 123. PipingDesignOnline Video Training CAESAR II Statics: Quick Build Model 4. Use your mouse to drag a box to select the entire model. Make sure you get it all. 5. Click Renumber. 6. We do not want Increment, we want to Renumber. Select Renumber under Action in the Block Renumber dialog box. 7. We are going to start at 10 again and go by 10's, so 10 to 20 to 30 to 40, and so on. Type 10 in the Start Node box, and then type 10 in the Node Increment box. 122 Copyright© 2015 All Rights Reserved CAD Training Technologies, LLC
  • 124. PipingDesignOnline Video Training CAESAR II Statics: Quick Build Model 8. Click OK. 9. Select the drop-down arrow next to the single piece of paper, and then select Elements. 123 Copyright© 2015 All Rights Reserved CAD Training Technologies, LLC
  • 125. PipingDesignOnline Video Training CAESAR II Statics: Quick Build Model 10.Now you can see the nice clean data, 10, 20, 30. Remember we had node 15 in there, so this is a very clean model. However, now we do not know where our nodes are. 11.Let's take a couple points in the list that are useful to put on our plot. Well, let's put the first node—we should write down some of these node numbers-- node ten is our origin. We want to show that on our plot. 124 Copyright© 2015 All Rights Reserved CAD Training Technologies, LLC
  • 126. PipingDesignOnline Video Training CAESAR II Statics: Quick Build Model 12.We are just going to come in to the points on either end of the loop, so node 60 begins that loop and node 150 ends that first loop. 13.You get the drift. We are going to drop in the very last node in the model at node 500. 14.Let us go to a quick plot capability we have in CAESAR II. Save this model by error checking it. Click Start Run. This automatically saves the model. Make sure there are no errors. Yes, we can see this is the same model. 125 Copyright© 2015 All Rights Reserved CAD Training Technologies, LLC
  • 127. PipingDesignOnline Video Training CAESAR II Statics: Quick Build Model 15.Close the Piping Input window and go back to the main menu of CAESAR II. 16.Click Generate Stress Isometrics in the main menu. This opens the C2Isogen - (QUICK BUILD) window. 126 Copyright© 2015 All Rights Reserved CAD Training Technologies, LLC
  • 128. PipingDesignOnline Video Training CAESAR II Statics: Quick Build Model 17.Let's assume you know nothing about Isogen, but you see the Create Isometric Drawing button. Click Create Isometric Drawing. 18.We are going to Use Default Style (1). CAESAR II has already created a PCF, a piping component file. Isogen reads the PCF file to create the plot, that nice drawing (2) of our model. CAESAR II has a copy of personal Isogen shipped with it, so you can do this as well. We are not going to edit the PCF; we are just going to use it (3). Select Use Default Style and then click OK. 19.Now Isogen creates a DWG, a drawing file that we can review and annotate. Isogen actually gave me three different drawing files, QUICK BUILD.DWG, QUICK BUILDA.DWG, and QUICK BUILDB.DWG. 1 2 3 127 Copyright© 2015 All Rights Reserved CAD Training Technologies, LLC
  • 129. PipingDesignOnline Video Training CAESAR II Statics: Quick Build Model 20.Shift+click and select the third one to select them all. 21.Click View to view those files. 22.The machine I am using has AutoCAD installed on it, so it's going open up AutoCAD, because it's associated with DWG files, and show me those three drawings. I am working with a two- monitor system. I am just going to take these drawing files and lay them on top of this screen. You now have opened the three drawing files. The one you see now is the third one. 23.Zoom into the tail end of the system on the right. You can see the anchor, the guide and the y support. Anchor Guide Y Support 128 Copyright© 2015 All Rights Reserved CAD Training Technologies, LLC