
Recommended
More Related Content
What's hot
What's hot (17)
Viewers also liked
Viewers also liked (15)
Similar to MDT Step public
Similar to MDT Step public (20)
MDT Step public
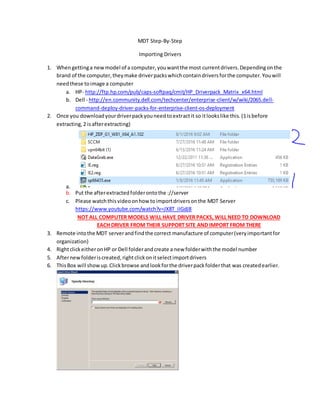
- 1. MDT Step-By-Step Importing Drivers 1. Whengettinga newmodel of a computer,youwantthe most currentdrivers.Dependingonthe brand of the computer,theymake driverpackswhichcontaindriversforthe computer.Youwill needthese toimage a computer a. HP- http://ftp.hp.com/pub/caps-softpaq/cmit/HP_Driverpack_Matrix_x64.html b. Dell - http://en.community.dell.com/techcenter/enterprise-client/w/wiki/2065.dell- command-deploy-driver-packs-for-enterprise-client-os-deployment 2. Once you downloadyourdriverpackyouneedtoextractit so itlookslike this.(1isbefore extracting,2 isafterextracting) a. b. Put the afterextractedfolderontothe ://server c. Please watchthisvideoonhow toimportdriversonthe MDT Server https://www.youtube.com/watch?v=JX8T_iIGdJ8 NOT ALL COMPUTER MODELS WILL HAVE DRIVER PACKS, WILL NEED TO DOWNLOAD EACH DRIVER FROM THEIR SUPPORT SITE AND IMPORT FROM THERE 3. Remote intothe MDT serverandfindthe correct manufacture of computer(veryimportantfor organization) 4. RightclickeitheronHP or Dell folderandcreate a new folderwiththe model number 5. Afternewfolderiscreated,rightclickonitselectimportdrivers 6. ThisBox will showup.Clickbrowse andlookforthe driverpackfolderthat was createdearlier.
- 2. 7. Once folderisselectedandfound,clicknextandthiswindow willshow 8. Thisis justa summaryscreentellingyouwhatitsdoingandwhere itsgoing.Justclicknext. 9. Afteryouclicknext,itwill openthe driversandsearchfor filesitwantstodownload.It’sa very smart programand will grabdriversfromothermodelsif itneedsit.However,sometimesnotall driversare grabbedand additiondriverswill needtobe importeddependingoncomputer.(aka. Testthe computerbefore deployment) 10. Once thisprocessis completed,itshould“ProcessCompletedSuccessfully”clickfinish
- 3. 11. Once you clickfinish,itshouldlooklike this. 12. NOTE: Sometimesdriverslookthe same andhave (1),(2),etcbehindthem. THESE ARE NOT DUPLICATES. DO NOT DELETE ANY DRIVERS. 13. PE Driversare sometimesneeded. These are special driversthatare calledPre-environment drivers.These driversare forthe bootimagesthatMDT needs.WithoutPEdrivers,nothingwill workcorrectly.There are differentversions of PEdriversandsince we are now on Windows10, we use version10.0v PE drivers.PEDriverscan be foundbelow andneedtobe updated regularlyasnewmodelscome in.(Importingthemisthe same wayas normal drivers,just differentfolder) a. HP - http://ftp.hp.com/pub/caps-softpaq/cmit/HP_WinPE_DriverPack.html b. Dell - http://en.community.dell.com/techcenter/enterprise-client/w/wiki/2065.dell- command-deploy-driver-packs-for-enterprise-client-os-deployment 14. If still unclear about my instruction,please watch videosbelow a. Importing Drivers- https://www.youtube.com/watch?v=JX8T_iIGdJ8 b. Importing PE Drivers - https://www.youtube.com/watch?v=j5a4AV9ZG50 OS Injection 1. If the OS came as an ISO,that needstobe extracted anywhereonyourowncomputer.If not, proceedontostep2. (Shouldlooklike below) **Note,if youdonotget image off of KMS server it wontwork.KMS servercontainsspecial wim.filesthatMDT needs**
- 4. 2. If these filesaren’talreadyonthe server,place thesefilesintoone folder,ontothe server.(doesn’tmatterwhere) 3. Remote into MDT and rightclick “OperatingSystem”(thiswindow will come up) 4. Select“Full Setof source files”thisiswhatyoudo 98% of the time.Youwoulduse customimage file if youwere tocapture of computeranduse that OS for deployments 5. Clicknextandlocate the folderyoumade on the serverandselectitand clicknext
- 5. 6. It will thenaskyouwhatdo you wantto name it.Name is whatversion,bit,anddate of image. 7. It will thenimportthe OSintoMDT and once finished,will eithersayuploadcomplete orfailed. 8. If unclearon howto do this,please watchvideobelow. https://www.youtube.com/watch?v=u8tI7uDCdSA Selection Profiles Selection profiles within MDT are need because it helps specify which drivers go to which Task Sequence. Without Selection profiles, deployments times take very long and slows down overall process.
- 6. 1. Firstyour goingto wantto go to the MDT serverand onthe leftside,findadvanced Configurationandthenexpanditandselectselectionprofile 2. Rightclickon selectionprofilesandthenthisbox will show up 3. Under “Selectionprofile name”name itthe model of computer.
- 7. 4. On the nextpage,you’ll see this 5. You will needtoexpand“Outof Box Drivers”and findthe model of computeryourtryingto deploy. (ex.Prodesk600G2) youthenalsohave to check yourPE drivers. DependingonWhat OS youare deployingdependsonPEDriversyouselecthere andOutof Box Driversas well.
- 8. 6. Clicknextandsummarypage will come upand selectionprofileisnow complete.Whichshould looklike thiswhendone. 7. If my intructionsweren’tclear,please follow the videobelow. https://youtu.be/nsU8xVszslc?t=2m6s Creating A Task Sequence A Task Sequence basicallybringseverythingtogetherandmakesitpossible to image computers. 98% of the time if someone doesn’t work, is due to the TS. The way I setup op TSs is by computer make and model. 1. What youwant to do firstisgo intothe MDT servergo to Task Sequences,Windows10,and thenthe make of the computeryouwant to deploy(Ex.HPor Dell) Once youfoundthe folder for the make,rightclickand select“New TaskSequence”
- 9. 2. Once click,thisbox will shoe up 3. Task sequence isimportant.If anyerrorsoccur,MDT will give youerrorsbyTS ID.I name our TS ID by 000xx. Aswritingthisrightnow,currentnumberis00031, nextone wouldbe 00032 and so on. 4. For the TS name,thisis where youwantto putthe model name of the computer. (DONOT PUT HP PROBOOK 4560P do PROBOOK 4560P) 5. Clicknext 6. Nextpage will looklikethis,Leave itanddonot change this 7. Clicknext
- 10. 8. Nextpage shouldlooklike this,selectdesiredOS,mostof the time it’sthe mostcurrent OS. 9. Once you clicknext,thisbox will show up. Since we dohave aKMS server,we don’tneedto worryabout changinganything.However,if forsome reasonyouwantto use a MAK key,this
- 11. selectitand putthe keyin. 10. Once you clicknext,fill outthe boxeshow Ihave them.If youwishtohave differenthome IE pages,youcan have that changedhere. 11. Once you clicknext,putinthe local Administratorpasswordyouwishtohave
- 12. 12. Once you clicknext,youwill getasummarypage whichyou can justhitnextagainand TS will be created. 13. Once done,itshouldlooklike this. 14. Selectthe TS youjustmake and openitup.
- 13. 15. From here youcan editthe name yousee as well aswhichOS It can be deployedon.Select “Task Sequence”tab 16. From here you’ll see ascreenthatlookslike this.Thisiswhere all the meatandbonesand customaztionscanbe done withinadeployment.ForeverTSyou do, youneedto dostep17 down,to all newTS’s.
- 14. 17. Lefthand side,select“Injectdrivers” 18. From here under“Choose aselectionProfile”Selectthe profilemade earilertomatchthe TS. Thisis so the rightdriversgoto the rightmodel.If youdon’tdothis,it will pickandchoose whichdriversitwantswhichisntalwaysgoodand takesa longtime.Afterthisisdone,hitapply.
- 15. 19. *** If youeverchange the OS and wantto update ityou can change it fromhere.Clickbrowse and selectthe updatedOS*** 20. Thisnextstepcreate a role whichenable .NET3.5 a. FirsthighlightWindowsUpdate b. Second,clickADD c. Third,clickroles
- 17. 21. Next,copywouldIhave intothe new TS includingname andcheckmarks.Thenhit apply 22. Nextwe wantto Addstandardapplications.These applicationsneedtobe install onall computerregardlesswhattheyare.These programsARENOT inthe selectionapplication option.Programsthatare standardare Omessenger,Adobe Reader,SAP. a. FirsthightlightEnable .NET3.5 b. Second,Add c. Third,General
- 19. 23. Once created,selectitandrename itto what programit is as well andselect“Install asingle application”andclickbrowse
- 20. 24. ThenselectdesiredapplicationandclickOk 25. ThenclickApplyanddo thisfor the nextprograms.
- 21. 26. Once you getdone puttinginthe standardprograms,thenyou’ll needtoaddthe application selectionlist.
- 22. 27. Thenleave ithowit isinsteadornormallychangingitlike below. 28. Nextisaddinginthe EndpointProtectioninstallwhichshouldbe the lastthingMDT installssince it hasto do updatesandetc.
- 23. 29. Followthisorder 30. Once created,rename itand putthiscode below intothe commandline 31. "serverDeploymentShare$MDTApplicationsSymantecEndpointProtection 12.1.6168.6000 (x64)Sep64.msi" ALLUSERS=1 /qb /norestart 32. ThenclickOK and all done. 33. If my instructionsweren’tclear,pleasefollow videolinkbelow https://www.youtube.com/watch?v=GnG_Fg3utyg Updating Deployment and Boot Images This is important step, if you don’t update deployment and boot images, nothing will work and no changes will be saved.
- 24. 1. Go intoMDT and rightclick onMDT DeploymentShare andselectUpdate DeploymentShare 2. You will see thisbox open.Nowthere are twooptionhere.First one isoptimize the bootimage updatingprocess.Thisisthe normal setyou will doaftercreatingthe normal stepsabove. However,number2recreatesthe whole bootimage.Thisshouldonlybe done if the bootimage iscorrupt or if youmade major changes (loadingLOTS of driversandmakingLOTS of TS at one time) Normally,select1and clicknext.It thenwill update the MDTserverand bootimage.
- 25. 3. Afterbootimage iscomplete,itwill getyouasummaryand say complete.Fromhere youhave to tell there DeploymentServertoUse the new image. 4. Rightclickon Lite Touch WindowsPE(x64) andsay replace
- 26. 5. Nexthitbrose andselectthe x64 boot image andclickopenand next 6. Keepclickingnextanditwill update the bootimage.
- 27. NTLite NTLite is our custom imaging software. This software can customize images by injecting updates, registry changes, add and removing and over all changing the OS to what you want. This is a very powerful tool and needs to be taken seriously and once image is completed IT NEEDS TO BE TESTED 100%. That being said, the images and software is forever changing so my documentation may or may NOT match what you see. 1. OpenNTlite, 2. Once open,itmay wantto update,letitupdate itself andinstall anyupdates 3. From here youwouldwantto downloadanimage fromthe KMS site andplace it somewhere where youwouldremember.Once thatiscomplete,clickaddandfindthe EXTRACTEDfiles. ***Note,99.9% of the time yougetan OS, it’sinan ISO format,youwill needtoextractthe iso intofiles***
- 28. 4. Once folderisselected,clickopenandrightclickonthe OSand clickload. 5. Thisproccesstakesawhile. 6. Once its done itwill loadintoascreenthat lookslike this. 7. Notice,myXML sessionissavedanddoesapply itself ontothe image.Whatthatbasicallymeans isit checksand unchecksthe boxesInormallywoulduncheck.Soyoudon’thave todo anything. If you do wantto see whatI do and Don’tcheck,I provide the XML textbelow. a. <ComponentFeatures> b. <Feature enabled="yes">CortanaSupport</Feature> c. <Feature enabled="yes">DefaultFonts</Feature> d. <Feature enabled="no">Hyper-V</Feature> e. <Feature enabled="no">ManualSetup</Feature> f. <Feature enabled="yes">OfficeSupport</Feature>
- 29. g. <Feature enabled="no">NetworkDiscovery</Feature> h. <Feature enabled="yes">OOBE</Feature> i. <Feature enabled="yes">Printing</Feature> j. <Feature enabled="yes">Recommended-All</Feature> k. <Feature enabled="no">Recommended-Tablet</Feature> l. <Feature enabled="yes">USB</Feature> m. <Feature enabled="no">VisualStudio</Feature> n. <Feature enabled="yes">AppxSupport</Feature> o. <Feature enabled="yes">WindowsUpdate</Feature> p. </ComponentFeatures> q. <MachineDrivers> r. <Machine enabled="yes">HostMachine</Machine> s. <Machine enabled="no">Hyper-VVM</Machine> t. <Machine enabled="no">ParallelsVM</Machine> u. <Machine enabled="no">Virtual Box VM</Machine> v. <Machine enabled="no">VMWare VM</Machine> 8. Once finishwithcustomizingmove toapplytab 9. You wantto uncheckand recheckCreate ISOand name the ISO andthenclicksave.
- 30. 10. Afterthis,youwantto hitthe biggreenbuttononthe topleftof the program.Thiswill startthe image creationprocess. Odds and Ends Like I saidbefore,thisserverismassive and is always changing. Decided to post some odds and ends if you ever run into them. Winrar Need winrar to extract your iso’s and images after creating custom ones as well as downloading them from the Microsoft Website http://www.rarlab.com/download.htm Images onto USB First, you’ll need to download and install the tool from Microsoft’s website, and then you’ll need to make sure that you have an ISO image of Windows 7, 8, or 10. This also works with Vista or XP, of course, but most people wouldn’t be installing those these days. If you have issues using the tool, you might want to reformat your drive as NTFS beforehand, which you can do by right-cicking the drive icon in Windows Explorer.
- 31. Creating a USB Drive with the Windows Installer It’s a pretty straight forward process, first browse to the location of your Windows ISO file and click Next.
- 32. Select USB device…this also helps you burn the ISO to DVD as well if you need that option. Choose your flash drive and click Begin copying.
- 33. Now just wait for the process to complete. The drive will be formatted and files copied to the flash drive. When the process is finished you will be able to see the files on the flash drive as you would if you opened the installation disc. Now you can start the installation on any computer that allows you to boot from a USB drive.
- 34. WinToFlash Update: this utility distributes adware so we’re not linking to it anymore. If you want to transfer a Windows 7 installation disc to USB…another super easy utility to use is WinToFlash. Just follow through the straight forward wizard, and you’ll be ready to install Windows 7 from your flash drive in no time.
- 35. The neat thing about this utility is it also offers different advanced features and tasks for other versions of Windows too.
- 36. It’s as easy as choosing the location of the Windows installation disc and the USB drive. Where in this example the DVD is drive (E:) and the flash drive is (F:). They recommend to turn off your Antivirus to increase the process speed, but we had MSE running on our machine and it didn’t seem to affect performance at all. Next, you’ll need to agree to the Windows 7 EULA and hit continue.
- 37. Now just wait until the drive is formatted and the files are transferred over to the USB drive. The amount of time it takes will vary between systems. In our test it took around 10 minutes to complete over to an 8GB flash drive.
- 38. That’s it! Now the drive is ready so you can install Windows 7 on your netbook or any other computer that supports booting from a USB drive.
- 39. Conclusion WinToFlash is still in Beta and doesn’t require installation to use. Microsoft’s tool apparently became Open Sourced recently, requires installation, and a few other requirements like .NET Framework. Both of these tools are free and each one works a bit differently, so you’ll need to decide which will work best in your situation. If you don’t want to manually create a bootable flash drive and copy the install files over, then you might want to check out these extremely simple to use utilities. Download WinToFlash (Because there is adware in this application we’ve removed the link) Download Windows 7 USB/DVD Download Tool KMS Key (needed for USB installs) Microsoft Office Update Injection When you slipstream Service Pack 2 with your Office 2010 installation media, Office 2010 will be directly installed at Service Pack 2 level, saving you the trouble of applying it afterwards. All you need is Office 2010 Service Pack 2 and the installation file or DVD of Office 2010. Optionally, you can also modify the installation to already accept the EULA, fill out your Product Key and customize some additional settings. Folder Structure Slipstreaming process Accept EULA, set Product Key and additional options Example Folder structure This guide assumes the following folder structure but you can of course differ from that; C:Office2010
- 40. C:Office2010DVD C:Office2010SP2 C:Office2010SP2extract Slipstreaming process 1. Download the administrative version of Office 2010 SP2 for your language and save it to; C:Office2010SP2 Download: Service Pack 2 for Microsoft Office 2010 (KB2687455) 32-Bit Edition Download: Service Pack 2 for Microsoft Office 2010 (KB2687455) 64-Bit Edition 2. Extract the downloaded Service Pack 2 file and extract it to the C:Office2010SP2extract folder via the following Run command (the command below assumes the English 32-bit version of SP2); "C:Office2010SP2officesuite2010sp2-kb2687455-x86-fullfile-en-us.exe" /extract:"C:Office2010SP2extract" Note: The command above is a single line. You can open the Run command via Start-> Run or by pressing +R on your keyboard. 3. When you get a User Account Control (UAC) prompt, press continue or provide administrator credentials. 4. Accept the EULA of the Service Pack. 5. Insert your Office 2010 DVD and copy its contents to; C:Office2010DVD If you only have a single installation file (*.exe) open the Run command and type; "<path to your installation file>" /extract:"C:Office2010DVD" If your DVD contains both the 32-bit (x86) and the 64-bit (x64) version of Office 2010, then you could either only copy over the contents of the folder matching the version that you want to use, or copy over everything and repeat the slipstreaming process for the other version as well (just in case you decide to use the other version later on). 6. Copy all the files from the C:Office2010SP2extract to the Updatesfolder in; C:Office2010DVD 7. When the copy is finished, you can write the contents of the C:Office2010DVD folder to a DVD and you’ll have an Office 2010 SP2 slipstreamed DVD!
- 41. Note: You can follow these instructions as well to include updates and otherhotfixes. AcceptEULA, set ProductKey and additionaloptions Aside from including the Service Pack, you might want to make some changes to the installation process. For instance, to never prompt you for the EULA anymore or to already have the Product Key filled out for you. Office Customization Tool (OCT) If you have the Enterprise version of Office 2010, then you can set these additional installation options and settings by using the Office Customization Tool (OCT). To start this tool start setup.exe from the Office 2010 DVD (or extracted installation files) with the /admin switch. The OCT not only allows you to customize the installation experience but also allows you configure Office settings itself. This will allow you for instance to deploy Office with a preconfigured Outlook mail profile. Config.xml If you don’t have an Enterprise version, or as an alternative, you could customize the config.xml file that Office uses for its installation. You can find this file in the productname.WW folder. For instance, the WW folder for the Retail version of the Professional Plus editions of Office 2010 is called; ProPlusr.WW You can set the variables between the <Configuration Product="productname"> and the </Configuration> tags. Tip! For documentation about modifying the config.xml file of the Office installation can be found here; Config.xml file in Office 2010 Example The example below will modify the installation for the Retail version of the Professional Plus edition of Office 2010 to; Accept the EULA.
- 42. Fill out the installation key. Sets the name of the person responsible for the license. Sets the name of the company responsible for the license. <Configuration Product="ProPlusr"> <Display Level="full" CompletionNotice="yes" SuppressModal="no" AcceptEula="yes" /> <PIDKEY Value="1234512345123451234512345" /> <USERNAME Value="Robert Sparnaaij" /> <COMPANYNAME Value="HowTo-Outlook.com" /> </Configuration> Note that the Product Key does not require the dashes (-) to separate the 5 key sections. https://www.youtube.com/watch?v=l_azrPJ3ksM Can find updates here, need to download extract updates. https://support.office.com/en-us/article/Office-Updates-a118ec61-f007-492f-bfa5-5a6f764d5471 Upgrading MDT Server to New Version **TAKE EXTREME CAUTION, ONCE YOU GO FORWARD, CANT COME BACK**
- 43. In this post you learn to upgrade an existing MDT 2013 environment, with or without ConfigMgr integration, to MDT 2013 Update 1. The guide is divided in two parts: Upgrading MDT 2013 Lite Touch (standalone) to MDT 2013 Update1 Upgrading MDT 2013 Zero Touch (integrated with ConfigMgr 2012 R2) to MDT 2013 Update1 Update September16, 2015: MDT 2013 Update 1 has been re-released, new build (8298). Read the announcement from the product team: MDT 2013 Update 1 re-released(build8298) http://blogs.technet.com/b/msdeployment/archive/2015/09/15/mdt-2013-update-1-re-released- build-8298.aspx Download links MDT 2013 Update 1 (build 8298) download link: http://www.microsoft.com/en- us/download/details.aspx?id=48595 Now, back to the upgrade guides! Upgrading MDT 2013 Lite Touch (standalone) to MDT 2013 Update 1 Note #1: Don’t forget to create new task sequences after the upgrade, the MDT 2013 Update 1 task sequence templates have updated logic on disk partitioning (and a few other updates). Note #2: Not applicable for this guide, but please note that new deployment shares will be locked down by default (security)
- 44. Note #3: There is a known issue in Windows ADK 10 (which MDT uses) that you should know about. It’s not the end of the world, there is a workaround: Updating the deployment share breaks on Windows Server 2012 R2 if you have a fast disk So, the injection of the MDAC component into the MDT 2013 Update 1 boot image breaks when running on Windows Server 2012 R2, in combination of having a fast disk (SSD). This is a known bug in the Windows ADK 10. Keith Garner has posted a more detailed explanation on the issue: https://keithga.wordpress.com/2015/08/17/mdt-2013-uberbug01-mdac-and-the-fast- machine/ Workaround #1: Update the deployment from a Windows 10 machine with MDT 2013 Update 1 and Windows 10 ADK installed (open deployment share remotely). Workaround #2: Disable the MDAC from the MDT boot images, no harm if you are not using the MDT database.
- 45. Continue with the real upgrade work Other than above, upgrading MDT 2013 Lite Touch to MDT 2013 Update 1 is quite straight forward, simple follow these steps: 1. Makea backup copy of your deployment share (yes, complete backup). 2. Check if there is a pending reboot, use the https://gallery.technet.microsoft.com/scriptcenter/Get- PendingReboot-Query-bdb79542 fromTechNet Gallery, written by Brian Wilhite. To run the cmdlet, first load the script as a function by "dot sourcing" theGet-PendingReboot.ps1 script. Run . .Get-PendingReboot.ps1, and then run the Get-PendingReboot command. Note: The script also supportsthe –ComputerName parameter if you want to run it on remote machines. Running the Get-PendingReboot command after “dot sourcing” the Get-PendingReboot.ps1 script. 3. Uninstall Windows ADK 8.1, and then install Windows ADK 10. Select the following components: Deployment Tools Windows PreinstallationEnvironment (Windows PE) Imaging And Configuration Designer(WICD) User State Migration Tool (USMT) 4. Reboot themachine (just for good measure). 5. Install MDT 2013 Update 1 (automatically uninstalls MDT 2013) 6. Using Deployment Workbench, right-click the deployment share and select Upgrade Deployment Share. 7. Repeat step 6 if you have more deployment shares. 8. After upgrading the deployment share, using Deployment Workbench, right-click the deployment share and select Update Deployment Share. This willcreate new boot images.
- 46. Note: If the updatefails, review the workarounds in thebeginning of this post: 9. Repeat step 8 if you have more deployment shares. 10. Now the fun begins! You need to create new MDT task sequences. The MDT 2013 Update1 task sequence templates have updated logic on disk partitioning (and a few other updates). 11. If using WDS for PXEbooting MDT boot images, replace theboot images with the new ones. Upgrading a deployment share.
- 47. Updating the deployment share (after upgrade), to create new boot images. Replacing the old MDT 2013 boot images with MDT 2013 Update 1 boot images.
- 48. Upgrading MDT 2013 Zero Touch (integrated with ConfigMgr 2012 R2) to MDT 2013 Update 1 Note #1: Don’t forget to create new task sequences after the upgrade, the MDT 2013 Update 1 task sequence templates have updated logic on disk partitioning (and a few other updates). Note #2: There is a known issue in Windows ADK 10 (which MDT and ConfigMgr 2012 R2 SP1 uses) that you should know about. It’s not the end of the world, there is a workaround: Creating boot images with additional components (like PowerShell) breaks if you have a fast disk Injection of the additional component into the ConfigMgr boot image may break when running on Windows Server 2012 R2, in combination of having a fast disk (SSD). This is a known bug in the Windows ADK 10. Workaround: Install the ConfigMgr Console on a Windows 10 machine with MDT 2013 Update 1 and Windows 10 ADK installed. Create the boot images from that console. First, MDT 2013 Update 1 Zero Touch is supported on both ConfigMgr 2012 R2 and ConfigMgr 2012 R2 SP1 (SP2), but I do recommend to upgrade to Windows ADK 10, ConfigMgr 2012 R2 SP1 CU1 + the KB3084586 hotfix. Windows ADK 10 allows for managing WinPE 10 boot images from the console, adding drivers etc. CU1 fixes Windows 10 driver import, and the KB3084586 hotfix fixes an issue where driver packages are bloated. I also recommend installing KB3089193 to fix an issue with offline servicing of Windows 10 updates. Anyway, that means there are two main parts to the upgrade: Upgrade ConfigMgr 2012 R2 to ConfigMgr 2012 R2 SP1 CU1 + KB3084586 + KB3089193 Upgrade the MDT 2013 integration in ConfigMgr to MDT 2013 Update1 Upgrade ConfigMgr 2012 R2 to Windows ADK 10 and ConfigMgr 2012 R2 SP1 CU1 + KB3084586 + KB3089193 Before you start, since upgrading to Windows ADK 10 and ConfigMgr 2012 R2 SP1 will upgrade the default USMT from Windows ADK 8.1 to to USMT from Windows ADK 10, I recommend copy the USMT for Windows 8.1 folder somewhere else in the event you still need it. Here are the steps for the upgrade: 1. Backup your ConfigMgr 2012 R2 server (SQL Backup, of course) 2. Copy theSQL Database to another SQL Server, and run the TESTDBUPGRADEprocess 3. Makea copy of the existing USMT for Windows 8.1 package, and configure thepackage to use the new location. 4. Uninstall Windows ADK 8.1 5. Install Windows ADK 10 6. Install ConfigMgr 2012 R2 SP1, select theupgrade option, wait until status for all components are ok. 7. Install ConfigMgr 2012 R2 SP1 CU1 8. Install KB3084586 and KB3089193 hotfixes for ConfigMgr 2012 R2 SP1 CU1
- 49. Upgrade the MDT 2013 integration in ConfigMgr to MDT 2013 Update 1 Once the ConfigMgr 2012 R2 SP1 CU1 setup is completed, you can start upgrading the MDT integration. 1. Install MDT 2013 Update1 (automatically uninstalls MDT 2013) 2. Run the Configure ConfigMgr Integration wizard, and install the extensions 3. Create a new dummy task sequence using theCreate MDT Task Sequence wizard, and select to create a new MDT package and new USMT package during that wizard. 4. Create new boot images using theCreate MDT Boot image wizard. Note: You can also upgrade existing boot images, but I recommend leaving them as they are for now, to not break any production deployments 5. Now the fun begins! You need to create new MDT task sequences, and of course configure them to use the new MDT package, new USMT package, and new boot images. TheMDT 2013 Update1 task sequences for example have updated logic on disk partitioning (and a few other updates). Troubleshooting Drivers When deploying machines with MDT 2013 Lite Touch or ConfigMgr 2012 R2 you eventually come across a scenario when not all drivers install, and your device manager looks something like the following screen shot. To troubleshoot the missing drivers you need to know how MDT 2013 or ConfigMgr 2012 R2 goes about injecting drivers. Their process is quite similar but it’s not identical between the solutions, so in this post you find two sections: Troubleshooting Drivers for MDT 2013 Lite Touch Troubleshooting Drivers for ConfigMgr 2012 R2
- 50. Device Manager with missing drivers. Troubleshooting Drivers for MDT 2013 Lite Touch MDT 2013 Lite Touch injects drivers in a three step process: 1. The MDT 2013 task sequence copies the drivers from thedeployment share to theC:Drivers folder on themachine you are deploying. The files that are copied depends on your configuration, but the most common method is to use a per model approach use the DriverGroup001 variable. Anyway, to troubleshoot why thecorrect drivers are not copied, you can review the ZTIDrivers.log and the SMSTS.log file. 2. Then MDT uses dismto apply theunattend.xml which contains information about staging the drivers that were copied to C:Drivers into the Driver Store. To troubleshoot this step, you can review the dism.log file.
- 51. 3. Then themachine reboot and setup will install the drivers that are matching, and that have thebest ranking if there are multiple drivers that is matching the hardware. For technical details on driver selection, check the How Windows Ranks Drivers post on MSDN. You can also check one my TechEd sessions: A Drivers Saga: Mastering Windows Deployment for more info. Anyway, to troubleshoot this step, you can review thesetupapi.dev.log file if you are deploying Windows 7. For Windows 8.1 and Windows 10 deployment you need to check both setupapi.dev.log and setupapi.setup.log. Troubleshooting Drivers for ConfigMgr 2012 R2 As with MDT, ConfigMgr 2012 R2 injects drivers in a three step process: 1. The ConfigMgr task sequence copies thedrivers from the deployment share to the C:_SMSTaskSequencePackages<packageid> folder on the machine you are deploying. The files that are copied depends on your configuration, but the most common method is to use a per model approach using the drive package feature in ConfigMgr. Anyway, to troubleshoot why thecorrect drivers are not copied, you can review the SMSTS.log file. 2. Then ConfigMgr generates a temporary XMLfile with instructions to inject thedriver, and then calls dism to stage the driver into theDriver Store. To troubleshoot this step, you can review the dism.log file. 3. Then themachine reboot and setup will install the drivers that are matching, and that have thebest ranking if there are multiple drivers that is matching the hardware. For technical details on driver selection, check the How Windows Ranks Drivers post on MSDN. You can also check one my TechEd sessions: A Drivers Saga: MasteringWindows Deployment for more info. Anyway, to troubleshoot this step, you can review the setupapi.dev.logfile if you are deploying Windows 7. For Windows 8.1 and Windows 10 deployment you need to check both setupapi.dev.log and setupapi.setup.log. Happy Deployment / Johan Surface 3 Drivers Finding Windows 10 drivers, or drivers in general, for the Surface 3 machine can be a bit challenging since Microsoft decided to change the search experience for their download site from poor to worse. Anyway, the trick is to Google/Bing for the Surface Pro 3 drivers which are available here:https://www.microsoft.com/en-us/download/details.aspx?id=38826 When you expand the Details node in the Surface Pro 3 drivers download, you see the links to Surface 3 drivers: Surface 3: http://www.microsoft.com/en-us/download/details.aspx?id=49040 Surface 3 LTE ATT: http://www.microsoft.com/en-us/download/details.aspx?id=49039 Surface 3 LTE North America Carrier Unlocked: http://www.microsoft.com/en- us/download/details.aspx?id=49037 Surface 3 LTE Outside of North America and Y!mobile Japan: http://www.microsoft.com/en- us/download/details.aspx?id=49041
- 52. Expanding Details on Surface Pro 3 drivers will show you links to Surface 3 drivers. MDT ICD https://www.youtube.com/watch?v=SGz9A8kGgTg Injecting Drivers https://www.youtube.com/watch?v=JX8T_iIGdJ8&index=8&list=PLY27VNfjvp0XLVfTJx1tNpSb0B8xhyjF9 Making Task Sequence https://www.youtube.com/watch?v=FBaBN1p9c- c&list=PLY27VNfjvp0XLVfTJx1tNpSb0B8xhyjF9&index=6 Updating Deployment Share
- 53. https://www.youtube.com/watch?v=IxlUikrqJOQ&index=5&list=PLY27VNfjvp0XLVfTJx1tNpSb0B8xhyjF9 Configure WDS and PXE Server https://www.youtube.com/watch?v=niGfXqZ8ZRE&index=12&list=PLY27VNfjvp0XLVfTJx1tNpSb0B8xhyj F9 Deploying More than One OS https://www.youtube.com/watch?v=MBODk5X0CTI&list=PLY27VNfjvp0XLVfTJx1tNpSb0B8xhyjF9&index =13 Importing Application https://www.youtube.com/watch?v=mv8FHm1Kips MDT Application Package Creation https://www.youtube.com/watch?v=Jjn06KZgLzI NTlite https://www.youtube.com/watch?v=SUboENUd2oM&list=PL5kGbVFOkulzFpLwTMyEgFdEzqIaTNK0b **HAVE TO STAY CURRENT WITH IMAGE BUILDS, IMAGE BUILDS SOLVE MANY ISSUES AND ADD IMPROVEMENTS AS WELL AS SAVE TIME ON IMAGING** HP SoftPaq Download Manager https://www.youtube.com/watch?v=MgX9gvM2LBY PE Drivers https://www.youtube.com/watch?v=j5a4AV9ZG50 http://ftp.hp.com/pub/caps-softpaq/cmit/HP_WinPE_DriverPack.html http://en.community.dell.com/techcenter/enterprise-client/w/wiki/2065.dell-command-deploy-driver- packs-for-enterprise-client-os-deployment MDT Drivers https://www.youtube.com/watch?v=j5a4AV9ZG50 https://www.youtube.com/watch?v=ZTfzJMgsbkQ https://www.youtube.com/watch?v=nsU8xVszslc https://www.youtube.com/watch?v=MK2mlqIxtGM
- 54. WDS Capture and MDT injection https://www.youtube.com/watch?v=r0kx0xRn9J0 Driver Packs http://en.community.dell.com/techcenter/enterprise-client/w/wiki/2065.dell-command-deploy-driver- packs-for-enterprise-client-os-deployment http://www8.hp.com/us/en/ads/clientmanagement/drivers-pack.html NOT ALL COMPUTER WILL HAVE DRIVER PACKS, WILL HAVE TO GO FIND AND TEST THE DRIVERS NEEDED. Updates https://catalog.update.microsoft.com/v7/site/Home.aspx Creating Boot Images https://www.youtube.com/watch?v=QOVcR_8BC3g Careful with this, can kill the whole MDT server if done wrong Creating Capture Images https://www.youtube.com/watch?v=_g6CTcg7RdM Modifying CustomSettings.ini https://www.youtube.com/watch?v=CtIOzb0dh5I