More Related Content Similar to Dr Gogo Mangbola Enlargement Cream WhatsApp/Call +27810000898 (20) 1. © 2004 MicrosoftCorporation Step By Step TutorialsforMicrosoft® Windows 2000 Accessibility Options
Windows 2000 / 1
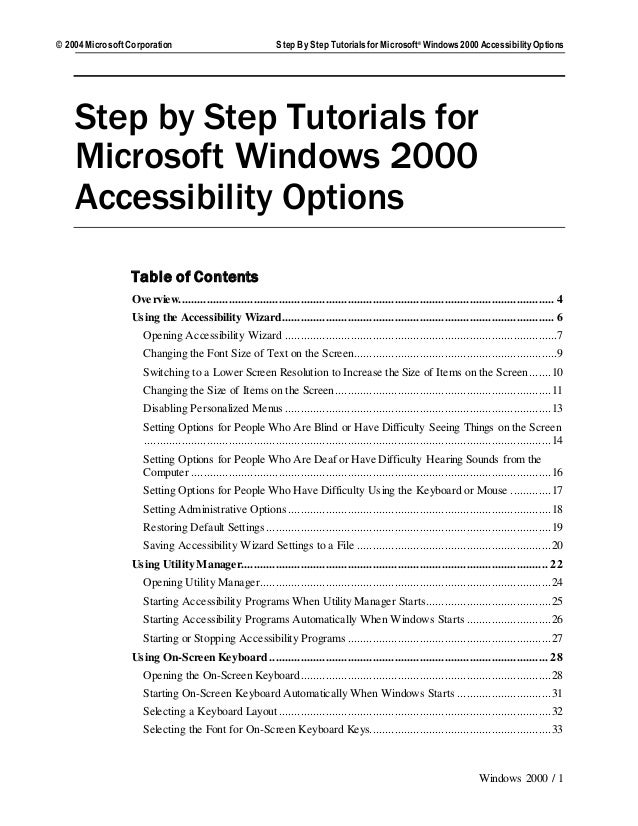
Step by Step Tutorials for
Microsoft Windows 2000
Accessibility Options
Table of Contents
Overview........................................................................................................................ 4
Using the Accessibility Wizard....................................................................................... 6
Opening Accessibility Wizard .......................................................................................7
Changing the Font Size of Text on the Screen.................................................................9
Switching to a Lower Screen Resolution to Increase the Size of Items on the Screen.......10
Changing the Size of Items on the Screen.....................................................................11
Disabling Personalized Menus .....................................................................................13
Setting Options for People Who Are Blind or Have Difficulty Seeing Things on the Screen
..................................................................................................................................14
Setting Options for People Who Are Deaf or Have Difficulty Hearing Sounds from the
Computer ...................................................................................................................16
Setting Options for People Who Have Difficulty Using the Keyboard or Mouse .............17
Setting Administrative Options ....................................................................................18
Restoring Default Settings ...........................................................................................19
Saving Accessibility Wizard Settings to a File ..............................................................20
Using Utility Manager.................................................................................................. 22
Opening Utility Manager.............................................................................................24
Starting Accessibility Programs When Utility Manager Starts........................................25
Starting Accessibility Programs Automatically When Windows Starts ...........................26
Starting or Stopping Accessibility Programs .................................................................27
Using On-Screen Keyboard ......................................................................................... 28
Opening the On-Screen Keyboard................................................................................28
Starting On-Screen Keyboard Automatically When Windows Starts ..............................31
Selecting a Keyboard Layout.......................................................................................32
Selecting the Font for On-Screen Keyboard Keys..........................................................33
2. Microsoft Windows 2000 Accessibility Options © 2004 Microsoft Corporation
Windows 2000 / 2
Using an Audible Click ...............................................................................................34
Activating Scanning Mode ..........................................................................................35
Activating Hovering Mode ..........................................................................................36
Activating Clicking Mode ...........................................................................................37
Using Narrator ............................................................................................................ 38
Opening Narrator........................................................................................................40
Starting Narrator Automatically When Windows Starts.................................................41
Setting Up Narrator to Announce Events on the Screen.................................................42
Setting Up Narrator to Read Typed Keys Aloud............................................................43
Setting Up the Mouse Pointer to Move to Active Items .................................................44
Starting Narrator Minimized........................................................................................45
Setting Narrator Voice Options ....................................................................................46
Using Magnifier........................................................................................................... 47
Opening Magnifier......................................................................................................49
Starting Magnifier Automatically When Windows Starts...............................................50
Changing Magnifier to High Contrast...........................................................................51
Inverting the Colors of the Magnifier Window..............................................................52
Setting the Magnification Level...................................................................................53
Setting Magnifier Tracking Options .............................................................................54
Changing the Position of the Magnifier Window...........................................................55
Changing the Size of the Magnifier Window ................................................................56
Adjusting Settings Through Control Panel.................................................................. 57
Adjusting Accessibility Options...................................................................................58
Turning StickyKeys On and Off...................................................................................60
Selecting StickyKeys Settings......................................................................................61
Turning FilterKeys On and Off....................................................................................62
Selecting FilterKeys Settings .......................................................................................63
Turning ToggleKeys On and Off..................................................................................64
Selecting ToggleKeys Settings.....................................................................................65
Showing Extra Keyboard Help in Programs..................................................................66
Turning SoundSentry On and Off.................................................................................67
Selecting SoundSentry Settings....................................................................................68
Turning ShowSounds On and Off................................................................................69
Turning High Contrast On and Off...............................................................................70
Selecting High Contrast Settings ..................................................................................71
Turning MouseKeys On and Off..................................................................................72
3. © 2004 MicrosoftCorporation Step By Step TutorialsforMicrosoft® Windows 2000 Accessibility Options
Windows 2000 / 3
Selecting MouseKeys Settings .....................................................................................73
Turning Off Accessibility Features After Computer Is Idle ............................................74
Enabling a Warning Message to Appear When Turning a Feature On.............................75
Enabling a Warning Sound to Play When Turning a Feature On or Off...........................76
Supporting SerialKeys Devices....................................................................................77
Selecting SerialKeys Settings ......................................................................................78
Applying All Settings to the Logon Desktop.................................................................79
Applying All Settings to Defaults for New Users..........................................................80
Selecting a Dvorak Keyboard Layout...........................................................................81
Using Other Control Panel Options Programs............................................................. 82
Adjusting Display Options...........................................................................................83
Adjusting Internet Options...........................................................................................84
Adjusting Keyboard Options .......................................................................................85
Adjusting Mouse Options ............................................................................................86
Adjusting Sounds and Multimedia Options ...................................................................87
Adjusting Users and Passwords Options .......................................................................88
4. Microsoft Windows 2000 Accessibility Options © 2004 Microsoft Corporation
Windows 2000 / 4
Overview
Make computers easier and more comfortable to use with accessibility features and utilities
built right into Microsoft® Windows 2000 (Professional and Home versions).
Display and Readability
Display options—choose screen elements and schemes,adjust the screen area and font sizes,
select a screen saver,change the size and color of icons, and smooth the edges of screen
fonts.
Icon size—make icons larger for visibility, or smaller for increased screen space.
Screen resolution—change pixel count to enlarge objects on screen.
High contrast schemes—select color combinations that are easier to see.
Microsoft Magnifier—enlarge portion of screen for better visibility.
Sounds and Speech
Windows 2000 includes options to make computer sounds easier to hear or distinguish—or,
you can choose visual alternatives to sound. Options you can adjust include:
Sound options—assign sounds to events, choose sound schemes,adjust sound
volume, show volume control in the taskbar,and select audio devices.
ShowSounds—display captions for speech and sounds.
SoundSentry—display visual warnings for system sounds.
Notification—Get sound or visual cues when accessibility features are turned on or
off.
Keyboard and Mouse
In Windows 2000 you can choose a number of options to make your keyboard and mouse
faster and easier to use. Options you can adjust include:
Mouse options:
Choose right-handed or left-handed mouse button configuration
Adjust the double-click speed
Change the pointer scheme
Adjust the pointer speed and acceleration rate.
5. © 2004 MicrosoftCorporation Step By Step TutorialsforMicrosoft® Windows 2000 Accessibility Options
Windows 2000 / 5
Keyboard options:
Adjust the character repeat rate and repeat-delay speed.
StickyKeys—allow pressing one key at a time (rather than simultaneously) for key
combinations.
FilterKeys—ignore brief or repeated keystrokes and slow down the repeat rate.
ToggleKeys—hear tones when pressing certain keys.
MouseKeys—move the mouse pointer using the numerical keypad.
Dvorak Keyboard Layout—choose alternative keyboard layouts for people who
type with one hand or finger.
Accessibility Wizard and Utilities
The Accessibility Wizard can help new users quickly and easily set up groups of accessibility
options that address visual, hearing and dexterity needs all in one place. The Accessibility
Wizard asks questions about accessibility needs. Then, based on the answers,it configures
utilities and settings for individual users. The Accessibility Wizard can be run again at any
time to make changes, or changes can be made to individual settings through Control Panel.
To learn about the Accessibility Wizard, see:
Opening the Accessibility Wizard
Windows 2000 Accessibility Utilities:
Magnifier—a display utility that makes the computer screen more readable by
creating a separate window that displays a magnified portion of the screen.
Narrator—a text-to-speech utility that reads what is displayed on the screen—the
contents of the active window, menu options, or text that has been typed.
On-Screen Keyboard—displays a virtual keyboard on the computer screen that
allows people to type data by using a pointing device or joystick.
Utility Manager—enables administrator-level users to check an accessibility
program's status and start or stop an accessibility programs—automatically, if
required.
Using Assistive Technology
If you use assistive technology, be sure to contact your assistive technology manufacturer to
check compatibility with Windows 2000 and to learn how to adjust your settings to optimize
compatibility.
6. Microsoft Windows 2000 Accessibility Options © 2004 Microsoft Corporation
Windows 2000 / 6
Using the Accessibility Wizard
One of the best ways to get started using the accessibility features of Windows 2000 is to run
the Accessibility Wizard. The Accessibility Wizard asks you questions about your
accessibility needs. Then, based on your answers,it configures utilities and settings for you.
You can run the Accessibility Wizard again at any time to make changes,or you can use
Control Panelas explained below.
How to Customize With Accessibility Wizard
With the Accessibility Wizard, you can set options specifically for:
People who are blind or have difficulty seeing things on screen.
People who are deaf or have difficulty hearing sounds from the computer.
People who have difficulty using the keyboard or mouse.
7. © 2004 MicrosoftCorporation Step By Step TutorialsforMicrosoft® Windows 2000 Accessibility Options
Windows 2000 / 7
OpeningAccessibilityWizard
Mouse actions Keyboard actions
1 On the Start menu:
Point to Programs.
Point to Accessories.
Point to Accessibility.
Select Accessibility Wizard.
Display the Start menu by pressing
CTRL+ESC (or the Windows logo key).
Move to Programs by pressing P.
Move to Accessories by pressing the UP
ARROW or DOWN ARROW key. Press
ENTER.
Move to Accessibility, and then press
ENTER.
Move to Accessibility Wizard, and then
press ENTER.
To continue
To complete the Accessibility Wizard, see one or more of the following Step by Step Guides:
Changing the Font Size of Text on the Screen
Switching to a Lower Screen Resolution to Increase the Size of items on the Screen
Changing the Size of Items on the Screen
Disabling Personalized Menus
Setting Options for People Who Are Blind or Have Difficulty Seeing Things on the
Screen
Setting Options for People Who Are Deaf or Have Difficulty Hearing Sounds from the
Computer
Setting Options for People Who Have Difficulty Using the Keyboard or Mouse
Setting Administrative Options
Restoring Default Settings
Saving Accessibility Wizard Settings to a File
8. Microsoft Windows 2000 Accessibility Options © 2004 Microsoft Corporation
Windows 2000 / 8
Quick Reference: OpeningAccessibility Wizard
Start Menu Procedures
Select the Start button, or
press CTRL+ESC.
Select Programs.
Select Accessories.
Select Accessibility.
Select Accessibility Wizard.
Accessibility Wizard
Procedures
Select Next or press N to
continue through the
wizard.
9. © 2004 MicrosoftCorporation Step By Step TutorialsforMicrosoft® Windows 2000 Accessibility Options
Windows 2000 / 9
Changingthe Font Size of Text on the Screen
Mouse actions Keyboard actions
1 On the Start menu:
Point to Programs.
Point to Accessories.
Point to Accessibility.
Select Accessibility Wizard.
Display the Start menu by pressing
CTRL+ESC (or the Windows logo key).
Move to Programs by pressing P.
Move to Accessories by pressing the UP
ARROW or DOWN ARROW key. Press
ENTER.
Move to Accessibility, and then press
ENTER.
Move to Accessibility Wizard, and then
press ENTER.
2 In the Welcome to the Accessibility Wizard
dialog box:
Select Next.
In the Welcome to the Accessibility Wizard
dialog box:
Press N.
3 In the Text Size dialog box:
Select Use large window titles and
menus.
Select Next to continue through the
wizard.
In the Text Size dialog box:
Select Use large window titles and
menus by using the UP ARROW and
DOWN ARROW keys.
Press N to continue through the wizard
(use the arrow keys and ENTER to select
the appropriate options).
4 In the Completing the Accessibility Wizard
dialog box:
Select Finish to save yourchanges and
exit the wizard.
In the Completing the Accessibility Wizard
dialog box:
Press ENTER to save yourchanges and
exit the wizard.
10. Microsoft Windows 2000 Accessibility Options © 2004 Microsoft Corporation
Windows 2000 / 10
Switchingto a Lower Screen Resolution to Increase
the Size of Items on the Screen
Mouse actions Keyboard actions
1 On the Start menu:
Point to Programs.
Point to Accessories.
Point to Accessibility.
Select Accessibility Wizard.
Display the Start menu by pressing
CTRL+ESC (or the Windows logo key).
Move to Programs by pressing P.
Move to Accessories by pressing the UP
ARROW or DOWN ARROW key. Press
ENTER.
Move to Accessibility, and then press
ENTER.
Move to Accessibility Wizard, and then
press ENTER.
2 In the Welcome to the Accessibility Wizard
dialog box:
Select Next.
In the Welcome to the Accessibility Wizard
dialog box:
Press N.
3 In the Text Size dialog box:
Select the smallest text you can read.
Select Next.
In the Text Size dialog box:
Select the smallest text you can read by
using the UP ARROW and DOWN
ARROW keys.
Press N.
4 In the Display Settings dialog box:
Select the Switch to a lower screen
resolution check box.
Select Next to continue through the
wizard.
In the Display Settings dialog box:
Select Switch to a lower screen
resolution check box by pressing S.
Press N to continue through the wizard
(use the arrow keys and ENTER to select
the appropriate options).
5 In the Completing the Accessibility Wizard
dialog box:
Press ENTER to save yourchanges and
exit the wizard.
In the Completing the Accessibility Wizard
dialog box:
Press ENTER to save yourchanges and
exit the wizard.
11. © 2004 MicrosoftCorporation Step By Step TutorialsforMicrosoft® Windows 2000 Accessibility Options
Windows 2000 / 11
Changingthe Size of Items on the Screen
Mouse actions Keyboard actions
1 On the Start menu:
Point to Programs.
Point to Accessories.
Point to Accessibility.
Select Accessibility Wizard.
Display the Start menu by pressing
CTRL+ESC (or the Windows logo key).
Move to Programs by pressing P.
Move to Accessories by pressing the UP
ARROW or DOWN ARROW key. Press
ENTER.
Move to Accessibility, and then press
ENTER.
Move to Accessibility Wizard, and then
press ENTER.
2 In the Welcome to the Accessibility Wizard
dialog box:
Select Next.
In the Welcome to the Accessibility Wizard
dialog box:
Press N.
3 In the Text Size dialog box:
Select the smallest text you can read.
Select Next.
In the Text Size dialog box:
Select the smallest text you can read by
using the UP ARROW and DOWN
ARROW keys.
Press N.
4 In the Display Settings dialog box:
Ensure that the Change the font size
check box is selected.
If it is not selected,select this check box.
Select Next.
In the Display Settings dialog box:
Ensure that the Change the font size
check box is selected.
If it is not selected,press C.
Press N.
5 In the Set Wizard Options dialog box:
Select the I am blind or have difficulty
seeing things on screen check box.
Select Next.
In the Set Wizard Options dialog box:
Select the I am blind or have difficulty
seeing things on screen check box by
pressing L.
Press N.
6 In the Scroll Bar and Window Border Size
dialog box:
Select the scroll bar and window border
size you want.
Select Next.
In the Scroll Bar and Window Border Size
dialog box:
Select the scroll bar and window border
size you want by using the LEFT
ARROW and RIGHT ARROW keys.
Press N.
12. Microsoft Windows 2000 Accessibility Options © 2004 Microsoft Corporation
Windows 2000 / 12
7 In the Icon Size dialog box:
Select the icon size you want.
Select Next to continue through the
wizard.
In the Icon Size dialog box:
Select the icon size you want by using the
LEFT ARROW and RIGHT ARROW
keys.
Press N to continue through the wizard
(use the arrow keys and ENTER to select
the appropriate options).
8 In the Completing the Accessibility Wizard
dialog box:
Press ENTER to save yourchanges and
exit the wizard.
In the Completing the Accessibility Wizard
dialog box:
Press ENTER to save yourchanges and
exit the wizard.
13. © 2004 MicrosoftCorporation Step By Step TutorialsforMicrosoft® Windows 2000 Accessibility Options
Windows 2000 / 13
DisablingPersonalized Menus
Mouse actions Keyboard actions
1 On the Start menu:
Point to Programs.
Point to Accessories.
Point to Accessibility.
Select Accessibility Wizard.
Display the Start menu by pressing
CTRL+ESC (or the Windows logo key).
Move to Programs by pressing P.
Move to Accessories by pressing the UP
ARROW or DOWN ARROW key. Press
ENTER.
Move to Accessibility, and then press
ENTER.
Move to Accessibility Wizard, and then
press ENTER.
2 In the Welcome to the Accessibility Wizard
dialog box:
Select Next.
In the Welcome to the Accessibility Wizard
dialog box:
Press N.
3 In the Text Size dialog box:
Select the smallest text you can read.
Select Next.
In the Text Size dialog box:
Select the smallest text you can read by
using the UP ARROW and DOWN
ARROW keys.
Press N.
4 In the Display Settings dialog box:
Select the Disable Personalized Menus
check box.
Select Next to continue through the
wizard.
In the Display Settings dialog box:
Select the Disable personalized menus
check box by pressing D.
Press N to continue through the wizard
(use the arrow keys and ENTER to select
the appropriate options).
5 In the Completing the Accessibility Wizard
dialog box:
Press ENTER to save yourchanges and
exit the wizard.
In the Completing the Accessibility Wizard
dialog box:
Press ENTER to save yourchanges and
exit the wizard.
14. Microsoft Windows 2000 Accessibility Options © 2004 Microsoft Corporation
Windows 2000 / 14
Setting Options for People Who Are Blind or Have
DifficultySeeing Things on the Screen
Mouse actions Keyboard actions
1 On the Start menu:
Point to Programs.
Point to Accessories.
Point to Accessibility.
Select Accessibility Wizard.
Display the Start menu by pressing
CTRL+ESC (or the Windows logo key).
Move to Programs by pressing P.
Move to Accessories by pressing the UP
ARROW or DOWN ARROW key. Press
ENTER.
Move to Accessibility, and then press
ENTER.
Move to Accessibility Wizard, and then
press ENTER.
2 In the Welcome to the Accessibility Wizard
dialog box:
Select Next.
In the Welcome to the Accessibility Wizard
dialog box:
Press N.
3 In the Text Size dialog box:
Select the smallest text you can read.
Select Next.
In the Text Size dialog box:
Select the smallest text you can read by
using the UP ARROW and DOWN
ARROW keys.
Press N.
4 In the Display Settings dialog box:
Ensure that the Change the font size
check box is selected.
If it is not selected,select this check box.
If you want to use Microsoft Magnifier,
select the Use Microsoft Magnifier
check box.
Select Next.
In the Display Settings dialog box:
Ensure that the Change the font size
check box is selected.
If it is not selected,press C.
If you want to use Microsoft Magnifier,
press U.
Press N.
5 In the Set Wizard Options dialog box:
Select the I am blind or have difficulty
seeing things on screen check box.
Select Next to continue through the
wizard.
In the Set Wizard Options dialog box:
Select the I am blind or have difficulty
seeing things on screen check box by
pressing L.
Press N to continue through the wizard
(use the arrow keys and ENTER to select
the appropriate options).
15. © 2004 MicrosoftCorporation Step By Step TutorialsforMicrosoft® Windows 2000 Accessibility Options
Windows 2000 / 15
6 In the Completing the Accessibility Wizard
dialog box:
Press ENTER to save yourchanges and
exit the wizard.
In the Completing the Accessibility Wizard
dialog box:
Press ENTER to save yourchanges and
exit the wizard.
16. Microsoft Windows 2000 Accessibility Options © 2004 Microsoft Corporation
Windows 2000 / 16
Setting Options for People Who Are Deaf or Have
DifficultyHearing Sounds from the Computer
Mouse actions Keyboard actions
1 On the Start menu:
Point to Programs.
Point to Accessories.
Point to Accessibility.
Select Accessibility Wizard.
Display the Start menu by pressing
CTRL+ESC (or the Windows logo key).
Move to Programs by pressing P.
Move to Accessories by pressing the UP
ARROW or DOWN ARROW key. Press
ENTER.
Move to Accessibility, and then press
ENTER.
Move to Accessibility Wizard, and then
press ENTER.
2 In the Welcome to the Accessibility Wizard
dialog box:
Select Next.
In the Welcome to the Accessibility Wizard
dialog box:
Press N.
3 In the Text Size dialog box:
Select the smallest text you can read.
Select Next.
In the Text Size dialog box:
Select the smallest text you can read by
using the UP ARROW and DOWN
ARROW keys.
Press N.
4 In the Display Settings dialog box:
Select the options you want.
Select Next.
In the Display Settings dialog box:
Select the options you want.
Press N.
5 In the Set Wizard Options dialog box:
Select the I am deaf or have difficulty
hearing sounds from the computer
check box.
Select Next to continue through the
wizard.
In the Set Wizard Options dialog box:
Select the I am deaf or have difficulty
hearing sounds from the computer
check box by pressing D.
Press N to continue through the wizard
(use the arrow keys and ENTER to select
the appropriate options).
6 In the Completing the Accessibility Wizard
dialog box:
Press ENTER to save yourchanges and
exit the wizard.
In the Completing the Accessibility Wizard
dialog box:
Press ENTER to save yourchanges and
exit the wizard.
17. © 2004 MicrosoftCorporation Step By Step TutorialsforMicrosoft® Windows 2000 Accessibility Options
Windows 2000 / 17
Setting Options for People Who Have Difficulty Using
the Keyboard or Mouse
Mouse actions Keyboard actions
1 On the Start menu:
Point to Programs.
Point to Accessories.
Point to Accessibility.
Select Accessibility Wizard.
Display the Start menu by pressing
CTRL+ESC (or the Windows logo key).
Move to Programs by pressing P.
Move to Accessories by pressing the UP
ARROW or DOWN ARROW key. Press
ENTER.
Move to Accessibility, and then press
ENTER.
Move to Accessibility Wizard, and then
press ENTER.
2 In the Welcome to the Accessibility Wizard
dialog box:
Select Next.
In the Welcome to the Accessibility Wizard
dialog box:
Press N.
3 In the Text Size dialog box:
Select the smallest text you can read.
Select Next.
In the Text Size dialog box:
Select the smallest text you can read by
using the UP ARROW and DOWN
ARROW keys.
Press N.
4 In the Display Settings dialog box:
Select the options you want.
Select Next.
In the Display Settings dialog box:
Select the options you want.
Press N.
5 In the Set Wizard Options dialog box:
Select the I have difficulty using the
keyboard or mouse check box.
Select Next to continue through the
wizard..
In the Set Wizard Options dialog box:
Select the I have difficulty using the
keyboard or mouse check box by
pressing K.
Press N to continue through the wizard
(use the arrow keys and ENTER to select
the appropriate options).
6 In the Completing the Accessibility Wizard
dialog box:
Press ENTER to save yourchanges and
exit the wizard.
In the Completing the Accessibility Wizard
dialog box:
Press ENTER to save yourchanges and
exit the wizard.
18. Microsoft Windows 2000 Accessibility Options © 2004 Microsoft Corporation
Windows 2000 / 18
Setting AdministrativeOptions
Mouse actions Keyboard actions
1 On the Start menu:
Point to Programs.
Point to Accessories.
Point to Accessibility.
Select Accessibility Wizard.
Display the Start menu by pressing
CTRL+ESC (or the Windows logo key).
Move to Programs by pressing P.
Move to Accessories by pressing the UP
ARROW or DOWN ARROW key. Press
ENTER.
Move to Accessibility, and then press
ENTER.
Move to Accessibility Wizard, and then
press ENTER.
2 In the Welcome to the Accessibility Wizard
dialog box:
Select Next.
In the Welcome to the Accessibility Wizard
dialog box:
Press N.
3 In the Text Size dialog box:
Select the smallest text you can read.
Select Next.
In the Text Size dialog box:
Select the smallest text you can read by
using the UP ARROW and DOWN
ARROW keys.
Press N.
4 In the Display Settings dialog box:
Select the options you want.
Select Next.
In the Display Settings dialog box:
Select the options you want.
Press N.
5 In the Set Wizard Options dialog box:
Select the I want to set administrative
options check box.
Select Next to continue through the
wizard.
In the Set Wizard Options dialog box:
Select the I want to set administrative
options check box by pressing A.
Press N to continue through the wizard
(use the arrow keys and ENTER to select
the appropriate options).
6 In the Completing the Accessibility Wizard
dialog box:
Press ENTER to save yourchanges and
exit the wizard.
In the Completing the Accessibility Wizard
dialog box:
Press ENTER to save yourchanges and
exit the wizard.
19. © 2004 MicrosoftCorporation Step By Step TutorialsforMicrosoft® Windows 2000 Accessibility Options
Windows 2000 / 19
Restoring Default Settings
Mouse actions Keyboard actions
1 On the Start menu:
Point to Programs.
Point to Accessories.
Point to Accessibility.
Select Accessibility Wizard.
Display the Start menu by pressing
CTRL+ESC (or the Windows logo key).
Move to Programs by pressing P.
Move to Accessories by pressing the UP
ARROW or DOWN ARROW key. Press
ENTER.
Move to Accessibility, and then press
ENTER.
Move to Accessibility Wizard, and then
press ENTER.
2 In the Welcome to the Accessibility Wizard
dialog box:
Select Next.
In the Welcome to the Accessibility Wizard
dialog box:
Press N.
3 In the Text Size dialog box:
Select the smallest text you can read.
Select Next.
In the Text Size dialog box:
Select the smallest text you can read by
using the UP ARROW and DOWN
ARROW keys.
Press N.
4 In the Display Settings dialog box:
Select Next.
In the Display Settings dialog box:
Press N.
5 In the Set Wizard Options dialog box:
Select Restore Default Settings.
Select Next to continue through the
wizard.
In the Set Wizard Options dialog box:
Select Restore Default Settings by
pressing R.
Press ENTER to continue through the
wizard.
6 In the Completing the Accessibility Wizard
dialog box:
Press ENTER to save yourchanges and
exit the wizard.
In the Completing the Accessibility Wizard
dialog box:
Press ENTER to save yourchanges and
exit the wizard.
20. Microsoft Windows 2000 Accessibility Options © 2004 Microsoft Corporation
Windows 2000 / 20
Saving AccessibilityWizard Settings to a File
Mouse actions Keyboard actions
1 On the Start menu:
Point to Programs.
Point to Accessories.
Point to Accessibility.
Select Accessibility Wizard.
Display the Start menu by pressing
CTRL+ESC (or the Windows logo key).
Move to Programs by pressing P.
Move to Accessories by pressing the UP
ARROW or DOWN ARROW key. Press
ENTER.
Move to Accessibility, and then press
ENTER.
Move to Accessibility Wizard, and then
press ENTER.
2 In the Welcome to the Accessibility Wizard
dialog box:
Select Next to continue through the wizard.
In the Welcome to the Accessibility Wizard
dialog box:
Press N to continue through the wizard.
3 In the Text Size dialog box:
Select the smallest text you can read.
Select Next.
In the Text Size dialog box:
Select the smallest text you can read by
using the UP ARROW and DOWN
ARROW keys.
Press N.
4 In the Display Settings dialog box:
Select the options you want.
Select Next.
In the Display Settings dialog box:
Select the options you want.
Press N.
5 In the Set Wizard Options dialog box:
Select the statements that apply to you.
Select Next to continue through the
wizard.
In the Set Wizard Options dialog box:
Select the statements that apply to you.
Press N to continue through the wizard.
6 In the Save Settings to File dialog box:
Select Save Settings.
In the Save Settings to File dialog box:
Select Save Settings by pressing S.
7 In the Save As dialog box:
Specify a file name and location.
Select Save.
Select Next to continue through the
wizard.
In the Save As dialog box:
Specify a file name and location.
Press ALT+S.
Press N to continue through the wizard.
21. © 2004 MicrosoftCorporation Step By Step TutorialsforMicrosoft® Windows 2000 Accessibility Options
Windows 2000 / 21
8 In the Completing the Accessibility Wizard
dialog box:
Press ENTER to save yourchanges and
exit the wizard.
In the Completing the Accessibility Wizard
dialog box:
Press ENTER to save yourchanges and
exit the wizard.
22. Microsoft Windows 2000 Accessibility Options © 2004 Microsoft Corporation
Windows 2000 / 22
Using Utility Manager
Utility Manager is a new program available through the Accessibility menu that brings all of
the Windows 2000 Accessibility programs—Narrator,Magnifier, and On-Screen Keyboard—
together in one place so that users can quickly check the status of individual programs and
start and stop them. If you have administrator-level access,you can also assign programs to
start when Windows 2000 starts.
Step by Step Guides for Using Utility Manager can help you
with:
Opening Utility Manager
Starting Accessibility Programs When Utility Manager Starts
Starting Accessibility Programs Automatically When Windows Starts
Starting or Stopping Accessibility Programs
23. © 2004 MicrosoftCorporation Step By Step TutorialsforMicrosoft® Windows 2000 Accessibility Options
Windows 2000 / 23
Quick Reference: OpeningUtility Manager
Start Menu Procedures
Select the Start button, or
press CTRL+ESC.
Select Programs.
Select Accessories.
Select Accessibility.
Select Utility Manager.
Utility Manager Procedures
In the Name list, select a
program.
Under Options forthe
program, select an option.
Select OK.
24. Microsoft Windows 2000 Accessibility Options © 2004 Microsoft Corporation
Windows 2000 / 24
OpeningUtility Manager
Mouse actions Keyboard actions
1 On the Start menu:
Point to Programs.
Point to Accessories.
Point to Accessibility.
Select Utility Manager.
To display the Utility Manager:
Press the Windows logo key+U.
To continue
To continue customizing Utility Manager,see one or more of the following Step by Step
Guides:
Starting Accessibility Programs When Utility Manager Starts
Starting Accessibility Programs Automatically When Windows Starts
Starting or Stopping Accessibility Programs
25. © 2004 MicrosoftCorporation Step By Step TutorialsforMicrosoft® Windows 2000 Accessibility Options
Windows 2000 / 25
StartingAccessibilityPrograms When Utility Manager
Starts
Mouse actions Keyboard actions
1 On the Start menu:
Point to Programs.
Point to Accessories.
Point to Accessibility.
Select Utility Manager.
To open Utility Manager:
Press the Windows logo key+U.
2 In the Name list:
Select a program.
In the Name list:
Select a program by pressing the UP
ARROW or DOWN ARROW key.
3 Under Options:
Select the Start automatically when
Utility Manager starts check box.
Note To cancel the automatic start, clear the
Start automatically when Utility Manager
starts check box.
Under Options:
Select the Start automatically when
Utility Manager starts check box by
pressing ALT+U.
Note To cancel the automatic start, clear the
Start automatically when Utility Manager
starts check box by pressing ALT+U.
4 Repeat for each utility you want to start when
Utility Manager starts.
Repeat for each utility you want to start when
Utility Manager starts.
5 Select OK. Press ENTER.
26. Microsoft Windows 2000 Accessibility Options © 2004 Microsoft Corporation
Windows 2000 / 26
StartingAccessibilityPrograms Automatically When
WindowsStarts
Mouse actions Keyboard actions
1 On the Start menu:
Point to Programs.
Point to Accessories.
Point to Accessibility.
Select Utility Manager.
To open Utility Manager:
Press the Windows logo key+U.
2 In the Name list:
Select a program.
In the Name list:
Select a program by pressing the UP
ARROW or DOWN ARROW key.
3 Under Options:
Select the Start automatically when
Windows starts check box.
Note To cancel the automatic start, clear the
Start automatically when Windows starts
check box.
Under Options:
Select the Start automatically when
Windows starts check box by pressing
ALT+W.
Note To cancel the automatic start, clear the
Start automatically when Windows starts
check box, by pressing ALT+W.
4 Repeat for each utility you want to start when
Windows starts.
Repeat for each utility you want to start when
Windows starts.
5 Select OK. Press ENTER.
27. © 2004 MicrosoftCorporation Step By Step TutorialsforMicrosoft® Windows 2000 Accessibility Options
Windows 2000 / 27
Startingor StoppingAccessibility Programs
Mouse actions Keyboard actions
1 To start or stop an accessibility program:
On the Start menu, point to Programs.
Point to Accessories.
Point to Accessibility.
Select Utility Manager.
To open Utility Manager:
Press the Windows logo key+U.
2 In the Utility Manager dialog box:
Select a program from the list.
In the Utility Manager dialog box:
Select a program from the list by pressing
the UP ARROW or DOWN ARROW
key.
3 Under Options:
Select the Start or Stop button.
Select OK.
Under Options:
Select Start by pressing ALT+A or select
Stop by pressing ALT+O.
Press ENTER.
28. Microsoft Windows 2000 Accessibility Options © 2004 Microsoft Corporation
Windows 2000 / 28
Using On-Screen Keyboard
On-Screen Keyboard is a utility that displays a virtual keyboard on the computer screen that
allows people with mobility impairments to type data by using a pointing device or joystick.
Besides providing a minimum level of functionality for some people with mobility
impairments, On-Screen Keyboard can also help people who do not know how to type.
Step by Step Guides for On-Screen Keyboard can help you
with:
Opening the On-Screen Keyboard
Starting On-Screen Keyboard Automatically When Windows Starts
Selecting a Keyboard Layout
Selecting the Font for On-Screen Keyboard Keys
Using an Audible Click
Activating Scanning Mode
Activating Hovering Mode
Activating Clicking Mode
Openingthe On-Screen Keyboard
Mouse actions Keyboard actions
1 On the Start menu:
Point to Programs.
Point to Accessories.
Point to Accessibility.
Select On-Screen Keyboard.
Note A message box with a link to more
information about the On-Screen Keyboard
may appear. To close the box, select OK.
Display the Start menu by pressing
CTRL+ESC (or the Windows logo key).
Move to Programs by pressing P.
Move to Accessories by pressing the UP
ARROW or DOWN ARROW key. Press
ENTER.
Move to Accessibility, and then press
ENTER.
Move to On-Screen Keyboard, and then
press ENTER.
Note A message box with a link to more
information about accessibility utilities may
appear. To close the box, press ENTER.
To continue
29. © 2004 MicrosoftCorporation Step By Step TutorialsforMicrosoft® Windows 2000 Accessibility Options
Windows 2000 / 29
To continue customizing On-Screen Keyboard,see one or more of the following Step by Step
Guides:
Starting On-Screen Keyboard Automatically When Windows Starts
Selecting a Keyboard Layout
Selecting the Font for On-Screen Keyboard Keys
Using an Audible Click
Activating Scanning Mode
Activating Hovering Mode
Activating Clicking Mode
30. Microsoft Windows 2000 Accessibility Options © 2004 Microsoft Corporation
Windows 2000 / 30
Quick Reference: OpeningOn-Screen Keyboard
Start Menu Procedures
Select the Start button, or
press CTRL+ESC.
Select Programs.
Select Accessories.
Select Accessibility.
Select On-Screen Keyboard.
On-Screen Keyboard
Procedures
Select keys by using a
pointing device, or use the
menus to specify options.
31. © 2004 MicrosoftCorporation Step By Step TutorialsforMicrosoft® Windows 2000 Accessibility Options
Windows 2000 / 31
StartingOn-Screen Keyboard AutomaticallyWhen
WindowsStarts
Mouse actions Table Head
1 On the Start menu:
Point to Programs.
Point to Accessories.
Point to Accessibility.
Select Utility Manager.
To open Utility Manager:
Press the Windows logo key+U.
2 In the Name list:
Select On-Screen Keyboard.
In the Name list:
Select On-Screen Keyboard by pressing
the UP ARROW or DOWN ARROW
key.
3 Under Options for On-Screen Keyboard:
Select the Start automatically when
Windows starts check box.
Note To cancel the automatic start, clear the
Start automatically when Windows starts
check box.
Under Options for On-Screen Keyboard:
Select the Start automatically when
Windows starts check box by pressing
ALT+W.
Note To cancel the automatic start, clear the
Start automatically when Windows starts
check box by pressing ALT+W.
4 Select OK. Press ENTER.
32. Microsoft Windows 2000 Accessibility Options © 2004 Microsoft Corporation
Windows 2000 / 32
Selectinga Keyboard Layout
Mouse actions Keyboard actions
1 On the Start menu:
Point to Programs.
Point to Accessories.
Point to Accessibility.
Select On-Screen Keyboard.
Note A message box with a link to more
information about the On-Screen Keyboard
may appear. To close the box, select OK.
Display the Start menu by pressing CTRL+ESC
(or the Windows logo key).
Move to Programs by pressing P.
Move to Accessories by pressing the UP
ARROW or DOWN ARROW key. Press
ENTER.
Move to Accessibility, and then press
ENTER.
Move to On-Screen Keyboard, and then
press ENTER.
Note A message box with a link to more
information about the On-Screen Keyboard may
appear. To close the box, press ENTER.
2 In the On-Screen Keyboard window:
On the Keyboard menu, select the
keyboard layout you prefer.
In the On-Screen Keyboard window:
Display the Keyboard menu by pressing
ALT+K.
Select the keyboard layout you prefer.
33. © 2004 MicrosoftCorporation Step By Step TutorialsforMicrosoft® Windows 2000 Accessibility Options
Windows 2000 / 33
Selectingthe Font for On-Screen Keyboard Keys
Mouse actions Keyboard actions
1 On the Start menu:
Point to Programs.
Point to Accessories.
Point to Accessibility.
Select On-Screen Keyboard.
Note A message box with a link to more
information about the On-Screen Keyboard
may appear. To close the box, select OK.
Display the Start menu by pressing CTRL+ESC
(or the Windows logo key).
Move to Programs by pressing P.
Move to Accessories by pressing the UP
ARROW or DOWN ARROW key. Press
ENTER.
Move to Accessibility, and then press
ENTER.
Move to On-Screen Keyboard, and then
press ENTER.
Note A message box with a link to more
information about the On-Screen Keyboard may
appear. To close the box, press ENTER.
2 In the On-Screen Keyboard window:
On the Settings menu, select Font.
In the On-Screen Keyboard window:
Display the Settings menu by pressing
ALT+S.
Select Font by pressing F.
3 In the Font dialog box:
Select a font, font style, and font size.
In the Font dialog box:
Select a font, font style, and font size by
using the UP ARROW, DOWN ARROW,
and TAB keys.
4 Select OK. Press ENTER.
34. Microsoft Windows 2000 Accessibility Options © 2004 Microsoft Corporation
Windows 2000 / 34
Using an AudibleClick
Mouse actions Keyboard actions
1 On the Start menu:
Point to Programs.
Point to Accessories.
Point to Accessibility.
Select On-Screen Keyboard.
Note A message box with a link to more
information about the On-Screen Keyboard
may appear. To close the box, select OK.
Display the Start menu by pressing
CTRL+ESC (or the Windows logo key).
Move to Programs by pressing P.
Move to Accessories by pressing the UP
ARROW or DOWN ARROW key. Press
ENTER.
Move to Accessibility, and then press
ENTER.
Move to On-Screen Keyboard, and then
press ENTER.
Note A message box with a link to more
information about the On-Screen Keyboard
may appear. To close the box, press ENTER.
2 In the On-Screen Keyboard window:
On the Settings menu, select Use Click
Sound.
In the On-Screen Keyboard window:
Display the Settings menu by pressing
ALT+S
Select Use Click Sound by pressing U.
35. © 2004 MicrosoftCorporation Step By Step TutorialsforMicrosoft® Windows 2000 Accessibility Options
Windows 2000 / 35
ActivatingScanningMode
Mouse actions Keyboard actions
1 On the Start menu:
Point to Programs.
Point to Accessories.
Point to Accessibility.
Select On-Screen Keyboard.
Note A message box with a link to more
information about the On-Screen Keyboard
may appear. To close the box, select OK.
Display the Start menu by pressing
CTRL+ESC (or the Windows logo key).
Move to Programs by pressing P.
Move to Accessories by pressing the UP
ARROW or DOWN ARROW key. Press
ENTER.
Move to Accessibility, and then press
ENTER.
Move to On-Screen Keyboard, and then
press ENTER.
Note A message box with a link to more
information about the On-Screen Keyboard
may appear. To close the box, press ENTER.
2 In the On-Screen Keyboard window:
On the Settings menu, select Typing
Mode.
In the On-Screen Keyboard window:
Display the Settings menu by pressing
ALT+S.
Select Typing Mode by pressing T.
3 In the Typing Mode dialog box:
Select Joystick or key to select.
In the Typing Mode dialog box:
Select Joystick or key to selectby
pressing J.
4 To set the speed for how quickly On-Screen
Keyboard scans:
Use the up and down arrows next to the
Scan Interval box.
Select the Advanced button.
To set the speed for how quickly On-Screen
Keyboard scans:
Press the TAB key.
Use the UP ARROW and DOWN
ARROW keys to select a scan interval.
Select the Advanced button by pressing
ALT+A.
5 In the Scanning Options dialog box:
Select the Serial, parallel, or game port
check box.
OR
Select the Keyboard key check box.
In the Scanning Options dialog box:
Select the Serial, parallel, or game port
check box by pressing S.
OR
Select the Keyboard key check box by
pressing K.
36. Microsoft Windows 2000 Accessibility Options © 2004 Microsoft Corporation
Windows 2000 / 36
6 Select OK two times to close the dialog
boxes.
Press ALT+O twice to close the dialog boxes.
ActivatingHovering Mode
Mouse actions Keyboard actions
1 On the Start menu:
Point to Programs.
Point to Accessories.
Point to Accessibility.
Select On-Screen Keyboard.
Note A message box with a link to more
information about On-Screen Keyboard may
appear. To close the box, select OK.
Display the Start menu by pressing
CTRL+ESC (or the Windows logo key).
Move to Programs by pressing P.
Move to Accessories by pressing the UP
ARROW or DOWN ARROW key. Press
ENTER.
Move to Accessibility, and then press
ENTER.
Move to On-Screen Keyboard, and then
press ENTER.
Note A message box with a link to more
information about On-Screen Keyboard may
appear. To close the box, select ENTER.
2 In the On-Screen Keyboard window:
On the Settings menu, select Typing
Mode.
In the On-Screen Keyboard window:
Display the Settings menu by pressing
ALT+S.
Select Typing Mode by pressing T.
3 In the Typing Mode dialog box:
Select Hover to select.
In the Typing Mode dialog box:
Select Hover to select by pressing H.
4 To adjust the minimum hover time:
Use the up arrow or down arrow.
To adjust the minimum hover time:
Press the TAB key twice.
Use the UP ARROW and DOWN
ARROW keys.
5 Select OK. Select ENTER, or press ALT+O.
37. © 2004 MicrosoftCorporation Step By Step TutorialsforMicrosoft® Windows 2000 Accessibility Options
Windows 2000 / 37
ActivatingClickingMode
Mouse actions Keyboard actions
1 On the Start menu:
Point to Programs.
Point to Accessories.
Point to Accessibility.
Select On-Screen Keyboard.
Note A message box with a link to more
information about the On-Screen Keyboard
may appear. To close the box, select OK.
Display the Start menu by pressing
CTRL+ESC (or the Windows logo key).
Move to Programs by pressing P.
Move to Accessories by pressing the UP
ARROW or DOWN ARROW key. Press
ENTER.
Move to Accessibility, and then press
ENTER.
Move to On-Screen Keyboard, and then
press ENTER.
Note A message box with a link to more
information about the On-Screen Keyboard
may appear. To close the box, press ENTER.
2 In the On-Screen Keyboard window:
On the Settings menu, select Typing
Mode.
In the On-Screen Keyboard window:
Display the Settings menu by pressing
ALT+S.
Select Typing Mode by pressing T.
3 In the Typing Mode dialog box:
Select Click to select.
In the Typing Mode dialog box:
Select Click to select by pressing
ALT+K.
4 Select OK. Press ALT+O to close the dialog box.
38. Microsoft Windows 2000 Accessibility Options © 2004 Microsoft Corporation
Windows 2000 / 38
Using Narrator
Narrator is a text-to-speech utility for people who are blind or have low vision. Narrator reads
what is displayed on the screen—the contents of the active window, menu options, or text
that has been typed.
Narrator is designed to work with Notepad, WordPad, Control Panelprograms, Internet
Explorer, and some parts of Windows 2000 Setup. Narrator has a number of options that
allow users to customize the way screen elements are read.
Note: Narrator is currently available only in English, and may not read words aloud correctly
in programs other than those mentioned above.
Step by Step Guides for Narrator can help you with:
Opening Narrator
Starting Narrator Automatically When Windows Starts
Setting Up Narrator to Announce Events on the Screen
Setting Up Narrator to Read Typed Keys Aloud
Setting Up the Mouse Pointer to Move to Active Items
Starting Narrator Minimized
Setting Narrator Voice Options
39. © 2004 MicrosoftCorporation Step By Step TutorialsforMicrosoft® Windows 2000 Accessibility Options
Windows 2000 / 39
Quick Reference: OpeningNarrator
Start Menu Procedures
Select the Start button, or
press CTRL+ESC.
Select Programs.
Select Accessories.
Select Accessibility.
Select Narrator.
Narrator Procedures
Select the options you
want.
Optionally, select the
Minimize button to hide the
Narrator window while you
use Narrator.
40. Microsoft Windows 2000 Accessibility Options © 2004 Microsoft Corporation
Windows 2000 / 40
OpeningNarrator
Mouse actions Keyboard actions
1 On the Start menu:
Point to Programs.
Point to Accessories.
Point to Accessibility.
Select Narrator.
Note A message box with a link to more
information about Narrator may appear. To
close the box, select OK.
Display the Start menu by pressing
CTRL+ESC (or the Windows logo key).
Move to Programs by pressing P.
Move to Accessories by pressing the UP
ARROW or DOWN ARROW key. Press
ENTER.
Move to Accessibility, and then press
ENTER.
Move to Narrator, and then press
ENTER.
Note A message box with a link to more
information about Narrator may appear. To
close the box, press ENTER.
To continue
To continue customizing Narrator,see one or more of the following Step by Step Guides:
Starting Narrator Automatically When Windows Starts
Setting Up Narrator to Announce Events on the Screen
Setting Up Narrator to Read Typed Keys Aloud
Setting Up the Mouse Pointer to Move to Active Items
Starting Narrator Minimized
Setting Narrator Voice Options
41. © 2004 MicrosoftCorporation Step By Step TutorialsforMicrosoft® Windows 2000 Accessibility Options
Windows 2000 / 41
StartingNarratorAutomatically When WindowsStarts
Mouse actions Keyboard actions
1 On the Start menu:
Point to Programs.
Point to Accessories.
Point to Accessibility.
Select Utility Manager.
To open Utility Manager:
Press the Windows logo key+U.
2 In the Name list:
Select Narrator.
In the Name list:
Move to Narrator by pressing the UP
ARROW or DOWN ARROW key.
3 Under Options for Narrator:
Select the Start automatically when
Windows starts check box.
Under Options for Narrator:
Select the Start automatically when
Windows starts check box by pressing
the ALT+W.
4 Select OK. Press ENTER.
42. Microsoft Windows 2000 Accessibility Options © 2004 Microsoft Corporation
Windows 2000 / 42
Setting Up Narratorto AnnounceEvents on the Screen
Mouse actions Keyboard actions
1 On the Start menu:
Point to Programs.
Point to Accessories.
Point to Accessibility.
Select Narrator.
Note A message box with a link to more
information about Narrator may appear. To
close the box, select OK.
Display the Start menu by pressing
CTRL+ESC (or the Windows logo key).
Move to Programs by pressing P.
Move to Accessories by pressing the UP
ARROW or DOWN ARROW key. Press
ENTER.
Move to Accessibility, and then press
ENTER.
Move to Narrator, and then press
ENTER.
Note A message box with a link to more
information about Narrator may appear. To
close the box, press ENTER.
2 In the Narrator window:
Ensure that the Announce events on
screen check box is selected.
Note To use Narrator but hide the Narrator
dialog box, select the Minimize button.If you
select Exit, Narrator turns off.
In the Narrator window:
Ensure that the Announce events on
screen check box is selected.If it is not,
press ALT+A.
Note To use Narrator but hide the Narrator
dialog box, press ALT+SPACEBAR, N. To
turn off Narrator, press ALT+X, and then
press Y.
43. © 2004 MicrosoftCorporation Step By Step TutorialsforMicrosoft® Windows 2000 Accessibility Options
Windows 2000 / 43
Setting Up Narratorto Read Typed Keys Aloud
Mouse actions Keyboard actions
1 On the Start menu:
Point to Programs.
Point to Accessories.
Point to Accessibility.
Select Narrator.
Note A message box with a link to more
information about Narrator may appear. To
close the box, select OK.
Display the Start menu by pressing
CTRL+ESC (or the Windows logo key).
Move to Programs by pressing P.
Move to Accessories by pressing the UP
ARROW or DOWN ARROW key. Press
ENTER.
Move to Accessibility, and then press
ENTER.
Move to Narrator, and then press
ENTER.
Note A message box with a link to more
information about Narrator may appear. To
close the box, press ENTER.
2 In the Narrator window:
Ensure that the Read typed characters
check box is selected.
Note To use Narrator but hide the Narrator
dialog box, select the Minimize button.If you
select Exit, Narrator turns off.
In the Narrator window:
Ensure that the Read typed characters
check box is selected. If it is not, press
ALT+R.
Note To use Narrator but hide the Narrator
dialog box, press ALT+SPACEBAR, N. To
turn off Narrator, press ALT+X, and then
press Y.
44. Microsoft Windows 2000 Accessibility Options © 2004 Microsoft Corporation
Windows 2000 / 44
Setting Up the Mouse Pointer to Move to Active Items
Mouse actions Keyboard actions
1 On the Start menu:
Point to Programs.
Point to Accessories.
Point to Accessibility.
Select Narrator.
Note A message box with a link to more
information about Narrator may appear. To
close the box, select OK.
Display the Start menu by pressing
CTRL+ESC (or the Windows logo key).
Move to Programs by pressing P.
Move to Accessories by pressing the UP
ARROW or DOWN ARROW key. Press
ENTER.
Move to Accessibility, and then press
ENTER.
Move to Narrator, and then press
ENTER.
Note A message box with a link to more
information about Narrator may appear. To
close the box, press ENTER.
2 In the Narrator window:
Select the Move mouse pointer to the
active item check box.
Note To use Narrator but hide the Narrator
dialog box, select the Minimize button.If you
select Exit, Narrator turns off.
In the Narrator window:
Select the Move mouse pointer to the
active item check box by pressing
ALT+M.
Note To use Narrator but hide the Narrator
dialog box, press ALT+SPACEBAR, N. To
turn off Narrator, press ALT+X, and then
press Y.
45. © 2004 MicrosoftCorporation Step By Step TutorialsforMicrosoft® Windows 2000 Accessibility Options
Windows 2000 / 45
StartingNarratorMinimized
Mouse actions Keyboard actions
1 On the Start menu:
Point to Programs.
Point to Accessories.
Point to Accessibility.
Select Narrator.
Note A message box with a link to more
information about Narrator may appear. To
close the box, select OK.
Display the Start menu by pressing
CTRL+ESC (or the Windows logo key).
Move to Programs by pressing P.
Move to Accessories by pressing the UP
ARROW or DOWN ARROW key. Press
ENTER.
Move to Accessibility, and then press
ENTER.
Move to Narrator, and then press
ENTER.
Note A message box with a link to more
information about Narrator may appear. To
close the box, press ENTER.
2 In the Narrator window:
Select the Start Narrator minimized
check box.
Note To use Narrator but hide the Narrator
dialog box, select the Minimize button.If you
select Exit, Narrator turns off.
In the Narrator window:
Select the Start Narrator minimized
check box by pressing ALT+S.
Note To use Narrator but hide the Narrator
dialog box, press ALT+SPACEBAR, N. To
turn off Narrator, press ALT+X, and then
press Y.
46. Microsoft Windows 2000 Accessibility Options © 2004 Microsoft Corporation
Windows 2000 / 46
Setting NarratorVoice Options
Mouse actions Keyboard actions
1 On the Start menu:
Point to Programs.
Point to Accessories.
Point to Accessibility.
Select Narrator.
Note A message box with a link to more
information about Narrator may appear. To
close the box, select OK.
Display the Start menu by pressing
CTRL+ESC (or the Windows logo key).
Move to Programs by pressing P.
Move to Accessories by pressing the UP
ARROW or DOWN ARROW key. Press
ENTER.
Move to Accessibility, and then press
ENTER.
Move to Narrator, and then press
ENTER.
Note A message box with a link to more
information about Narrator may appear. To
close the box, press ENTER.
2 Select the Voice button. Press V to open Voice Settings.
3 In the Voice Settings dialog box:
Select the voice options you want to
change.
In the Voice Settings dialog box:
Select the voice options you want to
change by typing the appropriate access
keys. To select values, use the UP
ARROW and DOWN ARROW keys.
4 Select OK.
Note To use Narrator but hide the Narrator
dialog box, select the Minimize button.If you
select Exit, Narrator turns off.
Press ENTER.
Note To use Narrator but hide the Narrator
dialog box, press ALT+SPACEBAR, N. To
turn off Narrator, press ALT+X, and then
press Y.
47. © 2004 MicrosoftCorporation Step By Step TutorialsforMicrosoft® Windows 2000 Accessibility Options
Windows 2000 / 47
Using Magnifier
Magnifier is a display utility that makes the computer screen more readable by people who
have low vision by creating a separate window that displays a magnified portion of the
screen. Magnifier provides a minimum level of functionality for people who have slight
visual impairments. Magnifier enables you to:
Adjust the magnification level of text and images in the magnification window.
Change the size and location of the magnification window.
Change the position of the magnification window on the desktop.
Invert the screen colors.
Use a high-contrast setting.
Magnifier also has a number of tracking options, which include:
Following the mouse pointer as it moves on the screen.
Following the keyboard focus which centers on the location of the cursor.
Following text editing.
Step by Step Guides for Magnifier can help you with:
Opening Magnifier
Starting Magnifier Automatically When Windows Starts
Changing Magnifier to High Contrast
Inverting the Colors of the Magnifier Windows
Setting the Magnification Level
Setting Magnifier Tracking Options
Changing the Position of the Magnifier Window
Changing the Size of the Magnifier Window
48. Microsoft Windows 2000 Accessibility Options © 2004 Microsoft Corporation
Windows 2000 / 48
Quick Reference: OpeningMagnifier
Start Menu Procedures
Select the Start button, or
press CTRL+ESC.
Select Programs.
Select Accessories.
Select Accessibility.
Select Magnifier.
Magnifier Settings
Procedures
Select the options you
want.
Optionally, select the
Minimize button to hide the
Magnifier Settings dialog
box while you use
Magnifier.
49. © 2004 MicrosoftCorporation Step By Step TutorialsforMicrosoft® Windows 2000 Accessibility Options
Windows 2000 / 49
OpeningMagnifier
Mouse actions Keyboard actions
1 On the Start menu:
Point to Programs.
Point to Accessories.
Point to Accessibility.
Select Magnifier.
Note A message box with a link to more
information about Microsoft Magnifier may
appear. To close the box, select OK.
Note To use Magnifier but hide the
Magnifier Settings dialog box, select the
Minimize button.
Display the Start menu by pressing
CTRL+ESC (or the Windows logo key).
Move to Programs by pressing P.
Move to Accessories by pressing the UP
ARROW or DOWN ARROW key. Press
ENTER.
Move to Accessibility, and then press
ENTER.
Move to Magnifier, and then press
ENTER.
Note A message box with a link to more
information about Microsoft Magnifier may
appear. To close the box, press ENTER.
Note To use Magnifier but hide the
Magnifier Settings dialog box, press
ALT+SPACEBAR, N.
To continue
To continue customizing Magnifier, see one or more of the following Step by Step Guides:
Starting Magnifier Automatically When Windows Starts
Changing Magnifier to High Contrast
Inverting the Colors of the Magnifier Window
Setting the Magnification Level
Setting Magnifier Tracking Options
Changing the Position of the Magnifier Window
Changing the Size of the Magnifier Window
50. Microsoft Windows 2000 Accessibility Options © 2004 Microsoft Corporation
Windows 2000 / 50
StartingMagnifierAutomatically When Windows
Starts
Mouse actions Keyboard actions
1 On the Start menu:
Point to Programs.
Point to Accessories.
Point to Accessibility.
Select Utility Manager.
To open Utility Manager:
Press the Windows logo key+U.
2 In the Name list:
Select Magnifier.
In the Name list:
Select Magnifier by pressing the UP
ARROW or DOWN ARROW key.
3 Under Options for Magnifier:
Select the Start automatically when
Windows starts check box.
Note To cancel the automatic start, clear the
Start automatically when Windows starts
check box.
Under Options for Magnifier:
Select the Start automatically when
Windows starts check box by pressing
ALT+W.
Note To cancel the automatic start, clear the
Start automatically when Windows starts
check box by pressing ALT+W.
4 Select OK. Press ENTER.
51. © 2004 MicrosoftCorporation Step By Step TutorialsforMicrosoft® Windows 2000 Accessibility Options
Windows 2000 / 51
ChangingMagnifierto High Contrast
Mouse actions Keyboard actions
1 On the Start menu:
Point to Programs.
Point to Accessories.
Point to Accessibility.
Select Magnifier.
Note A message box with a link to more
information about Magnifier may appear. To
close the box, select OK.
Display the Start menu by pressing
CTRL+ESC (or the Windows logo key).
Move to Programs by pressing P.
Move to Accessories by pressing the UP
ARROW or DOWN ARROW key. Press
ENTER.
Move to Accessibility, and then press
ENTER.
Move to Magnifier, and then press
ENTER.
Note A message box with a link to more
information about Magnifier may appear. To
close the box, press ENTER.
2 In the Magnifier Settings dialog box, under
Colors:
Select Use High Contrast mode check
box.
Note To use Magnifier but hide the
Magnifier Settings dialog box, select the
Minimize button.
In the Magnifier Settings dialog box, under
Colors:
Select the Use High Contrast mode
check box by pressing ALT+C
Note To use Magnifier but hide the
Magnifier Settings dialog box, press
ALT+SPACEBAR, N.
52. Microsoft Windows 2000 Accessibility Options © 2004 Microsoft Corporation
Windows 2000 / 52
Invertingthe Colors of the MagnifierWindow
Mouse actions Keyboard actions
1 On the Start menu:
Point to Programs.
Point to Accessories.
Point to Accessibility.
Select Magnifier.
Note A message box with a link to more
information about Magnifier may appear. To
close the box, select OK.
Display the Start menu by pressing
CTRL+ESC (or the Windows logo key).
Move to Programs by pressing P.
Move to Accessories by pressing the UP
ARROW or DOWN ARROW key. Press
ENTER.
Move to Accessibility, and then press
ENTER.
Move to Magnifier, and then press
ENTER.
Note A message box with a link to more
information about Magnifier may appear. To
close the box, press ENTER.
2 In the Magnifier Settings dialog box, under
Colors:
Select the Invert Colors check box.
Note To use Magnifier but hide the
Magnifier Settings dialog box, select the
Minimize button.
In the Magnifier Settings dialog box, under
Colors:
Select the Invert Colors check box by
pressing ALT+I.
Note To use Magnifier but hide the
Magnifier Settings dialog box, press
ALT+SPACEBAR, N.
53. © 2004 MicrosoftCorporation Step By Step TutorialsforMicrosoft® Windows 2000 Accessibility Options
Windows 2000 / 53
Setting the Magnification Level
Mouse actions Keyboard actions
1 On the Start menu:
Point to Programs.
Point to Accessories.
Point to Accessibility.
Select Magnifier.
Note A message box with a link to more
information about Magnifier may appear. To
close the box, select OK.
Display the Start menu by pressing
CTRL+ESC (or the Windows logo key).
Move to Programs by pressing P.
Move to Accessories by pressing the UP
ARROW or DOWN ARROW key. Press
ENTER.
Move to Accessibility, and then press
ENTER.
Move to Magnifier, and then press
ENTER.
Note A message box with a link to more
information about Magnifier may appear. To
close the box, press ENTER.
2 In the Magnification level box:
Adjust the level of magnification by
typing a number from 1 to 9, or by using
the arrows to select.
Note To use Magnifier but hide the
Magnifier Settings dialog box, select the
Minimize button.
In the Magnification level box:
Adjust the level of magnification by
selecting a number from 1 to 9 using the
UP ARROW or DOWN ARROW
Note To use Magnifier but hide the
Magnifier Settings dialog box, press
ALT+SPACEBAR, N.
54. Microsoft Windows 2000 Accessibility Options © 2004 Microsoft Corporation
Windows 2000 / 54
Setting MagnifierTrackingOptions
Mouse actions Keyboard actions
1 On the Start menu:
Point to Programs.
Point to Accessories.
Point to Accessibility.
Select Magnifier.
Note A message box with a link to more
information about Magnifier may appear. To
close the box, select OK.
Display the Start menu by pressing
CTRL+ESC (or the Windows logo key).
Move to Programs by pressing P.
Move to Accessories by pressing the UP
ARROW or DOWN ARROW key. Press
ENTER.
Move to Accessibility, and then press
ENTER.
Move to Magnifier, and then press
ENTER.
Note A message box with a link to more
information about Magnifier may appear. To
close the box, press ENTER.
2 In the Magnifier Settings dialog box, under
Tracking:
Select the appropriate option.
Note To use Magnifier but hide the
Magnifier Settings dialog box, select the
Minimize button.
In the Magnifier Settings dialog box:
Press ALT+T to move to the Tracking
Options area.
Press the underlined access keys to select
the tracking options you want.
Note To use Magnifier but hide the
Magnifier Settings dialog box, press
ALT+SPACEBAR, N.
55. © 2004 MicrosoftCorporation Step By Step TutorialsforMicrosoft® Windows 2000 Accessibility Options
Windows 2000 / 55
Changingthe Position of the MagnifierWindow
Mouse actions Keyboard actions
1 When Magnifier is running:
Move the pointer over the Magnifier
window.
When Magnifier is running:
Make sure MouseKeys is turned on.
Move the pointer over the Magnifier
window by pressing the arrow keys on
your numeric keypad.
2 Hold down the mouse button and drag the
Magnifier window to reposition it.
To move the Magnifier window:
Press the INSERT key on your numeric
keypad.
Drag the Magnifier window to reposition
it by pressing the arrow keys on your
numeric keypad.
Press the DELETE key on your numeric
keypad.
56. Microsoft Windows 2000 Accessibility Options © 2004 Microsoft Corporation
Windows 2000 / 56
Changingthe Size of the MagnifierWindow
Mouse actions Keyboard actions
1 When Magnifier is running:
Move the mouse pointer over an edge of
the Magnifier window.
When Magnifier is running:
Make sure MouseKeys is turned on.
Move the pointer over an edge of the
Magnifier window by pressing the arrow
keys on your numeric keypad.
2 When the cursorbecomes a double-pointed
arrow:
Drag the Magnifier window border to
resize the window.
When the cursorbecomes a double-pointed
arrow:
Pressing the INSERT key on your
numeric keypad.
Press the arrow keys on your numeric
keypad to adjust the window to the size
you want.
Press the DELETE key on your numeric
keypad.
57. © 2004 MicrosoftCorporation Step By Step TutorialsforMicrosoft® Windows 2000 Accessibility Options
Windows 2000 / 57
Adjusting Settings Through Control
Panel
You can make adjustments to most of the accessibility features of Microsoft® Windows®
2000 by using Control Panel. And, by selecting just one icon in Control Panel—the
Accessibility Options icon—you can adjust most of the accessibility settings all in one place.
Step by Step Guides that will help you with:
Adjusting Accessibility Options
Turning StickyKeys On and Off
Selecting StickyKeys Settings
Turning FilterKeys On and Off
Selecting FilterKeys Settings
Turning ToggleKeys On and Off
Selecting ToggleKeys Settings
Showing Extra keyboard Help in Programs
Turning SoundSentry On and Off
Selecting SoundSentry Settings
Turning ShowSounds On and Off
Turning High Contrast On and Off
Selecting High Contrast Settings
Turning MouseKeys On and Off
Selecting MouseKeys Settings
Turning Off Accessibility Features After Computer is Idle for Specified Number of
Minutes
Enabling a Warning Message to Appear When Turning a Feature On
Enabling a Warning Sound to Play When Turning a Feature On or Off
Supporting SerialKeys Devices
Selecting SerialKeys Settings
Applying All Settings to the Logon Desktop
Applying All Settings to Defaults for New Users
Selecting a Dvorak Keyboard Layout
58. Microsoft Windows 2000 Accessibility Options © 2004 Microsoft Corporation
Windows 2000 / 58
AdjustingAccessibility Options
Mouse actions Keyboard actions
1 On the Start menu:
Point to Settings.
Select Control Panel.
Display the Start menu by pressing
CTRL+ESC (or the Windows logo key.)
Move to Settings by pressing S.
Select Control Panel by pressing C.
2 In Control Panel:
Double-click Accessibility Options.
In Control Panel:
Select the Accessibility Options icon by
using the arrow keys.
Press ENTER.
3 In the Accessibility Options dialog box:
To access keyboard settings,select the
Keyboard tab.
To access sound settings,select the
Sound tab.
To access display settings,select the
Display tab.
To access mouse settings,select the
Mouse tab.
To access otheraccessibility settings,
select the General tab.
In the Accessibility Options dialog box,
select a tab by pressing CTRL+TAB (continue
pressing TAB until you reach the desired tab).
To access keyboard options,select the
Keyboard tab.
To access sound options,select the
Sound tab.
To access display options,select the
Display tab.
To access mouse options,select the
Mouse tab.
To access otheraccessibility options,
select the General tab.
To continue
To continue customizing Accessibility Options, select the appropriate tab and see the
following Step by Step Guides:
On the Keyboard tab
Turning StickyKeys On and Off
Setting StickyKeys Settings
Turning FilterKeys On and Off
Selecting FilterKeys Settings
Turning ToggleKeys On and Off
Selecting ToggleKeys Settings
Showing Extra Keyboard Help in Programs
59. © 2004 MicrosoftCorporation Step By Step TutorialsforMicrosoft® Windows 2000 Accessibility Options
Windows 2000 / 59
On the Sound tab:
Turning SoundSentry On and Off
Selecting SoundSentry Settings
Turning ShowSounds On and Off
On the Display tab:
Turning High Contrast On and Off
Selecting High Contrast Settings
On the Mouse tab:
Turning MouseKeys On and Off
Selecting MouseKeys Settings
On the General tab:
Turning Off Accessibility Features After Computer Is Idle for Specified Number of
Minutes
Enabling a Warning Message to Appear When Turning a Feature On
Enabling a Warning Sound to Play When Turning a Feature On and Off
Supporting SerialKeys Devices
Selecting SerialKeys Settings
Applying All Settings to the Logon Desktop
Applying All Settings to Defaults for New Users
60. Microsoft Windows 2000 Accessibility Options © 2004 Microsoft Corporation
Windows 2000 / 60
TurningStickyKeys On and Off
StickyKeys is designed for people who have difficulty holding down two or more keys at a
time. When a shorcut requires a key combination such as CTRL+P,StickyKeys will enable
you to press one key at a time instead of pressing them simultaneously.
Mouse actions Keyboard actions
1 On the Start menu:
Point to Settings.
Select Control Panel.
Display the Start menu by pressing
CTRL+ESC (or the Windows logo key.)
Move to Settings by pressing S.
Select Control Panel by pressing C.
2 In Control Panel:
Double-click Accessibility Options.
In Control Panel:
Select the Accessibility Options icon by
using the arrow keys.
Press ENTER.
3 On the Keyboard tab:
To turn on StickyKeys, select the Use
StickyKeys check box.
OR
To turn off StickyKeys, clear the Use
StickyKeys check box.
Select OK
On the Keyboard tab:
To turn on StickyKeys, select the Use
StickyKeys check box by pressing U.
OR
To turn off StickyKeys, clear the Use
StickyKeys check box by pressing U.
Press ENTER.
4 To close Control Panel:
On the File menu, select Close.
To close Control Panel:
Press ALT+F, +C
61. © 2004 MicrosoftCorporation Step By Step TutorialsforMicrosoft® Windows 2000 Accessibility Options
Windows 2000 / 61
SelectingStickyKeys Settings
Mouse actions Keyboard actions
1 On the Start menu:
Point to Settings.
Select Control Panel.
Display the Start menu by pressing
CTRL+ESC (or the Windows logo key.)
Move to Settings by pressing S.
Select Control Panel by pressing C.
2 In Control Panel:
Double-click Accessibility Options.
In Control Panel:
Select the Accessibility Options icon by
using the arrow keys.
Press ENTER.
3 On the Keyboard tab:
Select the Use StickyKeys check box.
On the Keyboard tab:
Select the Use StickyKeys check box by
pressing U.
4 To access StickyKeys settings:
Select Settings.
To access StickyKeys settings:
Select Settings by pressing S.
5 In the Settings for StickyKeys dialog box:
Select the options you want by selecting
or clearing the check boxes.
Select OK twice to save the settings and
exit Accessibility Options.
In the Settings for StickyKeys dialog box:
Select options by pressing the underlined
access keys.
Press ENTER twice to save the settings
and exit Accessibility Options.
6 To close Control Panel:
On the File menu, select Close.
To close Control Panel:
Press ALT+F, C.
62. Microsoft Windows 2000 Accessibility Options © 2004 Microsoft Corporation
Windows 2000 / 62
TurningFilterKeysOn and Off
FilterKeys adjust the keyboard response so that inadvertently repeated keystrokes are
ignored.
Mouse actions Keyboard actions
1 On the Start menu:
Point to Settings.
Select Control Panel.
Display the Start menu by pressing
CTRL+ESC (or the Windows logo key.)
Move to Settings by pressing S.
Select Control Panel by pressing C.
2 In Control Panel:
Double-click Accessibility Options.
In Control Panel:
Select the Accessibility Options icon by
using the arrow keys.
Press ENTER.
3 On the Keyboard tab:
To turn on FilterKeys, select the Use
FilterKeys check box.
OR
To turn off FilterKeys, clear the Use
FilterKeys check box.
Select OK.
On the Keyboard tab:
To turn on FilterKeys, select the Use
FilterKeys check box by pressing F.
OR
To turn off FilterKeys, clear the Use
FilterKeys check box by pressing F.
Press ENTER.
4 To close Control Panel:
On the File menu, select Close.
To close Control Panel:
Press ALT+F, C
63. © 2004 MicrosoftCorporation Step By Step TutorialsforMicrosoft® Windows 2000 Accessibility Options
Windows 2000 / 63
SelectingFilterKeysSettings
Mouse actions Keyboard actions
1 On the Start menu:
Point to Settings.
Select Control Panel.
Display the Start menu by pressing
CTRL+ESC (or the Windows logo key.)
Move to Settings by pressing S.
Select Control Panel by pressing C.
2 In Control Panel:
Double-click Accessibility Options.
In Control Panel:
Select the Accessibility Options icon by
using the arrow keys.
Press ENTER.
3 On the Keyboard tab:
Select the Use FilterKeys check box.
On the Keyboard tab:
Select the Use FilterKeys check box by
pressing F.
4 To access FilterKeys settings:
Select Settings.
To access FilterKeys settings:
Select Settings by pressing E.
5 In the Settings for FilterKeys dialog box:
Select the options you want.
Select OK twice to save the settings and
exit Accessibility Options.
In the Settings for FilterKeys dialog box:
Select options by pressing the underlined
access keys.
Press ENTER twice to save the settings
and exit Accessibility Options.
6 To close Control Panel:
On the File menu, select Close
To close Control Panel:
Press ALT+F, C.
64. Microsoft Windows 2000 Accessibility Options © 2004 Microsoft Corporation
Windows 2000 / 64
TurningToggleKeys On and Off
When ToggleKeys is turned on, a sound is emitted when certain “locking” keys are pressed.
Mouse actions Keyboard actions
1 On the Start menu:
Point to Settings.
Select Control Panel.
Display the Start menu by pressing
CTRL+ESC (or the Windows logo key.)
Move to Settings by pressing S.
Select Control Panel by pressing C.
2 In Control Panel:
Double-click Accessibility Options.
In Control Panel:
Select the Accessibility Options icon by
using the arrow keys.
Press ENTER.
3 On the Keyboard tab:
To turn on ToggleKeys, select the Use
ToggleKeys check box.
OR
To turn off ToggleKeys, clear the Use
ToggleKeys check box.
Select OK.
On the Keyboard tab:
To turn on ToggleKeys, select the Use
ToggleKeys check box by pressing T.
OR
To turn off ToggleKeys, clear the Use
ToggleKeys check box by pressing T.
Press ENTER.
4 To close Control Panel:
On the File menu, select Close.
To close Control Panel:
Press ALT+F, C
65. © 2004 MicrosoftCorporation Step By Step TutorialsforMicrosoft® Windows 2000 Accessibility Options
Windows 2000 / 65
SelectingToggleKeys Settings
Mouse actions Keyboard actions
1 On the Start menu:
Point to Settings.
Select Control Panel.
Display the Start menu by pressing
CTRL+ESC (or the Windows logo key.)
Move to Settings by pressing S.
Select Control Panel by pressing C.
2 In Control Panel:
Double-click Accessibility Options.
In Control Panel:
Select the Accessibility Options icon by
using the arrow keys.
Press ENTER.
3 On the Keyboard tab:
Select the Use ToggleKeys check box.
On the Keyboard tab:
Select the Use ToggleKeys check box by
pressing T.
4 To specify use of the shortcut:
Select Settings.
To specify use of the shortcut:
Select Settings by pressing N.
5 In the Settings for ToggleKeys dialog box:
To use the shortcut key for ToggleKeys,
select the check box.
Select OK twice to save the settings and
exit Accessibility Options.
In the Settings for ToggleKeys dialog box:
To use the shortcut key for ToggleKeys,
(if it is not already checked), select the
check box by typing S.
Press ENTER twice to save the settings
and exit Accessibility Options.
6 To close Control Panel:
On the File menu, select Close
To close Control Panel:
Press ALT+F, C.
66. Microsoft Windows 2000 Accessibility Options © 2004 Microsoft Corporation
Windows 2000 / 66
Showing Extra Keyboard Help in Programs
When this option is selected extra keyboard help is displayed in programs where it is
available.
Mouse actions Keyboard actions
1 On the Start menu:
Point to Settings.
Select Control Panel.
Display the Start menu by pressing
CTRL+ESC (or the Windows logo key.)
Move to Settings by pressing S.
Select Control Panel by pressing C.
2 In Control Panel:
Double-click Accessibility Options.
In Control Panel:
Select the Accessibility Options icon by
using the UP ARROW and DOWN
ARROW keys.
Press ENTER.
3 On the Keyboard tab:
Select the Show extra keyboard help in
programs check box.
Select OK
On the Keyboard tab:
Select the Show extra keyboard help in
programs check box by pressing W.
Press ENTER
4 To close Control Panel:
On the File menu, select Close.
To close Control Panel:
Press ALT+F, C.
67. © 2004 MicrosoftCorporation Step By Step TutorialsforMicrosoft® Windows 2000 Accessibility Options
Windows 2000 / 67
TurningSoundSentry On and Off
SoundSentry allows you to change the settings to generate visual warnings, such as a blinking
title bar or a screen flash, whenever the computer you are using generates a sound. You will
be able to choose visual warnings (for example, a flashing border) for sounds made by
windowed programs and for sounds made by full screen text programs.
Mouse actions Keyboard actions
1 On the Start menu:
Point to Settings.
Select Control Panel.
Display the Start menu by pressing
CTRL+ESC (or the Windows logo key.)
Move to Settings by pressing S.
Select Control Panel by pressing C.
2 In Control Panel:
Double-click Accessibility Options.
In Control Panel:
Select the Accessibility Options icon by
using the arrow keys.
Press ENTER.
3 In the Accessibility Options dialog box:
Select the Sound tab.
In the Accessibility Options dialog box:
Select the Sound tab by pressing
CTRL+TAB.
4 On the Sound tab:
To turn on SoundSentry,select the Use
SoundSentry check box.
Or
To turn off SoundSentry,clear the Use
SoundSentry check box.
Select OK.
On the Sound tab:
To turn on SoundSentry,select the Use
SoundSentry check box by pressing
ALT+S.
Or
To turn off SoundSentry,clear the Use
SoundSentry check box by pressing
ALT+S.
Press ENTER.
5 To close Control Panel:
On the File menu, select Close.
To close Control Panel:
Press ALT+F, C.
68. Microsoft Windows 2000 Accessibility Options © 2004 Microsoft Corporation
Windows 2000 / 68
SelectingSoundSentry Settings
Mouse actions Keyboard actions
1 On the Start menu, point to Settings.
Select Control Panel.
Display the Start menu by pressing
CTRL+ESC (or the Windows logo key).
Move to Settings by pressing S.
Select Control Panel by pressing C.
2 In Control Panel:
Double-click Accessibility Options.
In Control Panel:
Select the Accessibility Options icon by
using the arrow keys.
Press ENTER.
3 In the Accessibility Options dialog box:
Select the Sound tab.
In the Accessibility Options dialog box:
Select the Sound tab by pressing
CTRL+TAB.
4 On the Sound tab:
Select the Use SoundSentry check box.
Select Settings.
On the Sound tab:
Select the Use SoundSentry check box
by pressing ALT+S.
Select Settings by pressing E.
5 In the Settings for SoundSentry dialog box:
Select the visual warning you want.
Select OK twice to close the dialog
boxes.
In the Settings for SoundSentry dialog box:
Select the visual warning you want by
using the UP ARROW and DOWN
ARROW keys.
Press ENTER twice to close the dialog
boxes.
6 To close Control Panel:
On the File menu, select Close.
To close Control Panel:
Press ALT+F, C.
69. © 2004 MicrosoftCorporation Step By Step TutorialsforMicrosoft® Windows 2000 Accessibility Options
Windows 2000 / 69
TurningShowSounds On and Off
When ShowSounds is on, you can see captions for speech or other sounds that are parts of
your computer program.
Mouse actions Keyboard actions
1 On the Start menu:
Point to Settings.
Select Control Panel.
Display the Start menu by pressing
CTRL+ESC (or the Windows logo key.)
Move to Settings by pressing S.
Select Control Panel by pressing C.
2 In Control Panel:
Double-click Accessibility Options.
In Control Panel:
Select the Accessibility Options icon by
using the arrow keys.
Press ENTER.
3 In the Accessibility Options dialog box:
Select the Sound tab.
In the Accessibility Options dialog box:
Select the Sound tab by pressing
CTRL+TAB.
4 On the Sound tab:
To turn on ShowSounds,select the Use
ShowSounds check box.
OR
To turn off ShowSounds,clear the Use
ShowSounds check box.
Select OK.
On the Sound tab:
To turn on ShowSounds,select the Use
ShowSounds check box by pressing
ALT+H.
OR
To turn off ShowSounds,clear the Use
ShowSounds check box by pressing
ALT+H.
Press ENTER.
5 To close Control Panel:
On the File menu, select Close.
To close Control Panel:
Press ALT+SHIFT+C.
70. Microsoft Windows 2000 Accessibility Options © 2004 Microsoft Corporation
Windows 2000 / 70
TurningHigh Contrast On and Off
High Contrast schemes improve screen contrast for some computer users by providing
alternative color combinations and font sizes designed for improved readability.
Mouse actions Keyboard actions
1 On the Start menu:
Point to Settings.
Select Control Panel.
Display the Start menu by pressing
CTRL+ESC (or the Windows logo key.)
Move to Settings by pressing S.
Select Control Panel by pressing C.
2 In Control Panel:
Double-click Accessibility Options.
In Control Panel:
Select the Accessibility Options icon by
using the arrow keys.
Press ENTER.
3 In the Accessibility Options dialog box:
Select the Display tab.
In the Accessibility Options dialog box:
Select the Display tab by holding down
the CTRL key and pressing the TAB key
twice.
4 On the Display tab:
To turn on High Contrast, select the Use
High Contrast check box.
OR
To turn off High Contrast, clear the Use
High Contrast check box.
Select OK.
On the Display tab:
To turn on High Contrast, select the Use
High Contrast check box by pressing
ALT+U.
OR
To turn off High Contrast, clear the Use
High Contrast check box by pressing
ALT+U.
Press ENTER.
5 To close Control Panel:
On the File menu, select Close.
To close Control Panel:
Press ALT+F, C.
71. © 2004 MicrosoftCorporation Step By Step TutorialsforMicrosoft® Windows 2000 Accessibility Options
Windows 2000 / 71
SelectingHigh Contrast Settings
Mouse actions Keyboard actions
1 On the Start menu:
Point to Settings.
Select Control Panel.
Display the Start menu by pressing
CTRL+ESC (or the Windows logo key.)
Move to Settings by pressing S.
Select Control Panel by pressing C.
2 In Control Panel:
Double-click Accessibility Options.
In Control Panel:
Select the Accessibility Options icon by
using the arrow keys.
Press ENTER.
3 In the Accessibility Options dialog box:
Select the Display tab.
In the Accessibility Options dialog box:
Select the Display tab by holding down
the CTRL key and pressing the TAB key
twice.
4 On the Display tab:
Select the Use High Contrast check box.
On the Display tab:
Select the Use High Contrast check box
by pressing ALT+U.
5 To access High Contrast settings:
Select Settings.
To access High Contrast settings:
Select Settings by pressing S.
6 In the Settings for High Contrast dialog box:
Select the options you want.
Select OK twice to save your settings and
close the dialog boxes.
In the Settings for High Contrast dialog box:
Select the options you want by using the
underlined access keys.
Press ENTER twice to save your settings
and close the dialog boxes.
7 To close Control Panel:
On the File menu, select Close.
To close Control Panel:
Press ALT+F, C.
72. Microsoft Windows 2000 Accessibility Options © 2004 Microsoft Corporation
Windows 2000 / 72
TurningMouseKeys On and Off
When MouseKeys is on you can use the numeric keypad for data entry as well as for
navigation.
Mouse actions Keyboard actions
1 On the Start menu:
Point to Settings.
Select Control Panel.
Display the Start menu by pressing
CTRL+ESC (or the Windows logo key).
Move to Settings by pressing S.
Select Control Panel by pressing C.
2 In Control Panel:
Double-click Accessibility Options.
In Control Panel:
Select the Accessibility Options icon by
using the arrow keys.
Press ENTER.
3 In the Accessibility Options dialog box:
Select the Mouse tab.
In the Accessibility Options dialog box:
Select the Mouse tab by holding down
the CTRL key and pressing the TAB key
three times.
4 On the Mouse tab:
To turn on MouseKeys,select the Use
MouseKeys check box.
OR
To turn off MouseKeys,clear the Use
MouseKeys check box.
Select OK.
On the Mouse tab:
To turn on MouseKeys,select the Use
MouseKeys check box by pressing
ALT+M.
OR
To turn off MouseKeys,clear the Use
MouseKeys check box by pressing
ALT+M.
Press ENTER.
5 To close Control Panel:
On the File menu, select Close.
To close Control Panel:
Press ALT+F, C.
73. © 2004 MicrosoftCorporation Step By Step TutorialsforMicrosoft® Windows 2000 Accessibility Options
Windows 2000 / 73
SelectingMouseKeys Settings
You can set MouseKeys to be activated by pressing NUM LOCK.
Mouse actions Keyboard actions
1 On the Start menu:
Point to Settings.
Select Control Panel.
Display the Start menu by pressing
CTRL+ESC (or the Windows logo key).
Move to Settings by pressing S.
Select Control Panel by pressing C.
2 In Control Panel:
Double-click Accessibility Options.
In Control Panel:
Select the Accessibility Options icon by
using the arrow keys.
Press ENTER.
3 In the Accessibility Options dialog box:
Select the Mouse tab.
In the Accessibility Options dialog box:
Select the Mouse tab by holding down
the CTRL key and pressing the TAB key
three times.
4 On the Mouse tab:
Select Use MouseKeys.
Select Settings.
On the Mouse tab:
Select Use MouseKeys by pressing
ALT+M.
Select Settings by pressing S.
5 In the Settings for MouseKeys dialog box:
Select the options you want.
Select OK twice to save your settings and
close the dialog boxes.
In the Settings for MouseKeys dialog box:
Select the options you want by using the
underlined access keys, and the arrow
keys.
Press ENTER twice to save your settings
and close the dialog boxes.
6 To close Control Panel:
On the File menu, select Close.
To close Control Panel:
Press ALT+F, C.
74. Microsoft Windows 2000 Accessibility Options © 2004 Microsoft Corporation
Windows 2000 / 74
TurningOff Accessibility FeaturesAfter ComputerIs
Idle
When this option is selected the accessibility features you have used while working will be
turned off after a specified number of minutes. This benefits people who share a computer
and want to customize it to their personal preferences.
Mouse actions Keyboard actions
1 On the Start menu:
Point to Settings.
Select Control Panel.
Display the Start menu by pressing
CTRL+ESC (or the Windows logo key).
Move to Settings by pressing S.
Select Control Panel by pressing C.
2 In Control Panel:
Double-click Accessibility Options.
In Control Panel:
Select the Accessibility Options icon by
using the arrow keys.
Press ENTER.
3 In the Accessibility Options dialog box:
Select the General tab.
In the Accessibility Options dialog box:
Select the General tab by holding down
the CTRL key and pressing the TAB key
four times.
4 On the General tab:
Select the Turn off accessibility features
after idle for check box.
In the minutes box, select the idle time.
Select OK.
On the General tab:
Select the Turn off accessibility features
after idle for check box by pressing
ALT+T.
Specify the idle time by pressing the TAB
key and using the arrow keys to select a
value.
Press ENTER.
5 To close Control Panel:
On the File menu, select Close.
To close Control Panel:
Press ALT+F, C.
75. © 2004 MicrosoftCorporation Step By Step TutorialsforMicrosoft® Windows 2000 Accessibility Options
Windows 2000 / 75
Enablinga WarningMessage to Appear When Turning
a Feature On
When this option is selected a warning message will appear when a feature is turned on. This
is helpful in situations where a computer is shared, or when one user sometimes works with a
particular feature turned on and other times does not.
Mouse actions Keyboard actions
1 On the Start menu:
Point to Settings.
Select Control Panel.
Display the Start menu by pressing
CTRL+ESC (or the Windows logo key).
Move to Settings by pressing S.
Select Control Panel by pressing C.
2 In Control Panel:
Double-click Accessibility Options.
In Control Panel:
Select the Accessibility Options icon by
using the arrow keys.
Press ENTER.
3 In the Accessibility Options dialog box:
Display the General tab.
In the Accessibility Options dialog box:
Select the General tab by holding down
the CTRL key and pressing the TAB key
four times.
4 On the General tab:
Select the Give warning message when
turning a feature on check box.
Select OK.
On the General tab:
Select the Give warning message when
turning a feature on check box by
pressing G.
Press ENTER.
5 To close Control Panel:
On the File menu, select Close.
To close Control Panel:
Press ALT+F, C.
76. Microsoft Windows 2000 Accessibility Options © 2004 Microsoft Corporation
Windows 2000 / 76
Enablinga WarningSound to Play When Turning a
FeatureOn or Off
When this option is selected a warning sound if given when a feature is turned on or off. This
can benefit all users,and in particular those with visual impairments.
Mouse actions Keyboard actions
1 On the Start menu:
Point to Settings.
Select Control Panel.
Display the Start menu by pressing
CTRL+ESC (or the Windows logo key).
Move to Settings by pressing S.
Select Control Panel by pressing C.
2 In Control Panel:
Double-click Accessibility Options.
In Control Panel:
Select the Accessibility Options icon by
using the arrow keys.
Press ENTER.
3 In the Accessibility Options dialog box:
Select the General tab.
In the Accessibility Options dialog box:
Select the General tab by holding down
the CTRL key and pressing the TAB key
four times.
4 On the General tab:
Select the Make a sound when turning a
feature on or off check box.
Select OK.
On the General tab:
Select the Make a sound when turning a
feature on or off check box by pressing
S.
Press ENTER.
5 To close Control Panel:
On the File menu, select Close.
To close Control Panel:
Press ALT+F, C.
77. © 2004 MicrosoftCorporation Step By Step TutorialsforMicrosoft® Windows 2000 Accessibility Options
Windows 2000 / 77
SupportingSerialKeysDevices
This feature allows the use of alternative input devices such as augmentative speech devices.
Mouse actions Keyboard actions
1 On the Start menu:
Point to Settings.
Select Control Panel.
Display the Start menu by pressing
CTRL+ESC (or the Windows logo key).
Move to Settings by pressing S.
Select Control Panel by pressing C.
2 In Control Panel:
Double-click Accessibility Options.
In Control Panel:
Select the Accessibility Options icon by
using the arrow keys.
Press ENTER.
3 In the Accessibility Options dialog box:
Select the General tab.
In the Accessibility Options dialog box:
Select the General tab by holding down
the CTRL key and pressing the TAB key
four times.
4 On the General tab:
Select the Support SerialKey devices
check box.
Select OK.
On the General tab:
Select the Support SerialKey devices
check box by pressing ALT+U.
Press ENTER.
5 To close Control Panel:
On the File menu, select Close.
To close Control Panel:
Press ALT+F, C.
78. Microsoft Windows 2000 Accessibility Options © 2004 Microsoft Corporation
Windows 2000 / 78
SelectingSerialKeys Settings
Mouse actions Keyboard actions
1 On the Start menu:
Point to Settings.
Select Control Panel.
Display the Start menu by pressing
CTRL+ESC (or the Windows logo key).
Move to Settings by pressing S.
Select Control Panel by pressing C.
2 In Control Panel:
Double-click Accessibility Options.
In Control Panel:
Select the Accessibility Options icon by
using the arrow keys.
Press ENTER.
3 In the Accessibility Options dialog box:
Select the General tab.
In the Accessibility Options dialog box:
Select the General tab by holding down
the CTRL key and pressing the TAB key
four times.
4 On the General tab:
Select the Support SerialKey devices
check box.
Select Settings.
On the General tab:
Select the Support SerialKey devices
check box by pressing ALT+U.
Select Settings by pressing E
5 In the Settings for SerialKeys dialog box:
Select the options you want.
Select OK.
In the Settings for SerialKeys dialog box:
Select options using the underlined access
keys and the arrow keys.
Press ENTER.
6 To close Control Panel:
On the File menu, select Close.
To close Control Panel:
Press ALT+F, C.