Plc networking basics - controllogix

PLC Networking Basics using a Controllogix module also has an associated interactive youtube course that uses an intro project of networking multiple class laptops to a single Controllogix 5000 PLC/PAC. This powerpoint is for reference and additional information to supplement the course at http://www.youtube.com/watch?v=Au03psa9Vxk The PLC Networking Basics course has a total of 4 training modules (videos), each with it's own question at end, before directing you to next Controllogix tutorial. There is also an associated test for this training course at http://bin95.com/Employee-Training-Assessments/PLC-Training-Assessment/PLC-Networking-Basics-Controllogix.php Hope you like and share, which will encourage us to create more of these free courses.

Recommended
More Related Content
What's hot
What's hot (20)
Viewers also liked
Viewers also liked (18)
Similar to Plc networking basics - controllogix
Similar to Plc networking basics - controllogix (20)
More from Business Industrial Network
More from Business Industrial Network (20)
Recently uploaded
Recently uploaded (20)
Plc networking basics - controllogix
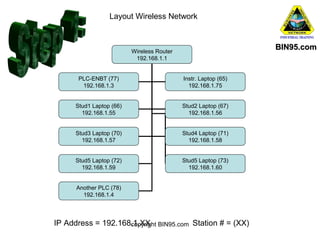
- 1. Layout Wireless Network BIN95.com Wireless Router 192.168.1.1 PLC-ENBT (77) 192.168.1.3 Instr. Laptop (65) 192.168.1.75 Stud1 Laptop (66) 192.168.1.55 Stud2 Laptop (67) 192.168.1.56 Stud3 Laptop (70) 192.168.1.57 Stud4 Laptop (71) 192.168.1.58 Stud5 Laptop (72) 192.168.1.59 Stud5 Laptop (73) 192.168.1.60 Another PLC (78) 192.168.1.4 IP Address = 192.168.1.XX BIN95.com Station # = (XX) copyright
- 2. Setup Laptop IP Address BIN95.com copyright BIN95.com
- 3. BIN95.com Click on Network Connections Select LAN , Local Area Conn copyright BIN95.com
- 4. BIN95.com Select Internet Protocol Then click Properties copyright BIN95.com
- 5. BIN95.com Select ‘Use the following IP address” Type in IP address you decided to use for student Laptop when mapping network Use default Subnet mask copyright BIN95.com
- 6. Plug in Ethernet Cable BIN95.com We used a Crossover Cable (T568ab) in our example, but you can use a Straight Trough Cable (T568a on both ends) if you like. copyright BIN95.com
- 7. Test Network Connection to ENBT Card BIN95.com Select Start, then Run Type in “command”, then click OK copyright BIN95.com
- 9. Install ENBT EDS Files BIN95.com Click Start, select programs and navigate to EDS Install Tool as show above and click it. On the dialog box that pops open, click the “Add” button. copyright BIN95.com
- 10. Select EDS Folder in EDS Wizard BIN95.com 1. Select “ Register a directory” 2. Click Browse 3. Select folder with EDS Sheets 4. Click OK button 5. Check mark “Look in subfolders” 6. Then click “Next” button copyright BIN95.com
- 11. EDS Files are now Installed BIN95.com Leave all files checked and click the “Next” button. 2 more dialog boxes will open after clicking next on this one, just click “Next” button on them too. Then click “Finnish” on the final 4th dialog box that opens. copyright BIN95.com
- 12. Install RSLinx Ethernet Driver BIN95.com Open RSLinx, Select “Communications” from pull down menu. Click on “Configure Driver”. copyright BIN95.com
- 13. Install RSLinx Ethernet Driver BIN95.com 1. Select “Ethernet devices” from drop down list of available driver types. 2. Click “Add New” button. copyright BIN95.com
- 14. A dialog box will pop up for you to optional change default driver name. Rename driver to something that better reflects the real world. BIN95.com •“ENBT” lets users know what IP address the drive is set for. •“Ethernet” lets users know what type of driver it is. •Set ENBT Station # and IP address. •Set Driver Station # •Click “OK” button. copyright BIN95.com
- 15. Before clicking “Close” button, make sure you see “RUNNING” in both the description and status columns. copyright BIN95.com BIN95.com
- 16. Click on ENBT Driver icon on the left, you should see the ENBT device icon appear on the right. Click on it one time so it is highlighted blue and minimize RSLinx. copyright BIN95.com BIN95.com
- 17. Wireless Router Setup •Plug ENBT Ethernet cable into port 1 of Router •In web browser, type router IP address •Change IP Address to same channel as laptops in this case 1.1 •Makes sure Mask is same as laptops and ENBT copyright BIN95.com BIN95.com
- 18. Go Online With ControlLogix BIN95.com Open RSLogix 5000, select “Communications” from pull down menu, click “Who Active”. copyright BIN95.com
- 20. BIN95.com For Videos: Go To http://www.youtube.com/watch? v=Au03psa9Vxk For Test: Go To http://bin95.com/Employee-TrainingAssessments/PLC-Training-Assessment/PLC-Networking-BasicsControllogix.php copyright BIN95.com
Editor's Notes
- Whenever working with networking Allen Bradley products, it is a good practice to use Octal number system (no 8s or 9s). So you will notice our Laptop station numbering in map above skips number 68 and 69. Also a good idea is to have laptops in a separate group of address than ENBT cards. (As station numbers are just for RSLinx, IP addresses use decimal numbering system.)
- Click on task bar and then ControlPanel
- Then click ok for this dialog box, and click done button on next dialog box.
- At command prompt, type “ping 192.168.1.3” or what ever address you have set up in your ControlLogix program loaded in the processor (via RSLogix 5000) for your ENBT card. A successful ping will show the same number of packets received as was sent. (our example 4 sent, 4 received). The Average time should be less than 1 millisecond. (our example was <0ms) If longer time was seen, or packets where lost, try another cable. Commend prompt = C:DOCUME~1STEVE>
- You will find the required EDS files on BIN95.com USB Flash Drive we giveaway in class. (EDS (Electronic Data Sheet)) They will be under the PLC5000 directory
- Note: Make sure “Look in subfolder” check box is checked, before clicking “Next button of wizard or it may not find your EDS files. To make it easier, we have placed only the ENBT EDS files in a folder “EDS” on the BIN95.com Flash Drive.
- So the step in this slide is to click “Next” button 3 times in a row, once for each of the 3 dialog boxes that appear. Then click “Finish” on the 4th dialog box, then “Exit” on the 5th dialog box. You are done installing EDS files.
- Use Station numbers (XX) and IP Addresses you mapped out in slide 1. (The example above is for Student laptop #6 on network map.)
- Note: If you see a yellow question mark on the right instead of ENBT icon pictured above, you did not properly install EDS files for ENBT.
- Access Wireless router via web browser. Type in original IP address (typically 192.168.0.1) Default user name is typically “admin”, passwords are “password” or “admin” In the default IP address the “0” (zero) we will refer to as the Channel. The ENBT card and laptops where all set up in previous slides with channel 1 (like 192.168.1.3). So we want to change the Router TCP/IP from 0 to 1 also. So wireless is on same channel. Also while you are there, double check to make sure mask is the same as it was for ENBT card and laptops (255.255.255.0) Changing channel from default can reduce interference, increase speed and make a little more secure. But in an Industrial environment (not a classroom like we are setting up here), you want to use the most secure industrial network, security and protocols you can.
- In the Who Active dialog box, click on the “+” sign to the left of ENBT driver icon. Click on the “+” sign next to 1756-ENBT Click on the “+” sign next to 1756-A4/A (the rack) Click on the Icon for 1756-L1/A (Logix 5550 processor) Click “Go Online” button.
- Success !! If you see gears moving in the icon Located on the left of status window with path “ENBT ethernet192.168.1.3Backplane�”
- For Videos: Go To http://www.youtube.com/watch?v=Au03psa9Vxk For Test: Go To http://bin95.com/Employee-Training-Assessments/PLC-Training-Assessment/PLC-Networking-Basics-Controllogix.php