Downloaded 95 times
![www.vishalbiyani.comLearning Puppet
First tomcat run! Now let’s log on to agent_0 and fire command:
In our first cut we want to do a few basic things:
install tomcat, start/run it and there should be a
way to test it in browser if it is working right. For
testing part we will install the “ROOT” app which
shows tomcat home page.Where to put all this
code? In the /etc/puppet/manifests/site.pp under
one of nodes.Our site.pp looks like:
1 node 'puppet.learn.com' {
2 package {'vim-enhanced.x86_64':
3 ensure => present,
4 }
5 }
6 node '0.pagent.vb.com' {
7 package { 'tomcat6':
So that will install & bring up tomcat.To check simply hit the
ip_address:8080* (Or find out the IP address that would get assigned from
Vagrantfile, in my case it is 192.168.17.10).You should see tomcat
homepage:
4|
7 package { 'tomcat6':
8 ensure => installed,
9 }
10
11 service { 'tomcat6':
12 ensure => running,
13 }
14 package { 'tomcat6-webapps':
15 ensure => installed,
16 require => Package['tomcat6'],
17 }
18 }
19 node '1.pagent.vb.com' {
20 }
In above snippet we have added lines from 7 – 17
to get done what we want. First we are declaring
that package tomcat6 should be installed,
secondly it should be running. In last block we are
installing the “ROOT” app which is named as
tomcat-webapps and also forming a relation on
installation of tomcat.
To get IP address of agent fire command “ifconfig” – here the IP address in
block eth1 would be accessible from your machine
So we have a basic tomcat server running but there are quite a few things
that need to be taken care of for example:
•Note that our current code will only work on certain operating systems – for
example if package name on a OS anything different than tomcat6 – then it
won’t work.
•Similarly adding code this way to node definition is not scalable for sure.
We need to move the code somewhere else.
But this is a good start for our first cut; we will refine this much more in
coming pages/slides!](https://image.slidesharecdn.com/learningpuppetchapter3-150519195033-lva1-app6892/75/Learning-puppet-chapter-3-4-2048.jpg)
![www.vishalbiyani.comLearning Puppet
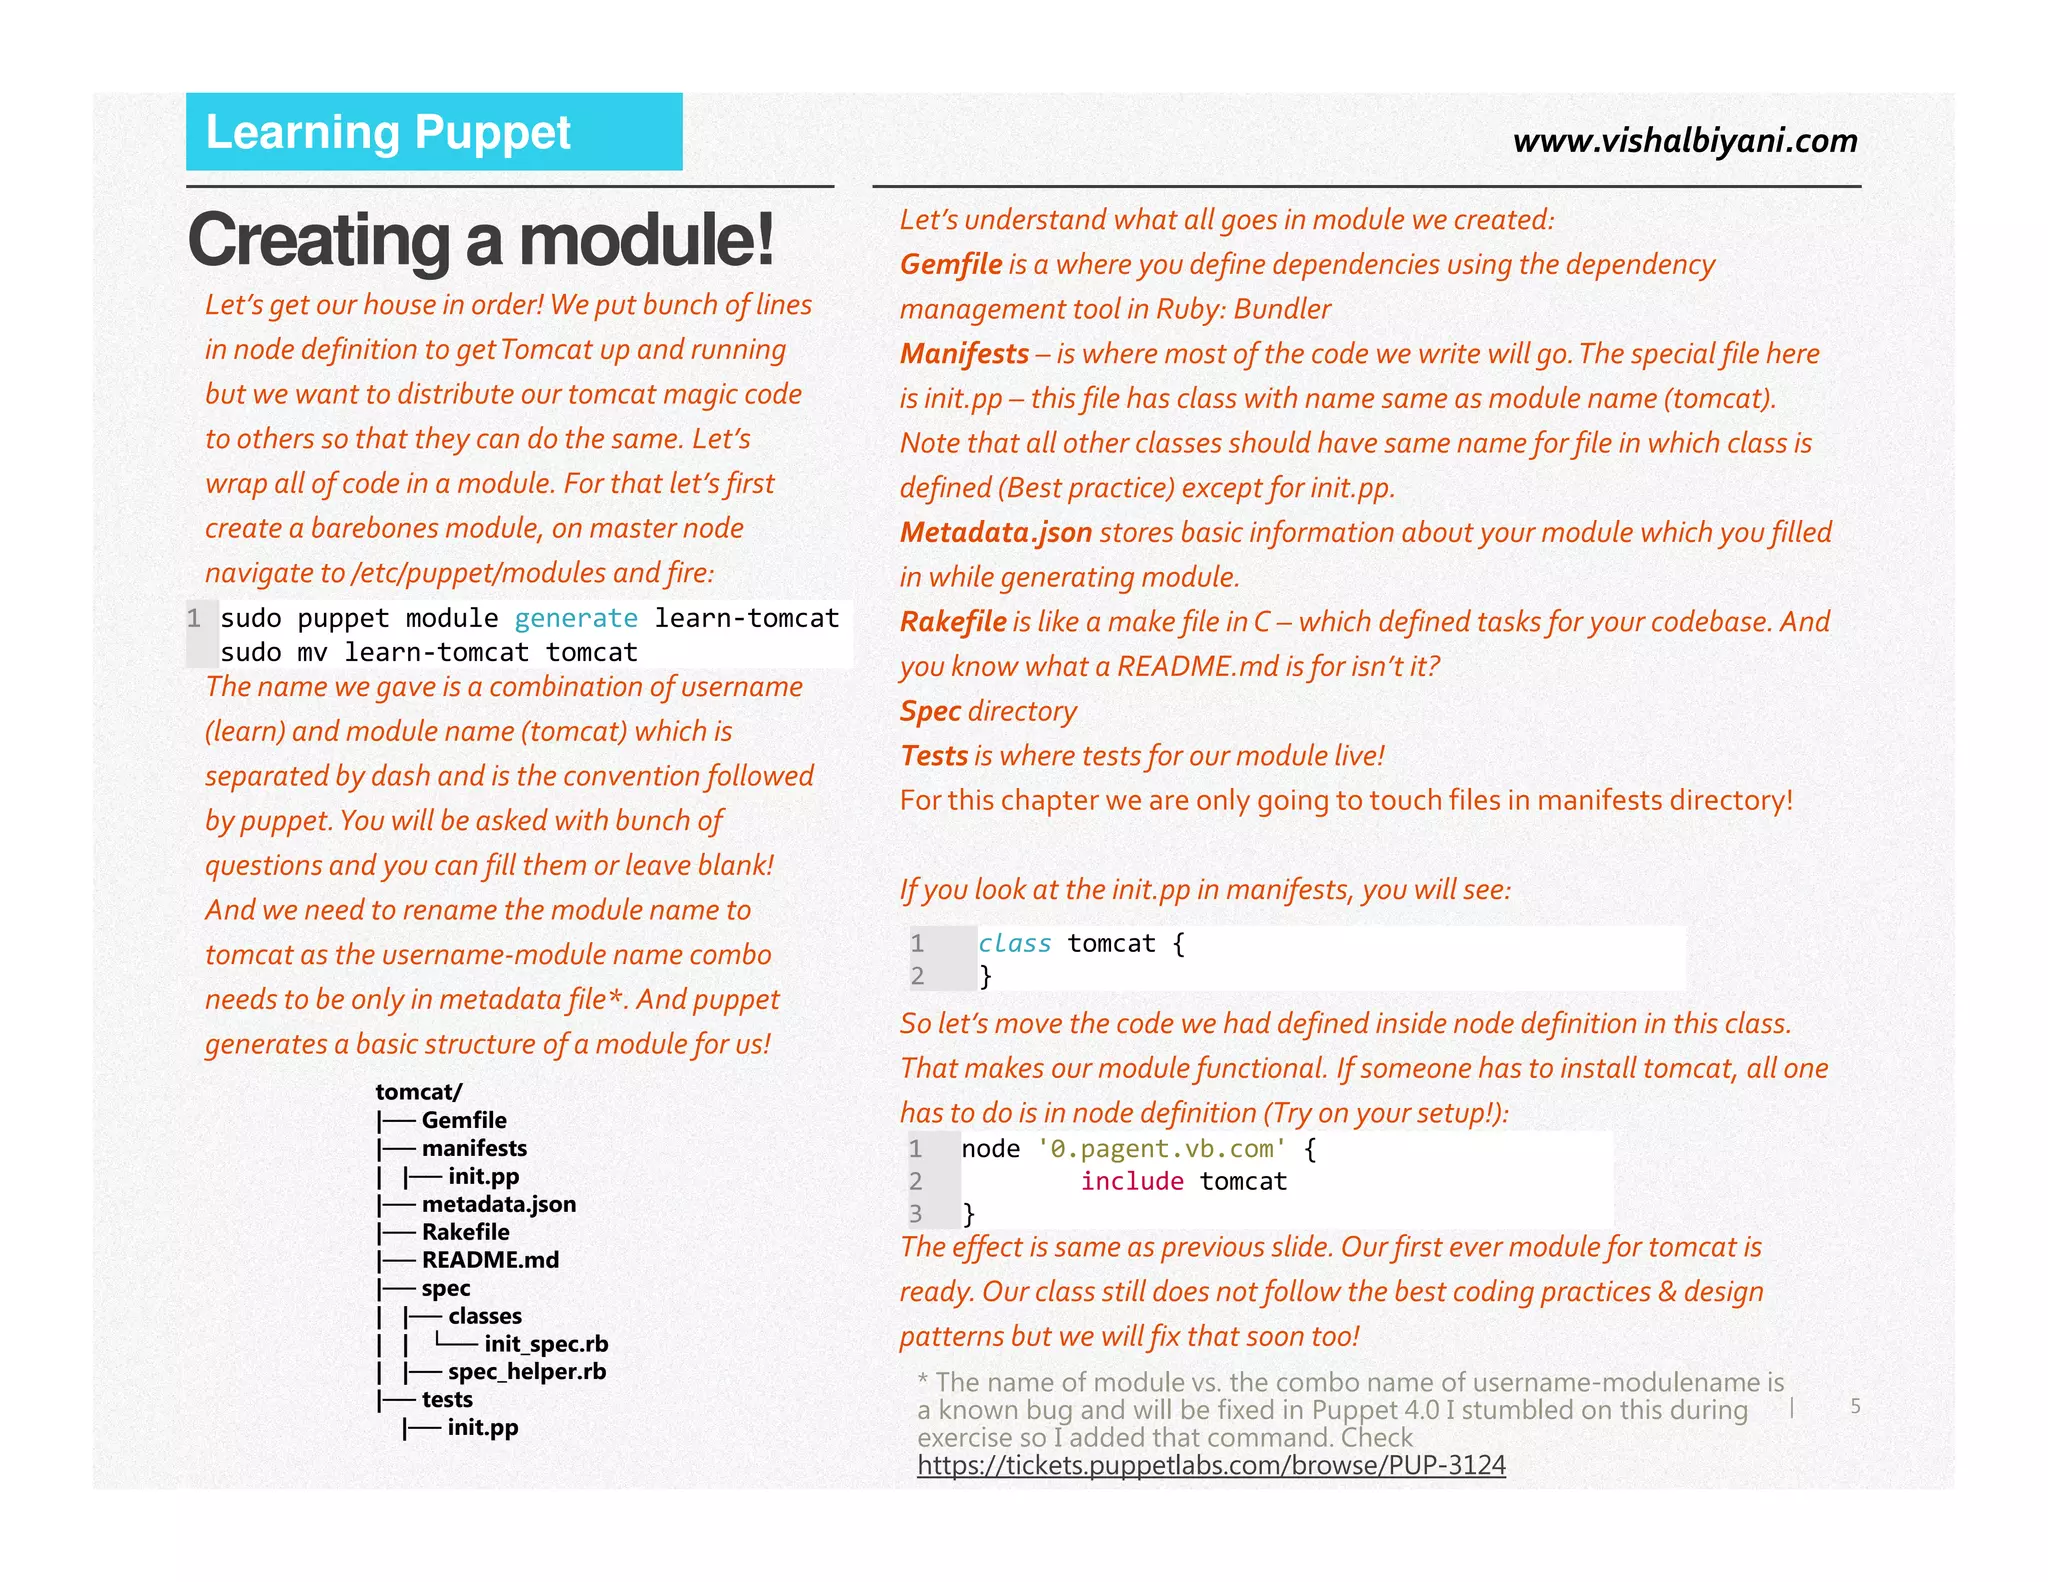
Code into logical classes
Next we want to break the code logic into
appropriate blocks.We are primarily doing a few
things – managing packages (installing them)
and once they are done then managing service
(Starting tomcat etc.). So it makes sense to add
the relevant chunk in relevant classes.
Our first step of getting packages and installing
them is grouped into install.pp which does same
thing but uses parameters instead of hardcoded
values of package names & states. Looks neat
isn’t it?
1 class tomcat::install inherits tomcat {
2 package { 'tomcat6':
3 name => $package_name,
4 ensure => $package_ensure,
5 }
6 package {'tomcat6-webapps':
7 name => $root_webapp_name,
8 ensure => $root_webapp_ensure,
9 require => Package['tomcat6'],
10 }
11 }
1 class tomcat::service inherits tomcat {
2 if ! ($service_ensure in ['stopped','running']){Next we manage services in service.pp. Here we
7|
2 if ! ($service_ensure in ['stopped','running']){
3 fail("Service status must be one of stopped or running")
4 }
5 if $service_manage == true {
6 service {'tomcat6':
7 ensure => $service_ensure,
8 name => $service_name,
9 }
10 }
11 }
Next we manage services in service.pp. Here we
add a small check to ensure user has not passed
invalid values for service status before we
actually start service.We are also letting user
decide weather service should be started or not
with $service_manage parameter. Rest all is old
code in new bottle (of beer or wine ;) )
1 class tomcat::config inherits tomcat {
2 }
We are adding one more class – config.pp and
leaving it blank, just for future you know!
So we defined classes but never invoked them?
How will this work? It will, in next slide ;)](https://image.slidesharecdn.com/learningpuppetchapter3-150519195033-lva1-app6892/75/Learning-puppet-chapter-3-7-2048.jpg)
![www.vishalbiyani.comLearning Puppet
Get Set Go..Finally we add the meat to main block of our
original class – tomcat (init.pp).We are using a
magic word – contain and then declaring the
three classes we defined in a specific order.
Because we don’t want to start tomcat service
before it is installed isn’t it? BTWWTH is this
contain?We will understand that in next slide but
for now understand that we are scoping them in
current context so that even if someone declares
them elsewhere with include – we are not
affected! (Remember that irrespective of number
of includes – it is executes only once?)
1 class tomcat (
2 $package_name = $tomcat::params::service_name,
3 $package_ensure = $tomcat::params::package_ensure,
4 $service_manage = $tomcat::params::service_manage,
5 $service_name = $tomcat::params::service_name,
6 $service_ensure = $tomcat::params::service_ensure,
7 $service_port = $tomcat::params::service_port,
8 ) inherits ::tomcat::params {
9 contain tomcat::config
10 contain tomcat::install
11 contain tomcat::service
12
13 Class['tomcat::config'] ->
14 Class['tomcat::install'] ->
15 Class['tomcat::service']
16 }
8|There is an excellent document on Puppet website which talks about good module design, our design is loosely
based on that, it is a MUST read: https://docs.puppetlabs.com/guides/module_guides/bgtm.html
What changes in node classification declaration
from last modification? Not much. Doing a
puppet run on agent would have same effect but
now our code is much cleaner & well structured. If
you need to pass parameters then we will have to
use the resource declaration way as shown in
second code snippet for node declaration:
1 node '0.pagent.vb.com' {
2 include tomcat
3 }
1 node '0.pagent.vb.com' {
2 class {'tomcat':
3 service_ensure => 'stopped',
4 }
5 }
If you noticed something – if you try changing the
port of service to anything other than 8080 – that
does not work, because we have not yet coded for
that.We will do that in next chapter but before
we finish let’s go over what containment is ?
Why can not we pass parameters in include way of class declaration above?
Why we had to fall back to resource based declaration? If you use include
function to declare classes then configuration parameters should ideally
come from Hiera and we will see how in upcoming chapters. It is suggested
to use include way of declaring going forward as we already covered in
chapter 2](https://image.slidesharecdn.com/learningpuppetchapter3-150519195033-lva1-app6892/75/Learning-puppet-chapter-3-8-2048.jpg)
![www.vishalbiyani.comLearning Puppet
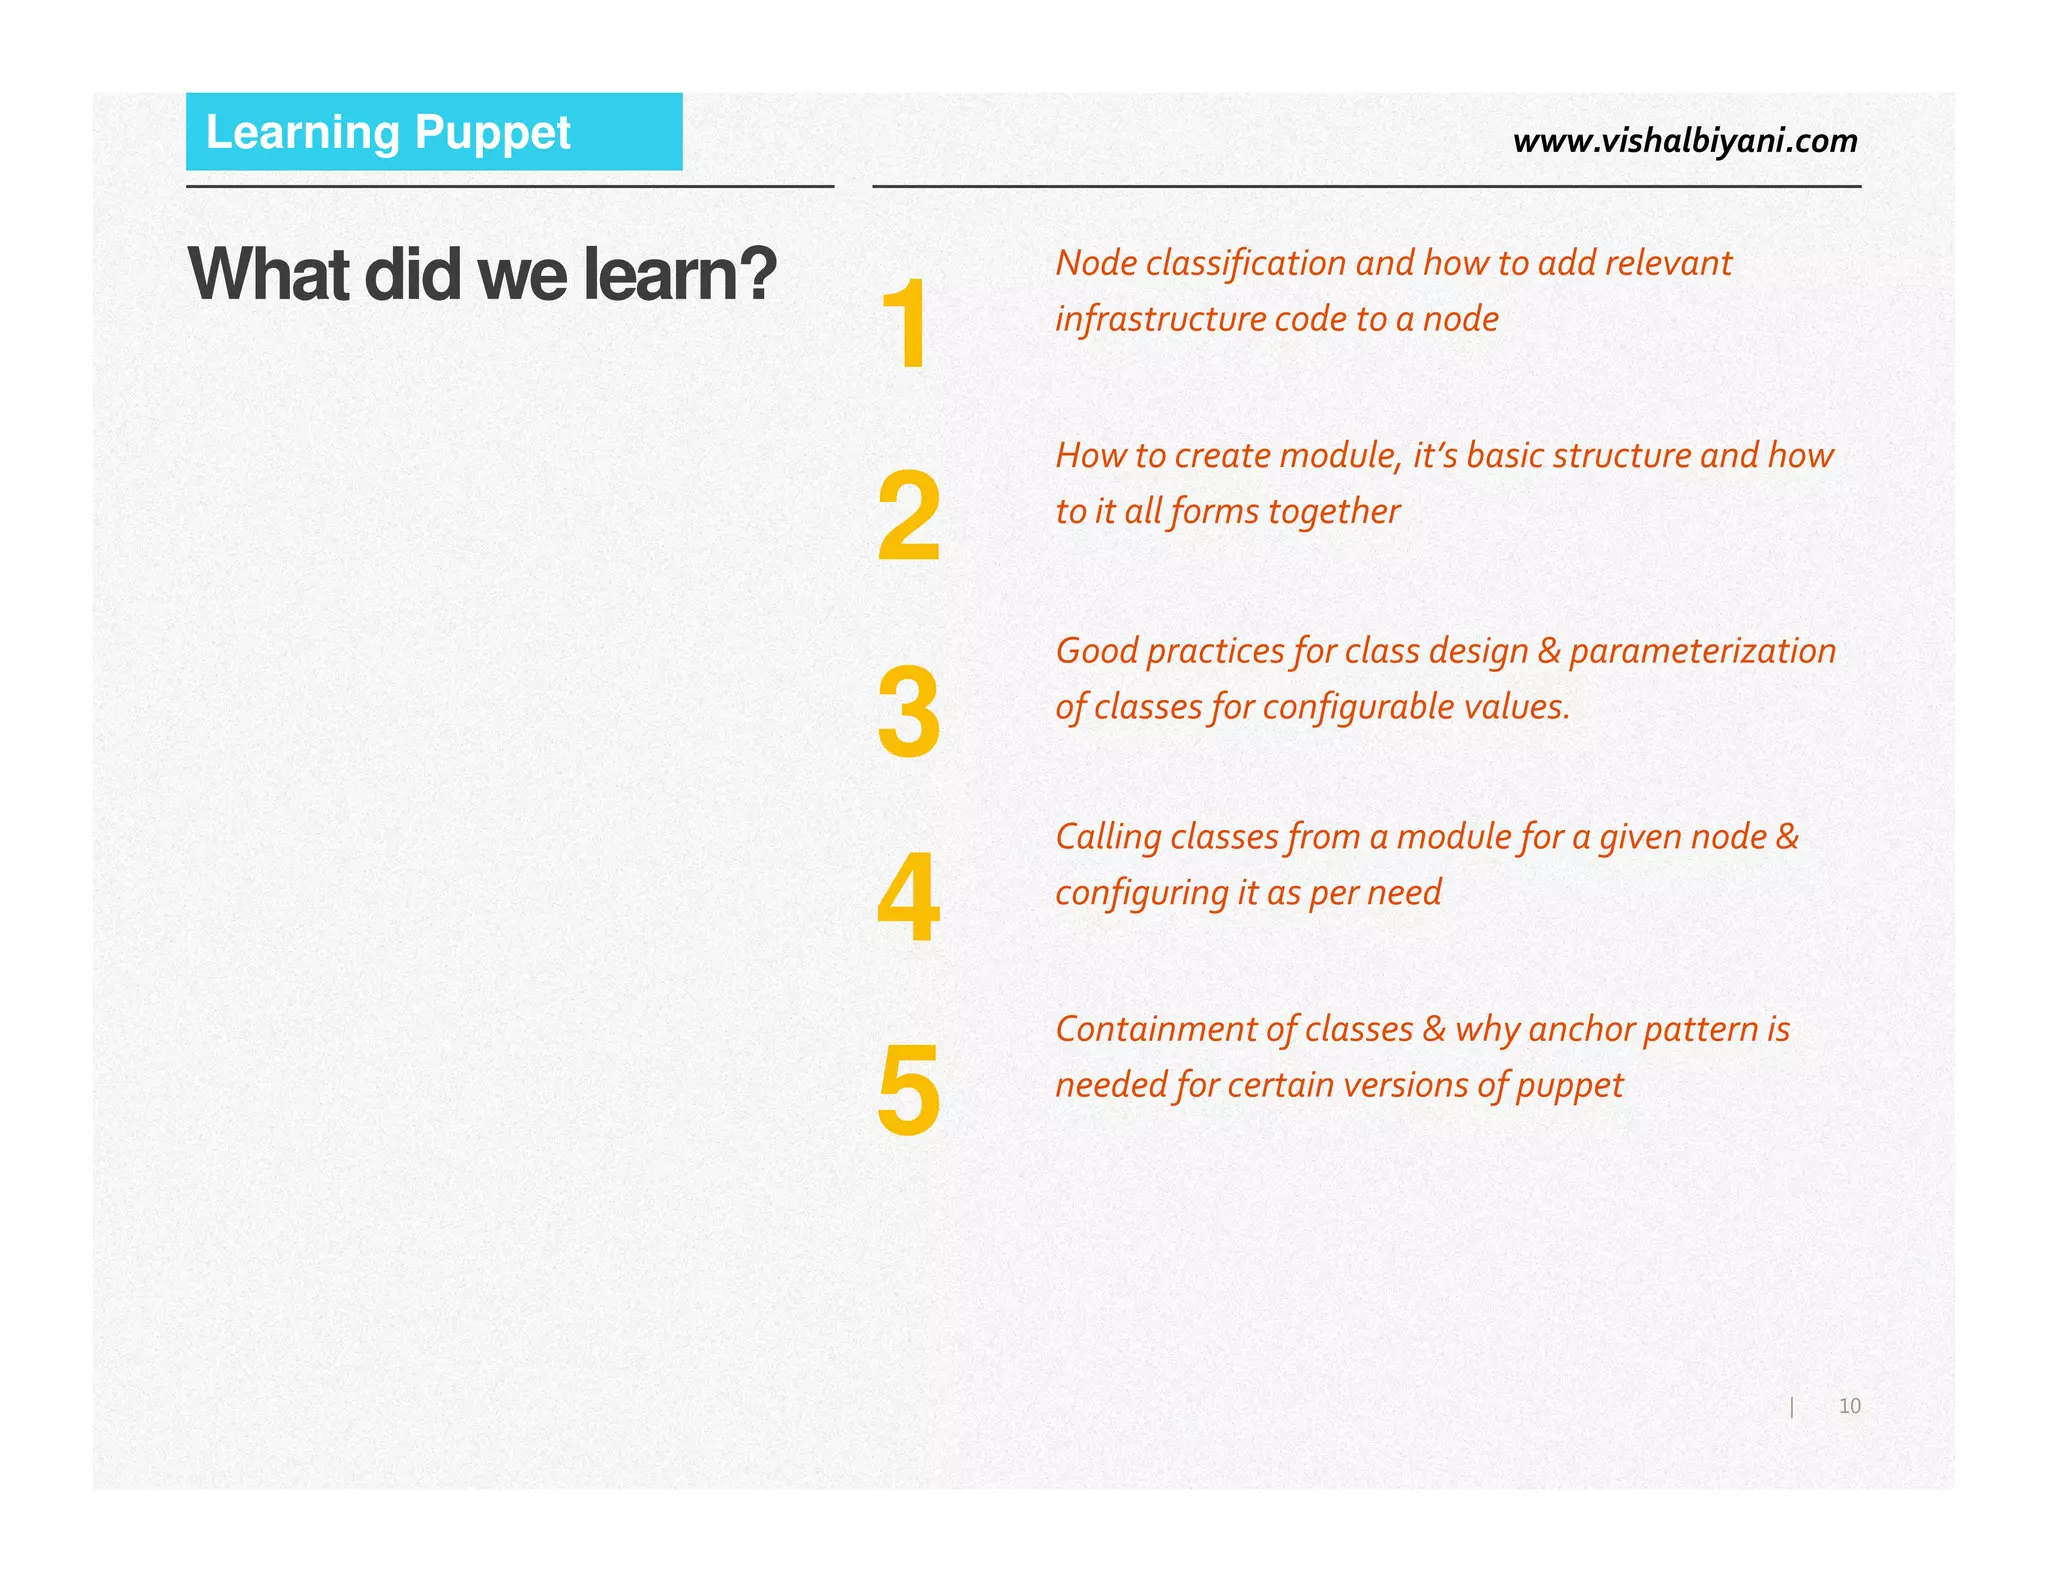
Containment &
Anchor pattern
So how do you contain classes? It is very simple syntax – in include like as
well as resource like declaration. For resource like, you will need to use all 4
lines below and in case of include like only line number 4 is needed!
Containment can be a tricky topic to understand
if we ignore basics, so let’s recap them once more:
•In puppet sequence of execution is not
guaranteed unless you explicitly form that
relationship (Between two resources).
•“include” type of declaration can be done
multiple times although the execution will
happen only once
•Thirdly if you define a resource within a class –
1 class {'tomcat::service':
2 service_ensure => 'stopped',
3 }
4 contain 'tomcat::service'
But there is a small problem – contain function was introduced in Puppet
enterprise 3.2 and puppet open source 3.4. So if you are using versions prior
to those, you will need to use puppetlabs/stdlibs module along with anchor
resource type.This is named “anchor containment pattern”. Let’s look at
some code and then digest it, our above declaration with anchor pattern
now will look like:
1 anchor['tomcat_start:'] ->
9|
•Thirdly if you define a resource within a class –
then you can be sure that the resource code will
be executed after class starts and before class
ends – this is basically called containment of that
resource to class. Resources and defined types by
default are contained.
Now let’s imagine you defined a class A.You
included A in another class B and many other
places. But puppet does not guarantee that A will
be executed within B by default.This means
classes by default are not contained and need to
be contained explicitly.Why? See footnote!
Classes are not contained by default is intentional. Imagine you declared “include class_name” n number of places and
puppet had to contain the class everywhere? At the same time when we design a large module, we want to make sure
parent class can contain other classes. Creating classes to have logical division is a good practice as we already saw!
1 anchor['tomcat_start:'] ->
2 Class['tomcat::service':] ->
3 anchor['tomcat_end':]
4 # Almost same as 'contain tomcat::service'
So here is what is happening:
•The class to be contained should be between two anchors.These anchors
should be unique within containing class.
•You must form relationship between class to be contained and anchors
such that there is one anchor before and after the contained class (-> forms
this relationship)
•Anchor code does not affect the execution – it is only to facilitate the
containment!](https://image.slidesharecdn.com/learningpuppetchapter3-150519195033-lva1-app6892/75/Learning-puppet-chapter-3-9-2048.jpg)

The document is a comprehensive guide on configuring a Tomcat server using Puppet, detailing steps to write a basic manifest and create a functional module. It discusses structuring code into classes for better organization and modular design, parameterization for customization, and contains best practices for managing Puppet modules. Additionally, it addresses concepts like containment and the anchor pattern for proper resource execution order in Puppet configurations.