1. Packet Tracer Activity for Lab 8
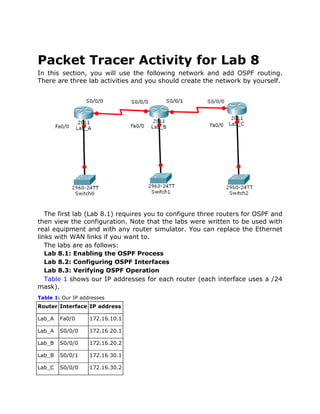
In this section, you will use the following network and add OSPF routing.
There are three lab activities and you should create the network by yourself.
The first lab (Lab 8.1) requires you to configure three routers for OSPF and
then view the configuration. Note that the labs were written to be used with
real equipment and with any router simulator. You can replace the Ethernet
links with WAN links if you want to.
The labs are as follows:
Lab 8.1: Enabling the OSPF Process
Lab 8.2: Configuring OSPF Interfaces
Lab 8.3: Verifying OSPF Operation
Table 1 shows our IP addresses for each router (each interface uses a /24
mask).
Table 1: Our IP addresses
Router Interface IP address
Lab_A Fa0/0 172.16.10.1
Lab_A S0/0/0 172.16.20.1
Lab_B S0/0/0 172.16.20.2
Lab_B S0/0/1 172.16.30.1
Lab_C S0/0/0 172.16.30.2
2. Lab_C Fa0/0 172.16.40.1
Hands-on Lab 8.1: Enabling the OSPF Process
This is the first mandatory step in OSPF configuration.
1. Enable OSPF process 100 on Lab_A:
Lab_A#conf t
Enter configuration commands, one per line.
End with CNTL/Z.
Lab_A (config)#router ospf 100
Lab_A (config-router)#^Z
2. Enable OSPF process 101 on Lab_B:
Lab_B#conf t
Enter configuration commands, one per line.
End with CNTL/Z.
Lab_B (config)#router ospf 101
Lab_B (config-router)#^Z
3. Enable OSPF process 102 on Lab_C:
Lab_C#conf t
Enter configuration commands, one per line.
End with CNTL/Z.
Lab_C (config)#router ospf 102
Lab_C (config-router)#^Z
Hands-on Lab 8.2: Configuring OSPF
Interfaces
The second mandatory step in OSPF is adding your network statements.
1. Configure the LAN and the network between Lab_A and Lab_B. Assign it to
area 0.
Lab_A#conf t
Enter configuration commands, one per line.
End with CNTL/Z.
Lab_A (config)#router ospf 100
Lab_A (config-router)#network 172.16.10.1 0.0.0.0 area 0
Lab_A (config-router)#network 172.16.20.1 0.0.0.0 area 0
3. Lab_A (config-router)#^Z
Lab_A #
2. Configure the networks on the Lab_B router. Assign them to area 0.
Lab_B#conf t
Enter configuration commands, one per line.
End with CNTL/Z.
Lab_B(config)#router ospf 101
Lab_B(config-router)#network 172.16.20.2 0.0.0.0 area 0
Lab_B(config-router)#network 172.16.30.1 0.0.0.0 area 0
Lab_B(config-router)#^Z
Lab_B #
3. Configure the networks on the Lab_C router. Assign them to area 0.
Lab_C#conf t
Enter configuration commands, one per line.
End with CNTL/Z.
Lab_C(config)#router ospf 102
Lab_C(config-router)#network 172.16.30.2 0.0.0.0 area 0
Lab_C(config-router)#network 172.16.40.1 0.0.0.0 area 0
Lab_C(config-router)#^Z
Lab_C#
Hands-on Lab 8.3: Verifying OSPF Operation
You need to be able to verify what you configure.
1. Execute a show ip ospf neighbors command from the Lab_A router and
view the results.
Lab_A#sho ip ospf neig
2. Execute a show ip route command to verify that all other routers are
learning all routes.
Lab_A#sho ip route
3. Execute a show ip protocols command to verify OSPF information.
Lab_A#sho ip protocols
4. Execute a show ip OSPF command to verify your RID.
Lab_A#sho ip ospf
5. Execute a show ip ospf interface f0/0 command to verify your timers.
Lab_A#sho ip ospf int f0/0
4. Great! You just finished the hands-on lab tasks. Remember to upload your
finished PKT file separately with your lab report to the Blackboard!