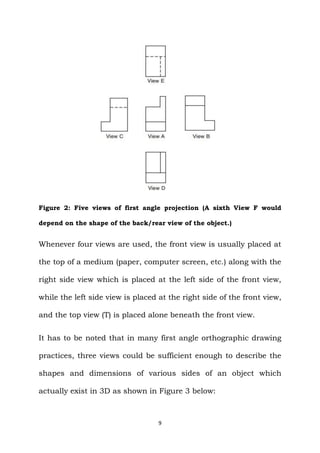
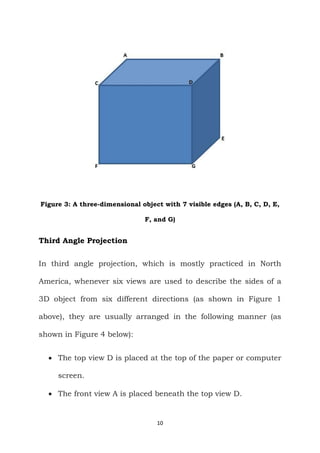
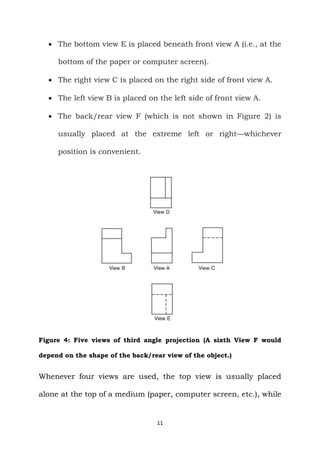
1
Orthographic drawing: Definition,
Types, Views, Tutorial & Practice
MARCH 2020
Definition of orthographic drawing; Types of
orthographic drawing (First angle projection,
and Third angle projection); Orthographic
drawing views; Orthographic drawing tutorial &
practice (Tools required for orthographic
drawing practice; General procedure;
Applications of orthographic drawing practice;
Orthographic drawing shapes/objects for
practice); and Conclusion
EDITED
BY IHAGH GODWIN
2
Motivation & Environment Presents
Orthographic Drawing: Definition,
Types, Views, Tutorial & Practice
Content: Definition of orthographic drawing;
Types of orthographic drawing (First angle
projection, and Third angle projection);
Orthographic drawing views; Orthographic
drawing tutorial & practice (Tools required
for orthographic drawing practice; General
procedure; Applications of orthographic
drawing practice; Orthographic drawing
shapes/objects for practice); and Conclusion
3
2020 Edition
Motivation & Environment
Copyright Free 2020
You may distribute without permission,
and share with anybody
Edited by Ihagh G.
MSc (Water Resources & Environmental Eng.);
BSc (Civil Engineering), and 7 years of
university teaching experience
Editor, Motivation & Environment
Website: https://motenv.wordpress.com/
Email: godwinihagh@gmail.com
4
Table of Contents Page
Table of Contents……………………………………………………… 4
1. Introduction……………………………………………………… 5
2. Definition of orthographic drawing……………………….. 6
3. Types of orthographic drawing …………………………….. 7
 First angle projection………………………………………….. 7
 Third angle projection…………………………………………. 10
4. Orthographic drawing views…..…………………………….. 12
5. Orthographic drawing tutorial & practice……………….. 15
 Tools required for orthographic drawing......................15
 General procedure…………………………......................... 19
 Applications of orthographic drawing practice………….22
 Orthographic drawing shapes/objects for practice…….22
Conclusion…………………………………………………………. ……. 26
Interested in starting and building a website?……………......26
5
1. Introduction
This eBook defines orthographic drawing (drafting or projection)
and uses 21 images to illustrate the meaning and types of
orthographic drawing. At the end of this eBook, there is a link to
hundreds of images of two- and three-dimensional (2D & 3D)
objects that can be used to practice, and enhance your
orthographic drawing skills. Generally, this eBook elaborates on
the following:
 Definition of orthographic drawing
 Types of orthographic drawing
o First angle projection
o Third angle projection
 Orthographic drawing views
 Orthographic drawing tutorial & practice
o Tools required for orthographic drawing practice
o General procedure
o Applications of orthographic drawing practice
o Orthographic drawing shapes/objects for practice
 Conclusion
6
2. Definition of orthographic drawing
Orthographic drawing, which is one of the three types of parallel
projections (orthographic, oblique, and axonometric), can be
defined as a type of technical drawing in which 3-dimensional
objects are represented in 2 dimensions by projecting planes
(consisting of 2 major axes) of objects so that they are parallel
with the plane of the media (paper, or computer) they are
projected upon.
Any type of orthographic drawing uses two-dimensional (2D)
views (obtained from two different lines of sight) to represent
different parts of three-dimensional objects, or planes of objects
viewed from/along different axes—typically, the x, y, and z axes.
Generally, the best way to fully express all the most important
visible parts of any 3D object in 2D views—either by first angle
orthographic projection or third angle orthographic projection—is
by using a maximum number of views, which in most cases is
six—or at least four or three.
However, in practice, most people or organizations use three or
four views to illustrate how the shapes and sizes of various parts
7
of an object look. Generally speaking, the number of views used
in an orthographic drawing or projection depends on the purpose
and objective of a drawing.
3. Types of orthographic drawing
Orthographic drawing (also known as orthographic projection)
consists of two types: first angle projection, and third angle
projection.
First angle projection
In first angle projection, which is popularly practiced in Europe,
whenever six views are used to illustrate how the sides of a 3D
object look from six directions (as shown in Figure 1 below), they
are usually arranged in the following manner (as shown in Figure
2 below):
 The bottom view E is placed at the top of the paper or
computer screen.
 The front view A is placed beneath the bottom view E.
 The top view D is placed beneath front view A (i.e., at the
bottom of the paper or computer screen.
 The right view C is placed on the left side of front view A.
8
 The left view B is placed on the right side of front view A.
 The back/rear view F (which is not shown in Figure 2) is
usually placed at the extreme left or right—whichever
position is convenient.
Figure 1: Six directions for six views
9
Figure 2: Five views of first angle projection (A sixth View F would
depend on the shape of the back/rear view of the object.)
Whenever four views are used, the front view is usually placed at
the top of a medium (paper, computer screen, etc.) along with the
right side view which is placed at the left side of the front view,
while the left side view is placed at the right side of the front view,
and the top view (T) is placed alone beneath the front view.
It has to be noted that in many first angle orthographic drawing
practices, three views could be sufficient enough to describe the
shapes and dimensions of various sides of an object which
actually exist in 3D as shown in Figure 3 below:
10
Figure 3: A three-dimensional object with 7 visible edges (A, B, C, D, E,
F, and G)
Third Angle Projection
In third angle projection, which is mostly practiced in North
America, whenever six views are used to describe the sides of a
3D object from six different directions (as shown in Figure 1
above), they are usually arranged in the following manner (as
shown in Figure 4 below):
 The top view D is placed at the top of the paper or computer
screen.
 The front view A is placed beneath the top view D.
11
 The bottom view E is placed beneath front view A (i.e., at the
bottom of the paper or computer screen).
 The right view C is placed on the right side of front view A.
 The left view B is placed on the left side of front view A.
 The back/rear view F (which is not shown in Figure 2) is
usually placed at the extreme left or right—whichever
position is convenient.
Figure 4: Five views of third angle projection (A sixth View F would
depend on the shape of the back/rear view of the object.)
Whenever four views are used, the top view is usually placed
alone at the top of a medium (paper, computer screen, etc.), while
12
the front view is placed beneath the top view, and the right side
view is placed at the right side of the front view, while the left side
view is placed at the left side of the front view. (Note that third
angle projection is the most popular type of orthographic drawing
or projection.)
Generally speaking, the difference between first angle projection
and third angle projection depends on where each view is placed
on paper or computer screen according to the universally
accepted requirements of the two main types of orthographic
drawing/projection.
4. Orthographic drawing views
There is no general rule per se, but the best or most
recommendable way to fully express the important visible and
hidden parts of any 3D object in 2D views, is by using as many
views as possible: probably between three and six views.
Unlike in Figure 1 above, whenever six views are used, different
directions (lines of sight projected on the sides of an object) can
be chosen to illustrate the top, bottom, front, rear/back, left and
right views, respectively, as can be seen in Figure 5 below:
13
Figure 5: Six different directions for six views
The third angle projection of Figure 5 is shown in Figure 6 below:
Figure 6: Third angle projection of the object in Figure 5
14
The orthographic drawings or projections of some other
objects/shapes can be viewed in Figures 7, 8, and 9 below:
Figure 7: First angle projection of an object
Figure 8: Projection of an object
15
Figure 9: Third angle projection of an object that has dimensions in
millimeters
Always remember that in many orthographic drawing practices
across the world, the number of views chosen or used usually
depends on the number of views required or needed.
5. Orthographic Drawing Tutorial &
Practice
Tools required for orthographic drawing practice
With regular drawing practice, it is very easy to learn and perfect
orthographic drawing skills. The tools usually required for
practicing orthographic drawing are quite the same as the ones
16
used in technical and engineering drawing, respectively.
Generally, the tools could include:
 Drawing board.
 Drawing paper: either Ao, A1, A2, A3, and A4.
 Drawing pencil.
 Eraser.
 30° × 60° and 45° × 45° set squares.
 300 mm (30 cm) ruler.
 T-square.
 Drawing compasses
Figure 10: Drawing board and drawing paper
17
Figure 11: Complete set of drawing board, drawing paper, tape/clips,
set square, and T-square
Figure 12: 45° × 45° (bigger: on the left), and 30° × 60° (smaller: on the
right) set-squares
18
Figure 13: T-square
Figure 14: Drawing compasses (for drawing circular or elliptical shapes)
19
T-squares and set squares must be aligned perfectly on the
pure/true x and y axes before perfect vertical or horizontal lines
can be produced. It will be difficult to produce good orthographic
drawings without drawing or projecting perfect vertical and
horizontal lines.
General Procedure
Generally, when projecting sides or different views of 3D objects
in 2D, a certain degree of concentration will be needed to ensure
that shapes, sizes, or dimensions are consistent and accurate.
The following are important when making orthographic
projections:
 Estimate the area of paper that would be enough to draw all
necessary and important views. In addition, determine an
appropriate scale for your drawings. A scale is any ratio
(examples: 1:10, 1:100, 1:1000, etc.) of the size of an object
on paper, to the actual size of the same object in real life.
Common scales for “enlargement of objects” include: 2:1,
5:1, 10:1, etc. On the other hand, common scales for
“reduction of objects”, include 1:2, 1:5, 1:10, etc.
20
 Put equal distances (which should also be considered in the
total area that would be enough to accommodate all views)
between views, vertically (for example, top, front, and
bottom views), and horizontally (for example, left, right, and
back/rear views).
 When drawing any view—whether square-, rectangular-, or
circular-shaped—mark the center lines of each shape and
the center/centroid of each shape. Center lines are very
important, not just because they are center lines, but
because they serve other purposes, one of them being that
they help in establishing other points and lines in drawings.
 Draw the top view, and project the most visible and
important lines into the front view, or vice versa.
 After drawing the front view, the right and left side views
can be projected and drawn; in addition, the bottom and
back/rear view can be also be drawn or constructed if
required.
21
Figure 15: Top view of an object drawn on drawing paper
As an example, in order to draw perfectly straight vertical and
horizontal lines for the two dimensional (2D) top view ABCD of a
3D object on paper (as shown in Figure 15 above), the following
steps should be taken:
 Points and A and B should be the same distance away from
the top border line on the drawing paper.
 Points and C and D should be the same distance away from
the bottom border line on the paper.
 Points and A and C should be the same distance away from
the left border line on the paper.
22
 Points and B and D should be the same distance away from
the right border line on the paper.
Applications of orthographic drawing practice
Orthographic drawings have many applications scattered across
various fields that require planning and designing such as
architecture, construction, design, engineering, environment,
estate management, manufacturing, surveying, etc. Orthographic
drawings are usually produced according to precision and
requirements. It is possible for an orthographic drawing that has
been produced in one country, to be used to manufacture an
object in another country.
Orthographic drawing shapes/objects for practice
Like we said earlier: “practice makes perfect”. In order to
strengthen your orthographic drawing skills, you may practice
how to draw the views of the following objects:
23
Figure 16: Third angle projection of an object with six views
Figure 17: Three commonly practiced orthographic views
24
The three main 2D views and six general 2D views of an L-shaped
object can be seen in Figures 18 and 19, respectively.
Figure 18: Three popular 2D views
Figure 19: Six views of the object shown in Figure 18 above
25
The use of colors makes it easier to understand, locate, and draw
2D views of 3D objects. With the aid of colors on objects, you can
study and practice how to draw Figures 20 and 21, respectively:
Figure 20: Figure 20_The use of colors in orthographic projection
Figure 21: Three third angle projection views with colors
26
Conclusion
Anyone who is interested in succeeding with orthographic
drawing or projection must practice consistently; there is no
other easy or painless way out. The more anyone practices, the
more proficient they will become, and develop newer and more
efficient ways to draw better.
If you are interested in viewing, studying, and drawing various
shapes/types of objects, click the following link: Hundreds of
images of objects projected in 2 and 3 dimensions. For regular
updates on technical & engineering drawing topics, subscribe
with your email address for new articles at the top or bottom of
the right sidebar of any web page on Motivation & Environment.
Interested in starting and building a
website?
If you are interested in starting and building a website on
WordPress.com, then sign up by clicking here. If you would like
to understand why WordPress.com is the best platform,
especially in terms of advanced-level security, then click here and
read a very enlightening article on the subject.

Orthographic Drawing_Definition, Types, Views, Tutorial & Practice

  • 1.
    1 Orthographic drawing: Definition, Types,Views, Tutorial & Practice MARCH 2020 Definition of orthographic drawing; Types of orthographic drawing (First angle projection, and Third angle projection); Orthographic drawing views; Orthographic drawing tutorial & practice (Tools required for orthographic drawing practice; General procedure; Applications of orthographic drawing practice; Orthographic drawing shapes/objects for practice); and Conclusion EDITED BY IHAGH GODWIN
  • 2.
    2 Motivation & EnvironmentPresents Orthographic Drawing: Definition, Types, Views, Tutorial & Practice Content: Definition of orthographic drawing; Types of orthographic drawing (First angle projection, and Third angle projection); Orthographic drawing views; Orthographic drawing tutorial & practice (Tools required for orthographic drawing practice; General procedure; Applications of orthographic drawing practice; Orthographic drawing shapes/objects for practice); and Conclusion
  • 3.
    3 2020 Edition Motivation &Environment Copyright Free 2020 You may distribute without permission, and share with anybody Edited by Ihagh G. MSc (Water Resources & Environmental Eng.); BSc (Civil Engineering), and 7 years of university teaching experience Editor, Motivation & Environment Website: https://motenv.wordpress.com/ Email: godwinihagh@gmail.com
  • 4.
    4 Table of ContentsPage Table of Contents……………………………………………………… 4 1. Introduction……………………………………………………… 5 2. Definition of orthographic drawing……………………….. 6 3. Types of orthographic drawing …………………………….. 7  First angle projection………………………………………….. 7  Third angle projection…………………………………………. 10 4. Orthographic drawing views…..…………………………….. 12 5. Orthographic drawing tutorial & practice……………….. 15  Tools required for orthographic drawing......................15  General procedure…………………………......................... 19  Applications of orthographic drawing practice………….22  Orthographic drawing shapes/objects for practice…….22 Conclusion…………………………………………………………. ……. 26 Interested in starting and building a website?……………......26
  • 5.
    5 1. Introduction This eBookdefines orthographic drawing (drafting or projection) and uses 21 images to illustrate the meaning and types of orthographic drawing. At the end of this eBook, there is a link to hundreds of images of two- and three-dimensional (2D & 3D) objects that can be used to practice, and enhance your orthographic drawing skills. Generally, this eBook elaborates on the following:  Definition of orthographic drawing  Types of orthographic drawing o First angle projection o Third angle projection  Orthographic drawing views  Orthographic drawing tutorial & practice o Tools required for orthographic drawing practice o General procedure o Applications of orthographic drawing practice o Orthographic drawing shapes/objects for practice  Conclusion
  • 6.
    6 2. Definition oforthographic drawing Orthographic drawing, which is one of the three types of parallel projections (orthographic, oblique, and axonometric), can be defined as a type of technical drawing in which 3-dimensional objects are represented in 2 dimensions by projecting planes (consisting of 2 major axes) of objects so that they are parallel with the plane of the media (paper, or computer) they are projected upon. Any type of orthographic drawing uses two-dimensional (2D) views (obtained from two different lines of sight) to represent different parts of three-dimensional objects, or planes of objects viewed from/along different axes—typically, the x, y, and z axes. Generally, the best way to fully express all the most important visible parts of any 3D object in 2D views—either by first angle orthographic projection or third angle orthographic projection—is by using a maximum number of views, which in most cases is six—or at least four or three. However, in practice, most people or organizations use three or four views to illustrate how the shapes and sizes of various parts
  • 7.
    7 of an objectlook. Generally speaking, the number of views used in an orthographic drawing or projection depends on the purpose and objective of a drawing. 3. Types of orthographic drawing Orthographic drawing (also known as orthographic projection) consists of two types: first angle projection, and third angle projection. First angle projection In first angle projection, which is popularly practiced in Europe, whenever six views are used to illustrate how the sides of a 3D object look from six directions (as shown in Figure 1 below), they are usually arranged in the following manner (as shown in Figure 2 below):  The bottom view E is placed at the top of the paper or computer screen.  The front view A is placed beneath the bottom view E.  The top view D is placed beneath front view A (i.e., at the bottom of the paper or computer screen.  The right view C is placed on the left side of front view A.
  • 8.
    8  The leftview B is placed on the right side of front view A.  The back/rear view F (which is not shown in Figure 2) is usually placed at the extreme left or right—whichever position is convenient. Figure 1: Six directions for six views
  • 9.
    9 Figure 2: Fiveviews of first angle projection (A sixth View F would depend on the shape of the back/rear view of the object.) Whenever four views are used, the front view is usually placed at the top of a medium (paper, computer screen, etc.) along with the right side view which is placed at the left side of the front view, while the left side view is placed at the right side of the front view, and the top view (T) is placed alone beneath the front view. It has to be noted that in many first angle orthographic drawing practices, three views could be sufficient enough to describe the shapes and dimensions of various sides of an object which actually exist in 3D as shown in Figure 3 below:
  • 10.
    10 Figure 3: Athree-dimensional object with 7 visible edges (A, B, C, D, E, F, and G) Third Angle Projection In third angle projection, which is mostly practiced in North America, whenever six views are used to describe the sides of a 3D object from six different directions (as shown in Figure 1 above), they are usually arranged in the following manner (as shown in Figure 4 below):  The top view D is placed at the top of the paper or computer screen.  The front view A is placed beneath the top view D.
  • 11.
    11  The bottomview E is placed beneath front view A (i.e., at the bottom of the paper or computer screen).  The right view C is placed on the right side of front view A.  The left view B is placed on the left side of front view A.  The back/rear view F (which is not shown in Figure 2) is usually placed at the extreme left or right—whichever position is convenient. Figure 4: Five views of third angle projection (A sixth View F would depend on the shape of the back/rear view of the object.) Whenever four views are used, the top view is usually placed alone at the top of a medium (paper, computer screen, etc.), while
  • 12.
    12 the front viewis placed beneath the top view, and the right side view is placed at the right side of the front view, while the left side view is placed at the left side of the front view. (Note that third angle projection is the most popular type of orthographic drawing or projection.) Generally speaking, the difference between first angle projection and third angle projection depends on where each view is placed on paper or computer screen according to the universally accepted requirements of the two main types of orthographic drawing/projection. 4. Orthographic drawing views There is no general rule per se, but the best or most recommendable way to fully express the important visible and hidden parts of any 3D object in 2D views, is by using as many views as possible: probably between three and six views. Unlike in Figure 1 above, whenever six views are used, different directions (lines of sight projected on the sides of an object) can be chosen to illustrate the top, bottom, front, rear/back, left and right views, respectively, as can be seen in Figure 5 below:
  • 13.
    13 Figure 5: Sixdifferent directions for six views The third angle projection of Figure 5 is shown in Figure 6 below: Figure 6: Third angle projection of the object in Figure 5
  • 14.
    14 The orthographic drawingsor projections of some other objects/shapes can be viewed in Figures 7, 8, and 9 below: Figure 7: First angle projection of an object Figure 8: Projection of an object
  • 15.
    15 Figure 9: Thirdangle projection of an object that has dimensions in millimeters Always remember that in many orthographic drawing practices across the world, the number of views chosen or used usually depends on the number of views required or needed. 5. Orthographic Drawing Tutorial & Practice Tools required for orthographic drawing practice With regular drawing practice, it is very easy to learn and perfect orthographic drawing skills. The tools usually required for practicing orthographic drawing are quite the same as the ones
  • 16.
    16 used in technicaland engineering drawing, respectively. Generally, the tools could include:  Drawing board.  Drawing paper: either Ao, A1, A2, A3, and A4.  Drawing pencil.  Eraser.  30° × 60° and 45° × 45° set squares.  300 mm (30 cm) ruler.  T-square.  Drawing compasses Figure 10: Drawing board and drawing paper
  • 17.
    17 Figure 11: Completeset of drawing board, drawing paper, tape/clips, set square, and T-square Figure 12: 45° × 45° (bigger: on the left), and 30° × 60° (smaller: on the right) set-squares
  • 18.
    18 Figure 13: T-square Figure14: Drawing compasses (for drawing circular or elliptical shapes)
  • 19.
    19 T-squares and setsquares must be aligned perfectly on the pure/true x and y axes before perfect vertical or horizontal lines can be produced. It will be difficult to produce good orthographic drawings without drawing or projecting perfect vertical and horizontal lines. General Procedure Generally, when projecting sides or different views of 3D objects in 2D, a certain degree of concentration will be needed to ensure that shapes, sizes, or dimensions are consistent and accurate. The following are important when making orthographic projections:  Estimate the area of paper that would be enough to draw all necessary and important views. In addition, determine an appropriate scale for your drawings. A scale is any ratio (examples: 1:10, 1:100, 1:1000, etc.) of the size of an object on paper, to the actual size of the same object in real life. Common scales for “enlargement of objects” include: 2:1, 5:1, 10:1, etc. On the other hand, common scales for “reduction of objects”, include 1:2, 1:5, 1:10, etc.
  • 20.
    20  Put equaldistances (which should also be considered in the total area that would be enough to accommodate all views) between views, vertically (for example, top, front, and bottom views), and horizontally (for example, left, right, and back/rear views).  When drawing any view—whether square-, rectangular-, or circular-shaped—mark the center lines of each shape and the center/centroid of each shape. Center lines are very important, not just because they are center lines, but because they serve other purposes, one of them being that they help in establishing other points and lines in drawings.  Draw the top view, and project the most visible and important lines into the front view, or vice versa.  After drawing the front view, the right and left side views can be projected and drawn; in addition, the bottom and back/rear view can be also be drawn or constructed if required.
  • 21.
    21 Figure 15: Topview of an object drawn on drawing paper As an example, in order to draw perfectly straight vertical and horizontal lines for the two dimensional (2D) top view ABCD of a 3D object on paper (as shown in Figure 15 above), the following steps should be taken:  Points and A and B should be the same distance away from the top border line on the drawing paper.  Points and C and D should be the same distance away from the bottom border line on the paper.  Points and A and C should be the same distance away from the left border line on the paper.
  • 22.
    22  Points andB and D should be the same distance away from the right border line on the paper. Applications of orthographic drawing practice Orthographic drawings have many applications scattered across various fields that require planning and designing such as architecture, construction, design, engineering, environment, estate management, manufacturing, surveying, etc. Orthographic drawings are usually produced according to precision and requirements. It is possible for an orthographic drawing that has been produced in one country, to be used to manufacture an object in another country. Orthographic drawing shapes/objects for practice Like we said earlier: “practice makes perfect”. In order to strengthen your orthographic drawing skills, you may practice how to draw the views of the following objects:
  • 23.
    23 Figure 16: Thirdangle projection of an object with six views Figure 17: Three commonly practiced orthographic views
  • 24.
    24 The three main2D views and six general 2D views of an L-shaped object can be seen in Figures 18 and 19, respectively. Figure 18: Three popular 2D views Figure 19: Six views of the object shown in Figure 18 above
  • 25.
    25 The use ofcolors makes it easier to understand, locate, and draw 2D views of 3D objects. With the aid of colors on objects, you can study and practice how to draw Figures 20 and 21, respectively: Figure 20: Figure 20_The use of colors in orthographic projection Figure 21: Three third angle projection views with colors
  • 26.
    26 Conclusion Anyone who isinterested in succeeding with orthographic drawing or projection must practice consistently; there is no other easy or painless way out. The more anyone practices, the more proficient they will become, and develop newer and more efficient ways to draw better. If you are interested in viewing, studying, and drawing various shapes/types of objects, click the following link: Hundreds of images of objects projected in 2 and 3 dimensions. For regular updates on technical & engineering drawing topics, subscribe with your email address for new articles at the top or bottom of the right sidebar of any web page on Motivation & Environment. Interested in starting and building a website? If you are interested in starting and building a website on WordPress.com, then sign up by clicking here. If you would like to understand why WordPress.com is the best platform, especially in terms of advanced-level security, then click here and read a very enlightening article on the subject.