
Recommended
More Related Content
What's hot
What's hot (20)
Similar to Research and planning
Similar to Research and planning (20)
More from tatiana kelman
Recently uploaded
Recently uploaded (20)
Research and planning
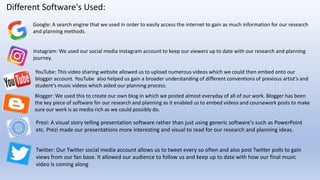
- 1. Different Software's Used: Google: A search engine that we used in order to easily access the internet to gain as much information for our research and planning methods. Instagram: We used our social media Instagram account to keep our viewers up to date with our research and planning journey. YouTube: This video sharing website allowed us to upload numerous videos which we could then embed onto our blogger account. YouTube also helped us gain a broader understanding of different conventions of previous artist’s and student’s music videos which aided our planning process. Blogger: We used this to create our own blog in which we posted almost everyday of all of our work. Blogger has been the key piece of software for our research and planning as it enabled us to embed videos and coursework posts to make sure our work is as media rich as we could possibly do. Prezi: A visual story telling presentation software rather than just using generic software's such as PowerPoint etc. Prezi made our presentations more interesting and visual to read for our research and planning ideas. Twitter: Our Twitter social media account allows us to tweet every so often and also post Twitter polls to gain views from our fan base. It allowed our audience to follow us and keep up to date with how our final music video is coming along
- 2. Piktochart: An infographic design application meant that we could include all of our research onto a piece of software in an aesthetic way. We were able to add pictures and backgrounds to make it appear more visually pleasing for the research that we achieved. Emaze: This is an online presentation website allowed us to use an alternative from all the other pieces of software that we have used. It is also visually pleasing for a presentation in order to captivate our viewers attention. Scribd: A publishing platform where we could publish word documents onto the blog. Usually, we would type up all of our notes onto a Word document, however this could not be embedded straight onto the blog so therefore we had to publish it onto Scribd first. This was useful for more lengthy and wordy posts. Calameo: Very similar to Scribd in the sense that you have to upload a previous word document with the research and planning onto Calameo and then embed it onto the blog. This is easy and accessible to use. SurveyMonkey: This is an online survey website where you can gain feedback on a questionnaire that you make yourself from people who participate and answer the questionnaire. It then automatically updates when someone has answered the questions for you to see what feedback you get. Wikipedia: The encyclopedia allowed us to sufficiently and quickly access a lot more information such as about the artist of the song that we chose, the history of the song and the meaning of the lyrics of the song, as well as other additional information. However, the negative of Wikipedia is that volunteers are the ones who create this information which means that it can often be changed and therefore be the wrong information. This meant that before we posted any of our research, we had to check that it was reliable.
- 3. Examples of posts where we used different software’s:
- 4. Construction & Ancillary For part of our year 13 coursework, we had to create and design our own magazine advert and digipak but before doing so, we took time into our research and planning. This way, it helped us shape our ideas and plans for what we would like to achieve with both our digipak and magazine advert and what type of theme would run throughout them both. For the magazine advert, we spent a lot of time looking at previous pop artist’s and past student’s adverts so that we could gain some inspiration as to what we would like ours to look like. This enabled us to know what a professional advert would look like so that we were able to make ours look much more realistic and a higher quality without having a high level of technology and budget. We discovered that a majority of pop magazine ad’s include conventions such as vibrant colours as they are more captivating and to also match with the theme of the digipak. One artist we looked at was Rihanna’s as it included bright colours such as shades of red and also a powerful main picture. This helped us prepare for creating our own as it gave us an understanding as to what a professional would look like. When we went filming for the music video, we made sure that we were taking pictures as well as videos so that we could use them for our advert and digipak to keep the same colour theme running throughout. Once we had researched into other’s adverts and digipak, we concluded that bright colours would be suitable for our ad due to the theme of our own music video. We designed our advert using different photo shop apps as software like these create a more professional look in which we want to achieve. We were able to add filters and text so that we could improve the appearance of the images that we had taken and also include information that you would typically see on an advert e.g. song title, artist, star ratings etc. For our digipak we were able to move around images to see which picture would suit which part of the cover best. These two tasks that have just been discussed are just ways to prove how our progression of our research and planning has improved from our previous coursework in year 13.
- 5. Post Production As we began to edit, we first looked on blogger to give us some inspiration by seeing what past students had used to edit and therefore we looked a different editing software’s. We discovered that iMovie was the most popular and used piece of software by past student’s in order to edit their music videos. iMovie also seemed most suitable for our group to use when editing because it was easy to access on the Apple MacBook and it was also free to download the app. It seemed like the most reasonable and obvious choice for us to edit our music video. We also used iMovie for our year 12 coursework, so we already had an understanding of how to use the app which made it easier to use. We have found that creating a music video this year has been much more challenging when editing due to the more complicated effects that make it look like a music video rather than the thriller we created last year. The only problem with using iMovie is that there are a limited amount of special effects and edits that you can do to clips so we decided to branch out and find others apps. We found an app called Hypno which enabled us to add effects to some of our footage to make it look trippy and unique. Therefore the only software we used to edit was iMovie and Hypno because they worked well with what we versioned the video to be like and also when creating the video. Also to add the music to the background of the music video, we were able to purchase our song from iTunes which was essential for our video to be successful. We then added this to iMovie and had to edit it so that the lip syncing matched perfectly in time with the lyrics of the song.
- 6. Post productions decisions Filters: We decided to add filters to our music video as they made the shots look more professional and for it to be more like a music video. In order to keep the same colour theme running throughout the video, we added filters to all of the footage rather than just a few parts of the video. We added a filter named ‘vintage’ as it gave it an effect that looked saturated and tanned as well as staying quite vibrant. With a filterWithout a filter We used filters to our advantage at the beginning of our music video by making all of the footage in black and white. We got this idea from a previous group creating a music video as it began black and white then contrasted to colour. As soon as the singing of the song begins, the filters instantly juxtapose to bright and vibrant colours which continue throughout.
- 7. Speed We occasionally decided to change the speed of the clips in the music video to make them either fit in with the beat of the music because often the shot that we filmed was too long or short, or to add effect when watching the video. We had to do this with our opening shot for example because the app that we edited the footage on was too long to fit with the beat of the music and it began to get boring so therefore we had to shorten it. A majority of the shots we had to either shorten or make longer in order for it to fit in with the music and to make it flow well. Other footage had to be slowed down, for example towards the middle, there is a shot of the artist drinking which we slowed down as it connoted the storyline of the music video more. We also got this inspiration to slow some of the shots from the real music video of the artist. When she is in a nightclub, there are multiple shots of the artist drinking which are slowed down because it is a more effective way to portray the storyline. Sped up footage Slowed down footage
- 8. Crop For most of the footage that we recorded for our music video, we had to crop down what you could see on the screen as occasionally there would be something in the background that we would not want to be seen in the video. When we cropped some of the footage, it would then zoom in more on the image to focus on the artist. We didn’t have to do this that often but only on the occasional image where we couldn’t film a close enough shot. An example of when we had to crop footage in our music video was the clip of the artist drinking as we caught people in the background that we did not want to be in the video. We also crop the shot of the artist’s face to zoom in more and show the effect of her being ‘high’ which is the idea of the song. Someone in the background that we cut out We had to crop this so that you couldn’t see the whiteboard
- 9. Creativity