1. The Instruction of DVR Watch
Ⅰ. Preface
Thank you for purchasing this product. Under the guidance of this manual, you may use this item and the subsidiary
application procedures properly. Please read the manual carefully before using, so that you can operate it correctly and
freely.
Ⅱ. Functions summary:
*. Video Dimension: 640*480
*. Memory Support: 512MB/1GB/2GB/4GB/8GB (Optional)
*. Video Recording Function
*. PC Camera Function
*. USB: 2.0(Hs)
*. Built-in Li-Battery: working 2 hours continuously (Max)
*. Not need driver installation if the operating system is Windows ME/ 2000/ XP/ Mac OS 9.2.2 or above (windows98 is
excepted)
Ⅲ. Charging
Built-in rechargeable Li-Battery, Please insert the USB cable to the DVR firstly .Wristwatch firstly and then be in
charging when the USB plug is connected with charger or inserted into the USB port of PC. Once connected correctly,
the green light of this DVR watch will be in work. When green light is off and Blue light is on, which means the battery
is in full capacity, then stop charging.
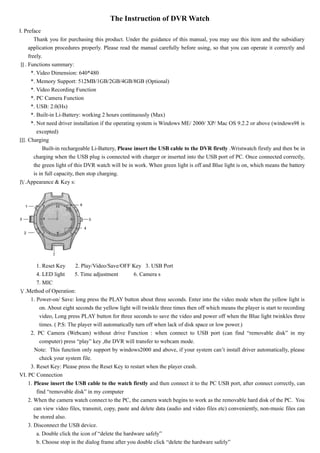
Ⅳ.Appearance & Key s:
1. Reset Key 2. Play/Video/Save/OFF Key 3. USB Port
4. LED light 5. Time adjustment 6. Camera s
7. MIC
Ⅴ.Method of Operation:
1. Power-on/ Save: long press the PLAY button about three seconds. Enter into the video mode when the yellow light is
on. About eight seconds the yellow light will twinkle three times then off which means the player is start to recording
video, Long press PLAY button for three seconds to save the video and power off when the Blue light twinkles three
times. ( P.S: The player will automatically turn off when lack of disk space or low power.)
2. PC Camera (Webcam) without drive Function : when connect to USB port (can find “removable disk” in my
computer) press “play” key ,the DVR will transfer to webcam mode.
Note: This function only support by windows2000 and above, if your system can’t install driver automatically, please
check your system file.
3. Reset Key: Please press the Reset Key to restart when the player crash.
VI. PC Connection
1. Please insert the USB cable to the watch firstly and then connect it to the PC USB port, after connect correctly, can
find “removable disk” in my computer
2. When the camera watch connect to the PC, the camera watch begins to work as the removable hard disk of the PC. You
can view video files, transmit, copy, paste and delete data (audio and video files etc) conveniently, non-music files can
be stored also.
3. Disconnect the USB device.
a. Double click the icon of “delete the hardware safely”
b. Choose stop in the dialog frame after you double click “delete the hardware safely”
2. c. Choose the device you want to stop, and confirm, there will be a hint The USB mass storage Device can be removed
from the system safely
d. Close the dialog frame of “delete the hardware safely”
e. Disconnected the player from the PC
VII. Video recording time setting
Please connect DVR watch to the computer first and then open the file of “SystemTime config.exe” in the CD disk. As
follow:
Step1: Open the tool of time setting in CD disk.
Step2: The system will show the following hint:
Step3: in the USB Disk list select the corresponding USB Disk, Click the“apply” button, OS time will be written in the
DVR watch automatically.
Step4: After setting successfully, the system will show hint as follow:
Step5:Click OK, then remove the USB device safely.
VIII. Attentions
1. Working Temperature: Use the device under the nature temperature.
2.Recording Brightness: Please use the device under the circumstance of light enough, do not point the camera to bright
sunshine and other sharp light sources in avoid to demage the optical device.
3.Other warnings: This device belongs to new precision electronic product, collision and vigorous shaking are not allowed,
do not use it in strong magnetic and electric fields
X. Trouble-shooting
Can not turn on Check if the battery is short of power, Please charge the palyer
3. 1.Check if the USB cable between the player and the PC is in good conditon and connect
correctly.
Can not download and 2. Check if the installation of the drive is proper (under Windows 98)
upload files normally 3. Check if the player has enough space to store files.
DVR 手表操作手册
Ⅰ.按键定义
1. 复位键
2. 开关机、录制、保存
3. USB 口
4. LED 显示窗口
5. 手表时间调整
6. 摄像头
7. MIC 孔
Ⅱ. 规格简介:
*. 录像尺寸: 640*480
*. 录像格式 AVI
*. 容量支持: 512MB/1GB/2GB/4GB/8GB (可选)
*. 录像功能
*. USB: 2.0(Hs)
*. 高容量聚合物锂离子电池: 最大连续工作 2 小时 (Max)
*. 以下系统无须安装驱动: Windows ME/ 2000/ XP/ Mac OS 9.2.2 以上 (windows98SE 除外)
III. 操作说明:
1. 开关机/ 保存:
长按“PLAY”键 3 秒左右. 黄色 LED 亮表示 DVR 启动中并将自动进入录像模式. 大约 8 秒后绿色 LED 将会连
续闪 3 次并关闭,表示录像开始. 录像过程中长按“PLAY”键 3 秒 DVR 将保存后自动关机(蓝色灯连闪三
次)
Note:: 当内存空间不足或电量不足时,DVR 会自动关机
2.无驱 PC Camera (电脑摄像头)功能 : 当连接到电脑后(电脑应该显示”可移动磁盘”)时,再次按下“Play” 键
DVR 将会自动转为摄像头模式
注:此功能只支持 Win2000 以上操作系统,如果你的系统在按下 Play 键后无法自动安装驱动,请检查你的系统
文件是否完整.
2. 复位键: 当 DVR 对于操作无任何反应时可使用此按键对系统进行复位
IV.充电或连接电脑读取文件.
内置可充电锂离子电池,充电或连接电脑时,首先把 USB 线插入 DVR 端 ,再把另外一端连接
电 脑 或 者 充 电器 , 连接成功后,黄色指示灯将工作,如果黄色指示灯灭掉,蓝色指示灯亮起表明电量已