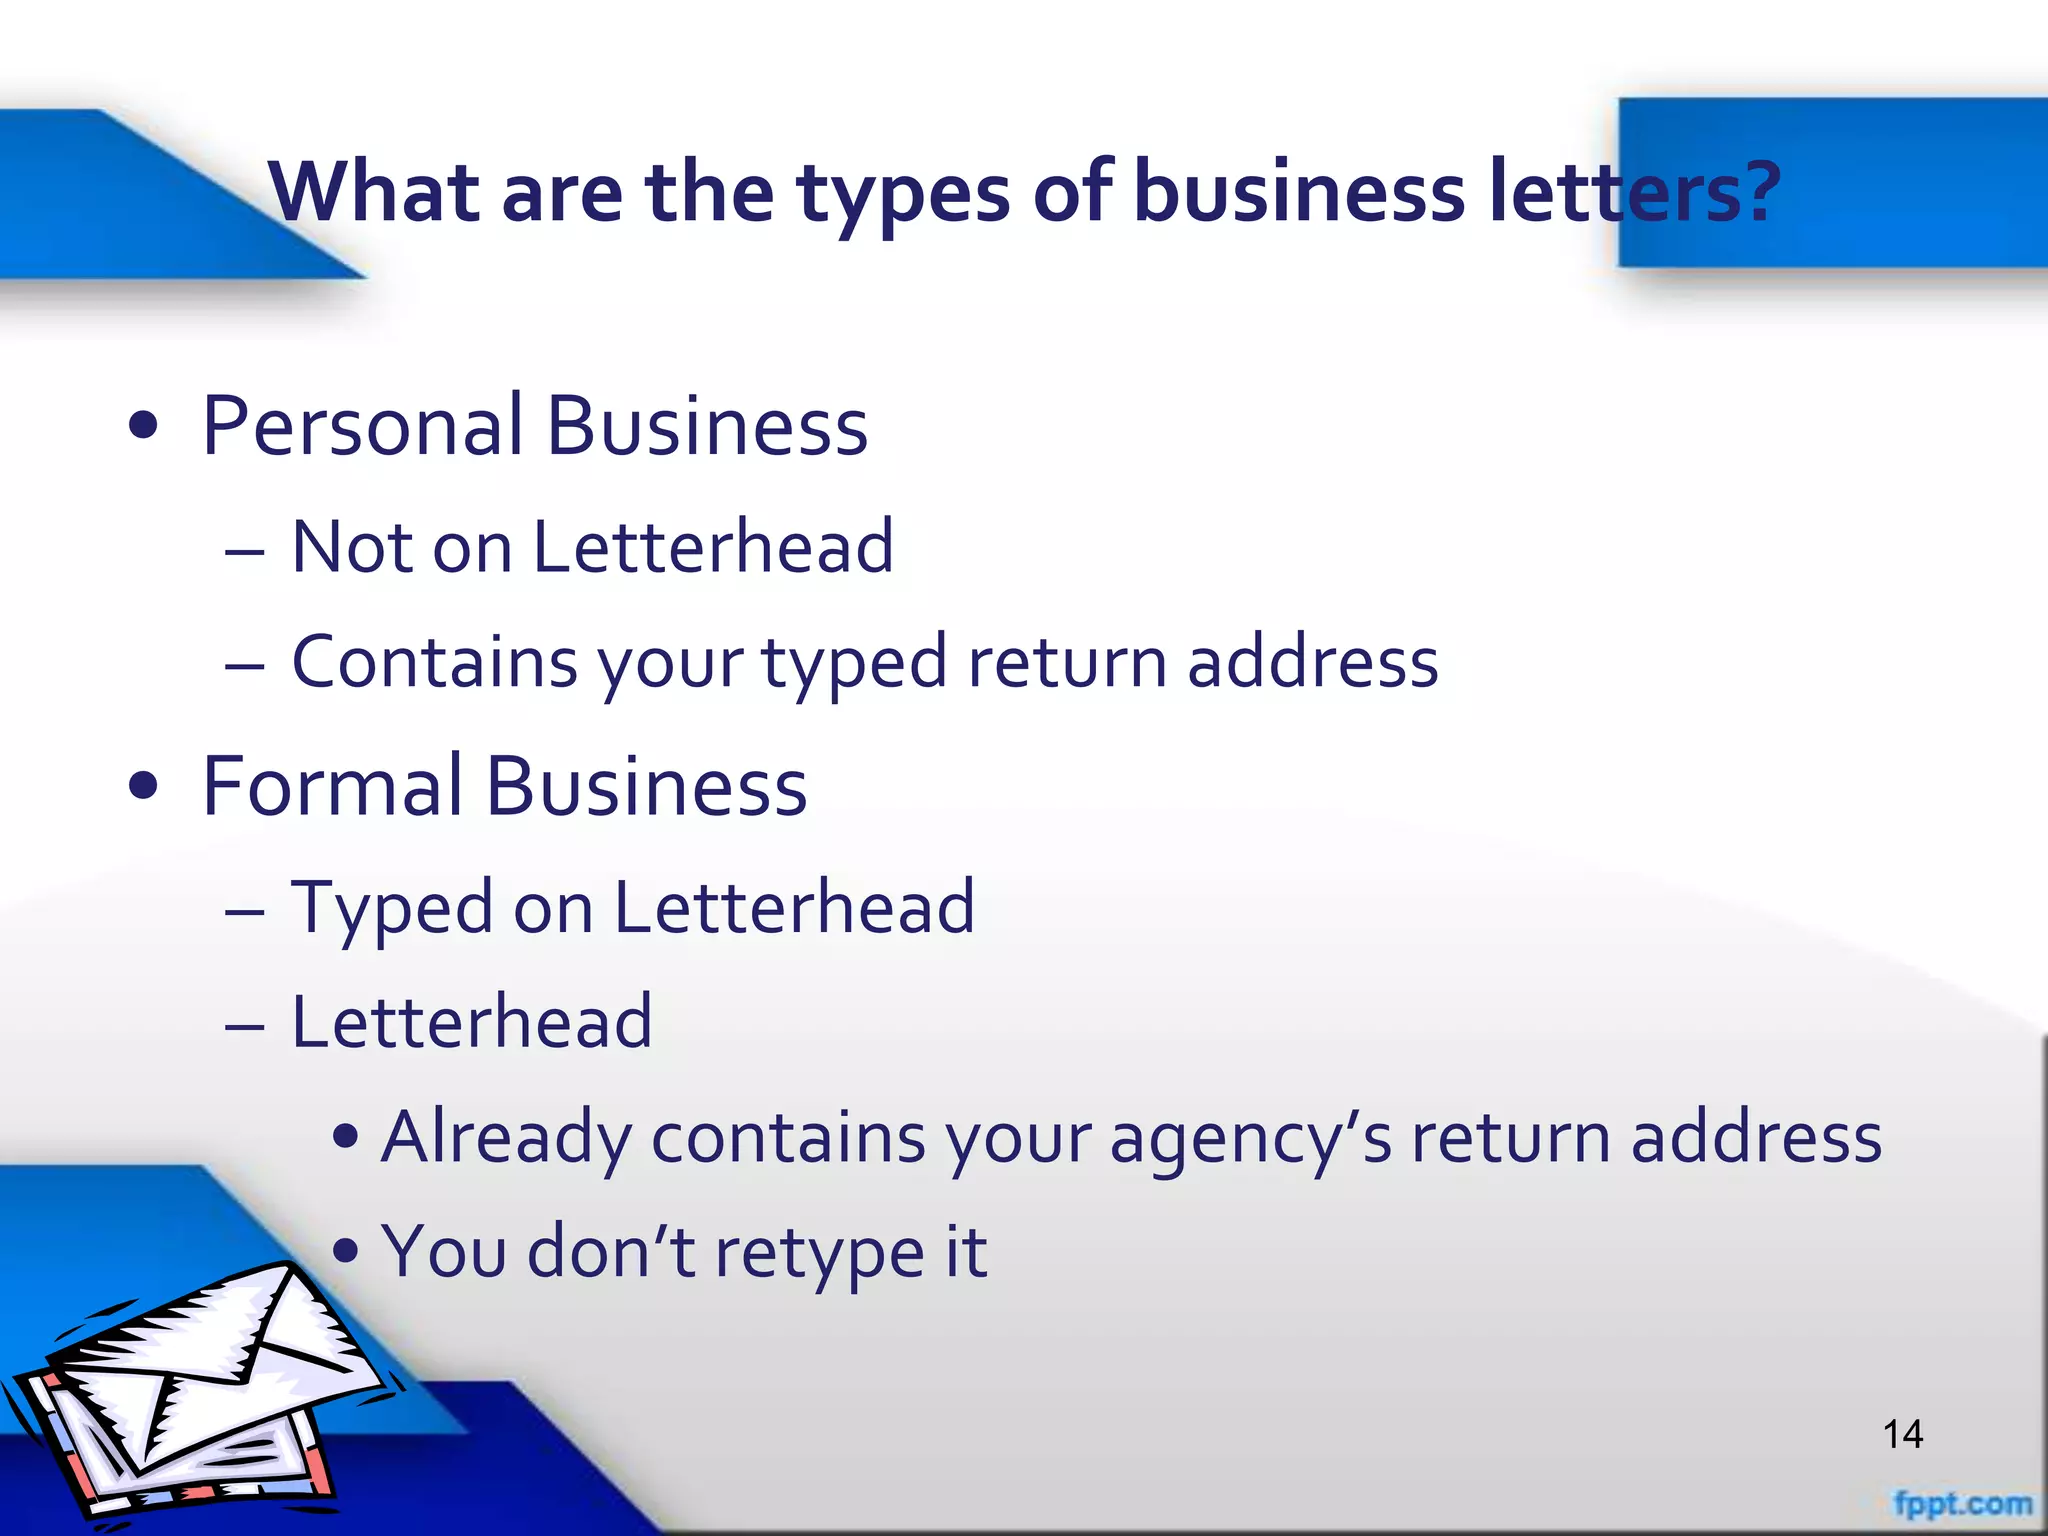
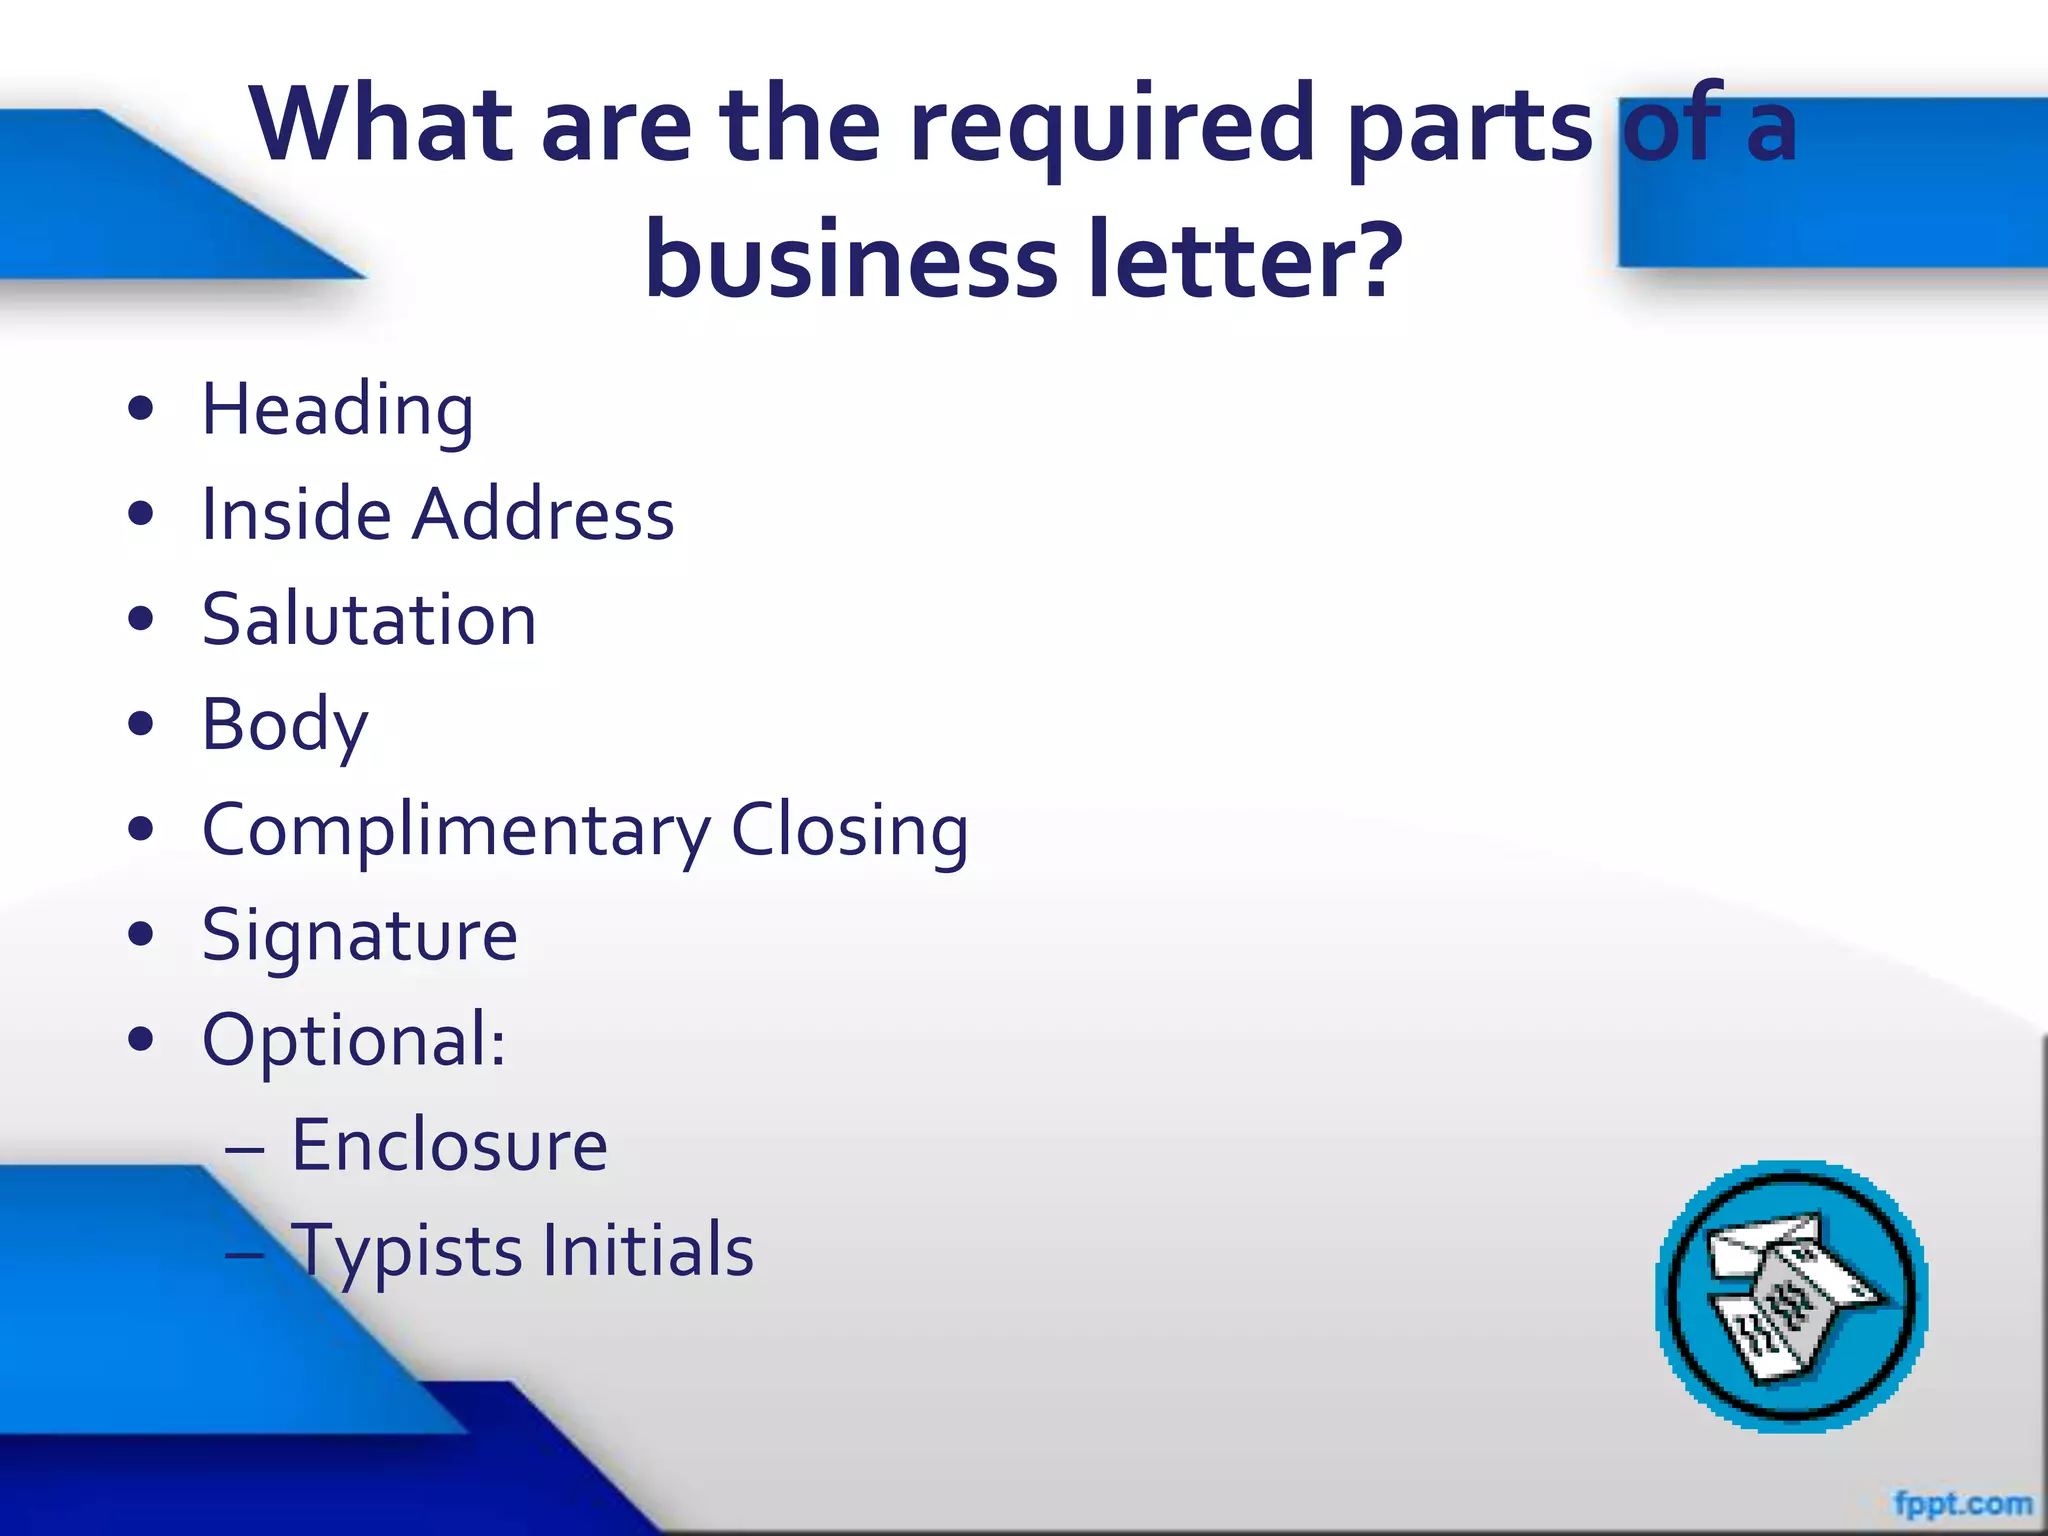
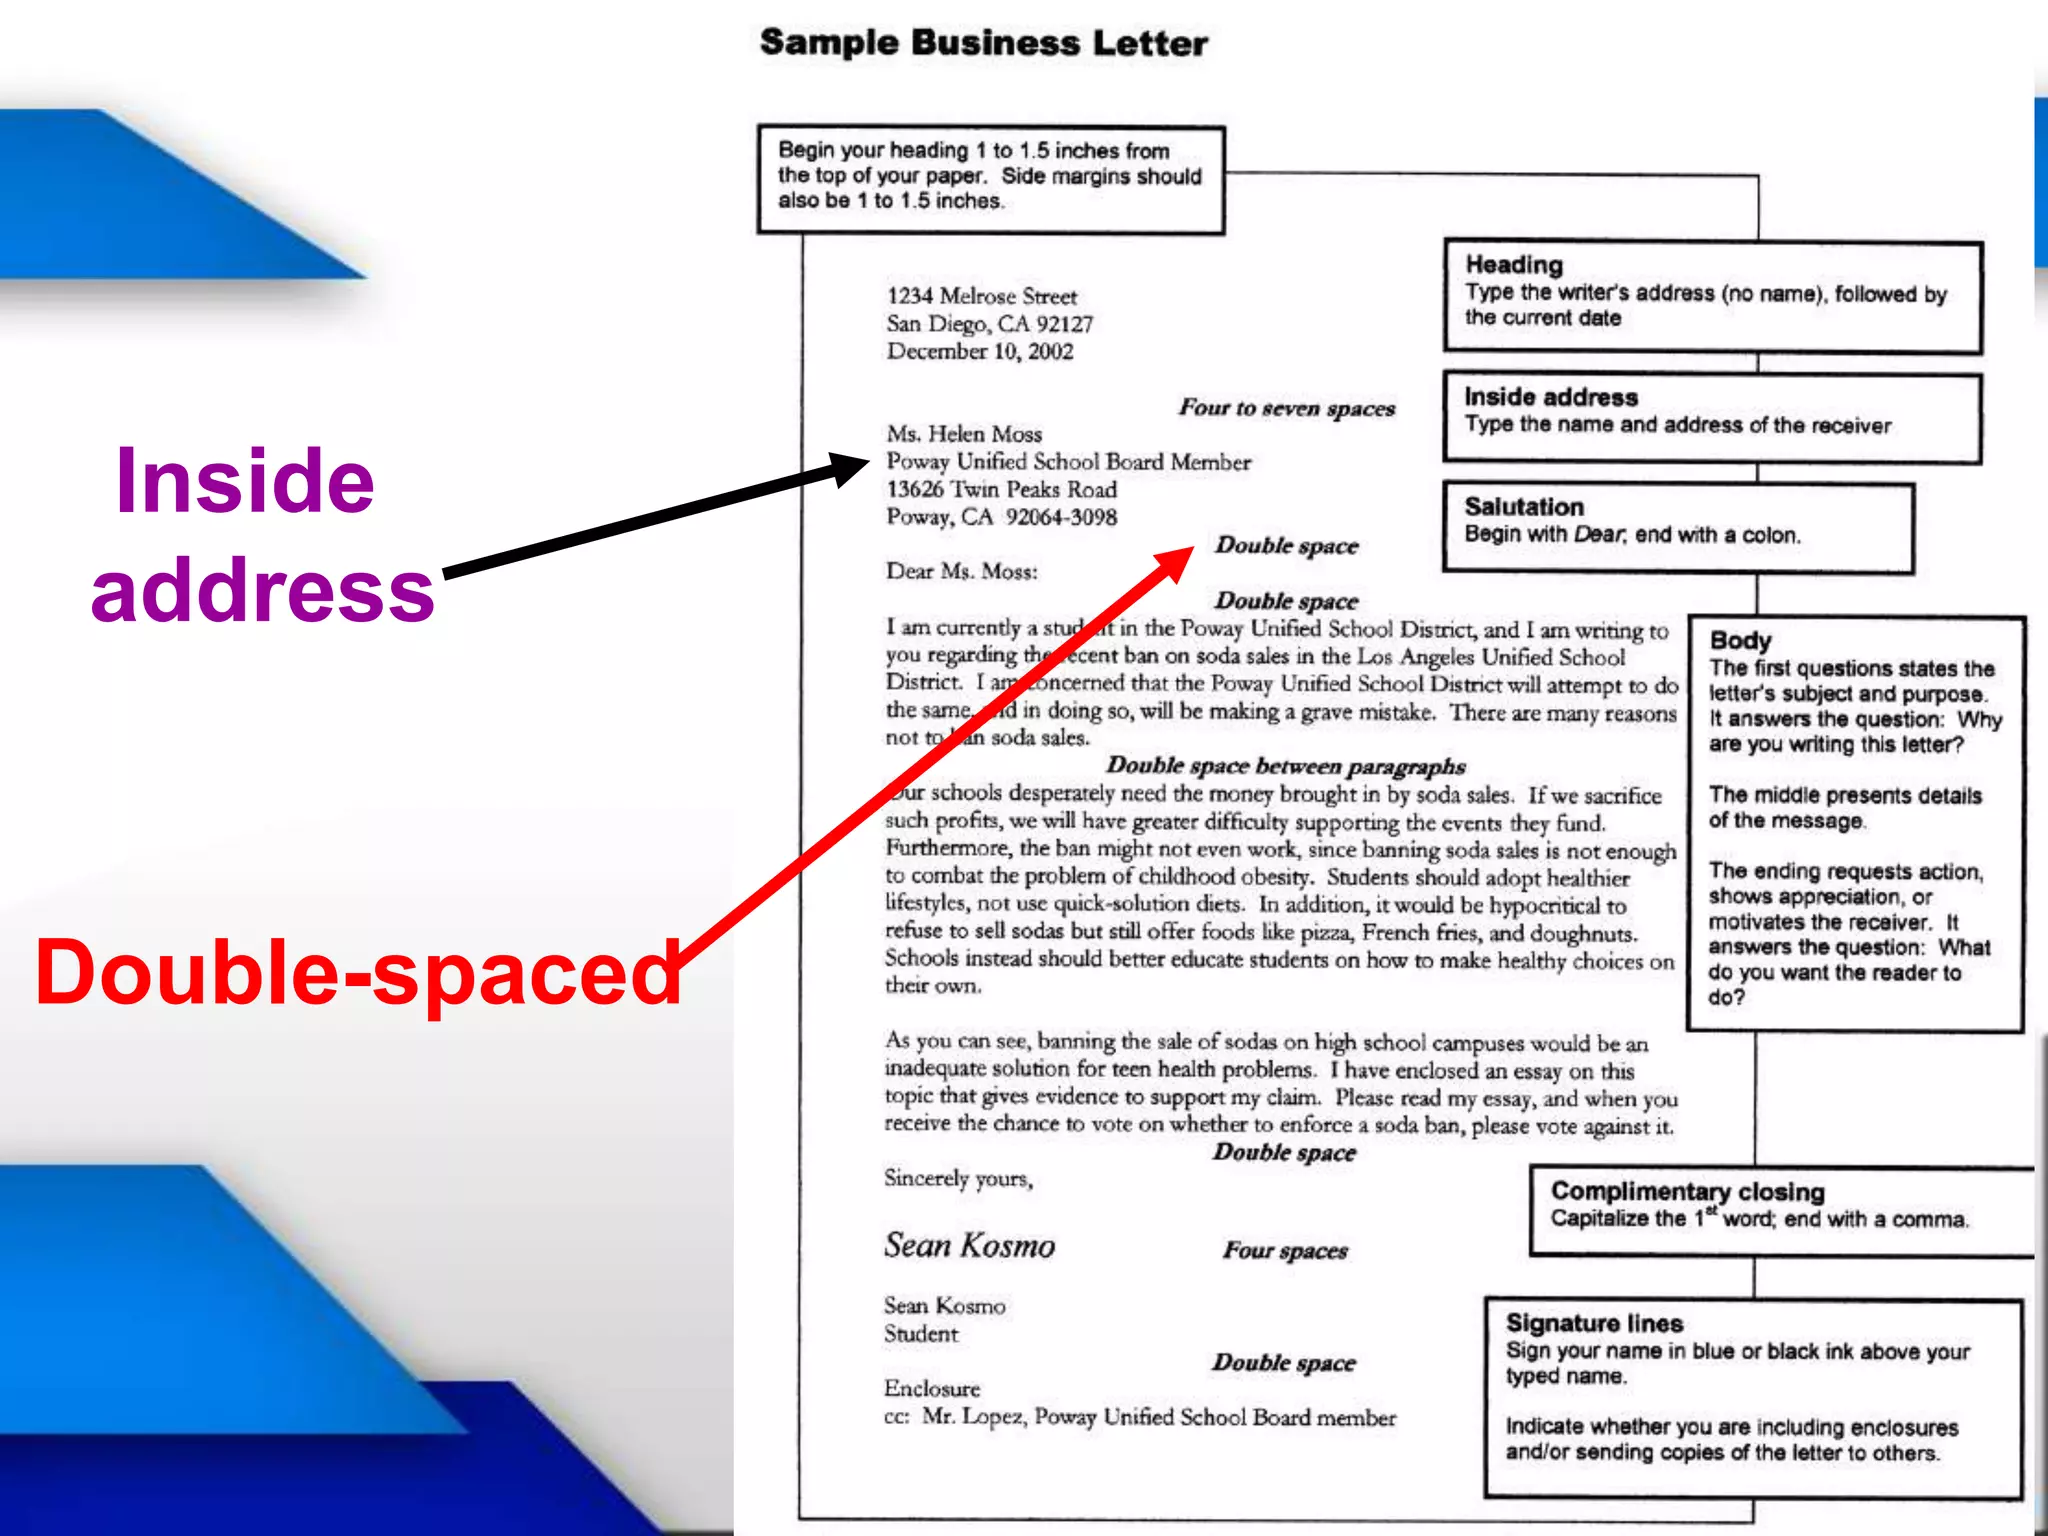
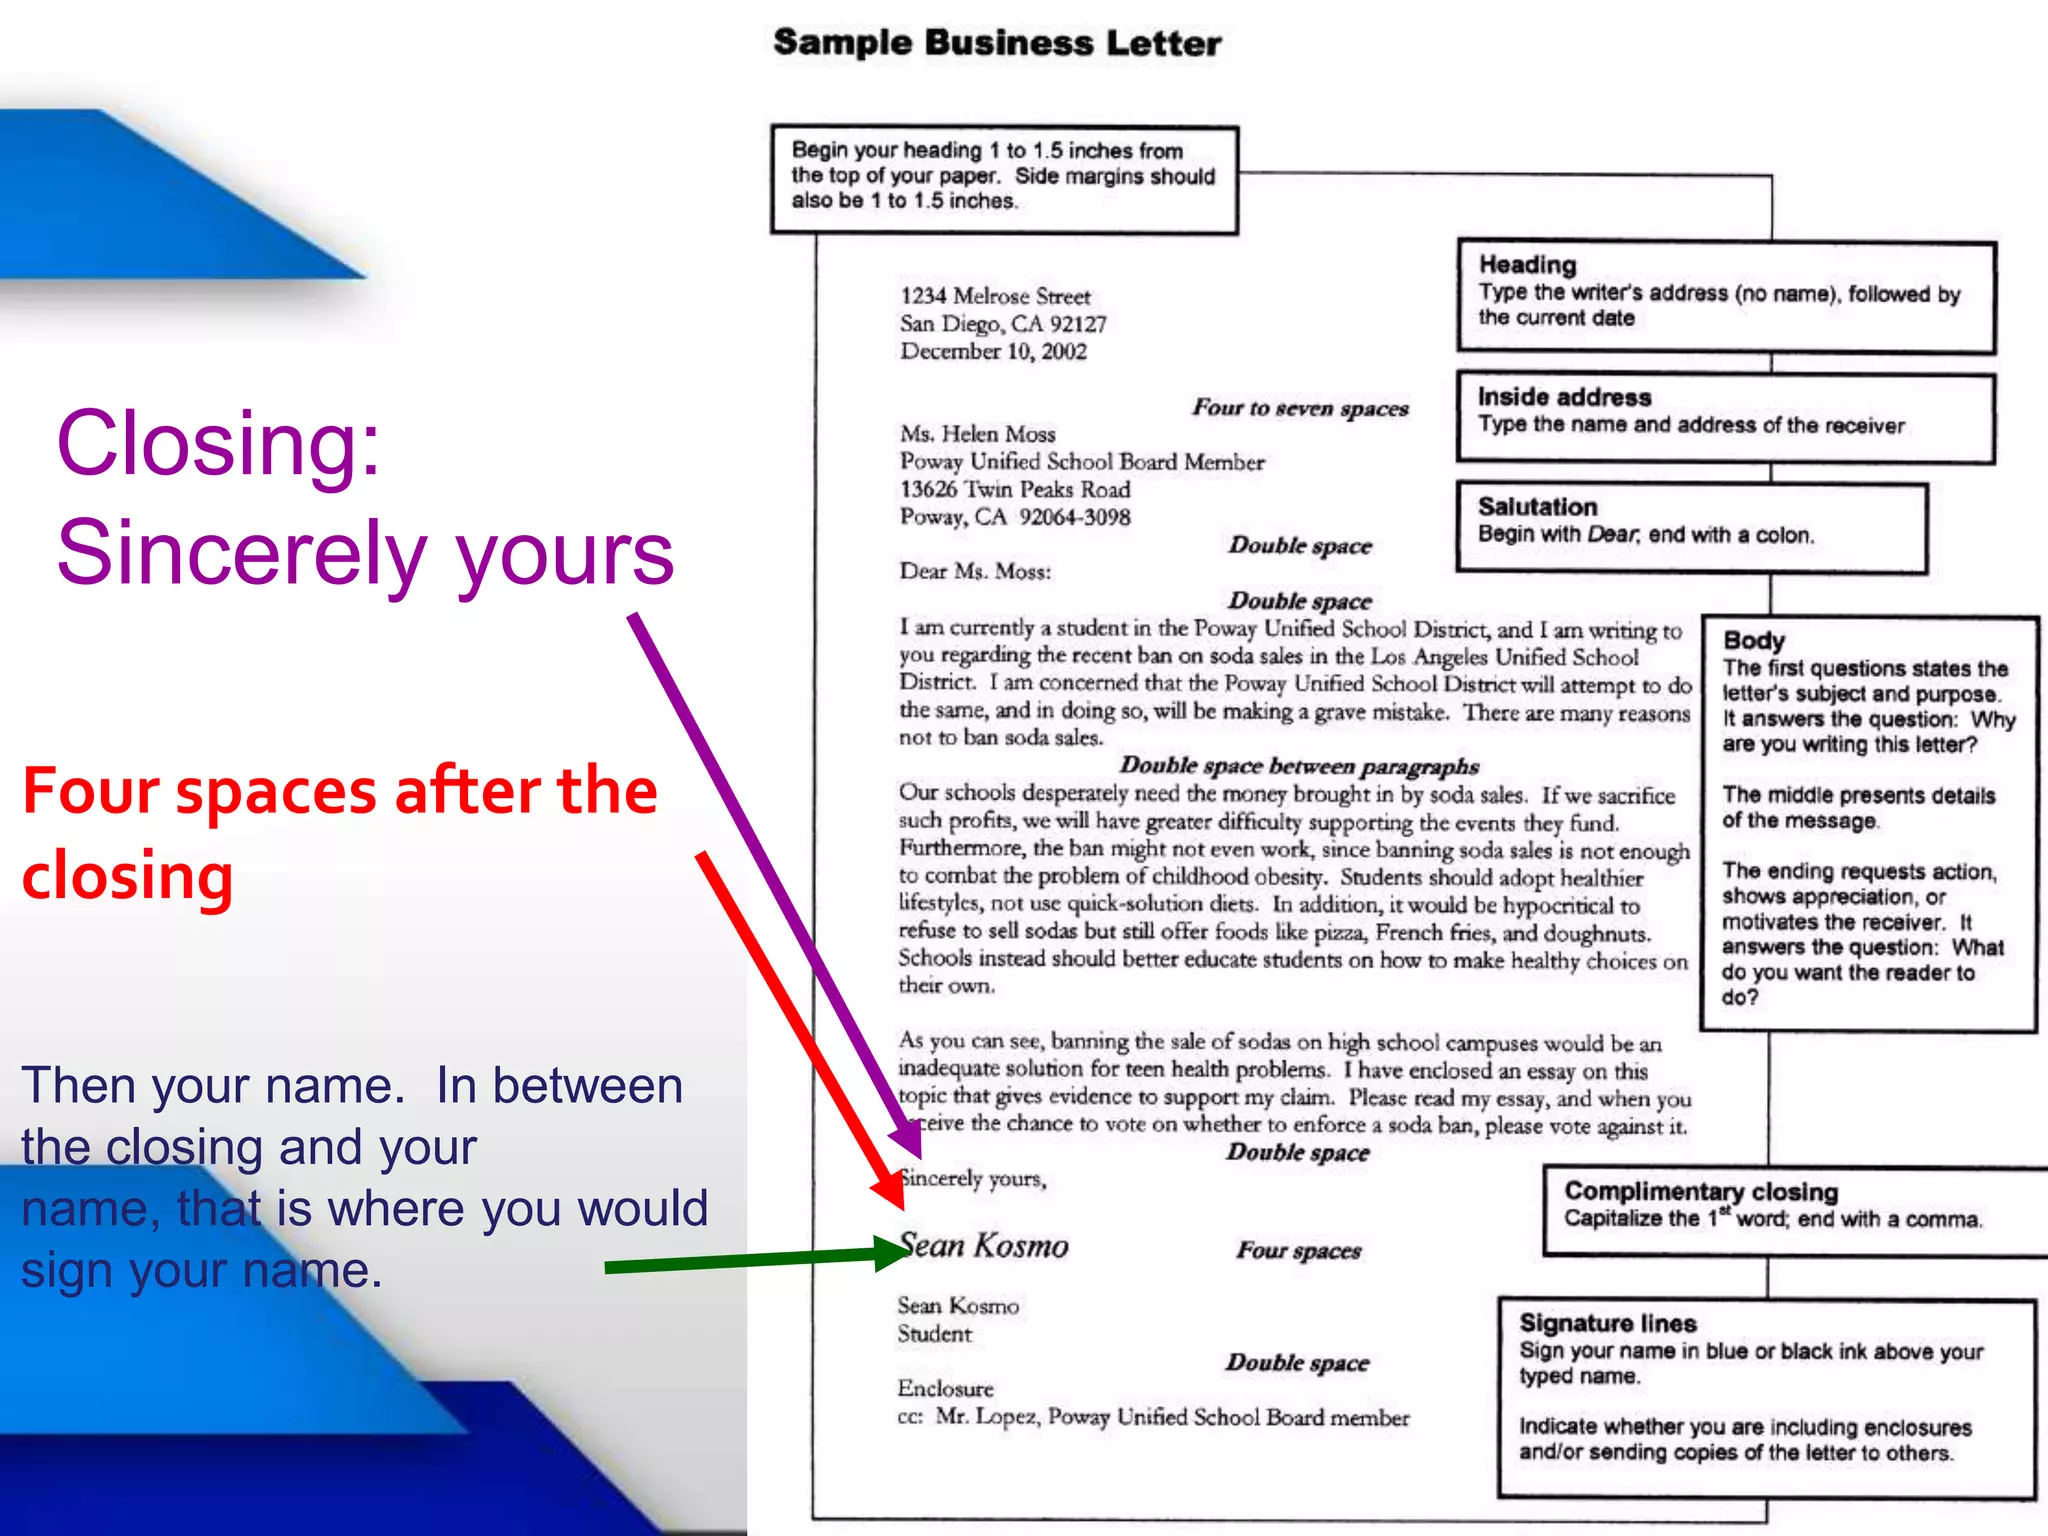
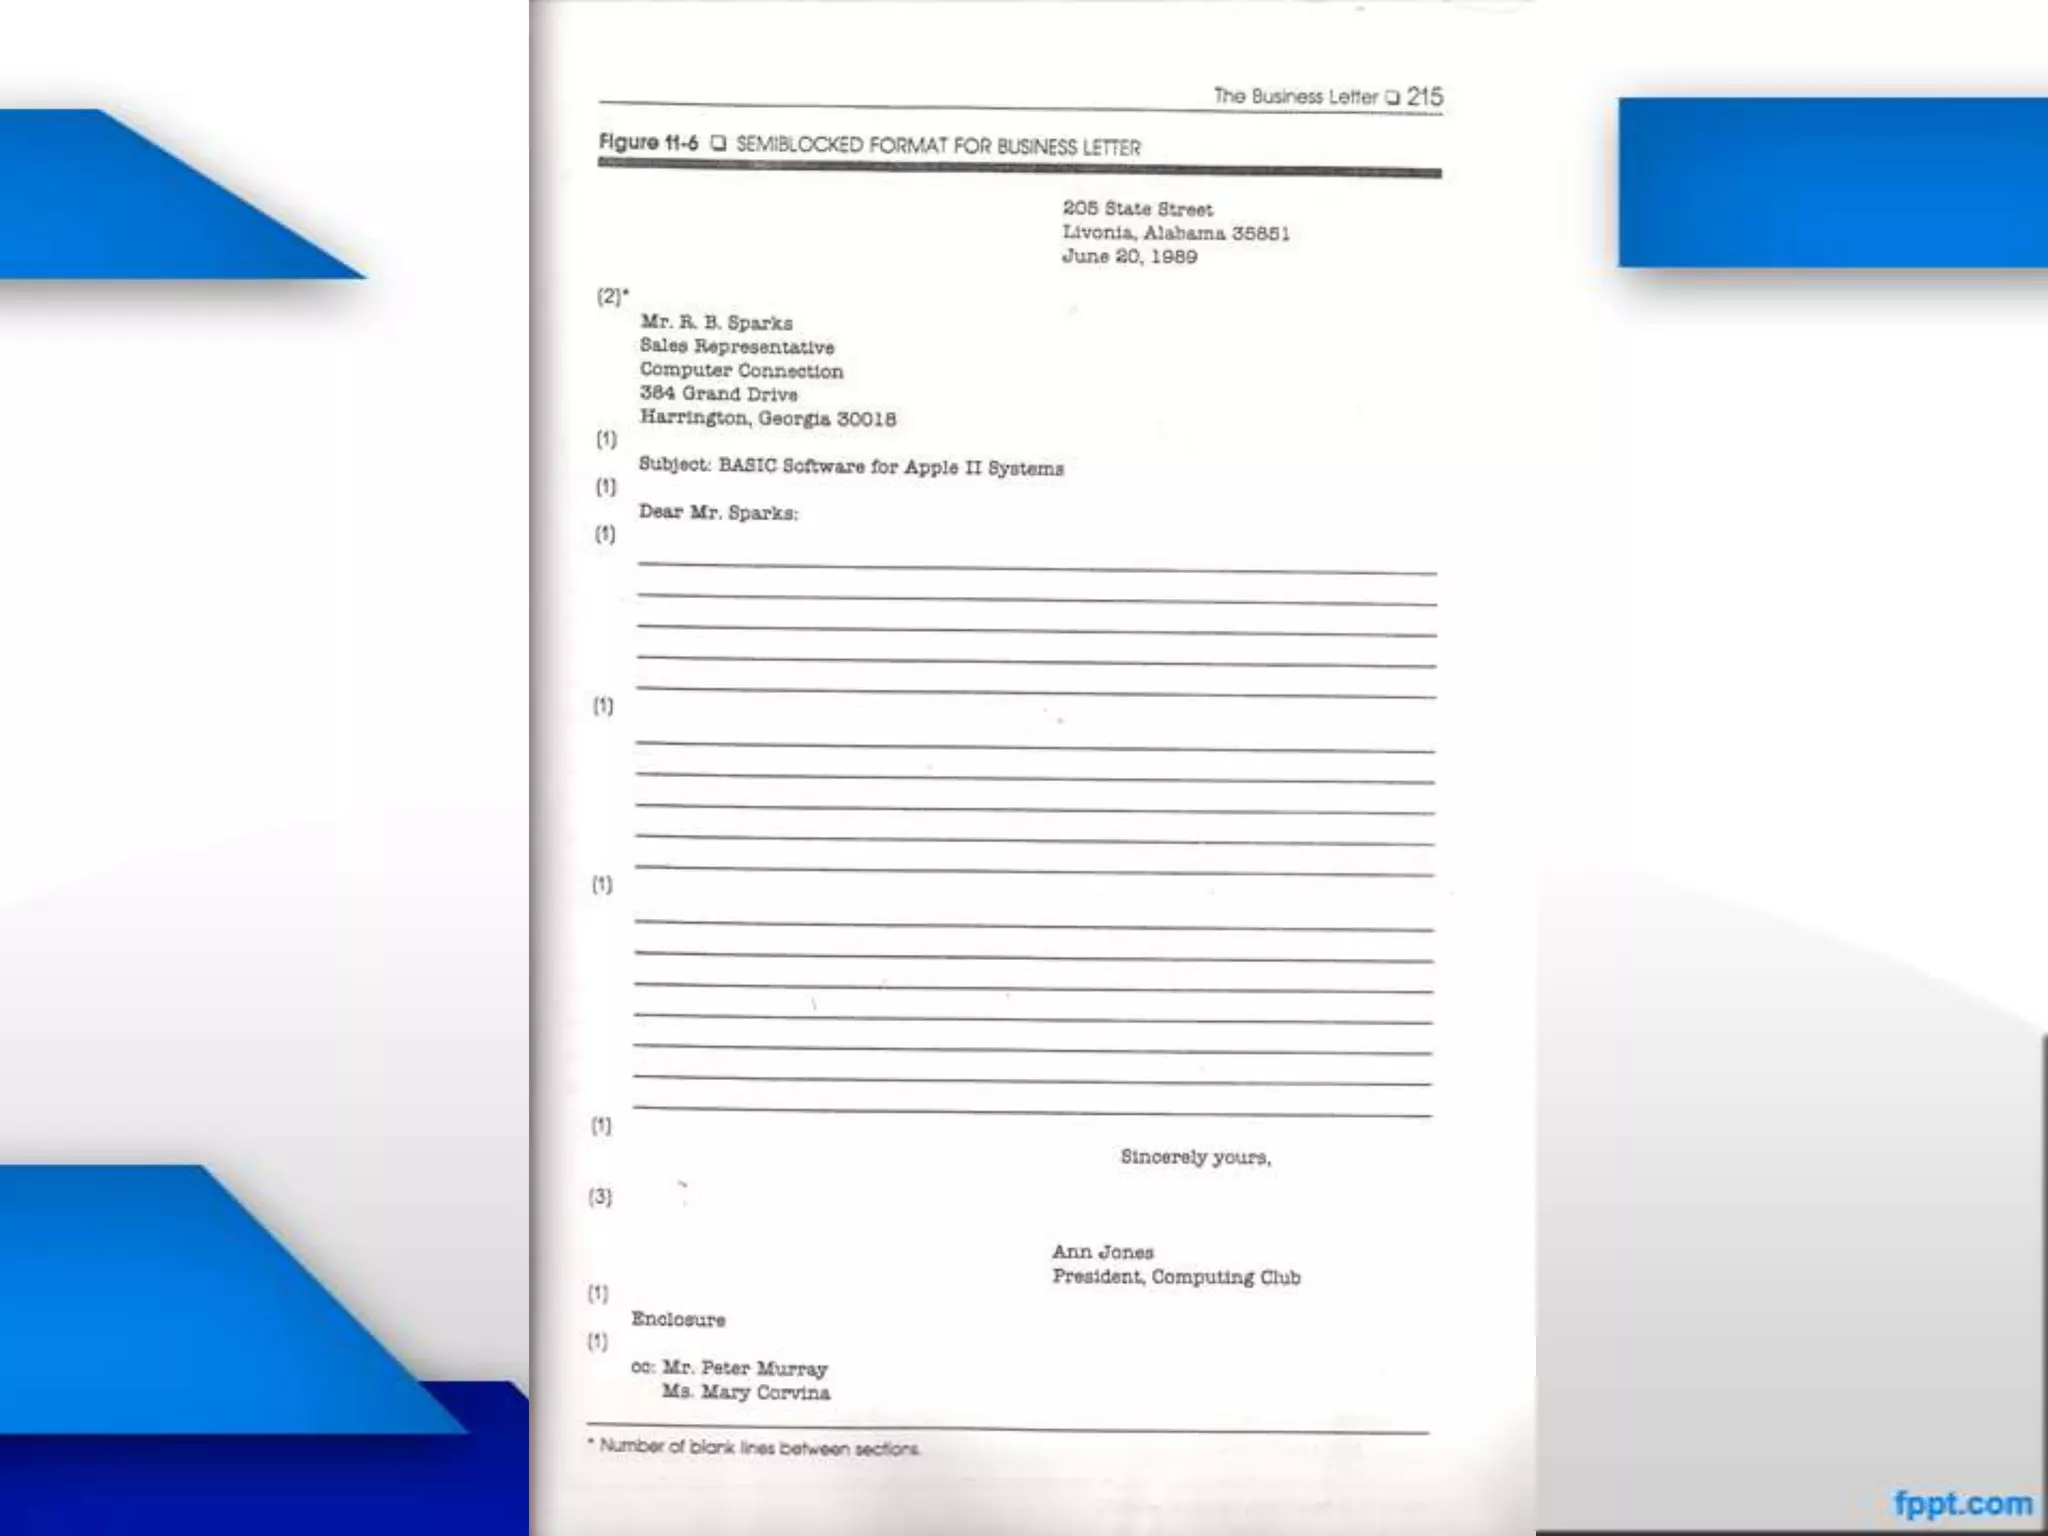
SlideShare a Scribd company logo
1 of 38
Seminar-Workshop on
Business Correspondence
                               October 10-11, 2012
    Bureau of Fisheries and Aquatic Resources- IV-A
                  Venue: National Irrigation Agency
Business correspondence is an instrument of
decision making in the professional world.

Business correspondence is a link between
people.

It helps to reinforce professional exchange of
ideas, opinion, and information.
Office communication includes face-to-face,
telephonic, letters, emails, and faxes from-

     1. One agency to another

     2. One department/division to another

     3. Employees to the supervisor and vice versa
Type of medium used would depend on
the situation, importance, and urgency.

Written communication, however, has
certain distinct advantages.
1. It gives information, clarification, directive,
   explanation, etc.
2. It creates a record of the message.
3. It facilitates subsequent reference.
4. The reader gets an opportunity to read at a
convenient time.
5. It offers greater clarity to the messages.
Fitting the message to the
                specific reader or organization


                    Communicating the purpose
 Adaptation
                    of the correspondence clearly
  to your
environment
and recipient       Exhibiting professionalism in
                    business communications


                Representing your agency
                in the most positive way
•••••The Seven C’s of Effective
Communication
•••••••••••••••••••••••••••••
SEVEN C’s of Effective Communication

            CLEAR

            CONCISE

            COMPLETE

            CONCRETE

            CORRECT
            COHERENT
            COURTEOUS
Business
           Memoranda   E-mails
 Letters
•••••The Business Letter
•••••••••••••••••••••••••••••
What is a Business Letter?
•   Why write one?
•   To whom is one written?
•   What should be in one?
•   What is proper format?
THE IMPORTANCE OF LETTERS
• Letters represent your company’s public image and your
  competence.
• Letters are more personal than a report, yet more formal
  than memos or e-mail.
• Letters are more permanent than e-mail.
• Letters constitute an official legal record of an agreement .
• Letters provide a wide range of corporate information .
• Letters sell.
• Letters are efficient for targeted mass mailings.
What are the types of business letters?

• Personal Business
  – Not on Letterhead
  – Contains your typed return address
• Formal Business
  – Typed on Letterhead
  – Letterhead
     • Already contains your agency’s return address
     • You don’t retype it

                                                   14
PURPOSE
• What do I want the reader to know?
• What kind of business letter am I writing?
  – Letter of inquiry
  – Letter of application
  – Letter of complaint
  – Letter of regret
  – Thank you letter
Why write Business Letters?
· To persuade
· To inform
· To request
· To express thanks
· To remind
· To recommend
· To apologize
· To congratulate
· To reject a proposal or offer
· To introduce a person or policy
· To invite or welcome
· To follow up
· To formalize decisions
Green Solutions Philippines
Suite 25, 32nd Floor, RCBC Building,
Ayala Avenue, Makati City

October 10, 2012

Sec. Proceso J. Alcala
Secretary
Department of Agriculture
Elliptical Road, Diliman, Quezon City

Honorable Sir,

Greetings in Peace!

Ours is an organization who has the vision and mission of promoting clean, chemical-free, and pollution-free oceans. A group of
dynamic and visionary young environmentalists established our organization in hopes of making the Phils. seas healthier and more
habitable to aquatic resources.

Pollution is linked to fish diseases, reproductive problems and mutations. The toxins include industrial chemicals and pesticides that
enter fisheries through ground and surface water and through the air which make fish become contaminated because they absorb
the toxins in the water, and the toxins are passed on to other animals and people through the food chain.

On October 29, 2012, 9 local government units in the Metro will be visited to do a massive campaign for the “Clean the Seas” project
which advocates education and training to volunteers to identify and respond to ocean pollution and habitat threats, and work with
the local government to advocate for needed changes.

Whereas, it is the opinion of our office to seek the partnership of the government in this endeavour. We would like to seek your
assistance in providing us with technical support in so far as providing us with the current situation of our oceans and their aquatic
resources. The information that you could give us would also help us to come up with new breakthroughs that would further
strengthen our pro-environment campaign which is, ultimately, for the good of mankind.

Should you find our campaign of utmost interest, we would be appreciative of your invaluable help to our organization.

Thank you for your consideration and God bless!
                                                                                    Very Sincerely Yours,
                                                                                    Clarence Gatbonton, M.D, Ph. D.
What are the required parts of a
            business letter?
•   Heading
•   Inside Address
•   Salutation
•   Body
•   Complimentary Closing
•   Signature
•   Optional:
     – Enclosure
     – Typists Initials
Margins
What’s in The Heading
      (your information)
• Always includes the date
   – As the last entry
• Personal Business Letter (no letterhead)
   – Your return address
   – May include phone number, fax number, e-mail
     address
   – Date
• Formal Business Letter (on letterhead)
   – Date only
                                              20
Heading


       Date

Skip four lines.
What is the Inside Address
 (addressee’s information)

• Person’s Name, Title
• Company/Agency Name/Department
• Company/Agency Address
     (single spaced)


                                   22
RULES OF THUMB…
 AVOID ABBREVIATIONS EXCEPT FOR STATES AND TITLES.
   (Mr., Mrs., Ms., etc. – Phl, NJ)

 PLACE A SINGLE WORD TITLE AFTER THE NAME SEPARATED BY
  A COMMA.
   Mr. Ronald F. Naguit, Director

 PLACE A LONGER TITLE ON A SEPARATE LINE.
   Ms. Camilla D. Sanchez
   Executive Director of Safety
Inside
 address


Double-spaced
What is the Salutation?
            (a greeting)

•   Dear Mr. Peralta:
•   Dear Dr. Guzman:
•   Dear Ms. Nacion:
•   Dear Sir:
•   Dear Madam:
•   Gentlemen:


                           25
4. Salutation/Greeting


 Double space.
What is the Body?
         (The actual letter)
• Brief and to the point!
   – Strictly Business
• Guideline – 3 paragraphs
   – Brief Introduction
   – Content - What I want/ message
   – Conclusion and thank you


                                      27
Body: State your
purpose for writing
this letter.
You may or may not
have more than one
paragraph. If you
do, between each
paragraph, be sure
to double space.
Complimentary Close

• Sincerely,
• Yours truly,
• Respectfully yours,


                        30
Closing:
 Sincerely yours

Four spaces after the
closing

Then your name. In between
the closing and your
name, that is where you would
sign your name.
Signature


• Your full name
  – Mr. Alfred Guiang
• Your title and division(if appropriate)
  – Information Officer
  – PIA-NCR


                                            32
Optional Parts
• Enclosure
  – If something else is in the letter or package
  • P.S: additional information
  • Cc: copies sent to other concerned persons


                                                    33
Business
Letter in
Block Style
What are acceptable formats
         of a business letter?
• Unblocked
• Blocked
  – All parts are Left Justified to the margin
• Modified Block
  – All parts Left Justified
  – Heading, Close, Signature at
    tab position 3
  – Indentation – choose either
     • No paragraph indentation
     • All paragraphs first line indent .5

                                                 35
Business Correspondence Seminar

More Related Content

What's hot

Oral communication
Oral communicationOral communication
Oral communicationAnandbabu V
 
Difference between Academic Writing and Non-academic Writing
Difference between Academic Writing and Non-academic WritingDifference between Academic Writing and Non-academic Writing
Difference between Academic Writing and Non-academic WritingDaya Vaghani
 
academic communication 2.pptx
academic communication 2.pptxacademic communication 2.pptx
academic communication 2.pptxFilizMizrak
 
Business Writing
Business WritingBusiness Writing
Business WritingNia Noelle
 
Communicative competence slides
Communicative competence slidesCommunicative competence slides
Communicative competence slidessonsedela
 
Good news - Business Communication
Good news - Business CommunicationGood news - Business Communication
Good news - Business Communicationjulianmillar
 
How To Write a Business/Formal Letter
How To Write a Business/Formal LetterHow To Write a Business/Formal Letter
How To Write a Business/Formal LetterGenevieve Oh
 
Written communication
Written communicationWritten communication
Written communicationVasim Shaikh
 
Testing the Productive Skills: Speaking and Writing
Testing the Productive Skills: Speaking and WritingTesting the Productive Skills: Speaking and Writing
Testing the Productive Skills: Speaking and WritingKeithAnimasDolorian
 
Business communication
Business communicationBusiness communication
Business communicationpsp78
 
Communication process with practical example
Communication process with practical exampleCommunication process with practical example
Communication process with practical exampleMohammad Yousif
 
Writing Effective Business EMails!
Writing Effective Business EMails!Writing Effective Business EMails!
Writing Effective Business EMails!lorzinian
 
EAPP_Paraphrasing and Summarizing
EAPP_Paraphrasing and SummarizingEAPP_Paraphrasing and Summarizing
EAPP_Paraphrasing and SummarizingTine Lachica
 
Speech communication
Speech communicationSpeech communication
Speech communicationRey Rimando
 
Types of business reports
Types of business reportsTypes of business reports
Types of business reportsRahul Ahuja
 
Definition of writing
Definition of writingDefinition of writing
Definition of writingLatipah Hamid
 
Business correspondence
Business correspondenceBusiness correspondence
Business correspondenceChara Sumayao
 

What's hot (20)

Oral communication
Oral communicationOral communication
Oral communication
 
Difference between Academic Writing and Non-academic Writing
Difference between Academic Writing and Non-academic WritingDifference between Academic Writing and Non-academic Writing
Difference between Academic Writing and Non-academic Writing
 
academic communication 2.pptx
academic communication 2.pptxacademic communication 2.pptx
academic communication 2.pptx
 
Business Writing
Business WritingBusiness Writing
Business Writing
 
Communicative competence slides
Communicative competence slidesCommunicative competence slides
Communicative competence slides
 
Good news - Business Communication
Good news - Business CommunicationGood news - Business Communication
Good news - Business Communication
 
Oral communication
Oral communicationOral communication
Oral communication
 
How To Write a Business/Formal Letter
How To Write a Business/Formal LetterHow To Write a Business/Formal Letter
How To Write a Business/Formal Letter
 
Written communication
Written communicationWritten communication
Written communication
 
Testing the Productive Skills: Speaking and Writing
Testing the Productive Skills: Speaking and WritingTesting the Productive Skills: Speaking and Writing
Testing the Productive Skills: Speaking and Writing
 
Business communication
Business communicationBusiness communication
Business communication
 
Communication process with practical example
Communication process with practical exampleCommunication process with practical example
Communication process with practical example
 
Writing Effective Business EMails!
Writing Effective Business EMails!Writing Effective Business EMails!
Writing Effective Business EMails!
 
EAPP_Paraphrasing and Summarizing
EAPP_Paraphrasing and SummarizingEAPP_Paraphrasing and Summarizing
EAPP_Paraphrasing and Summarizing
 
Speech communication
Speech communicationSpeech communication
Speech communication
 
Business letter
Business letterBusiness letter
Business letter
 
Types of business reports
Types of business reportsTypes of business reports
Types of business reports
 
Writing a Business Email
Writing a Business EmailWriting a Business Email
Writing a Business Email
 
Definition of writing
Definition of writingDefinition of writing
Definition of writing
 
Business correspondence
Business correspondenceBusiness correspondence
Business correspondence
 

Viewers also liked

Business correspondence
Business correspondenceBusiness correspondence
Business correspondenceDaina Abdul
 
Business Correspondence
Business CorrespondenceBusiness Correspondence
Business CorrespondenceSherrie Lee
 
Introduction to business correspondence
Introduction to business correspondenceIntroduction to business correspondence
Introduction to business correspondenceEnglishProf1
 
Types of business correspondence
Types of business correspondenceTypes of business correspondence
Types of business correspondencealieskandary
 
Effective Business Correspondence
Effective Business CorrespondenceEffective Business Correspondence
Effective Business CorrespondenceJodie Nicotra
 
Business correspondence
Business correspondenceBusiness correspondence
Business correspondenceCiklum Ukraine
 
Basic principles in Business Correspondence
Basic principles in Business CorrespondenceBasic principles in Business Correspondence
Basic principles in Business CorrespondenceShin Evangelista
 
7 characterisitics of effective business correspondence
7 characterisitics of effective business correspondence7 characterisitics of effective business correspondence
7 characterisitics of effective business correspondenceErvin Ramos
 
Social correspondence
Social correspondenceSocial correspondence
Social correspondenceNk Babul
 
Ppt on business writing
Ppt on business writingPpt on business writing
Ppt on business writingtechmodi_India
 
Written communication
Written communication Written communication
Written communication Deep Narayan
 
Business correspondence
Business correspondenceBusiness correspondence
Business correspondenceprince2511
 
BUSINESS LETTER AND DIFFERENT STYLES
BUSINESS LETTER AND DIFFERENT STYLESBUSINESS LETTER AND DIFFERENT STYLES
BUSINESS LETTER AND DIFFERENT STYLESSeemab Abbas
 
Customer's Letter of Appreciation
Customer's Letter of AppreciationCustomer's Letter of Appreciation
Customer's Letter of AppreciationKelley Cummings
 
Letter of Appreciation July 2013
Letter of Appreciation July 2013Letter of Appreciation July 2013
Letter of Appreciation July 2013Pramod Dwivedi
 
Letter of Appreciation August 2013
Letter of Appreciation August 2013Letter of Appreciation August 2013
Letter of Appreciation August 2013Pramod Dwivedi
 
Business correspondence
Business correspondenceBusiness correspondence
Business correspondenceRashid Arhaan
 
Letter of Appreciation 24Aug2014
Letter of Appreciation 24Aug2014Letter of Appreciation 24Aug2014
Letter of Appreciation 24Aug2014shobegomez
 
home-office-correspondence-tracking
home-office-correspondence-trackinghome-office-correspondence-tracking
home-office-correspondence-trackingMichelle Jennings
 

Viewers also liked (20)

Business correspondence
Business correspondenceBusiness correspondence
Business correspondence
 
Business Correspondence
Business CorrespondenceBusiness Correspondence
Business Correspondence
 
Introduction to business correspondence
Introduction to business correspondenceIntroduction to business correspondence
Introduction to business correspondence
 
Types of business correspondence
Types of business correspondenceTypes of business correspondence
Types of business correspondence
 
Effective Business Correspondence
Effective Business CorrespondenceEffective Business Correspondence
Effective Business Correspondence
 
Business correspondence
Business correspondenceBusiness correspondence
Business correspondence
 
Basic principles in Business Correspondence
Basic principles in Business CorrespondenceBasic principles in Business Correspondence
Basic principles in Business Correspondence
 
Writing Effective Business Correspondenc
Writing Effective Business CorrespondencWriting Effective Business Correspondenc
Writing Effective Business Correspondenc
 
7 characterisitics of effective business correspondence
7 characterisitics of effective business correspondence7 characterisitics of effective business correspondence
7 characterisitics of effective business correspondence
 
Social correspondence
Social correspondenceSocial correspondence
Social correspondence
 
Ppt on business writing
Ppt on business writingPpt on business writing
Ppt on business writing
 
Written communication
Written communication Written communication
Written communication
 
Business correspondence
Business correspondenceBusiness correspondence
Business correspondence
 
BUSINESS LETTER AND DIFFERENT STYLES
BUSINESS LETTER AND DIFFERENT STYLESBUSINESS LETTER AND DIFFERENT STYLES
BUSINESS LETTER AND DIFFERENT STYLES
 
Customer's Letter of Appreciation
Customer's Letter of AppreciationCustomer's Letter of Appreciation
Customer's Letter of Appreciation
 
Letter of Appreciation July 2013
Letter of Appreciation July 2013Letter of Appreciation July 2013
Letter of Appreciation July 2013
 
Letter of Appreciation August 2013
Letter of Appreciation August 2013Letter of Appreciation August 2013
Letter of Appreciation August 2013
 
Business correspondence
Business correspondenceBusiness correspondence
Business correspondence
 
Letter of Appreciation 24Aug2014
Letter of Appreciation 24Aug2014Letter of Appreciation 24Aug2014
Letter of Appreciation 24Aug2014
 
home-office-correspondence-tracking
home-office-correspondence-trackinghome-office-correspondence-tracking
home-office-correspondence-tracking
 

Similar to Business Correspondence Seminar

Writing Effective Business Correspondence
Writing Effective Business CorrespondenceWriting Effective Business Correspondence
Writing Effective Business CorrespondenceSaied Eshaghi
 
Business Communication
Business CommunicationBusiness Communication
Business CommunicationJanet Tibaldo
 
BUSINESS-LETTER.ppt
BUSINESS-LETTER.pptBUSINESS-LETTER.ppt
BUSINESS-LETTER.pptLallHussain
 
IT team communication skill version 1.0.1
IT team communication skill version 1.0.1IT team communication skill version 1.0.1
IT team communication skill version 1.0.1Rishabh Pandey
 
Writing Effective Communication, Memos and Letters
Writing Effective Communication, Memos and LettersWriting Effective Communication, Memos and Letters
Writing Effective Communication, Memos and LettersAngelicaGepes1
 
Letter drafting ppt 15 feb
Letter drafting ppt 15 febLetter drafting ppt 15 feb
Letter drafting ppt 15 febsherod123
 
Read this PPT for better understanding module 4.pptx
Read this PPT for better understanding module 4.pptxRead this PPT for better understanding module 4.pptx
Read this PPT for better understanding module 4.pptxriteshchail622622
 
3-B Business Letter.pptx
3-B Business Letter.pptx3-B Business Letter.pptx
3-B Business Letter.pptxRuhilaAnwar
 
Introduction to messages and the writing process - Business Communication
Introduction to messages and the writing process - Business CommunicationIntroduction to messages and the writing process - Business Communication
Introduction to messages and the writing process - Business Communicationjulianmillar
 
Behavior and Business: Best Practices in Business Etiquette
Behavior and Business: Best Practices in Business EtiquetteBehavior and Business: Best Practices in Business Etiquette
Behavior and Business: Best Practices in Business EtiquetteCareer Communications Group
 

Similar to Business Correspondence Seminar (20)

Writing Effective Business Correspondence
Writing Effective Business CorrespondenceWriting Effective Business Correspondence
Writing Effective Business Correspondence
 
Business Communication
Business CommunicationBusiness Communication
Business Communication
 
kamath2.ppt
kamath2.pptkamath2.ppt
kamath2.ppt
 
BUSINESS-LETTER.ppt
BUSINESS-LETTER.pptBUSINESS-LETTER.ppt
BUSINESS-LETTER.ppt
 
BC Unit - 1
BC Unit - 1BC Unit - 1
BC Unit - 1
 
IT team communication skill version 1.0.1
IT team communication skill version 1.0.1IT team communication skill version 1.0.1
IT team communication skill version 1.0.1
 
Writing Effective Communication, Memos and Letters
Writing Effective Communication, Memos and LettersWriting Effective Communication, Memos and Letters
Writing Effective Communication, Memos and Letters
 
Letter drafting ppt 15 feb
Letter drafting ppt 15 febLetter drafting ppt 15 feb
Letter drafting ppt 15 feb
 
Read this PPT for better understanding module 4.pptx
Read this PPT for better understanding module 4.pptxRead this PPT for better understanding module 4.pptx
Read this PPT for better understanding module 4.pptx
 
Letter writing
Letter writingLetter writing
Letter writing
 
3-B Business Letter.pptx
3-B Business Letter.pptx3-B Business Letter.pptx
3-B Business Letter.pptx
 
Lec 6-
Lec 6-Lec 6-
Lec 6-
 
Final pp
Final ppFinal pp
Final pp
 
Introduction to messages and the writing process - Business Communication
Introduction to messages and the writing process - Business CommunicationIntroduction to messages and the writing process - Business Communication
Introduction to messages and the writing process - Business Communication
 
Bc
BcBc
Bc
 
Final pp..jury
Final pp..jury Final pp..jury
Final pp..jury
 
Behavior and Business: Best Practices in Business Etiquette
Behavior and Business: Best Practices in Business EtiquetteBehavior and Business: Best Practices in Business Etiquette
Behavior and Business: Best Practices in Business Etiquette
 
Mc 4
Mc 4Mc 4
Mc 4
 
business letter
business letterbusiness letter
business letter
 
Business Writing
Business WritingBusiness Writing
Business Writing
 

Recently uploaded

Call Girls in Mehrauli Delhi 💯Call Us 🔝8264348440🔝
Call Girls in Mehrauli Delhi 💯Call Us 🔝8264348440🔝Call Girls in Mehrauli Delhi 💯Call Us 🔝8264348440🔝
Call Girls in Mehrauli Delhi 💯Call Us 🔝8264348440🔝soniya singh
 
Catalogue ONG NUOC PPR DE NHAT .pdf
Catalogue ONG NUOC PPR DE NHAT      .pdfCatalogue ONG NUOC PPR DE NHAT      .pdf
Catalogue ONG NUOC PPR DE NHAT .pdfOrient Homes
 
Vip Female Escorts Noida 9711199171 Greater Noida Escorts Service
Vip Female Escorts Noida 9711199171 Greater Noida Escorts ServiceVip Female Escorts Noida 9711199171 Greater Noida Escorts Service
Vip Female Escorts Noida 9711199171 Greater Noida Escorts Serviceankitnayak356677
 
Lucknow 💋 Escorts in Lucknow - 450+ Call Girl Cash Payment 8923113531 Neha Th...
Lucknow 💋 Escorts in Lucknow - 450+ Call Girl Cash Payment 8923113531 Neha Th...Lucknow 💋 Escorts in Lucknow - 450+ Call Girl Cash Payment 8923113531 Neha Th...
Lucknow 💋 Escorts in Lucknow - 450+ Call Girl Cash Payment 8923113531 Neha Th...anilsa9823
 
Call Girls In Sikandarpur Gurgaon ❤️8860477959_Russian 100% Genuine Escorts I...
Call Girls In Sikandarpur Gurgaon ❤️8860477959_Russian 100% Genuine Escorts I...Call Girls In Sikandarpur Gurgaon ❤️8860477959_Russian 100% Genuine Escorts I...
Call Girls In Sikandarpur Gurgaon ❤️8860477959_Russian 100% Genuine Escorts I...lizamodels9
 
0183760ssssssssssssssssssssssssssss00101011 (27).pdf
0183760ssssssssssssssssssssssssssss00101011 (27).pdf0183760ssssssssssssssssssssssssssss00101011 (27).pdf
0183760ssssssssssssssssssssssssssss00101011 (27).pdfRenandantas16
 
Regression analysis: Simple Linear Regression Multiple Linear Regression
Regression analysis:  Simple Linear Regression Multiple Linear RegressionRegression analysis:  Simple Linear Regression Multiple Linear Regression
Regression analysis: Simple Linear Regression Multiple Linear RegressionRavindra Nath Shukla
 
The CMO Survey - Highlights and Insights Report - Spring 2024
The CMO Survey - Highlights and Insights Report - Spring 2024The CMO Survey - Highlights and Insights Report - Spring 2024
The CMO Survey - Highlights and Insights Report - Spring 2024christinemoorman
 
VIP Kolkata Call Girl Howrah 👉 8250192130 Available With Room
VIP Kolkata Call Girl Howrah 👉 8250192130  Available With RoomVIP Kolkata Call Girl Howrah 👉 8250192130  Available With Room
VIP Kolkata Call Girl Howrah 👉 8250192130 Available With Roomdivyansh0kumar0
 
Monte Carlo simulation : Simulation using MCSM
Monte Carlo simulation : Simulation using MCSMMonte Carlo simulation : Simulation using MCSM
Monte Carlo simulation : Simulation using MCSMRavindra Nath Shukla
 
Tech Startup Growth Hacking 101 - Basics on Growth Marketing
Tech Startup Growth Hacking 101  - Basics on Growth MarketingTech Startup Growth Hacking 101  - Basics on Growth Marketing
Tech Startup Growth Hacking 101 - Basics on Growth MarketingShawn Pang
 
Call Girls In Connaught Place Delhi ❤️88604**77959_Russian 100% Genuine Escor...
Call Girls In Connaught Place Delhi ❤️88604**77959_Russian 100% Genuine Escor...Call Girls In Connaught Place Delhi ❤️88604**77959_Russian 100% Genuine Escor...
Call Girls In Connaught Place Delhi ❤️88604**77959_Russian 100% Genuine Escor...lizamodels9
 
GD Birla and his contribution in management
GD Birla and his contribution in managementGD Birla and his contribution in management
GD Birla and his contribution in managementchhavia330
 
Russian Faridabad Call Girls(Badarpur) : ☎ 8168257667, @4999
Russian Faridabad Call Girls(Badarpur) : ☎ 8168257667, @4999Russian Faridabad Call Girls(Badarpur) : ☎ 8168257667, @4999
Russian Faridabad Call Girls(Badarpur) : ☎ 8168257667, @4999Tina Ji
 
A DAY IN THE LIFE OF A SALESMAN / WOMAN
A DAY IN THE LIFE OF A  SALESMAN / WOMANA DAY IN THE LIFE OF A  SALESMAN / WOMAN
A DAY IN THE LIFE OF A SALESMAN / WOMANIlamathiKannappan
 
M.C Lodges -- Guest House in Jhang.
M.C Lodges --  Guest House in Jhang.M.C Lodges --  Guest House in Jhang.
M.C Lodges -- Guest House in Jhang.Aaiza Hassan
 
rishikeshgirls.in- Rishikesh call girl.pdf
rishikeshgirls.in- Rishikesh call girl.pdfrishikeshgirls.in- Rishikesh call girl.pdf
rishikeshgirls.in- Rishikesh call girl.pdfmuskan1121w
 
Call Girls Pune Just Call 9907093804 Top Class Call Girl Service Available
Call Girls Pune Just Call 9907093804 Top Class Call Girl Service AvailableCall Girls Pune Just Call 9907093804 Top Class Call Girl Service Available
Call Girls Pune Just Call 9907093804 Top Class Call Girl Service AvailableDipal Arora
 
Eni 2024 1Q Results - 24.04.24 business.
Eni 2024 1Q Results - 24.04.24 business.Eni 2024 1Q Results - 24.04.24 business.
Eni 2024 1Q Results - 24.04.24 business.Eni
 
RE Capital's Visionary Leadership under Newman Leech
RE Capital's Visionary Leadership under Newman LeechRE Capital's Visionary Leadership under Newman Leech
RE Capital's Visionary Leadership under Newman LeechNewman George Leech
 

Recently uploaded (20)

Call Girls in Mehrauli Delhi 💯Call Us 🔝8264348440🔝
Call Girls in Mehrauli Delhi 💯Call Us 🔝8264348440🔝Call Girls in Mehrauli Delhi 💯Call Us 🔝8264348440🔝
Call Girls in Mehrauli Delhi 💯Call Us 🔝8264348440🔝
 
Catalogue ONG NUOC PPR DE NHAT .pdf
Catalogue ONG NUOC PPR DE NHAT      .pdfCatalogue ONG NUOC PPR DE NHAT      .pdf
Catalogue ONG NUOC PPR DE NHAT .pdf
 
Vip Female Escorts Noida 9711199171 Greater Noida Escorts Service
Vip Female Escorts Noida 9711199171 Greater Noida Escorts ServiceVip Female Escorts Noida 9711199171 Greater Noida Escorts Service
Vip Female Escorts Noida 9711199171 Greater Noida Escorts Service
 
Lucknow 💋 Escorts in Lucknow - 450+ Call Girl Cash Payment 8923113531 Neha Th...
Lucknow 💋 Escorts in Lucknow - 450+ Call Girl Cash Payment 8923113531 Neha Th...Lucknow 💋 Escorts in Lucknow - 450+ Call Girl Cash Payment 8923113531 Neha Th...
Lucknow 💋 Escorts in Lucknow - 450+ Call Girl Cash Payment 8923113531 Neha Th...
 
Call Girls In Sikandarpur Gurgaon ❤️8860477959_Russian 100% Genuine Escorts I...
Call Girls In Sikandarpur Gurgaon ❤️8860477959_Russian 100% Genuine Escorts I...Call Girls In Sikandarpur Gurgaon ❤️8860477959_Russian 100% Genuine Escorts I...
Call Girls In Sikandarpur Gurgaon ❤️8860477959_Russian 100% Genuine Escorts I...
 
0183760ssssssssssssssssssssssssssss00101011 (27).pdf
0183760ssssssssssssssssssssssssssss00101011 (27).pdf0183760ssssssssssssssssssssssssssss00101011 (27).pdf
0183760ssssssssssssssssssssssssssss00101011 (27).pdf
 
Regression analysis: Simple Linear Regression Multiple Linear Regression
Regression analysis:  Simple Linear Regression Multiple Linear RegressionRegression analysis:  Simple Linear Regression Multiple Linear Regression
Regression analysis: Simple Linear Regression Multiple Linear Regression
 
The CMO Survey - Highlights and Insights Report - Spring 2024
The CMO Survey - Highlights and Insights Report - Spring 2024The CMO Survey - Highlights and Insights Report - Spring 2024
The CMO Survey - Highlights and Insights Report - Spring 2024
 
VIP Kolkata Call Girl Howrah 👉 8250192130 Available With Room
VIP Kolkata Call Girl Howrah 👉 8250192130  Available With RoomVIP Kolkata Call Girl Howrah 👉 8250192130  Available With Room
VIP Kolkata Call Girl Howrah 👉 8250192130 Available With Room
 
Monte Carlo simulation : Simulation using MCSM
Monte Carlo simulation : Simulation using MCSMMonte Carlo simulation : Simulation using MCSM
Monte Carlo simulation : Simulation using MCSM
 
Tech Startup Growth Hacking 101 - Basics on Growth Marketing
Tech Startup Growth Hacking 101  - Basics on Growth MarketingTech Startup Growth Hacking 101  - Basics on Growth Marketing
Tech Startup Growth Hacking 101 - Basics on Growth Marketing
 
Call Girls In Connaught Place Delhi ❤️88604**77959_Russian 100% Genuine Escor...
Call Girls In Connaught Place Delhi ❤️88604**77959_Russian 100% Genuine Escor...Call Girls In Connaught Place Delhi ❤️88604**77959_Russian 100% Genuine Escor...
Call Girls In Connaught Place Delhi ❤️88604**77959_Russian 100% Genuine Escor...
 
GD Birla and his contribution in management
GD Birla and his contribution in managementGD Birla and his contribution in management
GD Birla and his contribution in management
 
Russian Faridabad Call Girls(Badarpur) : ☎ 8168257667, @4999
Russian Faridabad Call Girls(Badarpur) : ☎ 8168257667, @4999Russian Faridabad Call Girls(Badarpur) : ☎ 8168257667, @4999
Russian Faridabad Call Girls(Badarpur) : ☎ 8168257667, @4999
 
A DAY IN THE LIFE OF A SALESMAN / WOMAN
A DAY IN THE LIFE OF A  SALESMAN / WOMANA DAY IN THE LIFE OF A  SALESMAN / WOMAN
A DAY IN THE LIFE OF A SALESMAN / WOMAN
 
M.C Lodges -- Guest House in Jhang.
M.C Lodges --  Guest House in Jhang.M.C Lodges --  Guest House in Jhang.
M.C Lodges -- Guest House in Jhang.
 
rishikeshgirls.in- Rishikesh call girl.pdf
rishikeshgirls.in- Rishikesh call girl.pdfrishikeshgirls.in- Rishikesh call girl.pdf
rishikeshgirls.in- Rishikesh call girl.pdf
 
Call Girls Pune Just Call 9907093804 Top Class Call Girl Service Available
Call Girls Pune Just Call 9907093804 Top Class Call Girl Service AvailableCall Girls Pune Just Call 9907093804 Top Class Call Girl Service Available
Call Girls Pune Just Call 9907093804 Top Class Call Girl Service Available
 
Eni 2024 1Q Results - 24.04.24 business.
Eni 2024 1Q Results - 24.04.24 business.Eni 2024 1Q Results - 24.04.24 business.
Eni 2024 1Q Results - 24.04.24 business.
 
RE Capital's Visionary Leadership under Newman Leech
RE Capital's Visionary Leadership under Newman LeechRE Capital's Visionary Leadership under Newman Leech
RE Capital's Visionary Leadership under Newman Leech
 

Business Correspondence Seminar

  • 1. Seminar-Workshop on Business Correspondence October 10-11, 2012 Bureau of Fisheries and Aquatic Resources- IV-A Venue: National Irrigation Agency
  • 2.
  • 3. Business correspondence is an instrument of decision making in the professional world. Business correspondence is a link between people. It helps to reinforce professional exchange of ideas, opinion, and information.
  • 4. Office communication includes face-to-face, telephonic, letters, emails, and faxes from- 1. One agency to another 2. One department/division to another 3. Employees to the supervisor and vice versa
  • 5. Type of medium used would depend on the situation, importance, and urgency. Written communication, however, has certain distinct advantages.
  • 6. 1. It gives information, clarification, directive, explanation, etc. 2. It creates a record of the message. 3. It facilitates subsequent reference. 4. The reader gets an opportunity to read at a convenient time. 5. It offers greater clarity to the messages.
  • 7. Fitting the message to the specific reader or organization Communicating the purpose Adaptation of the correspondence clearly to your environment and recipient Exhibiting professionalism in business communications Representing your agency in the most positive way
  • 8. •••••The Seven C’s of Effective Communication •••••••••••••••••••••••••••••
  • 9. SEVEN C’s of Effective Communication CLEAR CONCISE COMPLETE CONCRETE CORRECT COHERENT COURTEOUS
  • 10. Business Memoranda E-mails Letters
  • 12. What is a Business Letter? • Why write one? • To whom is one written? • What should be in one? • What is proper format?
  • 13. THE IMPORTANCE OF LETTERS • Letters represent your company’s public image and your competence. • Letters are more personal than a report, yet more formal than memos or e-mail. • Letters are more permanent than e-mail. • Letters constitute an official legal record of an agreement . • Letters provide a wide range of corporate information . • Letters sell. • Letters are efficient for targeted mass mailings.
  • 14. What are the types of business letters? • Personal Business – Not on Letterhead – Contains your typed return address • Formal Business – Typed on Letterhead – Letterhead • Already contains your agency’s return address • You don’t retype it 14
  • 15. PURPOSE • What do I want the reader to know? • What kind of business letter am I writing? – Letter of inquiry – Letter of application – Letter of complaint – Letter of regret – Thank you letter
  • 16. Why write Business Letters? · To persuade · To inform · To request · To express thanks · To remind · To recommend · To apologize · To congratulate · To reject a proposal or offer · To introduce a person or policy · To invite or welcome · To follow up · To formalize decisions
  • 17. Green Solutions Philippines Suite 25, 32nd Floor, RCBC Building, Ayala Avenue, Makati City October 10, 2012 Sec. Proceso J. Alcala Secretary Department of Agriculture Elliptical Road, Diliman, Quezon City Honorable Sir, Greetings in Peace! Ours is an organization who has the vision and mission of promoting clean, chemical-free, and pollution-free oceans. A group of dynamic and visionary young environmentalists established our organization in hopes of making the Phils. seas healthier and more habitable to aquatic resources. Pollution is linked to fish diseases, reproductive problems and mutations. The toxins include industrial chemicals and pesticides that enter fisheries through ground and surface water and through the air which make fish become contaminated because they absorb the toxins in the water, and the toxins are passed on to other animals and people through the food chain. On October 29, 2012, 9 local government units in the Metro will be visited to do a massive campaign for the “Clean the Seas” project which advocates education and training to volunteers to identify and respond to ocean pollution and habitat threats, and work with the local government to advocate for needed changes. Whereas, it is the opinion of our office to seek the partnership of the government in this endeavour. We would like to seek your assistance in providing us with technical support in so far as providing us with the current situation of our oceans and their aquatic resources. The information that you could give us would also help us to come up with new breakthroughs that would further strengthen our pro-environment campaign which is, ultimately, for the good of mankind. Should you find our campaign of utmost interest, we would be appreciative of your invaluable help to our organization. Thank you for your consideration and God bless! Very Sincerely Yours, Clarence Gatbonton, M.D, Ph. D.
  • 18. What are the required parts of a business letter? • Heading • Inside Address • Salutation • Body • Complimentary Closing • Signature • Optional: – Enclosure – Typists Initials
  • 20. What’s in The Heading (your information) • Always includes the date – As the last entry • Personal Business Letter (no letterhead) – Your return address – May include phone number, fax number, e-mail address – Date • Formal Business Letter (on letterhead) – Date only 20
  • 21. Heading Date Skip four lines.
  • 22. What is the Inside Address (addressee’s information) • Person’s Name, Title • Company/Agency Name/Department • Company/Agency Address (single spaced) 22
  • 23. RULES OF THUMB…  AVOID ABBREVIATIONS EXCEPT FOR STATES AND TITLES. (Mr., Mrs., Ms., etc. – Phl, NJ)  PLACE A SINGLE WORD TITLE AFTER THE NAME SEPARATED BY A COMMA. Mr. Ronald F. Naguit, Director  PLACE A LONGER TITLE ON A SEPARATE LINE. Ms. Camilla D. Sanchez Executive Director of Safety
  • 25. What is the Salutation? (a greeting) • Dear Mr. Peralta: • Dear Dr. Guzman: • Dear Ms. Nacion: • Dear Sir: • Dear Madam: • Gentlemen: 25
  • 27. What is the Body? (The actual letter) • Brief and to the point! – Strictly Business • Guideline – 3 paragraphs – Brief Introduction – Content - What I want/ message – Conclusion and thank you 27
  • 28. Body: State your purpose for writing this letter.
  • 29. You may or may not have more than one paragraph. If you do, between each paragraph, be sure to double space.
  • 30. Complimentary Close • Sincerely, • Yours truly, • Respectfully yours, 30
  • 31. Closing: Sincerely yours Four spaces after the closing Then your name. In between the closing and your name, that is where you would sign your name.
  • 32. Signature • Your full name – Mr. Alfred Guiang • Your title and division(if appropriate) – Information Officer – PIA-NCR 32
  • 33. Optional Parts • Enclosure – If something else is in the letter or package • P.S: additional information • Cc: copies sent to other concerned persons 33
  • 35. What are acceptable formats of a business letter? • Unblocked • Blocked – All parts are Left Justified to the margin • Modified Block – All parts Left Justified – Heading, Close, Signature at tab position 3 – Indentation – choose either • No paragraph indentation • All paragraphs first line indent .5 35

Editor's Notes

  1. Custom animation effects: text rebound(Intermediate)To reproduce the text effects on this slide, do the following:On the Home tab, in the Slides group, click Layout, and then click Blank.On the Insert tab, in the Text group, click TextBox. Drag to draw a text box on the slide.In the text box, enter text and select it. On the Home tab, in the Font group, do the following:In the Font list, select Corbel.In the FontSize box, enter 50. Click Bold.On the Home tab, in the Paragraph group, click Center. Select the text box on the slide. Under DrawingTools, on the Format tab, in the WordArtStyles group, click MoreWordArt, and then under Appliesto All Text in Shape click Fill - Accent 1, Plastic Bevel, Reflection (first row, fifth option from the left).To reproduce the animation effects on this slide, do the following:On the View tab, in the Zoom group, click Zoom, and then in the Zoom dialog box, select 66%. On the Animations tab, in the Animations group, click CustomAnimation. On the slide, select the text box. In the CustomAnimation task pane, do the following:Click AddEffect, point to Entrance, and then click MoreEffects. In the AddEntranceEffects dialog box, under Subtle, click Fade.Select the animation effect (fade effect for the text box). Under Modify: Fade,do the following:In the Start list, select WithPrevious.In the Speed list, select Fast. Click AddEffect, point to MotionPath, point to DrawCustomPath, and then click Freeform. Press and hold SHIFT, and then do the following to draw the freeform line on the slide: Click the first point in the center of the text box.Click the second point on the right edge of the text box.Double-click the third and final point 2” beyond the left edge of the slide.In the Custom Animation task pane, select the custom path effect. Under Modify: Custom Path,do the following:In the Start list, select WithPrevious.In the Speed list, select Medium. On the slide, right-click the motion path on the slide, and select ReversePathDirection.To reproduce the background effects on this slide, do the following:Right-click the slide background area, and then click Format Background. In the Format Background dialog box, click Fill in the left pane, select Gradient fill in the Fill pane, and then do the following:In the Type list, select Radial.Click the button next to Direction, and then click From Center (first row, second option from the left). Under Gradient stops, click Add or Remove until two stops appear in the drop-down list.Also under Gradient stops, customize the gradient stops that you added as follows:Select Stop 1 from the list, and then do the following:In the Stop position box, enter 0%.Click the button next to Color, and then under ThemeColors click White, Background 1 (first row, first option from the left). Select Stop 2 from the list, and then do the following: In the Stop position box, enter 100%.Click the button next to Color, click MoreColors, and then in the Colors dialog box, on the Custom tab, enter values for Red: 200, Green: 209, and Blue: 218.
  2. Custom animation effects: object spins on end(Advanced)To reproduce the background effects on this slide, do the following:On the Home tab, in the Slides group, click Layout, and then click Blank.Right-click the slide background area, and then click Format Background. In the Format Background dialog box, click Fill in the left pane, and then select Solid fill in the Fill pane. Click the button next to Color, and then under Theme Colors click White, Background 1 (first row, first option from the left).To reproduce the rectangle on this slide, do the following:On the Home tab, in the Drawing group, click Shapes, and then under Rectangles click Rounded Rectangle (second option from the left). On the slide, drag to draw a rounded rectangle.Select the rectangle. Drag the yellow diamond adjustment handle to the left to decrease the amount of rounding on the corners. With the rounded rectangle still selected, under Drawing Tools, on the Format tab, in the Size group, do the following:In the Shape Height box, enter 3.5”.In the Shape Width box, enter 0.25”.Under Drawing Tools, on the Format tab, in the bottom right corner of the Shape Styles group, click the Format Shape dialog box launcher. In the Format Shape dialog box, click Fill in the left pane. In the Fill pane, select Solid fill, click the button next to Color, and then under Theme Colors click White, Background 1, Darker 15% (third row, first option from the left).Also in the Format Shape dialog box, click Line Color in the left pane. In the Line Color pane, select No line. Also in the Format Shape dialog box, click Shadow in the left pane. In the Shadow pane, click the button next to Presets, under Outer select Offset Bottom (first row, second option from the left), and then do the following:In the Transparency box, enter 0%.In the Size box, enter 100%. In the Blur box, enter 8.5 pt.In the Angle box, enter 90°.In the Distance box, enter 1 pt.Also in the Format Shape dialog box, click 3-D Format in the left pane. In the 3-D Format pane, do the following:Under Bevel, click the button next to Top, and then under Bevel click Circle (first row, first option from the left). Next to Top, in the Width box, enter 5 pt, and in the Height box, enter 5 pt.Under Surface, click the button next to Material, and then under Standard click Matte (first row, first option from the left). Click the button next to Lighting, and then under Neutral click Soft (first row, third option from the left).On the slide, select the rounded rectangle. On the Home tab, in the Clipboard group, click the arrow under Paste, and then click Duplicate.Select the duplicate rectangle. On the Home tab, in the Drawing group, do the following:Click the arrow next to Shape Fill, and then click No Fill.Click the arrow next to Shape Outline, and then click No Outline.Drag the second rectangle above the first rectangle until the lower edge overlays the top edge of the first rectangle. (Note: When the spinning animation effect is created later for these rectangles, the spin will center where the edges of the rectangles meet.)Press and hold CTRL, and then select both rectangles. On the Home tab, in the Drawing group, click Arrange, and do the following:Point to Align, and then click Align Selected Objects.Point to Align, and then click Align Center.Click Group. On the slide, drag the group until it is centered horizontally on the left edge of the slide (straddling the edge).On the Home tab, in the Drawing group, click Arrange, point to Align, and then do the following:Click Align to Slide.Click Align Middle.To reproduce the dashed arc on this slide, do the following:On the Home tab, in the Drawing group, click Shapes, and then under Basic Shapes click Arc (third row, 12th option from the left). On the slide, drag to draw an arc.Select the arc. Under Drawing Tools, on the Format tab, in the Size group, do the following:In the Shape Height box, enter 7.5”.In the Shape Width box, enter 7.5”.With the arc still selected, on the Home tab, in the Drawing group, click the arrow next to Shape Outline,and then do the following:Under Theme Colors, click White, Background 1, Darker 15% (third row, first option from the left).Point to Dashes, and then click Dash (fourth option from the top).On the slide, drag the yellow diamond adjustment handle on the right side of the arc to the bottom of the arc to create a half circle.Drag the arc until the yellow diamond adjustment handles are on the left edge of the slide.With the arc still selected, on the Home tab, in the Drawing group, click Arrange, point to Align, and then do the following:Click Align to Slide. Click Align Middle. To reproduce the half circle on this slide, do the following:On the slide, select the arc. On the Home tab, in the Clipboard group, click the arrow under Paste, and then click Duplicate.Select the duplicate arc. Under Drawing Tools, on the Format tab, in the Size group, do the following:In the Shape Height box, enter 3.33”.In the Shape Width box, enter 3.33”.With the second arc still selected, under Drawing Tools, on the Format tab, in the Shape Styles group, click the arrow next to Shape Fill, and then under Theme Colors click White, Background 1, Darker 5% (second row, first option from the left).Under Drawing Tools, on the Format tab, in the Shape Styles group, click the arrow next to Shape Outline,and then click No Outline.Under Drawing Tools, on the Format tab, in the Shape Styles group, click Shape Effects, point to Shadow, and then click ShadowOptions. In the Format Shape dialog box, click Shadow in the left pane. In the Shadow pane, click the button next to Presets, under Inner click Inside Right (second row, third option from the left), and then do the following:In the Transparency box, enter 86%.In the Blur box, enter 24 pt.In the Angle box, enter 315°.In the Distance box, enter 4 pt.On the slide, drag the second arc until the yellow diamond adjustment handles are on the left edge of the slide. On the Home tab, in the Drawing group, click Arrange, and then do the following:Point to Align, and then click Align to Slide. Point to Align, and then click Align Middle. Click Send to Back.To reproduce the button shapes on this slide, do the following:On the Home tab, in the Drawing group, click Shapes, and then under Basic Shapes click Oval (first row, second option from the left). On the slide, drag to draw an oval.Select the oval. Under Drawing Tools, on the Format tab, in the Size group, do the following:In the Shape Height box, enter 0.34”.In the Shape Width box, enter 0.34”.Under Drawing Tools, on the Format tab, in the Shape Styles group, click More, and then click Light 1 Outline, Colored Fill – Dark 1 (third row, first option from the left).Under Drawing Tools, on the Format tab, in the bottom right corner of the Shape Styles group, click the Format Shape dialog box launcher. In the Format Shape dialog box, click Fill in the left pane. In the Fill pane, select Solid Fill. Click the button next to Color, and then under Theme Colors click Olive Green, Accent 3, Lighter 80°(second row, seventh option from the left).Also in the Format Shape dialog box, click Line Color in the left pane. In the Line Color pane, select No line. Also in the Format Shape dialog box, click Shadow in the left pane. In the Shadow pane, click the button next to Presets, under Outer click Offset Bottom (first row, second option from the left), and then do the following:In the Transparency box, enter 0%.In the Size box, enter 100%.In the Blur box, enter 8.5 pt.In the Angle box, enter 90°.In the Distance box, enter 1 pt.Also in the Format Shape dialog box, click 3-D Format in the left pane, and then do the following in the 3-D Format pane:Under Bevel, click the button next to Top, and then under Bevel click Art Deco (third row, fourth option from the left). Next to Top, in the Width box, enter 5 pt, and in the Height box, enter 5 pt.Under Contour, click the button next to Color, and then under Theme Colors click White, Background 1 (first row, first option from the left). In the Size box, enter 3.5 pt.Under Surface, click the button next to Material, and then under Standard click Matte (first row, first option from the left). Click the button next to Lighting, and then under Neutral click Soft (first row, third option from the left).On the slide, select the oval. Under Drawing Tools, on the Format tab, in the bottom right corner of the Size group, click the Size and Position dialog box launcher. In the Size and Position dialog box, on the Position tab, do the following:In the Horizontal box, enter 2.98”.In the Vertical box, enter 1.5”.Select the oval. On the Home tab, in the Clipboard group, click the arrow under Paste, and then click Duplicate.Select the duplicate oval. Under Drawing Tools, on the Format tab, in the bottom right corner of the Size group, click the Size and Position dialog box launcher. In the Size and Position dialog box, on the Position tab, do the following:In the Horizontal box, enter 3.52”.In the Vertical box, enter 2.98”. Repeat step 9 two more times, for a total of four ovals. Under Drawing Tools, on the Format tab, in the bottom right corner of the Size group, click the Size and Position dialog box launcher. In the Size and Position dialog box, on the Position tab, do the following to position the third and fourth ovals:Select the third oval on the slide, and then enter 3.52” in the Horizontal box and 4.27” in the Vertical box.Select the fourth oval on the slide, and then enter 2.99” in the Horizontal box and 5.66” in the Vertical box.To reproduce the text on this slide, do the following:On the Insert tab, in the Text group, click Text Box, and then on the slide, drag to draw the text box. Enter text in the text box and select the text. On the Home tab, in the Font group, do the following: In the Font list, select Corbel.In the Font Size list, select 22.Click the arrow next to Font Color, and then under Theme Colors click White, Background 1, Darker 50% (sixth row, first option from the left).On the Home tab, in the Paragraph group, click Align Text Left to align the text left in the text box.On the slide, drag the text box to the right of the first oval.Select the text box. On the Home tab, in the Clipboard group, click the arrow under Paste, and then click Duplicate. Click in the text box and edit the text. Drag the second text box to the right of the second oval.Repeat steps 5-7 to create the third and fourth text boxes, dragging them to the right of the third and fourth ovals. To reproduce the animation effects on this slide, do the following:On the Animations tab, in the Animations group, click Custom Animation.On the Home tab, in the Editing group, click Select, and then click Selection Pane. In the Selection and Visibility pane, select the rectangle group. In the CustomAnimation task pane, do the following:Click AddEffect, point to Emphasis, and then click More Effects. In the Add Emphasis Effect dialog box, under Basic, click Spin. Select the animation effect (spin effect for the rectangle group). Under Modify: Spin, do the following:In the Start list, select With Previous. In the Amount list, in the Custom box, enter 123°,and then press ENTER. Also in the Amount list, click Counterclockwise.In the Speed list, select Fast. On the slide, select the first oval. In the CustomAnimation task pane, do the following:Click AddEffect, point to Emphasis, and then click More Effects. In the Add Emphasis Effect dialog box, under Basic, click Change Fill Color. Select the second animation effect (change fill color effect for the first oval). Under Modify: Change Fill Color, do the following:In the Start list, select After Previous. In the Fill Color list, click More Colors. In the Colors dialog box, on the Custom tab, enter values for Red: 130, Green: 153, Blue: 117. In the Speed list, select Very Fast.On the slide, select the first text box. In the CustomAnimation task pane, do the following:Click Add Effect, point to Entrance,and then click More Effects. In the Add Entrance Effect dialog box, under Subtle, click Fade. Select the third animation effect (fade effect for the first text box). Under Modify: Fade, do the following:In the Start list, select With Previous.In the Speed list, select Very Fast. In the Selection and Visibility pane, select the rectangle group. In the CustomAnimation task pane, do the following:Click AddEffect, point to Emphasis, and then click More Effects. In the Add Emphasis Effect dialog box, under Basic, click Spin. Select the fourth animation effect (spin effect for the rectangle group). Under Modify: Spin, do the following:In the Start list, select On Click. In the Amount list, in the Custom box, enter 22°, and then press ENTER. Also in the Amount list, click Clockwise. In the Speed list, select Very Fast.On the slide, select the second oval. In the CustomAnimation task pane, do the following:Click AddEffect, point to Emphasis, and then click More Effects. In the Add Emphasis Effect dialog box, under Basic, click Change Fill Color. Select the fifth animation effect (change fill color effect for the second oval). Under Modify: Change Fill Color, do the following:In the Start list, select After Previous. In the Fill Color list, click More Colors. In the Colors dialog box, on the Custom tab, enter values for Red: 130, Green: 153, Blue: 117. In the Speed list, select Very Fast.On the slide, select the second text box. In the CustomAnimation task pane, do the following:Click Add Effect, point to Entrance and then click More Effects. In the Add Entrance Effect dialog box, under Subtle, click Fade. Select the sixth animation effect (fade effect for the second text box). Under Modify: Fade, do the following:In the Start list, select With Previous.In the Speed list, select Very Fast. On the slide, select the third oval. In the CustomAnimation task pane, do the following:Click AddEffect, point to Emphasis, and then click More Effects. In the Add Emphasis Effect dialog box, under Basic, click Change Fill Color. Select the seventh animation effect (change fill color effect for the third oval). Under Modify: Change Fill Color, do the following:In the Start list, select After Previous. In the Fill Color list, click More Colors. In the Colors dialog box, on the Custom tab, enter values for Red: 130, Green: 153, Blue: 117. In the Speed list, select Very Fast.On the slide, select the third text box. In the CustomAnimation task pane, do the following:Click Add Effect, point to Entrance and then click More Effects. In the Add Entrance Effect dialog box, under Subtle, click Fade. Select the eighth animation effect (fade effect for the third text box). Under Modify: Fade, do the following:In the Start list, select With Previous.In the Speed list, select Very Fast. On the slide, select the fourth oval. In the CustomAnimation task pane, do the following:Click AddEffect, point to Emphasis, and then click More Effects. In the Add Emphasis Effect dialog box, under Basic, click Change Fill Color. Select the ninth animation effect (change fill color effect for the fourth oval). Under Modify: Change Fill Color, do the following:In the Start list, select After Previous. In the Fill Color list, click More Colors. In the Colors dialog box, on the Custom tab, enter values for Red: 130, Green: 153, Blue: 117. In the Speed list, select Very Fast.On the slide, select the fourth text box. In the CustomAnimation task pane, do the following:Click Add Effect, point to Entrance,and then click More Effects. In the Add Entrance Effect dialog box, under Subtle, click Fade. Select the 10th animation effect (fade effect for the fourth text box). Under Modify: Fade, do the following:In the Start list, select With Previous.In the Speed list, select Very Fast.
  3. Custom animation effects: dotted line with text fade by letter(Basic)To reproduce the text effects on this slide, do the following:On the Home tab, in the Slides group, click Layout, and then click Blank.On the Insert tab, in the Text group, click Text Box, and then on the slide, drag to draw a text box that spans the entire width of the slide.On the Insert tab, in the Text group, click Symbol. In the Symbol dialog box, do the following:In the Font list, select (normal text).In the Subset list, select General Punctuation.In the Character Code box, enter 2022 to select BULLET, and then click Insert.Click Insert 33 more times until there is a row of 34 bullets in the text box. In the text box, select the text, and then on the Home tab, in the Font group do the following:In the Font list, select ArialBlack.In the FontSize list, select 44.Click the arrow next to FontColor, and then under ThemeColors click White, Background 1 (first row, first option from the left).On the Home tab, in the Drawing group, click Arrange, point to Align, and then do the following:Click Align to Slide.Click AlignCenter.Click AlignMiddle.On the Insert tab, in the Text group, click TextBox. Drag to draw a text box on the slide.Enter and select the text. On the Home tab, in the Font group, do the following:In the Font list, select Corbel.In the FontSize box, enter 50.Click the arrow next to FontColor, and then under ThemeColors click White, Background 1 (first row, first option from the left).Click Bold.With the text still selected, on the Home tab, in the Paragraph group, click Center.Select the second text box. On the Home tab, in the Drawing group, click Arrange, point to Align, and then do the following:Click Align to Slide.Click AlignCenter.Click AlignMiddle.To reproduce the background effects on this slide, do the following:Right-click the slide background area, and then click Format Background. In the Format Background dialog box, click Fill in the left pane, select Gradient fill in the Fill pane, and then do the following:In the Type list, select Radial.Click the button next to Direction, and then click From Center (third option from the left). Under Gradient stops, click Add or Remove until two stops appear in the drop-down list.Also under Gradient stops, customize the gradient stops that you added as follows:Select Stop 1 from the list, and then do the following:In the Stop position box, enter 0%.Click the button next to Color, and then under ThemeColors select Blue, Accent 1, Darker 25% (fifth row, fifth option from the left). Select Stop 2 from the list, and then do the following: In the Stop position box, enter 100%.Click the button next to Color, and then under ThemeColors select Black, Text 1 (first row, second option from the left). To reproduce the animation effects on this slide, do the following:On the Animations tab, in the Animations group, click CustomAnimation. On the slide, select the first text box. In the CustomAnimation task pane, do the following:Click AddEffect, point to Entrance, and then click MoreEffects. In the AddEntrance Effect dialog box, under Basic, click Fly In.Select the animation effect (fly-in effect for the first text box). Click the arrow to the right of the selected effect, and then click EffectOptions. In the Fly In dialog box, do the following:On the Effect tab, do the following:In the Direction list, select FromLeft.In the Animatetext list, select ByLetter.In the % delay between letters box, enter 10.On the Timing tab, do the following:In the Start list, select WithPrevious.In the Speed list, select 0.5 seconds (Very Fast).On the slide, select the first text box. In the CustomAnimation task pane, do the following:Click AddEffect, point to Exit, and then click MoreEffects. In the Add Exit Effect dialog box, under Subtle, click Fade. Select the second animation effect (fade effect for the first text box). Click the arrow to the right of the selected effect, and then click EffectOptions. In the Fade dialog box, do the following:On the Effect tab, do the following:In the Animatetext list, select ByLetter.In the % delay between letters box, enter 10.On the Timing tab, do the following:In the Start list, select WithPrevious.In the Delay box, enter 1.5.In the Speed list, select 0.5 seconds (Very Fast).On the slide, select the second text box. In the CustomAnimation task pane, do the following.Click AddEffect, point to Entrance, and then click MoreEffects. In the AddEntranceEffect dialog box, under Subtle, click Fade.Select the third animation effect (fade effect for the second text box). Click the arrow to the right of the selected effect, and then click EffectOptions. In the Fade dialog box, do the following:On the Effect tab, do the following:In the Animatetext list, select ByLetter.In the % delay between letters box, enter 6.On the Timing tab, do the following:In the Start list, select WithPrevious.In the Delay box,enter 2.In the Speed list, select 0.5 seconds (Very Fast).
  4. Shaded text boxes with arrows(Intermediate)To reproduce the top shape with text effects on this slide, do the following:On the Home tab, in the Slides group, click Layout, and then click Blank.On the Home tab, in the Drawing group, click Shapes, and then under Rectangles, click Rounded Rectangle (second option from the left). On the slide, drag to draw a rounded rectangle.Select the rectangle. Under DrawingTools, on the Format tab, in the Size group, do the following:In the Shape Height box, enter .52”.In the Shape Width box, enter 3.75”.Drag the yellow diamond adjustment handle (at the top left of the rectangle) to the right to increase the amount of rounding at the corners of the rectangle. Select the rectangle. On the Home tab, in the bottom right corner of the Drawing group, click the Format Shape dialog box launcher. In the Format Shape dialog box, click Fill in the left pane, select Gradient fill in the Fill pane, and then do the following:In the Type list, select Linear. Click the button next to Direction, and then click Linear Down (first row, second option from the left).Under Gradient stops, click Add or Remove until two stops appear in the drop-down list.Also under Gradient stops, customize the gradient stops that you added as follows:Select Stop 1 from the list, and then do the following:In the Stop position box, enter 0%.Click the button next to Color, and then under Theme Colors click White, Background 1 (first row, first option from the left).Select Stop 2 from the list, and then do the following:In the Stop position box, enter 100%.Click the button next to Color, and then under Theme Colors click White, Background 1, Darker 15% (third row, first option from the left).Also in the Format Shape dialog box, click Line Color in the left pane, select Gradient Line in the Line Color pane, and then do the following:In the Type list, select Linear. Click the button next to Direction, and then click Linear Up (second row, second option from the left). Under Gradient stops, click Add or Remove until two stops appear in the drop-down list.Also under Gradient stops, customize the gradient stops that you added as follows:Select Stop 1 from the list, and then do the following:In the Stop position box, enter 0%.Click the button next to Color, and then under Theme Colors click White, Background 1 (first row, first option from the left).Select Stop 2 from the list, and then do the following:In the Stop position box, enter 100%.Click the button next to Color, and then under Theme Colors click White, Background 1, Darker 25% (fourth row, first option from the left).Also in the Format Shape dialog box, click Line Style in the left pane, and then in the Line Style pane, in the Width box, enter 2 pt. On the Home tab, in the Drawing group, click Shape Effects, and then do the following:Point to Glow, and then under Glow Variations click any option in the first row to set a 5 pt glow. Point to Glow, point to More Glow Colors, and then under Theme Colors click White, Background 1, Darker 25% (fourth row, first option from the left).On the slide, right-click the rounded rectangle, click Edit Text, then enter text. Select the text. On the Home tab, in the Font group, select Franklin Gothic Medium Cond from the Font list, select 24 from the Font Size list, and then click the arrow next to Font Color and under Theme Colors click White, Background 1, Darker 35% (fifth row, first option from the left).On the Home tab, in the Paragraph group, click Align Text Left to align the text left in the text box.Under Drawing Tools, on the Format tab, in the bottom right corner of the WordArt Styles group, click the Format Text Effects dialog box launcher. In the Format Text Effects dialog box, click Text Box in the left pane. In the Text Box pane, under Internal margin, enter 0.6” in the Left box to increase the left margin in the rounded rectangle to accommodate the embossed circle. To reproduce the olive-green circle and arrow for the top shape on this slide, do the following:On the Home tab, in the Drawing group, click Shapes, and then under Basic Shapes click Oval (first row, second option from the left). Press and hold SHIFT to constrain the shape to a circle, and then on the slide, drag to draw a circle. Select the circle. Under DrawingTools, on the Format tab, in the Size group, do the following:In the Shape Height box, enter .4”.In the Shape Width box, enter .4”.On the Home tab, in the bottom right corner of the Drawing group, click the Format Shape dialog box launcher. In the Format Shape dialog box, click Fill in the left pane. In the Fill pane, select Solid Fill, and then click the button next to Color and under Theme Colors click Olive Green, Accent 3, Lighter 60% (third row, seventh option from the left). Also in the Format Shape dialog box, click Line Color in the left pane, and then select No line in the Line Color pane.Also in the Format Shape dialog box, click Shadow in the left pane, and then in the Shadow pane,do the following:Click the button next to Presets, and then under Inner click Inside Diagonal Top Left (first row, first option from the left).In the Transparency box, enter 80%.In the Distance box, enter 2 pt. Drag the circle onto the left side of the rounded rectangle. On the Home tab, in the Drawing group, click Shapes, and then under Block Arrows click Chevron (second row, eighth option from the left). On the slide, drag to draw the chevron on the circle.Select the chevron. Under DrawingTools, on the Format tab, in the Size group, do the following:In the Shape Height box, enter .23”.In the Shape Width box, enter .23”.On the Home tab, in the Drawing group, click Shape Fill, and then click White, Background 1 (first row, first option from the left). On the Home tab, in the Drawing group, click Shape Outline, and then click No Outline. Press and hold SHIFT and select all three shapes. On the Home tab, in the Drawing group, click Arrange, point to Align, and then click Align Middle. To reproduce the other shapes and arrange them on this slide, do the following:Press and hold SHIFT and select all three shapes. On the Home tab, in the Drawing group, click Arrange, and then under Group Objects click Group.On the Home tab, in the Clipboard group, click the arrow under Paste, and then click Duplicate. Repeat the process until there is a total of four groups of shapes.Separate each group of shapes and loosely arrange them on the slide.Press and hold SHIFT and select all four groups of shapes. On the Home tab, in the Drawing group, click Arrange, and then do the following:Point to Align, and then click Align Selected Objects.Point to Align, and click Distribute Vertically.Point to Align, and then click Align Center. Under Group Objects click Group.With the group still selected on the slide, on the Home tab, in the Drawing group, click Arrange, point to Align,and then do the following:Click Align to Slide.Click Align Center.Click Align Middle.To change the color for the duplicate circles (second, third, and fourth from the top), do the following:Press and hold SHIFT and select all four groups of shapes. On the Home tab, in the Drawing group, click Arrange, and click Ungroup. Select the circle that you would like to change.Under Drawing Tools, on the Format tab, in the Shape Styles group, click the arrow next to Shape Fill, and then do the following:For the second circle from the top, under Theme Colors, click Blue, Accent 1, Lighter 60% (third row, fifth option from the left).For the third circle from the top, under Theme Colors, click Purple, Accent 4, Lighter 60% (third row, eighth option from the left).For the fourth circle from the top, under Theme Colors, click Red, Accent 2, Lighter 60% (third row, sixth option from the left).To reproduce the background on this slide, do the following:Right-click the slide background area, and then click Format Background. In the Format Background dialog box, click Fill in the left pane, select Gradient fill in the Fill pane, and then do the following:In the Type list, select Radial.Click the button next to Direction, and then click From Center (third option from the left).Under Gradient stops, click Add or Remove until two stops appear in the drop-down list.Also under Gradient stops, customize the gradient stops that you added as follows:Select Stop 1 from the list, and then do the following:In the Stop position box, enter 0%.Click the button next to Color, and then under Theme Colors click White, Background 1, Darker 15% (third row, first option from the left).Select Stop 2 from the list, and then do the following:In the Stop position box, enter 80%.Click the button next to Color, and then under Theme Colors click White, Background 1 (first row, first option from the left).
  5. Custom animation effects: fly-in and shrink lines, stretch rectangles(Intermediate)To reproduce the first vertical line on this slide, do the following:On the Home tab, in the Slides group, click Layout, and then click Blank.On the Home tab, in the Drawing group, click Shapes, and then under Lines click Line. On the slide, press and hold SHIFT, and then drag to draw a straight, vertical line.Under Drawing Tools, on the Format tab, in the Size group, in the Shape Width box, enter 4.5”.On the Home tab, in the bottom right corner of the Drawing group, click the Format Shape dialog box launcher. In the Format Shape dialog box, click Line Color in the left pane, select Gradient fill in the Line Color pane, and then do the following:In the Type list, select Linear.Click the button next to Direction, and then click Linear Right (first row, fourth option from the left).In the Angle box, enter 0°.Under Gradient stops, click Add or Remove until three stops appear in the drop-down list.Also under Gradient stops, customize the gradient stops that you added as follows:Select Stop 1 from the list, and then do the following:In the Stop position box, enter 0%.Click the button next to Color, select More Colors, and then in the Colors dialog box, on the Custom tab, enter values for Red: 148, Green: 172, and Blue: 208.In the Transparency box, enter 100%.Select Stop 2 from the list, and then do the following: In the Stop position box, enter 50%.Click the button next to Color, select More Colors, and then in the Colors dialog box, on the Custom tab, enter values for Red: 148, Green: 172, and Blue: 208.In the Transparency box, enter 0%.Select Stop 3 from the list, and then do the following:In the Stop position box, enter 99%.Click the button next to Color, select More Colors, and then in the Colors dialog box, on the Custom tab, enter values for Red: 148, Green: 172, and Blue: 208.In the Transparency box, enter 100%.Also in the Format Shape dialog box, click Line Style in the left pane. In the Line Style pane, in the Width box, enter 6 pt.To reproduce the first rectangle on this slide, do the following:On the Home tab, in the Drawing group, click Shapes, and then under Rectangles click Rectangle (first option from the left). On the slide, drag to draw a rectangle.Select the rectangle. Under DrawingTools, on the Format tab, in the Size group, do the following:In the ShapeHeight box, enter 2”.In the ShapeWidth box, enter 2”.Under Drawing Tools, on the Format tab, in the bottom right corner of the ShapeStyles group, click the FormatShape dialog box launcher. In the FormatShape dialog box, click Fill in the left pane, select Gradient fill in the Fill pane, and then do the following:In the Type list, select Linear.Click the button next to Direction, and then click Linear Up (second row, second option from the left).In the Angle box, enter 270°.Under Gradient stops, click Add or Remove until three stops appear in the drop-down list.Also under Gradient stops, customize the gradient stops that you added as follows:Select Stop 1 from the list, and then do the following:In the Stop position box, enter 0%.Click the button next to Color, click More Colors, and then in the Colors dialog box, on the Custom tab, enter values for Red: 44, Green: 93, and Blue: 152.In the Transparency box, enter 0%.Select Stop 2 from the list, and then do the following: In the Stop position box, enter 80%.Click the button next to Color, click More Colors, and then in the Colors dialog box, on the Custom tab, enter values for Red: 60, Green: 123, Blue: 199.In the Transparency box, enter 0%.Select Stop 3 from the list, and then do the following:In the Stop position box, enter 100%.Click the button next to Color, click More Colors, and then in the Colors dialog box, on the Custom tab, enter values for Red: 58, Green: 124, Blue: 203.In the Transparency box, enter 0%.Also in the Format Shape dialog box, click Line Color in the left pane. In the Line Color pane, select No line. Also in the Format Shape dialog box, click 3-D Format in the left pane, and in the 3-D Format pane, do the following:Under Bevel, click the button next to Top, and then under Bevel click Circle (first row, first option from the left). Next to Top, in the Width box, enter 5 pt, and in the Height box, enter 2 pt.Under Surface, in the Angle box, enter 20°.On the slide, right-click the rectangle and then click Edit Text.Enter text in the text box and select the text. On the Home tab, in the Font group, do the following:In the Font list, select Calibri.In the Font Size list, select 32.Click the button next to Font Color, and then under Theme Colors click White, Background 1 (first row, first option from the left).On the slide, press and hold CTRL, and then select the line and the rectangle.On the Home tab, in the Drawing group, click Arrange, point to Align, and then do the following:Click Align Selected Objects.Click Align Left.With the line and rectangle still selected, drag them to the left side of the slide. To reproduce the animation effects for the first vertical line and rectangle on this slide, do the following:On the Animations tab, in the Animations group, click CustomAnimation. On the slide, select the line. In the CustomAnimation task pane, do the following:Click AddEffect, point to Entrance, and then click MoreEffects. In the AddEntranceEffect dialog box, under Basic, click FlyIn.Select the first animation effect (fly-in effect for the line), and then under Modify: Fly In,do the following:In the Start list, select WithPrevious.In the Direction list, select FromTop.In the Speed list, select Fast.On the slide, select the line. In the CustomAnimation task pane, do the following:Click AddEffect, point to Emphasis, and then click MoreEffects. In the AddEmphasisEffect dialog box, under Basic, click Grow/Shrink.Select the second animation effect (grow/shrink effect for the line). Click the arrow to the right of the effect, and then click Effect Options. In the Grow/Shrink dialog box, do the following:On the Effect tab, do the following:In the Size list, select Tiny. Also in the Size list, select Vertical.On the Timing tab, do the following:In the Start list, select WithPrevious.In the Delay box, enter 0.5.In the Speed list, select 1 seconds (Fast).On the slide, select the rectangle. In the CustomAnimation task pane, do the following:Click AddEffect, point to Entrance, and then click MoreEffects. In the AddEntranceEffect dialog box, under Moderate, click Stretch.Select the third animation effect (stretch effect for the rectangle), and then under Modify: Stretch,do the following:In the Start list, select AfterPrevious.In the Direction list, select FromLeft.In the Speed list, select Fast.To reproduce the other shapes with animation effects on this slide, do the following:On the slide, press and hold CTRL, and then select the rectangle and the line. On the Home tab, in the Clipboard group, click the arrow under Paste, and then click Duplicate. On the slide, drag the second line and rectangle to the center of the slide. With the second line and rectangle still selected, on the Home tab, in the Clipboard group, click the arrow under Paste, and then click Duplicate. On the slide, drag the third line and rectangle to the right side of the slide. On the slide, press CTRL+A to select all the objects. On the Home tab, in the Drawing group, click Arrange, point to Align, and then do the following:Click Align to Slide.Click Align Middle. Click the text in each of the duplicate rectangles, and then edit the text.On the slide, select the second (middle) line. On the Home tab, in the bottom right corner of the Drawing group, click the Format Shape dialog box launcher. In the Format Shape dialog box, click Line Color in the left pane, select Gradient fill in the Line Color pane, and then do the following:In the Type list, select Linear.Click the button next to Direction, and then click Linear Right (first row, fourth option from the left).In the Angle box, enter 0°.Under Gradient stops, click Add or Remove until three stops appear in the drop-down list.Also under Gradient stops, customize the gradient stops that you added as follows:Select Stop 1 from the list, and then do the following:In the Stop position box, enter 0%.Click the button next to Color, select More Colors, and then in the Colors dialog box, on the Custom tab, enter values for Red: 154, Green: 181, Blue: 228.In the Transparency box, enter 100%.Select Stop 2 from the list, and then do the following: In the Stop position box, enter 50%.Click the button next to Color, and then under Theme Colors click White, Background 1, Darker 25% (fourth row, first option from the left).In the Transparency box, enter 0%.Select Stop 3 from the list, and then do the following:In the Stop position box, enter 99%.Click the button next to Color, and then under Theme Colors click White, Background 1, Darker 25% (fourth row, first option from the left).In the Transparency box, enter 100%.On the slide, select the second (middle) rectangle. On the Home tab, in the bottom right corner of the Drawing group, click the Format Shape dialog box launcher. In the Format Shape dialog box, click Fill in the left pane, select Gradient fill in the Fill pane, and then do the following:In the Type list, select Linear.Click the button next to Direction, and then click Linear Up (second row, second option from the left).In the Angle box, enter 270°.Under Gradient stops, click Add or Remove until three stops appear in the drop-down list.Also under Gradient stops, customize the gradient stops that you added as follows:Select Stop 1 from the list, and then do the following:In the Stop position box, enter 0%.Click the button next to Color, click More Colors, and then in the Colors dialog box, on the Custom tab, enter values for Red: 118, Green: 149, Blue: 53.Select Stop 2 from the list, and then do the following: In the Stop position box, enter 80%.Click the button next to Color, click More Colors, and then in the Colors dialog box, on the Custom tab, enter values for Red: 115, Green: 195, Blue: 72.Select Stop 3 from the list, and then do the following:In the Stop position box, enter 100%.Click the button next to Color, click More Colors, and then in the Colors dialog box, on the Custom tab, enter values for Red: 156, Green: 199, Blue: 70.On the slide, select the third (right) line. On the Home tab, in the bottom right corner of the Drawing group, click the Format Shape dialog box launcher. In the Format Shape dialog box, click Line Color in the left pane, select Gradient fill in the Line Color pane, and then do the following:In the Type list, select Linear.Click the button next to Direction, and then click Linear Right (first row, fourth option from the left).In the Angle box, enter 0°.Under Gradient stops, click Add or Remove until three stops appear in the drop-down list.Also under Gradient stops, customize the gradient stops that you added as follows:Select Stop 1 from the list, and then do the following:In the Stop position box, enter 0%.Click the button next to Color, and then under Theme Colors click Aqua, Accent 5, Lighter 40% (fourth row, ninth option from the left).In the Transparency box, enter 100%.Select Stop 2 from the list, and then do the following: In the Stop position box, enter 50%.Click the button next to Color, and then under Theme Colors click Aqua, Accent 5, Lighter 40% (fourth row, ninth option from the left).In the Transparency box, enter 0%.Select Stop 3 from the list, and then do the following:In the Stop position box, enter 99%.Click the button next to Color, and then under Theme Colors click Aqua, Accent 5, Lighter 40% (fourth row, ninth option from the left).In the Transparency box, enter 100%.On the slide, select the third (right) rectangle. On the Home tab, in the bottom right corner of the Drawing group, click the Format Shape dialog box launcher. In the Format Shape dialog box, click Fill in the left pane, select Gradient fill in the Fill pane, and then do the following:In the Type list, select Linear.Click the button next to Direction, and then click Linear Up (second row, second option from the left).In the Angle box, enter 270°.Under Gradient stops, click Add or Remove until three stops appear in the drop-down list.Also under Gradient stops, customize the gradient stops that you added as follows:Select Stop 1 from the list, and then do the following:In the Stop position box, enter 0%.Click the button next to Color, select More Colors, and then in the Colors dialog box, on the Custom tab, enter values for Red: 39, Green: 135, Blue: 160.Select Stop 2 from the list, and then do the following: In the Stop position box, enter 80%.Click the button next to Color, select More Colors, and then in the Colors dialog box, on the Custom tab, enter values for Red: 54, Green: 177, Blue: 210.Select Stop 3 from the list, and then do the following:In the Stop position box, enter 100%.Click the button next to Color, select More Colors, and then in the Colors dialog box, on the Custom tab, enter values for Red: 52, Green: 179, Blue: 214.To reproduce the background effects on this slide, do the following:Right-click the slide background area, and then click Format Background. In the Format Background dialog box, click Fill in the left pane, select Gradient fill in the Fill pane, and then do the following:In the Type list, select Radial.Click the button next to Direction, and then click From Center (third option from the left).Under Gradient stops, click Add or Remove until three stops appear in the drop-down list.Also under Gradient stops, customize the gradient stops that you added as follows:Select Stop 1 from the list, and then do the following:In the Stop position box, enter 33%.Click the button next to Color, and then under Theme Colors click White, Background 1 (first row, first option from the left).Select Stop 2 from the list, and then do the following: In the Stop position box, enter 67%.Click the button next to Color, select More Colors, and then in the Colors dialog box, on the Custom tab, enter values for Red: 228, Green: 233, Blue: 236.Select Stop 3 from the list, and then do the following: In the Stop position box, enter 100%.Click the button next to Color, select More Colors, and then in the Colors dialog box, on the Custom tab, enter values for Red: 178, Green: 186, Blue: 210.
  6. Custom animation effects: dotted line with text fade by letter(Basic)To reproduce the text effects on this slide, do the following:On the Home tab, in the Slides group, click Layout, and then click Blank.On the Insert tab, in the Text group, click Text Box, and then on the slide, drag to draw a text box that spans the entire width of the slide.On the Insert tab, in the Text group, click Symbol. In the Symbol dialog box, do the following:In the Font list, select (normal text).In the Subset list, select General Punctuation.In the Character Code box, enter 2022 to select BULLET, and then click Insert.Click Insert 33 more times until there is a row of 34 bullets in the text box. In the text box, select the text, and then on the Home tab, in the Font group do the following:In the Font list, select ArialBlack.In the FontSize list, select 44.Click the arrow next to FontColor, and then under ThemeColors click White, Background 1 (first row, first option from the left).On the Home tab, in the Drawing group, click Arrange, point to Align, and then do the following:Click Align to Slide.Click AlignCenter.Click AlignMiddle.On the Insert tab, in the Text group, click TextBox. Drag to draw a text box on the slide.Enter and select the text. On the Home tab, in the Font group, do the following:In the Font list, select Corbel.In the FontSize box, enter 50.Click the arrow next to FontColor, and then under ThemeColors click White, Background 1 (first row, first option from the left).Click Bold.With the text still selected, on the Home tab, in the Paragraph group, click Center.Select the second text box. On the Home tab, in the Drawing group, click Arrange, point to Align, and then do the following:Click Align to Slide.Click AlignCenter.Click AlignMiddle.To reproduce the background effects on this slide, do the following:Right-click the slide background area, and then click Format Background. In the Format Background dialog box, click Fill in the left pane, select Gradient fill in the Fill pane, and then do the following:In the Type list, select Radial.Click the button next to Direction, and then click From Center (third option from the left). Under Gradient stops, click Add or Remove until two stops appear in the drop-down list.Also under Gradient stops, customize the gradient stops that you added as follows:Select Stop 1 from the list, and then do the following:In the Stop position box, enter 0%.Click the button next to Color, and then under ThemeColors select Blue, Accent 1, Darker 25% (fifth row, fifth option from the left). Select Stop 2 from the list, and then do the following: In the Stop position box, enter 100%.Click the button next to Color, and then under ThemeColors select Black, Text 1 (first row, second option from the left). To reproduce the animation effects on this slide, do the following:On the Animations tab, in the Animations group, click CustomAnimation. On the slide, select the first text box. In the CustomAnimation task pane, do the following:Click AddEffect, point to Entrance, and then click MoreEffects. In the AddEntrance Effect dialog box, under Basic, click Fly In.Select the animation effect (fly-in effect for the first text box). Click the arrow to the right of the selected effect, and then click EffectOptions. In the Fly In dialog box, do the following:On the Effect tab, do the following:In the Direction list, select FromLeft.In the Animatetext list, select ByLetter.In the % delay between letters box, enter 10.On the Timing tab, do the following:In the Start list, select WithPrevious.In the Speed list, select 0.5 seconds (Very Fast).On the slide, select the first text box. In the CustomAnimation task pane, do the following:Click AddEffect, point to Exit, and then click MoreEffects. In the Add Exit Effect dialog box, under Subtle, click Fade. Select the second animation effect (fade effect for the first text box). Click the arrow to the right of the selected effect, and then click EffectOptions. In the Fade dialog box, do the following:On the Effect tab, do the following:In the Animatetext list, select ByLetter.In the % delay between letters box, enter 10.On the Timing tab, do the following:In the Start list, select WithPrevious.In the Delay box, enter 1.5.In the Speed list, select 0.5 seconds (Very Fast).On the slide, select the second text box. In the CustomAnimation task pane, do the following.Click AddEffect, point to Entrance, and then click MoreEffects. In the AddEntranceEffect dialog box, under Subtle, click Fade.Select the third animation effect (fade effect for the second text box). Click the arrow to the right of the selected effect, and then click EffectOptions. In the Fade dialog box, do the following:On the Effect tab, do the following:In the Animatetext list, select ByLetter.In the % delay between letters box, enter 6.On the Timing tab, do the following:In the Start list, select WithPrevious.In the Delay box,enter 2.In the Speed list, select 0.5 seconds (Very Fast).