
Recommended
More Related Content
What's hot
Similar to Guide to wordpress by Oli
Similar to Guide to wordpress by Oli (20)
Recently uploaded
Recently uploaded (20)
Guide to wordpress by Oli
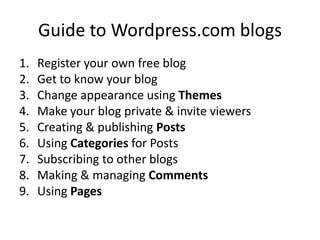
- 1. Guide to Wordpress.com blogs 1. Register your own free blog 2. Get to know your blog 3. Change appearance using Themes 4. Make your blog private & invite viewers 5. Creating & publishing Posts 6. Using Categories for Posts 7. Subscribing to other blogs 8. Making & managing Comments 9. Using Pages
- 2. Register your own free blog
- 3. Go to www.wordpress.com and click on ‘Get started here’
- 4. Enter your details and click ‘Create Blog’ Use .wordpress.com It is free of charge. Use your @uwe.ac.uk email address.
- 5. Check your email to complete registration Click ‘Activate Blog’ in the activation email you receive from wordpress.com. You can fill your profile details in now (name, interests etc.) or any time after you have activated your blog by clicking the name of your blog in the top right corner.
- 6. Click on the ‘My Blogs’ tab
- 7. Click on the name of your new blog
- 8. Your new blog Don’t worry if it doesn’t look exactly like this. The appearance may be different because your blog has a different ‘theme’. You can change the appearance of your blog to suit your own preferences later. This guide will show you how to do it. The address of your blog is: www.thenameofyourblog.wordpress.com So in this example it is: www.adummyname.wordpress.com
- 9. Get to know your blog
- 10. Finding your way around • You don’t need to know what every feature or button does to get going! • The part of your blog that others can see is often called the ‘front end’. • The ‘Dashboard’ is where you create and edit content (text, images, links etc.) and manage settings like Privacy, Subscriptions, Comments and Appearance. • Remember, for advice & help at any time go to: www.learn.wordpress.com
- 11. See what your blog looks like to others To go to the ‘front end’ of the blog click on the name of your blog in the top left corner of the window. You can do this at any time to see what your blog looks like to others.
- 12. Use your ‘Dashboard’ to adjust settings • Click the name of your blog in the top left corner then click Dashboard. • Use the Dashboard to create and edit content and control settings for your blog. • Only you can see your Dashboard. • You can also view it here: www.thenameofyourblog.wordpress.com/wp-admin
- 13. Themes
- 14. Change the appearance of your blog Change the appearance of your blog by selecting a different ‘theme’. Click ‘Appearance’ and ‘Themes’ in the Dashboard menu. Find a theme you like and click ‘Activate’. Go to the front end of your website and refresh the page in your browser to see how it looks.
- 15. Comparison of two ‘themes’ default ‘2010’ theme ‘Beach’ theme • All of the content (text, images, posts, comments etc.) remains safely on your blog. • The ‘look and feel’ (header image, page layout, menus, colours and fonts) will change. • Most themes are free of charge. You can change theme as often as you like.
- 16. Privacy
- 17. Adjust your ‘Privacy’ settings You need to make your blog ‘private’ so that only the people you invite can view your blog. From your Dashboard go to ‘Settings’ then click ‘Privacy’.
- 18. Choose the setting and invite viewers Select ‘I would like my site to be private, visible only to users I choose’ and click ‘Save Changes’. Then click ‘Invite viewers to your blog’.
- 19. Inviting others to view your blog Enter the email addresses (separated by a comma) of people you want to invite. Remember to invite your tutor. You should invite people as viewers so select the ‘Viewer’ role and click ‘Send Invitation’.
- 20. Creating & Publishing Posts
- 21. Create a new blog Post You can create a new blog Post in several different ways. It doesn’t matter which method you choose. They all do the same thing. From the Dashboard From the ‘front end’
- 22. How to write and publish a Post Writing, editing and publishing a Post is straightforward. 1. Write the title of the Post. 2. Write the main content for the Post. 3. Click the ‘Publish’ button. Read the content of this unpublished Post to see how it is done.
- 23. A published Post Remember you can see what your blog Posts look like to others (the ‘front end’) at any time by clicking your blog’s name in the top left corner.
- 24. Categories
- 25. Making ‘Categories’ for Posts Read the content of this unpublished Post for instructions. Categories make it easy to organise your Posts and for others to find your Posts.
- 26. A published Post in a Category This is the published Post. Links to recent Posts and links to Categories are shown on the page. Below the Post you can also see a link for others to ‘Leave a comment’ about your Post.
- 27. Subscribing to other blogs
- 28. Viewing other’s work • If your group members’ blogs are set as ‘private’ they will need to invite you to view their blogs. • Click the ‘Accept Invitation’ link in the invitation email you receive. • You must have a Wordpress.com account to view ‘private’ blogs you are invited to. If you don’t have an account yet, create one.
- 29. Subscribe to other’s blogs • If you subscribe to your group members’ blogs (or anyone else’s) you will receive an email notification every time they add a new Post • Go to the blog you want to subscribe to and click the ‘+Follow’ button.
- 30. Manage your subscriptions • Go to your Dashboard and click ‘Blogs I Follow’ to see the blogs you are subscribed to. • You can change the frequency of email notification of new Posts from here too.
- 31. Comments
- 32. Commenting Commenting on a Posts can help learning. Comments are ideal for giving and receiving feedback and developing ideas. Read the content of this Post to see how to make a new Comment. Comments often need to be ‘approved’ by a blog’s owner before they are published.
- 33. Managing Comments View all the Comments you have made on other blogs click via 'Comment's I've Made'. To manage (approve, edit, delete etc.) all Comments from others, click 'Comments' in the main menu. You can view and manage recent Comments directly from your Dashboard.
- 34. Pages
- 35. Use Pages for ‘static’ content Click ‘Pages’ on your Dashboard to add or edit Pages. You may want an ‘About Me’, ‘Learning Outcomes’ or ‘Project Outline’ Page. Posts are displayed in reverse chronological order on your blog but Pages are usually used for ‘static’ content that isn’t time specific and is less likely to be updated often.
- 36. Summary This guide has shown you how to: • Get your own free wordpress.com blog • View the public ‘front end’ & the private ‘Dashboard’ • Control privacy settings • Create & publish Posts • Create Categories for Posts • Subscribe to other blogs • Make & manage Comments • Change the Theme • Use Pages