SlideShare a Scribd company logo
1 of 10
Download to read offline
Italian Bamboo Rodmakers Association
Page 20 Bamboo Journal
Wood Reel
Enzo Bardus
My name is Enzo and I am passionate about the fly fishing world and I consider myself lucky to live in Friuli where
there is an abundance of rivers suitable for this type of fishing.
I started fishing when I was 9 (in 1959) and I remember my first reel that was made from materials bought from my
mother’s, a dressmaker, haberdashery shop. The wooden spool for the sewing threads that I needed to wind up the
nylon that my mother used to make necklaces, the dressmaker’s pins that I used to bend and use as hooks to catch
bleaks.
I started approaching fly fishing in 1975 and through the years I have tried to gain knowledge of everything concern-
ing this sport by buying specialised magazines, catalogues, even foreign books.
In 1990 I joined a fly fishing club to exchange ideas and opinions with other fishermen and to offer my experience to
the young members.
I have always preferred bamboo rods and I am fascinated by the fact that such a simple plant can give rise to such
works of art.
In 1995, with the help of some members of the club, I bought the necessary material to build my first bamboo rods
and naming each one. I built various bamboo rods and when I had achieved what I thought was the best result; I de-
cided to try building wooden reels to complete the aesthetic aspect of my rods.
Manufacturing a reel
In the past, this article on building wooden reels
was published in the PIPAM website—Italian Fly
Fishing Portal http://www.pipam.org
We decided to publish it, with the Author's per-
mission - whom we thank - in order to bring once
again this interesting article to the attention of
the rodmakers audience and also because we
were urged by recurrent request from our not
Italians readers.
Italian Bamboo Rodmakers Association
Page 21 Bamboo Journal
Choosing the wood and octagonal pre-forging
There is a multitude of wood to build a reel but it is essential that they be quite hard. The best part is the lower trunk
and precisely the point where the roots are attached to the trunk. In the absence of this, the trunk will do, as long as it
is cut with the right moon: the best is the August full moon which always occurs in September. In this period the
plant slows down the photosynthesis keeping and fixing in time its qualities of hardness and conservation.
The trunk is cut longitudinally in planks 4cm thick, piling them horizontally in a dry airy place with wooden strips in
between to improve the drying process which will last two years. I have built reels with various types of wood, for
example national walnut, oak, cherry, hornbeam, etc. Olive is the one I prefer because of the contrasting grain pat-
terns.
The contrast in the grain of the wood varies from tree to tree and depends strongly on where they grow. I noticed that
a piece of olive wood from Lombardy has a smooth and uniform grain, while the olive wood from Elba Island has a
deformed grain with very contrasting dark light tones. This piece of olive wood was given to me by a friend and had
come from a very old tree, dead and destined to become firewood.
Once the drying process is done, with a circular saw cut the plank giving it a square shape then remove the corners
and create an octagonal shape which facilitates the work at the lathe.
Pin to hold the wood
Before proceeding to the turning of the roughly squared piece of wood without corners we must build a pin at the
lathe to hold it during the working (fig.1).
The measurements of the pin are: total length including
the thread 10cm; diameter of the part that is inserted in
the chuck of the lathe 10mm; diameter of the part that is
fixed between two washers 6mm. At the top of the pin and
precisely near the thread, drill a hole that will serve to
insert the fixed centre of the lathe during the working of
the wood.
First step
The first step is to draw a circumference with a compass on the surface of the wood slightly larger than the finished
size of the reel (the piece of wood prepared for the case of the reel) with a drill press with a 6mm point for wood,
make a hole at the centre of the circumference.
Insert the piece of wood on the pin (fig.1) and fix it well between the two washers. (It is advisable to use the fixed cen-
tre of the lathe to keep the pin more tightly during the working of the wood).
I used the rounded to turn the wood (34-tab.I).
After turning the surface of the circumference to get a cylinder 72mm in diameter, polish it with fine sandpaper and
move on to working the right side of the cylinder getting near the locking washer with the tool; then remove the piece
from the pin and the chuck, turn the jaws of the lathe upside down, (my lathe has a small chuck, so the jaws cannot
grab the piece and I am forced to turn them).
Now the cylinder is not fixed on the pin, but the jaws of the chuck grab and hold the cylinder.
Block the cylinder with the side that is worked already facing the chuck and finish till the other side of the cylinder is
down to the right size (about 35mm), turn the cylinder and finish the part that could not be done because the locking
washer obstructed the tool.
Italian Bamboo Rodmakers Association
Page 22 Bamboo Journal
Incision on the circumference and seat of the
screw of the centre pin
Keeping the cylinder in this position, with the tool (35
-tab.I) engrave the circumference at about 6mm of its
height. This groove (5mm where a copper thread will
be inserted) will help to reinforce the case of the reel
from the empty side (where the reel will be inserted)
This working is optional and depends on the width
and the length of the lights we will engrave on the case
of the reel (weakening it). Keeping the cylinder in this
position with the point (28-tab.I) make the seat of the
pin-blocking screw (8-tab.I) with a depth of 3mm. (eg.
fig.2).
The seat of the screw of the reel cent re pin must have
a diameter slightly larger than the diameter of the
screw, to regulate the centre of the reel with the case
of the reel later.
Peripheral measurements and designing the
holes
Once this working is completed, remove the cylinder
from the chuck and carry out some measurements on
the surface of the circumference.
We must decide how to make the holes of the reel. We
can make two holes at the sides of the reel feet or one
hole perpendicular to the reel foot (round, more or
less oval). See fig.3 for the side ones and fig.4 for the
one perpendicular to the foot -
Measure where the foot of the reel will be inserted, the
size of the side holes or the one opposite the foot, the
two holes to insert the wearing reinforcement due to
the running of the line.
At the height of the foot of the reel make a 1,5mm hole
in the groove for the copper thread. (19-tab.I).
Use of the vertical drill and vice
Using a vertical drill and a good vice to block the cylinder (it is important to
do this type of work with a full cylinder to block the cylinder well in the
vice) drill with a 14mm point (28-tab.I) the lights of the reel.
Keeping the cylinder in the vice lightly cut the circumference with the
18mm point forming a shallow oval groove (it is important to avoid going
deep thus not jeopardising the hold of the foot with the reel). See fig.5.
At the centre of the oval drill a 2,5mm hole for the screw (18-tab.I) to fix
the foot.
Italian Bamboo Rodmakers Association
Page 23 Bamboo Journal
Anti abrasion line guide
Using the vertical drill, make two holes with a 2,5mm
point for wood; they must not go through the cylinder
and they are drilled at about 3mm from the circumfer-
ence. If the cylinder is 35mm high, the hole will be
33,5mm deep.
The two holes are drilled after the holes of the reel and
they will be drilled in such a way that they will be half
in the wood and half out, to expose the metal of the
wearing reinforcement.
In these two holes we will insert two pieces of ano-
dised aluminium (22-tab.I), 30mm long, glued and
each covered with a top of the same type of wood (See
fig.6)
External radial part of the reel
At this point we can safely drill the case of the reel in a radial design like the model in fig.2 if we desire.
Draw the pattern of the holes on a graph paper, carefully glue it on the centre and with a pointy burin press on the
dots where you will drill with a point for wood (it is not necessary to drill the cylinder from side to side.
Slight conical edging of the external face of the reel
The cylinder is blocked on the chuck and the face to edge with a slight conical shape (7 degree angle) is the side with
the seat for the pin blocking screw (8-tab.I).
With the tool engrave this face carefully to not more than 25mm.
The sharp corner that remains on the circumference will be rounded with a file and sandpaper to give the external
face of the reel case a smooth and rounded shape.
Working the inside of the cylinder
Invert the position of the cylinder on the jaws of the lathe chuck and with the tool (32-tab.I); remove the material
from inside the cylinder.
Start engraving at the centre of the cylinder and proceed with the tool to a depth of 28mm.
In this way you almost reach the circumference, leaving an edge of 5mm.
The empty part of the cylinder now measures 28mm in depth and 67mm in diameter.
Internal oil well for the foot screw
Remove the reel case and block in the vice and with a vertical drill with a point for wood (26-tab.I), the same diame-
ter as the head of the screw (18-tab.I) from the internal part of the reel case make a 1mm seat measured from the
head of the screw. This operation is essential as it prevents the reel; once it is inserted in the reel case, to hit against
this screw.
Fixing the copper thread in the groove
Take a 0.8mm copper thread slightly longer than the circumference of the reel case: insert both ends in the hole and
twisting them it adheres perfectly to the groove. Solder the external part of the reel and cut of the excess inside it; if
there are smears finish with a file and sandpaper. (See fig.7).
Italian Bamboo Rodmakers Association
Page 24 Bamboo Journal
For the moment the working on the reel case are fin-
ished and we will continue later.
Preparing the reel
Follow the same process as the reel case till you reach
the desired diameter of the cylinder, 6mm with a
height of 32mm (inserting the reel in the reel case it
must protrude 5mm).
Radial design on the cylinder of the reel
The drilling procedure on the cylinder of the reel is
the same as the one on the reel case; the drilling can
be done from side to side or only on the external part
of the cylinder.
When drilling be careful when executing the holes
near the circumference, one must be smaller than the
others (2,5mm) to put the knob (see fig.8). It is im-
portant to position the knob observing the grain that
from the centre moves flows outwards (less probabil-
ity of breakage).
Rounding the external face of the reel
Put the frame and reel on the pin that was used for the case and fix it between the two washers, (turn the jaws of the
lathe chuck) block the pin insert the fixed centre, keep the same angle of the turret (7 degrees like the reel cask),
penetrate the tool 25mm removing only 1mm of material from the reel case. With a file and sandpaper take away the
sharp corner of the reel case and round it; the same on the opposite side.
Flaring of the reel case hole
With the vertical drill and a 14mm point for wood flare to a depth of 1,5mm the hole for the knob.
With this operation the knob will be parallel to the axis of the reel. See fig.8......
Italian Bamboo Rodmakers Association
Page 25 Bamboo Journal
Flaring of the central hole of the reel cylinder
Take the cylinder of the reel from the pin, turn the
jaws, block the cylinder in the jaws and with an 8mm
point drill a hole from side to side. (In this bigger hole,
we will insert the bronze bearing that has an internal
diameter of 6mm and an external diameter of 8mm).
With the tool (31-tab.I) work the external face of the
cylinder for the seat of the female press stud (45-tab.I)
and for the finishing cap to cover the stud.
The depth is 5mm and the diameter 14mm. (See fig.9).
Holes for the seats on the reel cylinder with the
dead centre chuck jaw of the lathe
Turn the reel cylinder on the chuck jaw and on its in-
ternal face, make the following seats:
1) for the seal (6-tab.I) with a 9mm point for wood and
a depth of 3mm
2) for the seat of the washer (9-tab.I) with a 14mm
point (n° 28) and a depth of 0,5mm. (See fig.10).
Modify the central hole of the reel
With the dead centre of the lathe insert an 8mm point for wood and drill the cylinder from side to side.
Preparation at the lathe for the internal bronze bearing
Turn the jaws of the lathe, block the brass bearing (13-tab.I) with a protrusion from the jaws of 40mm. With the tool
bring the external circumference of the bearing to 8mm and with the 6mm dead centre drill the bearing.
With the cutting tool (33-tab.I), cut the future bronze bearing to measure 20mm with a protrusion from the jaws of
40mm.
Italian Bamboo Rodmakers Association
Page 26 Bamboo Journal
Preparation of the reel
Take the pin (fig.1), block it in the chuck jaw of the
lathe, insert the reel on the pin with the bronze bear-
ing inside it (temporarily for the centring) and block it
between the two washers; match the pin to the dead
centre of the lathe and with the tool (34-tab.I) remove
the material between the two faces of the cylinder by
penetrating delicately and leaving 2,5mm for both
sides of the reel and an internal diameter of the reel
(where the backing will be) of 18mm. See fig.11.
Inserting the bronze bearing, the rubber seal of the button, the washer and the finishing top
Insert the rubber seal inside the reel (6-tab.I) and fix it with a few drops of super glue, fix the washer to the rubber
seal, (9-tab.I).
On the opposite side insert the bronze bearing with glue; insert the female part of the press stud (4-tab.I), glue the
finishing top and polish the external surface of the reel
Pin of the brass knob, washer and wooden knob
The brass pin of the knob is created from the threaded bar (14-tab.I) worked on the lathe.
The working on the lathe is carried out by fixing the piece on the chuck, leaving 30mm for the working; bring the di-
ameter of the pin to size for its entire length to 7mm, another passage with the tool will bring the diameter of the pin
to 6mm with the dead centre, thread it (the size of the threading must match the size of the screw (17-tab.I).
Once the threading has been done, with the cutting tool (33-tab.I) cut the pin of the knob on the 7mm diameter leav-
ing a margin of 0,5mm from the 6mm diameter, thus forming a small top (which will block the knob).
On the same brass pin with the 7mm diameter we will get the “holding” washer (16-tab.I), which will be placed be-
tween the pin of the knob and the hole on the external face of the reel. The size of the washer is: 7mm diameter,
0,3mm length and 3,5mm hole.
The wooden knob is obtained on the lathe and its internal diameter will be slightly larger than the pin to have less
fiction. The size is: diameter 7,5mm, 14,8mm length and internal hole 6,2mm.
Adapting the pin to the reel
Take the male press stud (obtained from the piece 11-
tab.I), or weld the male stud (5-tab.I) on the piece (11-
tab.I) eliminating the edge of the stud with a file
bringing it to size (11-tab.I). Insert it by screwing it on
the opposite side to where the screw will be inserted
(8-tab.I); insert the reel until the stud snaps.
On the opposite side insert the screwdriver screwing
or unscrewing the male stud to regulate the matching
of the reel with the head of the pin. Once it is regu-
lated fix the male stud with super glue to the pin of the
reel.
Italian Bamboo Rodmakers Association
Page 27 Bamboo Journal
Centring the reel and fixing the pin to the reel case
Remove the reel from the pin, place the pin in the reel case and with the screw ((8-tab.I that was previously reduced
in thickness) fix the pin in the reel case. Insert the reel on the pin until it snaps and centre the reel with the reel case.
Once this operation has been carried out, block the screw with super glue (8-tab.I).
Foot of the reel case
It is obtained from a piece of brass, modelled with a jagged saw (23-tab.I) and using various files (29-tab.I), to a
length of 62mm and width 13mm. At the centre drill a hole with a 1,5mm point threaded the same way as the screw
(18-tab.I) (external diameter 20mm internal diameter 17mm).
Duration
Once all the workings, finishing, polishing and external smoothing have been carried out, soak the reel case with a
waterproof product (I use a very fluid liquid that is used in building construction as an isolator in cement). When the
product has penetrated and is dry, use liquid wax to polish it. On the pin of the reel, I use grease.
Before fishing it is important to spray a water repellent product (I use the one for cloche); after fishing, I suggest you
remove the line from the reel and dry it with kitchen paper. It can then be rewound but it is better to remove the reel
from the reel case to eliminate any humidity faster.
In time the reel will change tone and go dark; this does not affect its qualities in any way.
The OR seal that also causes friction, in time will loosen: replace it.
Italian Bamboo Rodmakers Association
Page 28 Bamboo Journal
LEGEND FOR TAB.I
It is important to have a small lathe for metal and a vertical drill.
1) Two pieces of wood, one for the case and another one that can be smaller for the reel.
2)
Scrap wood that is used for the small knob of the reel and to cover the screws on the case and the holes of the reel
press studs (4-tab.I).
3)
(Mishap) to highlight the position of the rubber seal inside the reel, this rubber serves as a seal for the internal
grease, to prevent the penetration of water and as fiction of the reel case.
4)
Female press stud that is placed in the appropriate seat that was made with the tool 8 (32-tab 9).I on the external
part of the reel “where there are the radial holes and the knob ".
5)
Male stud (this stud is used as a sample to copy and reconstruct on the pin at the lathe (11-tab.I). This stud (male
and female) blocks the reel with the reel case with a simple snap.
6) Rubber seal.
7)
It is the pin where the reel will turn. This brass stud has an internal threading to half its length; the pin needs to
be threaded for its entire length “from side to side” the internal thread is the same as the piece of threaded bar (11
-tab.I) that is brought to a final size of 15mm. On the opposite side the male stud is engraved with a cut on the
head with a saw (23-tab.I). This threaded piece “that takes an alley key shape” is inserted on the pin 87-tab.I and
regulated the matching of the reel to the pin when it is snapped shut. Once the regulation is finished, it is fixed
with a drop of super glue.
8) This screw fixes the pin (7-tab.I) to the reel case.
9)
Brass washer that is glued on the seal (3-tab.I). Its seat must be made by engraving the reel with a point (type 28-
tab.) with the same external diameter of the washer or with the tool 31-tab.I.
10)
Piece of brass tube that is modelled with a saw (23-tab.I) and various files (29-tab.I) that will become the foot of
the reel case (size length 62mm by 13mm). At the centre of it make a hole with a 1,5mm point and thread it like
the screw (18-tab.I). (Size: external diameter 20mm, internal diameter 17mm).
11) Piece of threaded brass bar (that is brought to a length of 6mm).
12) Piece of larger threaded brass bar to make the pin of the knob and relative washer (16-tab.I).
13)
Brass rod to make the internal bronze bearing of the reel. The bronze bearing is placed between the rubber seal (6
-tab.I) and the stud (4-tab.I).
14) Piece of threaded bar to make the washer (9-tab.I).
15) Pin of the finished knob with an internal thread the same as the screw (17-tab.I)
16) Washer of the knob that is matched between the pin and the reel of the reel case.
Italian Bamboo Rodmakers Association
Page 29 Bamboo Journal
17)
Fixing screw of the knob with the reel. The small hole that can be seen (3-tab.I) facilitates the insertion of the
screwdriver to fix the screw to the knob that is inside the reel.
18) Screw to fix the foot of the reel to the case.
19)
Brass thread to reinforce the external part of the reel case (a 1,5mm hole is made near the foot at the centre
groove to insert the two ends of the brass thread and after tensioning it well it is fixed with a drop of tin.
20) e
21)
Fine and very fine sandpaper to smoothen the external parts of the reel case.
22) A 2,5mm knitting needle as reinforcement for the line guide. (optional)
23) Saw.
24) 2,5 point for wood to drill the reel for the knob, the foot of the reel case and to reinforce the line guide (22-tab.I)
25) e
26)
Points for wood to drill and form the radial holes on the reel. These holes must be drilled before forming the reel
(emptying the reel, seat of the line).
27)
18mm point for wood to make the seat of the foot (it must not be very deep) and it is made before emptying the
internal part of the case to have more grip. This working is carried out with a vertical drill brushing with the
point the surface of the circumference from the opposite side of the two line guides.
28)
15mm point to drill the holes on the circumference of the reel case, this operation too is done with a solid wood
cylinder. You can choose the size of the holes without exaggerating to risk weakening the reel case.
29) File for the various finishing touches and to eliminate the trimmings of brass and wood.
I wish you success

More Related Content

What's hot

4 classic roubo-style-workbench
4 classic roubo-style-workbench4 classic roubo-style-workbench
4 classic roubo-style-workbenchYadeaHerman
 
Easy small wood projects
Easy small wood projectsEasy small wood projects
Easy small wood projectsheatherbarnard5
 
Silencer patent-drawings
Silencer patent-drawingsSilencer patent-drawings
Silencer patent-drawingsToz Koparan
 
Wood working or Wood work shop
Wood working or Wood work shopWood working or Wood work shop
Wood working or Wood work shopMona Khan
 
Manufacturing Practice (MP) Training Project
Manufacturing Practice (MP) Training ProjectManufacturing Practice (MP) Training Project
Manufacturing Practice (MP) Training ProjectDushmanta Nath
 
Joineries and construction
Joineries and constructionJoineries and construction
Joineries and constructionAmeeshi Goenka
 
Presentation on knife sharpening
Presentation on knife sharpeningPresentation on knife sharpening
Presentation on knife sharpeningRupam Das
 
Carpentry (Workshop Technology) Tools and Joints (engineering)
Carpentry (Workshop Technology) Tools and Joints (engineering)Carpentry (Workshop Technology) Tools and Joints (engineering)
Carpentry (Workshop Technology) Tools and Joints (engineering)ArunMK17
 
Workshop Practice manual 2016
 Workshop Practice manual 2016  Workshop Practice manual 2016
Workshop Practice manual 2016 Joseph Konnully
 
Paint your guitar wallhanger
Paint your guitar wallhangerPaint your guitar wallhanger
Paint your guitar wallhangerSaulo Gomes
 
Mechanical Technology Grade 12 Chapter 4 Tools
Mechanical Technology Grade 12 Chapter 4 ToolsMechanical Technology Grade 12 Chapter 4 Tools
Mechanical Technology Grade 12 Chapter 4 ToolsFuture Managers
 
Workshop Techanology, fitting shop
Workshop Techanology, fitting shopWorkshop Techanology, fitting shop
Workshop Techanology, fitting shopYasir Hashmi
 

What's hot (20)

Carpentry9333
Carpentry9333Carpentry9333
Carpentry9333
 
4 classic roubo-style-workbench
4 classic roubo-style-workbench4 classic roubo-style-workbench
4 classic roubo-style-workbench
 
Easy small wood projects
Easy small wood projectsEasy small wood projects
Easy small wood projects
 
Silencer patent-drawings
Silencer patent-drawingsSilencer patent-drawings
Silencer patent-drawings
 
Break down bow
Break down bowBreak down bow
Break down bow
 
Wood working or Wood work shop
Wood working or Wood work shopWood working or Wood work shop
Wood working or Wood work shop
 
Workshop practice i
Workshop practice iWorkshop practice i
Workshop practice i
 
Manufacturing Practice (MP) Training Project
Manufacturing Practice (MP) Training ProjectManufacturing Practice (MP) Training Project
Manufacturing Practice (MP) Training Project
 
Joineries and construction
Joineries and constructionJoineries and construction
Joineries and construction
 
Joinery and process
Joinery and processJoinery and process
Joinery and process
 
Presentation on knife sharpening
Presentation on knife sharpeningPresentation on knife sharpening
Presentation on knife sharpening
 
Carpentry (Workshop Technology) Tools and Joints (engineering)
Carpentry (Workshop Technology) Tools and Joints (engineering)Carpentry (Workshop Technology) Tools and Joints (engineering)
Carpentry (Workshop Technology) Tools and Joints (engineering)
 
Workshop Practice manual 2016
 Workshop Practice manual 2016  Workshop Practice manual 2016
Workshop Practice manual 2016
 
Paint your guitar wallhanger
Paint your guitar wallhangerPaint your guitar wallhanger
Paint your guitar wallhanger
 
Types ofHammers
Types ofHammersTypes ofHammers
Types ofHammers
 
Mechanical Technology Grade 12 Chapter 4 Tools
Mechanical Technology Grade 12 Chapter 4 ToolsMechanical Technology Grade 12 Chapter 4 Tools
Mechanical Technology Grade 12 Chapter 4 Tools
 
Workshop Techanology, fitting shop
Workshop Techanology, fitting shopWorkshop Techanology, fitting shop
Workshop Techanology, fitting shop
 
Art on0508
Art on0508Art on0508
Art on0508
 
How to Make Pearl Snap FastenerJewelry
How to Make Pearl Snap FastenerJewelryHow to Make Pearl Snap FastenerJewelry
How to Make Pearl Snap FastenerJewelry
 
Joints..
Joints..Joints..
Joints..
 

Similar to Wood reel - bamboo journal 6 - italian bamboo rodmakers association

Similar to Wood reel - bamboo journal 6 - italian bamboo rodmakers association (20)

Make a Castanets - Movil
Make a Castanets - MovilMake a Castanets - Movil
Make a Castanets - Movil
 
소형베틀도면
소형베틀도면소형베틀도면
소형베틀도면
 
Construção de Violões
Construção de ViolõesConstrução de Violões
Construção de Violões
 
Build-It: Charcoal press
Build-It: Charcoal pressBuild-It: Charcoal press
Build-It: Charcoal press
 
Wheelchair wheel dryer tutorial
Wheelchair wheel dryer tutorialWheelchair wheel dryer tutorial
Wheelchair wheel dryer tutorial
 
Build-It: Hand-held foam cutter
Build-It: Hand-held foam cutterBuild-It: Hand-held foam cutter
Build-It: Hand-held foam cutter
 
Cadeira de jardin
Cadeira de jardinCadeira de jardin
Cadeira de jardin
 
Simple storage box
Simple storage boxSimple storage box
Simple storage box
 
Measuring device
Measuring deviceMeasuring device
Measuring device
 
Can stirling engine
Can stirling engineCan stirling engine
Can stirling engine
 
Wooden Bench With Storage.
Wooden Bench With Storage.Wooden Bench With Storage.
Wooden Bench With Storage.
 
Building a mobile chipper
Building a mobile chipperBuilding a mobile chipper
Building a mobile chipper
 
Build-It: Bicycle Hacksaw
Build-It: Bicycle HacksawBuild-It: Bicycle Hacksaw
Build-It: Bicycle Hacksaw
 
How To Make OHLG
How To Make OHLGHow To Make OHLG
How To Make OHLG
 
Woods Presentation
Woods PresentationWoods Presentation
Woods Presentation
 
Fashion designer knitting (under graduate)
Fashion designer knitting  (under graduate) Fashion designer knitting  (under graduate)
Fashion designer knitting (under graduate)
 
Philip Luty Expedient Homemade Ammo Handgun Firearms Reloading
Philip Luty Expedient Homemade Ammo Handgun Firearms ReloadingPhilip Luty Expedient Homemade Ammo Handgun Firearms Reloading
Philip Luty Expedient Homemade Ammo Handgun Firearms Reloading
 
Sewing machine needle a to z
Sewing machine needle a to zSewing machine needle a to z
Sewing machine needle a to z
 
접이식 자가제작 베틀제작 도면
접이식 자가제작 베틀제작 도면접이식 자가제작 베틀제작 도면
접이식 자가제작 베틀제작 도면
 
Building a cornhole set
Building a cornhole setBuilding a cornhole set
Building a cornhole set
 

More from Anibal Ruben Reyes

Del dicho al hecho claudio arazi
Del dicho al hecho   claudio araziDel dicho al hecho   claudio arazi
Del dicho al hecho claudio araziAnibal Ruben Reyes
 
Diccionario Enciclopédico de LA CAÑA VIAJERA
Diccionario Enciclopédico de LA CAÑA VIAJERADiccionario Enciclopédico de LA CAÑA VIAJERA
Diccionario Enciclopédico de LA CAÑA VIAJERAAnibal Ruben Reyes
 
Construcción de varas de caña dividida de sección poligonal.
Construcción de varas de caña dividida de sección poligonal.Construcción de varas de caña dividida de sección poligonal.
Construcción de varas de caña dividida de sección poligonal.Anibal Ruben Reyes
 
Horeshair fly lines_power_fibers_issue_36
Horeshair fly lines_power_fibers_issue_36Horeshair fly lines_power_fibers_issue_36
Horeshair fly lines_power_fibers_issue_36Anibal Ruben Reyes
 
Coloring bamboo strips compressed
Coloring bamboo strips compressedColoring bamboo strips compressed
Coloring bamboo strips compressedAnibal Ruben Reyes
 
Ten tipstocustomizeyourreelkit
Ten tipstocustomizeyourreelkitTen tipstocustomizeyourreelkit
Ten tipstocustomizeyourreelkitAnibal Ruben Reyes
 
Its reely pretty easy power fibers-issue_37
Its reely pretty easy   power fibers-issue_37Its reely pretty easy   power fibers-issue_37
Its reely pretty easy power fibers-issue_37Anibal Ruben Reyes
 
Fly lines how to make them overview
Fly lines   how to make them overviewFly lines   how to make them overview
Fly lines how to make them overviewAnibal Ruben Reyes
 
Como empezar a pescar con mosca tomo 1: la pesca
Como empezar a pescar con mosca   tomo 1: la pescaComo empezar a pescar con mosca   tomo 1: la pesca
Como empezar a pescar con mosca tomo 1: la pescaAnibal Ruben Reyes
 
The fly tying bible por Peter Gathercole
The fly tying bible por Peter GathercoleThe fly tying bible por Peter Gathercole
The fly tying bible por Peter GathercoleAnibal Ruben Reyes
 
LINEAS CASERAS PARA LA PESCA CON MOSCA - SINGLE HAND SPEY CASERAS
LINEAS CASERAS PARA LA PESCA CON MOSCA - SINGLE HAND SPEY CASERASLINEAS CASERAS PARA LA PESCA CON MOSCA - SINGLE HAND SPEY CASERAS
LINEAS CASERAS PARA LA PESCA CON MOSCA - SINGLE HAND SPEY CASERASAnibal Ruben Reyes
 
LINEAS CASERAS PARA LA PESCA CON MOSCA - SINGLE HAND SKAGIT CASERAS
LINEAS CASERAS PARA LA PESCA CON MOSCA - SINGLE HAND SKAGIT CASERASLINEAS CASERAS PARA LA PESCA CON MOSCA - SINGLE HAND SKAGIT CASERAS
LINEAS CASERAS PARA LA PESCA CON MOSCA - SINGLE HAND SKAGIT CASERASAnibal Ruben Reyes
 
Manual de construcción de viviendas en madera
Manual de construcción de viviendas en maderaManual de construcción de viviendas en madera
Manual de construcción de viviendas en maderaAnibal Ruben Reyes
 
Tearfund paso a paso - construccion de estanques de tierra y cria de peces
Tearfund   paso a paso - construccion de estanques de tierra y cria de pecesTearfund   paso a paso - construccion de estanques de tierra y cria de peces
Tearfund paso a paso - construccion de estanques de tierra y cria de pecesAnibal Ruben Reyes
 
Cord grips and handles (Empuñaduras encordadas)
Cord grips and handles (Empuñaduras encordadas)Cord grips and handles (Empuñaduras encordadas)
Cord grips and handles (Empuñaduras encordadas)Anibal Ruben Reyes
 

More from Anibal Ruben Reyes (20)

Del dicho al hecho claudio arazi
Del dicho al hecho   claudio araziDel dicho al hecho   claudio arazi
Del dicho al hecho claudio arazi
 
Diccionario Enciclopédico de LA CAÑA VIAJERA
Diccionario Enciclopédico de LA CAÑA VIAJERADiccionario Enciclopédico de LA CAÑA VIAJERA
Diccionario Enciclopédico de LA CAÑA VIAJERA
 
Construcción de varas de caña dividida de sección poligonal.
Construcción de varas de caña dividida de sección poligonal.Construcción de varas de caña dividida de sección poligonal.
Construcción de varas de caña dividida de sección poligonal.
 
Varas de bambu laminadas
Varas de bambu laminadas Varas de bambu laminadas
Varas de bambu laminadas
 
Horeshair fly lines_power_fibers_issue_36
Horeshair fly lines_power_fibers_issue_36Horeshair fly lines_power_fibers_issue_36
Horeshair fly lines_power_fibers_issue_36
 
Coloring bamboo strips compressed
Coloring bamboo strips compressedColoring bamboo strips compressed
Coloring bamboo strips compressed
 
Bamboo rods marcelo calviello
Bamboo rods   marcelo calvielloBamboo rods   marcelo calviello
Bamboo rods marcelo calviello
 
Ten tipstocustomizeyourreelkit
Ten tipstocustomizeyourreelkitTen tipstocustomizeyourreelkit
Ten tipstocustomizeyourreelkit
 
Its reely pretty easy power fibers-issue_37
Its reely pretty easy   power fibers-issue_37Its reely pretty easy   power fibers-issue_37
Its reely pretty easy power fibers-issue_37
 
Fly lines how to make them overview
Fly lines   how to make them overviewFly lines   how to make them overview
Fly lines how to make them overview
 
Como empezar a pescar con mosca tomo 1: la pesca
Como empezar a pescar con mosca   tomo 1: la pescaComo empezar a pescar con mosca   tomo 1: la pesca
Como empezar a pescar con mosca tomo 1: la pesca
 
The fly tying bible por Peter Gathercole
The fly tying bible por Peter GathercoleThe fly tying bible por Peter Gathercole
The fly tying bible por Peter Gathercole
 
LINEAS CASERAS PARA LA PESCA CON MOSCA - SINGLE HAND SPEY CASERAS
LINEAS CASERAS PARA LA PESCA CON MOSCA - SINGLE HAND SPEY CASERASLINEAS CASERAS PARA LA PESCA CON MOSCA - SINGLE HAND SPEY CASERAS
LINEAS CASERAS PARA LA PESCA CON MOSCA - SINGLE HAND SPEY CASERAS
 
LINEAS CASERAS PARA LA PESCA CON MOSCA - SINGLE HAND SKAGIT CASERAS
LINEAS CASERAS PARA LA PESCA CON MOSCA - SINGLE HAND SKAGIT CASERASLINEAS CASERAS PARA LA PESCA CON MOSCA - SINGLE HAND SKAGIT CASERAS
LINEAS CASERAS PARA LA PESCA CON MOSCA - SINGLE HAND SKAGIT CASERAS
 
Manual de construcción de viviendas en madera
Manual de construcción de viviendas en maderaManual de construcción de viviendas en madera
Manual de construcción de viviendas en madera
 
Tearfund paso a paso - construccion de estanques de tierra y cria de peces
Tearfund   paso a paso - construccion de estanques de tierra y cria de pecesTearfund   paso a paso - construccion de estanques de tierra y cria de peces
Tearfund paso a paso - construccion de estanques de tierra y cria de peces
 
Bamboo under the_microscope
Bamboo under the_microscopeBamboo under the_microscope
Bamboo under the_microscope
 
Bamboo in the_laboratory
Bamboo in the_laboratoryBamboo in the_laboratory
Bamboo in the_laboratory
 
Cord grips and handles (Empuñaduras encordadas)
Cord grips and handles (Empuñaduras encordadas)Cord grips and handles (Empuñaduras encordadas)
Cord grips and handles (Empuñaduras encordadas)
 
Basic box make
Basic box makeBasic box make
Basic box make
 

Recently uploaded

在线办理ohio毕业证俄亥俄大学毕业证成绩单留信学历认证
在线办理ohio毕业证俄亥俄大学毕业证成绩单留信学历认证在线办理ohio毕业证俄亥俄大学毕业证成绩单留信学历认证
在线办理ohio毕业证俄亥俄大学毕业证成绩单留信学历认证nhjeo1gg
 
Call Girls Aslali 7397865700 Ridhima Hire Me Full Night
Call Girls Aslali 7397865700 Ridhima Hire Me Full NightCall Girls Aslali 7397865700 Ridhima Hire Me Full Night
Call Girls Aslali 7397865700 Ridhima Hire Me Full Nightssuser7cb4ff
 
8377877756 Full Enjoy @24/7 Call Girls in Nirman Vihar Delhi NCR
8377877756 Full Enjoy @24/7 Call Girls in Nirman Vihar Delhi NCR8377877756 Full Enjoy @24/7 Call Girls in Nirman Vihar Delhi NCR
8377877756 Full Enjoy @24/7 Call Girls in Nirman Vihar Delhi NCRdollysharma2066
 
Introduction-to-Canva-and-Graphic-Design-Basics.pptx
Introduction-to-Canva-and-Graphic-Design-Basics.pptxIntroduction-to-Canva-and-Graphic-Design-Basics.pptx
Introduction-to-Canva-and-Graphic-Design-Basics.pptxnewslab143
 
Passbook project document_april_21__.pdf
Passbook project document_april_21__.pdfPassbook project document_april_21__.pdf
Passbook project document_april_21__.pdfvaibhavkanaujia
 
办理学位证(SFU证书)西蒙菲莎大学毕业证成绩单原版一比一
办理学位证(SFU证书)西蒙菲莎大学毕业证成绩单原版一比一办理学位证(SFU证书)西蒙菲莎大学毕业证成绩单原版一比一
办理学位证(SFU证书)西蒙菲莎大学毕业证成绩单原版一比一F dds
 
shot list for my tv series two steps back
shot list for my tv series two steps backshot list for my tv series two steps back
shot list for my tv series two steps back17lcow074
 
Call Us ✡️97111⇛47426⇛Call In girls Vasant Vihar༒(Delhi)
Call Us ✡️97111⇛47426⇛Call In girls Vasant Vihar༒(Delhi)Call Us ✡️97111⇛47426⇛Call In girls Vasant Vihar༒(Delhi)
Call Us ✡️97111⇛47426⇛Call In girls Vasant Vihar༒(Delhi)jennyeacort
 
3D Printing And Designing Final Report.pdf
3D Printing And Designing Final Report.pdf3D Printing And Designing Final Report.pdf
3D Printing And Designing Final Report.pdfSwaraliBorhade
 
Revit Understanding Reference Planes and Reference lines in Revit for Family ...
Revit Understanding Reference Planes and Reference lines in Revit for Family ...Revit Understanding Reference Planes and Reference lines in Revit for Family ...
Revit Understanding Reference Planes and Reference lines in Revit for Family ...Narsimha murthy
 
VIP Call Girls Service Mehdipatnam Hyderabad Call +91-8250192130
VIP Call Girls Service Mehdipatnam Hyderabad Call +91-8250192130VIP Call Girls Service Mehdipatnam Hyderabad Call +91-8250192130
VIP Call Girls Service Mehdipatnam Hyderabad Call +91-8250192130Suhani Kapoor
 
Call In girls Bhikaji Cama Place 🔝 ⇛8377877756 FULL Enjoy Delhi NCR
Call In girls Bhikaji Cama Place 🔝 ⇛8377877756 FULL Enjoy Delhi NCRCall In girls Bhikaji Cama Place 🔝 ⇛8377877756 FULL Enjoy Delhi NCR
Call In girls Bhikaji Cama Place 🔝 ⇛8377877756 FULL Enjoy Delhi NCRdollysharma2066
 
ARt app | UX Case Study
ARt app | UX Case StudyARt app | UX Case Study
ARt app | UX Case StudySophia Viganò
 
办理(USYD毕业证书)澳洲悉尼大学毕业证成绩单原版一比一
办理(USYD毕业证书)澳洲悉尼大学毕业证成绩单原版一比一办理(USYD毕业证书)澳洲悉尼大学毕业证成绩单原版一比一
办理(USYD毕业证书)澳洲悉尼大学毕业证成绩单原版一比一diploma 1
 
Call Girls Satellite 7397865700 Ridhima Hire Me Full Night
Call Girls Satellite 7397865700 Ridhima Hire Me Full NightCall Girls Satellite 7397865700 Ridhima Hire Me Full Night
Call Girls Satellite 7397865700 Ridhima Hire Me Full Nightssuser7cb4ff
 
NATA 2024 SYLLABUS, full syllabus explained in detail
NATA 2024 SYLLABUS, full syllabus explained in detailNATA 2024 SYLLABUS, full syllabus explained in detail
NATA 2024 SYLLABUS, full syllabus explained in detailDesigntroIntroducing
 
(办理学位证)埃迪斯科文大学毕业证成绩单原版一比一
(办理学位证)埃迪斯科文大学毕业证成绩单原版一比一(办理学位证)埃迪斯科文大学毕业证成绩单原版一比一
(办理学位证)埃迪斯科文大学毕业证成绩单原版一比一Fi sss
 
VIP Call Girls Service Bhagyanagar Hyderabad Call +91-8250192130
VIP Call Girls Service Bhagyanagar Hyderabad Call +91-8250192130VIP Call Girls Service Bhagyanagar Hyderabad Call +91-8250192130
VIP Call Girls Service Bhagyanagar Hyderabad Call +91-8250192130Suhani Kapoor
 

Recently uploaded (20)

在线办理ohio毕业证俄亥俄大学毕业证成绩单留信学历认证
在线办理ohio毕业证俄亥俄大学毕业证成绩单留信学历认证在线办理ohio毕业证俄亥俄大学毕业证成绩单留信学历认证
在线办理ohio毕业证俄亥俄大学毕业证成绩单留信学历认证
 
Call Girls Aslali 7397865700 Ridhima Hire Me Full Night
Call Girls Aslali 7397865700 Ridhima Hire Me Full NightCall Girls Aslali 7397865700 Ridhima Hire Me Full Night
Call Girls Aslali 7397865700 Ridhima Hire Me Full Night
 
8377877756 Full Enjoy @24/7 Call Girls in Nirman Vihar Delhi NCR
8377877756 Full Enjoy @24/7 Call Girls in Nirman Vihar Delhi NCR8377877756 Full Enjoy @24/7 Call Girls in Nirman Vihar Delhi NCR
8377877756 Full Enjoy @24/7 Call Girls in Nirman Vihar Delhi NCR
 
Introduction-to-Canva-and-Graphic-Design-Basics.pptx
Introduction-to-Canva-and-Graphic-Design-Basics.pptxIntroduction-to-Canva-and-Graphic-Design-Basics.pptx
Introduction-to-Canva-and-Graphic-Design-Basics.pptx
 
Passbook project document_april_21__.pdf
Passbook project document_april_21__.pdfPassbook project document_april_21__.pdf
Passbook project document_april_21__.pdf
 
办理学位证(SFU证书)西蒙菲莎大学毕业证成绩单原版一比一
办理学位证(SFU证书)西蒙菲莎大学毕业证成绩单原版一比一办理学位证(SFU证书)西蒙菲莎大学毕业证成绩单原版一比一
办理学位证(SFU证书)西蒙菲莎大学毕业证成绩单原版一比一
 
shot list for my tv series two steps back
shot list for my tv series two steps backshot list for my tv series two steps back
shot list for my tv series two steps back
 
Call Us ✡️97111⇛47426⇛Call In girls Vasant Vihar༒(Delhi)
Call Us ✡️97111⇛47426⇛Call In girls Vasant Vihar༒(Delhi)Call Us ✡️97111⇛47426⇛Call In girls Vasant Vihar༒(Delhi)
Call Us ✡️97111⇛47426⇛Call In girls Vasant Vihar༒(Delhi)
 
3D Printing And Designing Final Report.pdf
3D Printing And Designing Final Report.pdf3D Printing And Designing Final Report.pdf
3D Printing And Designing Final Report.pdf
 
Revit Understanding Reference Planes and Reference lines in Revit for Family ...
Revit Understanding Reference Planes and Reference lines in Revit for Family ...Revit Understanding Reference Planes and Reference lines in Revit for Family ...
Revit Understanding Reference Planes and Reference lines in Revit for Family ...
 
VIP Call Girls Service Mehdipatnam Hyderabad Call +91-8250192130
VIP Call Girls Service Mehdipatnam Hyderabad Call +91-8250192130VIP Call Girls Service Mehdipatnam Hyderabad Call +91-8250192130
VIP Call Girls Service Mehdipatnam Hyderabad Call +91-8250192130
 
Call In girls Bhikaji Cama Place 🔝 ⇛8377877756 FULL Enjoy Delhi NCR
Call In girls Bhikaji Cama Place 🔝 ⇛8377877756 FULL Enjoy Delhi NCRCall In girls Bhikaji Cama Place 🔝 ⇛8377877756 FULL Enjoy Delhi NCR
Call In girls Bhikaji Cama Place 🔝 ⇛8377877756 FULL Enjoy Delhi NCR
 
Cheap Rate ➥8448380779 ▻Call Girls In Iffco Chowk Gurgaon
Cheap Rate ➥8448380779 ▻Call Girls In Iffco Chowk GurgaonCheap Rate ➥8448380779 ▻Call Girls In Iffco Chowk Gurgaon
Cheap Rate ➥8448380779 ▻Call Girls In Iffco Chowk Gurgaon
 
ARt app | UX Case Study
ARt app | UX Case StudyARt app | UX Case Study
ARt app | UX Case Study
 
办理(USYD毕业证书)澳洲悉尼大学毕业证成绩单原版一比一
办理(USYD毕业证书)澳洲悉尼大学毕业证成绩单原版一比一办理(USYD毕业证书)澳洲悉尼大学毕业证成绩单原版一比一
办理(USYD毕业证书)澳洲悉尼大学毕业证成绩单原版一比一
 
Call Girls in Pratap Nagar, 9953056974 Escort Service
Call Girls in Pratap Nagar,  9953056974 Escort ServiceCall Girls in Pratap Nagar,  9953056974 Escort Service
Call Girls in Pratap Nagar, 9953056974 Escort Service
 
Call Girls Satellite 7397865700 Ridhima Hire Me Full Night
Call Girls Satellite 7397865700 Ridhima Hire Me Full NightCall Girls Satellite 7397865700 Ridhima Hire Me Full Night
Call Girls Satellite 7397865700 Ridhima Hire Me Full Night
 
NATA 2024 SYLLABUS, full syllabus explained in detail
NATA 2024 SYLLABUS, full syllabus explained in detailNATA 2024 SYLLABUS, full syllabus explained in detail
NATA 2024 SYLLABUS, full syllabus explained in detail
 
(办理学位证)埃迪斯科文大学毕业证成绩单原版一比一
(办理学位证)埃迪斯科文大学毕业证成绩单原版一比一(办理学位证)埃迪斯科文大学毕业证成绩单原版一比一
(办理学位证)埃迪斯科文大学毕业证成绩单原版一比一
 
VIP Call Girls Service Bhagyanagar Hyderabad Call +91-8250192130
VIP Call Girls Service Bhagyanagar Hyderabad Call +91-8250192130VIP Call Girls Service Bhagyanagar Hyderabad Call +91-8250192130
VIP Call Girls Service Bhagyanagar Hyderabad Call +91-8250192130
 

Wood reel - bamboo journal 6 - italian bamboo rodmakers association

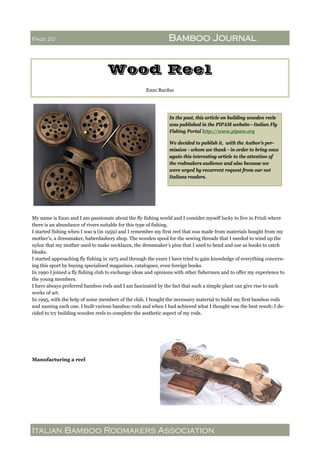
  • 1. Italian Bamboo Rodmakers Association Page 20 Bamboo Journal Wood Reel Enzo Bardus My name is Enzo and I am passionate about the fly fishing world and I consider myself lucky to live in Friuli where there is an abundance of rivers suitable for this type of fishing. I started fishing when I was 9 (in 1959) and I remember my first reel that was made from materials bought from my mother’s, a dressmaker, haberdashery shop. The wooden spool for the sewing threads that I needed to wind up the nylon that my mother used to make necklaces, the dressmaker’s pins that I used to bend and use as hooks to catch bleaks. I started approaching fly fishing in 1975 and through the years I have tried to gain knowledge of everything concern- ing this sport by buying specialised magazines, catalogues, even foreign books. In 1990 I joined a fly fishing club to exchange ideas and opinions with other fishermen and to offer my experience to the young members. I have always preferred bamboo rods and I am fascinated by the fact that such a simple plant can give rise to such works of art. In 1995, with the help of some members of the club, I bought the necessary material to build my first bamboo rods and naming each one. I built various bamboo rods and when I had achieved what I thought was the best result; I de- cided to try building wooden reels to complete the aesthetic aspect of my rods. Manufacturing a reel In the past, this article on building wooden reels was published in the PIPAM website—Italian Fly Fishing Portal http://www.pipam.org We decided to publish it, with the Author's per- mission - whom we thank - in order to bring once again this interesting article to the attention of the rodmakers audience and also because we were urged by recurrent request from our not Italians readers.
  • 2. Italian Bamboo Rodmakers Association Page 21 Bamboo Journal Choosing the wood and octagonal pre-forging There is a multitude of wood to build a reel but it is essential that they be quite hard. The best part is the lower trunk and precisely the point where the roots are attached to the trunk. In the absence of this, the trunk will do, as long as it is cut with the right moon: the best is the August full moon which always occurs in September. In this period the plant slows down the photosynthesis keeping and fixing in time its qualities of hardness and conservation. The trunk is cut longitudinally in planks 4cm thick, piling them horizontally in a dry airy place with wooden strips in between to improve the drying process which will last two years. I have built reels with various types of wood, for example national walnut, oak, cherry, hornbeam, etc. Olive is the one I prefer because of the contrasting grain pat- terns. The contrast in the grain of the wood varies from tree to tree and depends strongly on where they grow. I noticed that a piece of olive wood from Lombardy has a smooth and uniform grain, while the olive wood from Elba Island has a deformed grain with very contrasting dark light tones. This piece of olive wood was given to me by a friend and had come from a very old tree, dead and destined to become firewood. Once the drying process is done, with a circular saw cut the plank giving it a square shape then remove the corners and create an octagonal shape which facilitates the work at the lathe. Pin to hold the wood Before proceeding to the turning of the roughly squared piece of wood without corners we must build a pin at the lathe to hold it during the working (fig.1). The measurements of the pin are: total length including the thread 10cm; diameter of the part that is inserted in the chuck of the lathe 10mm; diameter of the part that is fixed between two washers 6mm. At the top of the pin and precisely near the thread, drill a hole that will serve to insert the fixed centre of the lathe during the working of the wood. First step The first step is to draw a circumference with a compass on the surface of the wood slightly larger than the finished size of the reel (the piece of wood prepared for the case of the reel) with a drill press with a 6mm point for wood, make a hole at the centre of the circumference. Insert the piece of wood on the pin (fig.1) and fix it well between the two washers. (It is advisable to use the fixed cen- tre of the lathe to keep the pin more tightly during the working of the wood). I used the rounded to turn the wood (34-tab.I). After turning the surface of the circumference to get a cylinder 72mm in diameter, polish it with fine sandpaper and move on to working the right side of the cylinder getting near the locking washer with the tool; then remove the piece from the pin and the chuck, turn the jaws of the lathe upside down, (my lathe has a small chuck, so the jaws cannot grab the piece and I am forced to turn them). Now the cylinder is not fixed on the pin, but the jaws of the chuck grab and hold the cylinder. Block the cylinder with the side that is worked already facing the chuck and finish till the other side of the cylinder is down to the right size (about 35mm), turn the cylinder and finish the part that could not be done because the locking washer obstructed the tool.
  • 3. Italian Bamboo Rodmakers Association Page 22 Bamboo Journal Incision on the circumference and seat of the screw of the centre pin Keeping the cylinder in this position, with the tool (35 -tab.I) engrave the circumference at about 6mm of its height. This groove (5mm where a copper thread will be inserted) will help to reinforce the case of the reel from the empty side (where the reel will be inserted) This working is optional and depends on the width and the length of the lights we will engrave on the case of the reel (weakening it). Keeping the cylinder in this position with the point (28-tab.I) make the seat of the pin-blocking screw (8-tab.I) with a depth of 3mm. (eg. fig.2). The seat of the screw of the reel cent re pin must have a diameter slightly larger than the diameter of the screw, to regulate the centre of the reel with the case of the reel later. Peripheral measurements and designing the holes Once this working is completed, remove the cylinder from the chuck and carry out some measurements on the surface of the circumference. We must decide how to make the holes of the reel. We can make two holes at the sides of the reel feet or one hole perpendicular to the reel foot (round, more or less oval). See fig.3 for the side ones and fig.4 for the one perpendicular to the foot - Measure where the foot of the reel will be inserted, the size of the side holes or the one opposite the foot, the two holes to insert the wearing reinforcement due to the running of the line. At the height of the foot of the reel make a 1,5mm hole in the groove for the copper thread. (19-tab.I). Use of the vertical drill and vice Using a vertical drill and a good vice to block the cylinder (it is important to do this type of work with a full cylinder to block the cylinder well in the vice) drill with a 14mm point (28-tab.I) the lights of the reel. Keeping the cylinder in the vice lightly cut the circumference with the 18mm point forming a shallow oval groove (it is important to avoid going deep thus not jeopardising the hold of the foot with the reel). See fig.5. At the centre of the oval drill a 2,5mm hole for the screw (18-tab.I) to fix the foot.
  • 4. Italian Bamboo Rodmakers Association Page 23 Bamboo Journal Anti abrasion line guide Using the vertical drill, make two holes with a 2,5mm point for wood; they must not go through the cylinder and they are drilled at about 3mm from the circumfer- ence. If the cylinder is 35mm high, the hole will be 33,5mm deep. The two holes are drilled after the holes of the reel and they will be drilled in such a way that they will be half in the wood and half out, to expose the metal of the wearing reinforcement. In these two holes we will insert two pieces of ano- dised aluminium (22-tab.I), 30mm long, glued and each covered with a top of the same type of wood (See fig.6) External radial part of the reel At this point we can safely drill the case of the reel in a radial design like the model in fig.2 if we desire. Draw the pattern of the holes on a graph paper, carefully glue it on the centre and with a pointy burin press on the dots where you will drill with a point for wood (it is not necessary to drill the cylinder from side to side. Slight conical edging of the external face of the reel The cylinder is blocked on the chuck and the face to edge with a slight conical shape (7 degree angle) is the side with the seat for the pin blocking screw (8-tab.I). With the tool engrave this face carefully to not more than 25mm. The sharp corner that remains on the circumference will be rounded with a file and sandpaper to give the external face of the reel case a smooth and rounded shape. Working the inside of the cylinder Invert the position of the cylinder on the jaws of the lathe chuck and with the tool (32-tab.I); remove the material from inside the cylinder. Start engraving at the centre of the cylinder and proceed with the tool to a depth of 28mm. In this way you almost reach the circumference, leaving an edge of 5mm. The empty part of the cylinder now measures 28mm in depth and 67mm in diameter. Internal oil well for the foot screw Remove the reel case and block in the vice and with a vertical drill with a point for wood (26-tab.I), the same diame- ter as the head of the screw (18-tab.I) from the internal part of the reel case make a 1mm seat measured from the head of the screw. This operation is essential as it prevents the reel; once it is inserted in the reel case, to hit against this screw. Fixing the copper thread in the groove Take a 0.8mm copper thread slightly longer than the circumference of the reel case: insert both ends in the hole and twisting them it adheres perfectly to the groove. Solder the external part of the reel and cut of the excess inside it; if there are smears finish with a file and sandpaper. (See fig.7).
  • 5. Italian Bamboo Rodmakers Association Page 24 Bamboo Journal For the moment the working on the reel case are fin- ished and we will continue later. Preparing the reel Follow the same process as the reel case till you reach the desired diameter of the cylinder, 6mm with a height of 32mm (inserting the reel in the reel case it must protrude 5mm). Radial design on the cylinder of the reel The drilling procedure on the cylinder of the reel is the same as the one on the reel case; the drilling can be done from side to side or only on the external part of the cylinder. When drilling be careful when executing the holes near the circumference, one must be smaller than the others (2,5mm) to put the knob (see fig.8). It is im- portant to position the knob observing the grain that from the centre moves flows outwards (less probabil- ity of breakage). Rounding the external face of the reel Put the frame and reel on the pin that was used for the case and fix it between the two washers, (turn the jaws of the lathe chuck) block the pin insert the fixed centre, keep the same angle of the turret (7 degrees like the reel cask), penetrate the tool 25mm removing only 1mm of material from the reel case. With a file and sandpaper take away the sharp corner of the reel case and round it; the same on the opposite side. Flaring of the reel case hole With the vertical drill and a 14mm point for wood flare to a depth of 1,5mm the hole for the knob. With this operation the knob will be parallel to the axis of the reel. See fig.8......
  • 6. Italian Bamboo Rodmakers Association Page 25 Bamboo Journal Flaring of the central hole of the reel cylinder Take the cylinder of the reel from the pin, turn the jaws, block the cylinder in the jaws and with an 8mm point drill a hole from side to side. (In this bigger hole, we will insert the bronze bearing that has an internal diameter of 6mm and an external diameter of 8mm). With the tool (31-tab.I) work the external face of the cylinder for the seat of the female press stud (45-tab.I) and for the finishing cap to cover the stud. The depth is 5mm and the diameter 14mm. (See fig.9). Holes for the seats on the reel cylinder with the dead centre chuck jaw of the lathe Turn the reel cylinder on the chuck jaw and on its in- ternal face, make the following seats: 1) for the seal (6-tab.I) with a 9mm point for wood and a depth of 3mm 2) for the seat of the washer (9-tab.I) with a 14mm point (n° 28) and a depth of 0,5mm. (See fig.10). Modify the central hole of the reel With the dead centre of the lathe insert an 8mm point for wood and drill the cylinder from side to side. Preparation at the lathe for the internal bronze bearing Turn the jaws of the lathe, block the brass bearing (13-tab.I) with a protrusion from the jaws of 40mm. With the tool bring the external circumference of the bearing to 8mm and with the 6mm dead centre drill the bearing. With the cutting tool (33-tab.I), cut the future bronze bearing to measure 20mm with a protrusion from the jaws of 40mm.
  • 7. Italian Bamboo Rodmakers Association Page 26 Bamboo Journal Preparation of the reel Take the pin (fig.1), block it in the chuck jaw of the lathe, insert the reel on the pin with the bronze bear- ing inside it (temporarily for the centring) and block it between the two washers; match the pin to the dead centre of the lathe and with the tool (34-tab.I) remove the material between the two faces of the cylinder by penetrating delicately and leaving 2,5mm for both sides of the reel and an internal diameter of the reel (where the backing will be) of 18mm. See fig.11. Inserting the bronze bearing, the rubber seal of the button, the washer and the finishing top Insert the rubber seal inside the reel (6-tab.I) and fix it with a few drops of super glue, fix the washer to the rubber seal, (9-tab.I). On the opposite side insert the bronze bearing with glue; insert the female part of the press stud (4-tab.I), glue the finishing top and polish the external surface of the reel Pin of the brass knob, washer and wooden knob The brass pin of the knob is created from the threaded bar (14-tab.I) worked on the lathe. The working on the lathe is carried out by fixing the piece on the chuck, leaving 30mm for the working; bring the di- ameter of the pin to size for its entire length to 7mm, another passage with the tool will bring the diameter of the pin to 6mm with the dead centre, thread it (the size of the threading must match the size of the screw (17-tab.I). Once the threading has been done, with the cutting tool (33-tab.I) cut the pin of the knob on the 7mm diameter leav- ing a margin of 0,5mm from the 6mm diameter, thus forming a small top (which will block the knob). On the same brass pin with the 7mm diameter we will get the “holding” washer (16-tab.I), which will be placed be- tween the pin of the knob and the hole on the external face of the reel. The size of the washer is: 7mm diameter, 0,3mm length and 3,5mm hole. The wooden knob is obtained on the lathe and its internal diameter will be slightly larger than the pin to have less fiction. The size is: diameter 7,5mm, 14,8mm length and internal hole 6,2mm. Adapting the pin to the reel Take the male press stud (obtained from the piece 11- tab.I), or weld the male stud (5-tab.I) on the piece (11- tab.I) eliminating the edge of the stud with a file bringing it to size (11-tab.I). Insert it by screwing it on the opposite side to where the screw will be inserted (8-tab.I); insert the reel until the stud snaps. On the opposite side insert the screwdriver screwing or unscrewing the male stud to regulate the matching of the reel with the head of the pin. Once it is regu- lated fix the male stud with super glue to the pin of the reel.
  • 8. Italian Bamboo Rodmakers Association Page 27 Bamboo Journal Centring the reel and fixing the pin to the reel case Remove the reel from the pin, place the pin in the reel case and with the screw ((8-tab.I that was previously reduced in thickness) fix the pin in the reel case. Insert the reel on the pin until it snaps and centre the reel with the reel case. Once this operation has been carried out, block the screw with super glue (8-tab.I). Foot of the reel case It is obtained from a piece of brass, modelled with a jagged saw (23-tab.I) and using various files (29-tab.I), to a length of 62mm and width 13mm. At the centre drill a hole with a 1,5mm point threaded the same way as the screw (18-tab.I) (external diameter 20mm internal diameter 17mm). Duration Once all the workings, finishing, polishing and external smoothing have been carried out, soak the reel case with a waterproof product (I use a very fluid liquid that is used in building construction as an isolator in cement). When the product has penetrated and is dry, use liquid wax to polish it. On the pin of the reel, I use grease. Before fishing it is important to spray a water repellent product (I use the one for cloche); after fishing, I suggest you remove the line from the reel and dry it with kitchen paper. It can then be rewound but it is better to remove the reel from the reel case to eliminate any humidity faster. In time the reel will change tone and go dark; this does not affect its qualities in any way. The OR seal that also causes friction, in time will loosen: replace it.
  • 9. Italian Bamboo Rodmakers Association Page 28 Bamboo Journal LEGEND FOR TAB.I It is important to have a small lathe for metal and a vertical drill. 1) Two pieces of wood, one for the case and another one that can be smaller for the reel. 2) Scrap wood that is used for the small knob of the reel and to cover the screws on the case and the holes of the reel press studs (4-tab.I). 3) (Mishap) to highlight the position of the rubber seal inside the reel, this rubber serves as a seal for the internal grease, to prevent the penetration of water and as fiction of the reel case. 4) Female press stud that is placed in the appropriate seat that was made with the tool 8 (32-tab 9).I on the external part of the reel “where there are the radial holes and the knob ". 5) Male stud (this stud is used as a sample to copy and reconstruct on the pin at the lathe (11-tab.I). This stud (male and female) blocks the reel with the reel case with a simple snap. 6) Rubber seal. 7) It is the pin where the reel will turn. This brass stud has an internal threading to half its length; the pin needs to be threaded for its entire length “from side to side” the internal thread is the same as the piece of threaded bar (11 -tab.I) that is brought to a final size of 15mm. On the opposite side the male stud is engraved with a cut on the head with a saw (23-tab.I). This threaded piece “that takes an alley key shape” is inserted on the pin 87-tab.I and regulated the matching of the reel to the pin when it is snapped shut. Once the regulation is finished, it is fixed with a drop of super glue. 8) This screw fixes the pin (7-tab.I) to the reel case. 9) Brass washer that is glued on the seal (3-tab.I). Its seat must be made by engraving the reel with a point (type 28- tab.) with the same external diameter of the washer or with the tool 31-tab.I. 10) Piece of brass tube that is modelled with a saw (23-tab.I) and various files (29-tab.I) that will become the foot of the reel case (size length 62mm by 13mm). At the centre of it make a hole with a 1,5mm point and thread it like the screw (18-tab.I). (Size: external diameter 20mm, internal diameter 17mm). 11) Piece of threaded brass bar (that is brought to a length of 6mm). 12) Piece of larger threaded brass bar to make the pin of the knob and relative washer (16-tab.I). 13) Brass rod to make the internal bronze bearing of the reel. The bronze bearing is placed between the rubber seal (6 -tab.I) and the stud (4-tab.I). 14) Piece of threaded bar to make the washer (9-tab.I). 15) Pin of the finished knob with an internal thread the same as the screw (17-tab.I) 16) Washer of the knob that is matched between the pin and the reel of the reel case.
  • 10. Italian Bamboo Rodmakers Association Page 29 Bamboo Journal 17) Fixing screw of the knob with the reel. The small hole that can be seen (3-tab.I) facilitates the insertion of the screwdriver to fix the screw to the knob that is inside the reel. 18) Screw to fix the foot of the reel to the case. 19) Brass thread to reinforce the external part of the reel case (a 1,5mm hole is made near the foot at the centre groove to insert the two ends of the brass thread and after tensioning it well it is fixed with a drop of tin. 20) e 21) Fine and very fine sandpaper to smoothen the external parts of the reel case. 22) A 2,5mm knitting needle as reinforcement for the line guide. (optional) 23) Saw. 24) 2,5 point for wood to drill the reel for the knob, the foot of the reel case and to reinforce the line guide (22-tab.I) 25) e 26) Points for wood to drill and form the radial holes on the reel. These holes must be drilled before forming the reel (emptying the reel, seat of the line). 27) 18mm point for wood to make the seat of the foot (it must not be very deep) and it is made before emptying the internal part of the case to have more grip. This working is carried out with a vertical drill brushing with the point the surface of the circumference from the opposite side of the two line guides. 28) 15mm point to drill the holes on the circumference of the reel case, this operation too is done with a solid wood cylinder. You can choose the size of the holes without exaggerating to risk weakening the reel case. 29) File for the various finishing touches and to eliminate the trimmings of brass and wood. I wish you success