SlideShare a Scribd company logo
1 of 21
Download to read offline
The Classic Roubo Style Workbench
I've had a Roubo-style workbench at the top of my
wish-list for quite a while after reading through
Christopher Schwarz's Workbenches: From Design &
Theory to Construction & Use. And, as luck would
have it, three years ago I helped a friend mill several
large trees that they had taken down and, in return,
he was nice enough to give me a bunch of really nice,
thick lumber to use for a workbench. So while that
finishes drying, I thought I'd build a bench from
common construction-grade lumber and experiment
with some design and construction ideas that I've
come across over the years.
Design and Build a Woodworking Workbench: Page 1
Intermediate Level Project
Step 1: Materials
For this bench I used 2x8 and 2x10 construction-grade lumber and a piece of 3/4" MDF for the shelf. The upside to
using construction-grade lumber is the price. The southern yellow pine boards for this bench cost right around
$100 here in North Carolina. Unfortunately, the downside to using this type of lumber is the quality. I spent quite a
while sorting through lumber at two different stores to find the boards needed for this project.
I tried to find the straightest boards without knots on either the outside edges or down the middle since they'll all be
ripped in half. A few small knots on the top are fine and can easily be filled with epoxy or Super Glue, but it's best
to avoid anything large that looks like it might break off.
For the top and stretchers, I decided to use 2x8 boards which saves a little money and still results in a plenty-thick
top at 3-1/4" thick and stretchers that were 3-3/4" thick. For the legs, I switched to 2x10s and ended up with legs
that were a little over 4" wide.
Lumber (Southern Yellow Pine or Similar)
Top: (9) 2" x 8" x 8'
Stretchers: (1) 2" x 8" x 10' and (1) 2" x 8" x 8'
Legs: (2) 2" x 10" x 10'
Other Materials
Titebond III Wood Glue
Design and Build a Woodworking Workbench: Page 2
Step 2: Tools Used
To speed up the process of surfacing the construction grade lumber, I used a jointer and planer. You could
purchase pre-surfaced boards to skip this step at additional cost, skip-plane the boards using only a planer, or
even hand-plane the boards if you like a good workout.
A table-saw is very handy for ripping the boards to final width, though a circular saw with an edge guide could also
be used. The sliding miter saw could also be replaced with a circular saw or hand saw. The main goal is to end up
with boards that have a consistent thickness and that the thickness of the outer two boards of the top match the
thickness of the corresponding boards in the leg and long stretcher so that the laminated joints match.
Hitachi 12" Compound Sliding Miter Saw (C12RSH) (Latest version: C12RSH2)
Dewalt Heavy Duty Miter Saw Stand (DWX723)
Grizzly 8" Jointer (G0586) on Mobile Base
Ridgid 13" 3-Blade Thickness Planer (R4330) (Latest version: R4331)
Grizzly 17" Bandsaw (G0513P)
Grizzly G0691 Table Saw
Craftsman 17" Drill Press (22901) on Mobile Base
Drill Press Table
Bosch 5" Random Orbit Sander (ROS20VSC)
Skil 6 Amp Scrolling Jigsaw (4690-01)
Rockler 16-Piece Forstner Drill Bit Set
Ridgid 18V Power Tools 5-Piece Combo Kit
Rubber Roller for Spreading Glue
Design and Build a Woodworking Workbench: Page 3
Step 3: Preparing Boards for the Top
I started with the top and split it into three sections.
Trying to glue more than six long boards at a time can
be stressful, and I had dreams of running the sections
back through the jointer and planer.
I started with the middle section first by cutting the
board to rough length at the miter saw, leaving three
to four inches extra for planer snipe and for spacers.
Then I joined one face and edge at the jointer and ran
them through the planer to get a final thickness of 1-
1/4".
Next, I ripped the boards into two pieces by running
the jointed and then newly cut edges against the
fence at the table saw. I also went ahead and cut off
two spacer pieces to use later when laminating the
leg tenons.
Design and Build a Woodworking Workbench: Page 4
Step 4: Gluing the Top Sections
Since these boards like to warp after they're surfaced,
I also made a few clamping cauls from some scraps.
These will be used to remove any crook in the boards
during glue-up by clamping them across the top and
bottom edges of the boards.
Then it was time to add some glue! For this project I
used Titebond III glue which costs a bit more but has
a longer open time which reduces some of the glue-
up stress. This project and the vises should take
around 2/3 of a gallon, so I definitely recommend
buying a gallon bottle to save some money.
I tried to move quickly and spread the glue using a
hard rubber roller which worked really well. Once the
glue was applied I attached the cauls and then the
rest of the clamps. Then I tried to clean up as much
glue squeeze-out as possible before moving on to the
next two sections.
While the middle section dried, I repeated the same
steps for the front and back sections except for the
top's two outermost boards. These boards will be
laminated later (once spacers are made from the
legs) to create the through-mortise for the legs. The
important thing to remember is that the thickness of
these two boards needs to match the thickness of the
middle and outer leg boards and the long stretcher.
Design and Build a Woodworking Workbench: Page 5
Step 5: Preparing Boards for the Legs and Stretchers
Next, I rough cut a single 10' 2x8 board for the long
stretchers, again leaving enough room for a 4" spacer
to use when laminating the lap-joint in the legs. Note
that the spacer (shown here) should be cut after the
stretchers have been surfaced and ripped to final
width.
I also went ahead and cut the boards for the legs to
rough length at the miter saw also leaving about 4"
extra for the spacer that will be used to create the
mortises in the top. Since the 2x10's that I wanted to
use for the legs were wider than my jointer, I went
ahead and ripped them using my bandsaw. I then
surfaced them at the jointer and planer and ripped
everything to final width at the table saw.
Design and Build a Woodworking Workbench: Page 6
Step 6 : Laminating the Leg's Tenon and Lap Joints
After cleaning up the top edge of the leg boards at the
miter saw, it was time to glue the parts together. Each
leg consists of three boards laminated together. To
create the tenons on the leg, I temporarily clamped
two of the spacer blocks that I cut earlier from the top
to the middle leg board. I tried to make sure that the
spacer blocks were flush with the top of the middle
leg board to ensure a gap-free with the top later.
To remove any any slight warping between the three
leg pieces, I used a pair of parallel clamps to keep the
sides flush.
To avoid having to use a dado blade later, I also cut
the front board of the leg and used the spacer cut
from the long stretcher to create its corresponding lap
joint.
Once everything was in place and clamped down, I
immediately removed all three spacer blocks and
cleaned up any glue squeeze-out.
Finally, I cut all the legs to their final length at the
miter saw and saved the odd shaped cut-offs for use
later as spacers when laminating the mortises in the
top.
Design and Build a Woodworking Workbench: Page 7
Step 7: Filling Small Gaps
I did end up with a very small gap between two of the boards in one leg. To fix this, I made a simple wood filler
from some pine sawdust and glue mixed together. After it dried I sanded it down and while it's not 100% perfect
due to the changes in wood color, you now have to look closely to notice it.
Note that this can be used for any of the laminations should you end up with a small gap in the top.
Step 8: Leg Vise Preparation
Before moving back to the top, I went ahead and drilled a few holes for the linear bearing and leg vise screw at the
drill press. I'll cover this as well as building the chop for the leg vise in more detail in our next Instructable.
Design and Build a Woodworking Workbench: Page 8
Step 9: Preparing Outer Top Pieces
To finish up the top sections, I started by cutting the
left end of each laminated section at the miter saw. I
then cut the boards that make up the row with the
mortise into the pieces. To make sure that the
matching front and back pieces were identical, I made
one final cut at the miter saw trimming each pair of
boards together.
Before gluing these into place, I went ahead and
drilled 3/4" dog holes as deep as I could with my
Forstner bit at the drill press. This made it much
easier to finish drilling the holes later with a regular
spade bit.
Step 10: Laminating the Mortises in the Top
Next, working from left to right, I glued up the three pieces to form the two mortises using the spacer blocks from
the legs. And again, as soon as everything was clamped down I made sure to remove the spacers and clean up
any excess glue.
After the glue dried, I finished up the section by gluing on the outer most board. I then repeated the same steps to
finish the last section.
Design and Build a Woodworking Workbench: Page 9
Step 11: Preparing the Top Sections
I then moved to the floor and started cleaning up the
bottom of each section by sanding any glue squeeze
out before switching to the hand planes to roughly
flatten the sections. I had originally intended to run
each of these sections back through the jointer and
planer, but they were starting to get pretty heavy and
my middle section actually ended up a little wider
than my jointer.
While planing, I tried to focus on the area around the
mortise to try to avoid any gaps once the legs were
added. I also checked periodically to make sure the
sides and bottom remained square. Once I was
happy with the fit between the sections, I took them to
the miter saw and cut them to final length which
ended up being right at 6'6".
Design and Build a Woodworking Workbench: Page 10
Step 12: Gluing the Top Sections
Next, it was finally time to glue up the three section to form the top. I started with the rear and the middle sections
first and once those dried, I glued the front section onto the other two.
Design and Build a Woodworking Workbench: Page 11
Step 13: Routing a Groove in the Top for the Sliding Deadman
Before moving onto the legs and stretchers, I routed a groove on the bottom of the top along the front for a board
jack or sliding deadman which I'll be adding in a future Instructable. It's just easier to do now to avoid having to flip
the bench over again later.
Design and Build a Woodworking Workbench: Page 12
Step 14: Preparing the Short Stretchers
Since assembling the entire base and then trying to
get all four tenons to fit in the top at once didn't sound
like a lot of fun, I decided to fit each leg first and then
attach the stretchers to them in-place. This actually
went a lot better than I thought it would. After a little
sanding, the tenons fit nicely, though I should have
sanded one a little more as the fit was a bit tight when
dry. When the glue was applied later, it required a fair
amount of persuasion to fully seat.
Once all the legs were dry fit in place, I marked and
cut pieces for what would later become the inner half
of the short stretchers. I could then clamp one in
place as a spacer and mark the exact length on the
outer half of the stretcher. After cutting the outer
boards to length, I headed over to the table saw and
cut a small bevel on the ends just to make it look a bit
nicer.
I then took them to the drill press and counterbored
two holes on each side. And after clamping them
back into place on the legs, I pre-drilled and screwed
them into place temporarily just to make the final
glue-up go faster.
Design and Build a Woodworking Workbench: Page 13
Step 15: Preparing the Long Stretchers
Next, I repeated the same process with the long
stretchers. Starting again with the inner half and using
it as a spacer to help mark the outer half. For the long
stretchers I made four counterbored holes for each
lap joint and again pre-drilled and temporarily
screwed the stretchers in-place.
Once that was finished, I removed both of the long
stretchers and then the legs and short stretchers on
the right end to prepare for the first step of this glue-
up.
Design and Build a Woodworking Workbench: Page 14
Step 16: Assembling the Legs and Stretchers
I started the final assembly by applying glue to the
mortises and tenons on the right two legs first. Once
the legs were in place, I then glued and screwed the
outer half of the right stretcher onto the legs.
To keep the legs in their proper alignment while the
glue dried, I screwed the long stretchers back into
place. This also gave me something to clamp the legs
down to as I didn't have a pair of clamps that were
quite long enough to go over the entire leg.
After the glue dried I repeated these same steps for
the left two legs and stretchers except that I went
ahead and glued and screwed the long stretchers to
the legs as well.
Design and Build a Woodworking Workbench: Page 15
Step 17: Easing Edges and Finishing the Bottom of the Top
While the glue was drying (and before I flipped it over), I eased the edges of the legs and stretchers a bit with a
block plane and some sandpaper. I also beveled the bottom of all the feet to help prevent tear-out when the bench
is moved around on the floor. Then I applied a little boiled linseed oil to the bottom of the top before flipping it over
with the help of a friend.
Design and Build a Woodworking Workbench: Page 16
Step 18: Completing the Stretchers
I finished up the inside half of the stretchers by applying some glue and clamping it into place using a small piece
of 3/4" MDF to position it so that the final shelf would sit flush with the outer half of the stretcher. Then I screwed it
into place and repeated the process for the remaining stretchers.
Step 19: Attaching the Inner-Inner Stretchers
Once that was done, I marked and cut the final "inner-inner" stretchers for the left and right sides. This isn't really
needed, but I had some leftover pieces so I thought I might as well add.
Note that if you wish to add a leg vise, it's best to wait to add these (and the shelf) until after adding a guide block
that will be described in that video. It just makes attaching the guide a bit easier.
Design and Build a Woodworking Workbench: Page 17
Step 20: Finishing the Stretchers
To finish up with the stretchers, I cut some 1/2" poplar dowels into plugs at the bandsaw to hide the screws. After
gluing them into place I sanded them flush and wiped on more boiled linseed oil.
Step 21: Flattening the Top
The next big step was to flatten the bench top, though
it was basically just a repeat of what I did for its
underside. I started by using my Stanley #5 plane to
knock down most of the high spots. Rubbing some
paraffin wax on the plane's sole helped quite a bit
(you can also find it at grocery stores in their canning
section).
After a while, I switched to my Stanley #7 and just
used my longest straight edge at different angles to
check which areas needed more work. If you have a
pair of winding sticks (or two straight edges) you
could also check for twist. I'll probably give mine a
few more months and then double check it.
Design and Build a Woodworking Workbench: Page 18
Step 22: Finishing the Top
Once I was happy with the top's flatness (completely unrelated to how tired I got), I started drilling out the
remainder of the dog holes. To prevent tear out on the underside, I clamped a small board in place before using a
spade bit to finish drilling the holes.
To finish the top, I sanded it with 80 grit sandpaper and eased over the dog hole edges a little before applying a
coat of boiled linseed oil.
Design and Build a Woodworking Workbench: Page 19
Step 23: Adding a Shelf
To finish up the bench, I measured and cut a piece of 3/4" MDF to size for the shelf since I always seem to have
left over MDF lying around. I then used a jigsaw to cut out notches in the corners to fit around the legs. After a little
test-fitting, I wiped on some boiled linseed oil which darkens the MDF. Once that dried I applied a light coat of
paste wax and fit it in place on the bench.
Step 24: Workbench Complete (Mostly)
That completes the workbench itself! So far I'm very
happy with the way it turned out -- especially how
nice the mortise and tenon joints ended up in the
top.
Design and Build a Woodworking Workbench: Page 20
Design and Build a Woodworking Workbench: Page 21

More Related Content

Similar to Easy small wood projects

Woodworking: The Essentila "all Purpose" workbench
Woodworking: The Essentila "all Purpose" workbenchWoodworking: The Essentila "all Purpose" workbench
Woodworking: The Essentila "all Purpose" workbenchYadeaHerman
 
How to make a cornhole board set
How to make a cornhole board setHow to make a cornhole board set
How to make a cornhole board setKrystle Cook
 
How to make pallet wood slab from recycled materia
How to make pallet wood slab from recycled materiaHow to make pallet wood slab from recycled materia
How to make pallet wood slab from recycled materiajessica30251
 
Make a wooden toolbox
Make a wooden toolboxMake a wooden toolbox
Make a wooden toolboxHAYS NYC
 
How to build storage boxes cabinet from recycled m
How to build storage boxes cabinet from recycled mHow to build storage boxes cabinet from recycled m
How to build storage boxes cabinet from recycled mjessica30251
 
Wooden Bench With Storage.
Wooden Bench With Storage.Wooden Bench With Storage.
Wooden Bench With Storage.WonderfullDaily
 
Woods Presentation
Woods PresentationWoods Presentation
Woods Presentationjsartoris
 
How to Build an Adirondack Chair
How to Build an Adirondack ChairHow to Build an Adirondack Chair
How to Build an Adirondack ChairVera Stewart
 
Small woodworking projects
Small woodworking projectsSmall woodworking projects
Small woodworking projectsjazza patrick
 
Deck-Lounger-Plan
Deck-Lounger-PlanDeck-Lounger-Plan
Deck-Lounger-PlanDan Cary
 
Biomimicry Project -Process Journal
Biomimicry Project -Process JournalBiomimicry Project -Process Journal
Biomimicry Project -Process Journalimdoldoli
 
How to-make-pallet-wood-slab-from-recycled-materia (1)
How to-make-pallet-wood-slab-from-recycled-materia (1)How to-make-pallet-wood-slab-from-recycled-materia (1)
How to-make-pallet-wood-slab-from-recycled-materia (1)NehalNadaf
 
Building giant articulated hands carved from wood
Building giant articulated hands carved from woodBuilding giant articulated hands carved from wood
Building giant articulated hands carved from woodjessica30251
 
Wood tube bamboo journal 6 - italian bamboo rodmakers association
Wood tube   bamboo journal 6 - italian bamboo rodmakers associationWood tube   bamboo journal 6 - italian bamboo rodmakers association
Wood tube bamboo journal 6 - italian bamboo rodmakers associationAnibal Ruben Reyes
 
Week 2 Tool Box Making FOR GRADE 12 AND 11
Week 2 Tool Box Making FOR GRADE 12 AND 11Week 2 Tool Box Making FOR GRADE 12 AND 11
Week 2 Tool Box Making FOR GRADE 12 AND 11LeoNinoDulce
 

Similar to Easy small wood projects (20)

Woodworking: The Essentila "all Purpose" workbench
Woodworking: The Essentila "all Purpose" workbenchWoodworking: The Essentila "all Purpose" workbench
Woodworking: The Essentila "all Purpose" workbench
 
How to make a cornhole board set
How to make a cornhole board setHow to make a cornhole board set
How to make a cornhole board set
 
How to make pallet wood slab from recycled materia
How to make pallet wood slab from recycled materiaHow to make pallet wood slab from recycled materia
How to make pallet wood slab from recycled materia
 
Make a wooden toolbox
Make a wooden toolboxMake a wooden toolbox
Make a wooden toolbox
 
Workbenchwriteup
WorkbenchwriteupWorkbenchwriteup
Workbenchwriteup
 
How to build storage boxes cabinet from recycled m
How to build storage boxes cabinet from recycled mHow to build storage boxes cabinet from recycled m
How to build storage boxes cabinet from recycled m
 
Wooden Bench With Storage.
Wooden Bench With Storage.Wooden Bench With Storage.
Wooden Bench With Storage.
 
Cadeira de jardin
Cadeira de jardinCadeira de jardin
Cadeira de jardin
 
Woods Presentation
Woods PresentationWoods Presentation
Woods Presentation
 
Coffee table @1
Coffee table @1Coffee table @1
Coffee table @1
 
Measuring device
Measuring deviceMeasuring device
Measuring device
 
How to Build an Adirondack Chair
How to Build an Adirondack ChairHow to Build an Adirondack Chair
How to Build an Adirondack Chair
 
Woodworking plans
Woodworking plansWoodworking plans
Woodworking plans
 
Small woodworking projects
Small woodworking projectsSmall woodworking projects
Small woodworking projects
 
Deck-Lounger-Plan
Deck-Lounger-PlanDeck-Lounger-Plan
Deck-Lounger-Plan
 
Biomimicry Project -Process Journal
Biomimicry Project -Process JournalBiomimicry Project -Process Journal
Biomimicry Project -Process Journal
 
How to-make-pallet-wood-slab-from-recycled-materia (1)
How to-make-pallet-wood-slab-from-recycled-materia (1)How to-make-pallet-wood-slab-from-recycled-materia (1)
How to-make-pallet-wood-slab-from-recycled-materia (1)
 
Building giant articulated hands carved from wood
Building giant articulated hands carved from woodBuilding giant articulated hands carved from wood
Building giant articulated hands carved from wood
 
Wood tube bamboo journal 6 - italian bamboo rodmakers association
Wood tube   bamboo journal 6 - italian bamboo rodmakers associationWood tube   bamboo journal 6 - italian bamboo rodmakers association
Wood tube bamboo journal 6 - italian bamboo rodmakers association
 
Week 2 Tool Box Making FOR GRADE 12 AND 11
Week 2 Tool Box Making FOR GRADE 12 AND 11Week 2 Tool Box Making FOR GRADE 12 AND 11
Week 2 Tool Box Making FOR GRADE 12 AND 11
 

Recently uploaded

Call Girls in Tilak Nagar (DELHI-) 8377877756 Call Girls Service
Call Girls in Tilak Nagar (DELHI-) 8377877756 Call Girls ServiceCall Girls in Tilak Nagar (DELHI-) 8377877756 Call Girls Service
Call Girls in Tilak Nagar (DELHI-) 8377877756 Call Girls Servicedollysharma2066
 
(8264348440) 🔝 Call Girls In Sriniwaspuri 🔝 Delhi NCR
(8264348440) 🔝 Call Girls In Sriniwaspuri 🔝 Delhi NCR(8264348440) 🔝 Call Girls In Sriniwaspuri 🔝 Delhi NCR
(8264348440) 🔝 Call Girls In Sriniwaspuri 🔝 Delhi NCRsoniya singh
 
Viet Nam Inclusive Business Accreditation System
Viet Nam Inclusive Business Accreditation SystemViet Nam Inclusive Business Accreditation System
Viet Nam Inclusive Business Accreditation SystemTri Dung, Tran
 
(8264348440) 🔝 Call Girls In Khanpur 🔝 Delhi NCR
(8264348440) 🔝 Call Girls In Khanpur 🔝 Delhi NCR(8264348440) 🔝 Call Girls In Khanpur 🔝 Delhi NCR
(8264348440) 🔝 Call Girls In Khanpur 🔝 Delhi NCRsoniya singh
 
(8264348440) 🔝 Call Girls In Green Park 🔝 Delhi NCR
(8264348440) 🔝 Call Girls In Green Park 🔝 Delhi NCR(8264348440) 🔝 Call Girls In Green Park 🔝 Delhi NCR
(8264348440) 🔝 Call Girls In Green Park 🔝 Delhi NCRsoniya singh
 
Guwahati Call Girls 7001305949 WhatsApp Number 24x7 Best Services
Guwahati Call Girls 7001305949 WhatsApp Number 24x7 Best ServicesGuwahati Call Girls 7001305949 WhatsApp Number 24x7 Best Services
Guwahati Call Girls 7001305949 WhatsApp Number 24x7 Best Servicesnajka9823
 
Product Catalog Bandung Home Decor Design Furniture
Product Catalog Bandung Home Decor Design FurnitureProduct Catalog Bandung Home Decor Design Furniture
Product Catalog Bandung Home Decor Design Furniturem3resolve
 
Model Call Girl in Bawana Delhi reach out to us at 🔝8264348440🔝
Model Call Girl in Bawana Delhi reach out to us at 🔝8264348440🔝Model Call Girl in Bawana Delhi reach out to us at 🔝8264348440🔝
Model Call Girl in Bawana Delhi reach out to us at 🔝8264348440🔝soniya singh
 
Authentic No 1 Amil Baba In Pakistan Amil Baba In Faisalabad Amil Baba In Kar...
Authentic No 1 Amil Baba In Pakistan Amil Baba In Faisalabad Amil Baba In Kar...Authentic No 1 Amil Baba In Pakistan Amil Baba In Faisalabad Amil Baba In Kar...
Authentic No 1 Amil Baba In Pakistan Amil Baba In Faisalabad Amil Baba In Kar...Authentic No 1 Amil Baba In Pakistan
 
Call Girls At-( Nearby )-Bhikaji Cama Place, Delhi | ⑧③77⓿⑧76⓿7
Call Girls At-( Nearby )-Bhikaji Cama Place, Delhi | ⑧③77⓿⑧76⓿7Call Girls At-( Nearby )-Bhikaji Cama Place, Delhi | ⑧③77⓿⑧76⓿7
Call Girls At-( Nearby )-Bhikaji Cama Place, Delhi | ⑧③77⓿⑧76⓿7dollysharma2066
 
Gurgaon Rajiv Chowk 🔝 Call Girls Service 🔝 ( 8264348440 ) unlimited hard sex ...
Gurgaon Rajiv Chowk 🔝 Call Girls Service 🔝 ( 8264348440 ) unlimited hard sex ...Gurgaon Rajiv Chowk 🔝 Call Girls Service 🔝 ( 8264348440 ) unlimited hard sex ...
Gurgaon Rajiv Chowk 🔝 Call Girls Service 🔝 ( 8264348440 ) unlimited hard sex ...soniya singh
 
(8264348440) 🔝 Call Girls In Safdarjung Enclave 🔝 Delhi NCR
(8264348440) 🔝 Call Girls In Safdarjung Enclave 🔝 Delhi NCR(8264348440) 🔝 Call Girls In Safdarjung Enclave 🔝 Delhi NCR
(8264348440) 🔝 Call Girls In Safdarjung Enclave 🔝 Delhi NCRsoniya singh
 
(8264348440) 🔝 Call Girls In Babarpur 🔝 Delhi NCR
(8264348440) 🔝 Call Girls In Babarpur 🔝 Delhi NCR(8264348440) 🔝 Call Girls In Babarpur 🔝 Delhi NCR
(8264348440) 🔝 Call Girls In Babarpur 🔝 Delhi NCRsoniya singh
 
办昆士兰大学UQ毕业证书/成绩单GPA修改 - 留学买假毕业证
办昆士兰大学UQ毕业证书/成绩单GPA修改 - 留学买假毕业证办昆士兰大学UQ毕业证书/成绩单GPA修改 - 留学买假毕业证
办昆士兰大学UQ毕业证书/成绩单GPA修改 - 留学买假毕业证0622mpom
 

Recently uploaded (20)

Call Girls in Tilak Nagar (DELHI-) 8377877756 Call Girls Service
Call Girls in Tilak Nagar (DELHI-) 8377877756 Call Girls ServiceCall Girls in Tilak Nagar (DELHI-) 8377877756 Call Girls Service
Call Girls in Tilak Nagar (DELHI-) 8377877756 Call Girls Service
 
(8264348440) 🔝 Call Girls In Sriniwaspuri 🔝 Delhi NCR
(8264348440) 🔝 Call Girls In Sriniwaspuri 🔝 Delhi NCR(8264348440) 🔝 Call Girls In Sriniwaspuri 🔝 Delhi NCR
(8264348440) 🔝 Call Girls In Sriniwaspuri 🔝 Delhi NCR
 
Viet Nam Inclusive Business Accreditation System
Viet Nam Inclusive Business Accreditation SystemViet Nam Inclusive Business Accreditation System
Viet Nam Inclusive Business Accreditation System
 
(8264348440) 🔝 Call Girls In Khanpur 🔝 Delhi NCR
(8264348440) 🔝 Call Girls In Khanpur 🔝 Delhi NCR(8264348440) 🔝 Call Girls In Khanpur 🔝 Delhi NCR
(8264348440) 🔝 Call Girls In Khanpur 🔝 Delhi NCR
 
(8264348440) 🔝 Call Girls In Green Park 🔝 Delhi NCR
(8264348440) 🔝 Call Girls In Green Park 🔝 Delhi NCR(8264348440) 🔝 Call Girls In Green Park 🔝 Delhi NCR
(8264348440) 🔝 Call Girls In Green Park 🔝 Delhi NCR
 
Guwahati Call Girls 7001305949 WhatsApp Number 24x7 Best Services
Guwahati Call Girls 7001305949 WhatsApp Number 24x7 Best ServicesGuwahati Call Girls 7001305949 WhatsApp Number 24x7 Best Services
Guwahati Call Girls 7001305949 WhatsApp Number 24x7 Best Services
 
Product Catalog Bandung Home Decor Design Furniture
Product Catalog Bandung Home Decor Design FurnitureProduct Catalog Bandung Home Decor Design Furniture
Product Catalog Bandung Home Decor Design Furniture
 
Model Call Girl in Bawana Delhi reach out to us at 🔝8264348440🔝
Model Call Girl in Bawana Delhi reach out to us at 🔝8264348440🔝Model Call Girl in Bawana Delhi reach out to us at 🔝8264348440🔝
Model Call Girl in Bawana Delhi reach out to us at 🔝8264348440🔝
 
Pakistani Jumeirah Call Girls # +971559085003 # Pakistani Call Girls In Jumei...
Pakistani Jumeirah Call Girls # +971559085003 # Pakistani Call Girls In Jumei...Pakistani Jumeirah Call Girls # +971559085003 # Pakistani Call Girls In Jumei...
Pakistani Jumeirah Call Girls # +971559085003 # Pakistani Call Girls In Jumei...
 
Authentic No 1 Amil Baba In Pakistan Amil Baba In Faisalabad Amil Baba In Kar...
Authentic No 1 Amil Baba In Pakistan Amil Baba In Faisalabad Amil Baba In Kar...Authentic No 1 Amil Baba In Pakistan Amil Baba In Faisalabad Amil Baba In Kar...
Authentic No 1 Amil Baba In Pakistan Amil Baba In Faisalabad Amil Baba In Kar...
 
Call Girls At-( Nearby )-Bhikaji Cama Place, Delhi | ⑧③77⓿⑧76⓿7
Call Girls At-( Nearby )-Bhikaji Cama Place, Delhi | ⑧③77⓿⑧76⓿7Call Girls At-( Nearby )-Bhikaji Cama Place, Delhi | ⑧③77⓿⑧76⓿7
Call Girls At-( Nearby )-Bhikaji Cama Place, Delhi | ⑧③77⓿⑧76⓿7
 
Cheap Rate ➥8448380779 ▻Call Girls In Sector 56 Gurgaon
Cheap Rate ➥8448380779 ▻Call Girls In Sector 56 GurgaonCheap Rate ➥8448380779 ▻Call Girls In Sector 56 Gurgaon
Cheap Rate ➥8448380779 ▻Call Girls In Sector 56 Gurgaon
 
Gurgaon Rajiv Chowk 🔝 Call Girls Service 🔝 ( 8264348440 ) unlimited hard sex ...
Gurgaon Rajiv Chowk 🔝 Call Girls Service 🔝 ( 8264348440 ) unlimited hard sex ...Gurgaon Rajiv Chowk 🔝 Call Girls Service 🔝 ( 8264348440 ) unlimited hard sex ...
Gurgaon Rajiv Chowk 🔝 Call Girls Service 🔝 ( 8264348440 ) unlimited hard sex ...
 
young call girls in kailash Nagar, 🔝 9953056974 🔝 escort Service
young call girls in kailash Nagar, 🔝 9953056974 🔝 escort Serviceyoung call girls in kailash Nagar, 🔝 9953056974 🔝 escort Service
young call girls in kailash Nagar, 🔝 9953056974 🔝 escort Service
 
(8264348440) 🔝 Call Girls In Safdarjung Enclave 🔝 Delhi NCR
(8264348440) 🔝 Call Girls In Safdarjung Enclave 🔝 Delhi NCR(8264348440) 🔝 Call Girls In Safdarjung Enclave 🔝 Delhi NCR
(8264348440) 🔝 Call Girls In Safdarjung Enclave 🔝 Delhi NCR
 
Why Powderless DTF Printer is T-shirt Printing Game Changer.pptx
Why Powderless DTF Printer is T-shirt Printing Game Changer.pptxWhy Powderless DTF Printer is T-shirt Printing Game Changer.pptx
Why Powderless DTF Printer is T-shirt Printing Game Changer.pptx
 
Cheap Rate ➥8448380779 ▻Call Girls In Sector 55 Gurgaon
Cheap Rate ➥8448380779 ▻Call Girls In Sector 55 GurgaonCheap Rate ➥8448380779 ▻Call Girls In Sector 55 Gurgaon
Cheap Rate ➥8448380779 ▻Call Girls In Sector 55 Gurgaon
 
(8264348440) 🔝 Call Girls In Babarpur 🔝 Delhi NCR
(8264348440) 🔝 Call Girls In Babarpur 🔝 Delhi NCR(8264348440) 🔝 Call Girls In Babarpur 🔝 Delhi NCR
(8264348440) 🔝 Call Girls In Babarpur 🔝 Delhi NCR
 
办昆士兰大学UQ毕业证书/成绩单GPA修改 - 留学买假毕业证
办昆士兰大学UQ毕业证书/成绩单GPA修改 - 留学买假毕业证办昆士兰大学UQ毕业证书/成绩单GPA修改 - 留学买假毕业证
办昆士兰大学UQ毕业证书/成绩单GPA修改 - 留学买假毕业证
 
Hot Sexy call girls in Rajouri Garden🔝 9953056974 🔝 Delhi escort Service
Hot Sexy call girls in  Rajouri Garden🔝 9953056974 🔝 Delhi escort ServiceHot Sexy call girls in  Rajouri Garden🔝 9953056974 🔝 Delhi escort Service
Hot Sexy call girls in Rajouri Garden🔝 9953056974 🔝 Delhi escort Service
 

Easy small wood projects

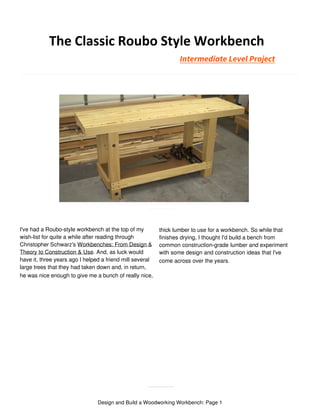
  • 1. The Classic Roubo Style Workbench I've had a Roubo-style workbench at the top of my wish-list for quite a while after reading through Christopher Schwarz's Workbenches: From Design & Theory to Construction & Use. And, as luck would have it, three years ago I helped a friend mill several large trees that they had taken down and, in return, he was nice enough to give me a bunch of really nice, thick lumber to use for a workbench. So while that finishes drying, I thought I'd build a bench from common construction-grade lumber and experiment with some design and construction ideas that I've come across over the years. Design and Build a Woodworking Workbench: Page 1 Intermediate Level Project
  • 2. Step 1: Materials For this bench I used 2x8 and 2x10 construction-grade lumber and a piece of 3/4" MDF for the shelf. The upside to using construction-grade lumber is the price. The southern yellow pine boards for this bench cost right around $100 here in North Carolina. Unfortunately, the downside to using this type of lumber is the quality. I spent quite a while sorting through lumber at two different stores to find the boards needed for this project. I tried to find the straightest boards without knots on either the outside edges or down the middle since they'll all be ripped in half. A few small knots on the top are fine and can easily be filled with epoxy or Super Glue, but it's best to avoid anything large that looks like it might break off. For the top and stretchers, I decided to use 2x8 boards which saves a little money and still results in a plenty-thick top at 3-1/4" thick and stretchers that were 3-3/4" thick. For the legs, I switched to 2x10s and ended up with legs that were a little over 4" wide. Lumber (Southern Yellow Pine or Similar) Top: (9) 2" x 8" x 8' Stretchers: (1) 2" x 8" x 10' and (1) 2" x 8" x 8' Legs: (2) 2" x 10" x 10' Other Materials Titebond III Wood Glue Design and Build a Woodworking Workbench: Page 2
  • 3. Step 2: Tools Used To speed up the process of surfacing the construction grade lumber, I used a jointer and planer. You could purchase pre-surfaced boards to skip this step at additional cost, skip-plane the boards using only a planer, or even hand-plane the boards if you like a good workout. A table-saw is very handy for ripping the boards to final width, though a circular saw with an edge guide could also be used. The sliding miter saw could also be replaced with a circular saw or hand saw. The main goal is to end up with boards that have a consistent thickness and that the thickness of the outer two boards of the top match the thickness of the corresponding boards in the leg and long stretcher so that the laminated joints match. Hitachi 12" Compound Sliding Miter Saw (C12RSH) (Latest version: C12RSH2) Dewalt Heavy Duty Miter Saw Stand (DWX723) Grizzly 8" Jointer (G0586) on Mobile Base Ridgid 13" 3-Blade Thickness Planer (R4330) (Latest version: R4331) Grizzly 17" Bandsaw (G0513P) Grizzly G0691 Table Saw Craftsman 17" Drill Press (22901) on Mobile Base Drill Press Table Bosch 5" Random Orbit Sander (ROS20VSC) Skil 6 Amp Scrolling Jigsaw (4690-01) Rockler 16-Piece Forstner Drill Bit Set Ridgid 18V Power Tools 5-Piece Combo Kit Rubber Roller for Spreading Glue Design and Build a Woodworking Workbench: Page 3
  • 4. Step 3: Preparing Boards for the Top I started with the top and split it into three sections. Trying to glue more than six long boards at a time can be stressful, and I had dreams of running the sections back through the jointer and planer. I started with the middle section first by cutting the board to rough length at the miter saw, leaving three to four inches extra for planer snipe and for spacers. Then I joined one face and edge at the jointer and ran them through the planer to get a final thickness of 1- 1/4". Next, I ripped the boards into two pieces by running the jointed and then newly cut edges against the fence at the table saw. I also went ahead and cut off two spacer pieces to use later when laminating the leg tenons. Design and Build a Woodworking Workbench: Page 4
  • 5. Step 4: Gluing the Top Sections Since these boards like to warp after they're surfaced, I also made a few clamping cauls from some scraps. These will be used to remove any crook in the boards during glue-up by clamping them across the top and bottom edges of the boards. Then it was time to add some glue! For this project I used Titebond III glue which costs a bit more but has a longer open time which reduces some of the glue- up stress. This project and the vises should take around 2/3 of a gallon, so I definitely recommend buying a gallon bottle to save some money. I tried to move quickly and spread the glue using a hard rubber roller which worked really well. Once the glue was applied I attached the cauls and then the rest of the clamps. Then I tried to clean up as much glue squeeze-out as possible before moving on to the next two sections. While the middle section dried, I repeated the same steps for the front and back sections except for the top's two outermost boards. These boards will be laminated later (once spacers are made from the legs) to create the through-mortise for the legs. The important thing to remember is that the thickness of these two boards needs to match the thickness of the middle and outer leg boards and the long stretcher. Design and Build a Woodworking Workbench: Page 5
  • 6. Step 5: Preparing Boards for the Legs and Stretchers Next, I rough cut a single 10' 2x8 board for the long stretchers, again leaving enough room for a 4" spacer to use when laminating the lap-joint in the legs. Note that the spacer (shown here) should be cut after the stretchers have been surfaced and ripped to final width. I also went ahead and cut the boards for the legs to rough length at the miter saw also leaving about 4" extra for the spacer that will be used to create the mortises in the top. Since the 2x10's that I wanted to use for the legs were wider than my jointer, I went ahead and ripped them using my bandsaw. I then surfaced them at the jointer and planer and ripped everything to final width at the table saw. Design and Build a Woodworking Workbench: Page 6
  • 7. Step 6 : Laminating the Leg's Tenon and Lap Joints After cleaning up the top edge of the leg boards at the miter saw, it was time to glue the parts together. Each leg consists of three boards laminated together. To create the tenons on the leg, I temporarily clamped two of the spacer blocks that I cut earlier from the top to the middle leg board. I tried to make sure that the spacer blocks were flush with the top of the middle leg board to ensure a gap-free with the top later. To remove any any slight warping between the three leg pieces, I used a pair of parallel clamps to keep the sides flush. To avoid having to use a dado blade later, I also cut the front board of the leg and used the spacer cut from the long stretcher to create its corresponding lap joint. Once everything was in place and clamped down, I immediately removed all three spacer blocks and cleaned up any glue squeeze-out. Finally, I cut all the legs to their final length at the miter saw and saved the odd shaped cut-offs for use later as spacers when laminating the mortises in the top. Design and Build a Woodworking Workbench: Page 7
  • 8. Step 7: Filling Small Gaps I did end up with a very small gap between two of the boards in one leg. To fix this, I made a simple wood filler from some pine sawdust and glue mixed together. After it dried I sanded it down and while it's not 100% perfect due to the changes in wood color, you now have to look closely to notice it. Note that this can be used for any of the laminations should you end up with a small gap in the top. Step 8: Leg Vise Preparation Before moving back to the top, I went ahead and drilled a few holes for the linear bearing and leg vise screw at the drill press. I'll cover this as well as building the chop for the leg vise in more detail in our next Instructable. Design and Build a Woodworking Workbench: Page 8
  • 9. Step 9: Preparing Outer Top Pieces To finish up the top sections, I started by cutting the left end of each laminated section at the miter saw. I then cut the boards that make up the row with the mortise into the pieces. To make sure that the matching front and back pieces were identical, I made one final cut at the miter saw trimming each pair of boards together. Before gluing these into place, I went ahead and drilled 3/4" dog holes as deep as I could with my Forstner bit at the drill press. This made it much easier to finish drilling the holes later with a regular spade bit. Step 10: Laminating the Mortises in the Top Next, working from left to right, I glued up the three pieces to form the two mortises using the spacer blocks from the legs. And again, as soon as everything was clamped down I made sure to remove the spacers and clean up any excess glue. After the glue dried, I finished up the section by gluing on the outer most board. I then repeated the same steps to finish the last section. Design and Build a Woodworking Workbench: Page 9
  • 10. Step 11: Preparing the Top Sections I then moved to the floor and started cleaning up the bottom of each section by sanding any glue squeeze out before switching to the hand planes to roughly flatten the sections. I had originally intended to run each of these sections back through the jointer and planer, but they were starting to get pretty heavy and my middle section actually ended up a little wider than my jointer. While planing, I tried to focus on the area around the mortise to try to avoid any gaps once the legs were added. I also checked periodically to make sure the sides and bottom remained square. Once I was happy with the fit between the sections, I took them to the miter saw and cut them to final length which ended up being right at 6'6". Design and Build a Woodworking Workbench: Page 10
  • 11. Step 12: Gluing the Top Sections Next, it was finally time to glue up the three section to form the top. I started with the rear and the middle sections first and once those dried, I glued the front section onto the other two. Design and Build a Woodworking Workbench: Page 11
  • 12. Step 13: Routing a Groove in the Top for the Sliding Deadman Before moving onto the legs and stretchers, I routed a groove on the bottom of the top along the front for a board jack or sliding deadman which I'll be adding in a future Instructable. It's just easier to do now to avoid having to flip the bench over again later. Design and Build a Woodworking Workbench: Page 12
  • 13. Step 14: Preparing the Short Stretchers Since assembling the entire base and then trying to get all four tenons to fit in the top at once didn't sound like a lot of fun, I decided to fit each leg first and then attach the stretchers to them in-place. This actually went a lot better than I thought it would. After a little sanding, the tenons fit nicely, though I should have sanded one a little more as the fit was a bit tight when dry. When the glue was applied later, it required a fair amount of persuasion to fully seat. Once all the legs were dry fit in place, I marked and cut pieces for what would later become the inner half of the short stretchers. I could then clamp one in place as a spacer and mark the exact length on the outer half of the stretcher. After cutting the outer boards to length, I headed over to the table saw and cut a small bevel on the ends just to make it look a bit nicer. I then took them to the drill press and counterbored two holes on each side. And after clamping them back into place on the legs, I pre-drilled and screwed them into place temporarily just to make the final glue-up go faster. Design and Build a Woodworking Workbench: Page 13
  • 14. Step 15: Preparing the Long Stretchers Next, I repeated the same process with the long stretchers. Starting again with the inner half and using it as a spacer to help mark the outer half. For the long stretchers I made four counterbored holes for each lap joint and again pre-drilled and temporarily screwed the stretchers in-place. Once that was finished, I removed both of the long stretchers and then the legs and short stretchers on the right end to prepare for the first step of this glue- up. Design and Build a Woodworking Workbench: Page 14
  • 15. Step 16: Assembling the Legs and Stretchers I started the final assembly by applying glue to the mortises and tenons on the right two legs first. Once the legs were in place, I then glued and screwed the outer half of the right stretcher onto the legs. To keep the legs in their proper alignment while the glue dried, I screwed the long stretchers back into place. This also gave me something to clamp the legs down to as I didn't have a pair of clamps that were quite long enough to go over the entire leg. After the glue dried I repeated these same steps for the left two legs and stretchers except that I went ahead and glued and screwed the long stretchers to the legs as well. Design and Build a Woodworking Workbench: Page 15
  • 16. Step 17: Easing Edges and Finishing the Bottom of the Top While the glue was drying (and before I flipped it over), I eased the edges of the legs and stretchers a bit with a block plane and some sandpaper. I also beveled the bottom of all the feet to help prevent tear-out when the bench is moved around on the floor. Then I applied a little boiled linseed oil to the bottom of the top before flipping it over with the help of a friend. Design and Build a Woodworking Workbench: Page 16
  • 17. Step 18: Completing the Stretchers I finished up the inside half of the stretchers by applying some glue and clamping it into place using a small piece of 3/4" MDF to position it so that the final shelf would sit flush with the outer half of the stretcher. Then I screwed it into place and repeated the process for the remaining stretchers. Step 19: Attaching the Inner-Inner Stretchers Once that was done, I marked and cut the final "inner-inner" stretchers for the left and right sides. This isn't really needed, but I had some leftover pieces so I thought I might as well add. Note that if you wish to add a leg vise, it's best to wait to add these (and the shelf) until after adding a guide block that will be described in that video. It just makes attaching the guide a bit easier. Design and Build a Woodworking Workbench: Page 17
  • 18. Step 20: Finishing the Stretchers To finish up with the stretchers, I cut some 1/2" poplar dowels into plugs at the bandsaw to hide the screws. After gluing them into place I sanded them flush and wiped on more boiled linseed oil. Step 21: Flattening the Top The next big step was to flatten the bench top, though it was basically just a repeat of what I did for its underside. I started by using my Stanley #5 plane to knock down most of the high spots. Rubbing some paraffin wax on the plane's sole helped quite a bit (you can also find it at grocery stores in their canning section). After a while, I switched to my Stanley #7 and just used my longest straight edge at different angles to check which areas needed more work. If you have a pair of winding sticks (or two straight edges) you could also check for twist. I'll probably give mine a few more months and then double check it. Design and Build a Woodworking Workbench: Page 18
  • 19. Step 22: Finishing the Top Once I was happy with the top's flatness (completely unrelated to how tired I got), I started drilling out the remainder of the dog holes. To prevent tear out on the underside, I clamped a small board in place before using a spade bit to finish drilling the holes. To finish the top, I sanded it with 80 grit sandpaper and eased over the dog hole edges a little before applying a coat of boiled linseed oil. Design and Build a Woodworking Workbench: Page 19
  • 20. Step 23: Adding a Shelf To finish up the bench, I measured and cut a piece of 3/4" MDF to size for the shelf since I always seem to have left over MDF lying around. I then used a jigsaw to cut out notches in the corners to fit around the legs. After a little test-fitting, I wiped on some boiled linseed oil which darkens the MDF. Once that dried I applied a light coat of paste wax and fit it in place on the bench. Step 24: Workbench Complete (Mostly) That completes the workbench itself! So far I'm very happy with the way it turned out -- especially how nice the mortise and tenon joints ended up in the top. Design and Build a Woodworking Workbench: Page 20
  • 21. Design and Build a Woodworking Workbench: Page 21