Weldability Testings
Presented by
P.Archunan
1st
year-M.E(Welding Technology)
GCE,Salem
Let starts with a philosophy
One good TEST is worth a thousands
experts opinion -Anonymous
Theory is a captain;Practice,the
soldiers -Leonardo Da Vinci
WELDABILITY
• Weldability is the ability of any material (usually metals and its
alloys) to weld with other materials.
• Weldability is the relative suitability of a material for welding
According to AWS ,Weldability is the capacity of a material or
combination of mateials to be welded under fabrication conditions
into specific , suitability designed structure and to perform
satisfactory in the intended service
ASPECTS OF WELDABILITY
• Metallurgical compatibility of the materials to be welded (base and
weld metal dilution)
• Mechanical soundness
• Good serviceabilty of the weld joint
WELDABILITY ASSESSMENT
• The weldability can be assessed in relation to a process three things
must be decided
a)The degree of tolerance that can be allowed for purely
metallurgical defects
b) The degree of tolerance that can be allowed for operational
defects
c)The type of test that will be suitable in the circumstances
MEASUREMENT OF WELDABILITY
Weldability test can provide clues as to the precaution such as
 Appropriate selection of filler material
 Preheat
 Energy input
 Weld design
Weldability tests are employed for getting quantative measurement
WELDABILITY TESTS
• Theoritical tests
a)Jominy hardness bend ductile tests
b)Prediction of HAZ hardness from carbon equivalent
• Simulated tests
• Visual examination
• Component sampling tests
• Actual welding tests
FABRICATION WELDABILITY TEST
• Hot cracking tests
a) Murex test
b)Houldcroft test
c)Varestraint test
d)Ring weldability test
e)Hot ductility test
• Cold cracking test
a)Controlled Thermal severity(CTS) test
b) Tekken test
c)Lehigh restraint test
d)Longitudinal bead weld tet
e)Implant test
FABRICATION WELDABILITY TEST
• Weldability test related to specific types of cracking
a)Lamilar tearing
i)Through thickness ductility test
ii)The cranfield test
iii)Lehigh cantilever lamellar tearing tet
iv)The window test
Hot Cracking Test
• MurexTest
Murex Test
• Fillet weld thick 10-15 mm
• Plates dimensions 50mm×70mm
• Rotation starts after 5 sec of welding
• Intial V angle 90;Maximum angle for rotation 120
• Rotating speed 1•/sec
• Susceptibility hot cracking indicated by the extend to weld metal
crack
• Strain ∞ rotation
• Used to assessing the cracking sensitivity of carbon and low alloy
steel weld depoits
Houldcraft Fishbone Test
RING WELDABILITY TEST
• Used to study the hot cracking of weld metal or partially melted zone
• It used for Al alloys and low alloy steels
• Test piece : square piece of sheet or plate with centre cut
 Radial and circumferential strains imposed by weld deposit
 Crack formed at the weld centerline is detected by visual inspection
or dye penetrant inspection
 Crack resistance θr

 Centerline and transverse cracks are formed when radial and
crcumferential stresses reached maximum value
 Restraint can be varied in a given plate thickness by adjusting the (i)
platesize, (ii) patch diameter and replaced by a patch
Controlled Thermal Severity
Test(CTS)
• TSN is Usually given as ‘Total Thickness’ in millimeters. The total
thickness is the sum of thickness of all the paths along which heat can
be conducted.
Controlled Thermal Severity
Test(CTS)
• Fillet weld along the plate edges is controlled by the thickness of the
plates and the differences in cooling rates between bithermal and
trithermal welds. This test is primarily used to evaluate the crack
sensitivity of hardenable steels
TEKKEN TEST
TEKKEN TEST
• The Tekken-Test is used to examine a single-run butt weld with the
aim of determining the preheating temperature required for test
conditions.
• The test is applied by steel fabricators to assess the cold cracking
susceptibility of their steels and may also be applied by processing
companies to evaluate the required welding conditions.
• .
• Objective of the test:Cold cracking susceptibility of butt welds (HAZ-
WM combination).
• Main fields of application: Acceptance tests, research and
development.
• Materials:High-strength unalloyed or low-alloyed steel (plate) and
respective appropriate filler material.
• Test thicknesses:t ≥ 10 mm.
TEKKEN TEST
• Number of specimens:1 to 3 for each condition. The required
preheating temperature (Tpreh) must be proved by at least 3
specimens without incipient crack
• Type of test:Butt weld (root run), testing of the weld (HAZ-WM)
• Loading:Self-restrained specimen, load level dependent on plate
thickness
• Test duration:≥ 16 h
• Tensioning:Stresses as a result of shrinkage restraint and
transformational residual stresses. The root face of the single V butt
joint is partially penetrated in order to achieve a corresponding
notch effect
TEKKEN TEST
• Crack location:HAZ and/or WM
• Crack identification:Visual examination, incipient crack examination
by means of metallographic sections or opening by force after
oxidizing annealing (250°C/3h).
• Special influencing factors:Plate thickness, joint preparation,
homogeneous preheating
• Criterion for the cracking susceptibility:Crack free conditions (weld
metal hydrogen content, preheating temperature, heat input), crack
coefficient: ratio of total crack surface to weld cross-sectional area
IMPLANT TEST
IMPLANT TEST
• The Implant-Test allows the evaluation of the cold cracking
susceptibility of a base material (HAZ) and the investigation of
individual influencing variables.
• The result is a characteristic value, e. g. the critical Implant stress
for a diffusible hydrogen content and for a respective hard
microstructure.
• A cylindrical notched specimen of the test material is inserted into
an appropriate borehole of a C-Mn steel plate to be welded to it by
one bead (see Fig. 1). After cooling down to the testing temperature
(e.g. 150°C) a constant test load is imposed on the specimen.
Fracture or incipient crack of the specimen is determined.
• Objective of the test:Cold cracking susceptibility of base materials
• fields of application:Acceptance tests, research and
development.
IMPLANT TEST
Materials:Implant-specimen of high-strength unalloyed or low-alloyed
steel (pipe, plate), in special cases made from weld metal.
Test thicknesses:Specimen diameter 6 or 8 mm.
Number of specimens:3 for each condition.
Type of test:Testing of the HAZ in the Implant specimen.
Loading:Constant optional test stress (e.g. base material yield
strength).
Test duration: ≥ 16 hours.
IMPLANT TEST
• Tensioning:Multiaxial stresses as a result of a defined notch,
defined imposed uniaxial tensile stress, transformational residual
stresses.
• Crack location:HAZ.
• Crack identification:Visual examination, incipient crack examination
by means of metallographic sections or opening by force after
oxidizing annealing (250°C/3h). Point in time of cracking by
evaluation of the stress history.
• Special influencing factors:Implant geometry, test load, defined
preheating.
• Criterion for the crackingsusceptibility:Conditions (weld metal
hydrogen content, preheating temperature,heat input) on which no
fractures or incipient cracks occur.
Lehigh Restraint Test
• Crack identification:Uses of visual examination on the surface of
welds. The absence of cracks should be verified by NDT-tests and
by using conventional metallographic examinations.
• Special influencing factors:Chemical compositions of filler materials
and base metal, preheating, heat input and weld-bead geometries.
• Criterion for the cracking susceptibility:Various levels of restraint
caused by sawing cut slots are usually assessed to gether with
existing crack length in order to explain the cracking susceptibility of
testing materials.
Bend Test
Bend Test
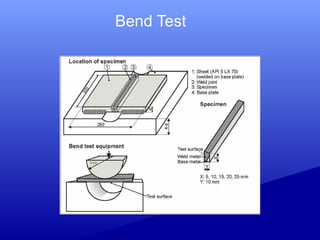
• The bead bend test has been developed for evaluating HACC
susceptibility of welded components.
• Different test conditions, e.g. interpass temperature, different layer
sequence, etc. can considered as experimental variables influencing
crack behaviour of components.
• In this approach, shrinkage of the testing welds during welding and
subsequent cooling is hindered by anchored welds of test specimens
with a massive bottom plate.
• A exposed time of 24 hours at room temperature after welding is
required before machining a test specimen.
• After annealing at 250°C for 16 hours, the test specimen is bent in
order to make visible micro cracks. The HACC susceptibility of the
test specimen is assessed using visual observations on the polished
test surface.
Bend Test
• Special influencing factors:Plate thickness, homogeneous
preheating of the specimen
• Criterion for the cracking susceptibility:Quantity, length and location
of cracks at the polished test surface

Weldability testings

  • 1.
  • 2.
    Let starts witha philosophy One good TEST is worth a thousands experts opinion -Anonymous Theory is a captain;Practice,the soldiers -Leonardo Da Vinci
  • 3.
    WELDABILITY • Weldability isthe ability of any material (usually metals and its alloys) to weld with other materials. • Weldability is the relative suitability of a material for welding According to AWS ,Weldability is the capacity of a material or combination of mateials to be welded under fabrication conditions into specific , suitability designed structure and to perform satisfactory in the intended service
  • 4.
    ASPECTS OF WELDABILITY •Metallurgical compatibility of the materials to be welded (base and weld metal dilution) • Mechanical soundness • Good serviceabilty of the weld joint WELDABILITY ASSESSMENT • The weldability can be assessed in relation to a process three things must be decided a)The degree of tolerance that can be allowed for purely metallurgical defects b) The degree of tolerance that can be allowed for operational defects c)The type of test that will be suitable in the circumstances
  • 5.
    MEASUREMENT OF WELDABILITY Weldabilitytest can provide clues as to the precaution such as  Appropriate selection of filler material  Preheat  Energy input  Weld design Weldability tests are employed for getting quantative measurement
  • 6.
    WELDABILITY TESTS • Theoriticaltests a)Jominy hardness bend ductile tests b)Prediction of HAZ hardness from carbon equivalent • Simulated tests • Visual examination • Component sampling tests • Actual welding tests
  • 7.
    FABRICATION WELDABILITY TEST •Hot cracking tests a) Murex test b)Houldcroft test c)Varestraint test d)Ring weldability test e)Hot ductility test • Cold cracking test a)Controlled Thermal severity(CTS) test b) Tekken test c)Lehigh restraint test d)Longitudinal bead weld tet e)Implant test
  • 8.
    FABRICATION WELDABILITY TEST •Weldability test related to specific types of cracking a)Lamilar tearing i)Through thickness ductility test ii)The cranfield test iii)Lehigh cantilever lamellar tearing tet iv)The window test
  • 9.
  • 10.
    Murex Test • Filletweld thick 10-15 mm • Plates dimensions 50mm×70mm • Rotation starts after 5 sec of welding • Intial V angle 90;Maximum angle for rotation 120 • Rotating speed 1•/sec • Susceptibility hot cracking indicated by the extend to weld metal crack • Strain ∞ rotation • Used to assessing the cracking sensitivity of carbon and low alloy steel weld depoits
  • 11.
  • 12.
  • 13.
  • 14.
  • 15.
    RING WELDABILITY TEST •Used to study the hot cracking of weld metal or partially melted zone • It used for Al alloys and low alloy steels • Test piece : square piece of sheet or plate with centre cut  Radial and circumferential strains imposed by weld deposit  Crack formed at the weld centerline is detected by visual inspection or dye penetrant inspection  Crack resistance θr   Centerline and transverse cracks are formed when radial and crcumferential stresses reached maximum value  Restraint can be varied in a given plate thickness by adjusting the (i) platesize, (ii) patch diameter and replaced by a patch
  • 16.
    Controlled Thermal Severity Test(CTS) •TSN is Usually given as ‘Total Thickness’ in millimeters. The total thickness is the sum of thickness of all the paths along which heat can be conducted.
  • 17.
    Controlled Thermal Severity Test(CTS) •Fillet weld along the plate edges is controlled by the thickness of the plates and the differences in cooling rates between bithermal and trithermal welds. This test is primarily used to evaluate the crack sensitivity of hardenable steels
  • 18.
  • 19.
    TEKKEN TEST • TheTekken-Test is used to examine a single-run butt weld with the aim of determining the preheating temperature required for test conditions. • The test is applied by steel fabricators to assess the cold cracking susceptibility of their steels and may also be applied by processing companies to evaluate the required welding conditions. • . • Objective of the test:Cold cracking susceptibility of butt welds (HAZ- WM combination). • Main fields of application: Acceptance tests, research and development. • Materials:High-strength unalloyed or low-alloyed steel (plate) and respective appropriate filler material. • Test thicknesses:t ≥ 10 mm.
  • 20.
    TEKKEN TEST • Numberof specimens:1 to 3 for each condition. The required preheating temperature (Tpreh) must be proved by at least 3 specimens without incipient crack • Type of test:Butt weld (root run), testing of the weld (HAZ-WM) • Loading:Self-restrained specimen, load level dependent on plate thickness • Test duration:≥ 16 h • Tensioning:Stresses as a result of shrinkage restraint and transformational residual stresses. The root face of the single V butt joint is partially penetrated in order to achieve a corresponding notch effect
  • 21.
    TEKKEN TEST • Cracklocation:HAZ and/or WM • Crack identification:Visual examination, incipient crack examination by means of metallographic sections or opening by force after oxidizing annealing (250°C/3h). • Special influencing factors:Plate thickness, joint preparation, homogeneous preheating • Criterion for the cracking susceptibility:Crack free conditions (weld metal hydrogen content, preheating temperature, heat input), crack coefficient: ratio of total crack surface to weld cross-sectional area
  • 22.
  • 23.
    IMPLANT TEST • TheImplant-Test allows the evaluation of the cold cracking susceptibility of a base material (HAZ) and the investigation of individual influencing variables. • The result is a characteristic value, e. g. the critical Implant stress for a diffusible hydrogen content and for a respective hard microstructure. • A cylindrical notched specimen of the test material is inserted into an appropriate borehole of a C-Mn steel plate to be welded to it by one bead (see Fig. 1). After cooling down to the testing temperature (e.g. 150°C) a constant test load is imposed on the specimen. Fracture or incipient crack of the specimen is determined. • Objective of the test:Cold cracking susceptibility of base materials • fields of application:Acceptance tests, research and development.
  • 24.
    IMPLANT TEST Materials:Implant-specimen ofhigh-strength unalloyed or low-alloyed steel (pipe, plate), in special cases made from weld metal. Test thicknesses:Specimen diameter 6 or 8 mm. Number of specimens:3 for each condition. Type of test:Testing of the HAZ in the Implant specimen. Loading:Constant optional test stress (e.g. base material yield strength). Test duration: ≥ 16 hours.
  • 25.
    IMPLANT TEST • Tensioning:Multiaxialstresses as a result of a defined notch, defined imposed uniaxial tensile stress, transformational residual stresses. • Crack location:HAZ. • Crack identification:Visual examination, incipient crack examination by means of metallographic sections or opening by force after oxidizing annealing (250°C/3h). Point in time of cracking by evaluation of the stress history. • Special influencing factors:Implant geometry, test load, defined preheating. • Criterion for the crackingsusceptibility:Conditions (weld metal hydrogen content, preheating temperature,heat input) on which no fractures or incipient cracks occur.
  • 26.
  • 27.
    Lehigh Restraint Test •Crack identification:Uses of visual examination on the surface of welds. The absence of cracks should be verified by NDT-tests and by using conventional metallographic examinations. • Special influencing factors:Chemical compositions of filler materials and base metal, preheating, heat input and weld-bead geometries. • Criterion for the cracking susceptibility:Various levels of restraint caused by sawing cut slots are usually assessed to gether with existing crack length in order to explain the cracking susceptibility of testing materials.
  • 28.
  • 29.
    Bend Test • Thebead bend test has been developed for evaluating HACC susceptibility of welded components. • Different test conditions, e.g. interpass temperature, different layer sequence, etc. can considered as experimental variables influencing crack behaviour of components. • In this approach, shrinkage of the testing welds during welding and subsequent cooling is hindered by anchored welds of test specimens with a massive bottom plate. • A exposed time of 24 hours at room temperature after welding is required before machining a test specimen. • After annealing at 250°C for 16 hours, the test specimen is bent in order to make visible micro cracks. The HACC susceptibility of the test specimen is assessed using visual observations on the polished test surface.
  • 30.
    Bend Test • Specialinfluencing factors:Plate thickness, homogeneous preheating of the specimen • Criterion for the cracking susceptibility:Quantity, length and location of cracks at the polished test surface