This tutorial teaches how to access a database from a Java EE application in NetBeans IDE. It involves creating an enterprise application, connecting to an existing database, generating entity and facade classes, adding JSF to the project, creating a controller managed bean, and displaying data from the database table on a web page using JSF tags.
Visual studio ide componects dot net framworkDipen Parmar
.NET - The IDE Components
Visual Basic .NET/The Visual Studio Integrated Development Environment. 1 IDE Contents. 1.1 Toolbox. 1.2 Solution Explorer. 1.3 Properties Windows. 1.4 Object Browser. Etc
//-------------------//
An integrated development environment (IDE) is a software application that provides comprehensive facilities to computer programmers for software development. An IDE normally consists of a source code editor, build automation tools, and a debugger.
7 Methods to Solve "You don't have appropriate permission to perform this ope...DataNumen, Inc.
When you try to access an archived PST file, Outlook throws out an error "You don’t have appropriate permission to perform this operation". Here we offer 7 menthods to solve the problem easily depending on diverse factors.
This slide is a tutorial about how to make a password storage using Excelsheet. We have to register on various website and most of the username and password is different. So if you have password storage, you don't have to remember a lot of password.
The tutorial describes the following topics in detail
CREATING AN ADF APPLICATION
DEPLOYING & RUNNING ADF APPLICATION ON WEBLOGIC SERVER
ADF DATA VISUALIZATION COMPONENTS
CREATING MORE COMPLEX BUSINESS COMPONENTS
CREATING MULTIPLE PAGE WEBSITES – PAGE FLOWS
CREATING JEE5 STATELESS SESSION EJBS
CREATING JAX-WS WEB SERVICES
ADDING THE NEW SERVICES INTO THE ADF APPLICATION
DATA VALIDATION (OPTIONAL)
• Create a new ADF Skin and check Skin values being used
• Change the page background and font family
• Update the look and feel for table headers and links
• Change the pane body and shape of tabs
• Implement dynamic skin change
Previous weeks work has been uploaded as well as any other pieces ne.docxkeilenettie
Previous weeks work has been uploaded as well as any other pieces needed.
Deliverables
All files are located in the subdirectory of the project. The project should function as specified: When you visit the Personnel form page (frmPersonnel.aspx), a record should be saved in the tblUserActivity table with the IP address, form name accessed (frmPersonnel), and the date accessed. When you click the View Activity button, you should see at least one record with this information. When the user goes to the frmPersonnel web form and enters data, the following business rules are to be enforced.
Fields may not be empty or filled with spaces. If any field is empty, turn that field background color to yellow and add to/create an error message to be shown in the error label.
The end date must be greater than the start date. If the end date is less than the start date turn both date fields yellow and add to/create an error message to be shown in the error label.
If all fields validate properly, then the session state items should be set properly and the user should see the frmPersonnelVerified form with all the values displayed. You will also add a new item to frmMain that will take the user to the new frmUserActivity form you added. Add the proper link and a hyperlinked image to allow the user to select this new option. Once you have verified that everything works, save your website, zip up all files, and submit it.
STEP 1: Step Title
1. Open Microsoft Visual Studio.NET.
2. Open the PayrollSystem website by clicking on it in the Recent Projects list, or by pulling down the File menu, selecting Open Website, navigating to the folder where you previously saved the PayrollSystem, and clicking Open.
3. Download the PayrollSystem_DB.accdb file from the Files section and save it on your local computer. (Note: your operating system may lock or block the file. Once you have copied it locally, right click on the file and select Properties and then Unblock if available). Then add it to the PayrollSystem website as follows: In Visual Studio, in the
Solution
Explorer click Website, Add Existing Item, then navigate to the PayrollSystem_DB.accdb file you downloaded, and click the Add button.
Make sure you select file types, which include *.accdb, *.accdb, etc. Otherwise, you will not be able to see the database file to select.
4. Now we need to create a new connection to the PayrollSystem_DB.accdb. To begin, click View Server Explorer.
5. When the Server Explorer toolbox appears, click the Connect to Database button.
6. When the Add Connection dialog appears, click the Change button. In the Change Data Source dialog, select MS Access Database File; Uncheck Always use this Selection; then click OK.
Press Continue to get the following screen.
7. Click the Browse button to navigate to the PayrollSystem_DB.accdb file in your website folder, then click Open. (NOTE: Be sure you select the PayrollSystem_DB.accdb file in your PayrollSystem website folder ...
Oracle EBS 12.1.3 : Integrate OA Framework BC4J components within java concur...Amit Singh
Every new release of Oracle EBS in last couple of years has proven that Oracle is relying more and more on Java based technologies to improve their customer experience. Oracle Application Framework (OAF) has been one of the development tool for HTML based self-service application development with in EBS. OAF is not limited to User interface development only. It can be also used in building concurrent program to perform background operation.
Discover how to integrate OA Framework BC4J component within Java concurrent program to perform a background job.
Create software builds with jazz team buildBill Duncan
A guide to using the Jazz Team Build feature in Rational Team Concert
Veena H. Balakrishnaiah (veena.balakrishna@in.ibm.com), Build and Release Engineer, IBM
Summary: Veena H. Balakrishnaiah gives an overview of how to configure source control and Jazz Team Build components of Rational Team Concert to define and manage your build. Jazz builds run against files that come from a designated build repository workspace and include traceability between change sets and work items. Jazz Team Builds provide support for the automation, monitoring, and awareness of a team's regular builds.
This article originally appeared at http://www.ibm.com/developerworks/rational/library/create-software-builds-jazz-team-build/index.html?ca=drs-
GEIT 3341 DATABASE I LAB 2
GEIT 3341 Database I
Lab 2
Web Development with Apex
Due Date:
Submission Method: Project Link, Username & Password
Objective(s) Target CLO(s) Reference
How to develop a web database
application using Oracle Application
Express. In today’s lab, you will learn
how to develop a web application from
a spreadsheet.
5 Instructor Demo Any
book and/or tutorial
on Oracle
Application Express
Name ID Section
Instructions:
This is a hands-on step-by-step lab that will teach you how to
• Build your first app through uploading a Spreadsheet
• Improve the Search and Report pages
GEIT 3341 DATABASE I LAB 2
PART 1: Create an app from Spreadsheet
You will build in this part a simple application based on a spreadsheet.
1. From your APEX workspace home page, click App Builder.
2. Click on Create a New App
GEIT 3341 DATABASE I LAB 2
4. Click the Copy and Paste option at the top and Select Project and Tasks from the sample
data set list and then click Next.
5. Set Table Name to PROJECT_TASKS and click Load Data.
7. Click Create App
3. Click From a File
6. Click on View Table
GEIT 3341 DATABASE I LAB 2
8. On the Create Application page, click Create App.
9. On the Create Application page, you can see all the listed pages. Click on Edit for more
details for a page.
10. Next to Feature, click Check all then click on Create Application
11. Now, you are redirected to the application's home page in the App Builder.
12. Click on Run Application to see how end users will see the app (a new web browser will
open). You have to enter your username and password you used to sign in into the APEX
workspace.
13. Explore the application by clicking on all the available buttons. (Click on Home button to
go back to the main page)
14. Click on Administration to review the options if needed
GEIT 3341 DATABASE I LAB 2
PART 2: Improve the Faceted Search
This part gives you a first-hand experience with enhancing the application by improving the
faceted search page for better clarity and improved usability.
1. For the runtime application, click on Project Tasks Search
2. In the toolbar (bottom of the page), click Edit page 3 (Note - End users who log directly
into the app will not see this toolbar.)
3. Alternatively, you can also navigate back to the APEX App Builder tab in your browser
manually by selecting the appropriate browser tab or window. Once in the App Builder
click 3 - Project Tasks Search.
4. You will have this window (The page should consist of three panes).
GEIT 3341 DATABASE I LAB 2
5. Under Search (from the left pane), within Facets then P3_STATUS
6. Currently the Status facet is a series of checkboxes. However, it is unlikely that users will
want to select more than one a ...
The Art Pastor's Guide to Sabbath | Steve ThomasonSteve Thomason
What is the purpose of the Sabbath Law in the Torah. It is interesting to compare how the context of the law shifts from Exodus to Deuteronomy. Who gets to rest, and why?
How to Split Bills in the Odoo 17 POS ModuleCeline George
Bills have a main role in point of sale procedure. It will help to track sales, handling payments and giving receipts to customers. Bill splitting also has an important role in POS. For example, If some friends come together for dinner and if they want to divide the bill then it is possible by POS bill splitting. This slide will show how to split bills in odoo 17 POS.
Model Attribute Check Company Auto PropertyCeline George
In Odoo, the multi-company feature allows you to manage multiple companies within a single Odoo database instance. Each company can have its own configurations while still sharing common resources such as products, customers, and suppliers.
Synthetic Fiber Construction in lab .pptxPavel ( NSTU)
Synthetic fiber production is a fascinating and complex field that blends chemistry, engineering, and environmental science. By understanding these aspects, students can gain a comprehensive view of synthetic fiber production, its impact on society and the environment, and the potential for future innovations. Synthetic fibers play a crucial role in modern society, impacting various aspects of daily life, industry, and the environment. ynthetic fibers are integral to modern life, offering a range of benefits from cost-effectiveness and versatility to innovative applications and performance characteristics. While they pose environmental challenges, ongoing research and development aim to create more sustainable and eco-friendly alternatives. Understanding the importance of synthetic fibers helps in appreciating their role in the economy, industry, and daily life, while also emphasizing the need for sustainable practices and innovation.
Unit 8 - Information and Communication Technology (Paper I).pdfThiyagu K
This slides describes the basic concepts of ICT, basics of Email, Emerging Technology and Digital Initiatives in Education. This presentations aligns with the UGC Paper I syllabus.
How to Make a Field invisible in Odoo 17Celine George
It is possible to hide or invisible some fields in odoo. Commonly using “invisible” attribute in the field definition to invisible the fields. This slide will show how to make a field invisible in odoo 17.
The Roman Empire A Historical Colossus.pdfkaushalkr1407
The Roman Empire, a vast and enduring power, stands as one of history's most remarkable civilizations, leaving an indelible imprint on the world. It emerged from the Roman Republic, transitioning into an imperial powerhouse under the leadership of Augustus Caesar in 27 BCE. This transformation marked the beginning of an era defined by unprecedented territorial expansion, architectural marvels, and profound cultural influence.
The empire's roots lie in the city of Rome, founded, according to legend, by Romulus in 753 BCE. Over centuries, Rome evolved from a small settlement to a formidable republic, characterized by a complex political system with elected officials and checks on power. However, internal strife, class conflicts, and military ambitions paved the way for the end of the Republic. Julius Caesar’s dictatorship and subsequent assassination in 44 BCE created a power vacuum, leading to a civil war. Octavian, later Augustus, emerged victorious, heralding the Roman Empire’s birth.
Under Augustus, the empire experienced the Pax Romana, a 200-year period of relative peace and stability. Augustus reformed the military, established efficient administrative systems, and initiated grand construction projects. The empire's borders expanded, encompassing territories from Britain to Egypt and from Spain to the Euphrates. Roman legions, renowned for their discipline and engineering prowess, secured and maintained these vast territories, building roads, fortifications, and cities that facilitated control and integration.
The Roman Empire’s society was hierarchical, with a rigid class system. At the top were the patricians, wealthy elites who held significant political power. Below them were the plebeians, free citizens with limited political influence, and the vast numbers of slaves who formed the backbone of the economy. The family unit was central, governed by the paterfamilias, the male head who held absolute authority.
Culturally, the Romans were eclectic, absorbing and adapting elements from the civilizations they encountered, particularly the Greeks. Roman art, literature, and philosophy reflected this synthesis, creating a rich cultural tapestry. Latin, the Roman language, became the lingua franca of the Western world, influencing numerous modern languages.
Roman architecture and engineering achievements were monumental. They perfected the arch, vault, and dome, constructing enduring structures like the Colosseum, Pantheon, and aqueducts. These engineering marvels not only showcased Roman ingenuity but also served practical purposes, from public entertainment to water supply.
The French Revolution, which began in 1789, was a period of radical social and political upheaval in France. It marked the decline of absolute monarchies, the rise of secular and democratic republics, and the eventual rise of Napoleon Bonaparte. This revolutionary period is crucial in understanding the transition from feudalism to modernity in Europe.
For more information, visit-www.vavaclasses.com
TESDA TM1 REVIEWER FOR NATIONAL ASSESSMENT WRITTEN AND ORAL QUESTIONS WITH A...
Tutorial 3 accessing the database
1. Tutorial 3: Accessing the Database
In this tutorial, you will learn how to access the database, retrieve data from one of its table and display the data
on a browser using Java EE in NetBeans IDE.
1. Open NetBeans.
2. Create a new Enterprise Application (refer to Tutorial 1 for the steps). If you have already created one,
then open it.
3. Create the database (refer to Tutorial 2 for the steps). If you have already created the database, then
make the connection by clicking the Services tab. Expand Databases until you come across the database
you have created previously, right-click the database then Connect.
4. At this point, your Enterprise Application Project should have the following files:
a. Entity class (<nameOfTable>.java)
b. Entity class session beans (AbstractFacade.java and <nameOfTableFacade.java)
If you still don't have these files at this point, then refer back to Tutorial 2 and create them.
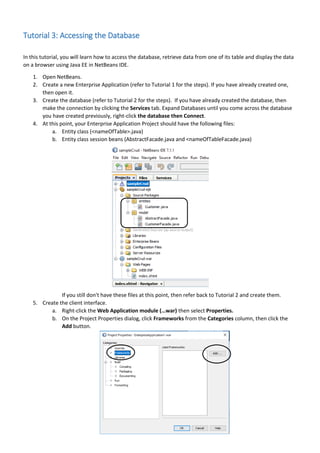
5. Create the client interface.
a. Right-click the Web Application module (…war) then select Properties.
b. On the Project Properties dialog, click Frameworks from the Categories column, then click the
Add button.
2. c. In the Add a Framework dialog, select JavaServer Faces then click OK.
d. In the application's Web Application module, expand Web Pages directory and delete index.html
or index.jsp. Make sure that only index.xhtml is left.
6. Create the controller object.
a. In the application's Web Application module, right-click Source Packages -> New -> Java
Package. Type controller as package name then click Finish.
b. Right-click the controller package then select New -> JSF Managed Bean (if you don't find this,
click Other -> JavaServer Faces -> JSF Managed Bean.
c. Type the name of the JSF managed bean, then change the Scope value to Session then click Finish
3. At the point, your enterprise application should have the following files in its directory:
7. Clean and build the application by right-clicking the project then select Clean and Build from the pop up
menu. You should see a green message that says that clean and build is successful. If the message is in
red, then it means that there are errors in the application and you should correct these.
8. Once the build is successful, click the Run button from the standard toolbar to test the application.
4. You should read something about Facelets on the browser of your desktop, like as follows:
9. Retrieve data from the table and display the data on the browser.
a. Place a form on your JSF (index.xhtml).
b. From the JSF Palette, drag a JSF Data Table From Entity object. If the Palette window is not
displayed, Click Window -> Palette from the menu bar or Window -> IDE Tools -> Palette. This
Palette should be displayed on the right side of the IDE screen.
c. You should see some JSF tags embedded in the body section of your index.xhtml file. These tags
would read as follows:
Drag this object
towards index.xhtml
body section.
5. 10. Add a new method in your controller that would display all records from the table.
a. Right-click the body of the controller class and select Insert Code -> Call Enterprise Bean.
b. Expand your ejb directory and select the appropriate …Façade file.
c. Add the method that would call the findAll() method from the session bean. Your controller code
should look like as follows:
Add this table attribute
if you want your table
to have borders.
6. d. Correct any errors (if there are any) by importing the necessary packages to gain access to the
library files you need – java.util.List and your entities package that contains your entity class.
e. Clean and Build, then run your program. You should see the following output on your browser.
Add this method to the controller
code. Make sure you use the correct
entity name (the one you have in
your entities package – in the ejb).
Your Project Directory
should have the following
files in it.