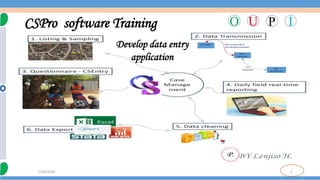
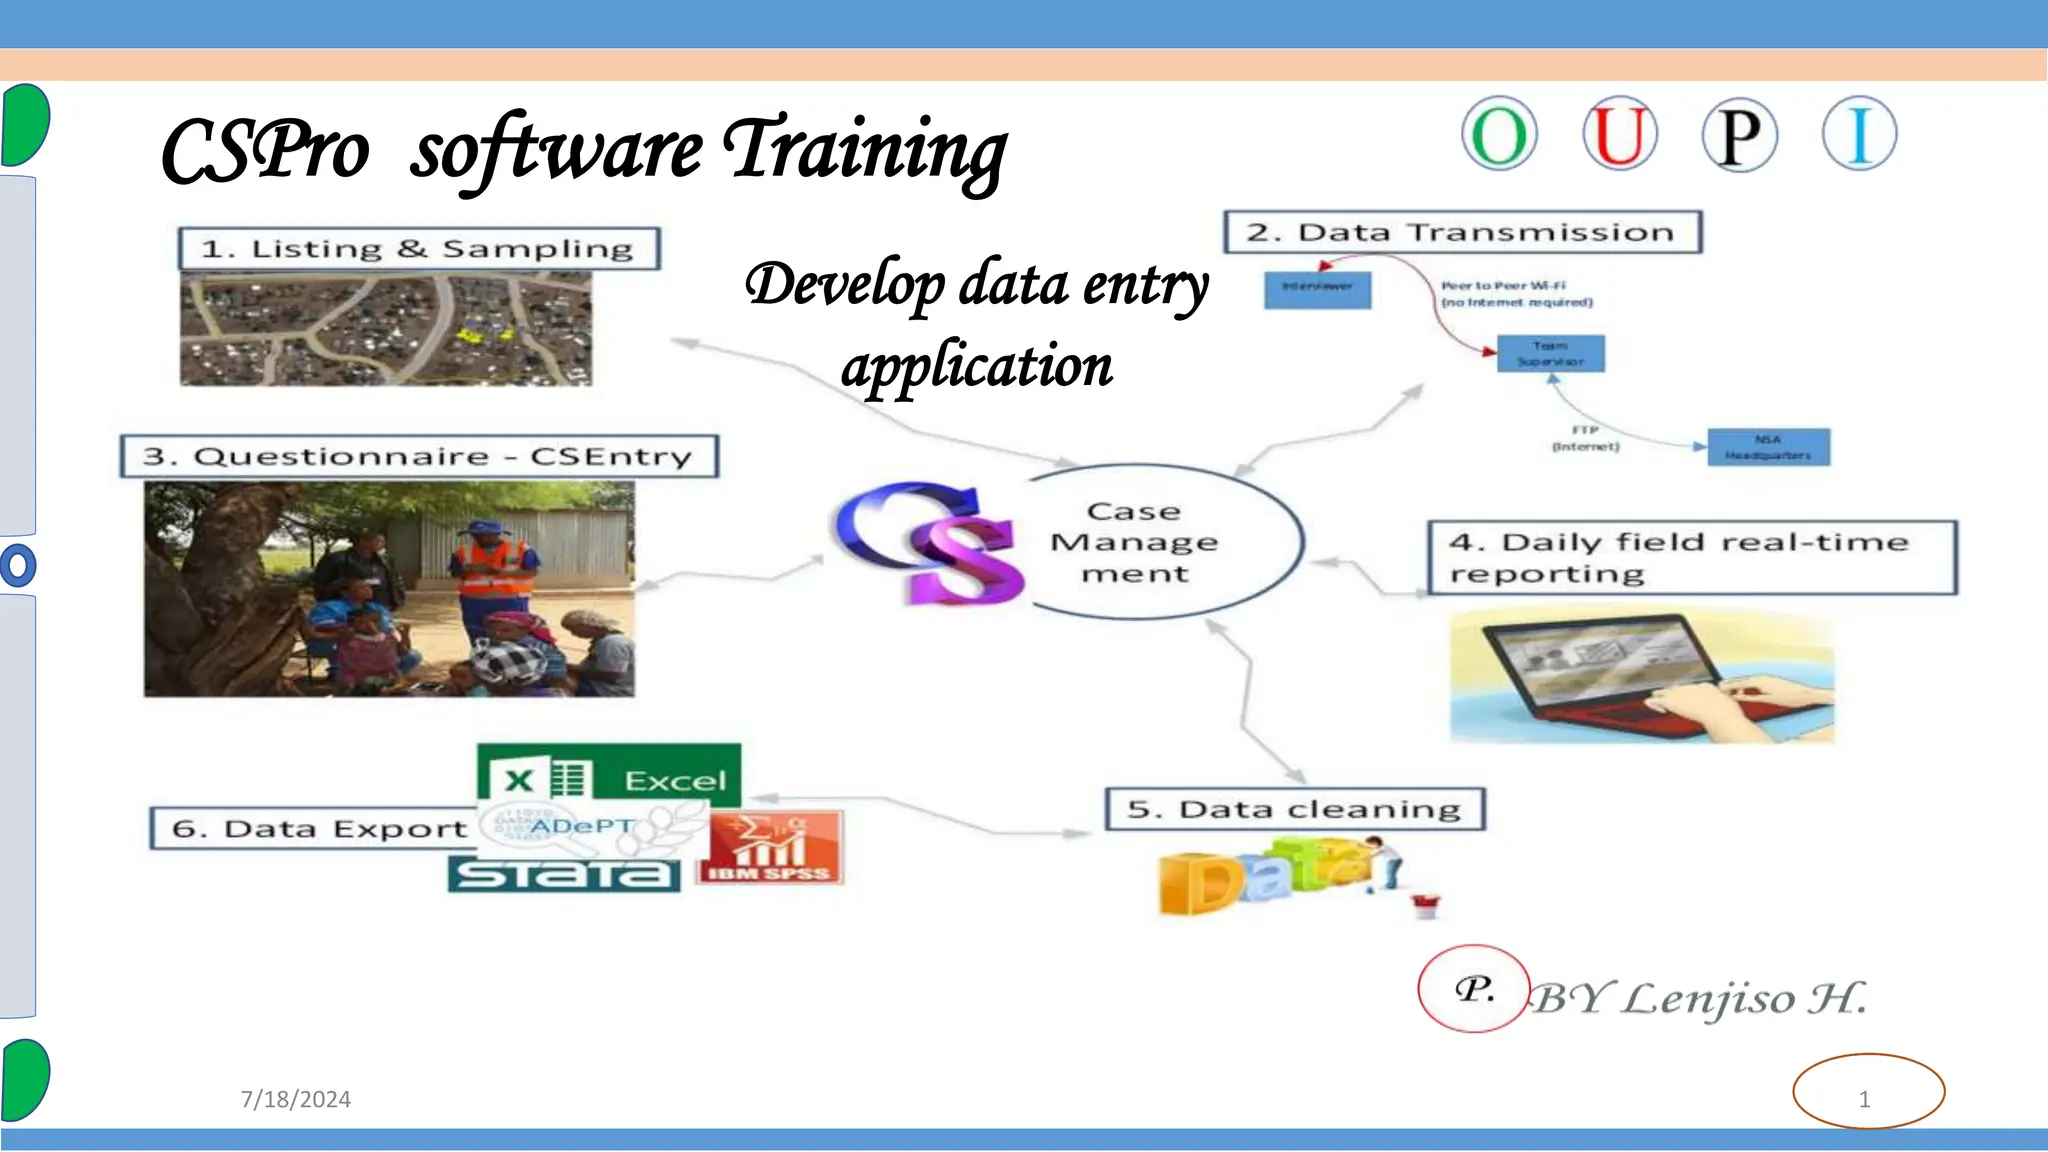
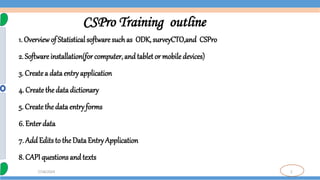
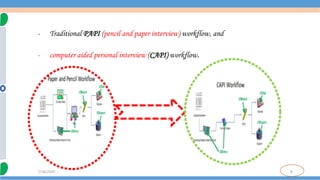
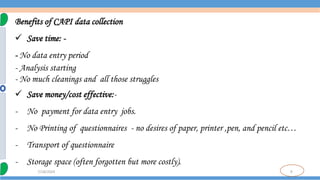
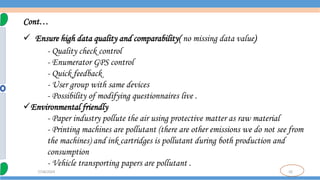
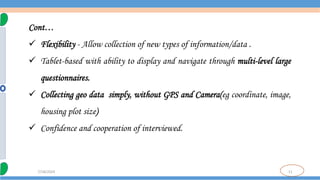
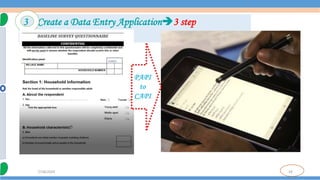
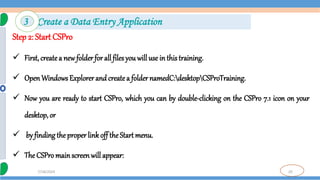
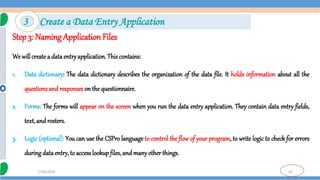
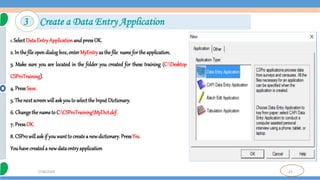
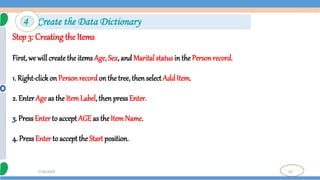
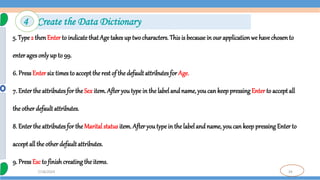
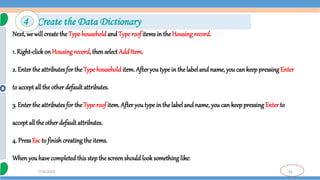
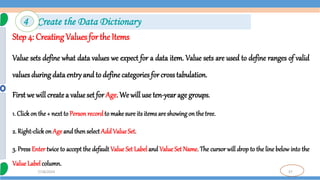
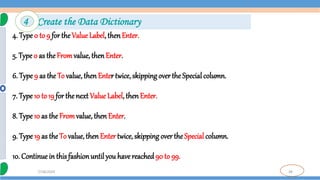
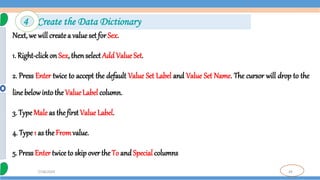
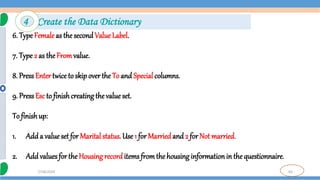
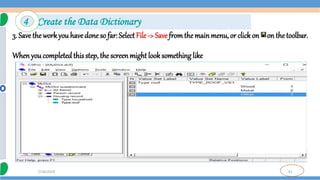
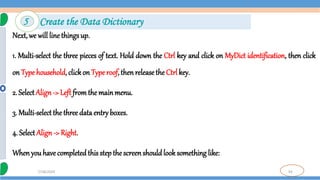
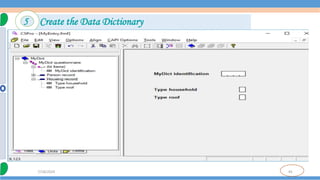
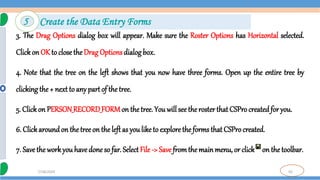
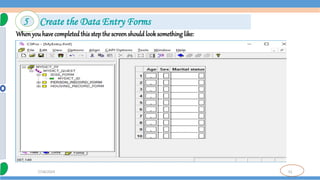
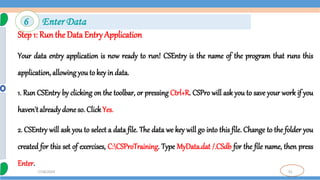
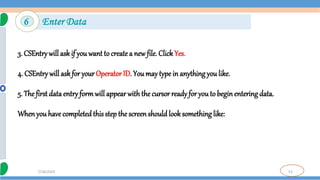
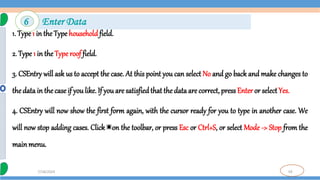
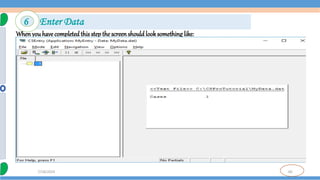
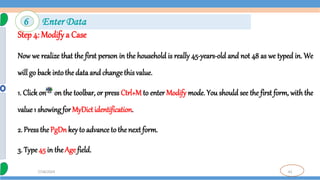
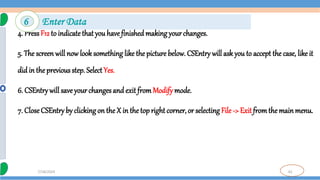
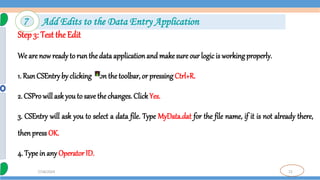
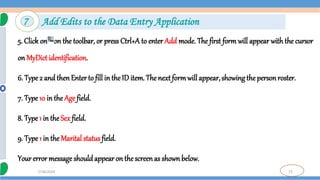
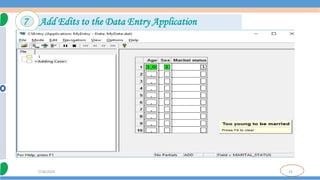
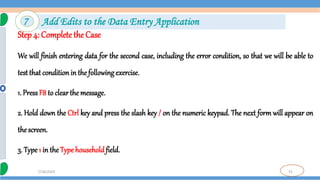
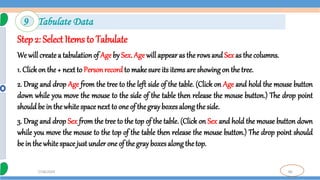
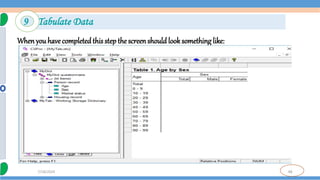
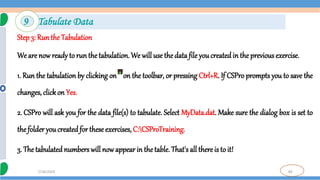
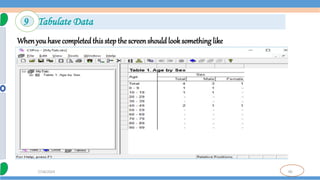
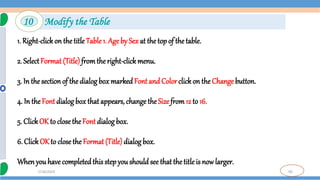
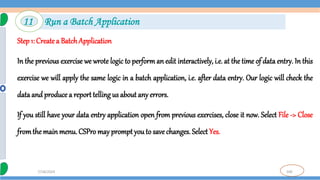
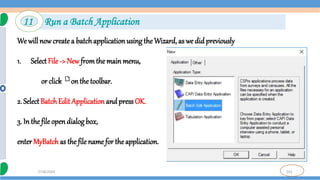
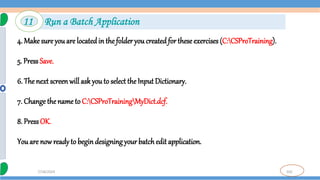
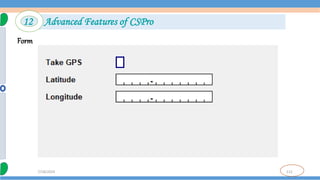
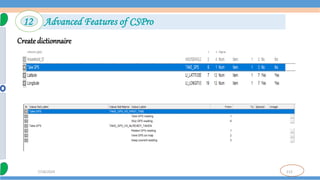
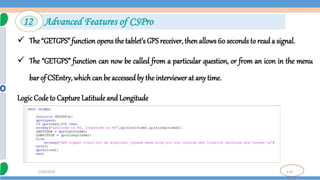
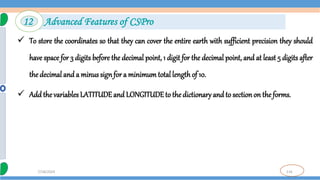
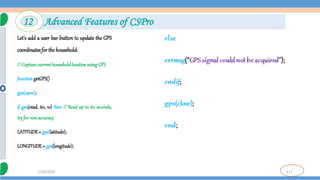
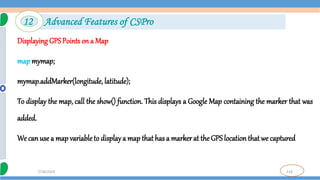
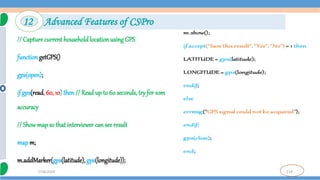
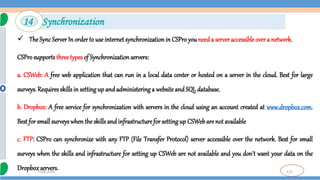
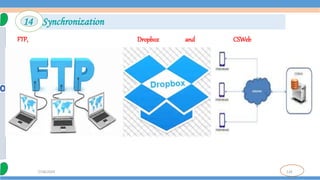
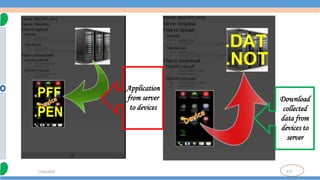
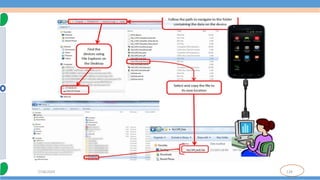
1
7/18/2024
CSPro software Training
Develop data entry
application
2
7/18/2024
CSPro Training outline
1. Overviewof Statistical software such as ODK, surveyCTO,and CSPro
2. Software installation(for computer, and tablet or mobile devices)
3. Createa data entryapplication
4. Create the data dictionary
5. Createthe data entry forms
6. Enterdata
7. AddEdits to the Data Entry Application
8. CAPI questions and texts
3
7/18/2024
CSPro Training outline
9. Tabulate Data
10. Modify the Table
11. Run a Batch Application
12. Advanced Features of CSPro such add GPS coordinate, photo(multimedia)
13. Menu Programs
14. Synchronization
15. CSProProcess Summary
4
7/18/2024
What is ODK?
 ODK stands for OpenData Kit.
 ODK is a set of free and open-source tools that are used for field data collection using Android
mobile phones (Devices).
 Open Data Kit has emerged as one of the most popular tools for projects data collection
especially because it allows offline data collection and submission to an online cloud server in
challenging environments. ODKmodule
1 Introduction
5
7/18/2024
What is surveyCTO?
 SurveyCTO is based on the Open Data Kit (ODK), the most widely-used open-source platform for
data collection.
 SurveyCTO is the most reliable, secure, and scalable mobile data collection platform for
Researchers and professionals.
 It is a powerful, field-tested platform that allows you to collect high-quality data using mobile
phones, tablets, or computers even whenyou’re offline Survey CTOmodule
1 Introduction
6
7/18/2024
What is CSPro?
 The Census and Survey Processing System (CSPro) is a software package for entry, editing,
tabulation, and dissemination of censusand survey data.
 CSPro combines thefeatures of
==> the Integrated Microcomputer Processing System(IMPS) and
==>the Integrated Systemfor Survey Analysis (ISSA).
 The data are stored in files describedby data dictionaries.
1 Introduction
7
7/18/2024
What is CSPro?
 CSPro also provides tools
- to viewdata and other text files.
- toviewtables and thematicmaps createdby CSPro
- to convert IMPS and ISSAdata dictionaries to and fromCSPro, and
- to convert ERSIshape files (maps) to CSPro map files.
1 Introduction
8
7/18/2024
- Traditional PAPI (pencil and paper interview) workflow, and
- computer aided personal interview (CAPI) workflow.
9
7/18/2024
Benefits of CAPI data collection
 Save time: -
- No data entry period
- Analysis starting
- No much cleanings and all those struggles
 Save money/cost effective:-
- No payment for data entry jobs.
- No Printing of questionnaires - no desires of paper, printer ,pen, and pencil etc…
- Transport of questionnaire
- Storage space (often forgotten but more costly).
10
7/18/2024
Cont…
 Ensure high data quality and comparability( no missing data value)
- Quality check control
- Enumerator GPS control
- Quick feedback
- User group with same devices
- Possibility of modifying questionnaires live .
Environmental friendly
- Paper industry pollute the air using protective matter as raw material
- Printing machines are pollutant (there are other emissions we do not see from
the machines) and ink cartridges is pollutant during both production and
consumption
- Vehicle transporting papers are pollutant .
11
7/18/2024
Cont…
 Flexibility - Allow collection of new types of information/data .
 Tablet-based with ability to display and navigate through multi-level large
questionnaires.
 Collecting geo data simply, without GPS and Camera(eg coordinate, image,
housing plot size)
 Confidence and cooperation of interviewed.
12
7/18/2024
Cont…
Support multiple language at the same time corresponding
Data capturing: entering data on a tablet
Survey management: managing teams of enumerators
Data management: data aggregation, versioning, reporting
Data security
13
7/18/2024
Installing a Newer Version
 Upgrading to CSPro 7.7 FromCSPro 7.1 or Earlier- withoutaffecting the previous version
 Updating a Previous Version of CSPro 7.1- It will not change any applications or other files that you
have created.
 Uninstalling CSPro
2 Installation
14
7/18/2024
Required Hardware and Software
Operating system: Android vs Windows
vs IOS
Processor: not an issue
RAM size: key factor
Wi-Fi - Required to be used for set-up,
upgrades, and syncing
Connectivity - 3G/4G
Screen Size - Depends on the requirement
of the survey.
2 Installation
15
7/18/2024
The final requirement for a CAPI survey is somewhere to store the data. CSPro offers the following data
storage options:
 Dropbox- provides two gigabytes of cloud storage at no charge to the user.
 A file transfer protocol (FTP) server- A local or cloud-based FTP server can be used with CSPro. An
FTP server can be set up locally on a server at headquarters, or in the cloud with options such as
FileZilla and Xflight
 A cloud-based or physical server with CSWeb installed- Setting up CSWeb cannot be done
independentlyand requires information technology (IT)staff to set up and test the server.
Server
16
7/18/2024
2 Installation
17
7/18/2024
Installing CSPro
The CSPro installer has the file name cspro7.1.exe. To install CSPro:
1. Double-clickon the file.
2. Selectthe components that youwant to install.
3. Selectthe folder where you want to install CSPro.
4. After CSPro has been installed on your computer,
5. You will finda CSPro 7.1 icon on your desktop
2 Installation
18
7/18/2024
3 Create a Data Entry Application3 step
19
7/18/2024
Step 1: Examine the Training Questionnaire
 Eachquestionnaire corresponds to a household.
 Eachquestionnaire (household) has a unique four-digit number at the top.
 We collect age, sex, and marital status for up to ten peoplein thehousehold.
 We collect type of housing and roof for the household.
3 Create a Data Entry Application
20
7/18/2024
Step 2: Start CSPro
 First, createa new folder for all files you will use in this training.
 OpenWindows Explorer and createa folder namedC:desktopCSProTraining.
 Now you are ready to start CSPro, which you can by double-clicking on the CSPro 7.1 icon on your
desktop, or
 by finding the properlink off theStart menu.
 The CSPro mainscreenwill appear:
3 Create a Data Entry Application
21
7/18/2024
3 Create a Data Entry Application
We will use the Wizardto createthe files that the data entry application
requires. Click on the radio button that says Createa new application.
You shouldsee the followingdialog box:
22
7/18/2024
Step 3: Naming Application Files
We will createa dataentryapplication. This contains:
1. Data dictionary: The data dictionary describes the organization of the data file. It holds information about all the
questions and responses on the questionnaire.
2. Forms: The forms will appear on the screen when you run the data entry application. They contain data entry fields,
text, and rosters.
3. Logic (optional): You can use the CSPro language to control the flow of your program, to write logic to check for errors
during data entry, to access lookup files, and manyother things.
3 Create a Data Entry Application
23
7/18/2024
3 Create a Data Entry Application
1. SelectDataEntryApplicationandpressOK.
2. In thefileopendialogbox,enterMyEntryasthefile namefortheapplication.
3. Make sure you are located in the folder you created for these training (C:Desktop
CSProTraining).
4. PressSave.
5. Thenextscreenwillaskyouto selecttheInputDictionary.
6. Changethenameto C:CSProTrainingMyDict.dcf.
7. PressOK.
8. CSProwillaskif youwantto createa newdictionary. PressYes.
Youhavecreateda newdataentryapplication
24
7/18/2024
Step 1: The ID Item
Every data dictionary requires at least one ID item, and you will often have more than one.
An ID (identification) itemis a unique number (or series of numbers)
- that allows CSPro to distinguish between individual questionnaires.
4 Create the Data Dictionary4 step
25
7/18/2024
Step 1: The ID Item
1. Clickon (IdItems), thenon the '+' next to it to open the tree on the left side of the screen.
- You will see that CSPro has createdone ID item.
- On the right side of the screen you will see in the Len column that this item has the length of one
character.
- We will make this four characters.
2. Right-clickon MyDict identification, below(Id Items) on the tree, and then select Modify Item.
4 Create the Data Dictionary
26
7/18/2024
Step 1: The ID Item
3. Press the Enter key three times until the lengthis highlighted in blue.
4. Type 4 and then Enter, then click on the white space below this line to finish making
this change.
When you have completed this step the screen should look something like
4 Create the Data Dictionary
27
7/18/2024
4 Create the Data Dictionary
28
7/18/2024
Step 2: The Records
 A record usually corresponds to a section of a questionnaire and consists of a group of related
questions.
 By default, CSPro creates one record.
 Our training application will have two records, a Person Recordand a Housing Record.
 We will change the one record that CSPro generated to Person Record, and then add the Housing
Record.
4 Create the Data Dictionary
29
7/18/2024
First, we will change the one record that CSPro generatedto PersonRecord:
1. Right-clickon MyDict record on thetree on theleft, thenselect Modify Record.
2. Type Person record as the Record Label, then pressEnter.
3. TypePERSON_RECORDas the RecordName, thenpressEnter.
4. PressEnter to leave the Type Value as is
5. Press N to change Required from Yes to No, then press Enter. Our application can have households with
no people, so personrecords are not required for us
4 Create the Data Dictionary
30
7/18/2024
6. Our application can have up to 10 people in a household, so type 10, then Enter, to change Max and
complete thechanges to this record.
Next we will add the Housing Record:
1. Right-clickon Person recordon the tree on the left, thenselect Add Record.
2. Type Housing recordas the Record Label, the press Enter.
3. PressEnter to accept HOUSING_RECORDas theRecord Name.
4 Create the Data Dictionary
31
7/18/2024
4. PressEnter to leave the Type Value as is.
5. Press Enter to leave Requiredas Yes.
6. PressEnter to leave Max as 1 and start a new record.
7. PressEsc on the blank recordto finish making thesechanges.
When youhave completedthis stepthe screenshould look something like:
4 Create the Data Dictionary
32
7/18/2024
4 Create the Data Dictionary
33
7/18/2024
Step 3: Creating the Items
First, we will create the items Age, Sex, and Marital status in the Personrecord.
1. Right-clickon Person recordon the tree, then selectAdd Item.
2. Enter Age as the ItemLabel, thenpressEnter.
3. PressEnter to accept AGE as the ItemName.
4. PressEnter to acceptthe Start position.
4 Create the Data Dictionary
34
7/18/2024
5. Type 2 thenEnter to indicate that Age takes up two characters. This is becausein our applicationwe havechosento
enter ages onlyup to 99.
6. Press Entersix times to accept the rest of the default attributes for Age.
7. Enter the attributes for theSex item. After youtype in the labeland name, you can keep pressing Enter to accept all
the other default attributes.
8. Enter the attributes for theMarital status item. After you type in the label and name, youcan keep pressingEnter to
accept all the other default attributes.
9. Press Esc to finish creating the items.
4 Create the Data Dictionary
35
7/18/2024
Next, we willcreatethe Typehouseholdand Type roof items in the Housing record.
1. Right-click on Housing record, then select Add Item.
2. Enter the attributes for the Type household item. Afteryoutype in the labeland name, you can keeppressingEnter
to accept all the other defaultattributes.
3. Enter the attributes for the Type roof item. After youtype in the labelandname, you can keep pressing Enter to
accept all the other default attributes.
4. Press Esc to finish creating the items.
Whenyouhavecompleted this stepthe screenshould looksomething like:
4 Create the Data Dictionary
36
7/18/2024
4 Create the Data Dictionary
37
7/18/2024
Step 4: Creating Values for the Items
Value sets define what data values we expect for a data item. Value sets are used to define ranges of valid
values during data entry and to define categories for crosstabulation.
First we will createa valueset for Age. We will use ten-year age groups.
1. Click on the + next to Person record to make sure its items are showingon the tree.
2. Right-click on Age and then select AddValueSet.
3. Press Enter twice to accept the default Value Set Label and Value Set Name. The cursor will drop to the line below into the
Value Label column.
4 Create the Data Dictionary
38
7/18/2024
4. Type 0 to 9 for the Value Label, thenEnter.
5. Type0 as theFromvalue, thenEnter.
6. Type 9 as the To value,then Enter twice, skipping over the Special column.
7. Type 10 to 19 for thenext Value Label, then Enter.
8. Type 10 as the Fromvalue, then Enter.
9. Type 19 as the To value,thenEnter twice, skipping overthe Special column.
10. Continuein this fashionuntil you have reached90 to 99.
4 Create the Data Dictionary
39
7/18/2024
Next, we will createa value set for Sex.
1. Right-clickon Sex, then select Add Value Set.
2. Press Enter twice to accept the default Value Set Label and Value Set Name. The cursor will drop to the
line belowintothe ValueLabel column.
3. TypeMale as the first Value Label.
4. Type 1 as theFromvalue.
5. Press Enter twice to skip over the To and Special columns
4 Create the Data Dictionary
40
7/18/2024
6. Type Female as the secondValue Label.
7. Type 2 as theFromvalue.
8. PressEnter twice to skip over the To and Special columns.
9. PressEsc to finishcreating thevalue set.
To finishup:
1. Add a value set for Marital status. Use 1 for Married and 2 for Not married.
2. Add values for the Housing recorditems fromthe housing informationin the questionnaire.
4 Create the Data Dictionary
41
7/18/2024
3. Save the work you havedone so far: Select File -> Save fromthe mainmenu, or clickon on the toolbar.
When youcompleted this step, the screenmight look something like
4 Create the Data Dictionary
42
7/18/2024
Step 1: Place ID and HousingItems on Form
 We will now switch fromthe data dictionary to the forms.
 Generally it is a good idea to make the data entry forms look just like the questionnaire
itself. We can easilydo this in CSPro.
 However, in order to show you more features and save time, we will not do so in this
training.
 We will place the dictionary items on the data entry form.
5 Create the Data Entry Forms 3 step
43
7/18/2024
1. Click on the toolbar. A blankgray formwill appear on the right hand side of the screen.
2. Make sure the items on the tree are expanded so you can see them all. If any item has a + sign next to it,
clickon the + sign.
3. Drag and drop MyDict identification from the tree to the top of the form. (Click on MyDict identification
and hold the mouse button down while you move the mouse to the top of the form, then release the mouse
button.)
4. Drag and drop Housing record from the tree to the form, underneath MyDict identification. Click OK to
accept the Drag Options settings.
5 Create the Data Dictionary
44
7/18/2024
Next, we will line things up.
1. Multi-select the three pieces of text. Hold down the Ctrl key and click on MyDict identification, then click
on Type household, clickon Type roof, then releasethe Ctrl key.
2. SelectAlign-> Left fromthe mainmenu.
3. Multi-selectthe three data entryboxes.
4. Select Align-> Right.
Whenyou have completedthis step the screenshould look something like:
5 Create the Data Dictionary
45
7/18/2024
5 Create the Data Dictionary
46
7/18/2024
Step 2: AddText and Boxes
First, we will add our own line of text at the top of the screen.
1. Right-clickon the form, somewhere aboveMyDict identification.
2. SelectAdd Text fromthe menu.
3. TypeMy First Application and then Enter (orclick on OK).
4. Adjust the position of the text until it is just where you want it. To do this, select the text (click on it)
and use the arrowkeys, or drag and drop the text to the new location..
5 Create the Data Entry Forms
47
7/18/2024
Next we will drawa box around the data entry fields.
1. Click on thetoolbar. A small toolbar will appear floating over the screen.
2. Clickon the box secondto the right of the floating toolbar.
3. Positionthe mouse pointer aboveand to theleft of MyDict identification.
4. Left-clickand hold the buttondown.
5. Drag the mousetoward theright and down.
6. Whenthe box looks the way you want it, release the mouse button.
5 Create the Data Entry Forms
48
7/18/2024
7. Click againon the toolbar to close the floatingtoolbar.
When youhave completedthis step
the screen should look
something like:
5 Create the Data Entry Forms
49
7/18/2024
Step 3: Generate Forms Automatically
CSPro allows you to generate a complete set of forms, which include all the items in the data dictionary,
in one operation. We will use this feature now in order to save time.
1. SelectEdit -> Generate Forms fromthe mainmenu, or press Ctrl+G.
2. CSPro will warn you that the forms you made in steps 1 and 2 will be replaced. Click on Yes to
continue.
5 Create the Data Entry Forms
50
7/18/2024
3. The Drag Options dialog box will appear. Make sure the Roster Options has Horizontal selected.
Clickon OK to close the Drag Optionsdialog box.
4. Note that the tree on the left shows that you now have three forms. Open up the entire tree by
clicking the + next to any part of the tree.
5. Clickon PERSON_RECORD_FORMon the tree. You will see the roster that CSProcreated for you.
6. Click aroundon thetree on the left as youlike to explore the forms that CSProcreated.
7. Save the workyou have done so far. Select File -> Save fromthe main menu, or click on the toolbar.
5 Create the Data Entry Forms
51
7/18/2024
Whenyouhavecompleted this stepthe screenshould looksomething like:
5 Create the Data Entry Forms
52
7/18/2024
Step 1: Run the Data Entry Application
Your data entry application is now ready to run! CSEntry is the name of the program that runs this
application, allowing you to key in data.
1. Run CSEntry by clicking on the toolbar, or pressing Ctrl+R. CSPro will ask you to save your work if you
haven't alreadydone so. ClickYes.
2. CSEntry will ask you to select a data file. The data we key will go into this file. Change to the folder you
created for this set of exercises, C:CSProTraining. Type MyData.dat /.CSdb for the file name, then press
Enter.
6 Enter Data
53
7/18/2024
3. CSEntry will ask if you want to create a new file. ClickYes.
4. CSEntry will ask for your Operator ID. You may type in anything you like.
5. The first data entry formwill appear with the cursor ready for youto beginentering data.
Whenyou have completedthis step the screenshould look something like:
6 Enter Data
54
7/18/2024
6 Enter Data
55
7/18/2024
Step 2: Adda Case
We will now type in the data for our first case (questionnaire). We will use a fictitious familyof four.
1. Type1 thenEnter to fill in the ID item. The next formwill appear, showing the person roster.
2. Type 48 in the Age field. The cursor will move to the Sex field.
3. Type 3 in the Sex field. CSEntry will tell you this value is out of range, because it is not in the value set
for Sex you created in your data dictionary.
6 Enter Data
56
7/18/2024
4. With the OUT OF RANGE message still showing, type 1. The message will go away and the cursor will
moveto the Marital status field.
5. Continue typing in data for thefamilyas shownbelow. Some CSEntry tips:
. You can movebackward to the previous field using Shift+Tab, left arrow or up arrow.
. You can moveforwardto the next field using Enter, Tab, right arrowor downarrow.
. You can change a field by simplytyping a new number intoit.
. You can erase a field using thespace bar
6 Enter Data
57
7/18/2024
6 Enter Data
58
7/18/2024
Step 3: Finish Adding a Case
We will now tell the rosterthat we have finished entering people.
1. Hold downthe Ctrl key.
2. Press the slash key / (on the numeric keypad). The next form will appear on the screen. If you have
trouble finding this key combination, which could be the case on some laptops, you can select Navigation
-> End Groupfromthe mainmenu.
Next we will type in thehouseholdformand end the case.
6 Enter Data
59
7/18/2024
1. Type1 in the Type householdfield.
2. Type 1 in theType roof field.
3. CSEntry will ask us to accept the case. At this point you can select No and go back and make changes to
thedata in thecase if you like. If you are satisfiedthat the data are correct, pressEnter or selectYes.
4. CSEntry will now show the first form again, with the cursor ready for you to type in another case. We
will now stop adding cases. Click on the toolbar, or press Esc or Ctrl+S, or select Mode -> Stop from the
mainmenu.
6 Enter Data
60
7/18/2024
Whenyouhavecompleted this stepthe screenshould looksomething like:
6 Enter Data
61
7/18/2024
Step 4: Modifya Case
Now we realize that the first person in the household is really 45-years-old and not 48 as we typed in. We
will go back intothe data and changethis value.
1. Click on on the toolbar, or press Ctrl+M to enter Modify mode. You should see the first form, with the
value1 showing for MyDictidentification.
2. Pressthe PgDnkey to advance to the next form.
3. Type45 in theAge field.
6 Enter Data
62
7/18/2024
4. PressF12 to indicatethat you havefinished making your changes.
5. The screen will now look something like the picture below. CSEntry will ask you to accept the case, like it
didin the previous step. Select Yes.
6. CSEntry will save your changes and exit fromModify mode.
7. CloseCSEntry by clickingon the X in the topright corner, or selecting File -> Exit fromthemainmenu.
6 Enter Data
63
7/18/2024
6 Enter Data
64
7/18/2024
Step 1: Write Logic for the Edit
7 Add Edits to the Data Entry Application
65
7/18/2024
Step 1: Write Logic for the Edit
We will now return to the data entry application. We will introduce a check to make sure that married
people are at least12-years-old. In our data entry application, we will perform this check immediately after
the keyer enters the maritalstatus.
If you still have your cross tabulation application open from previous exercises, close it now. Select File ->
Close fromthe main menu. CSPro may promptyou to save changes. SelectYes.
7 Add Edits to the Data Entry Application
66
7/18/2024
1. Open the data entry application we created earlier. Click on on the toolbar, or select File -> Open from
the mainmenu. Clickon the applicationname, MyEntry.ent, and clickOpen.
2. Get ready to write logic by clicking on the toolbar, or pressing Ctrl+L or selecting View -> Logic from
the mainmenu.
3. PressCtrl+Tto show names insteadof labels in the forms tree.
4. Click on the + next to PERSON_RECORD_FORM then click on the + next to PERSON_RECORD000 then
click on MARITAL_STATUS. The frame on the right hand side of the screen should show PROC
MARITAL_STATUS at the top.
7 Add Edits to the Data Entry Application
67
7/18/2024
5. Note that PROC is short for procedure. We put our logic in the procedure for MARITAL_STATUS
becausewe want it to execute immediatelyafterthe operator keys this field.
6. Type in thelogic codeexactlyas you see below.
PROC MARITAL_STATUS
if MARITAL_STATUS= 1 and AGE < 12 then
errmsg("Tooyoung to be married");
endif;
7 Add Edits to the Data Entry Application
68
7/18/2024
7 Add Edits to the Data Entry Application
69
7/18/2024
Step 2: Compile the Logic
You have typed logic in the CSPro language. Like all procedural languages, the system must check to
make sure that there are no syntax errors. This is calledcompiling.
1. Clickon MYDICT_FF in the forms tree to showall the CSPro logic.
2. Compile the logic by clicking on the toolbar, or pressing Ctrl+K or selecting File -> Compile from the
mainmenu.
3. If you typed the logic correctly, you will see Compile Successful in the Compiler Output window under
the logic.
7 Add Edits to the Data Entry Application
70
7/18/2024
4. If you see a dialog box that says Compile Failed, you have typed something incorrectly. A red circle will
appear in the margin indicating the approximate location of the error. The Compiler Output tab at the
bottom of the screen will show you an error message to help you determine the error. Check very carefully
to make sure youtyped in exactly whatwas shownin the previous step.
Whenyou have completedthis step the screenshould look something like:
7 Add Edits to the Data Entry Application
71
7/18/2024
7 Add Edits to the Data Entry Application
72
7/18/2024
Step 3: Test the Edit
We are now ready to runthe data application and make sure our logic is working properly.
1. Run CSEntry by clicking on the toolbar, or pressing Ctrl+R.
2. CSPro will ask you to save the changes. ClickYes.
3. CSEntry will ask you to select a data file. Type MyData.dat for the file name, if it is not already there,
thenpress OK.
4. Type in any Operator ID.
7 Add Edits to the Data Entry Application
73
7/18/2024
5. Click on on the toolbar, or press Ctrl+A to enter Add mode. The first form will appear with the cursor
on MyDict identification.
6. Type 2 and thenEnter to fill in the ID item. The next formwill appear,showing the person roster.
7. Type 10 in the Age field.
8. Type 1 in the Sex field.
9. Type 1 in the Marital status field.
Your error message shouldappear on the screenas shownbelow.
7 Add Edits to the Data Entry Application
74
7/18/2024
7 Add Edits to the Data Entry Application
75
7/18/2024
Step 4: Complete the Case
We will finish entering data for the second case, including the error condition, so that we will be able to
test that conditionin the following exercise.
1. PressF8 to clearthe message.
2. Hold down the Ctrl key and press the slash key / on the numeric keypad. The next form will appear on
the screen.
3. Type1 in theTypehouseholdfield.
7 Add Edits to the Data Entry Application
76
7/18/2024
4. Type 1 in the Type roof field.
5. CSEntry will ask us to accept the case. Select Yes.
6. Click on the toolbar, or press Esc or Ctrl+S, or select Mode -> Stop fromthe main menu.
7. Close CSEntry by clicking on the X in the top right corner, or selecting File -> Exit from
the main menu
7 Add Edits to the Data Entry Application
77
7/18/2024
Step1: Adding CAPI questions and texts
To add CAPI questions, we first needto tell CSProthat this is a CAPI application.
Choose Options – Data Entry… from the menu, and tick “CAPI mode” in the resulting data entry options
window:
8 CAPI questions and texts
78
7/18/2024
Whenpressing OK, the Form has changedslightly:
On top there is a yellow, emptyfield.
This is where the questions for the interviewerto read, as well as additional
instructions to him– if needed.
To add CAPI question to an item:
Make sure the Form treeis shownin theleft pane
(click theForms tab on the bottomof the window),
and highlight the itemyouwant to makethe question for.
8 CAPI questions and texts
79
7/18/2024
thenclick the CAPI questions button on the toolbar (shown below):
8 CAPI questions and texts
80
7/18/2024
The CAPI question editor has two default fonts. The first one is to use for the questions, and the other one to use for
additional comments or information to the interviewer likethis:
8 CAPI questions and texts
81
7/18/2024
Step2: Data entry options window
Selecting “Options” – “Data entry...” pops up a windowgiving options on how the application
should behave. We saw that we can define theapplicationto be a CAPI application. Here we shall
explore some of the other options available.
8 CAPI questions and texts
82
7/18/2024
Step3: More about the Data entry options window
Turning off the question about Operator ID
The questionabout Operator ID can be turned off. This is handyduringthe development of the
application, as much testing is needed, and it is annoying to have to answer this question every
time. To turnit off, select Options – Data Entry Options… fromthe toolbar, and un-tick“Askfor
operator ID” (but do rememberto turn in back on whenthe application is finished).
8 CAPI questions and texts
83
7/18/2024
Step 1: Create a Tabulation Application
In this exercise we will performsimple cross tabulations of the data you enteredin the previous exercise.
If you still have your data entry application open from previous exercises, close it now. Select File -> Close
fromthe main menu. CSPro may prompt you to save changes. Select Yes.
We will now create a crosstabulationapplicationusing the Wizard, as we did previously.
9 Tabulate Data
84
7/18/2024
9 Tabulate Data
1. Select File -> New from the main menu, or click on the
toolbar.
2. Select Tabulation Application and press OK.
3. In the file open dialog box, enter MyTab as the file name
for the application.
4. Make sure you are located in the folder you created for
these exercises (C:CSProTraining).
5. PressSave.
6. The next screen will ask you to select the Input
Dictionary.
7. Change the nameto C:CSProTrainingMyDict.dcf.
8. Press OK
85
7/18/2024
You are now ready to begin designing your tabulation. When you have completed this step the screen
should look something like:
9 Tabulate Data
86
7/18/2024
Step2: Select Items to Tabulate
We will create a tabulationof Age by Sex. Age will appear as the rows and Sex as the columns.
1. Clickon the + next to Personrecordto make sure its items are showing on the tree.
2. Drag and drop Age from the tree to the left side of the table. (Click on Age and hold the mouse button
down while you move the mouse to the side of the table then release the mouse button.) The drop point
should be in the white space next to one of thegray boxes along the side.
3. Drag and drop Sex from the tree to the top of the table. (Click on Sex and hold the mouse button down
while you move the mouse to the top of the table then release the mouse button.) The drop point should
be in the whitespace justunder one of the gray boxes along the top.
9 Tabulate Data
87
7/18/2024
Tips for creating tabulations:
 The item you drag from the dictionary tree will become either a row item or a column item depending
on where you drop it. Imagine a diagonal line from the top left to the bottom right of the table. An
item dropped on the left/under that line becomes a row item. An item dropped on the right/above
that line becomes a column item.
 You can remove an item from the table by clicking on any of its associated labels then dragging and
dropping it back to the dictionarytree.
9 Tabulate Data
88
7/18/2024
Whenyou have completedthis step the screenshould look something like:
9 Tabulate Data
89
7/18/2024
Step 3: Run the Tabulation
We are now ready to runthe tabulation. We will use the data file youcreatedin the previous exercise.
1. Run the tabulation by clicking on on the toolbar, or pressing Ctrl+R. If CSPro prompts you to save the
changes, clickon Yes.
2. CSPro will ask you for the data file(s) to tabulate. Select MyData.dat. Make sure the dialog box is set to
thefolder youcreatedfor these exercises, C:CSProTraining.
3. The tabulated numbers will now appear in the table. That's all thereis to it!
9 Tabulate Data
90
7/18/2024
Whenyou have completedthis step the screenshould look something like
9 Tabulate Data
91
7/18/2024
Step 1: Add Percent's
In this exercise we will modify the table you created in the previous exercise. We will begin by adding
percent's to the columns next to the values for the Sex variable.
1. Right-clickon the word Sex on the table,
just abovethe word Male.
2. SelectTally Attributes (Sex) fromthe right-click menu.
3. In the list on the left of the dialog box marked Available,
clickon Percent's and then clickthe Add --> button.
You shouldnow see Percent'slisted in the list on right of the dialog box marked Selected.
10 Modify the Table
92
7/18/2024
4. Click OK. You should see three new columns on the table for the percents.
5. Run the tabulation by clicking on the toolbar, or pressing Ctrl+R. When CSPro prompts you to save
the changes, click on Yes.
6. Select MyData.dat as the data file to tabulate, as in the previous exercise.
Whenyou have completedthis step you should see a table that looks something like
10 Modify the Table
93
7/18/2024
9 Tabulate Data
94
7/18/2024
Step 2: Add a Universe
We will now add a universeto our table.
A universeis a filter, or a way of restricting
the table to a subset of the data records that meet
a certaincondition. In this step we will run
the table for married people.
10 Modify the Table
95
7/18/2024
1. Right-clickanywhere on the table.
2. SelectTally Attributes (Table) fromthe right-clickmenu.
3. In the section of the dialog box marked Universe, type MARITAL_STATUS = 1. Be sure to type this
correctly, otherwiseyou may see the message "InvalidUniverse Syntax."
4. Click OK.
5. Run the tabulation by clicking on the toolbar, or pressing Ctrl+R. When CSPro prompts you to save
the changes, click on Yes.
10 Modify the Table
96
7/18/2024
6. Select MyData.dat as the data file to tabulate, as in the previous exercise.
Whenyou have completedthis step you should see a table that looks something like the following.
Notice that the counts are lower thanin the previous step becausewe are not counting unmarriedpeople.
10 Modify the Table
97
7/18/2024
10 Modify the Table
98
7/18/2024
Step 3: Changethe TitleFont
CSPro gives you great control
over the format of your tables.
As an example,
in this step we will changethe font of our
table's title to make it bigger
10 Modify the Table
99
7/18/2024
1. Right-clickon the title Table 1. Age by Sex at the top of the table.
2. SelectFormat (Title) fromthe right-clickmenu.
3. In the sectionof the dialog box markedFont and Color clickon the Change button.
4. In the Font dialog box that appears, change the Size from12 to 16.
5. ClickOK to close the Font dialog box.
6. Click OK to close the Format (Title)dialog box.
Whenyou have completedthis step you should see that the title is now larger.
10 Modify the Table
100
7/18/2024
Step 1: Create a BatchApplication
In the previous exercise we wrote logic to perform an edit interactively, i.e. at the time of data entry. In this
exercise we will apply the same logic in a batch application, i.e. after data entry. Our logic will check the
data and produce a reporttelling us about any errors.
If you still have your data entry application open from previous exercises, close it now. Select File -> Close
fromthe mainmenu. CSPro may prompt you to save changes. Select Yes.
11 Run a Batch Application
101
7/18/2024
We will now create a batchapplicationusing the Wizard, as we did previously
1. Select File -> New fromthe main menu,
or click on the toolbar.
2. SelectBatchEdit Application and press OK.
3. In the file open dialog box,
enter MyBatch as the file name for the application.
11 Run a Batch Application
102
7/18/2024
4. Make sure you are locatedin the folder you created for theseexercises (C:CSProTraining).
5. Press Save.
6. The next screenwill ask you to select the Input Dictionary.
7. Change the name to C:CSProTrainingMyDict.dcf.
8. PressOK.
You are now readyto begin designing your batchedit application.
11 Run a Batch Application
103
7/18/2024
11 Run a Batch Application
104
7/18/2024
Step 2: Write Logic and Compile
We will write the same logic we used in the previous exercise.
 PressCtrl+Tto show names insteadof labels in the edits tree.
 Click on the + next to PERSON_RECORD_EDT then click on MARITAL_STATUS. The frame on the
righthand side of the screenshouldshow PROC MARITAL_STATUS at the top.
 Type in the logicexactlyas you see below.
11 Run a Batch Application
105
7/18/2024
Note that we used $ in place of MARITAL_STATUS. This is the same thing because the logic is inside the procedure for
MARITAL_STATUS. In the CSPro language, $ is a short wayof saying"this item."
Compilethe logic by clicking on the toolbar, or pressingCtrl+Kor selecting File -> Compile fromthe mainmenu.
Correct anyerrorsuntil yousee CompileSuccessful.
PROCMARITAL_STATUS
if $ = 1 andAGE< 12 then
errmsg("Tooyoung to be married");
endif;
11 Run a Batch Application
106
7/18/2024
11 Run a Batch Application
107
7/18/2024
Step 3: Run the Batch Application
Your batch application is now ready to run. CSBatch is the name of the program that runs this
application. We will use the data file you createdin the previous exercise.
1. Run CSBatchby clicking on the toolbar, or pressing Ctrl+R.
2. CSPro will ask you to save the changes. ClickYes.
3. CSBatch will ask for some data file names. Click in the empty box next to Input Data File and type in
MyData.dat and clickOK.
11 Run a Batch Application
108
7/18/2024
CSBatchwill now runyour program.
11 Run a Batch Application
109
7/18/2024
Step 4: Examine the OutputReport
TheoutputreportwillappearintheCSProTextViewer. It willlooksomethinglike:
Application C:CSProTrainingMyBatch.bch
Type BATCH
Input Data<<TextFile>>C:CSProTrainingMyData.dat
<Output> <<Empty>>
Date August17,2023
StartTime 07:11:00
EndTime 07:11:00
11 Run a Batch Application
110
7/18/2024
11 Run a Batch Application
111
7/18/2024
Capturing LocationCoordinates
 To capture GPS coordinatesin CSPro, the first step is to create variables to store the GPS data.
 For simple purposes, latitude and longitude are needed, but more advanced system designers can
also collect information about altitude, satellites, accuracy, and readtimes.
The formats for latitude and longitude in the data dictionary
12 Advanced Features of CSPro
112
7/18/2024
Form
12 Advanced Features of CSPro
113
7/18/2024
Create dictionnaire
12 Advanced Features of CSPro
114
7/18/2024
 The “GETGPS” function opens the tablet’s GPS receiver, then allows 60 seconds to reada signal.
 The “GETGPS” function can now be called from a particular question, or from an icon in the menu
bar of CSEntry, whichcan be accessed by the interviewerat any time.
Logic Code to Capture Latitude and Longitude
12 Advanced Features of CSPro
115
7/18/2024
 In addition to querying the GPS latitude and longitude you can also query the accuracy, number of
satellites, and altitude (althoughon Android altitude is not very accurate).
 The longitude and latitude reported are in degrees in the WGS84 datum and are returned as decimal
numbers.
 To save the GPS coordinates in our data file we need to add the appropriate variables to our
dictionary.
12 Advanced Features of CSPro
116
7/18/2024
 To store the coordinates so that they can cover the entire earth with sufficient precision they should
have space for 3 digits before the decimal point, 1 digit for the decimal point, and at least 5 digits after
the decimal and a minus signfor a minimum total length of 10.
 Add the variables LATITUDEand LONGITUDEto the dictionary and to sectionon theforms.
12 Advanced Features of CSPro
117
7/18/2024
Let's add a user bar button to update the GPS
coordinatesforthe household:
// Capture current household location using GPS
functiongetGPS()
gps(open);
if gps(read, 60, 10) then // Read up to 60 seconds,
tryfor 10maccuracy
LATITUDE= gps(latitude);
LONGITUDE= gps(longitude);
12 Advanced Features of CSPro
118
7/18/2024
Displaying GPSPoints on a Map
map mymap;
mymap.addMarker(longitude, latitude);
To display the map, call the show() function. This displays a Google Map containing the marker that was
added.
We can use a map variable to displaya map that has a marker at the GPS locationthat we captured
12 Advanced Features of CSPro
119
7/18/2024
// Capture current household location using GPS
function getGPS()
gps(open);
if gps(read, 60, 10) then // Read up to 60 seconds, try for 10m
accuracy
// Showmap so that interviewer can see result
map m;
m.addMarker(gps(latitude), gps(longitude));
12 Advanced Features of CSPro
120
7/18/2024
Variables of type map have many other functions that let you customize the map, the markers, add
buttons and run logic functions when markers are tapped. You can also use offline base maps for
situations where you do not havean internet connection.
12 Advanced Features of CSPro
121
7/18/2024
A menu program is a CSPro data entry application that is used to manage the data entry workflow. A
menu program is not used for capturing any interview data itself. Instead, it launches other data entry
programs for interviews. Menu programs generallyhave some or all of following functions:
 LaunchesotherCSPro applications to do data collection(often pre-filling id items)
 Showreports on progress, summarystatistics
 Manage useraccessthroughusernames/passwords
 Manage household listing and interview assignments
 Launchsynchronization
13 Menu Programs
122
7/18/2024
Designingthe Screens and Flow
Once you decide on which functions you want
yourmenuprogramto perform,
the next stepis to design the screens and
howtheylink together.
This is most easilydone as a diagramlike the one belowfor
a fairlysimple menuprogram.
13 Menu Programs
123
7/18/2024
 Deployapplications to mobile devices over the internet
 Use the synchronization options dialog to add synchronizationto an application
 Create advanced synchronizations using CSPro logic to synchronize data files and update
applications in the field
 Create peer to peer synchronizations betweendevices for situations where there is no internetaccess
14 Synchronization
124
7/18/2024
14 Synchronization
125
7/18/2024
 The Sync Server In order to use internet synchronizationin CSPro you needa server accessible over a network.
CSProsupports three types of Synchronizationservers:
a. CSWeb: A free web application that can run in a local data center or hosted on a server in the cloud. Best for large
surveys. Requires skillsin settingup and administering a website andSQL database.
b. Dropbox: A free service for synchronization with servers in the cloud using an account created at www.dropbox.com.
Best for small surveyswhenthe skills and infrastructure for setting up CSWebare not available
c. FTP: CSPro can synchronize with any FTP (File Transfer Protocol) server accessible over the network. Best for small
surveys when the skills and infrastructure for setting up CSWeb are not available and you don't want your data on the
Dropboxservers.
14 Synchronization
126
7/18/2024
FTP, Dropbox and CSWeb
14 Synchronization
127
7/18/2024
Application
from server
to devices
Download
collected
data from
devices to
server
128
7/18/2024
129
7/18/2024
Conclusion
Congratulations! You have completed the CSPro training. We hope you are now ready to try creating and
running your own applications. Please refer to our User's Guides for more details. You can access them
fromCSPro simply by selecting Help -> Help Topics fromthe main menuof any CSPromodule.
15 CSPro Process Summary
130
Th@nk U...!
7/18/2024

Training on CSPro and step by steps.pptx

  • 1.
  • 2.
    2 7/18/2024 CSPro Training outline 1.Overviewof Statistical software such as ODK, surveyCTO,and CSPro 2. Software installation(for computer, and tablet or mobile devices) 3. Createa data entryapplication 4. Create the data dictionary 5. Createthe data entry forms 6. Enterdata 7. AddEdits to the Data Entry Application 8. CAPI questions and texts
  • 3.
    3 7/18/2024 CSPro Training outline 9.Tabulate Data 10. Modify the Table 11. Run a Batch Application 12. Advanced Features of CSPro such add GPS coordinate, photo(multimedia) 13. Menu Programs 14. Synchronization 15. CSProProcess Summary
  • 4.
    4 7/18/2024 What is ODK? ODK stands for OpenData Kit.  ODK is a set of free and open-source tools that are used for field data collection using Android mobile phones (Devices).  Open Data Kit has emerged as one of the most popular tools for projects data collection especially because it allows offline data collection and submission to an online cloud server in challenging environments. ODKmodule 1 Introduction
  • 5.
    5 7/18/2024 What is surveyCTO? SurveyCTO is based on the Open Data Kit (ODK), the most widely-used open-source platform for data collection.  SurveyCTO is the most reliable, secure, and scalable mobile data collection platform for Researchers and professionals.  It is a powerful, field-tested platform that allows you to collect high-quality data using mobile phones, tablets, or computers even whenyou’re offline Survey CTOmodule 1 Introduction
  • 6.
    6 7/18/2024 What is CSPro? The Census and Survey Processing System (CSPro) is a software package for entry, editing, tabulation, and dissemination of censusand survey data.  CSPro combines thefeatures of ==> the Integrated Microcomputer Processing System(IMPS) and ==>the Integrated Systemfor Survey Analysis (ISSA).  The data are stored in files describedby data dictionaries. 1 Introduction
  • 7.
    7 7/18/2024 What is CSPro? CSPro also provides tools - to viewdata and other text files. - toviewtables and thematicmaps createdby CSPro - to convert IMPS and ISSAdata dictionaries to and fromCSPro, and - to convert ERSIshape files (maps) to CSPro map files. 1 Introduction
  • 8.
    8 7/18/2024 - Traditional PAPI(pencil and paper interview) workflow, and - computer aided personal interview (CAPI) workflow.
  • 9.
    9 7/18/2024 Benefits of CAPIdata collection  Save time: - - No data entry period - Analysis starting - No much cleanings and all those struggles  Save money/cost effective:- - No payment for data entry jobs. - No Printing of questionnaires - no desires of paper, printer ,pen, and pencil etc… - Transport of questionnaire - Storage space (often forgotten but more costly).
  • 10.
    10 7/18/2024 Cont…  Ensure highdata quality and comparability( no missing data value) - Quality check control - Enumerator GPS control - Quick feedback - User group with same devices - Possibility of modifying questionnaires live . Environmental friendly - Paper industry pollute the air using protective matter as raw material - Printing machines are pollutant (there are other emissions we do not see from the machines) and ink cartridges is pollutant during both production and consumption - Vehicle transporting papers are pollutant .
  • 11.
    11 7/18/2024 Cont…  Flexibility -Allow collection of new types of information/data .  Tablet-based with ability to display and navigate through multi-level large questionnaires.  Collecting geo data simply, without GPS and Camera(eg coordinate, image, housing plot size)  Confidence and cooperation of interviewed.
  • 12.
    12 7/18/2024 Cont… Support multiple languageat the same time corresponding Data capturing: entering data on a tablet Survey management: managing teams of enumerators Data management: data aggregation, versioning, reporting Data security
  • 13.
    13 7/18/2024 Installing a NewerVersion  Upgrading to CSPro 7.7 FromCSPro 7.1 or Earlier- withoutaffecting the previous version  Updating a Previous Version of CSPro 7.1- It will not change any applications or other files that you have created.  Uninstalling CSPro 2 Installation
  • 14.
    14 7/18/2024 Required Hardware andSoftware Operating system: Android vs Windows vs IOS Processor: not an issue RAM size: key factor Wi-Fi - Required to be used for set-up, upgrades, and syncing Connectivity - 3G/4G Screen Size - Depends on the requirement of the survey. 2 Installation
  • 15.
    15 7/18/2024 The final requirementfor a CAPI survey is somewhere to store the data. CSPro offers the following data storage options:  Dropbox- provides two gigabytes of cloud storage at no charge to the user.  A file transfer protocol (FTP) server- A local or cloud-based FTP server can be used with CSPro. An FTP server can be set up locally on a server at headquarters, or in the cloud with options such as FileZilla and Xflight  A cloud-based or physical server with CSWeb installed- Setting up CSWeb cannot be done independentlyand requires information technology (IT)staff to set up and test the server. Server
  • 16.
  • 17.
    17 7/18/2024 Installing CSPro The CSProinstaller has the file name cspro7.1.exe. To install CSPro: 1. Double-clickon the file. 2. Selectthe components that youwant to install. 3. Selectthe folder where you want to install CSPro. 4. After CSPro has been installed on your computer, 5. You will finda CSPro 7.1 icon on your desktop 2 Installation
  • 18.
    18 7/18/2024 3 Create aData Entry Application3 step
  • 19.
    19 7/18/2024 Step 1: Examinethe Training Questionnaire  Eachquestionnaire corresponds to a household.  Eachquestionnaire (household) has a unique four-digit number at the top.  We collect age, sex, and marital status for up to ten peoplein thehousehold.  We collect type of housing and roof for the household. 3 Create a Data Entry Application
  • 20.
    20 7/18/2024 Step 2: StartCSPro  First, createa new folder for all files you will use in this training.  OpenWindows Explorer and createa folder namedC:desktopCSProTraining.  Now you are ready to start CSPro, which you can by double-clicking on the CSPro 7.1 icon on your desktop, or  by finding the properlink off theStart menu.  The CSPro mainscreenwill appear: 3 Create a Data Entry Application
  • 21.
    21 7/18/2024 3 Create aData Entry Application We will use the Wizardto createthe files that the data entry application requires. Click on the radio button that says Createa new application. You shouldsee the followingdialog box:
  • 22.
    22 7/18/2024 Step 3: NamingApplication Files We will createa dataentryapplication. This contains: 1. Data dictionary: The data dictionary describes the organization of the data file. It holds information about all the questions and responses on the questionnaire. 2. Forms: The forms will appear on the screen when you run the data entry application. They contain data entry fields, text, and rosters. 3. Logic (optional): You can use the CSPro language to control the flow of your program, to write logic to check for errors during data entry, to access lookup files, and manyother things. 3 Create a Data Entry Application
  • 23.
    23 7/18/2024 3 Create aData Entry Application 1. SelectDataEntryApplicationandpressOK. 2. In thefileopendialogbox,enterMyEntryasthefile namefortheapplication. 3. Make sure you are located in the folder you created for these training (C:Desktop CSProTraining). 4. PressSave. 5. Thenextscreenwillaskyouto selecttheInputDictionary. 6. Changethenameto C:CSProTrainingMyDict.dcf. 7. PressOK. 8. CSProwillaskif youwantto createa newdictionary. PressYes. Youhavecreateda newdataentryapplication
  • 24.
    24 7/18/2024 Step 1: TheID Item Every data dictionary requires at least one ID item, and you will often have more than one. An ID (identification) itemis a unique number (or series of numbers) - that allows CSPro to distinguish between individual questionnaires. 4 Create the Data Dictionary4 step
  • 25.
    25 7/18/2024 Step 1: TheID Item 1. Clickon (IdItems), thenon the '+' next to it to open the tree on the left side of the screen. - You will see that CSPro has createdone ID item. - On the right side of the screen you will see in the Len column that this item has the length of one character. - We will make this four characters. 2. Right-clickon MyDict identification, below(Id Items) on the tree, and then select Modify Item. 4 Create the Data Dictionary
  • 26.
    26 7/18/2024 Step 1: TheID Item 3. Press the Enter key three times until the lengthis highlighted in blue. 4. Type 4 and then Enter, then click on the white space below this line to finish making this change. When you have completed this step the screen should look something like 4 Create the Data Dictionary
  • 27.
  • 28.
    28 7/18/2024 Step 2: TheRecords  A record usually corresponds to a section of a questionnaire and consists of a group of related questions.  By default, CSPro creates one record.  Our training application will have two records, a Person Recordand a Housing Record.  We will change the one record that CSPro generated to Person Record, and then add the Housing Record. 4 Create the Data Dictionary
  • 29.
    29 7/18/2024 First, we willchange the one record that CSPro generatedto PersonRecord: 1. Right-clickon MyDict record on thetree on theleft, thenselect Modify Record. 2. Type Person record as the Record Label, then pressEnter. 3. TypePERSON_RECORDas the RecordName, thenpressEnter. 4. PressEnter to leave the Type Value as is 5. Press N to change Required from Yes to No, then press Enter. Our application can have households with no people, so personrecords are not required for us 4 Create the Data Dictionary
  • 30.
    30 7/18/2024 6. Our applicationcan have up to 10 people in a household, so type 10, then Enter, to change Max and complete thechanges to this record. Next we will add the Housing Record: 1. Right-clickon Person recordon the tree on the left, thenselect Add Record. 2. Type Housing recordas the Record Label, the press Enter. 3. PressEnter to accept HOUSING_RECORDas theRecord Name. 4 Create the Data Dictionary
  • 31.
    31 7/18/2024 4. PressEnter toleave the Type Value as is. 5. Press Enter to leave Requiredas Yes. 6. PressEnter to leave Max as 1 and start a new record. 7. PressEsc on the blank recordto finish making thesechanges. When youhave completedthis stepthe screenshould look something like: 4 Create the Data Dictionary
  • 32.
  • 33.
    33 7/18/2024 Step 3: Creatingthe Items First, we will create the items Age, Sex, and Marital status in the Personrecord. 1. Right-clickon Person recordon the tree, then selectAdd Item. 2. Enter Age as the ItemLabel, thenpressEnter. 3. PressEnter to accept AGE as the ItemName. 4. PressEnter to acceptthe Start position. 4 Create the Data Dictionary
  • 34.
    34 7/18/2024 5. Type 2thenEnter to indicate that Age takes up two characters. This is becausein our applicationwe havechosento enter ages onlyup to 99. 6. Press Entersix times to accept the rest of the default attributes for Age. 7. Enter the attributes for theSex item. After youtype in the labeland name, you can keep pressing Enter to accept all the other default attributes. 8. Enter the attributes for theMarital status item. After you type in the label and name, youcan keep pressingEnter to accept all the other default attributes. 9. Press Esc to finish creating the items. 4 Create the Data Dictionary
  • 35.
    35 7/18/2024 Next, we willcreatetheTypehouseholdand Type roof items in the Housing record. 1. Right-click on Housing record, then select Add Item. 2. Enter the attributes for the Type household item. Afteryoutype in the labeland name, you can keeppressingEnter to accept all the other defaultattributes. 3. Enter the attributes for the Type roof item. After youtype in the labelandname, you can keep pressing Enter to accept all the other default attributes. 4. Press Esc to finish creating the items. Whenyouhavecompleted this stepthe screenshould looksomething like: 4 Create the Data Dictionary
  • 36.
  • 37.
    37 7/18/2024 Step 4: CreatingValues for the Items Value sets define what data values we expect for a data item. Value sets are used to define ranges of valid values during data entry and to define categories for crosstabulation. First we will createa valueset for Age. We will use ten-year age groups. 1. Click on the + next to Person record to make sure its items are showingon the tree. 2. Right-click on Age and then select AddValueSet. 3. Press Enter twice to accept the default Value Set Label and Value Set Name. The cursor will drop to the line below into the Value Label column. 4 Create the Data Dictionary
  • 38.
    38 7/18/2024 4. Type 0to 9 for the Value Label, thenEnter. 5. Type0 as theFromvalue, thenEnter. 6. Type 9 as the To value,then Enter twice, skipping over the Special column. 7. Type 10 to 19 for thenext Value Label, then Enter. 8. Type 10 as the Fromvalue, then Enter. 9. Type 19 as the To value,thenEnter twice, skipping overthe Special column. 10. Continuein this fashionuntil you have reached90 to 99. 4 Create the Data Dictionary
  • 39.
    39 7/18/2024 Next, we willcreatea value set for Sex. 1. Right-clickon Sex, then select Add Value Set. 2. Press Enter twice to accept the default Value Set Label and Value Set Name. The cursor will drop to the line belowintothe ValueLabel column. 3. TypeMale as the first Value Label. 4. Type 1 as theFromvalue. 5. Press Enter twice to skip over the To and Special columns 4 Create the Data Dictionary
  • 40.
    40 7/18/2024 6. Type Femaleas the secondValue Label. 7. Type 2 as theFromvalue. 8. PressEnter twice to skip over the To and Special columns. 9. PressEsc to finishcreating thevalue set. To finishup: 1. Add a value set for Marital status. Use 1 for Married and 2 for Not married. 2. Add values for the Housing recorditems fromthe housing informationin the questionnaire. 4 Create the Data Dictionary
  • 41.
    41 7/18/2024 3. Save thework you havedone so far: Select File -> Save fromthe mainmenu, or clickon on the toolbar. When youcompleted this step, the screenmight look something like 4 Create the Data Dictionary
  • 42.
    42 7/18/2024 Step 1: PlaceID and HousingItems on Form  We will now switch fromthe data dictionary to the forms.  Generally it is a good idea to make the data entry forms look just like the questionnaire itself. We can easilydo this in CSPro.  However, in order to show you more features and save time, we will not do so in this training.  We will place the dictionary items on the data entry form. 5 Create the Data Entry Forms 3 step
  • 43.
    43 7/18/2024 1. Click onthe toolbar. A blankgray formwill appear on the right hand side of the screen. 2. Make sure the items on the tree are expanded so you can see them all. If any item has a + sign next to it, clickon the + sign. 3. Drag and drop MyDict identification from the tree to the top of the form. (Click on MyDict identification and hold the mouse button down while you move the mouse to the top of the form, then release the mouse button.) 4. Drag and drop Housing record from the tree to the form, underneath MyDict identification. Click OK to accept the Drag Options settings. 5 Create the Data Dictionary
  • 44.
    44 7/18/2024 Next, we willline things up. 1. Multi-select the three pieces of text. Hold down the Ctrl key and click on MyDict identification, then click on Type household, clickon Type roof, then releasethe Ctrl key. 2. SelectAlign-> Left fromthe mainmenu. 3. Multi-selectthe three data entryboxes. 4. Select Align-> Right. Whenyou have completedthis step the screenshould look something like: 5 Create the Data Dictionary
  • 45.
  • 46.
    46 7/18/2024 Step 2: AddTextand Boxes First, we will add our own line of text at the top of the screen. 1. Right-clickon the form, somewhere aboveMyDict identification. 2. SelectAdd Text fromthe menu. 3. TypeMy First Application and then Enter (orclick on OK). 4. Adjust the position of the text until it is just where you want it. To do this, select the text (click on it) and use the arrowkeys, or drag and drop the text to the new location.. 5 Create the Data Entry Forms
  • 47.
    47 7/18/2024 Next we willdrawa box around the data entry fields. 1. Click on thetoolbar. A small toolbar will appear floating over the screen. 2. Clickon the box secondto the right of the floating toolbar. 3. Positionthe mouse pointer aboveand to theleft of MyDict identification. 4. Left-clickand hold the buttondown. 5. Drag the mousetoward theright and down. 6. Whenthe box looks the way you want it, release the mouse button. 5 Create the Data Entry Forms
  • 48.
    48 7/18/2024 7. Click againonthe toolbar to close the floatingtoolbar. When youhave completedthis step the screen should look something like: 5 Create the Data Entry Forms
  • 49.
    49 7/18/2024 Step 3: GenerateForms Automatically CSPro allows you to generate a complete set of forms, which include all the items in the data dictionary, in one operation. We will use this feature now in order to save time. 1. SelectEdit -> Generate Forms fromthe mainmenu, or press Ctrl+G. 2. CSPro will warn you that the forms you made in steps 1 and 2 will be replaced. Click on Yes to continue. 5 Create the Data Entry Forms
  • 50.
    50 7/18/2024 3. The DragOptions dialog box will appear. Make sure the Roster Options has Horizontal selected. Clickon OK to close the Drag Optionsdialog box. 4. Note that the tree on the left shows that you now have three forms. Open up the entire tree by clicking the + next to any part of the tree. 5. Clickon PERSON_RECORD_FORMon the tree. You will see the roster that CSProcreated for you. 6. Click aroundon thetree on the left as youlike to explore the forms that CSProcreated. 7. Save the workyou have done so far. Select File -> Save fromthe main menu, or click on the toolbar. 5 Create the Data Entry Forms
  • 51.
    51 7/18/2024 Whenyouhavecompleted this stepthescreenshould looksomething like: 5 Create the Data Entry Forms
  • 52.
    52 7/18/2024 Step 1: Runthe Data Entry Application Your data entry application is now ready to run! CSEntry is the name of the program that runs this application, allowing you to key in data. 1. Run CSEntry by clicking on the toolbar, or pressing Ctrl+R. CSPro will ask you to save your work if you haven't alreadydone so. ClickYes. 2. CSEntry will ask you to select a data file. The data we key will go into this file. Change to the folder you created for this set of exercises, C:CSProTraining. Type MyData.dat /.CSdb for the file name, then press Enter. 6 Enter Data
  • 53.
    53 7/18/2024 3. CSEntry willask if you want to create a new file. ClickYes. 4. CSEntry will ask for your Operator ID. You may type in anything you like. 5. The first data entry formwill appear with the cursor ready for youto beginentering data. Whenyou have completedthis step the screenshould look something like: 6 Enter Data
  • 54.
  • 55.
    55 7/18/2024 Step 2: AddaCase We will now type in the data for our first case (questionnaire). We will use a fictitious familyof four. 1. Type1 thenEnter to fill in the ID item. The next formwill appear, showing the person roster. 2. Type 48 in the Age field. The cursor will move to the Sex field. 3. Type 3 in the Sex field. CSEntry will tell you this value is out of range, because it is not in the value set for Sex you created in your data dictionary. 6 Enter Data
  • 56.
    56 7/18/2024 4. With theOUT OF RANGE message still showing, type 1. The message will go away and the cursor will moveto the Marital status field. 5. Continue typing in data for thefamilyas shownbelow. Some CSEntry tips: . You can movebackward to the previous field using Shift+Tab, left arrow or up arrow. . You can moveforwardto the next field using Enter, Tab, right arrowor downarrow. . You can change a field by simplytyping a new number intoit. . You can erase a field using thespace bar 6 Enter Data
  • 57.
  • 58.
    58 7/18/2024 Step 3: FinishAdding a Case We will now tell the rosterthat we have finished entering people. 1. Hold downthe Ctrl key. 2. Press the slash key / (on the numeric keypad). The next form will appear on the screen. If you have trouble finding this key combination, which could be the case on some laptops, you can select Navigation -> End Groupfromthe mainmenu. Next we will type in thehouseholdformand end the case. 6 Enter Data
  • 59.
    59 7/18/2024 1. Type1 inthe Type householdfield. 2. Type 1 in theType roof field. 3. CSEntry will ask us to accept the case. At this point you can select No and go back and make changes to thedata in thecase if you like. If you are satisfiedthat the data are correct, pressEnter or selectYes. 4. CSEntry will now show the first form again, with the cursor ready for you to type in another case. We will now stop adding cases. Click on the toolbar, or press Esc or Ctrl+S, or select Mode -> Stop from the mainmenu. 6 Enter Data
  • 60.
    60 7/18/2024 Whenyouhavecompleted this stepthescreenshould looksomething like: 6 Enter Data
  • 61.
    61 7/18/2024 Step 4: ModifyaCase Now we realize that the first person in the household is really 45-years-old and not 48 as we typed in. We will go back intothe data and changethis value. 1. Click on on the toolbar, or press Ctrl+M to enter Modify mode. You should see the first form, with the value1 showing for MyDictidentification. 2. Pressthe PgDnkey to advance to the next form. 3. Type45 in theAge field. 6 Enter Data
  • 62.
    62 7/18/2024 4. PressF12 toindicatethat you havefinished making your changes. 5. The screen will now look something like the picture below. CSEntry will ask you to accept the case, like it didin the previous step. Select Yes. 6. CSEntry will save your changes and exit fromModify mode. 7. CloseCSEntry by clickingon the X in the topright corner, or selecting File -> Exit fromthemainmenu. 6 Enter Data
  • 63.
  • 64.
    64 7/18/2024 Step 1: WriteLogic for the Edit 7 Add Edits to the Data Entry Application
  • 65.
    65 7/18/2024 Step 1: WriteLogic for the Edit We will now return to the data entry application. We will introduce a check to make sure that married people are at least12-years-old. In our data entry application, we will perform this check immediately after the keyer enters the maritalstatus. If you still have your cross tabulation application open from previous exercises, close it now. Select File -> Close fromthe main menu. CSPro may promptyou to save changes. SelectYes. 7 Add Edits to the Data Entry Application
  • 66.
    66 7/18/2024 1. Open thedata entry application we created earlier. Click on on the toolbar, or select File -> Open from the mainmenu. Clickon the applicationname, MyEntry.ent, and clickOpen. 2. Get ready to write logic by clicking on the toolbar, or pressing Ctrl+L or selecting View -> Logic from the mainmenu. 3. PressCtrl+Tto show names insteadof labels in the forms tree. 4. Click on the + next to PERSON_RECORD_FORM then click on the + next to PERSON_RECORD000 then click on MARITAL_STATUS. The frame on the right hand side of the screen should show PROC MARITAL_STATUS at the top. 7 Add Edits to the Data Entry Application
  • 67.
    67 7/18/2024 5. Note thatPROC is short for procedure. We put our logic in the procedure for MARITAL_STATUS becausewe want it to execute immediatelyafterthe operator keys this field. 6. Type in thelogic codeexactlyas you see below. PROC MARITAL_STATUS if MARITAL_STATUS= 1 and AGE < 12 then errmsg("Tooyoung to be married"); endif; 7 Add Edits to the Data Entry Application
  • 68.
    68 7/18/2024 7 Add Editsto the Data Entry Application
  • 69.
    69 7/18/2024 Step 2: Compilethe Logic You have typed logic in the CSPro language. Like all procedural languages, the system must check to make sure that there are no syntax errors. This is calledcompiling. 1. Clickon MYDICT_FF in the forms tree to showall the CSPro logic. 2. Compile the logic by clicking on the toolbar, or pressing Ctrl+K or selecting File -> Compile from the mainmenu. 3. If you typed the logic correctly, you will see Compile Successful in the Compiler Output window under the logic. 7 Add Edits to the Data Entry Application
  • 70.
    70 7/18/2024 4. If yousee a dialog box that says Compile Failed, you have typed something incorrectly. A red circle will appear in the margin indicating the approximate location of the error. The Compiler Output tab at the bottom of the screen will show you an error message to help you determine the error. Check very carefully to make sure youtyped in exactly whatwas shownin the previous step. Whenyou have completedthis step the screenshould look something like: 7 Add Edits to the Data Entry Application
  • 71.
    71 7/18/2024 7 Add Editsto the Data Entry Application
  • 72.
    72 7/18/2024 Step 3: Testthe Edit We are now ready to runthe data application and make sure our logic is working properly. 1. Run CSEntry by clicking on the toolbar, or pressing Ctrl+R. 2. CSPro will ask you to save the changes. ClickYes. 3. CSEntry will ask you to select a data file. Type MyData.dat for the file name, if it is not already there, thenpress OK. 4. Type in any Operator ID. 7 Add Edits to the Data Entry Application
  • 73.
    73 7/18/2024 5. Click onon the toolbar, or press Ctrl+A to enter Add mode. The first form will appear with the cursor on MyDict identification. 6. Type 2 and thenEnter to fill in the ID item. The next formwill appear,showing the person roster. 7. Type 10 in the Age field. 8. Type 1 in the Sex field. 9. Type 1 in the Marital status field. Your error message shouldappear on the screenas shownbelow. 7 Add Edits to the Data Entry Application
  • 74.
    74 7/18/2024 7 Add Editsto the Data Entry Application
  • 75.
    75 7/18/2024 Step 4: Completethe Case We will finish entering data for the second case, including the error condition, so that we will be able to test that conditionin the following exercise. 1. PressF8 to clearthe message. 2. Hold down the Ctrl key and press the slash key / on the numeric keypad. The next form will appear on the screen. 3. Type1 in theTypehouseholdfield. 7 Add Edits to the Data Entry Application
  • 76.
    76 7/18/2024 4. Type 1in the Type roof field. 5. CSEntry will ask us to accept the case. Select Yes. 6. Click on the toolbar, or press Esc or Ctrl+S, or select Mode -> Stop fromthe main menu. 7. Close CSEntry by clicking on the X in the top right corner, or selecting File -> Exit from the main menu 7 Add Edits to the Data Entry Application
  • 77.
    77 7/18/2024 Step1: Adding CAPIquestions and texts To add CAPI questions, we first needto tell CSProthat this is a CAPI application. Choose Options – Data Entry… from the menu, and tick “CAPI mode” in the resulting data entry options window: 8 CAPI questions and texts
  • 78.
    78 7/18/2024 Whenpressing OK, theForm has changedslightly: On top there is a yellow, emptyfield. This is where the questions for the interviewerto read, as well as additional instructions to him– if needed. To add CAPI question to an item: Make sure the Form treeis shownin theleft pane (click theForms tab on the bottomof the window), and highlight the itemyouwant to makethe question for. 8 CAPI questions and texts
  • 79.
    79 7/18/2024 thenclick the CAPIquestions button on the toolbar (shown below): 8 CAPI questions and texts
  • 80.
    80 7/18/2024 The CAPI questioneditor has two default fonts. The first one is to use for the questions, and the other one to use for additional comments or information to the interviewer likethis: 8 CAPI questions and texts
  • 81.
    81 7/18/2024 Step2: Data entryoptions window Selecting “Options” – “Data entry...” pops up a windowgiving options on how the application should behave. We saw that we can define theapplicationto be a CAPI application. Here we shall explore some of the other options available. 8 CAPI questions and texts
  • 82.
    82 7/18/2024 Step3: More aboutthe Data entry options window Turning off the question about Operator ID The questionabout Operator ID can be turned off. This is handyduringthe development of the application, as much testing is needed, and it is annoying to have to answer this question every time. To turnit off, select Options – Data Entry Options… fromthe toolbar, and un-tick“Askfor operator ID” (but do rememberto turn in back on whenthe application is finished). 8 CAPI questions and texts
  • 83.
    83 7/18/2024 Step 1: Createa Tabulation Application In this exercise we will performsimple cross tabulations of the data you enteredin the previous exercise. If you still have your data entry application open from previous exercises, close it now. Select File -> Close fromthe main menu. CSPro may prompt you to save changes. Select Yes. We will now create a crosstabulationapplicationusing the Wizard, as we did previously. 9 Tabulate Data
  • 84.
    84 7/18/2024 9 Tabulate Data 1.Select File -> New from the main menu, or click on the toolbar. 2. Select Tabulation Application and press OK. 3. In the file open dialog box, enter MyTab as the file name for the application. 4. Make sure you are located in the folder you created for these exercises (C:CSProTraining). 5. PressSave. 6. The next screen will ask you to select the Input Dictionary. 7. Change the nameto C:CSProTrainingMyDict.dcf. 8. Press OK
  • 85.
    85 7/18/2024 You are nowready to begin designing your tabulation. When you have completed this step the screen should look something like: 9 Tabulate Data
  • 86.
    86 7/18/2024 Step2: Select Itemsto Tabulate We will create a tabulationof Age by Sex. Age will appear as the rows and Sex as the columns. 1. Clickon the + next to Personrecordto make sure its items are showing on the tree. 2. Drag and drop Age from the tree to the left side of the table. (Click on Age and hold the mouse button down while you move the mouse to the side of the table then release the mouse button.) The drop point should be in the white space next to one of thegray boxes along the side. 3. Drag and drop Sex from the tree to the top of the table. (Click on Sex and hold the mouse button down while you move the mouse to the top of the table then release the mouse button.) The drop point should be in the whitespace justunder one of the gray boxes along the top. 9 Tabulate Data
  • 87.
    87 7/18/2024 Tips for creatingtabulations:  The item you drag from the dictionary tree will become either a row item or a column item depending on where you drop it. Imagine a diagonal line from the top left to the bottom right of the table. An item dropped on the left/under that line becomes a row item. An item dropped on the right/above that line becomes a column item.  You can remove an item from the table by clicking on any of its associated labels then dragging and dropping it back to the dictionarytree. 9 Tabulate Data
  • 88.
    88 7/18/2024 Whenyou have completedthisstep the screenshould look something like: 9 Tabulate Data
  • 89.
    89 7/18/2024 Step 3: Runthe Tabulation We are now ready to runthe tabulation. We will use the data file youcreatedin the previous exercise. 1. Run the tabulation by clicking on on the toolbar, or pressing Ctrl+R. If CSPro prompts you to save the changes, clickon Yes. 2. CSPro will ask you for the data file(s) to tabulate. Select MyData.dat. Make sure the dialog box is set to thefolder youcreatedfor these exercises, C:CSProTraining. 3. The tabulated numbers will now appear in the table. That's all thereis to it! 9 Tabulate Data
  • 90.
    90 7/18/2024 Whenyou have completedthisstep the screenshould look something like 9 Tabulate Data
  • 91.
    91 7/18/2024 Step 1: AddPercent's In this exercise we will modify the table you created in the previous exercise. We will begin by adding percent's to the columns next to the values for the Sex variable. 1. Right-clickon the word Sex on the table, just abovethe word Male. 2. SelectTally Attributes (Sex) fromthe right-click menu. 3. In the list on the left of the dialog box marked Available, clickon Percent's and then clickthe Add --> button. You shouldnow see Percent'slisted in the list on right of the dialog box marked Selected. 10 Modify the Table
  • 92.
    92 7/18/2024 4. Click OK.You should see three new columns on the table for the percents. 5. Run the tabulation by clicking on the toolbar, or pressing Ctrl+R. When CSPro prompts you to save the changes, click on Yes. 6. Select MyData.dat as the data file to tabulate, as in the previous exercise. Whenyou have completedthis step you should see a table that looks something like 10 Modify the Table
  • 93.
  • 94.
    94 7/18/2024 Step 2: Adda Universe We will now add a universeto our table. A universeis a filter, or a way of restricting the table to a subset of the data records that meet a certaincondition. In this step we will run the table for married people. 10 Modify the Table
  • 95.
    95 7/18/2024 1. Right-clickanywhere onthe table. 2. SelectTally Attributes (Table) fromthe right-clickmenu. 3. In the section of the dialog box marked Universe, type MARITAL_STATUS = 1. Be sure to type this correctly, otherwiseyou may see the message "InvalidUniverse Syntax." 4. Click OK. 5. Run the tabulation by clicking on the toolbar, or pressing Ctrl+R. When CSPro prompts you to save the changes, click on Yes. 10 Modify the Table
  • 96.
    96 7/18/2024 6. Select MyData.datas the data file to tabulate, as in the previous exercise. Whenyou have completedthis step you should see a table that looks something like the following. Notice that the counts are lower thanin the previous step becausewe are not counting unmarriedpeople. 10 Modify the Table
  • 97.
  • 98.
    98 7/18/2024 Step 3: ChangetheTitleFont CSPro gives you great control over the format of your tables. As an example, in this step we will changethe font of our table's title to make it bigger 10 Modify the Table
  • 99.
    99 7/18/2024 1. Right-clickon thetitle Table 1. Age by Sex at the top of the table. 2. SelectFormat (Title) fromthe right-clickmenu. 3. In the sectionof the dialog box markedFont and Color clickon the Change button. 4. In the Font dialog box that appears, change the Size from12 to 16. 5. ClickOK to close the Font dialog box. 6. Click OK to close the Format (Title)dialog box. Whenyou have completedthis step you should see that the title is now larger. 10 Modify the Table
  • 100.
    100 7/18/2024 Step 1: Createa BatchApplication In the previous exercise we wrote logic to perform an edit interactively, i.e. at the time of data entry. In this exercise we will apply the same logic in a batch application, i.e. after data entry. Our logic will check the data and produce a reporttelling us about any errors. If you still have your data entry application open from previous exercises, close it now. Select File -> Close fromthe mainmenu. CSPro may prompt you to save changes. Select Yes. 11 Run a Batch Application
  • 101.
    101 7/18/2024 We will nowcreate a batchapplicationusing the Wizard, as we did previously 1. Select File -> New fromthe main menu, or click on the toolbar. 2. SelectBatchEdit Application and press OK. 3. In the file open dialog box, enter MyBatch as the file name for the application. 11 Run a Batch Application
  • 102.
    102 7/18/2024 4. Make sureyou are locatedin the folder you created for theseexercises (C:CSProTraining). 5. Press Save. 6. The next screenwill ask you to select the Input Dictionary. 7. Change the name to C:CSProTrainingMyDict.dcf. 8. PressOK. You are now readyto begin designing your batchedit application. 11 Run a Batch Application
  • 103.
    103 7/18/2024 11 Run aBatch Application
  • 104.
    104 7/18/2024 Step 2: WriteLogic and Compile We will write the same logic we used in the previous exercise.  PressCtrl+Tto show names insteadof labels in the edits tree.  Click on the + next to PERSON_RECORD_EDT then click on MARITAL_STATUS. The frame on the righthand side of the screenshouldshow PROC MARITAL_STATUS at the top.  Type in the logicexactlyas you see below. 11 Run a Batch Application
  • 105.
    105 7/18/2024 Note that weused $ in place of MARITAL_STATUS. This is the same thing because the logic is inside the procedure for MARITAL_STATUS. In the CSPro language, $ is a short wayof saying"this item." Compilethe logic by clicking on the toolbar, or pressingCtrl+Kor selecting File -> Compile fromthe mainmenu. Correct anyerrorsuntil yousee CompileSuccessful. PROCMARITAL_STATUS if $ = 1 andAGE< 12 then errmsg("Tooyoung to be married"); endif; 11 Run a Batch Application
  • 106.
    106 7/18/2024 11 Run aBatch Application
  • 107.
    107 7/18/2024 Step 3: Runthe Batch Application Your batch application is now ready to run. CSBatch is the name of the program that runs this application. We will use the data file you createdin the previous exercise. 1. Run CSBatchby clicking on the toolbar, or pressing Ctrl+R. 2. CSPro will ask you to save the changes. ClickYes. 3. CSBatch will ask for some data file names. Click in the empty box next to Input Data File and type in MyData.dat and clickOK. 11 Run a Batch Application
  • 108.
    108 7/18/2024 CSBatchwill now runyourprogram. 11 Run a Batch Application
  • 109.
    109 7/18/2024 Step 4: Examinethe OutputReport TheoutputreportwillappearintheCSProTextViewer. It willlooksomethinglike: Application C:CSProTrainingMyBatch.bch Type BATCH Input Data<<TextFile>>C:CSProTrainingMyData.dat <Output> <<Empty>> Date August17,2023 StartTime 07:11:00 EndTime 07:11:00 11 Run a Batch Application
  • 110.
    110 7/18/2024 11 Run aBatch Application
  • 111.
    111 7/18/2024 Capturing LocationCoordinates  Tocapture GPS coordinatesin CSPro, the first step is to create variables to store the GPS data.  For simple purposes, latitude and longitude are needed, but more advanced system designers can also collect information about altitude, satellites, accuracy, and readtimes. The formats for latitude and longitude in the data dictionary 12 Advanced Features of CSPro
  • 112.
  • 113.
  • 114.
    114 7/18/2024  The “GETGPS”function opens the tablet’s GPS receiver, then allows 60 seconds to reada signal.  The “GETGPS” function can now be called from a particular question, or from an icon in the menu bar of CSEntry, whichcan be accessed by the interviewerat any time. Logic Code to Capture Latitude and Longitude 12 Advanced Features of CSPro
  • 115.
    115 7/18/2024  In additionto querying the GPS latitude and longitude you can also query the accuracy, number of satellites, and altitude (althoughon Android altitude is not very accurate).  The longitude and latitude reported are in degrees in the WGS84 datum and are returned as decimal numbers.  To save the GPS coordinates in our data file we need to add the appropriate variables to our dictionary. 12 Advanced Features of CSPro
  • 116.
    116 7/18/2024  To storethe coordinates so that they can cover the entire earth with sufficient precision they should have space for 3 digits before the decimal point, 1 digit for the decimal point, and at least 5 digits after the decimal and a minus signfor a minimum total length of 10.  Add the variables LATITUDEand LONGITUDEto the dictionary and to sectionon theforms. 12 Advanced Features of CSPro
  • 117.
    117 7/18/2024 Let's add auser bar button to update the GPS coordinatesforthe household: // Capture current household location using GPS functiongetGPS() gps(open); if gps(read, 60, 10) then // Read up to 60 seconds, tryfor 10maccuracy LATITUDE= gps(latitude); LONGITUDE= gps(longitude); 12 Advanced Features of CSPro
  • 118.
    118 7/18/2024 Displaying GPSPoints ona Map map mymap; mymap.addMarker(longitude, latitude); To display the map, call the show() function. This displays a Google Map containing the marker that was added. We can use a map variable to displaya map that has a marker at the GPS locationthat we captured 12 Advanced Features of CSPro
  • 119.
    119 7/18/2024 // Capture currenthousehold location using GPS function getGPS() gps(open); if gps(read, 60, 10) then // Read up to 60 seconds, try for 10m accuracy // Showmap so that interviewer can see result map m; m.addMarker(gps(latitude), gps(longitude)); 12 Advanced Features of CSPro
  • 120.
    120 7/18/2024 Variables of typemap have many other functions that let you customize the map, the markers, add buttons and run logic functions when markers are tapped. You can also use offline base maps for situations where you do not havean internet connection. 12 Advanced Features of CSPro
  • 121.
    121 7/18/2024 A menu programis a CSPro data entry application that is used to manage the data entry workflow. A menu program is not used for capturing any interview data itself. Instead, it launches other data entry programs for interviews. Menu programs generallyhave some or all of following functions:  LaunchesotherCSPro applications to do data collection(often pre-filling id items)  Showreports on progress, summarystatistics  Manage useraccessthroughusernames/passwords  Manage household listing and interview assignments  Launchsynchronization 13 Menu Programs
  • 122.
    122 7/18/2024 Designingthe Screens andFlow Once you decide on which functions you want yourmenuprogramto perform, the next stepis to design the screens and howtheylink together. This is most easilydone as a diagramlike the one belowfor a fairlysimple menuprogram. 13 Menu Programs
  • 123.
    123 7/18/2024  Deployapplications tomobile devices over the internet  Use the synchronization options dialog to add synchronizationto an application  Create advanced synchronizations using CSPro logic to synchronize data files and update applications in the field  Create peer to peer synchronizations betweendevices for situations where there is no internetaccess 14 Synchronization
  • 124.
  • 125.
    125 7/18/2024  The SyncServer In order to use internet synchronizationin CSPro you needa server accessible over a network. CSProsupports three types of Synchronizationservers: a. CSWeb: A free web application that can run in a local data center or hosted on a server in the cloud. Best for large surveys. Requires skillsin settingup and administering a website andSQL database. b. Dropbox: A free service for synchronization with servers in the cloud using an account created at www.dropbox.com. Best for small surveyswhenthe skills and infrastructure for setting up CSWebare not available c. FTP: CSPro can synchronize with any FTP (File Transfer Protocol) server accessible over the network. Best for small surveys when the skills and infrastructure for setting up CSWeb are not available and you don't want your data on the Dropboxservers. 14 Synchronization
  • 126.
    126 7/18/2024 FTP, Dropbox andCSWeb 14 Synchronization
  • 127.
  • 128.
  • 129.
    129 7/18/2024 Conclusion Congratulations! You havecompleted the CSPro training. We hope you are now ready to try creating and running your own applications. Please refer to our User's Guides for more details. You can access them fromCSPro simply by selecting Help -> Help Topics fromthe main menuof any CSPromodule. 15 CSPro Process Summary
  • 130.