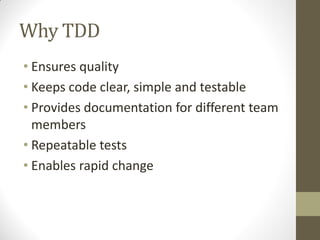
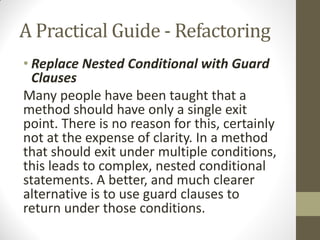
TDD is a design technique where tests are written before code to determine requirements. The Red-Green-Refactor process is followed: 1) Write a test that fails (red), 2) Write minimum code to pass the test (green), 3) Refactor code. TDD ensures quality, keeps code simple and testable, and allows for rapid change. Writing tests first helps design by clarifying requirements and preventing bugs.


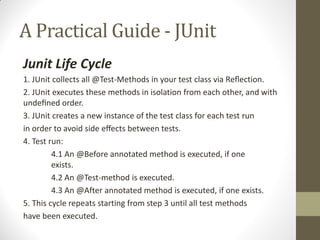
![A Practical Guide - JUnit
@RunWith(Parameterized.class)
public class PrimeNumberValidatorTest {
private Integer primeNumber;
private Boolean expectedValidation;
private PrimeNumberValidator primeNumberValidator;
@Before
public void initialize() {
primeNumberValidator = new PrimeNumberValidator();
}
// Each parameter should be placed as an argument here
// Every time runner triggers, it will pass the arguments from parameters we defined
public PrimeNumberValidatorTest(Integer primeNumber, Boolean expectedValidation) {
this.primeNumber = primeNumber;
this.expectedValidation = expectedValidation;
}
@Parameterized.Parameters
public static Collection primeNumbers() {
return Arrays.asList(new Object[][] {
{ 2, true },
{ 6, false },
{ 19, true },
{ 22, false }
});
}
}
// This test will run 4 times since we have 4 parameters defined
@Test
public void testPrimeNumberValidator() {
assertEquals(expectedValidation, primeNumberValidator.validate(primeNumber));
}](https://image.slidesharecdn.com/testdrivendevelopment-140112182119-phpapp01/85/Test-driven-development-25-320.jpg)


![[Final] ReactJS presentation](https://cdn.slidesharecdn.com/ss_thumbnails/65cfd4f9-740f-4f41-b769-b496b6e60802-170119143904-thumbnail.jpg?width=640&height=640&fit=bounds)


![[NDC2016] TERA 서버의 Modern C++ 활용기](https://cdn.slidesharecdn.com/ss_thumbnails/v09teramodernc20160425-160427044156-thumbnail.jpg?width=640&height=640&fit=bounds)