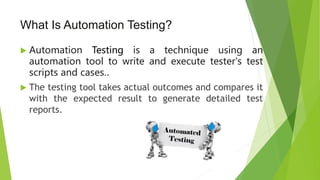
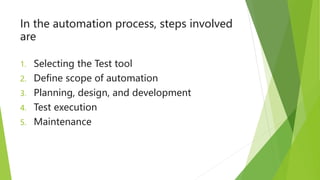
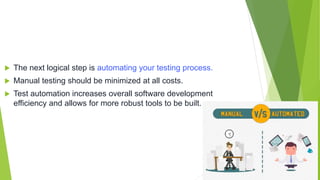
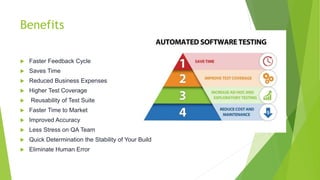
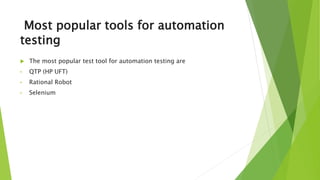
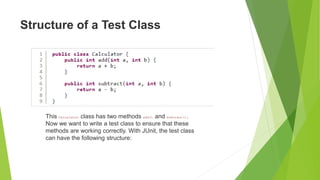
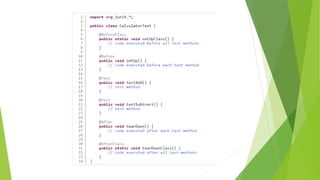
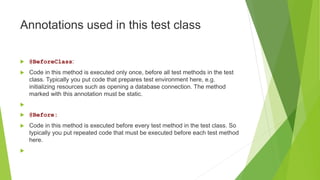
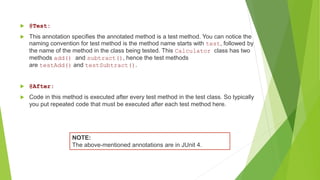
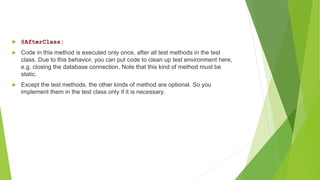
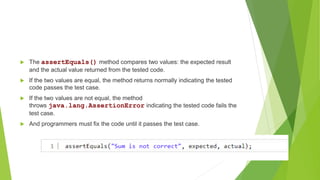
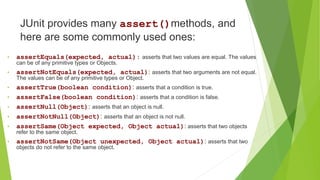
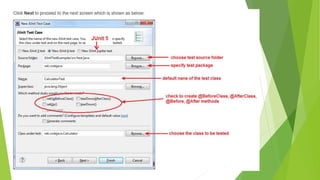
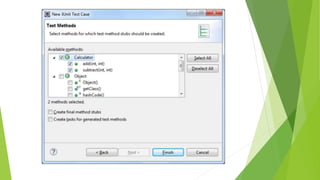
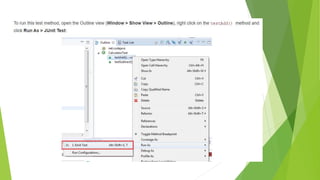
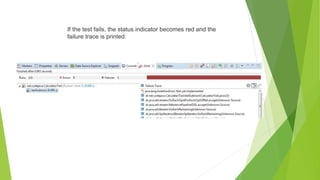
CSE376
UNIT - 1
What Is Automation Testing?
 Automation Testing is a technique using an
automation tool to write and execute tester's test
scripts and cases..
 The testing tool takes actual outcomes and compares it
with the expected result to generate detailed test
reports.
 Since test automation demands a considerable
investment of resources and money,
 We should define:
1. when to do automation,
2. the scope of the automation
3. best tool of automation.
 Good planning practices can save us from high costs.
In the automation process, steps involved
are
1. Selecting the Test tool
2. Define scope of automation
3. Planning, design, and development
4. Test execution
5. Maintenance
 Testing is an essential part of product development,
especially to guarantee quality.
 Many smaller and mid-sized companies don’t give testing
much attention even though it’s essential for delivering a
strong product.
 Some companies prefer to do manual testing, although
that’s not the only best approach.
 The next logical step is automating your testing process.
 Manual testing should be minimized at all costs.
 Test automation increases overall software development
efficiency and allows for more robust tools to be built.
Benefits
 Faster Feedback Cycle
 Saves Time
 Reduced Business Expenses
 Higher Test Coverage
 Reusability of Test Suite
 Faster Time to Market
 Improved Accuracy
 Less Stress on QA Team
 Quick Determination the Stability of Your Build
 Eliminate Human Error
Benefits
 Ability To Perform Testing On Multiple Platforms In Parallel
 Accelerate Cross Browser Testing
 Distributed Test Execution
 Data Driven Testing
Most popular tools for automation
testing
 The most popular test tool for automation testing are
• QTP (HP UFT)
• Rational Robot
• Selenium
Why JUnit?
 JUnit is one of the most popular unit testing frameworks for Java development.
 Unit testing is an important part in Test Driven Development (TDD) as it helps
finding problems in the code as early as possible, especially when you make
changes to the existing code you can run unit tests again to make sure that the
changes do not break the application (regression).
 JUnit is supported by almost any Java IDEs and build tools, thus it is the default
choice of programmers to test their code.
 Eclipse has very good support for JUnit - the IDE is shipped with JUnit as its
default testing library.
 Thus writing and running unit tests with JUnit in Eclipse is quick, easy and
productive.
Structure of a Test Class
This Calculator class has two methods add() and subtract().
Now we want to write a test class to ensure that these
methods are working correctly. With JUnit, the test class
can have the following structure:
Annotations used in this test class
 @BeforeClass:
 Code in this method is executed only once, before all test methods in the test
class. Typically you put code that prepares test environment here, e.g.
initializing resources such as opening a database connection. The method
marked with this annotation must be static.

 @Before:
 Code in this method is executed before every test method in the test class. So
typically you put repeated code that must be executed before each test method
here.

 @Test:
 This annotation specifies the annotated method is a test method. You can notice the
naming convention for test method is the method name starts with test, followed by
the name of the method in the class being tested. This Calculator class has two
methods add() and subtract(), hence the test methods
are testAdd() and testSubtract().
 @After:
 Code in this method is executed after every test method in the test class. So typically
you put repeated code that must be executed after each test method here.
NOTE:
The above-mentioned annotations are in JUnit 4.
 @AfterClass:
 Code in this method is executed only once, after all test methods in the test
class. Due to this behavior, you can put code to clean up test environment here,
e.g. closing the database connection. Note that this kind of method must be
static.
 Except the test methods, the other kinds of method are optional. So you
implement them in the test class only if it is necessary.
JUnit 5 changes in annotations
 From JUnit 5,
 @BeforeClass changes to @BeforeAll;
 @Before changes to @BeforeEach;
 @After changes to @AfterEach;
 @AfterClass changes to @AfterAll.
 This change in JUnit 5 reflects better meaning of the annotations.
With JUnit 5, the structure of a test class looks like this:
To be noted:
 In JUnit 4, you need to import the annotations from
the org.junit package, but in JUnit 5 you need to import them from
the org.junit.jupiter.api package.
Using Assert Statement in Test Methods
 In a test method, we use an assert statement to verify whether the code under
test produces the result as expected or not.
 If the result is as expected, the tested code passes the test case. Otherwise
the tested code fails the test case.
 We use the assertEquals() method from the class org.junit.Assert via
static import:
 you can use the fail() method to fail the test immediately, for example:
Use the fail() method to indicate that a method is not
yet implemented so when the test class is executed, it will
fail.
 The assertEquals() method compares two values: the expected result
and the actual value returned from the tested code.
 If the two values are equal, the method returns normally indicating the tested
code passes the test case.
 If the two values are not equal, the method
throws java.lang.AssertionError indicating the tested code fails the
test case.
 And programmers must fix the code until it passes the test case.
JUnit provides many assert()methods, and
here are some commonly used ones:
• assertEquals(expected, actual): asserts that two values are equal. The values
can be of any primitive types or Objects.
• assertNotEquals(expected, actual): asserts that two arguments are not equal.
The values can be of any primitive types or Object.
• assertTrue(boolean condition): asserts that a condition is true.
• assertFalse(boolean condition): asserts that a condition is false.
• assertNull(Object): asserts that an object is null.
• assertNotNull(Object): asserts that an object is not null.
• assertSame(Object expected, Object actual): asserts that two objects
refer to the same object.
• assertNotSame(Object unexpected, Object actual): asserts that two
objects do not refer to the same object.
You can see the green indicator bar in the upper-right
corner indicating that the test case has been executed
successfully - the code under test passes the test case.
If the test fails, the status indicator becomes red and the
failure trace is printed:
This is the result of running the testSubtract() method,
The class Calculator passes two test methods in the CalculatorTest class.

unit 1 (1).pptx

  • 1.
  • 2.
    What Is AutomationTesting?  Automation Testing is a technique using an automation tool to write and execute tester's test scripts and cases..  The testing tool takes actual outcomes and compares it with the expected result to generate detailed test reports.
  • 3.
     Since testautomation demands a considerable investment of resources and money,  We should define: 1. when to do automation, 2. the scope of the automation 3. best tool of automation.  Good planning practices can save us from high costs.
  • 4.
    In the automationprocess, steps involved are 1. Selecting the Test tool 2. Define scope of automation 3. Planning, design, and development 4. Test execution 5. Maintenance
  • 5.
     Testing isan essential part of product development, especially to guarantee quality.  Many smaller and mid-sized companies don’t give testing much attention even though it’s essential for delivering a strong product.  Some companies prefer to do manual testing, although that’s not the only best approach.
  • 6.
     The nextlogical step is automating your testing process.  Manual testing should be minimized at all costs.  Test automation increases overall software development efficiency and allows for more robust tools to be built.
  • 7.
    Benefits  Faster FeedbackCycle  Saves Time  Reduced Business Expenses  Higher Test Coverage  Reusability of Test Suite  Faster Time to Market  Improved Accuracy  Less Stress on QA Team  Quick Determination the Stability of Your Build  Eliminate Human Error
  • 8.
    Benefits  Ability ToPerform Testing On Multiple Platforms In Parallel  Accelerate Cross Browser Testing  Distributed Test Execution  Data Driven Testing
  • 9.
    Most popular toolsfor automation testing  The most popular test tool for automation testing are • QTP (HP UFT) • Rational Robot • Selenium
  • 10.
    Why JUnit?  JUnitis one of the most popular unit testing frameworks for Java development.  Unit testing is an important part in Test Driven Development (TDD) as it helps finding problems in the code as early as possible, especially when you make changes to the existing code you can run unit tests again to make sure that the changes do not break the application (regression).  JUnit is supported by almost any Java IDEs and build tools, thus it is the default choice of programmers to test their code.  Eclipse has very good support for JUnit - the IDE is shipped with JUnit as its default testing library.  Thus writing and running unit tests with JUnit in Eclipse is quick, easy and productive.
  • 11.
    Structure of aTest Class This Calculator class has two methods add() and subtract(). Now we want to write a test class to ensure that these methods are working correctly. With JUnit, the test class can have the following structure:
  • 13.
    Annotations used inthis test class  @BeforeClass:  Code in this method is executed only once, before all test methods in the test class. Typically you put code that prepares test environment here, e.g. initializing resources such as opening a database connection. The method marked with this annotation must be static.   @Before:  Code in this method is executed before every test method in the test class. So typically you put repeated code that must be executed before each test method here. 
  • 14.
     @Test:  Thisannotation specifies the annotated method is a test method. You can notice the naming convention for test method is the method name starts with test, followed by the name of the method in the class being tested. This Calculator class has two methods add() and subtract(), hence the test methods are testAdd() and testSubtract().  @After:  Code in this method is executed after every test method in the test class. So typically you put repeated code that must be executed after each test method here. NOTE: The above-mentioned annotations are in JUnit 4.
  • 15.
     @AfterClass:  Codein this method is executed only once, after all test methods in the test class. Due to this behavior, you can put code to clean up test environment here, e.g. closing the database connection. Note that this kind of method must be static.  Except the test methods, the other kinds of method are optional. So you implement them in the test class only if it is necessary.
  • 16.
    JUnit 5 changesin annotations  From JUnit 5,  @BeforeClass changes to @BeforeAll;  @Before changes to @BeforeEach;  @After changes to @AfterEach;  @AfterClass changes to @AfterAll.  This change in JUnit 5 reflects better meaning of the annotations.
  • 17.
    With JUnit 5,the structure of a test class looks like this:
  • 18.
    To be noted: In JUnit 4, you need to import the annotations from the org.junit package, but in JUnit 5 you need to import them from the org.junit.jupiter.api package.
  • 19.
    Using Assert Statementin Test Methods  In a test method, we use an assert statement to verify whether the code under test produces the result as expected or not.  If the result is as expected, the tested code passes the test case. Otherwise the tested code fails the test case.
  • 20.
     We usethe assertEquals() method from the class org.junit.Assert via static import:  you can use the fail() method to fail the test immediately, for example: Use the fail() method to indicate that a method is not yet implemented so when the test class is executed, it will fail.
  • 21.
     The assertEquals()method compares two values: the expected result and the actual value returned from the tested code.  If the two values are equal, the method returns normally indicating the tested code passes the test case.  If the two values are not equal, the method throws java.lang.AssertionError indicating the tested code fails the test case.  And programmers must fix the code until it passes the test case.
  • 22.
    JUnit provides manyassert()methods, and here are some commonly used ones: • assertEquals(expected, actual): asserts that two values are equal. The values can be of any primitive types or Objects. • assertNotEquals(expected, actual): asserts that two arguments are not equal. The values can be of any primitive types or Object. • assertTrue(boolean condition): asserts that a condition is true. • assertFalse(boolean condition): asserts that a condition is false. • assertNull(Object): asserts that an object is null. • assertNotNull(Object): asserts that an object is not null. • assertSame(Object expected, Object actual): asserts that two objects refer to the same object. • assertNotSame(Object unexpected, Object actual): asserts that two objects do not refer to the same object.
  • 29.
    You can seethe green indicator bar in the upper-right corner indicating that the test case has been executed successfully - the code under test passes the test case.
  • 30.
    If the testfails, the status indicator becomes red and the failure trace is printed:
  • 31.
    This is theresult of running the testSubtract() method,
  • 32.
    The class Calculatorpasses two test methods in the CalculatorTest class.