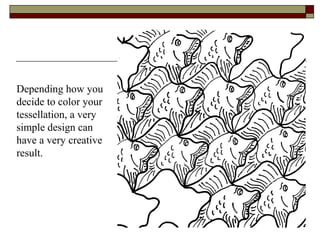
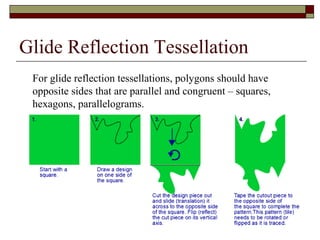
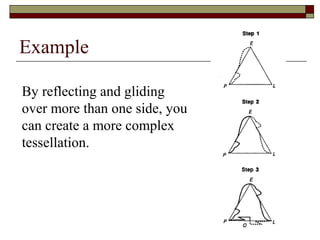
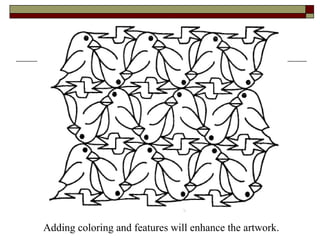
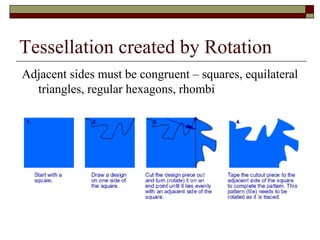
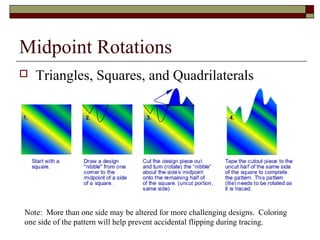
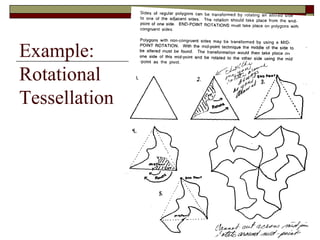
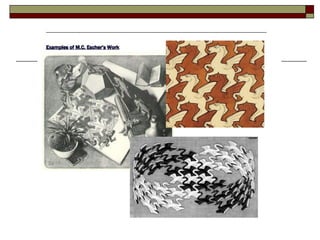
Tessellation Project
Today we will discuss the requirements and
expectations for your Tessellation projects and
you will receive a brief introduction to the
different types of tessellations. This is an
individual project.
Tessellation Project
   Maurits Cornelis Escher (1898 – 1972) was a
    Dutch artist famous for his repetitive,
    interlocking pattern. His works look like
    paintings but were done by woodcarving and
    lithographs.
   Escher’s designs are made from variations on
    tiling patterns called tessellations. A floor
    covered by square tiles is an example of a
    tessellation of squares.
Tessellations & Transformations

 Tessellations can be modified by using
     transformations. As you know,
    transformations are movements of
  geometric figures. One transformation,
 commonly used to create tessellations is
    a slide, or translation, of a figure.
Translation Tessellations
 For simple translation tessellations, polygons should have
 opposite sides that are parallel and congruent – squares,
 hexagons, parallelograms.
Example: Translation Tessellation
You can create more complex designs starting with
  square tessellations and making changes on both
  pairs of sides.
Depending how you
decide to color your
tessellation, a very
simple design can
have a very creative
result.
Glide Reflection Tessellation
 For glide reflection tessellations, polygons should have
 opposite sides that are parallel and congruent – squares,
 hexagons, parallelograms.
Example

By reflecting and gliding
over more than one side, you
can create a more complex
tessellation.
Adding coloring and features will enhance the artwork.
Tessellation created by Rotation
Adjacent sides must be congruent – squares, equilateral
  triangles, regular hexagons, rhombi
Midpoint Rotations
   Triangles, Squares, and Quadrilaterals


Note: More than one side may be altered for more challenging designs. Coloring
one side of the pattern will help prevent accidental flipping during tracing.
Example:
Rotational
Tessellation
Suggestions
   READ THE PACKET first before trying your
    tessellation. There is a lot of good information in the
    packet that will help you in deciding on which type
    of tessellation to do and in creating your tessellation.
   A template that is approximately 2 inches by 2
    inches will work well to create an 8 ½ by 11 inch
    tessellation.
Suggestions
   Try out several designs, by cutting and taping paper
    together until you find something you like.
   When you have decided on a design, create your
    template on a stiff material – heavy cardstock or a
    file folder seem to work well for creating a sturdy
    template that can be traced over and over.
   Be creative. Your design should not look like any of
    the designs in the packet or in this presentation.
   Remember: Finding a design online and copying it
    is plagiarism.
Tessellation Project
   Your project is due on WEdnesday, January
    30th at the beginning of class. Grading criteria
    is in your packet.
   On the due date, you must turn in your
    completed tessellation, your template.
   Do NOT wait until the last minute!!!!!
Tessellation project

Tessellation project

  • 1.
    Tessellation Project Today wewill discuss the requirements and expectations for your Tessellation projects and you will receive a brief introduction to the different types of tessellations. This is an individual project.
  • 2.
    Tessellation Project  Maurits Cornelis Escher (1898 – 1972) was a Dutch artist famous for his repetitive, interlocking pattern. His works look like paintings but were done by woodcarving and lithographs.  Escher’s designs are made from variations on tiling patterns called tessellations. A floor covered by square tiles is an example of a tessellation of squares.
  • 3.
    Tessellations & Transformations Tessellations can be modified by using transformations. As you know, transformations are movements of geometric figures. One transformation, commonly used to create tessellations is a slide, or translation, of a figure.
  • 4.
    Translation Tessellations Forsimple translation tessellations, polygons should have opposite sides that are parallel and congruent – squares, hexagons, parallelograms.
  • 5.
    Example: Translation Tessellation Youcan create more complex designs starting with square tessellations and making changes on both pairs of sides.
  • 6.
    Depending how you decideto color your tessellation, a very simple design can have a very creative result.
  • 7.
    Glide Reflection Tessellation For glide reflection tessellations, polygons should have opposite sides that are parallel and congruent – squares, hexagons, parallelograms.
  • 8.
    Example By reflecting andgliding over more than one side, you can create a more complex tessellation.
  • 9.
    Adding coloring andfeatures will enhance the artwork.
  • 10.
    Tessellation created byRotation Adjacent sides must be congruent – squares, equilateral triangles, regular hexagons, rhombi
  • 11.
    Midpoint Rotations  Triangles, Squares, and Quadrilaterals Note: More than one side may be altered for more challenging designs. Coloring one side of the pattern will help prevent accidental flipping during tracing.
  • 12.
  • 14.
    Suggestions  READ THE PACKET first before trying your tessellation. There is a lot of good information in the packet that will help you in deciding on which type of tessellation to do and in creating your tessellation.  A template that is approximately 2 inches by 2 inches will work well to create an 8 ½ by 11 inch tessellation.
  • 15.
    Suggestions  Try out several designs, by cutting and taping paper together until you find something you like.  When you have decided on a design, create your template on a stiff material – heavy cardstock or a file folder seem to work well for creating a sturdy template that can be traced over and over.  Be creative. Your design should not look like any of the designs in the packet or in this presentation.  Remember: Finding a design online and copying it is plagiarism.
  • 16.
    Tessellation Project  Your project is due on WEdnesday, January 30th at the beginning of class. Grading criteria is in your packet.  On the due date, you must turn in your completed tessellation, your template.  Do NOT wait until the last minute!!!!!