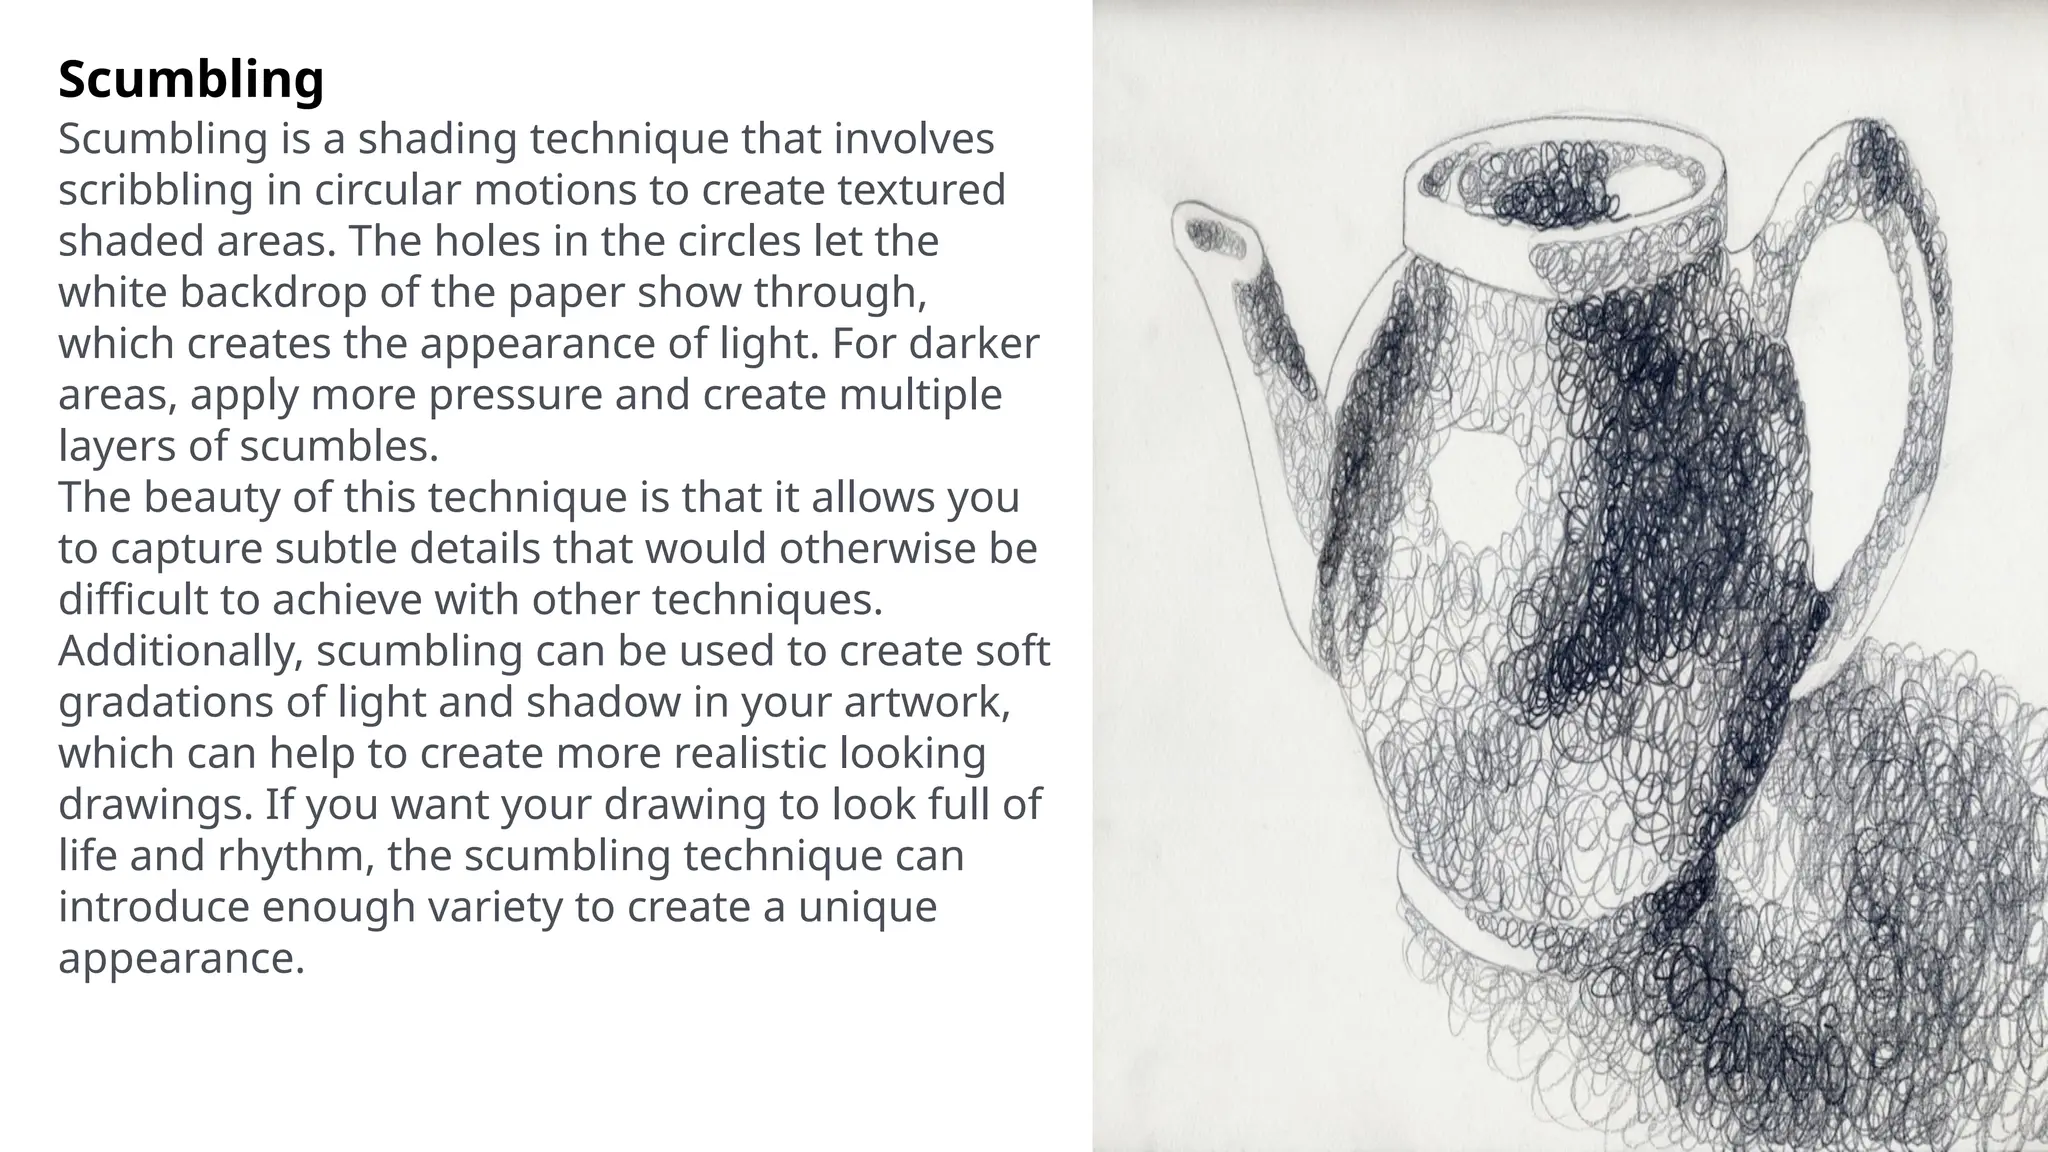
Shading
Shading is a technique used by an artist to create tonal
variations in their drawings or paintings. By applying
shading, an artist can achieve the desired level of contrast
between light and dark values.
Shading is a specific method that forms a part of the
drawing process, that is used to create the appearance of
volume and form. It can transform the depiction of a subject
or object, from appearing two dimensional and simply made
of contour lines, to appearing three dimensional.
Shading techniques differ from drawing techniques, as
shading techniques describe how the artist creates a value
range in their piece, to create the appearance of light, dark
and volume.
Shading Techniques
Shading techniques enable artists to create a
range of values and a contrast between
highlights and shadows. Different shading
techniques will produce different kinds of
textures, patterns and results.
A drawing is a combination of line and tone.
Shading is what takes a drawing from
looking two dimensional, to appearing as if
it has volume and form. Shading techniques
give the artist more control over the values
produced, whilst creating texture and depth.
Tonal Shading
Tonal shading is the process of
altering the pressure applied to the
pencil to create shadows and
highlights.
This is the easiest and most
intuitive shading technique, that
most people use when they start
learning to draw.
Tonal Shading
By applying an even amount of
pressure to create a smooth mark,
artists can block in large areas with
consistent values. Apply more
pressure and create darker marks,
then reduce the pressure for
lighter midtones. For the highlights
in a drawing, you can let the white
of the paper show through.
The benefit of this technique is that
you can create a smooth
appearance. For drawings that have
smooth surfaces, skin texture or for
realistic drawing styles, this
technique would be most suitable.
Tonal shading is an excellent
technique to use with mediums such
as charcoal and graphite. This is
because they have soft leads that
enable the artist to vary tone with
the pressure applied. Artists can also
use powdered graphite or charcoal
and brush it on the paper. With this,
artists can achieve lighter and more
even tones for smooth results.
Hatching
Hatching is a shading technique that
involves creating thin, parallel lines.
These can be used to create areas of
light or shadow in your artwork. This
technique can be varied by changing the
length and angle of the lines, as well as
adjusting their thickness and spacing.
The hatching technique can also be
used to create movement and direction
in landscapes or figures. If you are using
mediums like pen, ink, silverpoint, or
etching, hatching is a great way to
create variation in values.
Parallel hatching appears clean and tidy,
with uniform, straight lines. This
consistency and repetition creates
harmony in the shaded areas of the
drawing, which can add interest to the
composition of the piece.
Vary the darkness, thickness or density
of the lines to create areas that appear
darker or lighter. You can change the
direction of hatched lines for different
sections of the shadows in the drawing
to add variety to the piece. Choose to
follow the general plane of the contours
of the form, or guide the viewer towards
a focal point with the line direction.
Cross Hatching
Cross hatching is
similar to hatching, but
it involves crossing two
sets of thin, parallel
lines to create a more
detailed and textured
look. This technique can
be used in many ways,
from creating subtle
shadows and shading
to creating bolder
textures in your artwor
k
.
Cross hatching is a great way to
add extra depth and contrast to
your drawings, as it allows you to
create multiple layers of tonal
variation. It can also be used to
create dramatic effects in
landscapes, portraits or figures.
To improve your cross hatching skills, start
by simply drawing a series of lines. Try to
make each line you draw look uniform and
consistent. Then, try drawing longer lines,
keeping them uniform. Apply pressure to
create a series of uniform dark lines. When
your lines have uniformity, then move on
to challenging yourself to creating the
perfect gradient with cross hatched lines.
Start by outlining a square or circle shape,
then shading the darkest area with marks
that are close together and darker in value.
Slowly transition to the midtones by
applying less pressure to the pencil and
spacing the cross hatched marks out more.
Contour hatching
Contouring, or contour
hatching is similar to
cross hatching.
However, instead of
drawing crossed,
straight parallel lines,
draw the lines so that
they curve to the
contours of the
volume of the form that
you are trying to
represent.
Contour hatching is a shading
technique that better portrays the
volume of a figure or scene. It
adds texture and rhythm to a
drawing (and you can use the
technique with pen, ink or etching
materials), but it adds a sense of
realism by showing the
complexities of the curvature of
the form. Where parallel hatching
and cross hatching has a flat
effect, contour hatching better
communicates the planes of a
subject or object.
Stippling
Stippling is a shading
technique that involves
creating small dots of
varying densities to create
tonal variations in your
artwork. This technique also
works well when used
together with other shading
techniques, as it helps to add
extra texture and depth to
your drawings.
Stippling
This technique involves repeatedly
dotting the page, with dots in closer
proximity representing darker values. It
can take a long time to use dots for
shading, however once you get into the
flow of creating the dotting action, it
can be quite meditative. The results can
be striking—when the viewer steps
away, the dots appear to blur together,
creating shadow and highlight tones,
however, get up close and see patterns
of individual dots.
Scumbling
Scumbling is a shading technique that involves
scribbling in circular motions to create textured
shaded areas. The holes in the circles let the
white backdrop of the paper show through,
which creates the appearance of light. For darker
areas, apply more pressure and create multiple
layers of scumbles.
The beauty of this technique is that it allows you
to capture subtle details that would otherwise be
difficult to achieve with other techniques.
Additionally, scumbling can be used to create soft
gradations of light and shadow in your artwork,
which can help to create more realistic looking
drawings. If you want your drawing to look full of
life and rhythm, the scumbling technique can
introduce enough variety to create a unique
appearance.
The benefit of using different shading techniques
By using techniques such as
hatching, cross hatching, stippling
and scumbling, artists can achieve
not only depth in their tones and a
large value range, but also texture,
movement, rhythm and harmony.
The benefit of using different shading techniques
The purpose of shading, is to create a value range in an
artwork. Values refer to the relative lightness or darkness
of a colour, irrespective of its hue or saturation. Creating a
value range, then is about creating light and shadows in
an artwork. To create a high contrast between the lightest
and darkest values, the tonal shading technique is the
most effective. Apply pressure to a soft pencil or charcoal
stick to create the darkest values, and leave a lighter
touch for the lightest values.
Shading tips
•Start with light pressure, then gradually build the darker values.
This way, if you make a mistake, it will be easier to erase. Starting
tentatively results in more accurate finished pieces.
•Explore different materials and tools to create various textures.
Pastels, charcoal, chalk and ink pens can all help to achieve certain
effects.
•Be aware of the edges in your artwork– soft edges blur the boundary
between two tones, whereas hard edges provide a more precise
definition of where one stops and another begins.
•Experiment with different values and textures to create interesting
effects. You can use a combination of techniques, such as hatching
and cross hatching, to achieve the desired result.
•Get a value scale to help you determine value relationships better.
Spend time looking at your reference, to determine where the darkest
values are, the midtones, reflected light, light values and brightest
highlights are and their relationship to one another.
What have you learned?
1.What is shading?
2.What are the different kinds of
shading?
3.Why do we need to know shading?
Let’s have an activity:
Directions:
Draw a simple example for each
shading techniques that have been
discussed.
Reference:
https://finearttutorials.com/guide/shading-techniques/

Shading lecture for learners in highschool.pptx

  • 1.
  • 2.
    Shading is atechnique used by an artist to create tonal variations in their drawings or paintings. By applying shading, an artist can achieve the desired level of contrast between light and dark values. Shading is a specific method that forms a part of the drawing process, that is used to create the appearance of volume and form. It can transform the depiction of a subject or object, from appearing two dimensional and simply made of contour lines, to appearing three dimensional. Shading techniques differ from drawing techniques, as shading techniques describe how the artist creates a value range in their piece, to create the appearance of light, dark and volume.
  • 3.
    Shading Techniques Shading techniquesenable artists to create a range of values and a contrast between highlights and shadows. Different shading techniques will produce different kinds of textures, patterns and results.
  • 4.
    A drawing isa combination of line and tone. Shading is what takes a drawing from looking two dimensional, to appearing as if it has volume and form. Shading techniques give the artist more control over the values produced, whilst creating texture and depth.
  • 5.
    Tonal Shading Tonal shadingis the process of altering the pressure applied to the pencil to create shadows and highlights. This is the easiest and most intuitive shading technique, that most people use when they start learning to draw.
  • 6.
    Tonal Shading By applyingan even amount of pressure to create a smooth mark, artists can block in large areas with consistent values. Apply more pressure and create darker marks, then reduce the pressure for lighter midtones. For the highlights in a drawing, you can let the white of the paper show through.
  • 7.
    The benefit ofthis technique is that you can create a smooth appearance. For drawings that have smooth surfaces, skin texture or for realistic drawing styles, this technique would be most suitable. Tonal shading is an excellent technique to use with mediums such as charcoal and graphite. This is because they have soft leads that enable the artist to vary tone with the pressure applied. Artists can also use powdered graphite or charcoal and brush it on the paper. With this, artists can achieve lighter and more even tones for smooth results.
  • 8.
    Hatching Hatching is ashading technique that involves creating thin, parallel lines. These can be used to create areas of light or shadow in your artwork. This technique can be varied by changing the length and angle of the lines, as well as adjusting their thickness and spacing. The hatching technique can also be used to create movement and direction in landscapes or figures. If you are using mediums like pen, ink, silverpoint, or etching, hatching is a great way to create variation in values.
  • 9.
    Parallel hatching appearsclean and tidy, with uniform, straight lines. This consistency and repetition creates harmony in the shaded areas of the drawing, which can add interest to the composition of the piece. Vary the darkness, thickness or density of the lines to create areas that appear darker or lighter. You can change the direction of hatched lines for different sections of the shadows in the drawing to add variety to the piece. Choose to follow the general plane of the contours of the form, or guide the viewer towards a focal point with the line direction.
  • 11.
    Cross Hatching Cross hatchingis similar to hatching, but it involves crossing two sets of thin, parallel lines to create a more detailed and textured look. This technique can be used in many ways, from creating subtle shadows and shading to creating bolder textures in your artwor k .
  • 12.
    Cross hatching isa great way to add extra depth and contrast to your drawings, as it allows you to create multiple layers of tonal variation. It can also be used to create dramatic effects in landscapes, portraits or figures.
  • 13.
    To improve yourcross hatching skills, start by simply drawing a series of lines. Try to make each line you draw look uniform and consistent. Then, try drawing longer lines, keeping them uniform. Apply pressure to create a series of uniform dark lines. When your lines have uniformity, then move on to challenging yourself to creating the perfect gradient with cross hatched lines. Start by outlining a square or circle shape, then shading the darkest area with marks that are close together and darker in value. Slowly transition to the midtones by applying less pressure to the pencil and spacing the cross hatched marks out more.
  • 14.
    Contour hatching Contouring, orcontour hatching is similar to cross hatching. However, instead of drawing crossed, straight parallel lines, draw the lines so that they curve to the contours of the volume of the form that you are trying to represent.
  • 15.
    Contour hatching isa shading technique that better portrays the volume of a figure or scene. It adds texture and rhythm to a drawing (and you can use the technique with pen, ink or etching materials), but it adds a sense of realism by showing the complexities of the curvature of the form. Where parallel hatching and cross hatching has a flat effect, contour hatching better communicates the planes of a subject or object.
  • 16.
    Stippling Stippling is ashading technique that involves creating small dots of varying densities to create tonal variations in your artwork. This technique also works well when used together with other shading techniques, as it helps to add extra texture and depth to your drawings.
  • 17.
    Stippling This technique involvesrepeatedly dotting the page, with dots in closer proximity representing darker values. It can take a long time to use dots for shading, however once you get into the flow of creating the dotting action, it can be quite meditative. The results can be striking—when the viewer steps away, the dots appear to blur together, creating shadow and highlight tones, however, get up close and see patterns of individual dots.
  • 18.
    Scumbling Scumbling is ashading technique that involves scribbling in circular motions to create textured shaded areas. The holes in the circles let the white backdrop of the paper show through, which creates the appearance of light. For darker areas, apply more pressure and create multiple layers of scumbles. The beauty of this technique is that it allows you to capture subtle details that would otherwise be difficult to achieve with other techniques. Additionally, scumbling can be used to create soft gradations of light and shadow in your artwork, which can help to create more realistic looking drawings. If you want your drawing to look full of life and rhythm, the scumbling technique can introduce enough variety to create a unique appearance.
  • 19.
    The benefit ofusing different shading techniques By using techniques such as hatching, cross hatching, stippling and scumbling, artists can achieve not only depth in their tones and a large value range, but also texture, movement, rhythm and harmony.
  • 20.
    The benefit ofusing different shading techniques The purpose of shading, is to create a value range in an artwork. Values refer to the relative lightness or darkness of a colour, irrespective of its hue or saturation. Creating a value range, then is about creating light and shadows in an artwork. To create a high contrast between the lightest and darkest values, the tonal shading technique is the most effective. Apply pressure to a soft pencil or charcoal stick to create the darkest values, and leave a lighter touch for the lightest values.
  • 21.
    Shading tips •Start withlight pressure, then gradually build the darker values. This way, if you make a mistake, it will be easier to erase. Starting tentatively results in more accurate finished pieces. •Explore different materials and tools to create various textures. Pastels, charcoal, chalk and ink pens can all help to achieve certain effects. •Be aware of the edges in your artwork– soft edges blur the boundary between two tones, whereas hard edges provide a more precise definition of where one stops and another begins. •Experiment with different values and textures to create interesting effects. You can use a combination of techniques, such as hatching and cross hatching, to achieve the desired result. •Get a value scale to help you determine value relationships better. Spend time looking at your reference, to determine where the darkest values are, the midtones, reflected light, light values and brightest highlights are and their relationship to one another.
  • 22.
    What have youlearned? 1.What is shading? 2.What are the different kinds of shading? 3.Why do we need to know shading?
  • 23.
    Let’s have anactivity: Directions: Draw a simple example for each shading techniques that have been discussed.
  • 24.