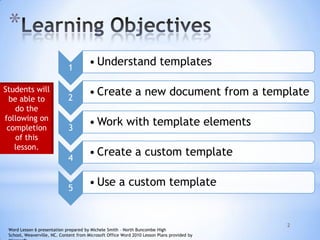
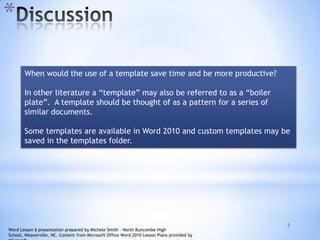
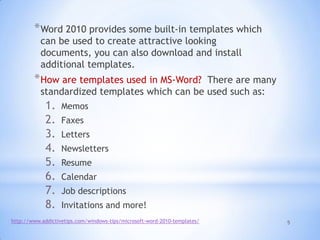
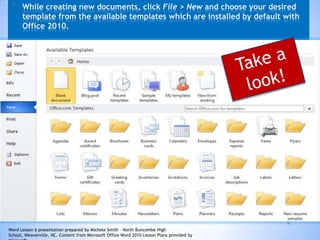
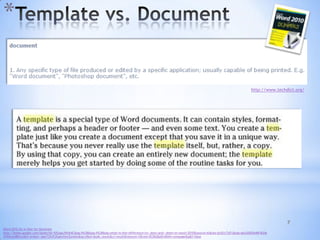
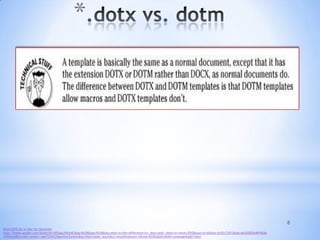
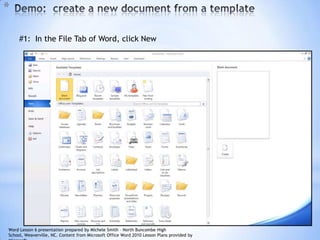
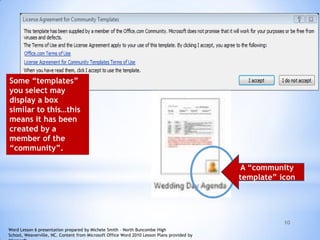
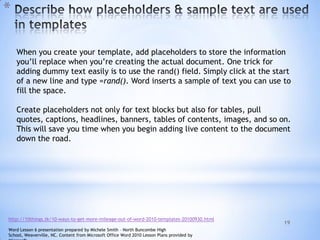
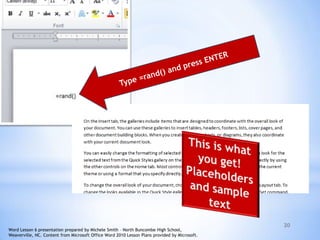
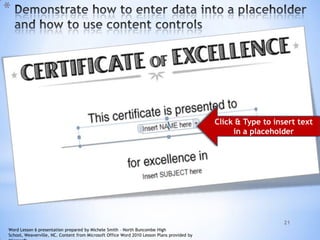
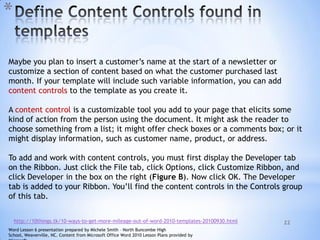
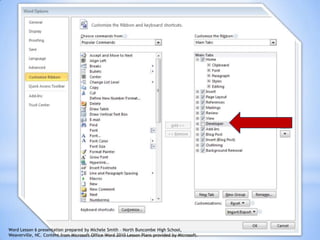
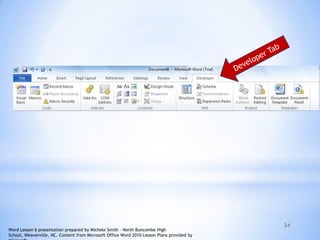
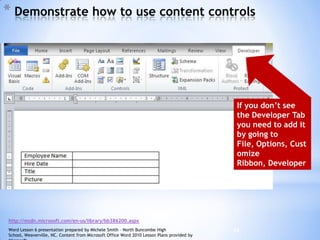
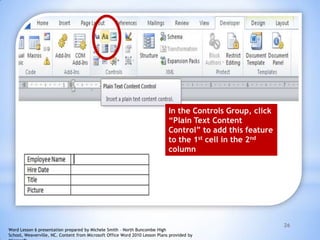
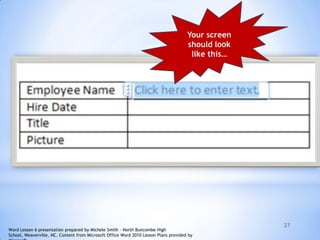
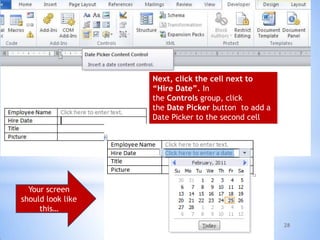
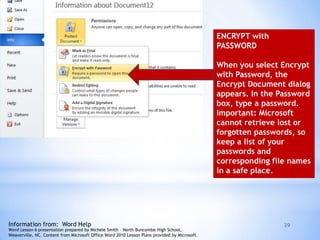
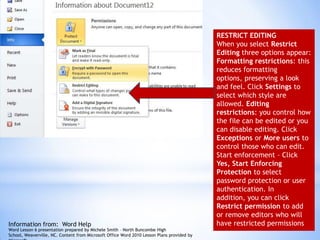
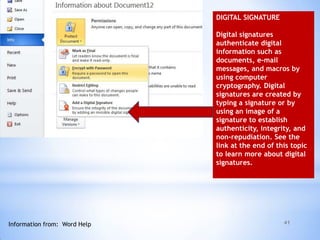
Lesson 6
*
Word Lesson 6 presentation prepared by Michele Smith – North Buncombe High
School, Weaverville, NC. Content from Microsoft Office Word 2010 Lesson Plans provided by
*
2
1
• Understand templates
2
• Create a new document from a template
3
• Work with template elements
4
• Create a custom template
5
• Use a custom template
Students will
be able to
do the
following on
completion
of this
lesson.
Word Lesson 6 presentation prepared by Michele Smith – North Buncombe High
School, Weaverville, NC. Content from Microsoft Office Word 2010 Lesson Plans provided by
*
3
When would the use of a template save time and be more productive?
In other literature a “template” may also be referred to as a “boiler
plate”. A template should be thought of as a pattern for a series of
similar documents.
Some templates are available in Word 2010 and custom templates may be
saved in the templates folder.
Word Lesson 6 presentation prepared by Michele Smith – North Buncombe High
School, Weaverville, NC. Content from Microsoft Office Word 2010 Lesson Plans provided by
4
*
Templates help the users create Word
documents in an effortless and fast method
Read more: http://www.brighthub.com/computing/windows-
platform/articles/30893.aspx#ixzz1EylfCuPB
5
*Word 2010 provides some built-in templates which
can be used to create attractive looking
documents, you can also download and install
additional templates.
*How are templates used in MS-Word? There are many
standardized templates which can be used such as:
1. Memos
2. Faxes
3. Letters
4. Newsletters
5. Resume
6. Calendar
7. Job descriptions
8. Invitations and more!
http://www.addictivetips.com/windows-tips/microsoft-word-2010-templates/
6
* While creating new documents, click File > New and choose your desired
template from the available templates which are installed by default with
Office 2010.
Word Lesson 6 presentation prepared by Michele Smith – North Buncombe High
School, Weaverville, NC. Content from Microsoft Office Word 2010 Lesson Plans provided by
7
*
Word 2010 All-in-One-for-Dummies
http://books.google.com/books?id=105JppJWUk4C&pg=PA38&lpg=PA38&dq=what+is+the+difference+in+.dotx+and+.dotm+in+word+2010&source=bl&ots=bJQ1cTsFlJ&sig=gXcG0XOA46F4G0e
1P4HwAj8Rlcw&hl=en&ei=-bpnTZXvFJGgtwfxmZzmAw&sa=X&oi=book_result&ct=result&resnum=5&ved=0CDkQ6AEwBA#v=onepage&q&f=false
http://www.techdict.org/
8
*
Word 2010 All-in-One-for-Dummies
http://books.google.com/books?id=105JppJWUk4C&pg=PA38&lpg=PA38&dq=what+is+the+difference+in+.dotx+and+.dotm+in+word+2010&source=bl&ots=bJQ1cTsFlJ&sig=gXcG0XOA46F4G0e
1P4HwAj8Rlcw&hl=en&ei=-bpnTZXvFJGgtwfxmZzmAw&sa=X&oi=book_result&ct=result&resnum=5&ved=0CDkQ6AEwBA#v=onepage&q&f=false
9
*
#1: In the File Tab of Word, click New
Word Lesson 6 presentation prepared by Michele Smith – North Buncombe High
School, Weaverville, NC. Content from Microsoft Office Word 2010 Lesson Plans provided by
10
Some “templates”
you select may
display a box
similar to this…this
means it has been
created by a
member of the
“community”.
A “community
template” icon
Word Lesson 6 presentation prepared by Michele Smith – North Buncombe High
School, Weaverville, NC. Content from Microsoft Office Word 2010 Lesson Plans provided by
11
*
Select a
category
Word Lesson 6 presentation prepared by Michele Smith – North Buncombe High
School, Weaverville, NC. Content from Microsoft Office Word 2010 Lesson Plans provided by
12
Word Lesson 6 presentation prepared by Michele Smith – North Buncombe High
School, Weaverville, NC. Content from Microsoft Office Word 2010 Lesson Plans provided by
13
You can click on the
“thumbnail” of the template
and review more “details”
about the template.
Word Lesson 6 presentation prepared by Michele Smith – North Buncombe High
School, Weaverville, NC. Content from Microsoft Office Word 2010 Lesson Plans provided by
14
Click
“download”
Word Lesson 6 presentation prepared by Michele Smith – North Buncombe High
School, Weaverville, NC. Content from Microsoft Office Word 2010 Lesson Plans provided by
15
Read the MS Agreement
and click “Accept”
Word Lesson 6 presentation prepared by Michele Smith – North Buncombe High
School, Weaverville, NC. Content from Microsoft Office Word 2010 Lesson Plans provided by
16
Click Download
Word Lesson 6 presentation prepared by Michele Smith – North Buncombe High
School, Weaverville, NC. Content from Microsoft Office Word 2010 Lesson Plans provided by
17
Download message box
Where do you want to
save the template?
Give it a filename and NOTICE
the “Save astype” *.dotx
18
Here is the
“blue sky”
template you
downloaded!
19
*
When you create your template, add placeholders to store the information
you’ll replace when you’re creating the actual document. One trick for
adding dummy text easily is to use the rand() field. Simply click at the start
of a new line and type =rand(). Word inserts a sample of text you can use to
fill the space.
Create placeholders not only for text blocks but also for tables, pull
quotes, captions, headlines, banners, tables of contents, images, and so on.
This will save you time when you begin adding live content to the document
down the road.
http://10things.tk/10-ways-to-get-more-mileage-out-of-word-2010-templates-20100930.html
Word Lesson 6 presentation prepared by Michele Smith – North Buncombe High
School, Weaverville, NC. Content from Microsoft Office Word 2010 Lesson Plans provided by
20
Word Lesson 6 presentation prepared by Michele Smith – North Buncombe High School,
Weaverville, NC. Content from Microsoft Office Word 2010 Lesson Plans provided by Microsoft.
21
*
Click & Type to insert text
in a placeholder
Word Lesson 6 presentation prepared by Michele Smith – North Buncombe High
School, Weaverville, NC. Content from Microsoft Office Word 2010 Lesson Plans provided by
22
*
Maybe you plan to insert a customer’s name at the start of a newsletter or
customize a section of content based on what the customer purchased last
month. If your template will include such variable information, you can add
content controls to the template as you create it.
A content control is a customizable tool you add to your page that elicits some
kind of action from the person using the document. It might ask the reader to
choose something from a list; it might offer check boxes or a comments box; or it
might display information, such as customer name, product, or address.
To add and work with content controls, you must first display the Developer tab
on the Ribbon. Just click the File tab, click Options, click Customize Ribbon, and
click Developer in the box on the right (Figure B). Now click OK. The Developer
tab is added to your Ribbon. You’ll find the content controls in the Controls group
of this tab.
http://10things.tk/10-ways-to-get-more-mileage-out-of-word-2010-templates-20100930.html
Word Lesson 6 presentation prepared by Michele Smith – North Buncombe High
School, Weaverville, NC. Content from Microsoft Office Word 2010 Lesson Plans provided by
23
Word Lesson 6 presentation prepared by Michele Smith – North Buncombe High School,
Weaverville, NC. Content from Microsoft Office Word 2010 Lesson Plans provided by Microsoft.
24
Word Lesson 6 presentation prepared by Michele Smith – North Buncombe High
School, Weaverville, NC. Content from Microsoft Office Word 2010 Lesson Plans provided by
25
* Demonstrate how to use content controls
http://msdn.microsoft.com/en-us/library/bb386200.aspx
If you don’t see
the Developer Tab
you need to add it
by going to
File, Options, Cust
omize
Ribbon, Developer
Word Lesson 6 presentation prepared by Michele Smith – North Buncombe High
School, Weaverville, NC. Content from Microsoft Office Word 2010 Lesson Plans provided by
26
In the Controls Group, click
“Plain Text Content
Control” to add this feature
to the 1st cell in the 2nd
column
Word Lesson 6 presentation prepared by Michele Smith – North Buncombe High
School, Weaverville, NC. Content from Microsoft Office Word 2010 Lesson Plans provided by
27
Your screen
should look
like this…
Word Lesson 6 presentation prepared by Michele Smith – North Buncombe High
School, Weaverville, NC. Content from Microsoft Office Word 2010 Lesson Plans provided by
28
Next, click the cell next to
“Hire Date”. In
the Controls group, click
the Date Picker button to add a
Date Picker to the second cell
Your screen
should look like
this…
29
2.In the Controls group, click the Combo Box button to add a ComboBoxContentControl to the third cell.
1. Click the third cell in
the second column (next
to Title).
2. In the Controls group,
click the Combo
Box button to add
a Combo Box the third
cell.
Word Lesson 6 presentation prepared by Michele Smith – North Buncombe High
School, Weaverville, NC. Content from Microsoft Office Word 2010 Lesson Plans provided by
30
Click the last cell
in the second
column (next
to Picture).
In tne Controls
group, click
the Picture
Content Control
button to add
a Picture Content
to the last cell.
31
Protect Content
Controls!
Use “Word
Help”….it is a
valuable
resource!
Word Lesson 6 presentation prepared by Michele Smith – North Buncombe High
School, Weaverville, NC. Content from Microsoft Office Word 2010 Lesson Plans provided by
32
*
Word Lesson 6 presentation prepared by Michele Smith – North Buncombe High
School, Weaverville, NC. Content from Microsoft Office Word 2010 Lesson Plans provided by
33
*Important questions to answer
PRIOR to creating a template:
1. Determine the intended audience
2. Create templates that are easy to
use
3. Make sure the template is
technically accurate (i.e. correct
calculations & functional macros
4. Spell & Grammar check
Word Lesson 6 presentation prepared by Michele Smith – North Buncombe High School,
Weaverville, NC. Content from Microsoft Office Word 2010 Lesson Plans provided by Microsoft.
34
*
Word Lesson 6 presentation prepared by Michele Smith – North Buncombe High
School, Weaverville, NC. Content from Microsoft Office Word 2010 Lesson Plans provided by
35
*
Word Lesson 6 presentation prepared by Michele Smith – North Buncombe High
School, Weaverville, NC. Content from Microsoft Office Word 2010 Lesson Plans provided by
36
*
Go to
File, Info, Per
missions
Word Lesson 6 presentation prepared by Michele Smith – North Buncombe High
School, Weaverville, NC. Content from Microsoft Office Word 2010 Lesson Plans provided by
37
This shows all
your “protect
document”
options
Word Lesson 6 presentation prepared by Michele Smith – North Buncombe High
School, Weaverville, NC. Content from Microsoft Office Word 2010 Lesson Plans provided by
38
MARK AS FINAL
When a document is
marked as
final, typing, editing
commands, and proofing
marks are disabled or
turned off and the
document becomes
read-only. The Mark as
Final command helps you
communicate that you
are sharing a completed
version of a document. It
also helps prevent
reviewers or readers
from making inadvertent
changes to the
document.
Information from: Word Help
Word Lesson 6 presentation prepared by Michele Smith – North Buncombe High
School, Weaverville, NC. Content from Microsoft Office Word 2010 Lesson Plans provided by
39
ENCRYPT with
PASSWORD
When you select Encrypt
with Password, the
Encrypt Document dialog
appears. In the Password
box, type a password.
Important: Microsoft
cannot retrieve lost or
forgotten passwords, so
keep a list of your
passwords and
corresponding file names
in a safe place.
Information from: Word Help
Word Lesson 6 presentation prepared by Michele Smith – North Buncombe High School,
Weaverville, NC. Content from Microsoft Office Word 2010 Lesson Plans provided by Microsoft.
40
RESTRICT EDITING
When you select Restrict
Editing three options appear:
Formatting restrictions: this
reduces formatting
options, preserving a look
and feel. Click Settings to
select which style are
allowed. Editing
restrictions: you control how
the file can be edited or you
can disable editing. Click
Exceptions or More users to
control those who can edit.
Start enforcement – Click
Yes, Start Enforcing
Protection to select
password protection or user
authentication. In
addition, you can click
Restrict permission to add
or remove editors who will
have restricted permissionsInformation from: Word Help
Word Lesson 6 presentation prepared by Michele Smith – North Buncombe High
School, Weaverville, NC. Content from Microsoft Office Word 2010 Lesson Plans provided by
41
DIGITAL SIGNATURE
Digital signatures
authenticate digital
information such as
documents, e-mail
messages, and macros by
using computer
cryptography. Digital
signatures are created by
typing a signature or by
using an image of a
signature to establish
authenticity, integrity, and
non-repudiation. See the
link at the end of this topic
to learn more about digital
signatures.
Information from: Word Help
42
1.Word Lesson 6, Exercise 1
2.Word Lesson 6, Project 1
3.Quia: “MSITA Lesson 6”
• http://www.quia.com/rr/788531.html
Now it is time for you to practice.
Please complete the following:
Word Lesson 6 presentation prepared by Michele Smith – North Buncombe High
School, Weaverville, NC. Content from Microsoft Office Word 2010 Lesson Plans provided by

Templates Powerpoint

  • 1.
    Lesson 6 * Word Lesson6 presentation prepared by Michele Smith – North Buncombe High School, Weaverville, NC. Content from Microsoft Office Word 2010 Lesson Plans provided by
  • 2.
    * 2 1 • Understand templates 2 •Create a new document from a template 3 • Work with template elements 4 • Create a custom template 5 • Use a custom template Students will be able to do the following on completion of this lesson. Word Lesson 6 presentation prepared by Michele Smith – North Buncombe High School, Weaverville, NC. Content from Microsoft Office Word 2010 Lesson Plans provided by
  • 3.
    * 3 When would theuse of a template save time and be more productive? In other literature a “template” may also be referred to as a “boiler plate”. A template should be thought of as a pattern for a series of similar documents. Some templates are available in Word 2010 and custom templates may be saved in the templates folder. Word Lesson 6 presentation prepared by Michele Smith – North Buncombe High School, Weaverville, NC. Content from Microsoft Office Word 2010 Lesson Plans provided by
  • 4.
    4 * Templates help theusers create Word documents in an effortless and fast method Read more: http://www.brighthub.com/computing/windows- platform/articles/30893.aspx#ixzz1EylfCuPB
  • 5.
    5 *Word 2010 providessome built-in templates which can be used to create attractive looking documents, you can also download and install additional templates. *How are templates used in MS-Word? There are many standardized templates which can be used such as: 1. Memos 2. Faxes 3. Letters 4. Newsletters 5. Resume 6. Calendar 7. Job descriptions 8. Invitations and more! http://www.addictivetips.com/windows-tips/microsoft-word-2010-templates/
  • 6.
    6 * While creatingnew documents, click File > New and choose your desired template from the available templates which are installed by default with Office 2010. Word Lesson 6 presentation prepared by Michele Smith – North Buncombe High School, Weaverville, NC. Content from Microsoft Office Word 2010 Lesson Plans provided by
  • 7.
  • 8.
  • 9.
    9 * #1: In theFile Tab of Word, click New Word Lesson 6 presentation prepared by Michele Smith – North Buncombe High School, Weaverville, NC. Content from Microsoft Office Word 2010 Lesson Plans provided by
  • 10.
    10 Some “templates” you selectmay display a box similar to this…this means it has been created by a member of the “community”. A “community template” icon Word Lesson 6 presentation prepared by Michele Smith – North Buncombe High School, Weaverville, NC. Content from Microsoft Office Word 2010 Lesson Plans provided by
  • 11.
    11 * Select a category Word Lesson6 presentation prepared by Michele Smith – North Buncombe High School, Weaverville, NC. Content from Microsoft Office Word 2010 Lesson Plans provided by
  • 12.
    12 Word Lesson 6presentation prepared by Michele Smith – North Buncombe High School, Weaverville, NC. Content from Microsoft Office Word 2010 Lesson Plans provided by
  • 13.
    13 You can clickon the “thumbnail” of the template and review more “details” about the template. Word Lesson 6 presentation prepared by Michele Smith – North Buncombe High School, Weaverville, NC. Content from Microsoft Office Word 2010 Lesson Plans provided by
  • 14.
    14 Click “download” Word Lesson 6presentation prepared by Michele Smith – North Buncombe High School, Weaverville, NC. Content from Microsoft Office Word 2010 Lesson Plans provided by
  • 15.
    15 Read the MSAgreement and click “Accept” Word Lesson 6 presentation prepared by Michele Smith – North Buncombe High School, Weaverville, NC. Content from Microsoft Office Word 2010 Lesson Plans provided by
  • 16.
    16 Click Download Word Lesson6 presentation prepared by Michele Smith – North Buncombe High School, Weaverville, NC. Content from Microsoft Office Word 2010 Lesson Plans provided by
  • 17.
    17 Download message box Wheredo you want to save the template? Give it a filename and NOTICE the “Save astype” *.dotx
  • 18.
    18 Here is the “bluesky” template you downloaded!
  • 19.
    19 * When you createyour template, add placeholders to store the information you’ll replace when you’re creating the actual document. One trick for adding dummy text easily is to use the rand() field. Simply click at the start of a new line and type =rand(). Word inserts a sample of text you can use to fill the space. Create placeholders not only for text blocks but also for tables, pull quotes, captions, headlines, banners, tables of contents, images, and so on. This will save you time when you begin adding live content to the document down the road. http://10things.tk/10-ways-to-get-more-mileage-out-of-word-2010-templates-20100930.html Word Lesson 6 presentation prepared by Michele Smith – North Buncombe High School, Weaverville, NC. Content from Microsoft Office Word 2010 Lesson Plans provided by
  • 20.
    20 Word Lesson 6presentation prepared by Michele Smith – North Buncombe High School, Weaverville, NC. Content from Microsoft Office Word 2010 Lesson Plans provided by Microsoft.
  • 21.
    21 * Click & Typeto insert text in a placeholder Word Lesson 6 presentation prepared by Michele Smith – North Buncombe High School, Weaverville, NC. Content from Microsoft Office Word 2010 Lesson Plans provided by
  • 22.
    22 * Maybe you planto insert a customer’s name at the start of a newsletter or customize a section of content based on what the customer purchased last month. If your template will include such variable information, you can add content controls to the template as you create it. A content control is a customizable tool you add to your page that elicits some kind of action from the person using the document. It might ask the reader to choose something from a list; it might offer check boxes or a comments box; or it might display information, such as customer name, product, or address. To add and work with content controls, you must first display the Developer tab on the Ribbon. Just click the File tab, click Options, click Customize Ribbon, and click Developer in the box on the right (Figure B). Now click OK. The Developer tab is added to your Ribbon. You’ll find the content controls in the Controls group of this tab. http://10things.tk/10-ways-to-get-more-mileage-out-of-word-2010-templates-20100930.html Word Lesson 6 presentation prepared by Michele Smith – North Buncombe High School, Weaverville, NC. Content from Microsoft Office Word 2010 Lesson Plans provided by
  • 23.
    23 Word Lesson 6presentation prepared by Michele Smith – North Buncombe High School, Weaverville, NC. Content from Microsoft Office Word 2010 Lesson Plans provided by Microsoft.
  • 24.
    24 Word Lesson 6presentation prepared by Michele Smith – North Buncombe High School, Weaverville, NC. Content from Microsoft Office Word 2010 Lesson Plans provided by
  • 25.
    25 * Demonstrate howto use content controls http://msdn.microsoft.com/en-us/library/bb386200.aspx If you don’t see the Developer Tab you need to add it by going to File, Options, Cust omize Ribbon, Developer Word Lesson 6 presentation prepared by Michele Smith – North Buncombe High School, Weaverville, NC. Content from Microsoft Office Word 2010 Lesson Plans provided by
  • 26.
    26 In the ControlsGroup, click “Plain Text Content Control” to add this feature to the 1st cell in the 2nd column Word Lesson 6 presentation prepared by Michele Smith – North Buncombe High School, Weaverville, NC. Content from Microsoft Office Word 2010 Lesson Plans provided by
  • 27.
    27 Your screen should look likethis… Word Lesson 6 presentation prepared by Michele Smith – North Buncombe High School, Weaverville, NC. Content from Microsoft Office Word 2010 Lesson Plans provided by
  • 28.
    28 Next, click thecell next to “Hire Date”. In the Controls group, click the Date Picker button to add a Date Picker to the second cell Your screen should look like this…
  • 29.
    29 2.In the Controlsgroup, click the Combo Box button to add a ComboBoxContentControl to the third cell. 1. Click the third cell in the second column (next to Title). 2. In the Controls group, click the Combo Box button to add a Combo Box the third cell. Word Lesson 6 presentation prepared by Michele Smith – North Buncombe High School, Weaverville, NC. Content from Microsoft Office Word 2010 Lesson Plans provided by
  • 30.
    30 Click the lastcell in the second column (next to Picture). In tne Controls group, click the Picture Content Control button to add a Picture Content to the last cell.
  • 31.
    31 Protect Content Controls! Use “Word Help”….itis a valuable resource! Word Lesson 6 presentation prepared by Michele Smith – North Buncombe High School, Weaverville, NC. Content from Microsoft Office Word 2010 Lesson Plans provided by
  • 32.
    32 * Word Lesson 6presentation prepared by Michele Smith – North Buncombe High School, Weaverville, NC. Content from Microsoft Office Word 2010 Lesson Plans provided by
  • 33.
    33 *Important questions toanswer PRIOR to creating a template: 1. Determine the intended audience 2. Create templates that are easy to use 3. Make sure the template is technically accurate (i.e. correct calculations & functional macros 4. Spell & Grammar check Word Lesson 6 presentation prepared by Michele Smith – North Buncombe High School, Weaverville, NC. Content from Microsoft Office Word 2010 Lesson Plans provided by Microsoft.
  • 34.
    34 * Word Lesson 6presentation prepared by Michele Smith – North Buncombe High School, Weaverville, NC. Content from Microsoft Office Word 2010 Lesson Plans provided by
  • 35.
    35 * Word Lesson 6presentation prepared by Michele Smith – North Buncombe High School, Weaverville, NC. Content from Microsoft Office Word 2010 Lesson Plans provided by
  • 36.
    36 * Go to File, Info,Per missions Word Lesson 6 presentation prepared by Michele Smith – North Buncombe High School, Weaverville, NC. Content from Microsoft Office Word 2010 Lesson Plans provided by
  • 37.
    37 This shows all your“protect document” options Word Lesson 6 presentation prepared by Michele Smith – North Buncombe High School, Weaverville, NC. Content from Microsoft Office Word 2010 Lesson Plans provided by
  • 38.
    38 MARK AS FINAL Whena document is marked as final, typing, editing commands, and proofing marks are disabled or turned off and the document becomes read-only. The Mark as Final command helps you communicate that you are sharing a completed version of a document. It also helps prevent reviewers or readers from making inadvertent changes to the document. Information from: Word Help Word Lesson 6 presentation prepared by Michele Smith – North Buncombe High School, Weaverville, NC. Content from Microsoft Office Word 2010 Lesson Plans provided by
  • 39.
    39 ENCRYPT with PASSWORD When youselect Encrypt with Password, the Encrypt Document dialog appears. In the Password box, type a password. Important: Microsoft cannot retrieve lost or forgotten passwords, so keep a list of your passwords and corresponding file names in a safe place. Information from: Word Help Word Lesson 6 presentation prepared by Michele Smith – North Buncombe High School, Weaverville, NC. Content from Microsoft Office Word 2010 Lesson Plans provided by Microsoft.
  • 40.
    40 RESTRICT EDITING When youselect Restrict Editing three options appear: Formatting restrictions: this reduces formatting options, preserving a look and feel. Click Settings to select which style are allowed. Editing restrictions: you control how the file can be edited or you can disable editing. Click Exceptions or More users to control those who can edit. Start enforcement – Click Yes, Start Enforcing Protection to select password protection or user authentication. In addition, you can click Restrict permission to add or remove editors who will have restricted permissionsInformation from: Word Help Word Lesson 6 presentation prepared by Michele Smith – North Buncombe High School, Weaverville, NC. Content from Microsoft Office Word 2010 Lesson Plans provided by
  • 41.
    41 DIGITAL SIGNATURE Digital signatures authenticatedigital information such as documents, e-mail messages, and macros by using computer cryptography. Digital signatures are created by typing a signature or by using an image of a signature to establish authenticity, integrity, and non-repudiation. See the link at the end of this topic to learn more about digital signatures. Information from: Word Help
  • 42.
    42 1.Word Lesson 6,Exercise 1 2.Word Lesson 6, Project 1 3.Quia: “MSITA Lesson 6” • http://www.quia.com/rr/788531.html Now it is time for you to practice. Please complete the following: Word Lesson 6 presentation prepared by Michele Smith – North Buncombe High School, Weaverville, NC. Content from Microsoft Office Word 2010 Lesson Plans provided by