SlideShare a Scribd company logo
Thinset
Thinset
Modified thinset
Tile Subfloor
Thinset
Wood SubstratesInterior Concrete Subfloors
SUPERSEALTile Subfloor Installation Instructions
Substrate ¼" x ¼" (6mm) notched trowel
For tiles - Surface toTiles 1/4”x 3/8” notched trowel,
back butter ALL tiles during installation.
Electric drill,mixer attachment,safety goggles,and gloves
Tape measure,carpenters pencil,knife or scissors,
clean mixing containers,chalk line
On Substrate One 50lb bag covers 150ft² to 200ft²
OnTile Subfloor One 50lb bag covers 40ft² to 50ft²
On Concrete Non Modified or Modified
OnWood ModifiedThinset.
OnTile Subfloor Modified only.
On Concrete - unmodified thinset mortar (ANSI 118.1) or modified thinset (ANSI 118.4 or ANSI 118.11)
OnWood - modified thinset (ANSI 118.4 or ANSI 118.11)
On SUPERSEALTile Subfloor- Modified thinset.
OnVinyl or Glossy concrete - Fast set thinset,scuff substrate with 100-200 grit scuff pad. Hand sand corners/details
GroutingTiles: Ensure that debris and spacers have been removed from the open joints. When setting tiles on
SUPERSEALTile Subfloor,use the standard grout spacing of 1/8th inch or less for most tiles.In some cases a larger spacing
may be required so alwayscheck the maximum allowable joint width as designated by the grout manufacturer.
1. All Substrates must conform to theTCNA Guidelines (Tile Council of North America) and good building practices and
be even,clean,flat,dry,load bearing and free of contaminates. When installing natural stone (i.e.marble),an
additional 3/8”subfloor is required.Refer to Marble Institute of America (MIA) orTerrazzo,Tile and Marble Association
of Canada (TTMAC)
The type of thinset mortar used to applySUPERSEALTile Subfloor must be appropriate for the substrate and in
accordance with the manufacturer's recommendations.The thinset must both bond to the substrate and
mechanically anchor the fleece on the underside of the SUPERSEALTile Subfloor to the substrate.
2.
Unroll theTile Subfloor and precut into manageable sections.Ensure to leave a ¼" gap around all walls,posts,stairs
etc…Trace the edge of each piece to mark the floor where the working sections fit.Roll up the sections ofSUPERSEAL
Tile Subfloor.Ensure to allow for movement joints where required.
3.
For installation the substrate (concrete or wood) start by mixing the thinset to a consistency so that it will be just
pourable from the pail but able to hold a notched shape.Using a ¼" x ¼" notched trowel,apply the thinset to the
substrate in the working area you marked off.The direction in which the thinset is combed does not affect the
adhesion or function of the SUPERSEALTile Subfloor.(One 50lb bag covers 150ft² to 200ft²)
4.
Unroll SUPERSEALTile Subfloor embedding the fleece into the thinset so that its entire surface is bonded.Be careful
not to exceed the working time of the thinset.Use a float,screed trowel or vinyl roller to press the SUPERSEALTile
Subfloor into the thinset.Start at one end and continue working in one direction to avoid air pockets.Periodically
check for 100% contact of the fabric with thinset.
5.
Butt edges of sections together.Use SUPERSEALSeam Cloth on seams if you are waterproofing the area or want to
enhance the anti-fracture properties of the flooring assembly.
6.
Immediately after SUPERSEALTile Subfloor is installed,tiles can be installed on top of the membrane.
It’s best to mark out the sections you will be working using a chalk line or marker.
Mix the thinset to the specifications listed on the bag.Using a 1/4" x 3/8" notched trowel apply a layer of modified
thinset on theTile Subfloor in the marked area.Ensure all the dimples are completely filled and you have a full thickness
of material.Apply modified thinset to the back of the tile (back butter) and solidly embed the tiles in the thinset.Keep in
mind the working time of the thinset so as to achieve sufficient bond.(One 50lb bag covers 40ft² to 50ft²)
7.
All applications & substrates and joists must conform to Standard Building Codes andTCNA* regulations
Thinset
Thinset
Modified thinset
Tile Subfloor
Thinset
For use on floor Joists with the following spacing:
Natural Stone tiles require an additional plywood layer
16" OC with 5/8"T&G
19.2" OC with 3/4"T&G
24" OC with 3/4"T&G and 3/8" wood underlayment
THINSETTOOLS
1-800-571-1877 www.superseal.ca

More Related Content

What's hot

Wall and Floor Tiling - Tools and Equipment: An Introduction
Wall and Floor Tiling -  Tools and Equipment: An IntroductionWall and Floor Tiling -  Tools and Equipment: An Introduction
Wall and Floor Tiling - Tools and Equipment: An Introduction
DjCurrie
 
Plastering and pointing
Plastering and pointingPlastering and pointing
Plastering and pointing
Shrikant Jahagirdar
 
How to install pvc downpipes
How to install pvc downpipesHow to install pvc downpipes
How to install pvc downpipesPraveen Sudarsan
 
Bmc flooring
Bmc flooring   Bmc flooring
Bmc flooring
Cutegalrj
 
brickwork, plastering and waterproofing
brickwork, plastering and waterproofingbrickwork, plastering and waterproofing
brickwork, plastering and waterproofing
RamkumarKumar9
 
Flooring
FlooringFlooring
Flooring
Jitesh Dhule
 
Chapter 8 floorings
Chapter 8 flooringsChapter 8 floorings
Chapter 8 floorings
KHUSHBU SHAH
 
Floor finishes
Floor finishes Floor finishes
Floor finishes Rita Mitra
 
Plastering by mani
Plastering by maniPlastering by mani
Plastering by mani
ManiShrestha5
 
How to build a retaining wall
How to build a retaining wallHow to build a retaining wall
How to build a retaining wallPraveen Sudarsan
 
Plastering and pointing
Plastering and pointingPlastering and pointing
Plastering and pointing
Rehmat Kaur
 
Ceramic / Porcelain Floor tile laying - Methodology
Ceramic / Porcelain Floor tile laying - MethodologyCeramic / Porcelain Floor tile laying - Methodology
Ceramic / Porcelain Floor tile laying - Methodology
THIYAGARAJAN GANESAN
 
Tekcem supra
Tekcem supraTekcem supra
Tekcem supra
steven price
 
Bolderstone brochure
Bolderstone brochureBolderstone brochure
Bolderstone brochure
kristenjames
 
Plastering
PlasteringPlastering
Plastering
Aglaia Connect
 
Pisa brochure
Pisa brochurePisa brochure
Pisa brochure
kristenjames
 

What's hot (19)

Wall and Floor Tiling - Tools and Equipment: An Introduction
Wall and Floor Tiling -  Tools and Equipment: An IntroductionWall and Floor Tiling -  Tools and Equipment: An Introduction
Wall and Floor Tiling - Tools and Equipment: An Introduction
 
Plastering and pointing
Plastering and pointingPlastering and pointing
Plastering and pointing
 
How to install pvc downpipes
How to install pvc downpipesHow to install pvc downpipes
How to install pvc downpipes
 
Bmc flooring
Bmc flooring   Bmc flooring
Bmc flooring
 
brickwork, plastering and waterproofing
brickwork, plastering and waterproofingbrickwork, plastering and waterproofing
brickwork, plastering and waterproofing
 
Flooring
FlooringFlooring
Flooring
 
Chapter 8 floorings
Chapter 8 flooringsChapter 8 floorings
Chapter 8 floorings
 
Floor finishes
Floor finishes Floor finishes
Floor finishes
 
Plastering by mani
Plastering by maniPlastering by mani
Plastering by mani
 
How to build a retaining wall
How to build a retaining wallHow to build a retaining wall
How to build a retaining wall
 
Plastering and pointing
Plastering and pointingPlastering and pointing
Plastering and pointing
 
Ceramic / Porcelain Floor tile laying - Methodology
Ceramic / Porcelain Floor tile laying - MethodologyCeramic / Porcelain Floor tile laying - Methodology
Ceramic / Porcelain Floor tile laying - Methodology
 
TTG installation
TTG installationTTG installation
TTG installation
 
Upvc fascia
Upvc fasciaUpvc fascia
Upvc fascia
 
Wall tiling
Wall tilingWall tiling
Wall tiling
 
Tekcem supra
Tekcem supraTekcem supra
Tekcem supra
 
Bolderstone brochure
Bolderstone brochureBolderstone brochure
Bolderstone brochure
 
Plastering
PlasteringPlastering
Plastering
 
Pisa brochure
Pisa brochurePisa brochure
Pisa brochure
 

Similar to Superseal Tile Subfloor Installation Instructions

Tips For Recified Tile
Tips For Recified Tile Tips For Recified Tile
Tips For Recified Tile
DaveGobis
 
Design Considerations for Large Format Tile
Design Considerations for Large Format TileDesign Considerations for Large Format Tile
Design Considerations for Large Format Tile
Scott Conwell, FAIA, FCSI
 
cereamic
cereamiccereamic
cereamic
Neha Bajpayee
 
Magnumstone retaining wall
Magnumstone retaining wallMagnumstone retaining wall
Magnumstone retaining wallNurafizah Hashim
 
Flooring
FlooringFlooring
Flooring
Moonsun Flower
 
Waterproffing.pptx
Waterproffing.pptxWaterproffing.pptx
Waterproffing.pptx
PrituJadhav1
 
Types of flooring-Terazzo flooring, cork flooring. linolium flooring.PVC floo...
Types of flooring-Terazzo flooring, cork flooring. linolium flooring.PVC floo...Types of flooring-Terazzo flooring, cork flooring. linolium flooring.PVC floo...
Types of flooring-Terazzo flooring, cork flooring. linolium flooring.PVC floo...
Priyanka Dange
 
Roof covering by piyush
Roof covering by piyushRoof covering by piyush
Roof covering by piyush
PiyushPathak9
 
Floor finishes
Floor finishesFloor finishes
Floor finishes
Abhishek kumar
 
Vent-Top X 1 and X 2 2005
Vent-Top X 1 and X 2 2005Vent-Top X 1 and X 2 2005
Vent-Top X 1 and X 2 2005Mike Coughlin
 
Types of Flooring
Types of Flooring Types of Flooring
Types of Flooring
Puneet Chhonker
 
Designing with Tile
Designing with TileDesigning with Tile
Designing with Tile
Scott Conwell, FAIA, FCSI
 
Termite Treatment
Termite TreatmentTermite Treatment
Termite Treatment
Manish Jain Luhadia
 
Stonecraft installation instructions
Stonecraft installation instructionsStonecraft installation instructions
Stonecraft installation instructions
Tri County Exteriors LLC
 
BC repair floors ppt
BC repair floors pptBC repair floors ppt
BC repair floors ppt
sandapraveenkumar
 
How To Install Cedar Shingles
How To Install Cedar ShinglesHow To Install Cedar Shingles
How To Install Cedar Shingles
wildeagle
 
RFP Bracket Installation
RFP Bracket InstallationRFP Bracket Installation
RFP Bracket Installation
RbethN6
 
3.floor systems.pdf
3.floor systems.pdf3.floor systems.pdf
3.floor systems.pdf
aqsamali1
 

Similar to Superseal Tile Subfloor Installation Instructions (20)

Tips For Recified Tile
Tips For Recified Tile Tips For Recified Tile
Tips For Recified Tile
 
Design Considerations for Large Format Tile
Design Considerations for Large Format TileDesign Considerations for Large Format Tile
Design Considerations for Large Format Tile
 
cereamic
cereamiccereamic
cereamic
 
Lay carpet tiles
Lay carpet tilesLay carpet tiles
Lay carpet tiles
 
Lay a laminate floor
Lay a laminate floorLay a laminate floor
Lay a laminate floor
 
Magnumstone retaining wall
Magnumstone retaining wallMagnumstone retaining wall
Magnumstone retaining wall
 
Flooring
FlooringFlooring
Flooring
 
Waterproffing.pptx
Waterproffing.pptxWaterproffing.pptx
Waterproffing.pptx
 
Types of flooring-Terazzo flooring, cork flooring. linolium flooring.PVC floo...
Types of flooring-Terazzo flooring, cork flooring. linolium flooring.PVC floo...Types of flooring-Terazzo flooring, cork flooring. linolium flooring.PVC floo...
Types of flooring-Terazzo flooring, cork flooring. linolium flooring.PVC floo...
 
Roof covering by piyush
Roof covering by piyushRoof covering by piyush
Roof covering by piyush
 
Floor finishes
Floor finishesFloor finishes
Floor finishes
 
Vent-Top X 1 and X 2 2005
Vent-Top X 1 and X 2 2005Vent-Top X 1 and X 2 2005
Vent-Top X 1 and X 2 2005
 
Types of Flooring
Types of Flooring Types of Flooring
Types of Flooring
 
Designing with Tile
Designing with TileDesigning with Tile
Designing with Tile
 
Termite Treatment
Termite TreatmentTermite Treatment
Termite Treatment
 
Stonecraft installation instructions
Stonecraft installation instructionsStonecraft installation instructions
Stonecraft installation instructions
 
BC repair floors ppt
BC repair floors pptBC repair floors ppt
BC repair floors ppt
 
How To Install Cedar Shingles
How To Install Cedar ShinglesHow To Install Cedar Shingles
How To Install Cedar Shingles
 
RFP Bracket Installation
RFP Bracket InstallationRFP Bracket Installation
RFP Bracket Installation
 
3.floor systems.pdf
3.floor systems.pdf3.floor systems.pdf
3.floor systems.pdf
 

Recently uploaded

Collocation thường gặp trong đề thi THPT Quốc gia.pdf
Collocation thường gặp trong đề thi THPT Quốc gia.pdfCollocation thường gặp trong đề thi THPT Quốc gia.pdf
Collocation thường gặp trong đề thi THPT Quốc gia.pdf
ngochaavk33a
 
UNIVERSAL HUMAN VALUES- Harmony in the Nature
UNIVERSAL HUMAN VALUES- Harmony in the NatureUNIVERSAL HUMAN VALUES- Harmony in the Nature
UNIVERSAL HUMAN VALUES- Harmony in the Nature
Chandrakant Divate
 
Ethical_dilemmas_MDI_Gurgaon-Business Ethics Case 1.pptx
Ethical_dilemmas_MDI_Gurgaon-Business Ethics Case 1.pptxEthical_dilemmas_MDI_Gurgaon-Business Ethics Case 1.pptx
Ethical_dilemmas_MDI_Gurgaon-Business Ethics Case 1.pptx
TANMAYJAIN511570
 
ÔN TẬP CỤM THÀNH NGỮ TIẾNG ANH CỰC HAY.docx
ÔN TẬP CỤM THÀNH NGỮ TIẾNG ANH CỰC HAY.docxÔN TẬP CỤM THÀNH NGỮ TIẾNG ANH CỰC HAY.docx
ÔN TẬP CỤM THÀNH NGỮ TIẾNG ANH CỰC HAY.docx
ngochaavk33a
 
Program Your Destiny eBook - Destiny University.pdf
Program Your Destiny eBook - Destiny University.pdfProgram Your Destiny eBook - Destiny University.pdf
Program Your Destiny eBook - Destiny University.pdf
Michael Herlache, MBA
 
SOCIOLOGY PPT. SOCIAL SECURITY POWER POINT
SOCIOLOGY PPT. SOCIAL SECURITY POWER POINTSOCIOLOGY PPT. SOCIAL SECURITY POWER POINT
SOCIOLOGY PPT. SOCIAL SECURITY POWER POINT
ssuser8d5e2d1
 
CHUYÊN ĐỀ READING ÔN THI HSG THPT HAY.docx
CHUYÊN ĐỀ READING ÔN THI HSG THPT HAY.docxCHUYÊN ĐỀ READING ÔN THI HSG THPT HAY.docx
CHUYÊN ĐỀ READING ÔN THI HSG THPT HAY.docx
ngochaavk33a
 

Recently uploaded (7)

Collocation thường gặp trong đề thi THPT Quốc gia.pdf
Collocation thường gặp trong đề thi THPT Quốc gia.pdfCollocation thường gặp trong đề thi THPT Quốc gia.pdf
Collocation thường gặp trong đề thi THPT Quốc gia.pdf
 
UNIVERSAL HUMAN VALUES- Harmony in the Nature
UNIVERSAL HUMAN VALUES- Harmony in the NatureUNIVERSAL HUMAN VALUES- Harmony in the Nature
UNIVERSAL HUMAN VALUES- Harmony in the Nature
 
Ethical_dilemmas_MDI_Gurgaon-Business Ethics Case 1.pptx
Ethical_dilemmas_MDI_Gurgaon-Business Ethics Case 1.pptxEthical_dilemmas_MDI_Gurgaon-Business Ethics Case 1.pptx
Ethical_dilemmas_MDI_Gurgaon-Business Ethics Case 1.pptx
 
ÔN TẬP CỤM THÀNH NGỮ TIẾNG ANH CỰC HAY.docx
ÔN TẬP CỤM THÀNH NGỮ TIẾNG ANH CỰC HAY.docxÔN TẬP CỤM THÀNH NGỮ TIẾNG ANH CỰC HAY.docx
ÔN TẬP CỤM THÀNH NGỮ TIẾNG ANH CỰC HAY.docx
 
Program Your Destiny eBook - Destiny University.pdf
Program Your Destiny eBook - Destiny University.pdfProgram Your Destiny eBook - Destiny University.pdf
Program Your Destiny eBook - Destiny University.pdf
 
SOCIOLOGY PPT. SOCIAL SECURITY POWER POINT
SOCIOLOGY PPT. SOCIAL SECURITY POWER POINTSOCIOLOGY PPT. SOCIAL SECURITY POWER POINT
SOCIOLOGY PPT. SOCIAL SECURITY POWER POINT
 
CHUYÊN ĐỀ READING ÔN THI HSG THPT HAY.docx
CHUYÊN ĐỀ READING ÔN THI HSG THPT HAY.docxCHUYÊN ĐỀ READING ÔN THI HSG THPT HAY.docx
CHUYÊN ĐỀ READING ÔN THI HSG THPT HAY.docx
 

Superseal Tile Subfloor Installation Instructions

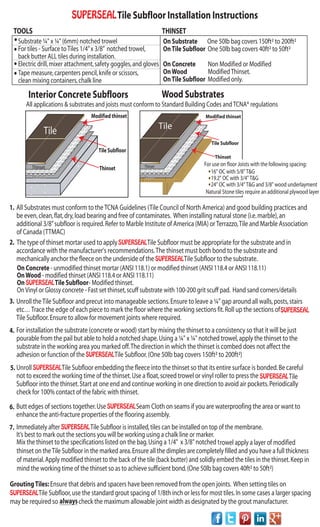
  • 1. Thinset Thinset Modified thinset Tile Subfloor Thinset Wood SubstratesInterior Concrete Subfloors SUPERSEALTile Subfloor Installation Instructions Substrate ¼" x ¼" (6mm) notched trowel For tiles - Surface toTiles 1/4”x 3/8” notched trowel, back butter ALL tiles during installation. Electric drill,mixer attachment,safety goggles,and gloves Tape measure,carpenters pencil,knife or scissors, clean mixing containers,chalk line On Substrate One 50lb bag covers 150ft² to 200ft² OnTile Subfloor One 50lb bag covers 40ft² to 50ft² On Concrete Non Modified or Modified OnWood ModifiedThinset. OnTile Subfloor Modified only. On Concrete - unmodified thinset mortar (ANSI 118.1) or modified thinset (ANSI 118.4 or ANSI 118.11) OnWood - modified thinset (ANSI 118.4 or ANSI 118.11) On SUPERSEALTile Subfloor- Modified thinset. OnVinyl or Glossy concrete - Fast set thinset,scuff substrate with 100-200 grit scuff pad. Hand sand corners/details GroutingTiles: Ensure that debris and spacers have been removed from the open joints. When setting tiles on SUPERSEALTile Subfloor,use the standard grout spacing of 1/8th inch or less for most tiles.In some cases a larger spacing may be required so alwayscheck the maximum allowable joint width as designated by the grout manufacturer. 1. All Substrates must conform to theTCNA Guidelines (Tile Council of North America) and good building practices and be even,clean,flat,dry,load bearing and free of contaminates. When installing natural stone (i.e.marble),an additional 3/8”subfloor is required.Refer to Marble Institute of America (MIA) orTerrazzo,Tile and Marble Association of Canada (TTMAC) The type of thinset mortar used to applySUPERSEALTile Subfloor must be appropriate for the substrate and in accordance with the manufacturer's recommendations.The thinset must both bond to the substrate and mechanically anchor the fleece on the underside of the SUPERSEALTile Subfloor to the substrate. 2. Unroll theTile Subfloor and precut into manageable sections.Ensure to leave a ¼" gap around all walls,posts,stairs etc…Trace the edge of each piece to mark the floor where the working sections fit.Roll up the sections ofSUPERSEAL Tile Subfloor.Ensure to allow for movement joints where required. 3. For installation the substrate (concrete or wood) start by mixing the thinset to a consistency so that it will be just pourable from the pail but able to hold a notched shape.Using a ¼" x ¼" notched trowel,apply the thinset to the substrate in the working area you marked off.The direction in which the thinset is combed does not affect the adhesion or function of the SUPERSEALTile Subfloor.(One 50lb bag covers 150ft² to 200ft²) 4. Unroll SUPERSEALTile Subfloor embedding the fleece into the thinset so that its entire surface is bonded.Be careful not to exceed the working time of the thinset.Use a float,screed trowel or vinyl roller to press the SUPERSEALTile Subfloor into the thinset.Start at one end and continue working in one direction to avoid air pockets.Periodically check for 100% contact of the fabric with thinset. 5. Butt edges of sections together.Use SUPERSEALSeam Cloth on seams if you are waterproofing the area or want to enhance the anti-fracture properties of the flooring assembly. 6. Immediately after SUPERSEALTile Subfloor is installed,tiles can be installed on top of the membrane. It’s best to mark out the sections you will be working using a chalk line or marker. Mix the thinset to the specifications listed on the bag.Using a 1/4" x 3/8" notched trowel apply a layer of modified thinset on theTile Subfloor in the marked area.Ensure all the dimples are completely filled and you have a full thickness of material.Apply modified thinset to the back of the tile (back butter) and solidly embed the tiles in the thinset.Keep in mind the working time of the thinset so as to achieve sufficient bond.(One 50lb bag covers 40ft² to 50ft²) 7. All applications & substrates and joists must conform to Standard Building Codes andTCNA* regulations Thinset Thinset Modified thinset Tile Subfloor Thinset For use on floor Joists with the following spacing: Natural Stone tiles require an additional plywood layer 16" OC with 5/8"T&G 19.2" OC with 3/4"T&G 24" OC with 3/4"T&G and 3/8" wood underlayment THINSETTOOLS 1-800-571-1877 www.superseal.ca