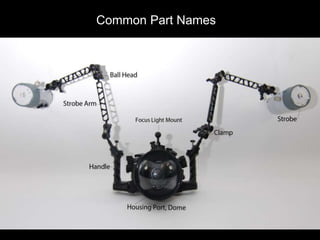
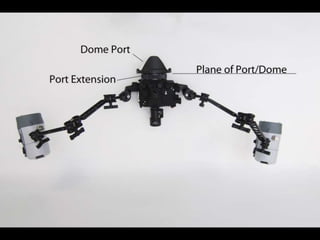
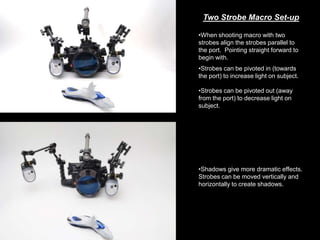
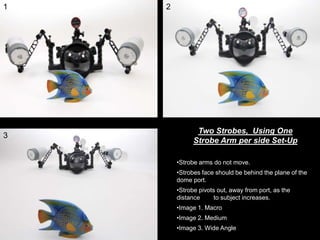
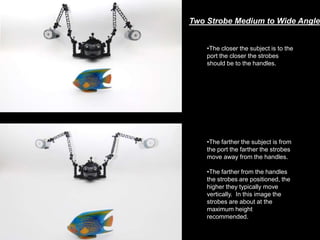
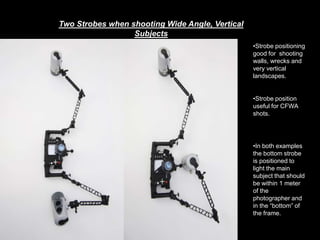
Basic Principles of Strobe
Positioning
Presented by Optical Ocean Sales
Lighting and strobe positioning are major factors in taking a
photo from average to interesting. There are many different
theories and techniques as to how best to light a subject
based on the end objective of the image. There are many
chapters in many fine books covering this subject in great
detail. Buy one!
The goal of the following is to give a simple starting point for
new photographers to work from.
Basic Glossary
Housing: The metal or plastic housing your camera goes into to be taken underwater.
Housing Port: The glass or acrylic fronted tube or dome on the front of your Housing. It is what your
camera lens captures images through.
There are typically two types of ports.
A. Flat Port: Used for shooting medium to small subjects, sometimes referred to as a Macro Port. It
typically looks like a tube with a flat piece of glass at the front
B. Dome Port: As the name refers this port is Domed and used for Medium to Wide Angle subjects
Handle: Some underwater housings have handles attached to them for easier use. Smaller housings
sometimes do not and can be held as you would the standard “dry land” camera.
Tray: For those Housings that do not have attached handles a tray and handle can be attached for
easier handling of the system. The tray typically is screwed in to holes in the bottom of the housing
where you would attach a tripod on a “dry-land” camera.
Strobe: Flash unit that lights subject underwater. Can be of many sizes, shapes and levels of light
output.
Strobe Arm: Metal arm of different lengths that connect strobe to camera housing. Strobe arms
typically have a round “ball head” on each end giving them a dumb-bell appearance.
Sync Cord: Cord that allows the camera to fire the strobe. There are two types.
A. Electronic Sync Cord: uses the camera’s strobe/hot shoe to send a signal to the strobe to
fire.
B. Optical Sync Cord: uses the light fromthecamera’s on board flash to fire the strobe.
Clamp: Typically butterfly shaped device that joins strobe arms. Joins strobe arm to strobe and
to housing.
Macro Photography: Images of small subjects. Typically smaller than the size of a typical fish.
Wide Angle Photography: Images of medium to large subjects. Can range from the size of a
turtle to a massive ship wrecks.
CFWA: Close focus wide angle. Typically employees the use of lenses 10mm to 20mm. The
goal is to have your subject very close to take advantage of your strobes while showing the
setting the subject is in. Example would be the “standard shot” of a diver looking at a fan, on the
reef with the surface above and the sun ball on the surface.
Strobe Flare/Hot Spot: This happens when a combination of strobe placement and power
causes a Hot Spot or Flare to appear in your image. A reduction in power and or moving the
strobe “back” can eliminate this problem
Common Part Names
Wide Angle Strobe Position to
avoid “flares” at sides of images.
•When shooting wide angle with strobes
at higher settings “flares” or “hot spots”
can show up in the sides of the image.
This is due to the camera picking up the
light from the strobe.
•When shooting very large subjects with
strobes at maximum power the strobes
need to be positioned behind the Plane of
the Dome. Better yet behind the plane of
the housing to avoid “flares” or “hot spots”
on the edges of image.
•Note that even with strobe arms at
maximum extension strobes still can be
pivoted away from the housing to
minimize backscatter.
Pivoting Strobes “In” and
“Out”
•Image #1 is the “In” position
•Image #2 is the “straight” or “parallel”
position
•Image #3 is the “Out” position
Note: with all three positions the face of
the strobe is kept behind the plane of the
Dome to avoid “hot spots” in the right and
left edges of your image.
1 2
3
•When shooting macro with two
strobes align the strobes parallel to
the port. Pointing straight forward to
begin with.
•Strobes can be pivoted in (towards
the port) to increase light on subject.
•Shadows give more dramatic effects.
Strobes can be moved vertically and
horizontally to create shadows.
Two Strobe Macro Set-up
•Strobes can be pivoted out (away
from the port) to decrease light on
subject.
•The closer the subject is to the
front of the housing port the
closer the strobe is positioned to
the port.
One Strobe Macro Set-
Up
•A good starting point is with the
strobe centered directly over the
port as in image #1.
1 2
3
Single Strobe Wide Angle
•Keeping the strobe pointing straight
forward, as the distance between the port
and the subject increases extend the
strobe away from the housing.
•The strobe can be moved vertically to
light the subject from “above” in a more
natural manner.
•Strobe arms do not move.
•Strobes face should be behind the plane of the
dome port.
•Strobe pivots out, away from port, as the
distance to subject increases.
•Image 1. Macro
•Image 2. Medium
•Image 3. Wide Angle
1 2
3
Two Strobes, Using One
Strobe Arm per side Set-Up
Two Strobe Medium to Wide Angle
•The closer the subject is to the
port the closer the strobes
should be to the handles.
•The farther the subject is from
the port the farther the strobes
move away from the handles.
•The farther from the handles
the strobes are positioned, the
higher they typically move
vertically. In this image the
strobes are about at the
maximum height
recommended.
Two Strobes when shooting Wide Angle, Vertical
Subjects
•Strobe positioning
good for shooting
walls, wrecks and
very vertical
landscapes.
•In both examples
the bottom strobe
is positioned to
light the main
subject that should
be within 1 meter
of the
photographer and
in the “bottom” of
the frame.
•Strobe position
useful for CFWA
shots.

Strobe Positioning

  • 1.
    Basic Principles ofStrobe Positioning Presented by Optical Ocean Sales
  • 2.
    Lighting and strobepositioning are major factors in taking a photo from average to interesting. There are many different theories and techniques as to how best to light a subject based on the end objective of the image. There are many chapters in many fine books covering this subject in great detail. Buy one! The goal of the following is to give a simple starting point for new photographers to work from.
  • 3.
    Basic Glossary Housing: Themetal or plastic housing your camera goes into to be taken underwater. Housing Port: The glass or acrylic fronted tube or dome on the front of your Housing. It is what your camera lens captures images through. There are typically two types of ports. A. Flat Port: Used for shooting medium to small subjects, sometimes referred to as a Macro Port. It typically looks like a tube with a flat piece of glass at the front B. Dome Port: As the name refers this port is Domed and used for Medium to Wide Angle subjects Handle: Some underwater housings have handles attached to them for easier use. Smaller housings sometimes do not and can be held as you would the standard “dry land” camera. Tray: For those Housings that do not have attached handles a tray and handle can be attached for easier handling of the system. The tray typically is screwed in to holes in the bottom of the housing where you would attach a tripod on a “dry-land” camera. Strobe: Flash unit that lights subject underwater. Can be of many sizes, shapes and levels of light output. Strobe Arm: Metal arm of different lengths that connect strobe to camera housing. Strobe arms typically have a round “ball head” on each end giving them a dumb-bell appearance.
  • 4.
    Sync Cord: Cordthat allows the camera to fire the strobe. There are two types. A. Electronic Sync Cord: uses the camera’s strobe/hot shoe to send a signal to the strobe to fire. B. Optical Sync Cord: uses the light fromthecamera’s on board flash to fire the strobe. Clamp: Typically butterfly shaped device that joins strobe arms. Joins strobe arm to strobe and to housing. Macro Photography: Images of small subjects. Typically smaller than the size of a typical fish. Wide Angle Photography: Images of medium to large subjects. Can range from the size of a turtle to a massive ship wrecks. CFWA: Close focus wide angle. Typically employees the use of lenses 10mm to 20mm. The goal is to have your subject very close to take advantage of your strobes while showing the setting the subject is in. Example would be the “standard shot” of a diver looking at a fan, on the reef with the surface above and the sun ball on the surface. Strobe Flare/Hot Spot: This happens when a combination of strobe placement and power causes a Hot Spot or Flare to appear in your image. A reduction in power and or moving the strobe “back” can eliminate this problem
  • 5.
  • 7.
    Wide Angle StrobePosition to avoid “flares” at sides of images. •When shooting wide angle with strobes at higher settings “flares” or “hot spots” can show up in the sides of the image. This is due to the camera picking up the light from the strobe. •When shooting very large subjects with strobes at maximum power the strobes need to be positioned behind the Plane of the Dome. Better yet behind the plane of the housing to avoid “flares” or “hot spots” on the edges of image. •Note that even with strobe arms at maximum extension strobes still can be pivoted away from the housing to minimize backscatter.
  • 8.
    Pivoting Strobes “In”and “Out” •Image #1 is the “In” position •Image #2 is the “straight” or “parallel” position •Image #3 is the “Out” position Note: with all three positions the face of the strobe is kept behind the plane of the Dome to avoid “hot spots” in the right and left edges of your image. 1 2 3
  • 9.
    •When shooting macrowith two strobes align the strobes parallel to the port. Pointing straight forward to begin with. •Strobes can be pivoted in (towards the port) to increase light on subject. •Shadows give more dramatic effects. Strobes can be moved vertically and horizontally to create shadows. Two Strobe Macro Set-up •Strobes can be pivoted out (away from the port) to decrease light on subject.
  • 10.
    •The closer thesubject is to the front of the housing port the closer the strobe is positioned to the port. One Strobe Macro Set- Up •A good starting point is with the strobe centered directly over the port as in image #1. 1 2 3
  • 11.
    Single Strobe WideAngle •Keeping the strobe pointing straight forward, as the distance between the port and the subject increases extend the strobe away from the housing. •The strobe can be moved vertically to light the subject from “above” in a more natural manner.
  • 12.
    •Strobe arms donot move. •Strobes face should be behind the plane of the dome port. •Strobe pivots out, away from port, as the distance to subject increases. •Image 1. Macro •Image 2. Medium •Image 3. Wide Angle 1 2 3 Two Strobes, Using One Strobe Arm per side Set-Up
  • 13.
    Two Strobe Mediumto Wide Angle •The closer the subject is to the port the closer the strobes should be to the handles. •The farther the subject is from the port the farther the strobes move away from the handles. •The farther from the handles the strobes are positioned, the higher they typically move vertically. In this image the strobes are about at the maximum height recommended.
  • 14.
    Two Strobes whenshooting Wide Angle, Vertical Subjects •Strobe positioning good for shooting walls, wrecks and very vertical landscapes. •In both examples the bottom strobe is positioned to light the main subject that should be within 1 meter of the photographer and in the “bottom” of the frame. •Strobe position useful for CFWA shots.