- The document describes how to configure a site-to-site IPsec VPN tunnel between Router R1 and Router R3 using pre-shared keys for authentication.
- The key steps are to configure ISAKMP policies for phase 1 negotiation, IPsec transform sets for phase 2 encryption and authentication, and crypto maps on each router to establish the VPN tunnel.
- Connectivity tests are then run to verify end-to-end connectivity between networks over the encrypted IPsec tunnel.
- A static route is established with the command "ip route 192.168.2.0 255.255.255.0 S0/0/0" on router R1. This establishes a static route and forwards traffic for the 192.168.2.0 network to the next hop S0/0/0.
- The static route is not automatically propagated. It needs to be manually configured on any other routers to establish the path between the two networks.
- Static routes are generally not preferred over dynamic routing protocols but can provide a quick solution until dynamic routing is configured.
The document contains sample questions and answers from a CCNA 2 Chapter 2 exam. It lists multiple choice questions about static routing concepts like administrative distance, route summarization, next hop addresses, and troubleshooting routing issues. It also includes exhibits of network diagrams and configuration outputs to aid in understanding the routing scenarios described in each question.
The document describes migrating from OSPF to IS-IS as an IGP. It begins by discussing the preparation needed, such as verifying OSPF configuration, deploying IS-IS across the entire backbone, and setting OSPF's administrative distance higher than IS-IS. Next, it details removing any remaining OSPF configuration and confirming IS-IS is operating correctly before fully removing OSPF. The goal is a smooth migration to using a single IGP of IS-IS for both IPv4 and IPv6 routing.
This document discusses three types of SPAN in Cisco networking devices: Local SPAN, Remote SPAN (RSPAN), and Encapsulated Remote SPAN (ERSPAN). Local SPAN mirrors traffic within a single switch, RSPAN mirrors traffic across multiple switches using a dedicated VLAN, and ERSPAN uses Generic Routing Encapsulation (GRE) to transport mirrored traffic across Layer 3 boundaries. Configuration examples are provided for setting up each type of SPAN session.
The document describes the basic BGP configuration of routers R1, R2, and ISPs Airtel, Reliance, and Vodafone. It defines the interfaces of each router and ISP with IP addresses. It also outlines the BGP configuration of each entity with AS numbers, neighbor definitions, and network advertisements. Troubleshooting commands like show ip route, show ip bgp summary, and show ip bgp neighbor are listed.
The document describes several EIGRP and OSPF configuration labs focused on routing protocols, including configuring EIGRP parameters like default networks, authentication, and route summarization, as well as OSPF labs on areas, route types, and virtual links. The labs provide instructions for common routing tasks to help readers master EIGRP and OSPF configurations.
The document provides instructions for a series of labs using NetSim to simulate Cisco routers. The labs cover connecting to a router, basic commands, show commands, CDP configuration, extended basics like setting the hostname and passwords, and configuring a banner message. The goal is to familiarize users with the Cisco IOS command line interface and basic router configuration.
This document provides instructions for configuring a network topology in Packet Tracer using 3 routers and 3 switches. It describes connecting the routers and switches with cables and configuring the IP addresses and default gateways for 6 PCs connected to the routers. It also includes directions for connecting the routers together with fiber cables and configuring RIP routing between the routers to establish communication between all devices on the 3 subnetworks.
Lab practice 1 configuring basic routing and switching (with answer) Arz Sy
This document describes a lab activity to configure basic routing and switching between two routers and connected devices. The objectives are to configure static routes and RIP routing between the routers, configure VLAN and management interfaces on a switch, and test connectivity between hosts connected to each network. Students will configure interfaces, IP addresses, routing protocols and verify connectivity using commands like ping, show ip route and show cdp neighbors.
This document provides instructions for setting up and configuring OTV (Overlay Transport Virtualization) in a lab environment to connect two data center sites. The key steps include:
1. Setting up the physical lab topology with two Nexus 7000 switches acting as OTV edge devices in each site, with dedicated VDCs for OTV.
2. Configuring OTV features and licenses on the edge devices, defining the site VLAN and extended VLANs, and configuring join interfaces to connect the devices.
3. Creating overlay interfaces on the edge devices and associating the control and data multicast groups.
4. Verifying the OTV configuration and checking for adjacencies between edge devices
The document describes steps to configure a network including: designing an IP addressing scheme; configuring DHCP, WAN technologies, EIGRP routing, and NAT; and implementing ACLs for security. Key steps include subnetting the 172.16.1.128/25 network and assigning addresses, configuring R3 as a DHCP server, enabling routing with EIGRP, using NAT on R2 for Internet access, and applying ACLs to restrict access between networks.
This document discusses using policy-based routing on a Cisco router to direct different types of traffic from two PCs to specific internet service providers (ISPs). PC1 traffic should always route through the slower ISP2 connection. PC2's Telnet and HTTPS traffic should use the more reliable ISP1, while other PC2 traffic uses ISP2. Access control lists are created to classify traffic, then a route map is used to implement the routing policies on the router's interface connected to the internal network.
Packet Tracer Simulation Lab Layer3 RoutingJohnson Liu
The document describes setting up routing between two routers. It involves:
1. Configuring WAN interfaces on each router and assigning IP addresses between them.
2. Setting up LAN segments behind each router by configuring LAN interfaces and assigning IP addresses.
3. Enabling static routing on each router to allow routing between the LAN segments since dynamic routing protocols have not been configured yet.
This document contains questions and answers related to CCNA 1 Chapter 11 exam. It provides the questions asked in the exam and lists possible multiple choice answers for each question. The document also includes router configuration examples and partial router outputs related to some of the troubleshooting questions.
OSPF is a link-state routing protocol that uses the Shortest Path First algorithm to calculate the shortest path to destinations. It propagates link-state advertisements rather than routing table updates. OSPF supports hierarchical routing to minimize routing updates. Single-area OSPF configurations assign networks to areas using the network command under the OSPF routing process.
This document provides instructions on configuring a router on a stick topology. It describes configuring a switch port as a trunk, and then creating subinterfaces on the router's physical interface that correspond to each VLAN. It shows assigning IP addresses to the subinterfaces to act as the default gateway for each VLAN subnet. Finally, it describes configuring PCs with IP addresses in the correct subnets and default gateways, and confirms connectivity between the VLANs via ping tests through the router.
A PROJECT REPORT
On
CISCO CERTIFIED NETWORK ASSOCIATE
A computer network, or simply a network, is a collection of computer and other hardware components interconnected by communication channels that allow sharing of resources and information. Where at least one process in one device is able to send/receive data to/from at least one process residing in a remote device, then the two devices are said to be in a network. Simply, more than one computer interconnected through a communication medium for information interchange is called a computer network.
The document is a list of questions and multiple choice answers for the CCNA 3 v5.0 Final Exam 2014. It includes 25 questions about topics such as configuring EIGRP, OSPF, STP, wireless networks, and troubleshooting routing protocols.
PBR-LB - Direct Server Return Load Balancing using Policy Based Routing (MEMO)Naoto MATSUMOTO
PBR-LB - Direct Server Return Load Balancing using Policy Based Routing
(MEMO)
07 Feb, 2013
SAKURA Internet Research Center
Senior Researcher / Naoto MATSUMOTO
Cisco CCNA Training/Exam Tips that are helpful for your Certification Exam!
To be Cisco Certified please Check out:
http://asmed.com/information-technology-it/
It is an open standard, distance vector, classfull routing protocol. Rip version 2 supports classless.
It sends the complete routing table out to all active interfaces every 30 seconds. Rip only uses hop count
to determine the best way to a remote network, but it has a maximum allowable hop count of 15 by
default, meaning that 16 is deemed unreachable. RIP works well in small networks, but it’s inefficient on
large networks with slow WAN links or on networks with a large number of routers installed.
This document provides instructions for configuring and managing Cisco Catalyst 2950 series switches. It discusses connecting and powering on the switch, navigating the command-line interface, viewing default configurations, resetting the switch configuration, configuring basic settings like IP addresses, VLANs and ports, managing the MAC address table, enabling port security, adding new switches to the network, backing up configurations, and recovering passwords. The key steps for initial switch configuration and basic switch management are covered.
OSPF can authenticate every OSPF message to prevent false routing information and denial-of-service attacks. There are two types of authentication: clear text uses unencrypted passwords while MD5 authentication uses encrypted passwords and is more secure. Configuring OSPF authentication involves setting passwords on interfaces and enabling authentication on the interface or area.
CCNA Routing and Switching Lessons 11-12 - WAN Configuration - Eric VanderburgEric Vanderburg
This document discusses configuration of PPP, ISDN, and Frame Relay. It describes how to configure PPP authentication using CHAP. For ISDN, it explains the reference points and covers configuring both BRI and PRI interfaces, including setting switch types, SPIDs, dial parameters and pools. For Frame Relay, it outlines configuring the encapsulation, LMI type, DLCI mapping with or without inverse ARP, and use of subinterfaces.
Cisco CCNA Training/Exam Tips that are helpful for your Certification Exam!
To be Cisco Certified please Check out:
http://asmed.com/information-technology-it/
This study guide is intended to provide those pursuing the CCNA certification with a framework of what concepts need to be studied. This is not a comprehensive document containing all the secrets of the CCNP nor is it a “braindump” of questions and answers.
I sincerely hope that this document provides some assistance and clarity in your studies.
Cisco CCNA IP SLA with tracking configurationHamed Moghaddam
Cisco CCNA/CCNP Training/Exam Tips that are helpful for your Certification Exam!
To be Cisco Certified please Check out:
http://asmed.com/information-technology-it/
How to Configure Routing Information Protocol (RIP)IT Tech
The document describes how to configure Routing Information Protocol (RIP) version 2 on three routers to enable routing between connected networks. It provides the configuration steps for setting hostnames, IP addresses and RIP on each router. It also shows how to verify the routing tables and connectivity between hosts on different networks using the ping command.
The document provides instructions for a lab activity to configure and verify EIGRP routing between two routers, R1 and R2. The key steps are:
1. Configure IP addresses on the interfaces of R1 and R2.
2. Check the routing tables on each router which initially only show directly connected networks.
3. Enable the EIGRP routing protocol on each router to exchange routing information.
4. Verify the EIGRP neighbor relationship forms and each router learns routes to networks attached to the other router.
How to configure interior gateway routing protocol (igrp)IT Tech
The document describes how to configure Interior Gateway Routing Protocol (IGRP) on three routers to enable connectivity between three networks. It provides the configuration steps for each router, including setting hostnames, IP addresses on interfaces, and enabling IGRP with the network commands. It also shows how to verify the routing tables and connectivity between networks using the ping command.
Cisco CCNA Training/Exam Tips that are helpful for your Certification Exam!
To be Cisco Certified please Check out:
http://asmed.com/information-technology-it/
Here are the key steps to reset the router configuration to factory defaults:
1. Access privileged EXEC mode by entering "enable"
2. Erase the startup configuration file by entering "erase startup-config", then confirm by pressing enter. This removes any saved configuration.
3. Reload the router by entering "reload". This will perform a soft reboot and reload the factory default configuration stored in ROM.
The router is now reset to its original factory settings. The IP addresses, passwords, and all other configuration changes made are erased.
- A static route is established with the command "ip route 192.168.2.0 255.255.255.0 S0/0/0" on router R1. This establishes a static route and forwards traffic for the 192.168.2.0 network to the next hop S0/0/0.
- The static route is not automatically propagated. It needs to be manually configured on any other routers to establish the path between the two networks.
- Static routes are generally not preferred over dynamic routing protocols but can provide a quick solution until dynamic routing is configured.
The document discusses configuring OSPF routing on Ethernet and Frame Relay networks. For the Ethernet network, OSPF is configured to elect R1 as the DR and R2 as the BDR by setting their interface priorities. For the Frame Relay network, OSPF is configured with static mappings between routers since Frame Relay is non-broadcast by default. Neighbor statements are used to define neighbors since hellos are unicast. Verification commands show the elected DR and neighbors.
Routing information protocol & rip configuration3Anetwork com
Routing Information Protocol (RIP) is a distance-vector routing protocol that uses hop count as its routing metric. RIP version 1 (RIPv1) uses broadcast updates every 30 seconds and has a maximum hop count of 15. RIPv1 supports classful routing only. RIP version 2 (RIPv2) is an enhanced protocol that uses multicasts, supports classless routing with VLSM, and allows for authentication. The document then provides the configuration and verification steps to implement RIPv2 routing between three routers connected in a network.
The serial interface is up but the line protocol is down. This indicates that while the physical layer connection is up, the data link layer is not establishing properly. Common reasons for this include:
- Mismatched encapsulation types on either end (e.g. one side PPP other side HDLC)
- Authentication failure if using PPP (e.g. wrong username/password)
- Layer 1 issues like clock rate mismatch if using HDLC
So in summary, the interface is physically up but the data link layer is failing to establish due to a configuration mismatch between the two directly connected routers.
Networking Tutorial Goes to Basic PPP Configuration3Anetwork com
Leading Cisco networking products distributor-3network.com
Here we will be going over Basic Configuration of PPP (Point-to-Point Protocol). It includes Basic Configuration tasks on a router, configuring OSPF routing protocol, and configuring PPP PAP and CHAP authentication
OSPF is a link-state routing protocol that uses LSAs to share routing information between routers. Routers running OSPF build a link-state database (LSDB) from received LSAs and use the SPF algorithm to determine the best paths to destinations. OSPF routers establish neighbor adjacencies to exchange LSAs and populate their LSDBs. Areas allow hierarchical routing and route summarization between areas is performed by area border routers (ABRs).
Eigrp on a cisco asa firewall configuration3Anetwork com
The document discusses configuring EIGRP routing on a Cisco ASA firewall. It describes setting up interfaces, IP addressing, and EIGRP routing on the ASA and two routers. The ASA separates an internal, DMZ, and external network, and redistributes a default static route into EIGRP. Configuration is verified by showing EIGRP neighbors, routes, and that the routers have learned routes from all connected networks.
Here are the key steps to configure RIPv2 on Router1:
1. Enter configuration mode:
Router1> enable
Router1# configure terminal
2. Configure the FastEthernet 0/0 interface:
Router1(config)# interface FastEthernet 0/0
Router1(config-if)# ip address 192.168.12.1 255.255.255.0
Router1(config-if)# no shutdown
3. Configure the Serial 0/0 interface:
Router1(config-if)# interface Serial 0/0
Router1(config-if)# ip address 192.168.23.1 255.255.255.252
Router1(config-if
This document discusses configuring next-hop-self on routers to change the next hop attribute for BGP routes advertised between autonomous systems. It shows the configuration of ISP1, ISP2 and Branch routers without changing the next hop. ISP1 is then configured with next-hop-self so that routes learned from ISP2 and advertised to Branch will have ISP1 as the next hop rather than ISP2. This allows Branch to successfully ping the network learned via BGP.
Router R1 and R2 are unable to establish an EIGRP neighbor adjacency even though their interfaces are configured for OSPF area 0. To troubleshoot the problem, the network administrator should check the hello and dead intervals between the routers to ensure they are configured with the same values. Configuring matching timers will allow the routers to form an adjacency and exchange routing information.
Cisco CCNA- How to Configure Multi-Layer SwitchHamed Moghaddam
Cisco CCNA Training/Exam Tips that are helpful for your Certification Exam!
To be Cisco Certified please Check out:
http://asmed.com/information-technology-it/
This document provides instructions for configuring a Cisco router, including:
- Accessing the Cisco IOS command-line interface via console, AUX, or Telnet connections
- Establishing a terminal session and logging into the router
- Navigating the different command modes like global configuration, interface configuration, and entering commands to configure settings like the router name, IP addresses, and enabling protocols
- The importance of copying the running configuration to startup configuration so configurations are preserved after reboots
- Using show commands to examine interface status and configurations
- Resetting the router configuration by erasing the startup configuration file and reloading
ccna project on topic company infrastructurePrince Gautam
Prince Gautam submitted a presentation on CCNA that introduces CCNA and networking. It defines CCNA, describes the importance of networking for communication and resource sharing. It also summarizes different types of networking including LAN, MAN, WAN and common networking devices like hubs, switches, routers. The presentation further explains concepts like subnetting, supernetting, routing protocols like RIP, EIGRP, OSPF and basic router configuration.
Similar to Site to Site VPN between Cisco Routers (20)
HCL Notes and Domino License Cost Reduction in the World of DLAUpanagenda
Webinar Recording: https://www.panagenda.com/webinars/hcl-notes-and-domino-license-cost-reduction-in-the-world-of-dlau/
The introduction of DLAU and the CCB & CCX licensing model caused quite a stir in the HCL community. As a Notes and Domino customer, you may have faced challenges with unexpected user counts and license costs. You probably have questions on how this new licensing approach works and how to benefit from it. Most importantly, you likely have budget constraints and want to save money where possible. Don’t worry, we can help with all of this!
We’ll show you how to fix common misconfigurations that cause higher-than-expected user counts, and how to identify accounts which you can deactivate to save money. There are also frequent patterns that can cause unnecessary cost, like using a person document instead of a mail-in for shared mailboxes. We’ll provide examples and solutions for those as well. And naturally we’ll explain the new licensing model.
Join HCL Ambassador Marc Thomas in this webinar with a special guest appearance from Franz Walder. It will give you the tools and know-how to stay on top of what is going on with Domino licensing. You will be able lower your cost through an optimized configuration and keep it low going forward.
These topics will be covered
- Reducing license cost by finding and fixing misconfigurations and superfluous accounts
- How do CCB and CCX licenses really work?
- Understanding the DLAU tool and how to best utilize it
- Tips for common problem areas, like team mailboxes, functional/test users, etc
- Practical examples and best practices to implement right away
Have you ever been confused by the myriad of choices offered by AWS for hosting a website or an API?
Lambda, Elastic Beanstalk, Lightsail, Amplify, S3 (and more!) can each host websites + APIs. But which one should we choose?
Which one is cheapest? Which one is fastest? Which one will scale to meet our needs?
Join me in this session as we dive into each AWS hosting service to determine which one is best for your scenario and explain why!
Your One-Stop Shop for Python Success: Top 10 US Python Development Providersakankshawande
Simplify your search for a reliable Python development partner! This list presents the top 10 trusted US providers offering comprehensive Python development services, ensuring your project's success from conception to completion.
AI 101: An Introduction to the Basics and Impact of Artificial IntelligenceIndexBug
Imagine a world where machines not only perform tasks but also learn, adapt, and make decisions. This is the promise of Artificial Intelligence (AI), a technology that's not just enhancing our lives but revolutionizing entire industries.
Digital Marketing Trends in 2024 | Guide for Staying AheadWask
https://www.wask.co/ebooks/digital-marketing-trends-in-2024
Feeling lost in the digital marketing whirlwind of 2024? Technology is changing, consumer habits are evolving, and staying ahead of the curve feels like a never-ending pursuit. This e-book is your compass. Dive into actionable insights to handle the complexities of modern marketing. From hyper-personalization to the power of user-generated content, learn how to build long-term relationships with your audience and unlock the secrets to success in the ever-shifting digital landscape.
HCL Notes und Domino Lizenzkostenreduzierung in der Welt von DLAUpanagenda
Webinar Recording: https://www.panagenda.com/webinars/hcl-notes-und-domino-lizenzkostenreduzierung-in-der-welt-von-dlau/
DLAU und die Lizenzen nach dem CCB- und CCX-Modell sind für viele in der HCL-Community seit letztem Jahr ein heißes Thema. Als Notes- oder Domino-Kunde haben Sie vielleicht mit unerwartet hohen Benutzerzahlen und Lizenzgebühren zu kämpfen. Sie fragen sich vielleicht, wie diese neue Art der Lizenzierung funktioniert und welchen Nutzen sie Ihnen bringt. Vor allem wollen Sie sicherlich Ihr Budget einhalten und Kosten sparen, wo immer möglich. Das verstehen wir und wir möchten Ihnen dabei helfen!
Wir erklären Ihnen, wie Sie häufige Konfigurationsprobleme lösen können, die dazu führen können, dass mehr Benutzer gezählt werden als nötig, und wie Sie überflüssige oder ungenutzte Konten identifizieren und entfernen können, um Geld zu sparen. Es gibt auch einige Ansätze, die zu unnötigen Ausgaben führen können, z. B. wenn ein Personendokument anstelle eines Mail-Ins für geteilte Mailboxen verwendet wird. Wir zeigen Ihnen solche Fälle und deren Lösungen. Und natürlich erklären wir Ihnen das neue Lizenzmodell.
Nehmen Sie an diesem Webinar teil, bei dem HCL-Ambassador Marc Thomas und Gastredner Franz Walder Ihnen diese neue Welt näherbringen. Es vermittelt Ihnen die Tools und das Know-how, um den Überblick zu bewahren. Sie werden in der Lage sein, Ihre Kosten durch eine optimierte Domino-Konfiguration zu reduzieren und auch in Zukunft gering zu halten.
Diese Themen werden behandelt
- Reduzierung der Lizenzkosten durch Auffinden und Beheben von Fehlkonfigurationen und überflüssigen Konten
- Wie funktionieren CCB- und CCX-Lizenzen wirklich?
- Verstehen des DLAU-Tools und wie man es am besten nutzt
- Tipps für häufige Problembereiche, wie z. B. Team-Postfächer, Funktions-/Testbenutzer usw.
- Praxisbeispiele und Best Practices zum sofortigen Umsetzen
In the rapidly evolving landscape of technologies, XML continues to play a vital role in structuring, storing, and transporting data across diverse systems. The recent advancements in artificial intelligence (AI) present new methodologies for enhancing XML development workflows, introducing efficiency, automation, and intelligent capabilities. This presentation will outline the scope and perspective of utilizing AI in XML development. The potential benefits and the possible pitfalls will be highlighted, providing a balanced view of the subject.
We will explore the capabilities of AI in understanding XML markup languages and autonomously creating structured XML content. Additionally, we will examine the capacity of AI to enrich plain text with appropriate XML markup. Practical examples and methodological guidelines will be provided to elucidate how AI can be effectively prompted to interpret and generate accurate XML markup.
Further emphasis will be placed on the role of AI in developing XSLT, or schemas such as XSD and Schematron. We will address the techniques and strategies adopted to create prompts for generating code, explaining code, or refactoring the code, and the results achieved.
The discussion will extend to how AI can be used to transform XML content. In particular, the focus will be on the use of AI XPath extension functions in XSLT, Schematron, Schematron Quick Fixes, or for XML content refactoring.
The presentation aims to deliver a comprehensive overview of AI usage in XML development, providing attendees with the necessary knowledge to make informed decisions. Whether you’re at the early stages of adopting AI or considering integrating it in advanced XML development, this presentation will cover all levels of expertise.
By highlighting the potential advantages and challenges of integrating AI with XML development tools and languages, the presentation seeks to inspire thoughtful conversation around the future of XML development. We’ll not only delve into the technical aspects of AI-powered XML development but also discuss practical implications and possible future directions.
OpenID AuthZEN Interop Read Out - AuthorizationDavid Brossard
During Identiverse 2024 and EIC 2024, members of the OpenID AuthZEN WG got together and demoed their authorization endpoints conforming to the AuthZEN API
Monitoring and Managing Anomaly Detection on OpenShift.pdfTosin Akinosho
Monitoring and Managing Anomaly Detection on OpenShift
Overview
Dive into the world of anomaly detection on edge devices with our comprehensive hands-on tutorial. This SlideShare presentation will guide you through the entire process, from data collection and model training to edge deployment and real-time monitoring. Perfect for those looking to implement robust anomaly detection systems on resource-constrained IoT/edge devices.
Key Topics Covered
1. Introduction to Anomaly Detection
- Understand the fundamentals of anomaly detection and its importance in identifying unusual behavior or failures in systems.
2. Understanding Edge (IoT)
- Learn about edge computing and IoT, and how they enable real-time data processing and decision-making at the source.
3. What is ArgoCD?
- Discover ArgoCD, a declarative, GitOps continuous delivery tool for Kubernetes, and its role in deploying applications on edge devices.
4. Deployment Using ArgoCD for Edge Devices
- Step-by-step guide on deploying anomaly detection models on edge devices using ArgoCD.
5. Introduction to Apache Kafka and S3
- Explore Apache Kafka for real-time data streaming and Amazon S3 for scalable storage solutions.
6. Viewing Kafka Messages in the Data Lake
- Learn how to view and analyze Kafka messages stored in a data lake for better insights.
7. What is Prometheus?
- Get to know Prometheus, an open-source monitoring and alerting toolkit, and its application in monitoring edge devices.
8. Monitoring Application Metrics with Prometheus
- Detailed instructions on setting up Prometheus to monitor the performance and health of your anomaly detection system.
9. What is Camel K?
- Introduction to Camel K, a lightweight integration framework built on Apache Camel, designed for Kubernetes.
10. Configuring Camel K Integrations for Data Pipelines
- Learn how to configure Camel K for seamless data pipeline integrations in your anomaly detection workflow.
11. What is a Jupyter Notebook?
- Overview of Jupyter Notebooks, an open-source web application for creating and sharing documents with live code, equations, visualizations, and narrative text.
12. Jupyter Notebooks with Code Examples
- Hands-on examples and code snippets in Jupyter Notebooks to help you implement and test anomaly detection models.
Taking AI to the Next Level in Manufacturing.pdfssuserfac0301
Read Taking AI to the Next Level in Manufacturing to gain insights on AI adoption in the manufacturing industry, such as:
1. How quickly AI is being implemented in manufacturing.
2. Which barriers stand in the way of AI adoption.
3. How data quality and governance form the backbone of AI.
4. Organizational processes and structures that may inhibit effective AI adoption.
6. Ideas and approaches to help build your organization's AI strategy.
Fueling AI with Great Data with Airbyte WebinarZilliz
This talk will focus on how to collect data from a variety of sources, leveraging this data for RAG and other GenAI use cases, and finally charting your course to productionalization.
How to Get CNIC Information System with Paksim Ga.pptxdanishmna97
Pakdata Cf is a groundbreaking system designed to streamline and facilitate access to CNIC information. This innovative platform leverages advanced technology to provide users with efficient and secure access to their CNIC details.
UiPath Test Automation using UiPath Test Suite series, part 6DianaGray10
Welcome to UiPath Test Automation using UiPath Test Suite series part 6. In this session, we will cover Test Automation with generative AI and Open AI.
UiPath Test Automation with generative AI and Open AI webinar offers an in-depth exploration of leveraging cutting-edge technologies for test automation within the UiPath platform. Attendees will delve into the integration of generative AI, a test automation solution, with Open AI advanced natural language processing capabilities.
Throughout the session, participants will discover how this synergy empowers testers to automate repetitive tasks, enhance testing accuracy, and expedite the software testing life cycle. Topics covered include the seamless integration process, practical use cases, and the benefits of harnessing AI-driven automation for UiPath testing initiatives. By attending this webinar, testers, and automation professionals can gain valuable insights into harnessing the power of AI to optimize their test automation workflows within the UiPath ecosystem, ultimately driving efficiency and quality in software development processes.
What will you get from this session?
1. Insights into integrating generative AI.
2. Understanding how this integration enhances test automation within the UiPath platform
3. Practical demonstrations
4. Exploration of real-world use cases illustrating the benefits of AI-driven test automation for UiPath
Topics covered:
What is generative AI
Test Automation with generative AI and Open AI.
UiPath integration with generative AI
Speaker:
Deepak Rai, Automation Practice Lead, Boundaryless Group and UiPath MVP
UiPath Test Automation using UiPath Test Suite series, part 6
Site to Site VPN between Cisco Routers
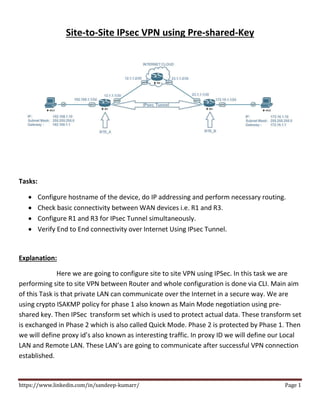
1. https://www.linkedin.com/in/sandeep-kumarr/ Page 1
Site-to-Site IPsec VPN using Pre-shared-Key
Tasks:
Configure hostname of the device, do IP addressing and perform necessary routing.
Check basic connectivity between WAN devices i.e. R1 and R3.
Configure R1 and R3 for IPsec Tunnel simultaneously.
Verify End to End connectivity over Internet Using IPsec Tunnel.
Explanation:
Here we are going to configure site to site VPN using IPSec. In this task we are
performing site to site VPN between Router and whole configuration is done via CLI. Main aim
of this Task is that private LAN can communicate over the Internet in a secure way. We are
using crypto ISAKMP policy for phase 1 also known as Main Mode negotiation using pre-
shared key. Then IPSec transform set which is used to protect actual data. These transform set
is exchanged in Phase 2 which is also called Quick Mode. Phase 2 is protected by Phase 1. Then
we will define proxy id’s also known as interesting traffic. In proxy ID we will define our Local
LAN and Remote LAN. These LAN’s are going to communicate after successful VPN connection
established.
2. https://www.linkedin.com/in/sandeep-kumarr/ Page 2
In Phase 1 for data integrity we can use MD5/SHA. For authentication we can use either
pre-share key or RSA-Signature. For confidentiality we can use any encryption algorithm
DES/3DES/AES. Lifetime is defined as at what interval DH will refresh key for phase 2
protection.
In phase 2 we are configuring transform set in which will define data encapsulation
method along with encryption and data integrity method. So here we have two options ESP
(Encapsulating Security Payload) and AH (Authentication Header). In ESP information is
protected from Layer 3 to Layer 7. In AH information is protected from Layer 4 to Layer 7.
At last we have to create a crypto map in which we call our proxy id’s and define our
VPN peer ip address. Here we can define route for our remote LAN by injecting reverse route.
Then finally call it on the interface. When we apply Crypto Map on interface it will start
listening ISAKMP packet at port 500. Which means that particular interface can accept ISAKMP
packet at port 500.
Configuration:
Lets start from PC1
Assign IP address 192.168.1.10/24 and Gateway 192.168.1.1
In run section type ncpa.cpl then enter.
6. https://www.linkedin.com/in/sandeep-kumarr/ Page 6
Lets verify the IP address assigned to PC1, open Command Prompt and type ipconfig
Similarly configure PC2 , Assign IP address 172.16.1.10/24 and Gateway 172.16.1.1
In run section type ncpa.cpl then enter.
10. https://www.linkedin.com/in/sandeep-kumarr/ Page 10
Lets verify the IP address assigned to PC2, open Command Prompt and type ipconfig
Now configure R1 with basic configuration like hostname and IP addressing
Router>enable
Router#configure terminal
Enter configuration commands, one per line. End with CNTL/Z.
Router(config)#hostname R1
R1(config)#interface ethernet0/1
R1(config-if)#ip address 192.168.1.1 255.255.255.0
R1(config-if)#no shutdown
*Aug 14 16:07:50.068: %LINK-3-UPDOWN: Interface Ethernet0/1, changed state to up
*Aug 14 16:07:51.074: %LINEPROTO-5-UPDOWN: Line protocol on Interface Ethernet0/1, changed
state to up
R1(config-if)#exit
R1(config)#interface ethernet0/0
R1(config-if)#ip address 12.1.1.1 255.255.255.252
11. https://www.linkedin.com/in/sandeep-kumarr/ Page 11
R1(config-if)#no shutdown
*Aug 14 16:08:59.792: %LINK-3-UPDOWN: Interface Ethernet0/0, changed state to up
*Aug 14 16:09:00.794: %LINEPROTO-5-UPDOWN: Line protocol on Interface Ethernet0/0, changed
state to up
R1(config-if)#end
R1#
Verify IP address assigned to Router R1 interfaces
R1#show ip interface brief
Interface IP-Address OK? Method Status Protocol
Ethernet0/0 12.1.1.1 YES manual up up
Ethernet0/1 192.168.1.1 YES manual up up
Ethernet0/2 unassigned YES unset administratively down down
Ethernet0/3 unassigned YES unset administratively down down
Now configure R2 with basic configuration like hostname and IP addressing
Router>enable
Router#configure terminal
Enter configuration commands, one per line. End with CNTL/Z.
Router(config)#hostname R2
R2(config)#interface ethernet0/0
R2(config-if)#ip address 12.1.1.2 255.255.255.252
R2(config-if)#no shutdown
*Aug 14 16:24:32.672: %LINK-3-UPDOWN: Interface Ethernet0/0, changed state to up
*Aug 14 16:24:33.678: %LINEPROTO-5-UPDOWN: Line protocol on Interface Ethernet0/0, changed
state to up
12. https://www.linkedin.com/in/sandeep-kumarr/ Page 12
R2(config-if)#exit
R2(config)#interface ethernet0/1
R2(config-if)#ip address 23.1.1.2 255.255.255.252
R2(config-if)#no shutdown
*Aug 14 16:25:39.726: %LINK-3-UPDOWN: Interface Ethernet0/1, changed state to up
*Aug 14 16:25:40.732: %LINEPROTO-5-UPDOWN: Line protocol on Interface Ethernet0/1, changed
state to up
R2(config-if)#end
R2#
Verify IP address assigned to Router R2 interfaces
R2#show ip interface brief
Interface IP-Address OK? Method Status Protocol
Ethernet0/0 12.1.1.2 YES manual up up
Ethernet0/1 23.1.1.2 YES manual up up
Ethernet0/2 unassigned YES unset administratively down down
Ethernet0/3 unassigned YES unset administratively down down
13. https://www.linkedin.com/in/sandeep-kumarr/ Page 13
Now configure R3 with basic configuration like hostname and IP addressing
Router>enable
Router#configure terminal
Enter configuration commands, one per line. End with CNTL/Z.
Router(config)#hostname R3
R3(config)#interface ethernet0/1
R3(config-if)#ip address 23.1.1.1 255.255.255.252
R3(config-if)#no shutdown
*Aug 14 17:11:59.175: %LINK-3-UPDOWN: Interface Ethernet0/1, changed state to up
*Aug 14 17:12:00.176: %LINEPROTO-5-UPDOWN: Line protocol on Interface Ethernet0/1, changed
state to up
R3(config-if)#exit
R3(config)#interface ethernet0/0
R3(config-if)#ip address 172.16.1.1 255.255.255.0
R3(config-if)#no shutdown
R3(config-if)#
*Aug 14 17:12:40.098: %LINK-3-UPDOWN: Interface Ethernet0/0, changed state to up
*Aug 14 17:12:41.104: %LINEPROTO-5-UPDOWN: Line protocol on Interface Ethernet0/0, changed
state to up
R3(config-if)#end
R3#
14. https://www.linkedin.com/in/sandeep-kumarr/ Page 14
Verify IP address assigned to Router R3 interfaces
R3#show ip interface brief
Interface IP-Address OK? Method Status Protocol
Ethernet0/0 172.16.1.1 YES manual up up
Ethernet0/1 23.1.1.1 YES manual up up
Ethernet0/2 unassigned YES unset administratively down down
Ethernet0/3 unassigned YES unset administratively down down
15. https://www.linkedin.com/in/sandeep-kumarr/ Page 15
Lets do Some Routing
Start with Router R1
R1(config)#ip route 0.0.0.0 0.0.0.0 ethernet0/0 12.1.1.2
Verify Routing Table of Router R1
R1#show ip route
Codes: L - local, C - connected, S - static, R - RIP, M - mobile, B - BGP
D - EIGRP, EX - EIGRP external, O - OSPF, IA - OSPF inter area
N1 - OSPF NSSA external type 1, N2 - OSPF NSSA external type 2
E1 - OSPF external type 1, E2 - OSPF external type 2
i - IS-IS, su - IS-IS summary, L1 - IS-IS level-1, L2 - IS-IS level-2
ia - IS-IS inter area, * - candidate default, U - per-user static route
o - ODR, P - periodic downloaded static route, H - NHRP, l - LISP
a - application route
+ - replicated route, % - next hop override
Gateway of last resort is 12.1.1.2 to network 0.0.0.0
S* 0.0.0.0/0 [1/0] via 12.1.1.2, Ethernet0/0
12.0.0.0/8 is variably subnetted, 2 subnets, 2 masks
C 12.1.1.0/30 is directly connected, Ethernet0/0
L 12.1.1.1/32 is directly connected, Ethernet0/0
192.168.1.0/24 is variably subnetted, 2 subnets, 2 masks
C 192.168.1.0/24 is directly connected, Ethernet0/1
L 192.168.1.1/32 is directly connected, Ethernet0/1
16. https://www.linkedin.com/in/sandeep-kumarr/ Page 16
Similarly on Router R3
R3(config)#ip route 0.0.0.0 0.0.0.0 ethernet0/1 23.1.1.2
Verify Routing Table of Router R3
R3#show ip route
Codes: L - local, C - connected, S - static, R - RIP, M - mobile, B - BGP
D - EIGRP, EX - EIGRP external, O - OSPF, IA - OSPF inter area
N1 - OSPF NSSA external type 1, N2 - OSPF NSSA external type 2
E1 - OSPF external type 1, E2 - OSPF external type 2
i - IS-IS, su - IS-IS summary, L1 - IS-IS level-1, L2 - IS-IS level-2
ia - IS-IS inter area, * - candidate default, U - per-user static route
o - ODR, P - periodic downloaded static route, H - NHRP, l - LISP
a - application route
+ - replicated route, % - next hop override
Gateway of last resort is 23.1.1.2 to network 0.0.0.0
S* 0.0.0.0/0 [1/0] via 23.1.1.2, Ethernet0/1
23.0.0.0/8 is variably subnetted, 2 subnets, 2 masks
C 23.1.1.0/30 is directly connected, Ethernet0/1
L 23.1.1.1/32 is directly connected, Ethernet0/1
172.16.0.0/16 is variably subnetted, 2 subnets, 2 masks
C 172.16.1.0/24 is directly connected, Ethernet0/0
L 172.16.1.1/32 is directly connected, Ethernet0/0
17. https://www.linkedin.com/in/sandeep-kumarr/ Page 17
Routing Table of Router R2
R2#show ip route
Codes: L - local, C - connected, S - static, R - RIP, M - mobile, B - BGP
D - EIGRP, EX - EIGRP external, O - OSPF, IA - OSPF inter area
N1 - OSPF NSSA external type 1, N2 - OSPF NSSA external type 2
E1 - OSPF external type 1, E2 - OSPF external type 2
i - IS-IS, su - IS-IS summary, L1 - IS-IS level-1, L2 - IS-IS level-2
ia - IS-IS inter area, * - candidate default, U - per-user static route
o - ODR, P - periodic downloaded static route, H - NHRP, l - LISP
a - application route
+ - replicated route, % - next hop override
Gateway of last resort is not set
12.0.0.0/8 is variably subnetted, 2 subnets, 2 masks
C 12.1.1.0/30 is directly connected, Ethernet0/0
L 12.1.1.2/32 is directly connected, Ethernet0/0
23.0.0.0/8 is variably subnetted, 2 subnets, 2 masks
C 23.1.1.0/30 is directly connected, Ethernet0/1
L 23.1.1.2/32 is directly connected, Ethernet0/1
18. https://www.linkedin.com/in/sandeep-kumarr/ Page 18
Lets check connectivity between Devices
R1#ping 192.168.1.10
Type escape sequence to abort.
Sending 5, 100-byte ICMP Echos to 192.168.1.10, timeout is 2 seconds:
!!!!!
Success rate is 100 percent (5/5), round-trip min/avg/max = 1/1/2 ms
R1#ping 23.1.1.1
Type escape sequence to abort.
Sending 5, 100-byte ICMP Echos to 23.1.1.1, timeout is 2 seconds:
!!!!!
Success rate is 100 percent (5/5), round-trip min/avg/max = 1/1/2 ms
Similarly from Router R3
R3#ping 172.16.1.10
Type escape sequence to abort.
Sending 5, 100-byte ICMP Echos to 172.16.1.10, timeout is 2 seconds:
!!!!!
Success rate is 100 percent (5/5), round-trip min/avg/max = 1/1/3 ms
R3#ping 12.1.1.1
Type escape sequence to abort.
Sending 5, 100-byte ICMP Echos to 12.1.1.1, timeout is 2 seconds:
!!!!!
Success rate is 100 percent (5/5), round-trip min/avg/max = 1/1/1 ms
19. https://www.linkedin.com/in/sandeep-kumarr/ Page 19
Lets Start with VPN Configuration on Router R1
So here We first create Crypto ISAKMP policy 1
R1(config)#
R1(config)#crypto isakmp policy 1
R1(config-isakmp)#hash md5
R1(config-isakmp)#authentication pre-share
R1(config-isakmp)#group 2
R1(config-isakmp)#encryption des
R1(config-isakmp)#exit
configure pre-shared-key authentication
R1(config)#crypto isakmp key sandeep@123 address 23.1.1.1
configure IPsec transform set for phase 2
R1(config)#crypto ipsec transform-set TSET esp-aes esp-md5-hmac
R1(cfg-crypto-trans)#mode tunnel
R1(cfg-crypto-trans)#exit
Configure an ACL for proxy ID or interesting traffic
R1(config)#
R1(config)#ip access-list extended VPN
R1(config-ext-nacl)#permit ip 192.168.1.0 0.0.0.255 172.16.1.0 0.0.0.255
R1(config-ext-nacl)#exit
R1(config)#
Now configure crypto map
R1(config)#crypto map SITE_A 1 ipsec-isakmp
% NOTE: This new crypto map will remain disabled until a peer
20. https://www.linkedin.com/in/sandeep-kumarr/ Page 20
and a valid access list have been configured.
R1(config-crypto-map)#set peer 23.1.1.1
R1(config-crypto-map)#match address VPN
R1(config-crypto-map)#set transform-set TSET
R1(config-crypto-map)#reverse-route static
R1(config-crypto-map)#exit
R1(config)#
Now apply crypto map on the interface
R1(config)#
R1(config)#interface ethernet0/0
R1(config-if)#crypto map SITE_A
R1(config-if)#
*Aug 14 19:57:07.548: %CRYPTO-6-ISAKMP_ON_OFF: ISAKMP is ON
Verify Configuration of IPsec VPN
Start with ISAKMP policy
R1#show crypto isakmp policy
Global IKE policy
Protection suite of priority 1
encryption algorithm: DES - Data Encryption Standard (56 bit keys).
hash algorithm: Message Digest 5
authentication method: Pre-Shared Key
Diffie-Hellman group: #2 (1024 bit)
lifetime: 86400 seconds, no volume limit
21. https://www.linkedin.com/in/sandeep-kumarr/ Page 21
Verify ISAKMP key
R1#show crypto isakmp key
Keyring Hostname/Address Preshared Key
default 23.1.1.1 sandeep@123
Verify IPsec Transform-set
R1#show crypto ipsec transform-set TSET
{ esp-aes esp-md5-hmac }
will negotiate = { Tunnel, },
Verify proxy-id
R1#show ip access-lists
Extended IP access list VPN
10 permit ip 192.168.1.0 0.0.0.255 172.16.1.0 0.0.0.255
Verify Crypto map
R1#show crypto map
Interfaces using crypto map NiStTeSt1:
Crypto Map IPv4 "SITE_A" 1 ipsec-isakmp
Peer = 23.1.1.1
Extended IP access list VPN
access-list VPN permit ip 192.168.1.0 0.0.0.255 172.16.1.0 0.0.0.255
Current peer: 23.1.1.1
Security association lifetime: 4608000 kilobytes/3600 seconds
Responder-Only (Y/N): N
PFS (Y/N): N
22. https://www.linkedin.com/in/sandeep-kumarr/ Page 22
Mixed-mode : Disabled
Transform sets={
TSET: { esp-aes esp-md5-hmac } ,
}
Reverse Route Injection Enabled
Interfaces using crypto map SITE_A:
Ethernet0/0
As we have enabled reverse-route in crypto map so a route should be present in routing table,
I have highlighted it in yellow colour in routing table.
R1#show ip route
Codes: L - local, C - connected, S - static, R - RIP, M - mobile, B - BGP
D - EIGRP, EX - EIGRP external, O - OSPF, IA - OSPF inter area
N1 - OSPF NSSA external type 1, N2 - OSPF NSSA external type 2
E1 - OSPF external type 1, E2 - OSPF external type 2
i - IS-IS, su - IS-IS summary, L1 - IS-IS level-1, L2 - IS-IS level-2
ia - IS-IS inter area, * - candidate default, U - per-user static route
o - ODR, P - periodic downloaded static route, H - NHRP, l - LISP
a - application route
+ - replicated route, % - next hop override
Gateway of last resort is 12.1.1.2 to network 0.0.0.0
S* 0.0.0.0/0 [1/0] via 12.1.1.2, Ethernet0/0
12.0.0.0/8 is variably subnetted, 2 subnets, 2 masks
23. https://www.linkedin.com/in/sandeep-kumarr/ Page 23
C 12.1.1.0/30 is directly connected, Ethernet0/0
L 12.1.1.1/32 is directly connected, Ethernet0/0
172.16.0.0/24 is subnetted, 1 subnets
S 172.16.1.0 [1/0] via 23.1.1.1
192.168.1.0/24 is variably subnetted, 2 subnets, 2 masks
C 192.168.1.0/24 is directly connected, Ethernet0/1
L 192.168.1.1/32 is directly connected, Ethernet0/1
Now configure R3 for VPN connection,
So here We first create Crypto ISAKMP policy 1
R3#
R3#conf t
Enter configuration commands, one per line. End with CNTL/Z.
R3(config)#crypto isakmp policy 1
R3(config-isakmp)#hash md5
R3(config-isakmp)#authentication pre-share
R3(config-isakmp)#group 2
R3(config-isakmp)#encryption des
R3(config-isakmp)#exi
Configure pre-shared-key for authentication
R3(config)#
R3(config)#crypto isakmp key sandeep@123 address 12.1.1.1
R3(config)#
24. https://www.linkedin.com/in/sandeep-kumarr/ Page 24
Configure ipsec transform set
R3(config)#crypto ipsec transform-set TSET esp-aes esp-md5-hmac
R3(cfg-crypto-trans)#mode tunnel
R3(cfg-crypto-trans)#exit
R3(config)#
Now create an ACL for proxy ID’s
R3(config)#ip access-list extended VPN
R3(config-ext-nacl)#permit ip 172.16.1.0 0.0.0.255 192.168.1.0 0.0.0.255
R3(config-ext-nacl)#exit
R3(config)#
Configure Crypto Map
R3(config)#crypto map SITE_B 1 ipsec-isakmp
% NOTE: This new crypto map will remain disabled until a peer
and a valid access list have been configured.
R3(config-crypto-map)#set peer 12.1.1.1
R3(config-crypto-map)#match address VPN
R3(config-crypto-map)#set transform-set TSET
R3(config-crypto-map)#reverse-route static
R3(config-crypto-map)#exit
Now apply crypto map on the interface
R3(config)#interface ethernet0/1
R3(config-if)#crypto map SITE_B
*Aug 14 20:22:06.426: %CRYPTO-6-ISAKMP_ON_OFF: ISAKMP is ON
R3(config-if)#exit
25. https://www.linkedin.com/in/sandeep-kumarr/ Page 25
Let’s verify the configuration of Router R3
Verify ISAKMP policy
R3#show crypto isakmp policy
Global IKE policy
Protection suite of priority 1
encryption algorithm: DES - Data Encryption Standard (56 bit keys).
hash algorithm: Message Digest 5
authentication method: Pre-Shared Key
Diffie-Hellman group: #2 (1024 bit)
lifetime: 86400 seconds, no volume limit
verify ISAKMP key
R3#show crypto isakmp key
Keyring Hostname/Address Preshared Key
default 12.1.1.1 sandeep@123
Verify IPsec Transform-set
R3#show crypto ipsec transform-set TSET
{ esp-aes esp-md5-hmac }
will negotiate = { Tunnel, },
Verify proxy Id
R3#show ip access-lists
Extended IP access list VPN
10 permit ip 172.16.1.0 0.0.0.255 192.168.1.0 0.0.0.255
26. https://www.linkedin.com/in/sandeep-kumarr/ Page 26
Verify Crypto Map
R3#show crypto map
Interfaces using crypto map NiStTeSt1:
Crypto Map IPv4 "SITE_B" 1 ipsec-isakmp
Peer = 12.1.1.1
Extended IP access list VPN
access-list VPN permit ip 172.16.1.0 0.0.0.255 192.168.1.0 0.0.0.255
Current peer: 12.1.1.1
Security association lifetime: 4608000 kilobytes/3600 seconds
Responder-Only (Y/N): N
PFS (Y/N): N
Mixed-mode : Disabled
Transform sets={
TSET: { esp-aes esp-md5-hmac } ,
}
Reverse Route Injection Enabled
Interfaces using crypto map SITE_B:
Ethernet0/1
Verify Routing Table
R3#show ip route
Codes: L - local, C - connected, S - static, R - RIP, M - mobile, B - BGP
D - EIGRP, EX - EIGRP external, O - OSPF, IA - OSPF inter area
N1 - OSPF NSSA external type 1, N2 - OSPF NSSA external type 2
E1 - OSPF external type 1, E2 - OSPF external type 2
27. https://www.linkedin.com/in/sandeep-kumarr/ Page 27
i - IS-IS, su - IS-IS summary, L1 - IS-IS level-1, L2 - IS-IS level-2
ia - IS-IS inter area, * - candidate default, U - per-user static route
o - ODR, P - periodic downloaded static route, H - NHRP, l - LISP
a - application route
+ - replicated route, % - next hop override
Gateway of last resort is 23.1.1.2 to network 0.0.0.0
S* 0.0.0.0/0 [1/0] via 23.1.1.2, Ethernet0/1
23.0.0.0/8 is variably subnetted, 2 subnets, 2 masks
C 23.1.1.0/30 is directly connected, Ethernet0/1
L 23.1.1.1/32 is directly connected, Ethernet0/1
172.16.0.0/16 is variably subnetted, 2 subnets, 2 masks
C 172.16.1.0/24 is directly connected, Ethernet0/0
L 172.16.1.1/32 is directly connected, Ethernet0/0
S 192.168.1.0/24 [1/0] via 12.1.1.1
So we are done with the configuration part of all the devices.
It’s time to verify VPN connection establishment between SITE_A and SITE_B.
28. https://www.linkedin.com/in/sandeep-kumarr/ Page 28
Verification of the TASK:
Generate some traffic from PC1 for PC2.
So here from 192.168.1.10 (PC1) ping to 172.16.1.10 (PC2)
Now check ISAKMP sa on Router R1
R1#show crypto isakmp sa
IPv4 Crypto ISAKMP SA
dst src state conn-id status
23.1.1.1 12.1.1.1 QM_IDLE 1001 ACTIVE
IPv6 Crypto ISAKMP SA
Now check IPsec sa on Router R1
R1#show crypto ipsec sa
interface: Ethernet0/0
Crypto map tag: SITE_A, local addr 12.1.1.1
protected vrf: (none)
local ident (addr/mask/prot/port): (192.168.1.0/255.255.255.0/0/0)
29. https://www.linkedin.com/in/sandeep-kumarr/ Page 29
remote ident (addr/mask/prot/port): (172.16.1.0/255.255.255.0/0/0)
current_peer 23.1.1.1 port 500
PERMIT, flags={origin_is_acl,}
#pkts encaps: 3, #pkts encrypt: 3, #pkts digest: 3
#pkts decaps: 3, #pkts decrypt: 3, #pkts verify: 3
#pkts compressed: 0, #pkts decompressed: 0
#pkts not compressed: 0, #pkts compr. failed: 0
#pkts not decompressed: 0, #pkts decompress failed: 0
#send errors 0, #recv errors 0
local crypto endpt.: 12.1.1.1, remote crypto endpt.: 23.1.1.1
plaintext mtu 1438, path mtu 1500, ip mtu 1500, ip mtu idb Ethernet0/0
current outbound spi: 0xAEDF3447(2933863495)
PFS (Y/N): N, DH group: none
inbound esp sas:
spi: 0x600FE16E(1611653486)
transform: esp-aes esp-md5-hmac ,
in use settings ={Tunnel, }
conn id: 1, flow_id: SW:1, sibling_flags 80004040, crypto map: SITE_A
sa timing: remaining key lifetime (k/sec): (4176059/3487)
IV size: 16 bytes
replay detection support: Y
Status: ACTIVE(ACTIVE)
30. https://www.linkedin.com/in/sandeep-kumarr/ Page 30
inbound ah sas:
inbound pcp sas:
outbound esp sas:
spi: 0xAEDF3447(2933863495)
transform: esp-aes esp-md5-hmac ,
in use settings ={Tunnel, }
conn id: 2, flow_id: SW:2, sibling_flags 80004040, crypto map: SITE_A
sa timing: remaining key lifetime (k/sec): (4176059/3487)
IV size: 16 bytes
replay detection support: Y
Status: ACTIVE(ACTIVE)
outbound ah sas:
outbound pcp sas:
Check Crypto session on Router R1
R1#show crypto session
Crypto session current status
Interface: Ethernet0/0
Session status: UP-ACTIVE
Peer: 23.1.1.1 port 500
Session ID: 0
IKEv1 SA: local 12.1.1.1/500 remote 23.1.1.1/500 Active
IPSEC FLOW: permit ip 192.168.1.0/255.255.255.0 172.16.1.0/255.255.255.0
Active SAs: 2, origin: crypto map
31. https://www.linkedin.com/in/sandeep-kumarr/ Page 31
Check similar things on Router R3
R3#show crypto isakmp sa
IPv4 Crypto ISAKMP SA
dst src state conn-id status
23.1.1.1 12.1.1.1 QM_IDLE 1001 ACTIVE
IPv6 Crypto ISAKMP SA
Check ipsec sa on Router R3
R3#show crypto ipsec sa
interface: Ethernet0/1
Crypto map tag: SITE_B, local addr 23.1.1.1
protected vrf: (none)
local ident (addr/mask/prot/port): (172.16.1.0/255.255.255.0/0/0)
remote ident (addr/mask/prot/port): (192.168.1.0/255.255.255.0/0/0)
current_peer 12.1.1.1 port 500
PERMIT, flags={origin_is_acl,}
#pkts encaps: 3, #pkts encrypt: 3, #pkts digest: 3
#pkts decaps: 3, #pkts decrypt: 3, #pkts verify: 3
#pkts compressed: 0, #pkts decompressed: 0
#pkts not compressed: 0, #pkts compr. failed: 0
#pkts not decompressed: 0, #pkts decompress failed: 0
#send errors 0, #recv errors 0
local crypto endpt.: 23.1.1.1, remote crypto endpt.: 12.1.1.1
plaintext mtu 1438, path mtu 1500, ip mtu 1500, ip mtu idb Ethernet0/1
current outbound spi: 0x600FE16E(1611653486)
32. https://www.linkedin.com/in/sandeep-kumarr/ Page 32
PFS (Y/N): N, DH group: none
inbound esp sas:
spi: 0xAEDF3447(2933863495)
transform: esp-aes esp-md5-hmac ,
in use settings ={Tunnel, }
conn id: 1, flow_id: SW:1, sibling_flags 80000040, crypto map: SITE_B
sa timing: remaining key lifetime (k/sec): (4257465/3134)
IV size: 16 bytes
replay detection support: Y
Status: ACTIVE(ACTIVE)
inbound ah sas:
inbound pcp sas:
outbound esp sas:
spi: 0x600FE16E(1611653486)
transform: esp-aes esp-md5-hmac ,
in use settings ={Tunnel, }
conn id: 2, flow_id: SW:2, sibling_flags 80000040, crypto map: SITE_B
sa timing: remaining key lifetime (k/sec): (4257465/3134)
IV size: 16 bytes
replay detection support: Y
Status: ACTIVE(ACTIVE)
outbound ah sas:
outbound pcp sas:
33. https://www.linkedin.com/in/sandeep-kumarr/ Page 33
Check crypto session on Router R3
R3#show crypto session
Crypto session current status
Interface: Ethernet0/1
Session status: UP-ACTIVE
Peer: 12.1.1.1 port 500
Session ID: 0
IKEv1 SA: local 23.1.1.1/500 remote 12.1.1.1/500 Active
IPSEC FLOW: permit ip 172.16.1.0/255.255.255.0 192.168.1.0/255.255.255.0
Active SAs: 2, origin: crypto map
END of Task.