Here are the key steps to reset the router configuration to factory defaults:
1. Access privileged EXEC mode by entering "enable"
2. Erase the startup configuration file by entering "erase startup-config", then confirm by pressing enter. This removes any saved configuration.
3. Reload the router by entering "reload". This will perform a soft reboot and reload the factory default configuration stored in ROM.
The router is now reset to its original factory settings. The IP addresses, passwords, and all other configuration changes made are erased.
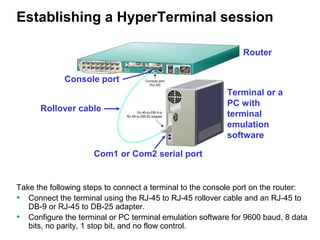


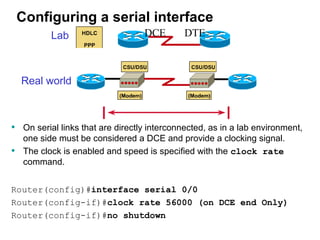


![Third, We check on the routing table for each
router
SanJose2#show ip route
Codes: C - connected, S - static, I - IGRP, R - RIP, M -
mobile, B - BGP
<omitted>
i - IS-IS, L1 - IS-IS level-1, L2 - IS-IS level-2, *
- candidate default
U - per-user static route, o - ODR
Gateway of last resort is not set
R 192.168.4.0/24 [120/1] via 192.168.2.2, 00:00:10,
Serial0
R 192.168.5.0/24 [120/2] via 192.168.2.2, 00:00:10,
Serial0
C 192.168.1.0/24 is directly connected, Ethernet0
C 192.168.2.0/24 is directly connected, Serial0
R 192.168.3.0/24 [120/1] via 192.168.2.2, 00:00:10,
Serial0
SanJose2#](https://image.slidesharecdn.com/introtorouterconfig-130310055700-phpapp01/85/Intro-to-router_config-15-320.jpg)
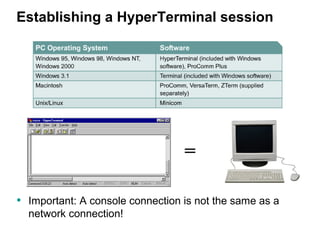
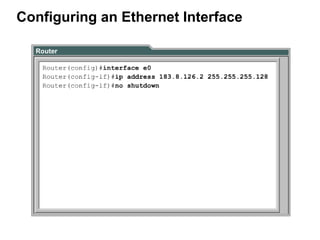
![Third, We check on the routing table for each
router
SanJose1#show ip route
Codes: C - connected, S - static, I - IGRP, R - RIP, M
- mobile, B - BGP
<omitted>
Gateway of last resort is not set
C 192.168.4.0/24 is directly connected, Serial1
R 192.168.5.0/24 [120/1] via 192.168.4.1, 00:00:12,
Serial1
R 192.168.1.0/24 [120/1] via 192.168.2.1, 00:00:10,
Serial0
C 192.168.2.0/24 is directly connected, Serial0
C 192.168.3.0/24 is directly connected, Ethernet0](https://image.slidesharecdn.com/introtorouterconfig-130310055700-phpapp01/85/Intro-to-router_config-16-320.jpg)
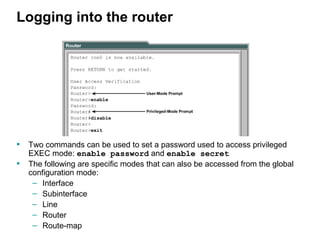
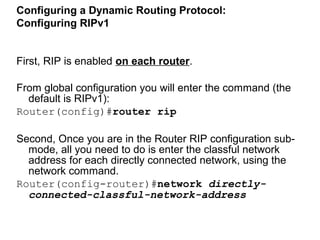
![Third, We check on the routing table for each
router
Baypointe#show ip route
Codes: C - connected, S - static, I - IGRP, R - RIP, M -
mobile, B - BGP
D - EIGRP, EX - EIGRP external, O - OSPF, IA - OSPF
inter area
N1 - OSPF NSSA external type 1, N2 - OSPF NSSA external
type 2
E1 - OSPF external type 1, E2 - OSPF external type 2, E
- EGP
i - IS-IS, L1 - IS-IS level-1, L2 - IS-IS level-2, * -
candidate default
U - per-user static route, o - ODR
Gateway of last resort is not set
C 192.168.4.0/24 is directly connected, Serial0
C 192.168.5.0/24 is directly connected, Ethernet0
R 192.168.1.0/24 [120/2] via 192.168.4.2, 00:00:23, Serial0
R 192.168.2.0/24 [120/1] via 192.168.4.2, 00:00:23, Serial0
R 192.168.3.0/24 [120/1] via 192.168.4.2, 00:00:23, Serial0](https://image.slidesharecdn.com/introtorouterconfig-130310055700-phpapp01/85/Intro-to-router_config-17-320.jpg)

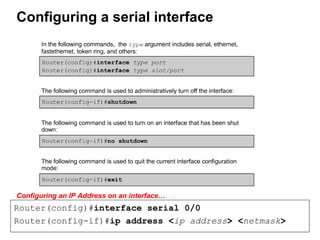
![copy running-config startup-config
Router# copy running-config startup-config
Or
Router# copy running startup
OR
Router# copy run start
OR
Any usage of the command or parameters, so that they are still uniquely recognizable .
WARNING
• Using an incorrect configuration file name could overwrite the router’s IOS in flash, as the router believes
you are trying to copy a blank file into flash.
Router#copy running-config start-up
**** NOTICE **** Incorrect file name!
Flash load helper v1.0
This process will accept the copy options and then terminate
the current system image to use the ROM based image for the copy.
Routing functionality will not be available during that time.
If you are logged in via telnet, this connection will terminate.
Users with console access can see the results of the copy operation.
---- ******** ----
Proceed? [confirm]^C
%Copy cancelled by user request.
Router#
Press <control> C](https://image.slidesharecdn.com/introtorouterconfig-130310055700-phpapp01/85/Intro-to-router_config-19-320.jpg)