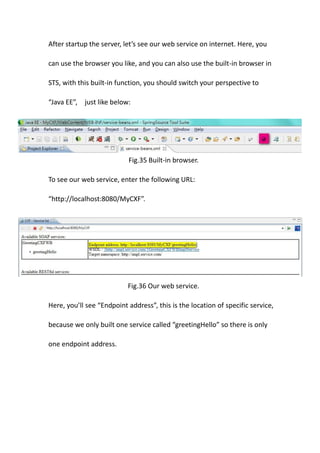
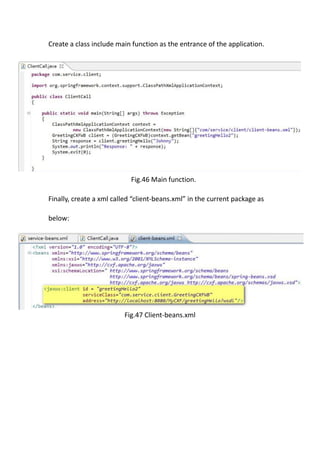
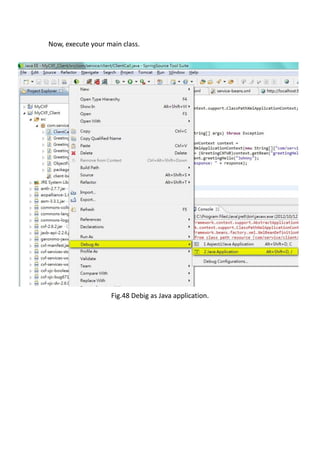
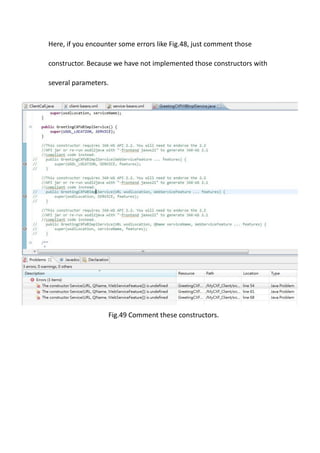
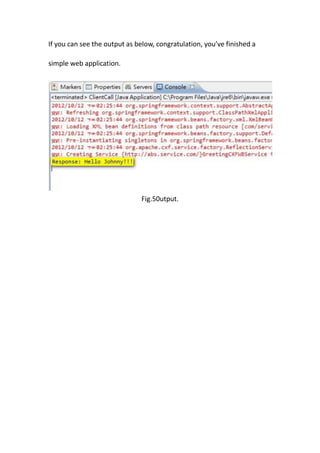
Developing Web Services with CXF

  framework, STS and Tomcat.


                Kevin Lu

         yotsuba1022@gmail.com
This is a simple tutorial for beginner who wants to learn how to develop

some webservices in Java.

Before we start, you should prepare some tools first :

    1.   Java SE
    2.   Spring Tool Suite(STS)
    3.   Apache CXF
    4.   Tomcat


OK, let’s set up the development environment. I assumed that you’ve

already installed Java in your OS, so we’ll start from installing STS.

Go to Spring source community, and scroll down to the bottom of

homepage.


                       Fig.1 Spring source community.
At the bottom of page, choose “Get Tool Kit(STS)”.


                    Fig.2 Choose “Get Tool Kit(STS)”.

As Fig.3, go to the download page.


                    Fig.3 Click the download buttom.
It’s up to you to provide your private information or not, you can also

click “take me to the download page”.


                            Fig.4 You can skip it.

At the download page, choose the product you want, if you’re using

windows, it’s better to choose installer.exe file.


                           Fig.5 Choose your STS.
After installing your STS, there are four folders under springsource folder.


                         Fig.6 springsource folder

Click “sts-x.x.x.RELEASE”, then execute “STS.exe”.


                               Fig.7 STS.exe
Executing…


                          Fig.8 Starting STS.

Now, choose your workspace and click OK.


                      Fig.9 Choosing workspace.
Great, you’ve finish setting your IDE, now it’s time to obtain the

framework(CXF) and container(Tomcat) you need.

Go to Apache CXF and choose the version you want.


                            Fig.10 Apache CXF

In Apache Tomcat, you can choose Core because it’s enough for us.


                          Fig.11 Apache Tomcat
Let’s back to STS, it’s time to build your first web application in Java.

Choose File->New->Dynamic Web Project.


                       Fig.12 Dynamic Web Project.
Before naming your project, please take a look at "Target runtime"

option, if the option is not an Apache Tomcat, click “New Runtime”.


                      Fig.13 Check Target runtime.
Then, you’ll see the following list, just choose the Apache Tomcat which

is match to your download version(My Tomcat is v7.0…).


                  Fig.14 Choose the Tomcat you want.
After choosing the version, select the path of your Tomcat.


                  Fig.15 Tomcat installation directory.
It’s done, click Next.


                         Fig.16
Changing the Default output folder to WebContent/WEB-INF/classes.


                      Fig.17 Default output folder.
Last step, select “Generate web.xml deployment descriptor”.


           Fig.18 Generate web.xml deployment descriptor.
Now, you’ve build a project as below:


                            Fig.19 Your project.

Let’s import our CXF resource now, right click on the folder

   WebContent/WEB-INF/lib and choose “Import”.


                              Fig.20 Import.
Choose General -> File System.


                    Fig.21 Choose “File System”.
Navigating to your CXF folder, and select all jar files in lib.


                              Fig.22 Jar files in lib.
You’ve finished all the settings in this project, it’s time to write some

code now. First, right click on your project and then new an interface.


                          Fig.23 New an interface.

It’s important to define packages in your project, a good classification of

packages can help you to manage your code effectively.


                           Fig.24 Define package.
We assume that our web service is an greeting system, it will say hello to

our ccustomer. According to this demand, we can define our service

interface as below:


                          Fig.25 Greeting system.

But, it’s not enough. Because CXF can not realize that this interface is for

web services. So we need to add some annotaion… .


                       Fig.26 Add some annotaion.

Explanation:

     @WebService: It means that the interface is a web service.

     @WebMethod: It means that this is a method in web service.

     @WebParam: The parameter in method, you can decide the

                        name of input parameter by name attribute.
Now, you've had an service interface, so let’s create a class to implement

this service:


                 Fig.27 The implementation of interface.

With an implementation, now we can create a web.xml file under

WebContent/WEB-INF.


                            Fig.28 web.xml
Explanation:

     <context-param>:
      Specify the corresponding configuration of spring.

     <param-value>:
      Specify the location of configuration document.

     <url-pattern>:
      The pattern of url when the service is called by someone.

Next, create service-beans.xml under WebContent/WEB-INF:


                        Fig.29 It’s an XML file.
Coding followed Fig.29:


                      Fig.30 service-beans.xml

Explanation:

     <jaxws:endpoint>:

        It defines a web service, the attribute “implementor” means

        that the actual class which will handle the web service and its

        value is mapping to the “id” of <bean> , finally, the concrete

        class will be specified in “class” of <bean>. And “address” is the

        pattern shown in URL.
We've almost finished our server-side application. But it still have a few

steps to do. We need to deploy our application to Tomcat.

Right click on your project and select Export->WAR file.


                Fig.31 Packaging your project to WAR file.
The WAR file should be put under the folder “webapps” of your Tomcat

directory. Also, you need to check “Target runtime” here to ensure it’s a

Tomcat server and don’t forget to select optimization option.


                           Fig.32 WAR Export.
Then, move to your Tomcat directory, you can see that there is a .bat file

called startup.bat under the bin folder. This batch can startup your

Tomcat server, so, just click it.


                         Fig.33 Startup your Tomcat.
The figure below is the startup snapshot of Tomcat server. To ensure

your Tomcat has startup successfully, you can look at the bottom to see

whether there is a message “Server startup in xxx ms” or not.


                         Fig.34 Startup Server.
After startup the server, let’s see our web service on internet. Here, you

can use the browser you like, and you can also use the built-in browser in

STS, with this built-in function, you should switch your perspective to

“Java EE”, just like below:


                           Fig.35 Built-in browser.

To see our web service, enter the following URL:

“http://localhost:8080/MyCXF”.


                           Fig.36 Our web service.

Here, you’ll see “Endpoint address”, this is the location of specific service,

because we only built one service called “greetingHello” so there is only

one endpoint address.
If you click the WSDL hyperlink below Endpoint address, you’ll see the

WSDL of greetingHello like Fig.36 .


                            Fig.37 WSDL file.

OK, it’s the end of establishing our server-side application. Now it’s time

to build our client application.
We’ve already established our server-side application, now, we can use

CXF to help us to generate a simple client application called stub. It’s

very convenient because we don’t need to program ourselves.


First, open the CXF package you’ve downloaded. In the bin folder, you

will see lots of batch files named with “wsdl2XXX”, these kind of batch

file can help us to generate stub according to specific services.


                          Fig.38 wsdl2XXX batch.
With these tools, we can generate client-side application automatically
by the following command:

wsdl2XXX –p package_name_of_generated_code
–d path_of_generated_code wsdl_address


                         Fig.39 Using wsdl2java.

In Fig.38, we use “wsdl2java” to generate our client-side application.
Moving to the directory you specified and you can see that in the

package you defined has generated several java files. These files are your

client-side codes.


                      Fig.40 Generated client code.
Now, we can start to build our client-side project, back to STS, choose

“Java Project” as your project type.


                      Fig.41 Choosing Java Project.


                       Fig.42 Create a Java Project.
The first thing we need to do is to import the generated client-side code,

right click on your project name, choose import option, and then select

the generated package.


After importing the package, we need to include some CXF libraries.

Choose “Build Path” -> “Configure Build Path”.


                       Fig.43 Configure Build Path.
Click tag “Libraries”, choose “Add External JARs”.


                                 Fig.44 Libraris.

Select all files in the CXF lib folder.


                          Fig.45 Select all files in lib.
Create a class include main function as the entrance of the application.


                            Fig.46 Main function.

Finally, create a xml called “client-beans.xml” in the current package as

below:


                         Fig.47 Client-beans.xml
Now, execute your main class.


                   Fig.48 Debig as Java application.
Here, if you encounter some errors like Fig.48, just comment those

constructor. Because we have not implemented those constructors with

several parameters.


                   Fig.49 Comment these constructors.
If you can see the output as below, congratulation, you’ve finished a

simple web application.


                               Fig.50utput.

Building A Simple Web Service With CXF

  • 1.
    Developing Web Serviceswith CXF framework, STS and Tomcat. Kevin Lu yotsuba1022@gmail.com
  • 2.
    This is asimple tutorial for beginner who wants to learn how to develop some webservices in Java. Before we start, you should prepare some tools first : 1. Java SE 2. Spring Tool Suite(STS) 3. Apache CXF 4. Tomcat OK, let’s set up the development environment. I assumed that you’ve already installed Java in your OS, so we’ll start from installing STS. Go to Spring source community, and scroll down to the bottom of homepage. Fig.1 Spring source community.
  • 3.
    At the bottomof page, choose “Get Tool Kit(STS)”. Fig.2 Choose “Get Tool Kit(STS)”. As Fig.3, go to the download page. Fig.3 Click the download buttom.
  • 4.
    It’s up toyou to provide your private information or not, you can also click “take me to the download page”. Fig.4 You can skip it. At the download page, choose the product you want, if you’re using windows, it’s better to choose installer.exe file. Fig.5 Choose your STS.
  • 5.
    After installing yourSTS, there are four folders under springsource folder. Fig.6 springsource folder Click “sts-x.x.x.RELEASE”, then execute “STS.exe”. Fig.7 STS.exe
  • 6.
    Executing… Fig.8 Starting STS. Now, choose your workspace and click OK. Fig.9 Choosing workspace.
  • 7.
    Great, you’ve finishsetting your IDE, now it’s time to obtain the framework(CXF) and container(Tomcat) you need. Go to Apache CXF and choose the version you want. Fig.10 Apache CXF In Apache Tomcat, you can choose Core because it’s enough for us. Fig.11 Apache Tomcat
  • 8.
    Let’s back toSTS, it’s time to build your first web application in Java. Choose File->New->Dynamic Web Project. Fig.12 Dynamic Web Project.
  • 9.
    Before naming yourproject, please take a look at "Target runtime" option, if the option is not an Apache Tomcat, click “New Runtime”. Fig.13 Check Target runtime.
  • 10.
    Then, you’ll seethe following list, just choose the Apache Tomcat which is match to your download version(My Tomcat is v7.0…). Fig.14 Choose the Tomcat you want.
  • 11.
    After choosing theversion, select the path of your Tomcat. Fig.15 Tomcat installation directory.
  • 12.
    It’s done, clickNext. Fig.16
  • 13.
    Changing the Defaultoutput folder to WebContent/WEB-INF/classes. Fig.17 Default output folder.
  • 14.
    Last step, select“Generate web.xml deployment descriptor”. Fig.18 Generate web.xml deployment descriptor.
  • 15.
    Now, you’ve builda project as below: Fig.19 Your project. Let’s import our CXF resource now, right click on the folder WebContent/WEB-INF/lib and choose “Import”. Fig.20 Import.
  • 16.
    Choose General ->File System. Fig.21 Choose “File System”.
  • 17.
    Navigating to yourCXF folder, and select all jar files in lib. Fig.22 Jar files in lib.
  • 18.
    You’ve finished allthe settings in this project, it’s time to write some code now. First, right click on your project and then new an interface. Fig.23 New an interface. It’s important to define packages in your project, a good classification of packages can help you to manage your code effectively. Fig.24 Define package.
  • 19.
    We assume thatour web service is an greeting system, it will say hello to our ccustomer. According to this demand, we can define our service interface as below: Fig.25 Greeting system. But, it’s not enough. Because CXF can not realize that this interface is for web services. So we need to add some annotaion… . Fig.26 Add some annotaion. Explanation:  @WebService: It means that the interface is a web service.  @WebMethod: It means that this is a method in web service.  @WebParam: The parameter in method, you can decide the name of input parameter by name attribute.
  • 20.
    Now, you've hadan service interface, so let’s create a class to implement this service: Fig.27 The implementation of interface. With an implementation, now we can create a web.xml file under WebContent/WEB-INF. Fig.28 web.xml
  • 21.
    Explanation:  <context-param>: Specify the corresponding configuration of spring.  <param-value>: Specify the location of configuration document.  <url-pattern>: The pattern of url when the service is called by someone. Next, create service-beans.xml under WebContent/WEB-INF: Fig.29 It’s an XML file.
  • 22.
    Coding followed Fig.29: Fig.30 service-beans.xml Explanation:  <jaxws:endpoint>: It defines a web service, the attribute “implementor” means that the actual class which will handle the web service and its value is mapping to the “id” of <bean> , finally, the concrete class will be specified in “class” of <bean>. And “address” is the pattern shown in URL.
  • 23.
    We've almost finishedour server-side application. But it still have a few steps to do. We need to deploy our application to Tomcat. Right click on your project and select Export->WAR file. Fig.31 Packaging your project to WAR file.
  • 24.
    The WAR fileshould be put under the folder “webapps” of your Tomcat directory. Also, you need to check “Target runtime” here to ensure it’s a Tomcat server and don’t forget to select optimization option. Fig.32 WAR Export.
  • 25.
    Then, move toyour Tomcat directory, you can see that there is a .bat file called startup.bat under the bin folder. This batch can startup your Tomcat server, so, just click it. Fig.33 Startup your Tomcat.
  • 26.
    The figure belowis the startup snapshot of Tomcat server. To ensure your Tomcat has startup successfully, you can look at the bottom to see whether there is a message “Server startup in xxx ms” or not. Fig.34 Startup Server.
  • 27.
    After startup theserver, let’s see our web service on internet. Here, you can use the browser you like, and you can also use the built-in browser in STS, with this built-in function, you should switch your perspective to “Java EE”, just like below: Fig.35 Built-in browser. To see our web service, enter the following URL: “http://localhost:8080/MyCXF”. Fig.36 Our web service. Here, you’ll see “Endpoint address”, this is the location of specific service, because we only built one service called “greetingHello” so there is only one endpoint address.
  • 28.
    If you clickthe WSDL hyperlink below Endpoint address, you’ll see the WSDL of greetingHello like Fig.36 . Fig.37 WSDL file. OK, it’s the end of establishing our server-side application. Now it’s time to build our client application.
  • 29.
    We’ve already establishedour server-side application, now, we can use CXF to help us to generate a simple client application called stub. It’s very convenient because we don’t need to program ourselves. First, open the CXF package you’ve downloaded. In the bin folder, you will see lots of batch files named with “wsdl2XXX”, these kind of batch file can help us to generate stub according to specific services. Fig.38 wsdl2XXX batch.
  • 30.
    With these tools,we can generate client-side application automatically by the following command: wsdl2XXX –p package_name_of_generated_code –d path_of_generated_code wsdl_address Fig.39 Using wsdl2java. In Fig.38, we use “wsdl2java” to generate our client-side application.
  • 31.
    Moving to thedirectory you specified and you can see that in the package you defined has generated several java files. These files are your client-side codes. Fig.40 Generated client code.
  • 32.
    Now, we canstart to build our client-side project, back to STS, choose “Java Project” as your project type. Fig.41 Choosing Java Project. Fig.42 Create a Java Project.
  • 33.
    The first thingwe need to do is to import the generated client-side code, right click on your project name, choose import option, and then select the generated package. After importing the package, we need to include some CXF libraries. Choose “Build Path” -> “Configure Build Path”. Fig.43 Configure Build Path.
  • 34.
    Click tag “Libraries”,choose “Add External JARs”. Fig.44 Libraris. Select all files in the CXF lib folder. Fig.45 Select all files in lib.
  • 35.
    Create a classinclude main function as the entrance of the application. Fig.46 Main function. Finally, create a xml called “client-beans.xml” in the current package as below: Fig.47 Client-beans.xml
  • 36.
    Now, execute yourmain class. Fig.48 Debig as Java application.
  • 37.
    Here, if youencounter some errors like Fig.48, just comment those constructor. Because we have not implemented those constructors with several parameters. Fig.49 Comment these constructors.
  • 38.
    If you cansee the output as below, congratulation, you’ve finished a simple web application. Fig.50utput.