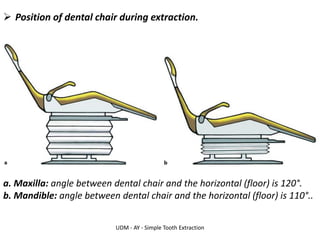
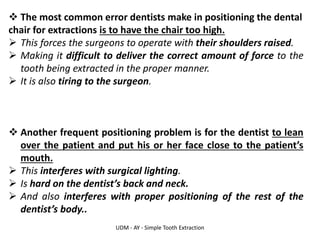
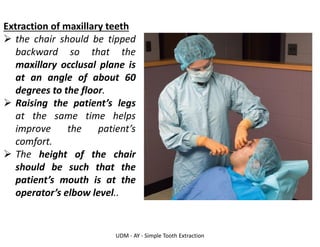
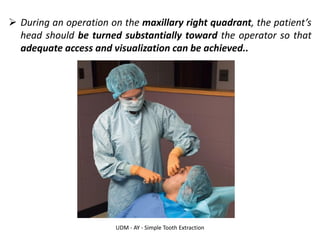
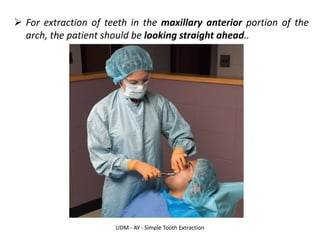
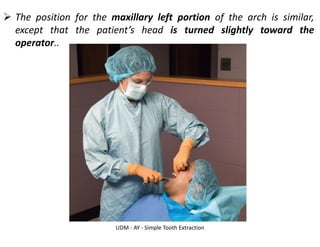
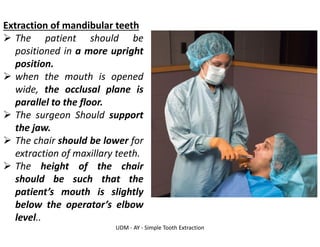
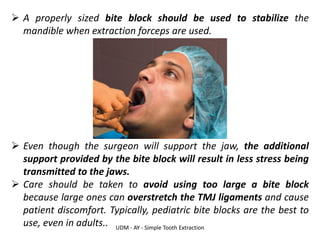
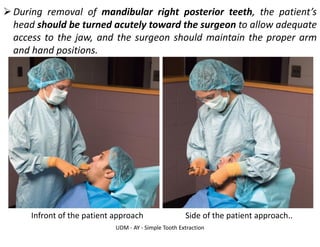
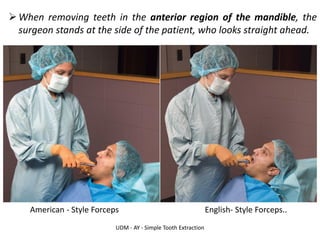
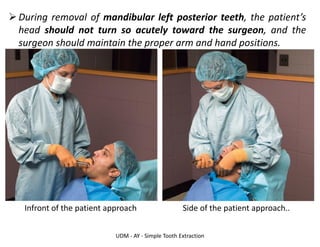
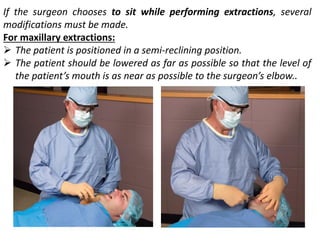
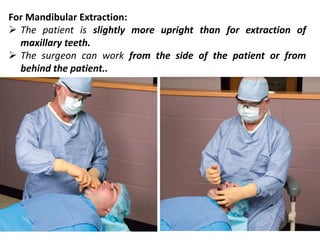
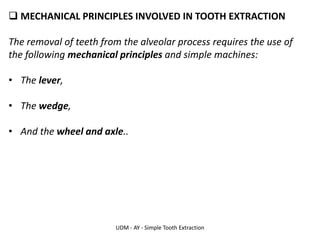
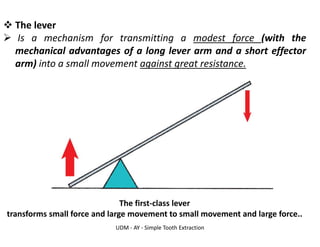
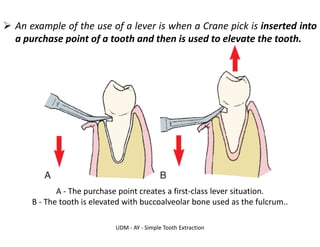
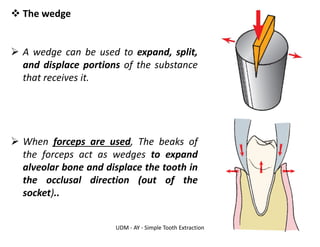
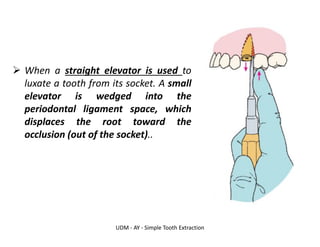
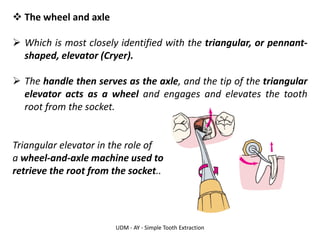
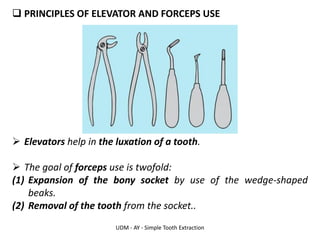
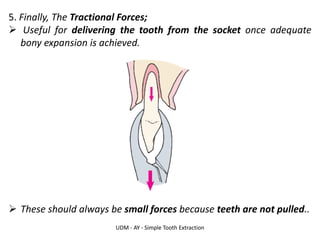
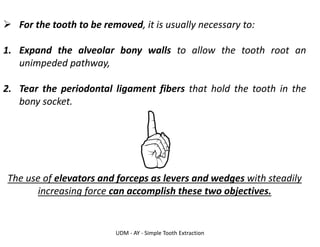
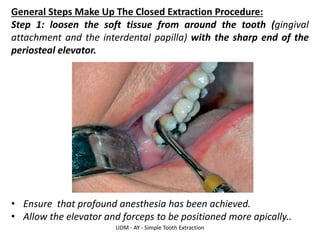
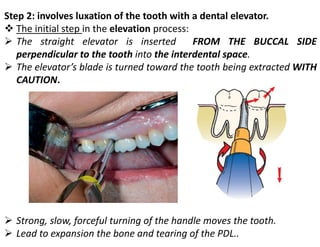
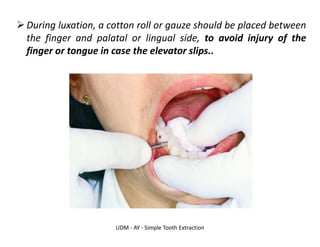
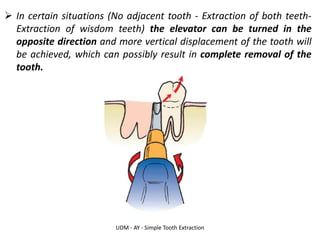
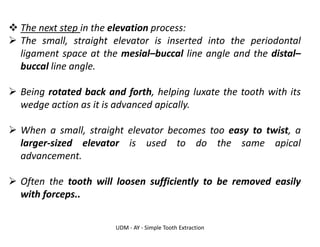
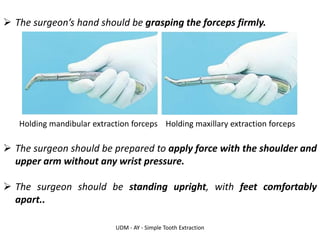
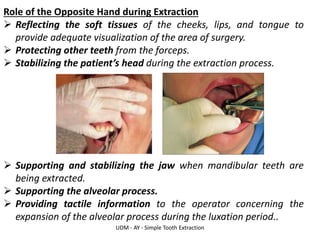
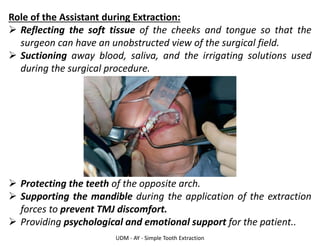
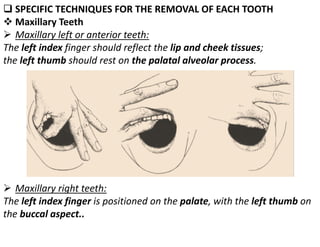
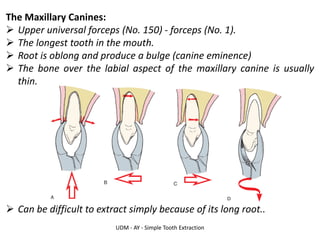
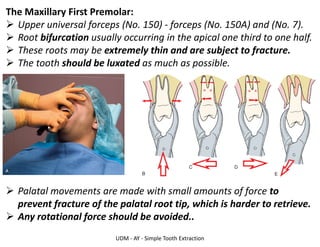
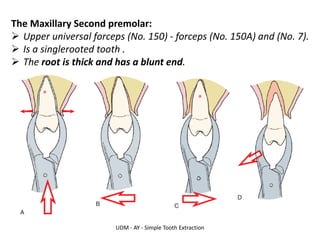
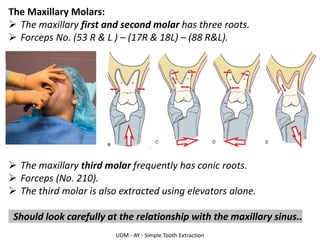
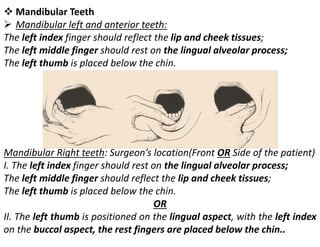
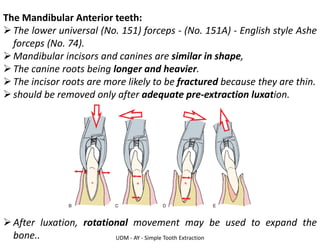
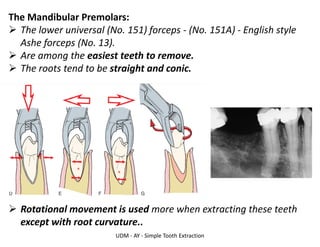
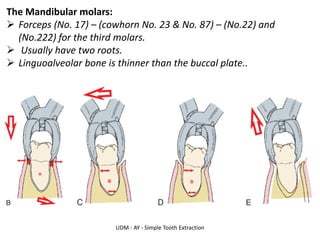
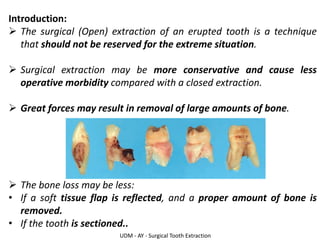
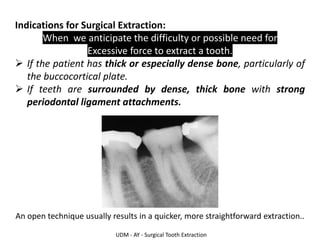
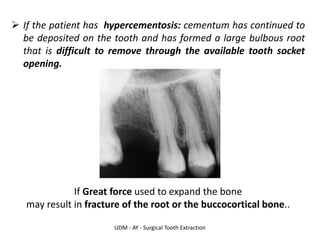
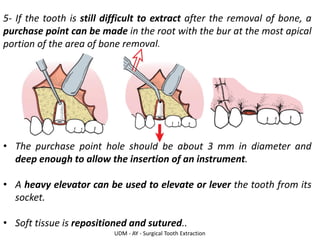
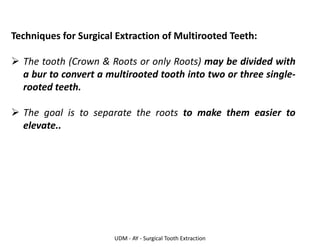
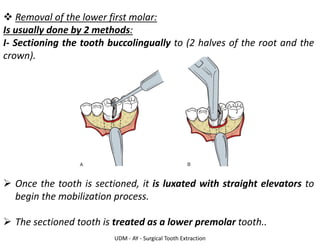
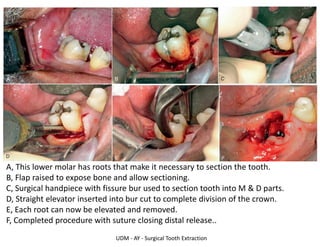
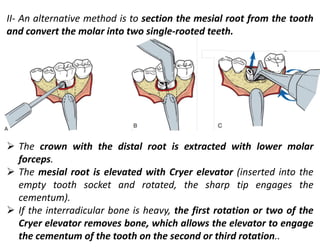
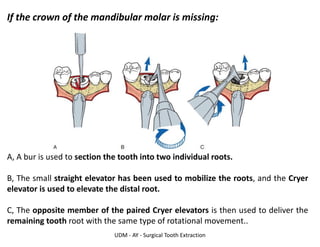
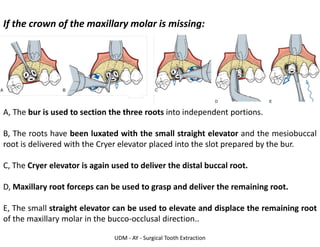
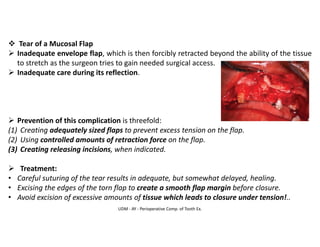
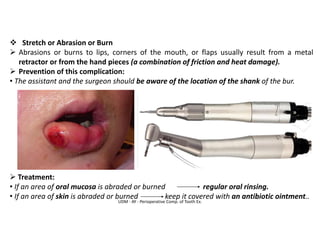
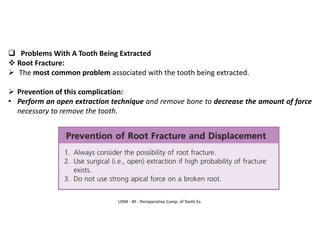
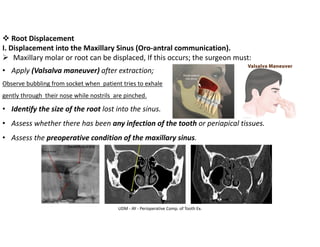
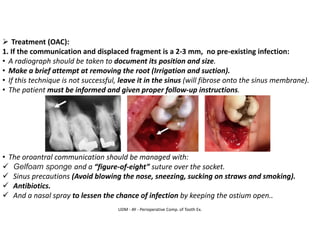
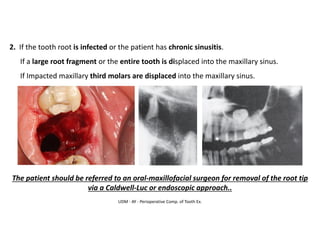
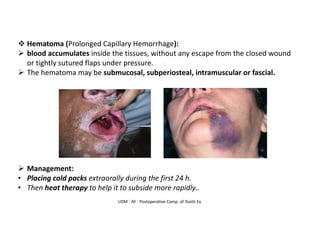
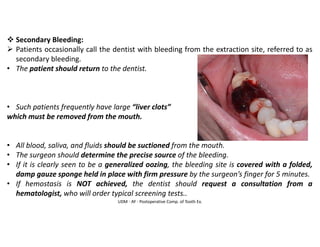
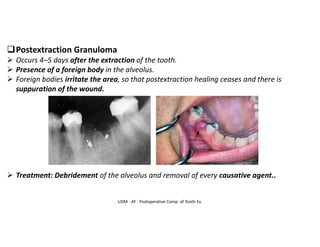
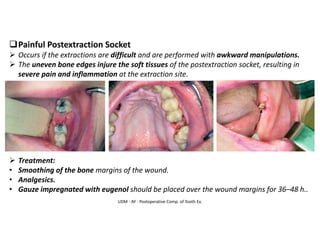
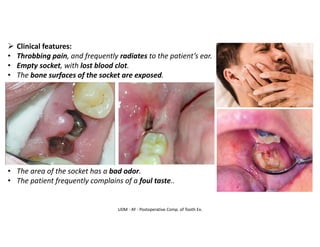
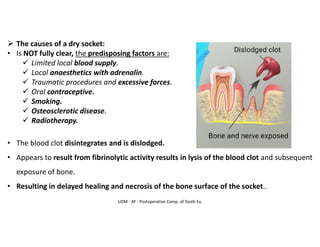
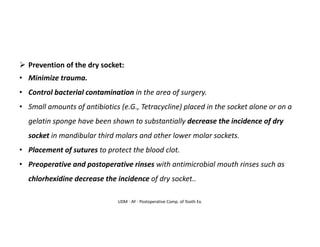
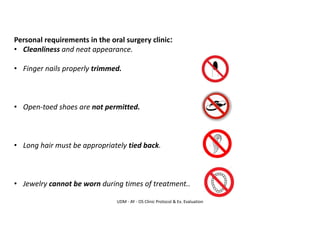
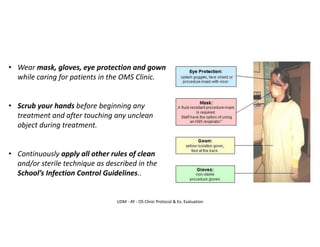
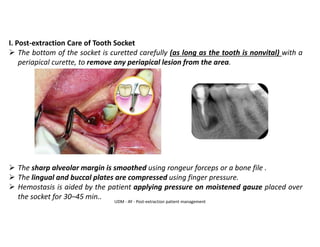
Simple Tooth Extraction
Abed Yakan
DDS, PGDip, MS, PhD - OMFS
Division of Clinical Dentistry - Oral & Maxillofacial Surgery
University of Detroit Mercy
UDM - AY - Simple Tooth Extraction
Contents:
❑ Patient and Surgeon Preparation.
❑ Chair Position for Extractions.
❑ Mechanical Principles Involved In Tooth Extraction.
❑ Principles of Elevator and Forceps Use.
❑ Procedure for Closed (Simple) Extraction.
❑ Specific Techniques for The Removal of Each Tooth.
UDM - AY - Simple Tooth Extraction
❑ PATIENT AND SURGEON PREPARATION
➢Surgeons must prevent transmission of infection.
➢All patients must be viewed as having bloodborne diseases.
➢Long-sleeved gowns, surgical gloves, surgical mask, and eyewear
with side-shields are required.
UDM - AY - Simple Tooth Extraction
➢A sterile waterproof drape should be put across the patient’s chest to
decrease the risk of contamination.
➢Patient should rinse their mouths vigorously with an antiseptic.
➢Place a partially unfolded 4 × 4 inch gauze loosely into the back of the
mouth to serve as a barrier to catch the tooth or fragments rather
than be swallowed or aspirated..
UDM - AY - Simple Tooth Extraction
❑ CHAIR POSITION FOR EXTRACTIONS
➢ Comfortable for the patient and surgeon.
➢ Allows the surgeon to have maximal control of the force that is
being delivered to the patient’s tooth.
➢ Allows the surgeon to keep the arms close to the body and
provides stability and support.
➢ Also allows the surgeon to keep the wrists straight enough to
deliver the force with the arm and shoulder, and not with the
fingers or hand.
➢ Can control the sudden loss of resistance from a tooth.
➢ Dentists usually stand during extractions..
UDM - AY - Simple Tooth Extraction
➢ Position of dental chair during extraction.
a. Maxilla: angle between dental chair and the horizontal (floor) is 120°.
b. Mandible: angle between dental chair and the horizontal (floor) is 110°..
UDM - AY - Simple Tooth Extraction
❖ The most common error dentists make in positioning the dental
chair for extractions is to have the chair too high.
➢ This forces the surgeons to operate with their shoulders raised.
➢ Making it difficult to deliver the correct amount of force to the
tooth being extracted in the proper manner.
➢ It is also tiring to the surgeon.
❖ Another frequent positioning problem is for the dentist to lean
over the patient and put his or her face close to the patient’s
mouth.
➢ This interferes with surgical lighting.
➢ Is hard on the dentist’s back and neck.
➢ And also interferes with proper positioning of the rest of the
dentist’s body..
UDM - AY - Simple Tooth Extraction
Extraction of maxillary teeth
➢ the chair should be tipped
backward so that the
maxillary occlusal plane is
at an angle of about 60
degrees to the floor.
➢ Raising the patient’s legs
at the same time helps
improve the patient’s
comfort.
➢ The height of the chair
should be such that the
patient’s mouth is at the
operator’s elbow level..
UDM - AY - Simple Tooth Extraction
➢ During an operation on the maxillary right quadrant, the patient’s
head should be turned substantially toward the operator so that
adequate access and visualization can be achieved..
UDM - AY - Simple Tooth Extraction
➢ For extraction of teeth in the maxillary anterior portion of the
arch, the patient should be looking straight ahead..
UDM - AY - Simple Tooth Extraction
➢ The position for the maxillary left portion of the arch is similar,
except that the patient’s head is turned slightly toward the
operator..
UDM - AY - Simple Tooth Extraction
Extraction of mandibular teeth
➢ The patient should be
positioned in a more upright
position.
➢ when the mouth is opened
wide, the occlusal plane is
parallel to the floor.
➢ The surgeon Should support
the jaw.
➢ The chair should be lower for
extraction of maxillary teeth.
➢ The height of the chair
should be such that the
patient’s mouth is slightly
below the operator’s elbow
level..
UDM - AY - Simple Tooth Extraction
➢ A properly sized bite block should be used to stabilize the
mandible when extraction forceps are used.
➢ Even though the surgeon will support the jaw, the additional
support provided by the bite block will result in less stress being
transmitted to the jaws.
➢ Care should be taken to avoid using too large a bite block
because large ones can overstretch the TMJ ligaments and cause
patient discomfort. Typically, pediatric bite blocks are the best to
use, even in adults..
UDM - AY - Simple Tooth Extraction
➢During removal of mandibular right posterior teeth, the patient’s
head should be turned acutely toward the surgeon to allow adequate
access to the jaw, and the surgeon should maintain the proper arm
and hand positions.
Infront of the patient approach Side of the patient approach..
UDM - AY - Simple Tooth Extraction
➢When removing teeth in the anterior region of the mandible, the
surgeon stands at the side of the patient, who looks straight ahead.
American - Style Forceps English- Style Forceps..
UDM - AY - Simple Tooth Extraction
➢During removal of mandibular left posterior teeth, the patient’s
head should not turn so acutely toward the surgeon, and the
surgeon should maintain the proper arm and hand positions.
Infront of the patient approach Side of the patient approach..
If the surgeon chooses to sit while performing extractions, several
modifications must be made.
For maxillary extractions:
➢ The patient is positioned in a semi-reclining position.
➢ The patient should be lowered as far as possible so that the level of
the patient’s mouth is as near as possible to the surgeon’s elbow..
For Mandibular Extraction:
➢ The patient is slightly more upright than for extraction of
maxillary teeth.
➢ The surgeon can work from the side of the patient or from
behind the patient..
UDM - AY - Simple Tooth Extraction
❑ MECHANICAL PRINCIPLES INVOLVED IN TOOTH EXTRACTION
The removal of teeth from the alveolar process requires the use of
the following mechanical principles and simple machines:
• The lever,
• The wedge,
• And the wheel and axle..
UDM - AY - Simple Tooth Extraction
❖ The lever
➢ Is a mechanism for transmitting a modest force (with the
mechanical advantages of a long lever arm and a short effector
arm) into a small movement against great resistance.
The first-class lever
transforms small force and large movement to small movement and large force..
UDM - AY - Simple Tooth Extraction
➢ An example of the use of a lever is when a Crane pick is inserted into
a purchase point of a tooth and then is used to elevate the tooth.
A - The purchase point creates a first-class lever situation.
B - The tooth is elevated with buccoalveolar bone used as the fulcrum..
UDM - AY - Simple Tooth Extraction
❖ The wedge
➢ A wedge can be used to expand, split,
and displace portions of the substance
that receives it.
➢ When forceps are used, The beaks of
the forceps act as wedges to expand
alveolar bone and displace the tooth in
the occlusal direction (out of the
socket)..
UDM - AY - Simple Tooth Extraction
➢ When a straight elevator is used to
luxate a tooth from its socket. A small
elevator is wedged into the
periodontal ligament space, which
displaces the root toward the
occlusion (out of the socket)..
UDM - AY - Simple Tooth Extraction
❖ The wheel and axle
➢ Which is most closely identified with the triangular, or pennant-
shaped, elevator (Cryer).
➢ The handle then serves as the axle, and the tip of the triangular
elevator acts as a wheel and engages and elevates the tooth
root from the socket.
Triangular elevator in the role of
a wheel-and-axle machine used to
retrieve the root from the socket..
UDM - AY - Simple Tooth Extraction
❑ PRINCIPLES OF ELEVATOR AND FORCEPS USE
➢ Elevators help in the luxation of a tooth.
➢ The goal of forceps use is twofold:
(1) Expansion of the bony socket by use of the wedge-shaped
beaks.
(2) Removal of the tooth from the socket..
Forceps can apply FIVE major motions to expand the bony socket and
luxate the teeth :
1. The First Is Apical Pressure;
➢ The forceps should be seated with strong apical pressure to expand
crestal bone and to displace the center of rotation as far apically as
possible..
➢ If the beaks of the forceps are forced into the periodontal ligament
space, the center of rotation is moved apically, which results in
greater movement of the expansion forces at the crest of the ridge
and less force moving the apex and decreases the chance for apical
root fracture.
If the forceps are apically seated, the center of rotation (*)
is displaced apically, and smaller apical pressures are generated.
This results in greater expansion of the buccal cortex, less movement of the
apex of the tooth, and, therefore, less chance of fracture of the root..
UDM - AY - Simple Tooth Extraction
2. The Second Is The Buccal Pressure;
➢ Result in expansion of the buccal plate at the crest of the ridge.
➢ Excessive force can fracture buccal bone or cause a fracture of the
apical portion of the root..
UDM - AY - Simple Tooth Extraction
3. The Third Is The Lingual Or Palatal Pressure;
➢ Result in expansion of the linguocrestal bone at the crest of the
ridge and slightly expand buccal bone at the apical area..
➢ Excessive force can fracture the bone or cause a fracture of the
apical portion of the root..
UDM - AY - Simple Tooth Extraction
4. The Fourth Is The Rotational Pressure;
➢ Rotates the tooth which causes some internal expansion of the
tooth socket and tearing of periodontal ligaments.
➢ Useful for the teeth with single, conical roots (such as central
maxillary incisors and mandibular premolars)..
UDM - AY - Simple Tooth Extraction
5. Finally, The Tractional Forces;
➢ Useful for delivering the tooth from the socket once adequate
bony expansion is achieved.
➢ These should always be small forces because teeth are not pulled..
UDM - AY - Simple Tooth Extraction
❑ PROCEDURE FOR CLOSED (SIMPLE) EXTRACTION
➢The correct technique = atraumatic extraction.
The wrong technique = excessively traumatic extraction.
➢ The three fundamental requirements for a good extraction are:
1) Adequate access and visualization of the field of surgery.
1) An unimpeded pathway for the removal of the tooth.
2) The use of controlled force to luxate and remove the tooth.
UDM - AY - Simple Tooth Extraction
➢ For the tooth to be removed, it is usually necessary to:
1. Expand the alveolar bony walls to allow the tooth root an
unimpeded pathway,
2. Tear the periodontal ligament fibers that hold the tooth in the
bony socket.
The use of elevators and forceps as levers and wedges with steadily
increasing force can accomplish these two objectives.
UDM - AY - Simple Tooth Extraction
General Steps Make Up The Closed Extraction Procedure:
Step 1: loosen the soft tissue from around the tooth (gingival
attachment and the interdental papilla) with the sharp end of the
periosteal elevator.
• Ensure that profound anesthesia has been achieved.
• Allow the elevator and forceps to be positioned more apically..
Step 2: involves luxation of the tooth with a dental elevator.
❖ The initial step in the elevation process:
➢ The straight elevator is inserted FROM THE BUCCAL SIDE
perpendicular to the tooth into the interdental space.
➢ The elevator’s blade is turned toward the tooth being extracted WITH
CAUTION.
➢ Strong, slow, forceful turning of the handle moves the tooth.
➢ Lead to expansion the bone and tearing of the PDL..
UDM - AY - Simple Tooth Extraction
➢During luxation, a cotton roll or gauze should be placed between
the finger and palatal or lingual side, to avoid injury of the
finger or tongue in case the elevator slips..
UDM - AY - Simple Tooth Extraction
➢ In certain situations (No adjacent tooth - Extraction of both teeth-
Extraction of wisdom teeth) the elevator can be turned in the
opposite direction and more vertical displacement of the tooth will
be achieved, which can possibly result in complete removal of the
tooth.
UDM - AY - Simple Tooth Extraction
❖ The next step in the elevation process:
➢ The small, straight elevator is inserted into the periodontal
ligament space at the mesial–buccal line angle and the distal–
buccal line angle.
➢ Being rotated back and forth, helping luxate the tooth with its
wedge action as it is advanced apically.
➢ When a small, straight elevator becomes too easy to twist, a
larger-sized elevator is used to do the same apical
advancement.
➢ Often the tooth will loosen sufficiently to be removed easily
with forceps..
UDM - AY - Simple Tooth Extraction
Step 3: involves adaptation of the forceps to the tooth.
➢ The proper forceps are now chosen for the tooth to be extracted.
➢ The forceps are then seated onto the tooth so that the tips of the
forceps beaks grasp the root underneath loosened soft tissue as
apically as possible.
➢ The lingual beak is usually seated first and then the buccal beak..
UDM - AY - Simple Tooth Extraction
➢ The surgeon’s hand should be grasping the forceps firmly.
Holding mandibular extraction forceps Holding maxillary extraction forceps
➢ The surgeon should be prepared to apply force with the shoulder and
upper arm without any wrist pressure.
➢ The surgeon should be standing upright, with feet comfortably
apart..
Step 4: involves luxation of the tooth with forceps.
➢The major portion of the force is directed toward the thinnest and,
therefore, weakest bone.
➢The major movement is labial and buccal for all teeth in the maxilla
and all but molar teeth in the mandible.
➢The surgeon uses slow, steady force to displace the tooth buccally.
➢The tooth is then moved again toward the opposite direction with
slow, deliberate, strong pressure.
➢As the alveolar bone begins to expand, the forceps are reseated
apically which causes additional expansion of alveolar bone and
further displaces the center of the rotation apically.
➢Buccal and lingual pressures continue to expand the alveolar socket..
UDM - AY - Simple Tooth Extraction
The following three factors must be re-emphasized:
(1) The forceps must be apically seated as far as possible and
reseated periodically during the extraction;
(2) The forces applied in the buccal and lingual directions should be
slow, deliberate pressures and not jerky wiggles;
(3) The force should be held for several seconds to allow the bone
time to expand.
*******************
UDM - AY - Simple Tooth Extraction
Step 5: involves removal of the tooth from the socket.
➢ Once the tooth has been luxated, a slight tractional force
toward the buccally or labially side can be used.
➢ Tractional forces should be minimized because this is the last
motion that is used once the alveolar process is sufficiently
expanded and the periodontal ligament is completely severed.
******************
UDM - AY - Simple Tooth Extraction
It must be remembered that teeth
Are Not Pulled, rather, They Are Gently Lifted
from the socket once the alveolar process has been expanded..
The surgeon should realize that the major role of forceps
IS NOT TO REMOVE THE TOOTH,
but rather to expand the bone so that the tooth can be removed.
UDM - AY - Simple Tooth Extraction
Role of the Opposite Hand during Extraction
➢ Reflecting the soft tissues of the cheeks, lips, and tongue to
provide adequate visualization of the area of surgery.
➢ Protecting other teeth from the forceps.
➢ Stabilizing the patient’s head during the extraction process.
➢ Supporting and stabilizing the jaw when mandibular teeth are
being extracted.
➢ Supporting the alveolar process.
➢ Providing tactile information to the operator concerning the
expansion of the alveolar process during the luxation period..
UDM - AY - Simple Tooth Extraction
Role of the Assistant during Extraction:
➢ Reflecting the soft tissue of the cheeks and tongue so that the
surgeon can have an unobstructed view of the surgical field.
➢ Suctioning away blood, saliva, and the irrigating solutions used
during the surgical procedure.
➢ Protecting the teeth of the opposite arch.
➢ Supporting the mandible during the application of the extraction
forces to prevent TMJ discomfort.
➢ Providing psychological and emotional support for the patient..
❑ SPECIFIC TECHNIQUES FOR THE REMOVAL OF EACH TOOTH
❖ Maxillary Teeth
➢ Maxillary left or anterior teeth:
The left index finger should reflect the lip and cheek tissues;
the left thumb should rest on the palatal alveolar process.
➢ Maxillary right teeth:
The left index finger is positioned on the palate, with the left thumb on
the buccal aspect..
The maxillary incisors:
➢ Upper universal forceps (No. 150) - forceps (No. 1).
➢ central incisors generally have conic roots.
➢ lateral incisors slightly longer, slenderer and have a distal
curvature on the apical one third of the root.
➢ Alveolar bone is thin on the labial side and heavier on the
palatal side.
➢ Rotational movement should be minimized for the lateral incisor..
UDM - AY - Simple Tooth Extraction
The Maxillary Canines:
➢ Upper universal forceps (No. 150) - forceps (No. 1).
➢ The longest tooth in the mouth.
➢ Root is oblong and produce a bulge (canine eminence)
➢ The bone over the labial aspect of the maxillary canine is usually
thin.
➢ Can be difficult to extract simply because of its long root..
UDM - AY - Simple Tooth Extraction
The Maxillary First Premolar:
➢ Upper universal forceps (No. 150) - forceps (No. 150A) and (No. 7).
➢ Root bifurcation usually occurring in the apical one third to one half.
➢ These roots may be extremely thin and are subject to fracture.
➢ The tooth should be luxated as much as possible.
➢ Palatal movements are made with small amounts of force to
prevent fracture of the palatal root tip, which is harder to retrieve.
➢ Any rotational force should be avoided..
UDM - AY - Simple Tooth Extraction
The Maxillary Second premolar:
➢ Upper universal forceps (No. 150) - forceps (No. 150A) and (No. 7).
➢ Is a singlerooted tooth .
➢ The root is thick and has a blunt end.
UDM - AY - Simple Tooth Extraction
The Maxillary Molars:
➢ The maxillary first and second molar has three roots.
➢ Forceps No. (53 R & L ) – (17R & 18L) – (88 R&L).
➢ The maxillary third molar frequently has conic roots.
➢ Forceps (No. 210).
➢ The third molar is also extracted using elevators alone.
Should look carefully at the relationship with the maxillary sinus..
❖ Mandibular Teeth
➢ Mandibular left and anterior teeth:
The left index finger should reflect the lip and cheek tissues;
The left middle finger should rest on the lingual alveolar process;
The left thumb is placed below the chin.
Mandibular Right teeth: Surgeon’s location(Front OR Side of the patient)
I. The left index finger should rest on the lingual alveolar process;
The left middle finger should reflect the lip and cheek tissues;
The left thumb is placed below the chin.
OR
II. The left thumb is positioned on the lingual aspect, with the left index
on the buccal aspect, the rest fingers are placed below the chin..
UDM - AY - Simple Tooth Extraction
The Mandibular Anterior teeth:
➢The lower universal (No. 151) forceps - (No. 151A) - English style Ashe
forceps (No. 74).
➢Mandibular incisors and canines are similar in shape,
➢The canine roots being longer and heavier.
➢The incisor roots are more likely to be fractured because they are thin.
➢should be removed only after adequate pre-extraction luxation.
➢After luxation, rotational movement may be used to expand the
bone..
UDM - AY - Simple Tooth Extraction
The Mandibular Premolars:
➢ The lower universal (No. 151) forceps - (No. 151A) - English style
Ashe forceps (No. 13).
➢ Are among the easiest teeth to remove.
➢ The roots tend to be straight and conic.
➢ Rotational movement is used more when extracting these teeth
except with root curvature..
UDM - AY - Simple Tooth Extraction
The Mandibular molars:
➢ Forceps (No. 17) – (cowhorn No. 23 & No. 87) – (No.22) and
(No.222) for the third molars.
➢ Usually have two roots.
➢ Linguoalveolar bone is thinner than the buccal plate..
UDM - AY - Simple Tooth Extraction
➢ If the tooth roots are bifurcated, Cowhorn forceps, can be used.
A, Forceps are positioned to engage the bifurcation area of the lower molar.
B, The handles of the forceps are squeezed, which forces the beaks to be in the bifurcation,
and creates force against the crest of the alveolar ridge.
C, Strong buccal forces are then used to expand the socket.
D, Strong lingual forces are used to luxate the tooth further.
E, The tooth is delivered in the bucco-occlusal direction with buccal and tractional forces..
UDM - AY - Simple Tooth Extraction
If root fracture does occur,
a mobile root tip can be removed
More Easily Than
one that has not been well luxated.
Thank You For
Your Kind Attention
yakanab@udmercy.edu
UDM - AY - Simple Tooth Extraction
Surgical Tooth Extraction
Abed Yakan
DDS, PGDip, MS, PhD - OMFS
Division of Clinical Dentistry - Oral & Maxillofacial Surgery
University of Detroit Mercy
UDM - AY - Surgical Tooth Extraction
Contents:
❑ Definition.
❑ Introduction.
❑ Indications for surgical extraction.
❑ Techniques for surgical extraction.
❑ Justification for leaving root fragments.
❑ Multiple extractions.
UDM - AY - Surgical Tooth Extraction
Definitions:
❖ Surgical (Open) extraction is the removal of a tooth that
presents clinically with a condition that does not safely or
adequately allow access using a non-surgical approach.
❖ Surgical Extraction of an Erupted Tooth: A tooth requiring
removal of bone and/or sectioning of tooth, and including
elevation of mucoperiosteal flap if indicated. Includes related
cutting of gingiva and bone, removal of tooth structure, minor
smoothing of socket bone and closure. (ADA, 2017)
❖ Surgical Removal of Residual Tooth Roots: (cutting procedure)
includes cutting of soft tissue and bone, removal of tooth
structure and closure. (ADA, 2017)..
UDM - AY - Surgical Tooth Extraction
Introduction:
➢ The surgical (Open) extraction of an erupted tooth is a technique
that should not be reserved for the extreme situation.
➢ Surgical extraction may be more conservative and cause less
operative morbidity compared with a closed extraction.
➢ Great forces may result in removal of large amounts of bone.
➢ The bone loss may be less:
• If a soft tissue flap is reflected, and a proper amount of bone is
removed.
• If the tooth is sectioned..
UDM - AY - Surgical Tooth Extraction
The surgeon should seriously consider performing a surgical
extraction after initial attempts at forceps extraction have failed.
Instead of applying greater amounts
of force that may not be controlled!
The surgeon should simply reflect a soft tissue flap,
section the tooth, remove some bone, if needed,
and extract the tooth in sections.
In these situations, the philosophy of “divide and conquer” results
in the most efficient and least traumatic extraction..
UDM - AY - Surgical Tooth Extraction
Indications for Surgical Extraction:
When we anticipate the difficulty or possible need for
Excessive force to extract a tooth.
➢ If the patient has thick or especially dense bone, particularly of
the buccocortical plate.
➢ If teeth are surrounded by dense, thick bone with strong
periodontal ligament attachments.
An open technique usually results in a quicker, more straightforward extraction..
UDM - AY - Surgical Tooth Extraction
➢ If the patient has hypercementosis: cementum has continued to
be deposited on the tooth and has formed a large bulbous root
that is difficult to remove through the available tooth socket
opening.
If Great force used to expand the bone
may result in fracture of the root or the buccocortical bone..
UDM - AY - Surgical Tooth Extraction
➢Roots that are widely divergent, or have severe dilaceration, or
root canal treated with large restoration.
Difficult to remove without fracturing one or more of the roots..
Techniques for Surgical
Extraction
UDM - AY - Surgical Tooth Extraction
Techniques for Surgical Extraction of Single-Rooted Tooth:
Provide adequate visualization and access by reflecting a sufficiently
large mucoperiosteal flap.
Methods of removal:
1- Attempt to reseat the extraction forceps and remove the tooth.
2- Grasp a bit of buccal bone under the beak of the forceps to obtain a
better mechanical advantage and grasp of the tooth root.
3- Push the straight elevator down the periodontal ligament space like
a shoehorn and apply to and fro motion to luxate the broken root..
UDM - AY - Surgical Tooth Extraction
4- Use a bur with irrigation to remove the bone and reduce the
amount of force necessary to displace the root.
• The width of buccal bone that is removed is essentially the same
width as the tooth in a mesiodistal direction.
• Bone should be removed approximately one half to two thirds the
length of the tooth root.
• A forceps or small straight elevator can be used to remove the
tooth..
UDM - AY - Surgical Tooth Extraction
5- If the tooth is still difficult to extract after the removal of bone, a
purchase point can be made in the root with the bur at the most apical
portion of the area of bone removal.
• The purchase point hole should be about 3 mm in diameter and
deep enough to allow the insertion of an instrument.
• A heavy elevator can be used to elevate or lever the tooth from its
socket.
• Soft tissue is repositioned and sutured..
UDM - AY - Surgical Tooth Extraction
Techniques for Surgical Extraction of Multirooted Teeth:
➢ The tooth (Crown & Roots or only Roots) may be divided with
a bur to convert a multirooted tooth into two or three single-
rooted teeth.
➢ The goal is to separate the roots to make them easier to
elevate..
UDM - AY - Surgical Tooth Extraction
❖ Removal of the lower first molar:
Is usually done by 2 methods:
I- Sectioning the tooth buccolingually to (2 halves of the root and the
crown).
➢ Once the tooth is sectioned, it is luxated with straight elevators to
begin the mobilization process.
➢ The sectioned tooth is treated as a lower premolar tooth..
UDM - AY - Surgical Tooth Extraction
A, This lower molar has roots that make it necessary to section the tooth.
B, Flap raised to expose bone and allow sectioning.
C, Surgical handpiece with fissure bur used to section tooth into M & D parts.
D, Straight elevator inserted into bur cut to complete division of the crown.
E, Each root can now be elevated and removed.
F, Completed procedure with suture closing distal release..
II- An alternative method is to section the mesial root from the tooth
and convert the molar into two single-rooted teeth.
➢ The crown with the distal root is extracted with lower molar
forceps.
➢ The mesial root is elevated with Cryer elevator (inserted into the
empty tooth socket and rotated, the sharp tip engages the
cementum).
➢ If the interradicular bone is heavy, the first rotation or two of the
Cryer elevator removes bone, which allows the elevator to engage
the cementum of the tooth on the second or third rotation..
UDM - AY - Surgical Tooth Extraction
If the crown of the mandibular molar is missing:
A, A bur is used to section the tooth into two individual roots.
B, The small straight elevator has been used to mobilize the roots, and the Cryer
elevator is used to elevate the distal root.
C, The opposite member of the paired Cryer elevators is then used to deliver the
remaining tooth root with the same type of rotational movement..
UDM - AY - Surgical Tooth Extraction
❖ Removal of maxillary molars:
➢ This three-rooted tooth must be divided in a pattern different from
that of the two rooted mandibular molar.
A, The bur is used to section the buccal roots from the crown portion of the tooth.
B, Upper molar forceps are then used to remove the crown with the palatal root.
C, The straight elevator is then used to mobilize or deliver one or both of buccal roots.
D, The Cryer elevator can be used in the usual fashion by placing the tip of the
elevator into the empty socket and rotating it to deliver the remaining root..
UDM - AY - Surgical Tooth Extraction
If the crown of the maxillary molar is missing:
A, The bur is used to section the three roots into independent portions.
B, The roots have been luxated with the small straight elevator and the mesiobuccal
root is delivered with the Cryer elevator placed into the slot prepared by the bur.
C, The Cryer elevator is again used to deliver the distal buccal root.
D, Maxillary root forceps can be used to grasp and deliver the remaining root.
E, The small straight elevator can be used to elevate and displace the remaining root
of the maxillary molar in the bucco-occlusal direction..
UDM - AY - Surgical Tooth Extraction
Techniques for Removal of Root Fragments and Tips:
❖ Simple technique:
Most useful when:
➢ The tooth was well luxated and mobile before the root tip fractured.
❖ Surgical technique:
Most useful when:
➢ The tooth was NOT luxated or mobile before the root tip fractured.
➢ The root is bulbous hypercementosed with bony interferences.
➢ There is severe dilaceration of the root end.
The surgeon should begin a surgical technique
if the simple technique is not immediately successful..
UDM - AY - Surgical Tooth Extraction
Requirements for removal of a small root tip fragment:
The surgeon SHOULD CLEARLY SEE the root tip,
so, it is critically important to have:
(1) Proper light.
(2) Irrigation.
(3) Excellent suction..
UDM - AY - Surgical Tooth Extraction
❖ Simple technique for Removal of Root Fragments and Tips:
➢ Examine the extracted tooth to see how much of a root remains.
➢ Reposition the patient so that adequate visualization is
achieved.
➢ Irrigated and suction the socket because the loose tooth
fragment occasionally can be irrigated from the socket.
➢ Inspect the tooth socket carefully to assess whether the root has
been removed from the socket.
➢ Remove the root apex from the socket with a root tip pick..
UDM - AY - Surgical Tooth Extraction
Root apex removal with root tip pick:
A, Small (2 to 4 mm) portion of the root apex is fractured.
B, The root tip pick is teased into the periodontal ligament space and used to
gently luxate the root tip from its socket.
Neither excessive apical force, nor excessive lateral force
should be applied to the root tip pick..
UDM - AY - Surgical Tooth Extraction
Root tip removal with the small straight elevator:
➢ Indicated for removal larger root fragments.
A, The small straight elevator is wedged into the
periodontal ligament space to displace the tooth in the
occlusal direction, the pressure applied should be in gentle
to-and-fro motions.
B, Excessive pressure in the apical direction results in
displacement of the tooth root into undesirable places such
as the maxillary sinus..
UDM - AY - Surgical Tooth Extraction
❖ Surgical technique for Removal of Root Fragments and Tips.
Two main surgical techniques are used to remove root tips.
I- As surgical removal of single-rooted teeth:
➢ Bone is removed with a bur to expose the buccal surface of the
tooth root.
➢ The root is buccally delivered through the opening with a small
straight elevator..
UDM - AY - Surgical Tooth Extraction
II- The open-window technique:
A, The open-window approach for retrieving the root is indicated when
buccocrestal bone must be maintained.
B, A bur is used to uncover the apex of the root and to allow sufficient access for
the insertion of the straight elevator.
C, The small straight elevator is then used to displace the root out of the tooth
socket..
UDM - AY - Surgical Tooth Extraction
General Steps of Surgical Extractions
➢ Reflect the suitable flap.
➢ Remove a small portion of crestal bone to expose the edge or the
furcation of the root.
➢ Remove the tooth or the root with the suitable technique.
➢ Check the bone edges; if sharp, smooth it with a bone file.
➢ Irrigate the entire surgical field with sterile saline.
➢ Set the flap in its original position and sutured into place with 3-0
black silk or chromic gut sutures..
JUSTIFICATION FOR LEAVING ROOT FRAGMENTS
The surgeon may consider leaving the root fragments if:
➢ Closed (simple) approaches of removal have been unsuccessful.
➢ Open (Surgical) approach may be excessively traumatic.
➢ The risks of removing a small root tip may outweigh the benefits:
• Cause excessive destruction of surrounding tissue.
• If excessive amounts of bone must be removed to retrieve the root.
• Risk of displacing the root into tissue spaces or into maxillary sinus.
➢ Three conditions should exist for a tooth root to be left:
• The root fragment should be no more than 4 to 5 mm in length.
• The root must be deeply embedded in bone and not superficial.
• The tooth involved must NOT be infected.
Consider the record in Pt’s chart, radiographic documentation,
inform the patient and follow-up..
UDM - AY - Surgical Tooth Extraction
MULTIPLE EXTRACTIONS
❖ Treatment Planning:
➢ Pre-extraction planning with regard to the replacement of the
teeth to be removed.
➢ The need for any other type of soft or hard tissue surgery such
as tuberosity reduction or the removal of undercuts or exostoses
in critical areas.
➢ If dental implants are to be placed immediately or at a later
time..
UDM - AY - Surgical Tooth Extraction
❖ Extraction Sequencing:
➢ Maxillary teeth should usually be removed first: WHY?
• An infiltration anesthetic has a more rapid onset and also
disappears more rapidly.
• During the extraction process, debris may fall into the empty
sockets of the lower teeth.
• Maxillary teeth are removed mainly by buccal not vertical force.
Disadvantage of extracting maxillary teeth first, the hemorrhage may
interfere with visualization during mandibular surgery.
➢ Posterior first.
➢ The most difficult last.
Removal of the teeth on either side weakens the bony socket on the
mesial and distal sides of these teeth,
and their subsequent extraction is made more straightforward..
UDM - AY - Surgical Tooth Extraction
❖ Technique for Multiple Extractions:
A, This patient’s remaining mandibular teeth are to be extracted.
B, The soft tissue attachment to teeth is incised with the No. 15 blade.
C, The periosteal elevator is used to reflect labial soft tissue just to
the crest of labioalveolar bone..
UDM - AY - Surgical Tooth Extraction
D, The teeth in the quadrant are luxated with the straight elevator
and then delivered with forceps in the usual fashion.
E, Rongeur forceps are used to remove only bone that is sharp and
protrudes above reapproximated soft tissue.
F, The buccolingual plates are pressed into their pre-existing
position with firm pressure unless implants are planned..
UDM - AY - Surgical Tooth Extraction
G, Tissue is closed with interrupted black silk sutures across the
papilla.
H, The patient returns for suture removal 1 week later.
I, Normal healing has occurred, and sutures are ready for removal..
Thank You For
Your Kind Attention
yakanab@udmercy.edu
UDM - AY - Surgical Tooth Extraction
Principles of Wound and Bone Healing
Abed Yakan
DDS, PGDip, MS, PhD - OMFS
Division of Clinical Dentistry - Oral & Maxillofacial Surgery
University of Detroit Mercy
UDM - AY - Principles of wound and bone healing
Contents
❑ Causes of Tissue Damage.
❑ Wound Repair.
❑ Healing of Extraction Sockets.
❑ Bone Healing.
UDM - AY - Principles of wound and bone healing
❑ Causes of Tissue Damage
Traumatic Injuries (Physical or Chemical).
Physical:
• Compromised blood flow.
• Crushing.
• Desiccation.
• Incision.
• Irradiation.
• Overcooling.
• Overheating..
UDM - AY - Principles of wound and bone healing
Chemical:
• Agents with unphysiologic PH.
• Agents with unphysiologic tonicity.
• Proteases.
• Vasoconstrictors.
• Thrombogenic agents..
UDM - AY - Principles of wound and bone healing
❑ Wound Repair
Epithelialization
➢ The Injured epithelium has a genetically programmed regenerative ability that allows it
to re-establish its integrity through proliferation, migration, and a process known as
contact inhibition. (Contact inhibition is a regulatory mechanism that functions to keep cells growing into a layer
one cell thick “a monolayer”. If a cell has plenty of available substrate space, it replicates rapidly and moves freely. This
process continues until the cells occupy the entire substratum).
➢ Wounds in which only the surface epithelium is injured (i.e., abrasions) heal by the
proliferation of epithelium across the wound bed.
➢ Wounds in which the subepithelial tissue is also damaged proliferates across whatever
vascularized tissue bed is available and stays under the portion of the superficial blood
clot that desiccates (i.e., forms a scab) until it reaches another epithelial margin..
UDM - AY - Principles of wound and bone healing
Stages of Wound Healing
These three basic stages are:
I. Inflammatory.
II. Fibroblastic.
III. Remodeling..
UDM - AY - Principles of wound and bone healing
I. Inflammatory stage (Lag Phase):
➢ Begins the moment tissue injury occurs and lasts 3 to 5 days.
➢ It has two phases: (1) vascular and (2) cellular.
(1) The vascular Phase: A. Vasoconstriction B. Vasodilation.
(2) The cellular phase:
Tissue trauma activate complement factors C3a and C5a.
C3a and C5a act as chemotactic factors causing neutrophil margination and migration.
The neutrophils release the contents of their lysosomes.
The lysosomal enzymes work to destroy bacteria and digest necrotic tissue.
Inflammatory stage of wound repair:
✓ Wound fills with clotted blood, inflammatory cells, and plasma.
✓ Adjacent epithelium begins to migrate into wound.
✓ Undifferentiated mesenchymal cells transform into fibroblasts..
UDM - AY - Principles of wound and bone healing
▪ The cardinal signs of inflammation: Redness (i.e., Erythema).
Swelling (i.e., Edema).
Warmth.
Pain.
Loss of function.
▪ The inflammatory stage is sometimes referred to as the lag phase, because the
principal material holding a wound together is fibrin, which possesses little tensile
strength..
UDM - AY - Principles of wound and bone healing
II. Fibroblastic stage:
➢ The strands of fibrin forming a latticework.
➢ fibroblasts begin laying down ground substance
and tropocollagen.
• The ground substance cements collagen fibers.
• Fibroblasts also secrete fibronectin.
✓ Helps stabilize fibrin.
✓ Acts as a chemotactic factor for fibroblasts.
• Existing vessels forms new capillaries buds.
• Fibroblasts deposit tropocollagen to produce
collagen to strengthen the healing wound.
• Collagen is laid down randomly.
• Wound will be able to withstand 70% to 80% as
much tension as uninjured tissue.
➢ Fibroblastic stage normally lasts 2 to 3 weeks..
UDM - AY - Principles of wound and bone healing
III. Remodeling stage:
➢ Many of randomly laid collagen fibers are
replaced by new oriented collagen fibers.
➢ The excess collagen fibers are removed,
which allows the scar to soften.
➢ Wound strength increases not more than
80% to 85% of the strength of uninjured
tissue.
➢ Wound metabolism lessens, vascularity is
decreased, which diminishes wound
erythema..
UDM - AY - Principles of wound and bone healing
Factors That Impair Wound Healing
Local Factors:
(1)Foreign material inflammatory - infection.
(2)Necrotic tissue prolonged inflammatory stage - nutrient source for bacteria.
(3)Ischemia increases the chances of wound infection.
(4)Wound tension reopen the wound and heal with excessive scar formation ..
UDM - AY - Principles of wound and bone healing
Systemic Factors:
UDM - AY - Principles of wound and bone healing
Methods of Wound Healing
Primary, Secondary, and Tertiary Intention.
➢ Healing by primary intention:
• No tissue loss.
• Stabilized in the same anatomic position they held before injury and are allowed to heal.
• Healing occurs more rapidly.
• lower risk of infection.
• less scar formation..
UDM - AY - Principles of wound and bone healing
➢ Healing by secondary intension:
• A gap is left between the edges of an incision.
• Tissue loss has occurred in a wound that prevents approximation of wound edges.
• Require a large amount of epithelial migration, collagen deposition, contraction, and
remodeling during healing.
• Healing is slower.
• Produces more scar tissue.
Extraction sockets are examples of wounds that heal by secondary intention..
UDM - AY - Principles of wound and bone healing
Healing by tertiary intention:
• Delay closing a wound, such as when there is poor circulation in the wound area or
infection.
• Healing is slower.
• Produces scar tissue.
• Some surgeons use the term tertiary intention to refer to the healing of wounds through
the use of tissue grafts to cover large wounds and bridge the gap between wound edges..
UDM - AY - Principles of wound and bone healing
❑ Healing of Extraction Sockets
➢ Sockets heal by secondary intention.
➢ When a tooth is removed, the remaining empty socket consists of cortical bone covered by
torn periodontal ligaments, with a rim of oral epithelium (gingiva) left at the coronal
portion.
➢ Healing of extraction sockets starts immediately after extraction and lasts several months..
UDM - AY - Principles of wound and bone healing
1st Week Of Healing
• The socket fills with blood, which coagulates and seals the socket from the oral
environment.
• White blood cells enter the socket to remove bacteria and debris.
• Ingrowth of fibroblasts and immature capillaries.
• Re-epithelialization and granulation tissue formations.
• Osteoclasts accumulate along the crestal bone..
UDM - AY - Principles of wound and bone healing
2nd – 4th Week Of Healing:
• large amount of granulation tissue fills the socket.
• Osteoid deposition has begun along the alveolar bone lining the socket.
• Epithelialization of most sockets complete at this time.
• The cortical bone continues to be resorbed from the crest and walls of the socket.
• New trabecular bone is laid down across the socket..
UDM - AY - Principles of wound and bone healing
4th – 6th Month Of Healing:
• The cortical bone lining a socket usually fully resorbed (this is recognized radiographically
by a loss of a distinct lamina dura).
• The bone fills the socket.
• The epithelium moves toward the crest and becomes at the level of adjacent crestal
gingiva.
• The only visible remnant of the socket after 1 year is the rim of fibrous (scar) tissue that
remains on the edentulous alveolar ridge..
❑ Bone Healing
➢ 3stages: inflammation, fibroblastic and
remodeling, with primary or secondary intention.
➢ Osteoblasts and osteoclasts are involved.
I. Early Phase of fibroblastic stage of bone repair :
• Osteogenic cells from periosteum and marrow
proliferate and differentiate into osteoblasts,
osteoclasts, and chondroblasts, and capillary
budding begins.
• Osteogenic cells resorb necrotic bone and bone
that needs to be remodeled.
• Osteoblasts then lay down osteoid, which, if
immobile during healing, usually goes on to
calcify.. Early phase of fibroblastic stage of bone repair.
UDM - AY - Principles of wound and bone healing
II. Late phase of fibroblastic stage of bone repair:
• Large amount of collagen must be laid down
to bridge the bony gap.
• The fibroblasts produce so much fibrous
matrix and form what is called a callus.
• Osteoclasts resorb necrotic bone.
• Chondroblast lay down cartilage.
• Osteoblast lay down bone.
• Capillary ingrowth continues.
• Internal and external calluses form.. Late phase of fibroblastic stage of bone repair.
UDM - AY - Principles of wound and bone healing
Remodeling stage of bone repair:
• Osteoclasts remove unnecessary bone.
• Osteoblasts lay new bone tissue.
• New Haversian systems develop.
• Calluses gradually decrease in size..
Remodeling stage of bone repair
UDM - AY - Principles of wound and bone healing
Healing of bone by primary intention:
➢ Bone is incompletely fractured or in “greenstick fracture”.
➢ Anatomic reduction of the fracture.
Little fibrous tissue is produced, and reossification occurs quickly..
UDM - AY - Principles of wound and bone healing
Two factors are important to proper bone healing:
(1) Vascularity.
(2) Immobility.
❖ If vascularity or oxygen supplies are:
• Sufficient bone will form.
• Sufficiently compromised cartilage will form.
• Poor the fibrous tissue does not chondrify or ossify.
❖ Mobility at the site:
• Compromise vascularity of the wound.
• Formation of cartilage or fibrous tissue, rather than bone along the fracture line..
Thank You For
Your Kind Attention
yakanab@udmercy.edu
Office Hours by Appointment - Room 358
UDM - AY - Principles of wound and bone healing
Perioperative Complications of Tooth Extraction
Abed Yakan
DDS, PGDip, MS, PhD - OMFS
Division of Clinical Dentistry - Oral & Maxillofacial Surgery
University of Detroit Mercy
UDM - AY - Perioperative Comp. of Tooth Ex.
Contents
❑ Prevention Of Complications.
❑ Soft Tissue Injuries.
❑ Problems With A Tooth Being Extracted.
❑ Injuries To Adjacent Teeth.
❑ Injuries To Osseous Structures.
❑ Injury To Regional Nerves..
UDM - AY - Perioperative Comp. of Tooth Ex.
❑ Prevention of Complications
1. The best and easiest way to manage a surgical complication is to prevent it from ever
happening;
• Thorough preoperative assessment.
• Comprehensive treatment plan.
• Careful execution of the surgical procedure.
• The complication is often predictable and can be managed routinely.
UDM - AY - Perioperative Comp. of Tooth Ex.
2. Dentists must perform surgery that is within the limits of their capabilities;
• Evaluate their training and abilities before deciding to perform a specific surgical task.
• Be cautious of unwarranted optimism.
• Keep in mind that referral to a specialist..
UDM - AY - Perioperative Comp. of Tooth Ex.
3. Thorough review of the patient’s medical history.
4. Obtain adequate images and carefully reviewing them.
5. Follow basic surgical principles.
6. Thorough preoperative instructions and explanations for the patient
7. Follow the principles of asepsis, atraumatic handling of tissues, hemostasis, and
thorough débridement of the wound after the surgical procedure.
➢ Controlled Force Is of Paramount Importance; This Means “Finesse,” Not “Force”..
UDM - AY - Perioperative Comp. of Tooth Ex.
❑ Soft Tissue Injuries
The surgeon must continue to pay careful attention to soft tissue
while working on bone and tooth structures..
Almost always the result of the:
➢ Surgeon’s lack of adequate attention to the delicate nature of the mucosa.
➢ Attempts to do surgery with inadequate access.
➢ Rushing during surgery.
➢ Use of excessive and uncontrolled force.
UDM - AY - Perioperative Comp. of Tooth Ex.
❖ Tear of a Mucosal Flap
➢ Inadequate envelope flap, which is then forcibly retracted beyond the ability of the tissue
to stretch as the surgeon tries to gain needed surgical access.
➢ Inadequate care during its reflection.
➢ Prevention of this complication is threefold:
(1) Creating adequately sized flaps to prevent excess tension on the flap.
(2) Using controlled amounts of retraction force on the flap.
(3) Creating releasing incisions, when indicated.
➢ Treatment:
• Careful suturing of the tear results in adequate, but somewhat delayed, healing.
• Excising the edges of the torn flap to create a smooth flap margin before closure.
• Avoid excision of excessive amounts of tissue which leads to closure under tension!..
UDM - AY - Perioperative Comp. of Tooth Ex.
❖ Puncture Wound
➢ Instruments may slip and puncture or tear into adjacent soft tissue.
➢ Prevention of this complication is threefold:
• Use of controlled force.
• Using finger support from the opposite hand if slippage is anticipated.
➢ Treatment:
• Control bleeding by direct pressure applied to the wound.
• The wound is usually left open un-sutured (adequate pathway for drainage)..
❖ Stretch or Abrasion or Burn
➢ Abrasions or burns to lips, corners of the mouth, or flaps usually result from a metal
retractor or from the hand pieces (a combination of friction and heat damage).
➢ Prevention of this complication:
• The assistant and the surgeon should be aware of the location of the shank of the bur.
➢ Treatment:
• If an area of oral mucosa is abraded or burned regular oral rinsing.
• If an area of skin is abraded or burned keep it covered with an antibiotic ointment..
UDM - AY - Perioperative Comp. of Tooth Ex.
❑ Problems With A Tooth Being Extracted
❖ Root Fracture:
➢ The most common problem associated with the tooth being extracted.
➢ Prevention of this complication:
• Perform an open extraction technique and remove bone to decrease the amount of force
necessary to remove the tooth.
❖ Root Displacement
I. Displacement into the Maxillary Sinus (Oro-antral communication).
➢ Maxillary molar or root can be displaced, If this occurs; the surgeon must:
• Apply (Valsalva maneuver) after extraction;
Observe bubbling from socket when patient tries to exhale
gently through their nose while nostrils are pinched.
• Identify the size of the root lost into the sinus.
• Assess whether there has been any infection of the tooth or periapical tissues.
• Assess the preoperative condition of the maxillary sinus.
UDM - AY - Perioperative Comp. of Tooth Ex.
➢ Prevention of this complication:
• Preoperative radiographs evaluation:
✓ Maxillary sinus pneumatization.
✓ The bone between the teeth and the sinus.
• Be careful during the luxation of a root tip.
UDM - AY - Perioperative Comp. of Tooth Ex.
➢ Treatment (OAC):
1. If the communication and displaced fragment is a 2-3 mm, no pre-existing infection:
• A radiograph should be taken to document its position and size.
• Make a brief attempt at removing the root (Irrigation and suction).
• If this technique is not successful, leave it in the sinus (will fibrose onto the sinus membrane).
• The patient must be informed and given proper follow-up instructions.
• The oroantral communication should be managed with:
✓ Gelfoam sponge and a “figure-of-eight” suture over the socket.
✓ Sinus precautions (Avoid blowing the nose, sneezing, sucking on straws and smoking).
✓ Antibiotics.
✓ And a nasal spray to lessen the chance of infection by keeping the ostium open..
UDM - AY - Perioperative Comp. of Tooth Ex.
2. If the tooth root is infected or the patient has chronic sinusitis.
If a large root fragment or the entire tooth is displaced into the maxillary sinus.
If Impacted maxillary third molars are displaced into the maxillary sinus.
The patient should be referred to an oral-maxillofacial surgeon for removal of the root tip
via a Caldwell-Luc or endoscopic approach..
UDM - AY - Perioperative Comp. of Tooth Ex.
II. Displacement into the infratemporal space.
➢ During elevation of the Impacted maxillary third molars , the elevator may force the tooth
posteriorly through the periosteum into the infratemporal fossa.
➢ The tooth is usually lateral to the lateral pterygoid plate and inferior to the lateral
pterygoid muscle.
➢ The dentist should make a single cautious effort to retrieve the tooth with a hemostat.
➢ If the tooth is not visible, don’t attempt..
UDM - AY - Perioperative Comp. of Tooth Ex.
➢ If the tooth is not retrieved after a single effort, the incision should be closed, and the
operation stopped.
➢ The patient should be informed that the tooth has been displaced and will be removed later.
➢ Antibiotics should be given to help decrease the possibility of an infection.
➢ During the initial healing time, fibrosis occurs and stabilizes the tooth in a firm position.
➢ The tooth is removed later by an oral-maxillofacial surgeon after radiographic localization..
UDM - AY - Perioperative Comp. of Tooth Ex.
III. Displacement into the submandibular space.
➢ If the lingual cortical bone was thin; even small amounts of apical pressure during
extraction of mandibular teeth or roots can result in displacement it into that space.
➢ The dentist should make a single effort to remove it.
➢ The index finger is inserted onto the lingual aspect in an attempt to place pressure against
the lingual aspect of the mandible and force the root back into the socket.
➢ If this effort is not successful at the initial attempt, the dentist should abandon the
procedure and refer the patient to an oral-maxillofacial surgeon.
➢ If the root fragment is small and was not infected preoperatively, the surgeon may elect
to leave the root in its position because surgical retrieval of the root may be an extensive
procedure or risk serious injury to the lingual nerve..
UDM - AY - Perioperative Comp. of Tooth Ex.
III. Tooth Lost Into The Pharynx
➢ The crown of a tooth or an entire tooth might be lost into the pharynx:
▪ The patient should be placed into a position with the mouth facing the floor.
▪ The patient should be encouraged to cough and spit the tooth out onto the floor.
▪ The suction device can sometimes be used to help remove the tooth.
▪ In spite of these efforts, the tooth may be swallowed or aspirated..
UDM - AY - Perioperative Comp. of Tooth Ex.
➢ If the tooth has been swallowed:
• It will pass through the gastrointestinal tract within 2 to 4 days.
• Because teeth are not usually sharp, unimpeded passage occurs in almost all situations.
• It may be prudent to have the patient go to an emergency room and have a radiograph of
the abdomen taken to confirm that the tooth is, indeed, in the gastrointestinal tract and
not in the respiratory tract.
• Follow-up radiographs are probably not necessary because swallowed teeth are
ultimately passed out along with feces..
UDM - AY - Perioperative Comp. of Tooth Ex.
➢ If the patient has a violent episode of coughing or shortness of breath:
• The tooth may have been aspirated through the vocal cords.
• The patient should be transported to an emergency room.
• Chest and abdominal radiographs should be taken to determine the location of the tooth.
• The urgent management of aspiration is to maintain the patient’s airway and breathing.
• Supplemental oxygen may be appropriate if signs of respiratory distress are observed..
UDM - AY - Perioperative Comp. of Tooth Ex.
❑ Injuries To Adjacent Teeth
I. Fracture or Dislodgment of an Adjacent Restoration:
➢ If a large restoration exists, the dentist should warn the patient preoperatively about the
possibility of fracturing or displacing it during the extraction.
➢ Prevention of such a fracture or displacement:
• Avoiding application of instrumentation and force on the restoration.
• Straight elevator should be inserted entirely into the periodontal ligament space, or not
used at all to luxate the tooth before extraction.
• The patient should be informed if a fracture of a tooth or restoration has occurred and
that a replacement restoration is needed..
UDM - AY - Perioperative Comp. of Tooth Ex.
II. Chipping or Fracturing A Cusp of The Opposite Tooth:
➢ If excessive tractional forces are used, the forceps strikes the teeth of the opposite arch,
chipping or fracturing a cusp.
➢ This is more likely to occur with extraction of lower teeth because these teeth may
require more vertical tractional forces for their delivery.
➢ Prevention of this type of injury can be accomplished by:
▪ Avoid the use of excessive tractional forces.
▪ Adequately luxate the tooth with apical, buccolingual, and rotational forces to minimize
the need for tractional forces.
▪ The dentist or assistant should protect the teeth of the opposite arch.
▪ If such an injury occurs, the tooth should be smoothed or restored..
UDM - AY - Perioperative Comp. of Tooth Ex.
III. Luxation of an Adjacent Tooth
➢ Inappropriate use of the extraction instruments may luxate an adjacent tooth.
➢ Forceps with broader beaks should be avoided because they will cause injury and luxation
of adjacent teeth.
➢ If an adjacent tooth is significantly luxated:
• Reposition the tooth into its appropriate position and stabilize it.
• Avoid hyperocclusion and traumatic occlusion.
• The luxated tooth should be stabilized with semirigid fixation:
✓ A simple silk suture that crosses the tooth is usually sufficient.
✓ Avoid rigid fixation with wires; it may result in external root resorption and ankylosis..
UDM - AY - Perioperative Comp. of Tooth Ex.
IV. Extraction of the Wrong Tooth
➢ Extraction of the wrong tooth should never occur.
➢ This is usually the most common cause of malpractice lawsuits against dentists.
➢ A common reason is that a dentist removes a tooth for another dentist:
✓ The use of differing tooth numbering systems or
✓ Differences in the mounting of radiographs.
✓ When the dentist is asked to remove teeth for orthodontic purposes.
An attentive clinical assessment of the tooth to be removed
before the elevator and forceps are applied
are the main methods of preventing this complication.
UDM - AY - Perioperative Comp. of Tooth Ex.
➢ If the surgeon realizes this error immediately:
• The tooth should be replaced quickly into the tooth socket.
• The tooth should be stabilized with semirigid fixation.
• The correct extraction should be deferred for 4 or 5 weeks until the fate of the replanted
tooth can be assessed.
• If the wrongfully extracted tooth has regained its attachment to the alveolar process, then
the originally planned extraction may proceed.
➢ If the surgeon does not realize this error immediately:
• Little can be done to correct the problem.
• Replantation of the extracted tooth after it has dried cannot be successfully accomplished.
➢ When the wrong tooth is extracted:
• Inform the patient and any other dentist involved with the patient’s care.
• The orthodontist may be able to adjust the treatment plan.
• a dental implant–supported restoration may totally restore the patient’s dental status as
it was before the inadvertent extraction..
UDM - AY - Perioperative Comp. of Tooth Ex.
❑ Injuries To Osseous Structures
I. Fracture of the Alveolar Process
➢ Instead of expanding, the bone fractures and is removed with the tooth.
➢ These bone injuries are caused by excessive force from the forceps.
➢ The most likely places for bone fractures are:
• The buccal cortical plate over the maxillary canine.
• The buccal cortical plate over maxillary first molars.
• The portions of the floor of the maxillary sinus that are associated with maxillary molars.
• The maxillary tuberosity.
• The labial bone over mandibular incisors..
UDM - AY - Perioperative Comp. of Tooth Ex.
➢ Management:
• If the bone has been completely removed:
✓ It should not be replaced.
✓ Any sharp edges should be smoothed.
✓ Soft tissue should be repositioned over the remaining bone to prevent delayed healing.
• If the bone remains attached to the periosteum:
✓ Usually heals if it can be separated from the tooth and is left attached to the soft tissue.
✓ It is worth the special effort to dissect the bone from the tooth.
✓ The bone and the soft tissue flap are reapproximated and secured with sutures..
UDM - AY - Perioperative Comp. of Tooth Ex.
II. Fracture of A Large Section of Bone in The Maxillary Tuberosity:
➢ Fractures of the maxillary tuberosity should be viewed as a significant complication.
➢ Most commonly result from extraction of an erupted maxillary 2nd and 3rd third molar.
➢ The treatment is similar to that just discussed for other bone fractures.
➢ The major therapeutic goal of management is to maintain the fractured bone in place and
to provide the best possible environment for healing.
➢ This may be a situation that can best be handled by referral to an oral-maxillofacial
surgeon..
❑ Injury to Regional Nerves:
➢ Caused by reflecting flaps or by traumatic extractions.
➢ The most frequently involved specific branches are:
• The inferior alveolar nerve.
• The mental nerve.
• The lingual nerve.
• The buccal nerve
• The nasopalatine nerve.
UDM - AY - Perioperative Comp. of Tooth Ex.
➢ If the Inferior alveolar nerve or the mental nerve is injured, the patient will experience
temporary or permanent paresthesia of the lip and chin.
➢ If the lingual nerve is injured, the patient will experience paresthesia of the tongue; and it
rarely regenerates if it is severely traumatized .
➢ The nasopalatine and long buccal nerves can be surgically sectioned without long-lasting
sequelae or much bother to the patient..
Thank You For
Your Kind Attention
yakanab@udmercy.edu
Office Hours by Appointment - Room 358
UDM - AY - Perioperative Comp. of Tooth Ex.
Post-operative Complications of Tooth Extraction
Abed Yakan
DDS, PGDip, MS, PhD - OMFS
Division of Clinical Dentistry - Oral & Maxillofacial Surgery
University of Detroit Mercy
UDM - AY - Postoperative Comp. of Tooth Ex.
Contents
❑ Trismus.
❑ Postoperative bleeding.
❑ Postextraction granuloma.
❑ Painful postextraction socket.
❑ Delayed healing:
❖ Infection.
❖ Wound dehiscence.
❖ Dry socket.
UDM - AY - Postoperative Comp. of Tooth Ex.
❑Trismus
❖ Definition: Is a painful condition that restricts normal mandibular movement and function
as a result of masticatory musculature spasms.
UDM - AY - Postoperative Comp. of Tooth Ex.
❖ Treatment:
➢ Heat therapy:
• Hot mouth rinses.
• Hot compresses are placed extraorally.
➢ Gentle massage of the temporomandibular joint area.
➢ Physiotherapy: Mouth Spatula, Trismus Screw, TheraBite.
➢ Medications:
• Analgesics.
• Anti-inflammatory.
• Muscle Relaxant.
• Sedatives..
UDM - AY - Postoperative Comp. of Tooth Ex.
❑Postoperative Bleeding
- Arterial bleeding. - Blood oozing.
- Soft tissue bleeding. - Hard tissue bleeding.
❖ Challenges To The Hemostatic Mechanism:
➢ The mouth and jaws are highly vascular.
➢ The extraction leaves an open wound.
➢ It is almost impossible to apply dressing material with enough pressure.
➢ Patients tend to explore the area of surgery with their tongues.
➢ The tongue may also cause secondary bleeding by creating small negative pressures
that suction the blood clot from the socket.
➢ Salivary enzymes may lyse the blood clot..
UDM - AY - Postoperative Comp. of Tooth Ex.
❖ Prevention of Bleeding:
➢ Obtain a history of bleeding:
• Any existing problems with bleeding or coagulation?
• Family history of bleeding?
• Medications currently being taken that might interfere with coagulation?
• Drugs such as anticoagulants may cause prolonged bleeding after extraction?
• Severe liver disease tend to bleed excessively?
When coagulopathy is suspected:
• laboratory testing before surgery is performed.
• Hematologist consultation.
➢ Surgery should be as atraumatic as possible.
➢ Clean incisions and gentle management of soft tissue.
➢ Sharp bony spicules should be smoothed or removed.
➢ Granulation tissue should be curetted from the periapical region..
UDM - AY - Postoperative Comp. of Tooth Ex.
❖ Treatment of bleeding:
➢ Soft tissue bleeding:
• Arterial bleeding:
Clamping the artery with a hemostat and ligating it with a nonresorbable suture.
• Blood oozing:
Direct pressure..
UDM - AY - Postoperative Comp. of Tooth Ex.
➢ Bone bleeding:
• Arterial bleeding from small bony foramen:
✓ The foramen can be crushed with the end of a hemostat or closed by bone wax.
✓ The bleeding socket is covered with a damp gauze.
✓ The patient bites down firmly on this gauze for at least 30 minutes.
✓ The surgeon should not dismiss the patient until hemostasis has been achieved.
• Blood oozing:
The absorbable gelatin sponge (Gelfoam), oxidized regenerated cellulose (Surgicel) or collagen
can be placed in the socket to help gain hemostasis..
UDM - AY - Postoperative Comp. of Tooth Ex.
✓ This material is placed in the extraction socket and is held in place with a figure-
of-eight suture placed over the socket.
✓ A gauze pack is then placed over the top of the socket and is held with pressure.
UDM - AY - Postoperative Comp. of Tooth Ex.
❖ Hematoma (Prolonged Capillary Hemorrhage):
➢ blood accumulates inside the tissues, without any escape from the closed wound
or tightly sutured flaps under pressure.
➢ The hematoma may be submucosal, subperiosteal, intramuscular or fascial.
➢ Management:
• Placing cold packs extraorally during the first 24 h.
• Then heat therapy to help it to subside more rapidly..
UDM - AY - Postoperative Comp. of Tooth Ex.
❖ Secondary Bleeding:
➢ Patients occasionally call the dentist with bleeding from the extraction site, referred to as
secondary bleeding.
• The patient should return to the dentist.
• Such patients frequently have large “liver clots”
which must be removed from the mouth.
• All blood, saliva, and fluids should be suctioned from the mouth.
• The surgeon should determine the precise source of the bleeding.
• If it is clearly seen to be a generalized oozing, the bleeding site is covered with a folded,
damp gauze sponge held in place with firm pressure by the surgeon’s finger for 5 minutes.
• If hemostasis is NOT achieved, the dentist should request a consultation from a
hematologist, who will order typical screening tests..
UDM - AY - Postoperative Comp. of Tooth Ex.
❑Postextraction Granuloma
➢ Occurs 4–5 days after the extraction of the tooth.
➢ Presence of a foreign body in the alveolus.
➢ Foreign bodies irritate the area, so that postextraction healing ceases and there is
suppuration of the wound.
➢ Treatment: Debridement of the alveolus and removal of every causative agent..
UDM - AY - Postoperative Comp. of Tooth Ex.
❑Painful Postextraction Socket
➢ Occurs if the extractions are difficult and are performed with awkward manipulations.
➢ The uneven bone edges injure the soft tissues of the postextraction socket, resulting in
severe pain and inflammation at the extraction site.
➢ Treatment:
• Smoothing of the bone margins of the wound.
• Analgesics.
• Gauze impregnated with eugenol should be placed over the wound margins for 36–48 h..
UDM - AY - Postoperative Comp. of Tooth Ex.
❑Delayed healing
➢ General factors:
• Blood diseases (agranulocytosis, leukemia).
• Diabetes mellitus.
• Osteopetrosis.
• Osteoporosis.
➢ Local factors:
• Infection.
• Wound dehiscence.
• Dry socket.
• Inflammatory hyperplastic granuloma.
• Irradiated region.
• Benign and malignant neoplasms..
UDM - AY - Postoperative Comp. of Tooth Ex.
❖ Infection:
➢ The most common cause of delayed wound healing is infection.
➢ Infections are a rare complication after routine dental extraction.
➢ Careful asepsis and thorough wound débridement after surgery can best prevent
infection after surgical procedures..
UDM - AY - Postoperative Comp. of Tooth Ex.
❖ Wound Dehiscence:
➢ Separation of the wound edges.
➢ Prevention of Wound Dehiscence
1. Use aseptic technique.
2. Perform atraumatic surgery.
3. Close the incision over intact bone.
4. Suture without tension..
UDM - AY - Postoperative Comp. of Tooth Ex.
❖ Dry socket (alveolar osteitis - fibrinolytic alveolitis)
➢ It is the most common and painful in the healing of extraction wounds.
➢ It is NOT associated with an infection (without fever, swelling, and erythema).
➢ Develops on the third or fourth day after removal of the tooth.
➢ The occurrence of a dry socket:
• Rare after a routine tooth extraction (2% of extractions).
• Frequent after the removal of impacted mandibular third molars and other
lower molars (20% of extractions)..
UDM - AY - Postoperative Comp. of Tooth Ex.
➢ Clinical features:
• Throbbing pain, and frequently radiates to the patient’s ear.
• Empty socket, with lost blood clot.
• The bone surfaces of the socket are exposed.
• The area of the socket has a bad odor.
• The patient frequently complains of a foul taste..
UDM - AY - Postoperative Comp. of Tooth Ex.
➢ The causes of a dry socket:
• Is NOT fully clear, the predisposing factors are:
✓ Limited local blood supply.
✓ Local anaesthetics with adrenalin.
✓ Traumatic procedures and excessive forces.
✓ Oral contraceptive.
✓ Smoking.
✓ Osteosclerotic disease.
✓ Radiotherapy.
• The blood clot disintegrates and is dislodged.
• Appears to result from fibrinolytic activity results in lysis of the blood clot and subsequent
exposure of bone.
• Resulting in delayed healing and necrosis of the bone surface of the socket..
UDM - AY - Postoperative Comp. of Tooth Ex.
➢ Prevention of the dry socket:
• Minimize trauma.
• Control bacterial contamination in the area of surgery.
• Small amounts of antibiotics (e.G., Tetracycline) placed in the socket alone or on a
gelatin sponge have been shown to substantially decrease the incidence of dry
socket in mandibular third molars and other lower molar sockets.
• Placement of sutures to protect the blood clot.
• Preoperative and postoperative rinses with antimicrobial mouth rinses such as
chlorhexidine decrease the incidence of dry socket..
UDM - AY - Postoperative Comp. of Tooth Ex.
➢ The treatment of Dry Socket:
• The goal is relieving the patient’s pain during the period of healing.
• If the patient receives no treatment, no sequela other than continued pain exists
(treatment does not hasten healing).
• Treatment is straightforward and consists of irrigation and insertion of a medicated
dressing:
✓ The socket is gently irrigated with sterile saline.
✓ The socket should NOT be curetted because this increases the amount of exposed
bone and the pain.
✓ The socket is gently suctioned of all excess saline..
UDM - AY - Postoperative Comp. of Tooth Ex.
✓ A small strip of Gelfoam soaked in or coated with the medication.
✓ The medication contains:
o Eugenol, which obtunds the pain from the bone tissue.
o A topical anesthetic such as benzocaine.
o Carrying vehicle such as balsam of peru.
UDM - AY - Postoperative Comp. of Tooth Ex.
✓ The medicated gauze is gently inserted into the socket, and the patient usually experiences
profound relief from pain within 5 minutes.
✓ The dressing is changed every other day for the next 3 to 6 days, depending on the severity
of pain.
✓ The socket is gently irrigated with saline at each dressing change.
✓ Once the patient’s pain decreases, the dressing should not be replaced because it acts as a
foreign body and further prolongs wound healing..
Thank You For
Your Kind Attention
yakanab@udmercy.edu
Office Hours by Appointment - Room 358
UDM - AY - Postoperative Comp. of Tooth Ex.
OS Clinic Protocol & Extraction Evaluation
Abed Yakan
DDS, PGDip, MS, PhD - OMFS
Division of Clinical Dentistry - Oral & Maxillofacial Surgery
University of Detroit Mercy
UDM - AY - OS Clinic Protocol & Ex. Evaluation
Contents
❑ OS clinic protocol.
❖ Personal requirements in the oral surgery clinic.
❖ Before start check.
❖ Instrument tray systems.
❖ During the procedure.
❖ After the procedure.
❑ Extraction evaluation.
OS Clinic Protocol
UDM - AY - OS Clinic Protocol & Ex. Evaluation
Personal requirements in the oral surgery clinic:
• Cleanliness and neat appearance.
• Finger nails properly trimmed.
• Open-toed shoes are not permitted.
• Long hair must be appropriately tied back.
• Jewelry cannot be worn during times of treatment..
UDM - AY - OS Clinic Protocol & Ex. Evaluation
• Wear mask, gloves, eye protection and gown
while caring for patients in the OMS Clinic.
• Scrub your hands before beginning any
treatment and after touching any unclean
object during treatment.
• Continuously apply all other rules of clean
and/or sterile technique as described in the
School’s Infection Control Guidelines..
Before start check
1. Cases will be assigned to you by OS front desk,
2. Call the patient form waiting area and seat your patient,
3. Open the patient’s Axium Chart and collect all the information needed,
4. Review the patient’s past and current medical findings and current surgical needs,
5. Complete focused patient assessment..
UDM - AY - OS Clinic Protocol & Ex. Evaluation
6. Sign the required consents (oral surgery, and postoperative),
7. Be prepared to answer any questions about the patient medical history, consults
responses, and the procedure to be done,
8. Present the case to the attending OS faculty and get the start check.
No treatment may be undertaken without the faculty’s authorization..
UDM - AY - OS Clinic Protocol & Ex. Evaluation
Instrument Tray Systems:
➢ Standard sets of instruments are packaged together, sterilized, and then unwrapped at
surgery.
➢ The basic extraction tray includes:
• local anesthesia syringe, a needle, a local anesthesia cartridge.
• Periosteal elevator.
• Periapical curette.
• Small and large straight elevator.
• Pair of college pliers.
• Curved hemostat.
• Minnesota retractor.
• Suction tip.
• 2 × 2-inch or 4 × 4-inch gauze.
** The required forceps would be added to this tray..
UDM - AY - OS Clinic Protocol & Ex. Evaluation
➢ The surgical extraction tray includes:
• The items from the basic extraction tray.
• Needle holder and suture.
• Suture scissors.
• Blade handle and blade.
• Adson tissue forceps.
• Bone file.
• Tongue retractor.
• Cryer elevators.
• Rongeur.
• Handpiece and bur..
UDM - AY - OS Clinic Protocol & Ex. Evaluation
During the procedure:
➢ In case of complication ask the attending faculty for help.
➢ OS faculty permission is mandatory for:
• Use of LA more than 2 Lidocaine.
• Check out surgical kit.
• Check out and use of sharp elevators.
• Use of the scalpel or drill.
➢ Avoid breaching infection control:
• Use the appropriate PPE.
• No Instruments’ packs on the tray.
• No Used gloves on the tray.
• Don’t touch the needle with any surface before injection or before recapping
• Don’t touch the keyboard or mouse with gloved hands.
• Avoid any contact between contaminated PPE and surfaces, clothing or people.
• Discard used PPE in appropriate disposal bags..
UDM - AY - OS Clinic Protocol & Ex. Evaluation
After the procedure:
➢ Ask the attending faculty to check the case.
➢ Complete the codes.
➢ Write the prescription.
➢ Write the detailed post operative note.
➢ All electronic notes and other data must be approved and signed off by the supervising
faculty prior to discharging the patient.
➢ Walk your patient out.
➢ All “sharps” first removed from the instrument tray and properly disposed.
➢ Return the tray and all instruments.
➢ Clean the chair and the cubicle to receive another patient.
**In case of injury during procedure, fill an incidence report and sign from attending faculty..
Extraction Evaluation
UDM - AY - OS Clinic Protocol & Ex. Evaluation
I. Medical/Dental History Review/Prevention of Emergencies:
➢ Complete, orderly and concise verbal presentation to faculty with no inaccuracies.
➢ Emergencies are prevented.
➢ The need for premedication and antibiotic prophylaxis are recognized and verified..
UDM - AY - OS Clinic Protocol & Ex. Evaluation
II. Pain Management:
➢ Ensures sufficient anesthesia is achieved prior to initiation of procedure.
➢ Demonstrates thorough knowledge of local anesthetic drugs.
➢ Demonstrates thorough knowledge of local anesthesia dosage and its complications..
UDM - AY - OS Clinic Protocol & Ex. Evaluation
III. Surgical Management:
➢ Demonstrates thorough knowledge of surgical instruments and their appropriate use
including recognition of any untoward events (incomplete tooth removal).
➢ Maintains appropriate protection of adjacent teeth and structures .
➢ Maintains appropriate patient and operator positioning..
UDM - AY - OS Clinic Protocol & Ex. Evaluation
IV. Soft tissue Management:
➢ Demonstrates or maintains protection of adjacent soft tissues.
➢ Provides proper flap or tissue reflection.
➢ Recognizes indication for sutures.
➢ Places appropriate sutures including type, number and location.
➢ Provides hemostasis..
UDM - AY - OS Clinic Protocol & Ex. Evaluation
V. Post operative Management:
➢ Demonstrates thorough knowledge and provision of postoperative instructions.
➢ After finishing the surgical procedure, oral and written instructions are given to the
patient, concerning exactly what to do in the next few days..
UDM - AY - OS Clinic Protocol & Ex. Evaluation
What makes you subject to standard not met?
• Wants to be told all the answers.
• Incomplete, disorganized presentation to faculty and/or contains inaccuracies.
• The need for premedication and antibiotic prophylaxis are not recognized and/or verified.
• Is not prepared for session (e.g., No custom tray, missing critical materials).
• Begins work without faculty approval.
• Inaccurately assesses the level of difficulty of the procedure.
• Pushes to provide care beyond your ability level.
• Works with a different faculty than directed.
• Emergencies are not prevented.
• Ignores or fails to communicate with the patient..
UDM - AY - OS Clinic Protocol & Ex. Evaluation
What makes you subject to standard not met?
• Demonstrates a lack of respect for patient’s culture.
• Shows lack of respect for the patient, staff or faculty.
• Insensitive to patient anxiety level.
• Breaches infection control guidelines.
• Runs overtime, you are responsible for significant delays in providing treatment.
• Cannot recognize when faculty assistance is needed.
• Do not ask for faculty assistance when it is needed.
• Argues with faculty.
• Does not disclose a significant problem to the faculty (e.G., Damage to adjacent tooth, etc.)
• Dismissing patient without check out..
UDM - AY - OS Clinic Protocol & Ex. Evaluation
What Makes You Fail in Competency?
➢ Missed informed consent.
➢ You missed relevant patient medical condition.
➢ You don’t know how to select type, dose and techniques of LA.
➢ Failure to recognize the proper needle length needed for the technique.
➢ Failure to achieve adequate pain management.
➢ Failure to recognize the proper instrument and the proper way for instrument use.
➢ Failure or incomplete tooth removal.
➢ Breaching infection control.
➢ Failure to Post-operative management and instructions.
➢ Failure to Diagnosis and management of post-operative complications.
➢ Ignorance in writing the prescription.
➢ Inability to evaluate your performance as part of self-assessment.
➢ Failure to pass the answer and question session..
UDM - AY - OS Clinic Protocol & Ex. Evaluation
See you in OS clinic
Thank You For
Your Kind Attention
yakanab@udmercy.edu
Office Hours by Appointment - Room 358
UDM - AY - OS Clinic Protocol & Ex. Evaluation
Post-extraction patient management
Abed Yakan
DDS, PGDip, MS, PhD - OMFS
Division of Clinical Dentistry - Oral & Maxillofacial Surgery
University of Detroit Mercy
UDM - AY - Post-extraction patient management
Contents:
I. Post-extraction care of tooth socket.
II. Post-extraction instructions.
III. Control of post-extraction hemorrhage.
IV. Control of post-extraction sequelae.
V. Post-extraction follow-up.
VI. Operative (post-extraction) note.
UDM - AY - Post-extraction patient management
I. Post-extraction Care of Tooth Socket
➢ The bottom of the socket is curetted carefully (as long as the tooth is nonvital) with a
periapical curette, to remove any periapical lesion from the area.
➢ The sharp alveolar margin is smoothed using rongeur forceps or a bone file .
➢ The lingual and buccal plates are compressed using finger pressure.
➢ Hemostasis is aided by the patient applying pressure on moistened gauze placed over
the socket for 30–45 min..
UDM - AY - Post-extraction patient management
II. Post-extraction Instructions
➢ Once the surgical procedure has been completed, patients should be given proper
instructions.
➢ The instructions should be given to the patient verbally and also written or printed on
paper.
➢ Postoperative instructions should explain what the patient is likely to experience, and
how to manage and control typical postoperative situations.
➢ These postoperative instructions should describe the most common complications.
➢ The instructions should also include a telephone number at which the surgeon or doctor
can be reached in an emergency..
UDM - AY - Post-extraction patient management
III. Control of Post-extraction Hemorrhage
➢ Place a small piece of moistened gauze directly over the socket.
➢ Large packs that cover the occlusal surfaces of the adjacent teeth is ineffective!
➢ Biting firmly on this gauze for at least 30 minutes.
➢ Ooze is normal for up to 24 hours after the extraction procedure.
➢ With more bleeding, reapplying the gauze for as long as 1 hour to gain control of bleeding.
➢ Biting on a tea bag for 30 minutes..
➢ AVOID the followings after extraction:
• All activities that disturb the blood clots.
• Talking minimum for 2 to 3 hours.
• Smoking for the first 12 hours.
• Sucking on a straw when drinking.
• Spiting during the first 12 hours.
• Strenuous exercise for the first 12 to 24 hours.
Prolonged oozing, bright red bleeding, or large clots in the patient’s mouth
are indications for a return visit..
UDM - AY - Post-extraction patient management
IV. Control of Post-extraction Sequelae
Pain and Discomfort:
➢ The surgeon must help the patient to have a realistic expectation of what type of pain
may occur after extraction.
➢ Patients who make a point of informing the surgeon that they expect a great deal of pain
after surgery should NOT be ignored or automatically told to take an (OTC) analgesic.
➢ The surgeon who spends some time discussing these issues with the patient before
surgery will be able to design the most appropriate analgesic regimen.
➢ It is important for the surgeon to assure patients that their postoperative discomfort
will be effectively managed..
UDM - AY - Post-extraction patient management
➢ Patients who are expected to have a higher level of pain
should be given a prescription analgesic that will control the pain.
➢ The patient should be told to take at least ibuprofen or acetaminophen postoperatively
to prevent initial discomfort when the effect of the local anesthetic disappears.
➢ The surgeon should also take care to advise the patient that the goal of analgesic
medication is management of pain and NOT elimination of all discomfort.
➢ The three characteristics of the pain that occur after routine tooth extraction:
(1) The pain is usually not severe and can be managed with mild OTC analgesics.
(2) The peak pain experience occurs about 12 hours after the extraction.
(3) Significant pain from extraction rarely persists longer than 2 days after surgery..
UDM - AY - Post-extraction patient management
➢ Postoperative pain is much more difficult to manage if administration of analgesic
medication is delayed until the pain is severe.
➢ The first dose of analgesic medication should be taken before the effects of the local
anesthetic subside, and it may take 60 to 90 minutes to become fully effective.
➢ All patients should be given instruction concerning analgesics before they are discharged..
UDM - AY - Post-extraction patient management
✓ Ibuprofen: NSAID - Has antiplatelet effect but not significant in postoperative bleeding.
✓ Acetaminophen: Does not interfere with platelet function.
✓ Opioids: Produce drowsiness and gastrointestinal upset.
The Drug Enforcement Administration (DEA) controls narcotic analgesics.
To write prescriptions for these drugs, the dentist must have a DEA permit and number..
UDM - AY - Post-extraction patient management
Diet:
➢ A high-calorie, high-volume liquid or soft diet is best for the first 12 to 24 hours.
➢ The patient must have an adequate intake of fluids, usually at least 2 liters (L), during the
first 24 hours.
➢ Food in the first 12 hours should be soft and cool to keep the local area comfortable and
have less tendency to cause local trauma or initiate rebleeding episodes.
➢ The patient should be advised to return to a normal diet as soon as possible.
➢ Patients who have diabetes should be encouraged to return to their normal insulin and
caloric intake as soon as possible..
UDM - AY - Post-extraction patient management
Oral Hygiene:
➢ Keeping the whole mouth reasonably clean results in a more rapid healing.
➢ May gently brush the teeth that are away from the area of surgery in the usual fashion.
➢ Avoid brushing the extraction site to prevent a new bleeding episode.
➢ Avoid disturbing sutures.
➢ The next day, patients should begin gentle rinses with dilute salt water.
➢ The water should be warm but not hot enough to burn the tissue.
➢ Most patients can resume their preoperative oral hygiene measures by the third or fourth
day after surgery..
UDM - AY - Post-extraction patient management
Edema:
➢ Simple single extraction will probably not result in swelling that the patient can see.
➢ Surgical extraction may result in moderately large amounts of swelling.
➢ Swelling usually reaches its maximum 36 to 48 hours.
➢ Swelling begins to subside on the third or fourth day.
➢ It is usually resolved by the end of the first week..
UDM - AY - Post-extraction patient management
What help in reduce swelling after extraction?
• Using Ice bag immediately for 20 min on and 20 min off for 12 to 24 hours.
• Second day, neither ice nor heat should be applied to the face.
• Third day, application of heat may help resolve the swelling more quickly.
• Sleeping in a more upright position by using extra pillows will help reduce facial edema..
UDM - AY - Post-extraction patient management
Prevention and Recognition of Infection:
➢ Adhere carefully to the basic principles of surgery:
• Minimize tissue damage.
• Remove sources of infection.
• Clean the wound.
➢ Patients with immune deficiency may require antibiotics to prevent infection.
➢ Antibiotics after routine extraction are usually not necessary in healthy patients.
➢ Infections after routine extractions are unusual..
UDM - AY - Post-extraction patient management
➢ The typical signs of infection are:
• Fever.
• Increased swelling.
• Reddening of skin.
• A foul taste in the mouth.
• Worsening pain 3 to 4 days after surgery.
• Oral wounds looked inflamed.
• Some purulence is usually present..
UDM - AY - Post-extraction patient management
Trismus: (limitation in mouth opening).
Trismus is usually not severe and does not hamper the patient’s normal activities.
How may it result?
➢ Trauma and the resulting inflammation involving the muscles of mastication:
• Surgical extraction of impacted mandibular third molars usually results in some degree of
trismus because the inflammatory response to the surgical procedure is sufficiently
widespread to involve several muscles of mastication.
➢ Multiple injections of the local anesthetic and penetrate the muscles:
• The muscle most likely to be involved is the medial pterygoid muscle, which may be
penetrated by the local anesthetic needle during the IAN block.
Patients should be warned that Trismus might occur and will likely resolve within a week..
UDM - AY - Post-extraction patient management
Ecchymosis:
➢ Blood oozes submucosally and subcutaneously, which appears as a bruise,
is known as ecchymosis.
➢ Ecchymosis is not dangerous and does not increase pain or infection.
➢ Ecchymosis is usually seen in older patients because of their:
• Decreased tissue tone,
• Increased capillary fragility,
• Weaker intercellular attachments.
➢ Typically, the onset of ecchymosis is 2 to 4 days after surgery and usually resolves within 7
to 10 days..
UDM - AY - Post-extraction patient management
V. Post-extraction Follow-up
➢ The surgeon can check the patient’s progress after the surgery.
➢ Uncomplicated procedures, a follow-up visit at 1 week is usually adequate.
➢ Sutures should be removed, as needed, at the 1-week postoperative appointment.
➢ If any problem arises, patient should request an earlier follow-up visit.
➢ The most likely reasons for an earlier follow-up visit are:
• Prolonged bleeding.
• Pain that is not responsive to the prescribed medication.
• And suspected infection.
• Dry socket..
UDM - AY - Post-extraction patient management
VI. Operative (Post-extraction) Note
➢ The surgeon must enter into the records a note of what transpired during each visit.
➢ Whenever surgery is performed, some critical factors should be entered into the chart:
These details may be recorded in various ways, depending on the software program used..
Post-extraction note (Simple)
•Extraction of tooth number(s):
•Vitals and chair-side tests: ---------------
•PMH, Meds, and Allergies reviewed.
•Risks and benefits of procedure reviewed.
•Consent read, signed, and understood.
•STO: student name, assistant name, faculty name, Time: -------- am / pm.
•Patient was prepped and draped in a normal oral surgical manner.
•----- carpules of -------was / were used to anesthetize the -------Nerve / Nerves.
•A periosteal elevator was used to separate the gingiva from the tooth/root.
•A straight elevator was then used to luxate the tooth.
•The tooth/root was removed using ----- forceps. *
• The extraction site was inspected and all granulation and / or infected tissue was removed.*
•A hemostatic pack was placed.
•The patient was given verbal and written post-operative instructions.
•The patient signed the postoperative instructions.
•There were no intraoperative complications, and the patient tolerated the procedure well.
•Good hemostasis was obtained, and the patient was discharged home.
•Follow-up: PRN / ------------
•Prescriptions: None / ------------
** Post-extraction note (Surgical) ADD:
• A full thickness buccal mucoperiosteal envelope flap was raised.
• The tooth was sectioned with a hall drill and removed using -------.
• The bone edges were smoothed with a bone file.
• The wound was irrigated with normal saline and debris were suctioned.
• The flap was replaced in its anatomic position and held with ---- sutures.
UDM - AY - Post-extraction patient management
Thank You For
Your Kind Attention
yakanab@udmercy.edu
Office Hours by Appointment - Room 358
UDM - AY - Post-extraction patient management

Simple Tooth Extraction dental extraction

  • 1.
    Simple Tooth Extraction AbedYakan DDS, PGDip, MS, PhD - OMFS Division of Clinical Dentistry - Oral & Maxillofacial Surgery University of Detroit Mercy UDM - AY - Simple Tooth Extraction
  • 2.
    UDM - AY- Simple Tooth Extraction Contents: ❑ Patient and Surgeon Preparation. ❑ Chair Position for Extractions. ❑ Mechanical Principles Involved In Tooth Extraction. ❑ Principles of Elevator and Forceps Use. ❑ Procedure for Closed (Simple) Extraction. ❑ Specific Techniques for The Removal of Each Tooth.
  • 3.
    UDM - AY- Simple Tooth Extraction ❑ PATIENT AND SURGEON PREPARATION ➢Surgeons must prevent transmission of infection. ➢All patients must be viewed as having bloodborne diseases. ➢Long-sleeved gowns, surgical gloves, surgical mask, and eyewear with side-shields are required.
  • 4.
    UDM - AY- Simple Tooth Extraction ➢A sterile waterproof drape should be put across the patient’s chest to decrease the risk of contamination. ➢Patient should rinse their mouths vigorously with an antiseptic. ➢Place a partially unfolded 4 × 4 inch gauze loosely into the back of the mouth to serve as a barrier to catch the tooth or fragments rather than be swallowed or aspirated..
  • 5.
    UDM - AY- Simple Tooth Extraction ❑ CHAIR POSITION FOR EXTRACTIONS ➢ Comfortable for the patient and surgeon. ➢ Allows the surgeon to have maximal control of the force that is being delivered to the patient’s tooth. ➢ Allows the surgeon to keep the arms close to the body and provides stability and support. ➢ Also allows the surgeon to keep the wrists straight enough to deliver the force with the arm and shoulder, and not with the fingers or hand. ➢ Can control the sudden loss of resistance from a tooth. ➢ Dentists usually stand during extractions..
  • 6.
    UDM - AY- Simple Tooth Extraction ➢ Position of dental chair during extraction. a. Maxilla: angle between dental chair and the horizontal (floor) is 120°. b. Mandible: angle between dental chair and the horizontal (floor) is 110°..
  • 7.
    UDM - AY- Simple Tooth Extraction ❖ The most common error dentists make in positioning the dental chair for extractions is to have the chair too high. ➢ This forces the surgeons to operate with their shoulders raised. ➢ Making it difficult to deliver the correct amount of force to the tooth being extracted in the proper manner. ➢ It is also tiring to the surgeon. ❖ Another frequent positioning problem is for the dentist to lean over the patient and put his or her face close to the patient’s mouth. ➢ This interferes with surgical lighting. ➢ Is hard on the dentist’s back and neck. ➢ And also interferes with proper positioning of the rest of the dentist’s body..
  • 8.
    UDM - AY- Simple Tooth Extraction Extraction of maxillary teeth ➢ the chair should be tipped backward so that the maxillary occlusal plane is at an angle of about 60 degrees to the floor. ➢ Raising the patient’s legs at the same time helps improve the patient’s comfort. ➢ The height of the chair should be such that the patient’s mouth is at the operator’s elbow level..
  • 9.
    UDM - AY- Simple Tooth Extraction ➢ During an operation on the maxillary right quadrant, the patient’s head should be turned substantially toward the operator so that adequate access and visualization can be achieved..
  • 10.
    UDM - AY- Simple Tooth Extraction ➢ For extraction of teeth in the maxillary anterior portion of the arch, the patient should be looking straight ahead..
  • 11.
    UDM - AY- Simple Tooth Extraction ➢ The position for the maxillary left portion of the arch is similar, except that the patient’s head is turned slightly toward the operator..
  • 12.
    UDM - AY- Simple Tooth Extraction Extraction of mandibular teeth ➢ The patient should be positioned in a more upright position. ➢ when the mouth is opened wide, the occlusal plane is parallel to the floor. ➢ The surgeon Should support the jaw. ➢ The chair should be lower for extraction of maxillary teeth. ➢ The height of the chair should be such that the patient’s mouth is slightly below the operator’s elbow level..
  • 13.
    UDM - AY- Simple Tooth Extraction ➢ A properly sized bite block should be used to stabilize the mandible when extraction forceps are used. ➢ Even though the surgeon will support the jaw, the additional support provided by the bite block will result in less stress being transmitted to the jaws. ➢ Care should be taken to avoid using too large a bite block because large ones can overstretch the TMJ ligaments and cause patient discomfort. Typically, pediatric bite blocks are the best to use, even in adults..
  • 14.
    UDM - AY- Simple Tooth Extraction ➢During removal of mandibular right posterior teeth, the patient’s head should be turned acutely toward the surgeon to allow adequate access to the jaw, and the surgeon should maintain the proper arm and hand positions. Infront of the patient approach Side of the patient approach..
  • 15.
    UDM - AY- Simple Tooth Extraction ➢When removing teeth in the anterior region of the mandible, the surgeon stands at the side of the patient, who looks straight ahead. American - Style Forceps English- Style Forceps..
  • 16.
    UDM - AY- Simple Tooth Extraction ➢During removal of mandibular left posterior teeth, the patient’s head should not turn so acutely toward the surgeon, and the surgeon should maintain the proper arm and hand positions. Infront of the patient approach Side of the patient approach..
  • 17.
    If the surgeonchooses to sit while performing extractions, several modifications must be made. For maxillary extractions: ➢ The patient is positioned in a semi-reclining position. ➢ The patient should be lowered as far as possible so that the level of the patient’s mouth is as near as possible to the surgeon’s elbow..
  • 18.
    For Mandibular Extraction: ➢The patient is slightly more upright than for extraction of maxillary teeth. ➢ The surgeon can work from the side of the patient or from behind the patient..
  • 19.
    UDM - AY- Simple Tooth Extraction ❑ MECHANICAL PRINCIPLES INVOLVED IN TOOTH EXTRACTION The removal of teeth from the alveolar process requires the use of the following mechanical principles and simple machines: • The lever, • The wedge, • And the wheel and axle..
  • 20.
    UDM - AY- Simple Tooth Extraction ❖ The lever ➢ Is a mechanism for transmitting a modest force (with the mechanical advantages of a long lever arm and a short effector arm) into a small movement against great resistance. The first-class lever transforms small force and large movement to small movement and large force..
  • 21.
    UDM - AY- Simple Tooth Extraction ➢ An example of the use of a lever is when a Crane pick is inserted into a purchase point of a tooth and then is used to elevate the tooth. A - The purchase point creates a first-class lever situation. B - The tooth is elevated with buccoalveolar bone used as the fulcrum..
  • 22.
    UDM - AY- Simple Tooth Extraction ❖ The wedge ➢ A wedge can be used to expand, split, and displace portions of the substance that receives it. ➢ When forceps are used, The beaks of the forceps act as wedges to expand alveolar bone and displace the tooth in the occlusal direction (out of the socket)..
  • 23.
    UDM - AY- Simple Tooth Extraction ➢ When a straight elevator is used to luxate a tooth from its socket. A small elevator is wedged into the periodontal ligament space, which displaces the root toward the occlusion (out of the socket)..
  • 24.
    UDM - AY- Simple Tooth Extraction ❖ The wheel and axle ➢ Which is most closely identified with the triangular, or pennant- shaped, elevator (Cryer). ➢ The handle then serves as the axle, and the tip of the triangular elevator acts as a wheel and engages and elevates the tooth root from the socket. Triangular elevator in the role of a wheel-and-axle machine used to retrieve the root from the socket..
  • 25.
    UDM - AY- Simple Tooth Extraction ❑ PRINCIPLES OF ELEVATOR AND FORCEPS USE ➢ Elevators help in the luxation of a tooth. ➢ The goal of forceps use is twofold: (1) Expansion of the bony socket by use of the wedge-shaped beaks. (2) Removal of the tooth from the socket..
  • 26.
    Forceps can applyFIVE major motions to expand the bony socket and luxate the teeth : 1. The First Is Apical Pressure; ➢ The forceps should be seated with strong apical pressure to expand crestal bone and to displace the center of rotation as far apically as possible..
  • 27.
    ➢ If thebeaks of the forceps are forced into the periodontal ligament space, the center of rotation is moved apically, which results in greater movement of the expansion forces at the crest of the ridge and less force moving the apex and decreases the chance for apical root fracture. If the forceps are apically seated, the center of rotation (*) is displaced apically, and smaller apical pressures are generated. This results in greater expansion of the buccal cortex, less movement of the apex of the tooth, and, therefore, less chance of fracture of the root..
  • 28.
    UDM - AY- Simple Tooth Extraction 2. The Second Is The Buccal Pressure; ➢ Result in expansion of the buccal plate at the crest of the ridge. ➢ Excessive force can fracture buccal bone or cause a fracture of the apical portion of the root..
  • 29.
    UDM - AY- Simple Tooth Extraction 3. The Third Is The Lingual Or Palatal Pressure; ➢ Result in expansion of the linguocrestal bone at the crest of the ridge and slightly expand buccal bone at the apical area.. ➢ Excessive force can fracture the bone or cause a fracture of the apical portion of the root..
  • 30.
    UDM - AY- Simple Tooth Extraction 4. The Fourth Is The Rotational Pressure; ➢ Rotates the tooth which causes some internal expansion of the tooth socket and tearing of periodontal ligaments. ➢ Useful for the teeth with single, conical roots (such as central maxillary incisors and mandibular premolars)..
  • 31.
    UDM - AY- Simple Tooth Extraction 5. Finally, The Tractional Forces; ➢ Useful for delivering the tooth from the socket once adequate bony expansion is achieved. ➢ These should always be small forces because teeth are not pulled..
  • 32.
    UDM - AY- Simple Tooth Extraction ❑ PROCEDURE FOR CLOSED (SIMPLE) EXTRACTION ➢The correct technique = atraumatic extraction. The wrong technique = excessively traumatic extraction. ➢ The three fundamental requirements for a good extraction are: 1) Adequate access and visualization of the field of surgery. 1) An unimpeded pathway for the removal of the tooth. 2) The use of controlled force to luxate and remove the tooth.
  • 33.
    UDM - AY- Simple Tooth Extraction ➢ For the tooth to be removed, it is usually necessary to: 1. Expand the alveolar bony walls to allow the tooth root an unimpeded pathway, 2. Tear the periodontal ligament fibers that hold the tooth in the bony socket. The use of elevators and forceps as levers and wedges with steadily increasing force can accomplish these two objectives.
  • 34.
    UDM - AY- Simple Tooth Extraction General Steps Make Up The Closed Extraction Procedure: Step 1: loosen the soft tissue from around the tooth (gingival attachment and the interdental papilla) with the sharp end of the periosteal elevator. • Ensure that profound anesthesia has been achieved. • Allow the elevator and forceps to be positioned more apically..
  • 35.
    Step 2: involvesluxation of the tooth with a dental elevator. ❖ The initial step in the elevation process: ➢ The straight elevator is inserted FROM THE BUCCAL SIDE perpendicular to the tooth into the interdental space. ➢ The elevator’s blade is turned toward the tooth being extracted WITH CAUTION. ➢ Strong, slow, forceful turning of the handle moves the tooth. ➢ Lead to expansion the bone and tearing of the PDL..
  • 36.
    UDM - AY- Simple Tooth Extraction ➢During luxation, a cotton roll or gauze should be placed between the finger and palatal or lingual side, to avoid injury of the finger or tongue in case the elevator slips..
  • 37.
    UDM - AY- Simple Tooth Extraction ➢ In certain situations (No adjacent tooth - Extraction of both teeth- Extraction of wisdom teeth) the elevator can be turned in the opposite direction and more vertical displacement of the tooth will be achieved, which can possibly result in complete removal of the tooth.
  • 38.
    UDM - AY- Simple Tooth Extraction ❖ The next step in the elevation process: ➢ The small, straight elevator is inserted into the periodontal ligament space at the mesial–buccal line angle and the distal– buccal line angle. ➢ Being rotated back and forth, helping luxate the tooth with its wedge action as it is advanced apically. ➢ When a small, straight elevator becomes too easy to twist, a larger-sized elevator is used to do the same apical advancement. ➢ Often the tooth will loosen sufficiently to be removed easily with forceps..
  • 39.
    UDM - AY- Simple Tooth Extraction Step 3: involves adaptation of the forceps to the tooth. ➢ The proper forceps are now chosen for the tooth to be extracted. ➢ The forceps are then seated onto the tooth so that the tips of the forceps beaks grasp the root underneath loosened soft tissue as apically as possible. ➢ The lingual beak is usually seated first and then the buccal beak..
  • 40.
    UDM - AY- Simple Tooth Extraction ➢ The surgeon’s hand should be grasping the forceps firmly. Holding mandibular extraction forceps Holding maxillary extraction forceps ➢ The surgeon should be prepared to apply force with the shoulder and upper arm without any wrist pressure. ➢ The surgeon should be standing upright, with feet comfortably apart..
  • 41.
    Step 4: involvesluxation of the tooth with forceps. ➢The major portion of the force is directed toward the thinnest and, therefore, weakest bone. ➢The major movement is labial and buccal for all teeth in the maxilla and all but molar teeth in the mandible. ➢The surgeon uses slow, steady force to displace the tooth buccally. ➢The tooth is then moved again toward the opposite direction with slow, deliberate, strong pressure. ➢As the alveolar bone begins to expand, the forceps are reseated apically which causes additional expansion of alveolar bone and further displaces the center of the rotation apically. ➢Buccal and lingual pressures continue to expand the alveolar socket..
  • 42.
    UDM - AY- Simple Tooth Extraction The following three factors must be re-emphasized: (1) The forceps must be apically seated as far as possible and reseated periodically during the extraction; (2) The forces applied in the buccal and lingual directions should be slow, deliberate pressures and not jerky wiggles; (3) The force should be held for several seconds to allow the bone time to expand. *******************
  • 43.
    UDM - AY- Simple Tooth Extraction Step 5: involves removal of the tooth from the socket. ➢ Once the tooth has been luxated, a slight tractional force toward the buccally or labially side can be used. ➢ Tractional forces should be minimized because this is the last motion that is used once the alveolar process is sufficiently expanded and the periodontal ligament is completely severed. ******************
  • 44.
    UDM - AY- Simple Tooth Extraction It must be remembered that teeth Are Not Pulled, rather, They Are Gently Lifted from the socket once the alveolar process has been expanded.. The surgeon should realize that the major role of forceps IS NOT TO REMOVE THE TOOTH, but rather to expand the bone so that the tooth can be removed.
  • 45.
    UDM - AY- Simple Tooth Extraction Role of the Opposite Hand during Extraction ➢ Reflecting the soft tissues of the cheeks, lips, and tongue to provide adequate visualization of the area of surgery. ➢ Protecting other teeth from the forceps. ➢ Stabilizing the patient’s head during the extraction process. ➢ Supporting and stabilizing the jaw when mandibular teeth are being extracted. ➢ Supporting the alveolar process. ➢ Providing tactile information to the operator concerning the expansion of the alveolar process during the luxation period..
  • 46.
    UDM - AY- Simple Tooth Extraction Role of the Assistant during Extraction: ➢ Reflecting the soft tissue of the cheeks and tongue so that the surgeon can have an unobstructed view of the surgical field. ➢ Suctioning away blood, saliva, and the irrigating solutions used during the surgical procedure. ➢ Protecting the teeth of the opposite arch. ➢ Supporting the mandible during the application of the extraction forces to prevent TMJ discomfort. ➢ Providing psychological and emotional support for the patient..
  • 47.
    ❑ SPECIFIC TECHNIQUESFOR THE REMOVAL OF EACH TOOTH ❖ Maxillary Teeth ➢ Maxillary left or anterior teeth: The left index finger should reflect the lip and cheek tissues; the left thumb should rest on the palatal alveolar process. ➢ Maxillary right teeth: The left index finger is positioned on the palate, with the left thumb on the buccal aspect..
  • 48.
    The maxillary incisors: ➢Upper universal forceps (No. 150) - forceps (No. 1). ➢ central incisors generally have conic roots. ➢ lateral incisors slightly longer, slenderer and have a distal curvature on the apical one third of the root. ➢ Alveolar bone is thin on the labial side and heavier on the palatal side. ➢ Rotational movement should be minimized for the lateral incisor..
  • 49.
    UDM - AY- Simple Tooth Extraction The Maxillary Canines: ➢ Upper universal forceps (No. 150) - forceps (No. 1). ➢ The longest tooth in the mouth. ➢ Root is oblong and produce a bulge (canine eminence) ➢ The bone over the labial aspect of the maxillary canine is usually thin. ➢ Can be difficult to extract simply because of its long root..
  • 50.
    UDM - AY- Simple Tooth Extraction The Maxillary First Premolar: ➢ Upper universal forceps (No. 150) - forceps (No. 150A) and (No. 7). ➢ Root bifurcation usually occurring in the apical one third to one half. ➢ These roots may be extremely thin and are subject to fracture. ➢ The tooth should be luxated as much as possible. ➢ Palatal movements are made with small amounts of force to prevent fracture of the palatal root tip, which is harder to retrieve. ➢ Any rotational force should be avoided..
  • 51.
    UDM - AY- Simple Tooth Extraction The Maxillary Second premolar: ➢ Upper universal forceps (No. 150) - forceps (No. 150A) and (No. 7). ➢ Is a singlerooted tooth . ➢ The root is thick and has a blunt end.
  • 52.
    UDM - AY- Simple Tooth Extraction The Maxillary Molars: ➢ The maxillary first and second molar has three roots. ➢ Forceps No. (53 R & L ) – (17R & 18L) – (88 R&L). ➢ The maxillary third molar frequently has conic roots. ➢ Forceps (No. 210). ➢ The third molar is also extracted using elevators alone. Should look carefully at the relationship with the maxillary sinus..
  • 53.
    ❖ Mandibular Teeth ➢Mandibular left and anterior teeth: The left index finger should reflect the lip and cheek tissues; The left middle finger should rest on the lingual alveolar process; The left thumb is placed below the chin. Mandibular Right teeth: Surgeon’s location(Front OR Side of the patient) I. The left index finger should rest on the lingual alveolar process; The left middle finger should reflect the lip and cheek tissues; The left thumb is placed below the chin. OR II. The left thumb is positioned on the lingual aspect, with the left index on the buccal aspect, the rest fingers are placed below the chin..
  • 54.
    UDM - AY- Simple Tooth Extraction The Mandibular Anterior teeth: ➢The lower universal (No. 151) forceps - (No. 151A) - English style Ashe forceps (No. 74). ➢Mandibular incisors and canines are similar in shape, ➢The canine roots being longer and heavier. ➢The incisor roots are more likely to be fractured because they are thin. ➢should be removed only after adequate pre-extraction luxation. ➢After luxation, rotational movement may be used to expand the bone..
  • 55.
    UDM - AY- Simple Tooth Extraction The Mandibular Premolars: ➢ The lower universal (No. 151) forceps - (No. 151A) - English style Ashe forceps (No. 13). ➢ Are among the easiest teeth to remove. ➢ The roots tend to be straight and conic. ➢ Rotational movement is used more when extracting these teeth except with root curvature..
  • 56.
    UDM - AY- Simple Tooth Extraction The Mandibular molars: ➢ Forceps (No. 17) – (cowhorn No. 23 & No. 87) – (No.22) and (No.222) for the third molars. ➢ Usually have two roots. ➢ Linguoalveolar bone is thinner than the buccal plate..
  • 57.
    UDM - AY- Simple Tooth Extraction ➢ If the tooth roots are bifurcated, Cowhorn forceps, can be used. A, Forceps are positioned to engage the bifurcation area of the lower molar. B, The handles of the forceps are squeezed, which forces the beaks to be in the bifurcation, and creates force against the crest of the alveolar ridge. C, Strong buccal forces are then used to expand the socket. D, Strong lingual forces are used to luxate the tooth further. E, The tooth is delivered in the bucco-occlusal direction with buccal and tractional forces..
  • 58.
    UDM - AY- Simple Tooth Extraction If root fracture does occur, a mobile root tip can be removed More Easily Than one that has not been well luxated.
  • 59.
    Thank You For YourKind Attention yakanab@udmercy.edu UDM - AY - Simple Tooth Extraction
  • 60.
    Surgical Tooth Extraction AbedYakan DDS, PGDip, MS, PhD - OMFS Division of Clinical Dentistry - Oral & Maxillofacial Surgery University of Detroit Mercy UDM - AY - Surgical Tooth Extraction
  • 61.
    UDM - AY- Surgical Tooth Extraction Contents: ❑ Definition. ❑ Introduction. ❑ Indications for surgical extraction. ❑ Techniques for surgical extraction. ❑ Justification for leaving root fragments. ❑ Multiple extractions.
  • 62.
    UDM - AY- Surgical Tooth Extraction Definitions: ❖ Surgical (Open) extraction is the removal of a tooth that presents clinically with a condition that does not safely or adequately allow access using a non-surgical approach. ❖ Surgical Extraction of an Erupted Tooth: A tooth requiring removal of bone and/or sectioning of tooth, and including elevation of mucoperiosteal flap if indicated. Includes related cutting of gingiva and bone, removal of tooth structure, minor smoothing of socket bone and closure. (ADA, 2017) ❖ Surgical Removal of Residual Tooth Roots: (cutting procedure) includes cutting of soft tissue and bone, removal of tooth structure and closure. (ADA, 2017)..
  • 63.
    UDM - AY- Surgical Tooth Extraction Introduction: ➢ The surgical (Open) extraction of an erupted tooth is a technique that should not be reserved for the extreme situation. ➢ Surgical extraction may be more conservative and cause less operative morbidity compared with a closed extraction. ➢ Great forces may result in removal of large amounts of bone. ➢ The bone loss may be less: • If a soft tissue flap is reflected, and a proper amount of bone is removed. • If the tooth is sectioned..
  • 64.
    UDM - AY- Surgical Tooth Extraction The surgeon should seriously consider performing a surgical extraction after initial attempts at forceps extraction have failed. Instead of applying greater amounts of force that may not be controlled! The surgeon should simply reflect a soft tissue flap, section the tooth, remove some bone, if needed, and extract the tooth in sections. In these situations, the philosophy of “divide and conquer” results in the most efficient and least traumatic extraction..
  • 65.
    UDM - AY- Surgical Tooth Extraction Indications for Surgical Extraction: When we anticipate the difficulty or possible need for Excessive force to extract a tooth. ➢ If the patient has thick or especially dense bone, particularly of the buccocortical plate. ➢ If teeth are surrounded by dense, thick bone with strong periodontal ligament attachments. An open technique usually results in a quicker, more straightforward extraction..
  • 66.
    UDM - AY- Surgical Tooth Extraction ➢ If the patient has hypercementosis: cementum has continued to be deposited on the tooth and has formed a large bulbous root that is difficult to remove through the available tooth socket opening. If Great force used to expand the bone may result in fracture of the root or the buccocortical bone..
  • 67.
    UDM - AY- Surgical Tooth Extraction ➢Roots that are widely divergent, or have severe dilaceration, or root canal treated with large restoration. Difficult to remove without fracturing one or more of the roots..
  • 68.
    Techniques for Surgical Extraction UDM- AY - Surgical Tooth Extraction
  • 69.
    Techniques for SurgicalExtraction of Single-Rooted Tooth: Provide adequate visualization and access by reflecting a sufficiently large mucoperiosteal flap. Methods of removal: 1- Attempt to reseat the extraction forceps and remove the tooth. 2- Grasp a bit of buccal bone under the beak of the forceps to obtain a better mechanical advantage and grasp of the tooth root. 3- Push the straight elevator down the periodontal ligament space like a shoehorn and apply to and fro motion to luxate the broken root..
  • 70.
    UDM - AY- Surgical Tooth Extraction 4- Use a bur with irrigation to remove the bone and reduce the amount of force necessary to displace the root. • The width of buccal bone that is removed is essentially the same width as the tooth in a mesiodistal direction. • Bone should be removed approximately one half to two thirds the length of the tooth root. • A forceps or small straight elevator can be used to remove the tooth..
  • 71.
    UDM - AY- Surgical Tooth Extraction 5- If the tooth is still difficult to extract after the removal of bone, a purchase point can be made in the root with the bur at the most apical portion of the area of bone removal. • The purchase point hole should be about 3 mm in diameter and deep enough to allow the insertion of an instrument. • A heavy elevator can be used to elevate or lever the tooth from its socket. • Soft tissue is repositioned and sutured..
  • 72.
    UDM - AY- Surgical Tooth Extraction Techniques for Surgical Extraction of Multirooted Teeth: ➢ The tooth (Crown & Roots or only Roots) may be divided with a bur to convert a multirooted tooth into two or three single- rooted teeth. ➢ The goal is to separate the roots to make them easier to elevate..
  • 73.
    UDM - AY- Surgical Tooth Extraction ❖ Removal of the lower first molar: Is usually done by 2 methods: I- Sectioning the tooth buccolingually to (2 halves of the root and the crown). ➢ Once the tooth is sectioned, it is luxated with straight elevators to begin the mobilization process. ➢ The sectioned tooth is treated as a lower premolar tooth..
  • 74.
    UDM - AY- Surgical Tooth Extraction A, This lower molar has roots that make it necessary to section the tooth. B, Flap raised to expose bone and allow sectioning. C, Surgical handpiece with fissure bur used to section tooth into M & D parts. D, Straight elevator inserted into bur cut to complete division of the crown. E, Each root can now be elevated and removed. F, Completed procedure with suture closing distal release..
  • 75.
    II- An alternativemethod is to section the mesial root from the tooth and convert the molar into two single-rooted teeth. ➢ The crown with the distal root is extracted with lower molar forceps. ➢ The mesial root is elevated with Cryer elevator (inserted into the empty tooth socket and rotated, the sharp tip engages the cementum). ➢ If the interradicular bone is heavy, the first rotation or two of the Cryer elevator removes bone, which allows the elevator to engage the cementum of the tooth on the second or third rotation..
  • 76.
    UDM - AY- Surgical Tooth Extraction If the crown of the mandibular molar is missing: A, A bur is used to section the tooth into two individual roots. B, The small straight elevator has been used to mobilize the roots, and the Cryer elevator is used to elevate the distal root. C, The opposite member of the paired Cryer elevators is then used to deliver the remaining tooth root with the same type of rotational movement..
  • 77.
    UDM - AY- Surgical Tooth Extraction ❖ Removal of maxillary molars: ➢ This three-rooted tooth must be divided in a pattern different from that of the two rooted mandibular molar. A, The bur is used to section the buccal roots from the crown portion of the tooth. B, Upper molar forceps are then used to remove the crown with the palatal root. C, The straight elevator is then used to mobilize or deliver one or both of buccal roots. D, The Cryer elevator can be used in the usual fashion by placing the tip of the elevator into the empty socket and rotating it to deliver the remaining root..
  • 78.
    UDM - AY- Surgical Tooth Extraction If the crown of the maxillary molar is missing: A, The bur is used to section the three roots into independent portions. B, The roots have been luxated with the small straight elevator and the mesiobuccal root is delivered with the Cryer elevator placed into the slot prepared by the bur. C, The Cryer elevator is again used to deliver the distal buccal root. D, Maxillary root forceps can be used to grasp and deliver the remaining root. E, The small straight elevator can be used to elevate and displace the remaining root of the maxillary molar in the bucco-occlusal direction..
  • 79.
    UDM - AY- Surgical Tooth Extraction Techniques for Removal of Root Fragments and Tips: ❖ Simple technique: Most useful when: ➢ The tooth was well luxated and mobile before the root tip fractured. ❖ Surgical technique: Most useful when: ➢ The tooth was NOT luxated or mobile before the root tip fractured. ➢ The root is bulbous hypercementosed with bony interferences. ➢ There is severe dilaceration of the root end. The surgeon should begin a surgical technique if the simple technique is not immediately successful..
  • 80.
    UDM - AY- Surgical Tooth Extraction Requirements for removal of a small root tip fragment: The surgeon SHOULD CLEARLY SEE the root tip, so, it is critically important to have: (1) Proper light. (2) Irrigation. (3) Excellent suction..
  • 81.
    UDM - AY- Surgical Tooth Extraction ❖ Simple technique for Removal of Root Fragments and Tips: ➢ Examine the extracted tooth to see how much of a root remains. ➢ Reposition the patient so that adequate visualization is achieved. ➢ Irrigated and suction the socket because the loose tooth fragment occasionally can be irrigated from the socket. ➢ Inspect the tooth socket carefully to assess whether the root has been removed from the socket. ➢ Remove the root apex from the socket with a root tip pick..
  • 82.
    UDM - AY- Surgical Tooth Extraction Root apex removal with root tip pick: A, Small (2 to 4 mm) portion of the root apex is fractured. B, The root tip pick is teased into the periodontal ligament space and used to gently luxate the root tip from its socket. Neither excessive apical force, nor excessive lateral force should be applied to the root tip pick..
  • 83.
    UDM - AY- Surgical Tooth Extraction Root tip removal with the small straight elevator: ➢ Indicated for removal larger root fragments. A, The small straight elevator is wedged into the periodontal ligament space to displace the tooth in the occlusal direction, the pressure applied should be in gentle to-and-fro motions. B, Excessive pressure in the apical direction results in displacement of the tooth root into undesirable places such as the maxillary sinus..
  • 84.
    UDM - AY- Surgical Tooth Extraction ❖ Surgical technique for Removal of Root Fragments and Tips. Two main surgical techniques are used to remove root tips. I- As surgical removal of single-rooted teeth: ➢ Bone is removed with a bur to expose the buccal surface of the tooth root. ➢ The root is buccally delivered through the opening with a small straight elevator..
  • 85.
    UDM - AY- Surgical Tooth Extraction II- The open-window technique: A, The open-window approach for retrieving the root is indicated when buccocrestal bone must be maintained. B, A bur is used to uncover the apex of the root and to allow sufficient access for the insertion of the straight elevator. C, The small straight elevator is then used to displace the root out of the tooth socket..
  • 86.
    UDM - AY- Surgical Tooth Extraction General Steps of Surgical Extractions ➢ Reflect the suitable flap. ➢ Remove a small portion of crestal bone to expose the edge or the furcation of the root. ➢ Remove the tooth or the root with the suitable technique. ➢ Check the bone edges; if sharp, smooth it with a bone file. ➢ Irrigate the entire surgical field with sterile saline. ➢ Set the flap in its original position and sutured into place with 3-0 black silk or chromic gut sutures..
  • 87.
    JUSTIFICATION FOR LEAVINGROOT FRAGMENTS The surgeon may consider leaving the root fragments if: ➢ Closed (simple) approaches of removal have been unsuccessful. ➢ Open (Surgical) approach may be excessively traumatic. ➢ The risks of removing a small root tip may outweigh the benefits: • Cause excessive destruction of surrounding tissue. • If excessive amounts of bone must be removed to retrieve the root. • Risk of displacing the root into tissue spaces or into maxillary sinus. ➢ Three conditions should exist for a tooth root to be left: • The root fragment should be no more than 4 to 5 mm in length. • The root must be deeply embedded in bone and not superficial. • The tooth involved must NOT be infected. Consider the record in Pt’s chart, radiographic documentation, inform the patient and follow-up..
  • 88.
    UDM - AY- Surgical Tooth Extraction MULTIPLE EXTRACTIONS ❖ Treatment Planning: ➢ Pre-extraction planning with regard to the replacement of the teeth to be removed. ➢ The need for any other type of soft or hard tissue surgery such as tuberosity reduction or the removal of undercuts or exostoses in critical areas. ➢ If dental implants are to be placed immediately or at a later time..
  • 89.
    UDM - AY- Surgical Tooth Extraction ❖ Extraction Sequencing: ➢ Maxillary teeth should usually be removed first: WHY? • An infiltration anesthetic has a more rapid onset and also disappears more rapidly. • During the extraction process, debris may fall into the empty sockets of the lower teeth. • Maxillary teeth are removed mainly by buccal not vertical force. Disadvantage of extracting maxillary teeth first, the hemorrhage may interfere with visualization during mandibular surgery. ➢ Posterior first. ➢ The most difficult last. Removal of the teeth on either side weakens the bony socket on the mesial and distal sides of these teeth, and their subsequent extraction is made more straightforward..
  • 90.
    UDM - AY- Surgical Tooth Extraction ❖ Technique for Multiple Extractions: A, This patient’s remaining mandibular teeth are to be extracted. B, The soft tissue attachment to teeth is incised with the No. 15 blade. C, The periosteal elevator is used to reflect labial soft tissue just to the crest of labioalveolar bone..
  • 91.
    UDM - AY- Surgical Tooth Extraction D, The teeth in the quadrant are luxated with the straight elevator and then delivered with forceps in the usual fashion. E, Rongeur forceps are used to remove only bone that is sharp and protrudes above reapproximated soft tissue. F, The buccolingual plates are pressed into their pre-existing position with firm pressure unless implants are planned..
  • 92.
    UDM - AY- Surgical Tooth Extraction G, Tissue is closed with interrupted black silk sutures across the papilla. H, The patient returns for suture removal 1 week later. I, Normal healing has occurred, and sutures are ready for removal..
  • 93.
    Thank You For YourKind Attention yakanab@udmercy.edu UDM - AY - Surgical Tooth Extraction
  • 94.
    Principles of Woundand Bone Healing Abed Yakan DDS, PGDip, MS, PhD - OMFS Division of Clinical Dentistry - Oral & Maxillofacial Surgery University of Detroit Mercy UDM - AY - Principles of wound and bone healing
  • 95.
    UDM - AY- Principles of wound and bone healing Contents ❑ Causes of Tissue Damage. ❑ Wound Repair. ❑ Healing of Extraction Sockets. ❑ Bone Healing.
  • 96.
    UDM - AY- Principles of wound and bone healing ❑ Causes of Tissue Damage Traumatic Injuries (Physical or Chemical). Physical: • Compromised blood flow. • Crushing. • Desiccation. • Incision. • Irradiation. • Overcooling. • Overheating..
  • 97.
    UDM - AY- Principles of wound and bone healing Chemical: • Agents with unphysiologic PH. • Agents with unphysiologic tonicity. • Proteases. • Vasoconstrictors. • Thrombogenic agents..
  • 98.
    UDM - AY- Principles of wound and bone healing ❑ Wound Repair Epithelialization ➢ The Injured epithelium has a genetically programmed regenerative ability that allows it to re-establish its integrity through proliferation, migration, and a process known as contact inhibition. (Contact inhibition is a regulatory mechanism that functions to keep cells growing into a layer one cell thick “a monolayer”. If a cell has plenty of available substrate space, it replicates rapidly and moves freely. This process continues until the cells occupy the entire substratum). ➢ Wounds in which only the surface epithelium is injured (i.e., abrasions) heal by the proliferation of epithelium across the wound bed. ➢ Wounds in which the subepithelial tissue is also damaged proliferates across whatever vascularized tissue bed is available and stays under the portion of the superficial blood clot that desiccates (i.e., forms a scab) until it reaches another epithelial margin..
  • 99.
    UDM - AY- Principles of wound and bone healing Stages of Wound Healing These three basic stages are: I. Inflammatory. II. Fibroblastic. III. Remodeling..
  • 100.
    UDM - AY- Principles of wound and bone healing I. Inflammatory stage (Lag Phase): ➢ Begins the moment tissue injury occurs and lasts 3 to 5 days. ➢ It has two phases: (1) vascular and (2) cellular. (1) The vascular Phase: A. Vasoconstriction B. Vasodilation.
  • 101.
    (2) The cellularphase: Tissue trauma activate complement factors C3a and C5a. C3a and C5a act as chemotactic factors causing neutrophil margination and migration. The neutrophils release the contents of their lysosomes. The lysosomal enzymes work to destroy bacteria and digest necrotic tissue. Inflammatory stage of wound repair: ✓ Wound fills with clotted blood, inflammatory cells, and plasma. ✓ Adjacent epithelium begins to migrate into wound. ✓ Undifferentiated mesenchymal cells transform into fibroblasts.. UDM - AY - Principles of wound and bone healing
  • 102.
    UDM - AY- Principles of wound and bone healing ▪ The cardinal signs of inflammation: Redness (i.e., Erythema). Swelling (i.e., Edema). Warmth. Pain. Loss of function. ▪ The inflammatory stage is sometimes referred to as the lag phase, because the principal material holding a wound together is fibrin, which possesses little tensile strength..
  • 103.
    UDM - AY- Principles of wound and bone healing II. Fibroblastic stage: ➢ The strands of fibrin forming a latticework. ➢ fibroblasts begin laying down ground substance and tropocollagen. • The ground substance cements collagen fibers. • Fibroblasts also secrete fibronectin. ✓ Helps stabilize fibrin. ✓ Acts as a chemotactic factor for fibroblasts. • Existing vessels forms new capillaries buds. • Fibroblasts deposit tropocollagen to produce collagen to strengthen the healing wound. • Collagen is laid down randomly. • Wound will be able to withstand 70% to 80% as much tension as uninjured tissue. ➢ Fibroblastic stage normally lasts 2 to 3 weeks..
  • 104.
    UDM - AY- Principles of wound and bone healing III. Remodeling stage: ➢ Many of randomly laid collagen fibers are replaced by new oriented collagen fibers. ➢ The excess collagen fibers are removed, which allows the scar to soften. ➢ Wound strength increases not more than 80% to 85% of the strength of uninjured tissue. ➢ Wound metabolism lessens, vascularity is decreased, which diminishes wound erythema..
  • 105.
    UDM - AY- Principles of wound and bone healing Factors That Impair Wound Healing Local Factors: (1)Foreign material inflammatory - infection. (2)Necrotic tissue prolonged inflammatory stage - nutrient source for bacteria. (3)Ischemia increases the chances of wound infection. (4)Wound tension reopen the wound and heal with excessive scar formation ..
  • 106.
    UDM - AY- Principles of wound and bone healing Systemic Factors:
  • 107.
    UDM - AY- Principles of wound and bone healing Methods of Wound Healing Primary, Secondary, and Tertiary Intention. ➢ Healing by primary intention: • No tissue loss. • Stabilized in the same anatomic position they held before injury and are allowed to heal. • Healing occurs more rapidly. • lower risk of infection. • less scar formation..
  • 108.
    UDM - AY- Principles of wound and bone healing ➢ Healing by secondary intension: • A gap is left between the edges of an incision. • Tissue loss has occurred in a wound that prevents approximation of wound edges. • Require a large amount of epithelial migration, collagen deposition, contraction, and remodeling during healing. • Healing is slower. • Produces more scar tissue. Extraction sockets are examples of wounds that heal by secondary intention..
  • 109.
    UDM - AY- Principles of wound and bone healing Healing by tertiary intention: • Delay closing a wound, such as when there is poor circulation in the wound area or infection. • Healing is slower. • Produces scar tissue. • Some surgeons use the term tertiary intention to refer to the healing of wounds through the use of tissue grafts to cover large wounds and bridge the gap between wound edges..
  • 110.
    UDM - AY- Principles of wound and bone healing ❑ Healing of Extraction Sockets ➢ Sockets heal by secondary intention. ➢ When a tooth is removed, the remaining empty socket consists of cortical bone covered by torn periodontal ligaments, with a rim of oral epithelium (gingiva) left at the coronal portion. ➢ Healing of extraction sockets starts immediately after extraction and lasts several months..
  • 111.
    UDM - AY- Principles of wound and bone healing 1st Week Of Healing • The socket fills with blood, which coagulates and seals the socket from the oral environment. • White blood cells enter the socket to remove bacteria and debris. • Ingrowth of fibroblasts and immature capillaries. • Re-epithelialization and granulation tissue formations. • Osteoclasts accumulate along the crestal bone..
  • 112.
    UDM - AY- Principles of wound and bone healing 2nd – 4th Week Of Healing: • large amount of granulation tissue fills the socket. • Osteoid deposition has begun along the alveolar bone lining the socket. • Epithelialization of most sockets complete at this time. • The cortical bone continues to be resorbed from the crest and walls of the socket. • New trabecular bone is laid down across the socket..
  • 113.
    UDM - AY- Principles of wound and bone healing 4th – 6th Month Of Healing: • The cortical bone lining a socket usually fully resorbed (this is recognized radiographically by a loss of a distinct lamina dura). • The bone fills the socket. • The epithelium moves toward the crest and becomes at the level of adjacent crestal gingiva. • The only visible remnant of the socket after 1 year is the rim of fibrous (scar) tissue that remains on the edentulous alveolar ridge..
  • 114.
    ❑ Bone Healing ➢3stages: inflammation, fibroblastic and remodeling, with primary or secondary intention. ➢ Osteoblasts and osteoclasts are involved. I. Early Phase of fibroblastic stage of bone repair : • Osteogenic cells from periosteum and marrow proliferate and differentiate into osteoblasts, osteoclasts, and chondroblasts, and capillary budding begins. • Osteogenic cells resorb necrotic bone and bone that needs to be remodeled. • Osteoblasts then lay down osteoid, which, if immobile during healing, usually goes on to calcify.. Early phase of fibroblastic stage of bone repair. UDM - AY - Principles of wound and bone healing
  • 115.
    II. Late phaseof fibroblastic stage of bone repair: • Large amount of collagen must be laid down to bridge the bony gap. • The fibroblasts produce so much fibrous matrix and form what is called a callus. • Osteoclasts resorb necrotic bone. • Chondroblast lay down cartilage. • Osteoblast lay down bone. • Capillary ingrowth continues. • Internal and external calluses form.. Late phase of fibroblastic stage of bone repair. UDM - AY - Principles of wound and bone healing
  • 116.
    Remodeling stage ofbone repair: • Osteoclasts remove unnecessary bone. • Osteoblasts lay new bone tissue. • New Haversian systems develop. • Calluses gradually decrease in size.. Remodeling stage of bone repair UDM - AY - Principles of wound and bone healing
  • 117.
    UDM - AY- Principles of wound and bone healing Healing of bone by primary intention: ➢ Bone is incompletely fractured or in “greenstick fracture”. ➢ Anatomic reduction of the fracture. Little fibrous tissue is produced, and reossification occurs quickly..
  • 118.
    UDM - AY- Principles of wound and bone healing Two factors are important to proper bone healing: (1) Vascularity. (2) Immobility. ❖ If vascularity or oxygen supplies are: • Sufficient bone will form. • Sufficiently compromised cartilage will form. • Poor the fibrous tissue does not chondrify or ossify. ❖ Mobility at the site: • Compromise vascularity of the wound. • Formation of cartilage or fibrous tissue, rather than bone along the fracture line..
  • 119.
    Thank You For YourKind Attention yakanab@udmercy.edu Office Hours by Appointment - Room 358 UDM - AY - Principles of wound and bone healing
  • 120.
    Perioperative Complications ofTooth Extraction Abed Yakan DDS, PGDip, MS, PhD - OMFS Division of Clinical Dentistry - Oral & Maxillofacial Surgery University of Detroit Mercy UDM - AY - Perioperative Comp. of Tooth Ex.
  • 121.
    UDM - AY- Perioperative Comp. of Tooth Ex. Contents ❑ Prevention Of Complications. ❑ Soft Tissue Injuries. ❑ Problems With A Tooth Being Extracted. ❑ Injuries To Adjacent Teeth. ❑ Injuries To Osseous Structures. ❑ Injury To Regional Nerves..
  • 122.
    UDM - AY- Perioperative Comp. of Tooth Ex. ❑ Prevention of Complications 1. The best and easiest way to manage a surgical complication is to prevent it from ever happening; • Thorough preoperative assessment. • Comprehensive treatment plan. • Careful execution of the surgical procedure. • The complication is often predictable and can be managed routinely.
  • 123.
    UDM - AY- Perioperative Comp. of Tooth Ex. 2. Dentists must perform surgery that is within the limits of their capabilities; • Evaluate their training and abilities before deciding to perform a specific surgical task. • Be cautious of unwarranted optimism. • Keep in mind that referral to a specialist..
  • 124.
    UDM - AY- Perioperative Comp. of Tooth Ex. 3. Thorough review of the patient’s medical history. 4. Obtain adequate images and carefully reviewing them. 5. Follow basic surgical principles. 6. Thorough preoperative instructions and explanations for the patient 7. Follow the principles of asepsis, atraumatic handling of tissues, hemostasis, and thorough débridement of the wound after the surgical procedure. ➢ Controlled Force Is of Paramount Importance; This Means “Finesse,” Not “Force”..
  • 125.
    UDM - AY- Perioperative Comp. of Tooth Ex. ❑ Soft Tissue Injuries The surgeon must continue to pay careful attention to soft tissue while working on bone and tooth structures.. Almost always the result of the: ➢ Surgeon’s lack of adequate attention to the delicate nature of the mucosa. ➢ Attempts to do surgery with inadequate access. ➢ Rushing during surgery. ➢ Use of excessive and uncontrolled force.
  • 126.
    UDM - AY- Perioperative Comp. of Tooth Ex. ❖ Tear of a Mucosal Flap ➢ Inadequate envelope flap, which is then forcibly retracted beyond the ability of the tissue to stretch as the surgeon tries to gain needed surgical access. ➢ Inadequate care during its reflection. ➢ Prevention of this complication is threefold: (1) Creating adequately sized flaps to prevent excess tension on the flap. (2) Using controlled amounts of retraction force on the flap. (3) Creating releasing incisions, when indicated. ➢ Treatment: • Careful suturing of the tear results in adequate, but somewhat delayed, healing. • Excising the edges of the torn flap to create a smooth flap margin before closure. • Avoid excision of excessive amounts of tissue which leads to closure under tension!..
  • 127.
    UDM - AY- Perioperative Comp. of Tooth Ex. ❖ Puncture Wound ➢ Instruments may slip and puncture or tear into adjacent soft tissue. ➢ Prevention of this complication is threefold: • Use of controlled force. • Using finger support from the opposite hand if slippage is anticipated. ➢ Treatment: • Control bleeding by direct pressure applied to the wound. • The wound is usually left open un-sutured (adequate pathway for drainage)..
  • 128.
    ❖ Stretch orAbrasion or Burn ➢ Abrasions or burns to lips, corners of the mouth, or flaps usually result from a metal retractor or from the hand pieces (a combination of friction and heat damage). ➢ Prevention of this complication: • The assistant and the surgeon should be aware of the location of the shank of the bur. ➢ Treatment: • If an area of oral mucosa is abraded or burned regular oral rinsing. • If an area of skin is abraded or burned keep it covered with an antibiotic ointment.. UDM - AY - Perioperative Comp. of Tooth Ex.
  • 129.
    UDM - AY- Perioperative Comp. of Tooth Ex. ❑ Problems With A Tooth Being Extracted ❖ Root Fracture: ➢ The most common problem associated with the tooth being extracted. ➢ Prevention of this complication: • Perform an open extraction technique and remove bone to decrease the amount of force necessary to remove the tooth.
  • 130.
    ❖ Root Displacement I.Displacement into the Maxillary Sinus (Oro-antral communication). ➢ Maxillary molar or root can be displaced, If this occurs; the surgeon must: • Apply (Valsalva maneuver) after extraction; Observe bubbling from socket when patient tries to exhale gently through their nose while nostrils are pinched. • Identify the size of the root lost into the sinus. • Assess whether there has been any infection of the tooth or periapical tissues. • Assess the preoperative condition of the maxillary sinus. UDM - AY - Perioperative Comp. of Tooth Ex.
  • 131.
    ➢ Prevention ofthis complication: • Preoperative radiographs evaluation: ✓ Maxillary sinus pneumatization. ✓ The bone between the teeth and the sinus. • Be careful during the luxation of a root tip. UDM - AY - Perioperative Comp. of Tooth Ex.
  • 132.
    UDM - AY- Perioperative Comp. of Tooth Ex. ➢ Treatment (OAC): 1. If the communication and displaced fragment is a 2-3 mm, no pre-existing infection: • A radiograph should be taken to document its position and size. • Make a brief attempt at removing the root (Irrigation and suction). • If this technique is not successful, leave it in the sinus (will fibrose onto the sinus membrane). • The patient must be informed and given proper follow-up instructions. • The oroantral communication should be managed with: ✓ Gelfoam sponge and a “figure-of-eight” suture over the socket. ✓ Sinus precautions (Avoid blowing the nose, sneezing, sucking on straws and smoking). ✓ Antibiotics. ✓ And a nasal spray to lessen the chance of infection by keeping the ostium open..
  • 133.
    UDM - AY- Perioperative Comp. of Tooth Ex. 2. If the tooth root is infected or the patient has chronic sinusitis. If a large root fragment or the entire tooth is displaced into the maxillary sinus. If Impacted maxillary third molars are displaced into the maxillary sinus. The patient should be referred to an oral-maxillofacial surgeon for removal of the root tip via a Caldwell-Luc or endoscopic approach..
  • 134.
    UDM - AY- Perioperative Comp. of Tooth Ex. II. Displacement into the infratemporal space. ➢ During elevation of the Impacted maxillary third molars , the elevator may force the tooth posteriorly through the periosteum into the infratemporal fossa. ➢ The tooth is usually lateral to the lateral pterygoid plate and inferior to the lateral pterygoid muscle. ➢ The dentist should make a single cautious effort to retrieve the tooth with a hemostat. ➢ If the tooth is not visible, don’t attempt..
  • 135.
    UDM - AY- Perioperative Comp. of Tooth Ex. ➢ If the tooth is not retrieved after a single effort, the incision should be closed, and the operation stopped. ➢ The patient should be informed that the tooth has been displaced and will be removed later. ➢ Antibiotics should be given to help decrease the possibility of an infection. ➢ During the initial healing time, fibrosis occurs and stabilizes the tooth in a firm position. ➢ The tooth is removed later by an oral-maxillofacial surgeon after radiographic localization..
  • 136.
    UDM - AY- Perioperative Comp. of Tooth Ex. III. Displacement into the submandibular space. ➢ If the lingual cortical bone was thin; even small amounts of apical pressure during extraction of mandibular teeth or roots can result in displacement it into that space. ➢ The dentist should make a single effort to remove it. ➢ The index finger is inserted onto the lingual aspect in an attempt to place pressure against the lingual aspect of the mandible and force the root back into the socket. ➢ If this effort is not successful at the initial attempt, the dentist should abandon the procedure and refer the patient to an oral-maxillofacial surgeon. ➢ If the root fragment is small and was not infected preoperatively, the surgeon may elect to leave the root in its position because surgical retrieval of the root may be an extensive procedure or risk serious injury to the lingual nerve..
  • 137.
    UDM - AY- Perioperative Comp. of Tooth Ex. III. Tooth Lost Into The Pharynx ➢ The crown of a tooth or an entire tooth might be lost into the pharynx: ▪ The patient should be placed into a position with the mouth facing the floor. ▪ The patient should be encouraged to cough and spit the tooth out onto the floor. ▪ The suction device can sometimes be used to help remove the tooth. ▪ In spite of these efforts, the tooth may be swallowed or aspirated..
  • 138.
    UDM - AY- Perioperative Comp. of Tooth Ex. ➢ If the tooth has been swallowed: • It will pass through the gastrointestinal tract within 2 to 4 days. • Because teeth are not usually sharp, unimpeded passage occurs in almost all situations. • It may be prudent to have the patient go to an emergency room and have a radiograph of the abdomen taken to confirm that the tooth is, indeed, in the gastrointestinal tract and not in the respiratory tract. • Follow-up radiographs are probably not necessary because swallowed teeth are ultimately passed out along with feces..
  • 139.
    UDM - AY- Perioperative Comp. of Tooth Ex. ➢ If the patient has a violent episode of coughing or shortness of breath: • The tooth may have been aspirated through the vocal cords. • The patient should be transported to an emergency room. • Chest and abdominal radiographs should be taken to determine the location of the tooth. • The urgent management of aspiration is to maintain the patient’s airway and breathing. • Supplemental oxygen may be appropriate if signs of respiratory distress are observed..
  • 140.
    UDM - AY- Perioperative Comp. of Tooth Ex. ❑ Injuries To Adjacent Teeth I. Fracture or Dislodgment of an Adjacent Restoration: ➢ If a large restoration exists, the dentist should warn the patient preoperatively about the possibility of fracturing or displacing it during the extraction. ➢ Prevention of such a fracture or displacement: • Avoiding application of instrumentation and force on the restoration. • Straight elevator should be inserted entirely into the periodontal ligament space, or not used at all to luxate the tooth before extraction. • The patient should be informed if a fracture of a tooth or restoration has occurred and that a replacement restoration is needed..
  • 141.
    UDM - AY- Perioperative Comp. of Tooth Ex. II. Chipping or Fracturing A Cusp of The Opposite Tooth: ➢ If excessive tractional forces are used, the forceps strikes the teeth of the opposite arch, chipping or fracturing a cusp. ➢ This is more likely to occur with extraction of lower teeth because these teeth may require more vertical tractional forces for their delivery. ➢ Prevention of this type of injury can be accomplished by: ▪ Avoid the use of excessive tractional forces. ▪ Adequately luxate the tooth with apical, buccolingual, and rotational forces to minimize the need for tractional forces. ▪ The dentist or assistant should protect the teeth of the opposite arch. ▪ If such an injury occurs, the tooth should be smoothed or restored..
  • 142.
    UDM - AY- Perioperative Comp. of Tooth Ex. III. Luxation of an Adjacent Tooth ➢ Inappropriate use of the extraction instruments may luxate an adjacent tooth. ➢ Forceps with broader beaks should be avoided because they will cause injury and luxation of adjacent teeth. ➢ If an adjacent tooth is significantly luxated: • Reposition the tooth into its appropriate position and stabilize it. • Avoid hyperocclusion and traumatic occlusion. • The luxated tooth should be stabilized with semirigid fixation: ✓ A simple silk suture that crosses the tooth is usually sufficient. ✓ Avoid rigid fixation with wires; it may result in external root resorption and ankylosis..
  • 143.
    UDM - AY- Perioperative Comp. of Tooth Ex. IV. Extraction of the Wrong Tooth ➢ Extraction of the wrong tooth should never occur. ➢ This is usually the most common cause of malpractice lawsuits against dentists. ➢ A common reason is that a dentist removes a tooth for another dentist: ✓ The use of differing tooth numbering systems or ✓ Differences in the mounting of radiographs. ✓ When the dentist is asked to remove teeth for orthodontic purposes. An attentive clinical assessment of the tooth to be removed before the elevator and forceps are applied are the main methods of preventing this complication.
  • 144.
    UDM - AY- Perioperative Comp. of Tooth Ex. ➢ If the surgeon realizes this error immediately: • The tooth should be replaced quickly into the tooth socket. • The tooth should be stabilized with semirigid fixation. • The correct extraction should be deferred for 4 or 5 weeks until the fate of the replanted tooth can be assessed. • If the wrongfully extracted tooth has regained its attachment to the alveolar process, then the originally planned extraction may proceed. ➢ If the surgeon does not realize this error immediately: • Little can be done to correct the problem. • Replantation of the extracted tooth after it has dried cannot be successfully accomplished. ➢ When the wrong tooth is extracted: • Inform the patient and any other dentist involved with the patient’s care. • The orthodontist may be able to adjust the treatment plan. • a dental implant–supported restoration may totally restore the patient’s dental status as it was before the inadvertent extraction..
  • 145.
    UDM - AY- Perioperative Comp. of Tooth Ex. ❑ Injuries To Osseous Structures I. Fracture of the Alveolar Process ➢ Instead of expanding, the bone fractures and is removed with the tooth. ➢ These bone injuries are caused by excessive force from the forceps. ➢ The most likely places for bone fractures are: • The buccal cortical plate over the maxillary canine. • The buccal cortical plate over maxillary first molars. • The portions of the floor of the maxillary sinus that are associated with maxillary molars. • The maxillary tuberosity. • The labial bone over mandibular incisors..
  • 146.
    UDM - AY- Perioperative Comp. of Tooth Ex. ➢ Management: • If the bone has been completely removed: ✓ It should not be replaced. ✓ Any sharp edges should be smoothed. ✓ Soft tissue should be repositioned over the remaining bone to prevent delayed healing. • If the bone remains attached to the periosteum: ✓ Usually heals if it can be separated from the tooth and is left attached to the soft tissue. ✓ It is worth the special effort to dissect the bone from the tooth. ✓ The bone and the soft tissue flap are reapproximated and secured with sutures..
  • 147.
    UDM - AY- Perioperative Comp. of Tooth Ex. II. Fracture of A Large Section of Bone in The Maxillary Tuberosity: ➢ Fractures of the maxillary tuberosity should be viewed as a significant complication. ➢ Most commonly result from extraction of an erupted maxillary 2nd and 3rd third molar. ➢ The treatment is similar to that just discussed for other bone fractures. ➢ The major therapeutic goal of management is to maintain the fractured bone in place and to provide the best possible environment for healing. ➢ This may be a situation that can best be handled by referral to an oral-maxillofacial surgeon..
  • 148.
    ❑ Injury toRegional Nerves: ➢ Caused by reflecting flaps or by traumatic extractions. ➢ The most frequently involved specific branches are: • The inferior alveolar nerve. • The mental nerve. • The lingual nerve. • The buccal nerve • The nasopalatine nerve. UDM - AY - Perioperative Comp. of Tooth Ex.
  • 149.
    UDM - AY- Perioperative Comp. of Tooth Ex. ➢ If the Inferior alveolar nerve or the mental nerve is injured, the patient will experience temporary or permanent paresthesia of the lip and chin. ➢ If the lingual nerve is injured, the patient will experience paresthesia of the tongue; and it rarely regenerates if it is severely traumatized . ➢ The nasopalatine and long buccal nerves can be surgically sectioned without long-lasting sequelae or much bother to the patient..
  • 150.
    Thank You For YourKind Attention yakanab@udmercy.edu Office Hours by Appointment - Room 358 UDM - AY - Perioperative Comp. of Tooth Ex.
  • 151.
    Post-operative Complications ofTooth Extraction Abed Yakan DDS, PGDip, MS, PhD - OMFS Division of Clinical Dentistry - Oral & Maxillofacial Surgery University of Detroit Mercy UDM - AY - Postoperative Comp. of Tooth Ex.
  • 152.
    UDM - AY- Postoperative Comp. of Tooth Ex. Contents ❑ Trismus. ❑ Postoperative bleeding. ❑ Postextraction granuloma. ❑ Painful postextraction socket. ❑ Delayed healing: ❖ Infection. ❖ Wound dehiscence. ❖ Dry socket.
  • 153.
    UDM - AY- Postoperative Comp. of Tooth Ex. ❑Trismus ❖ Definition: Is a painful condition that restricts normal mandibular movement and function as a result of masticatory musculature spasms.
  • 154.
    UDM - AY- Postoperative Comp. of Tooth Ex. ❖ Treatment: ➢ Heat therapy: • Hot mouth rinses. • Hot compresses are placed extraorally. ➢ Gentle massage of the temporomandibular joint area. ➢ Physiotherapy: Mouth Spatula, Trismus Screw, TheraBite. ➢ Medications: • Analgesics. • Anti-inflammatory. • Muscle Relaxant. • Sedatives..
  • 155.
    UDM - AY- Postoperative Comp. of Tooth Ex. ❑Postoperative Bleeding - Arterial bleeding. - Blood oozing. - Soft tissue bleeding. - Hard tissue bleeding. ❖ Challenges To The Hemostatic Mechanism: ➢ The mouth and jaws are highly vascular. ➢ The extraction leaves an open wound. ➢ It is almost impossible to apply dressing material with enough pressure. ➢ Patients tend to explore the area of surgery with their tongues. ➢ The tongue may also cause secondary bleeding by creating small negative pressures that suction the blood clot from the socket. ➢ Salivary enzymes may lyse the blood clot..
  • 156.
    UDM - AY- Postoperative Comp. of Tooth Ex. ❖ Prevention of Bleeding: ➢ Obtain a history of bleeding: • Any existing problems with bleeding or coagulation? • Family history of bleeding? • Medications currently being taken that might interfere with coagulation? • Drugs such as anticoagulants may cause prolonged bleeding after extraction? • Severe liver disease tend to bleed excessively? When coagulopathy is suspected: • laboratory testing before surgery is performed. • Hematologist consultation. ➢ Surgery should be as atraumatic as possible. ➢ Clean incisions and gentle management of soft tissue. ➢ Sharp bony spicules should be smoothed or removed. ➢ Granulation tissue should be curetted from the periapical region..
  • 157.
    UDM - AY- Postoperative Comp. of Tooth Ex. ❖ Treatment of bleeding: ➢ Soft tissue bleeding: • Arterial bleeding: Clamping the artery with a hemostat and ligating it with a nonresorbable suture. • Blood oozing: Direct pressure..
  • 158.
    UDM - AY- Postoperative Comp. of Tooth Ex. ➢ Bone bleeding: • Arterial bleeding from small bony foramen: ✓ The foramen can be crushed with the end of a hemostat or closed by bone wax. ✓ The bleeding socket is covered with a damp gauze. ✓ The patient bites down firmly on this gauze for at least 30 minutes. ✓ The surgeon should not dismiss the patient until hemostasis has been achieved. • Blood oozing: The absorbable gelatin sponge (Gelfoam), oxidized regenerated cellulose (Surgicel) or collagen can be placed in the socket to help gain hemostasis..
  • 159.
    UDM - AY- Postoperative Comp. of Tooth Ex. ✓ This material is placed in the extraction socket and is held in place with a figure- of-eight suture placed over the socket. ✓ A gauze pack is then placed over the top of the socket and is held with pressure.
  • 160.
    UDM - AY- Postoperative Comp. of Tooth Ex. ❖ Hematoma (Prolonged Capillary Hemorrhage): ➢ blood accumulates inside the tissues, without any escape from the closed wound or tightly sutured flaps under pressure. ➢ The hematoma may be submucosal, subperiosteal, intramuscular or fascial. ➢ Management: • Placing cold packs extraorally during the first 24 h. • Then heat therapy to help it to subside more rapidly..
  • 161.
    UDM - AY- Postoperative Comp. of Tooth Ex. ❖ Secondary Bleeding: ➢ Patients occasionally call the dentist with bleeding from the extraction site, referred to as secondary bleeding. • The patient should return to the dentist. • Such patients frequently have large “liver clots” which must be removed from the mouth. • All blood, saliva, and fluids should be suctioned from the mouth. • The surgeon should determine the precise source of the bleeding. • If it is clearly seen to be a generalized oozing, the bleeding site is covered with a folded, damp gauze sponge held in place with firm pressure by the surgeon’s finger for 5 minutes. • If hemostasis is NOT achieved, the dentist should request a consultation from a hematologist, who will order typical screening tests..
  • 162.
    UDM - AY- Postoperative Comp. of Tooth Ex. ❑Postextraction Granuloma ➢ Occurs 4–5 days after the extraction of the tooth. ➢ Presence of a foreign body in the alveolus. ➢ Foreign bodies irritate the area, so that postextraction healing ceases and there is suppuration of the wound. ➢ Treatment: Debridement of the alveolus and removal of every causative agent..
  • 163.
    UDM - AY- Postoperative Comp. of Tooth Ex. ❑Painful Postextraction Socket ➢ Occurs if the extractions are difficult and are performed with awkward manipulations. ➢ The uneven bone edges injure the soft tissues of the postextraction socket, resulting in severe pain and inflammation at the extraction site. ➢ Treatment: • Smoothing of the bone margins of the wound. • Analgesics. • Gauze impregnated with eugenol should be placed over the wound margins for 36–48 h..
  • 164.
    UDM - AY- Postoperative Comp. of Tooth Ex. ❑Delayed healing ➢ General factors: • Blood diseases (agranulocytosis, leukemia). • Diabetes mellitus. • Osteopetrosis. • Osteoporosis. ➢ Local factors: • Infection. • Wound dehiscence. • Dry socket. • Inflammatory hyperplastic granuloma. • Irradiated region. • Benign and malignant neoplasms..
  • 165.
    UDM - AY- Postoperative Comp. of Tooth Ex. ❖ Infection: ➢ The most common cause of delayed wound healing is infection. ➢ Infections are a rare complication after routine dental extraction. ➢ Careful asepsis and thorough wound débridement after surgery can best prevent infection after surgical procedures..
  • 166.
    UDM - AY- Postoperative Comp. of Tooth Ex. ❖ Wound Dehiscence: ➢ Separation of the wound edges. ➢ Prevention of Wound Dehiscence 1. Use aseptic technique. 2. Perform atraumatic surgery. 3. Close the incision over intact bone. 4. Suture without tension..
  • 167.
    UDM - AY- Postoperative Comp. of Tooth Ex. ❖ Dry socket (alveolar osteitis - fibrinolytic alveolitis) ➢ It is the most common and painful in the healing of extraction wounds. ➢ It is NOT associated with an infection (without fever, swelling, and erythema). ➢ Develops on the third or fourth day after removal of the tooth. ➢ The occurrence of a dry socket: • Rare after a routine tooth extraction (2% of extractions). • Frequent after the removal of impacted mandibular third molars and other lower molars (20% of extractions)..
  • 168.
    UDM - AY- Postoperative Comp. of Tooth Ex. ➢ Clinical features: • Throbbing pain, and frequently radiates to the patient’s ear. • Empty socket, with lost blood clot. • The bone surfaces of the socket are exposed. • The area of the socket has a bad odor. • The patient frequently complains of a foul taste..
  • 169.
    UDM - AY- Postoperative Comp. of Tooth Ex. ➢ The causes of a dry socket: • Is NOT fully clear, the predisposing factors are: ✓ Limited local blood supply. ✓ Local anaesthetics with adrenalin. ✓ Traumatic procedures and excessive forces. ✓ Oral contraceptive. ✓ Smoking. ✓ Osteosclerotic disease. ✓ Radiotherapy. • The blood clot disintegrates and is dislodged. • Appears to result from fibrinolytic activity results in lysis of the blood clot and subsequent exposure of bone. • Resulting in delayed healing and necrosis of the bone surface of the socket..
  • 170.
    UDM - AY- Postoperative Comp. of Tooth Ex. ➢ Prevention of the dry socket: • Minimize trauma. • Control bacterial contamination in the area of surgery. • Small amounts of antibiotics (e.G., Tetracycline) placed in the socket alone or on a gelatin sponge have been shown to substantially decrease the incidence of dry socket in mandibular third molars and other lower molar sockets. • Placement of sutures to protect the blood clot. • Preoperative and postoperative rinses with antimicrobial mouth rinses such as chlorhexidine decrease the incidence of dry socket..
  • 171.
    UDM - AY- Postoperative Comp. of Tooth Ex. ➢ The treatment of Dry Socket: • The goal is relieving the patient’s pain during the period of healing. • If the patient receives no treatment, no sequela other than continued pain exists (treatment does not hasten healing). • Treatment is straightforward and consists of irrigation and insertion of a medicated dressing: ✓ The socket is gently irrigated with sterile saline. ✓ The socket should NOT be curetted because this increases the amount of exposed bone and the pain. ✓ The socket is gently suctioned of all excess saline..
  • 172.
    UDM - AY- Postoperative Comp. of Tooth Ex. ✓ A small strip of Gelfoam soaked in or coated with the medication. ✓ The medication contains: o Eugenol, which obtunds the pain from the bone tissue. o A topical anesthetic such as benzocaine. o Carrying vehicle such as balsam of peru.
  • 173.
    UDM - AY- Postoperative Comp. of Tooth Ex. ✓ The medicated gauze is gently inserted into the socket, and the patient usually experiences profound relief from pain within 5 minutes. ✓ The dressing is changed every other day for the next 3 to 6 days, depending on the severity of pain. ✓ The socket is gently irrigated with saline at each dressing change. ✓ Once the patient’s pain decreases, the dressing should not be replaced because it acts as a foreign body and further prolongs wound healing..
  • 174.
    Thank You For YourKind Attention yakanab@udmercy.edu Office Hours by Appointment - Room 358 UDM - AY - Postoperative Comp. of Tooth Ex.
  • 175.
    OS Clinic Protocol& Extraction Evaluation Abed Yakan DDS, PGDip, MS, PhD - OMFS Division of Clinical Dentistry - Oral & Maxillofacial Surgery University of Detroit Mercy UDM - AY - OS Clinic Protocol & Ex. Evaluation
  • 176.
    UDM - AY- OS Clinic Protocol & Ex. Evaluation Contents ❑ OS clinic protocol. ❖ Personal requirements in the oral surgery clinic. ❖ Before start check. ❖ Instrument tray systems. ❖ During the procedure. ❖ After the procedure. ❑ Extraction evaluation.
  • 177.
    OS Clinic Protocol UDM- AY - OS Clinic Protocol & Ex. Evaluation
  • 178.
    UDM - AY- OS Clinic Protocol & Ex. Evaluation Personal requirements in the oral surgery clinic: • Cleanliness and neat appearance. • Finger nails properly trimmed. • Open-toed shoes are not permitted. • Long hair must be appropriately tied back. • Jewelry cannot be worn during times of treatment..
  • 179.
    UDM - AY- OS Clinic Protocol & Ex. Evaluation • Wear mask, gloves, eye protection and gown while caring for patients in the OMS Clinic. • Scrub your hands before beginning any treatment and after touching any unclean object during treatment. • Continuously apply all other rules of clean and/or sterile technique as described in the School’s Infection Control Guidelines..
  • 180.
    Before start check 1.Cases will be assigned to you by OS front desk, 2. Call the patient form waiting area and seat your patient, 3. Open the patient’s Axium Chart and collect all the information needed,
  • 181.
    4. Review thepatient’s past and current medical findings and current surgical needs, 5. Complete focused patient assessment..
  • 182.
    UDM - AY- OS Clinic Protocol & Ex. Evaluation 6. Sign the required consents (oral surgery, and postoperative), 7. Be prepared to answer any questions about the patient medical history, consults responses, and the procedure to be done, 8. Present the case to the attending OS faculty and get the start check. No treatment may be undertaken without the faculty’s authorization..
  • 183.
    UDM - AY- OS Clinic Protocol & Ex. Evaluation Instrument Tray Systems: ➢ Standard sets of instruments are packaged together, sterilized, and then unwrapped at surgery. ➢ The basic extraction tray includes: • local anesthesia syringe, a needle, a local anesthesia cartridge. • Periosteal elevator. • Periapical curette. • Small and large straight elevator. • Pair of college pliers. • Curved hemostat. • Minnesota retractor. • Suction tip. • 2 × 2-inch or 4 × 4-inch gauze. ** The required forceps would be added to this tray..
  • 184.
    UDM - AY- OS Clinic Protocol & Ex. Evaluation ➢ The surgical extraction tray includes: • The items from the basic extraction tray. • Needle holder and suture. • Suture scissors. • Blade handle and blade. • Adson tissue forceps. • Bone file. • Tongue retractor. • Cryer elevators. • Rongeur. • Handpiece and bur..
  • 185.
    UDM - AY- OS Clinic Protocol & Ex. Evaluation During the procedure: ➢ In case of complication ask the attending faculty for help. ➢ OS faculty permission is mandatory for: • Use of LA more than 2 Lidocaine. • Check out surgical kit. • Check out and use of sharp elevators. • Use of the scalpel or drill. ➢ Avoid breaching infection control: • Use the appropriate PPE. • No Instruments’ packs on the tray. • No Used gloves on the tray. • Don’t touch the needle with any surface before injection or before recapping • Don’t touch the keyboard or mouse with gloved hands. • Avoid any contact between contaminated PPE and surfaces, clothing or people. • Discard used PPE in appropriate disposal bags..
  • 186.
    UDM - AY- OS Clinic Protocol & Ex. Evaluation After the procedure: ➢ Ask the attending faculty to check the case. ➢ Complete the codes. ➢ Write the prescription. ➢ Write the detailed post operative note. ➢ All electronic notes and other data must be approved and signed off by the supervising faculty prior to discharging the patient. ➢ Walk your patient out. ➢ All “sharps” first removed from the instrument tray and properly disposed. ➢ Return the tray and all instruments. ➢ Clean the chair and the cubicle to receive another patient. **In case of injury during procedure, fill an incidence report and sign from attending faculty..
  • 187.
    Extraction Evaluation UDM -AY - OS Clinic Protocol & Ex. Evaluation
  • 188.
    UDM - AY- OS Clinic Protocol & Ex. Evaluation I. Medical/Dental History Review/Prevention of Emergencies: ➢ Complete, orderly and concise verbal presentation to faculty with no inaccuracies. ➢ Emergencies are prevented. ➢ The need for premedication and antibiotic prophylaxis are recognized and verified..
  • 189.
    UDM - AY- OS Clinic Protocol & Ex. Evaluation II. Pain Management: ➢ Ensures sufficient anesthesia is achieved prior to initiation of procedure. ➢ Demonstrates thorough knowledge of local anesthetic drugs. ➢ Demonstrates thorough knowledge of local anesthesia dosage and its complications..
  • 190.
    UDM - AY- OS Clinic Protocol & Ex. Evaluation III. Surgical Management: ➢ Demonstrates thorough knowledge of surgical instruments and their appropriate use including recognition of any untoward events (incomplete tooth removal). ➢ Maintains appropriate protection of adjacent teeth and structures . ➢ Maintains appropriate patient and operator positioning..
  • 191.
    UDM - AY- OS Clinic Protocol & Ex. Evaluation IV. Soft tissue Management: ➢ Demonstrates or maintains protection of adjacent soft tissues. ➢ Provides proper flap or tissue reflection. ➢ Recognizes indication for sutures. ➢ Places appropriate sutures including type, number and location. ➢ Provides hemostasis..
  • 192.
    UDM - AY- OS Clinic Protocol & Ex. Evaluation V. Post operative Management: ➢ Demonstrates thorough knowledge and provision of postoperative instructions. ➢ After finishing the surgical procedure, oral and written instructions are given to the patient, concerning exactly what to do in the next few days..
  • 193.
    UDM - AY- OS Clinic Protocol & Ex. Evaluation What makes you subject to standard not met? • Wants to be told all the answers. • Incomplete, disorganized presentation to faculty and/or contains inaccuracies. • The need for premedication and antibiotic prophylaxis are not recognized and/or verified. • Is not prepared for session (e.g., No custom tray, missing critical materials). • Begins work without faculty approval. • Inaccurately assesses the level of difficulty of the procedure. • Pushes to provide care beyond your ability level. • Works with a different faculty than directed. • Emergencies are not prevented. • Ignores or fails to communicate with the patient..
  • 194.
    UDM - AY- OS Clinic Protocol & Ex. Evaluation What makes you subject to standard not met? • Demonstrates a lack of respect for patient’s culture. • Shows lack of respect for the patient, staff or faculty. • Insensitive to patient anxiety level. • Breaches infection control guidelines. • Runs overtime, you are responsible for significant delays in providing treatment. • Cannot recognize when faculty assistance is needed. • Do not ask for faculty assistance when it is needed. • Argues with faculty. • Does not disclose a significant problem to the faculty (e.G., Damage to adjacent tooth, etc.) • Dismissing patient without check out..
  • 195.
    UDM - AY- OS Clinic Protocol & Ex. Evaluation What Makes You Fail in Competency? ➢ Missed informed consent. ➢ You missed relevant patient medical condition. ➢ You don’t know how to select type, dose and techniques of LA. ➢ Failure to recognize the proper needle length needed for the technique. ➢ Failure to achieve adequate pain management. ➢ Failure to recognize the proper instrument and the proper way for instrument use. ➢ Failure or incomplete tooth removal. ➢ Breaching infection control. ➢ Failure to Post-operative management and instructions. ➢ Failure to Diagnosis and management of post-operative complications. ➢ Ignorance in writing the prescription. ➢ Inability to evaluate your performance as part of self-assessment. ➢ Failure to pass the answer and question session..
  • 196.
    UDM - AY- OS Clinic Protocol & Ex. Evaluation See you in OS clinic
  • 197.
    Thank You For YourKind Attention yakanab@udmercy.edu Office Hours by Appointment - Room 358 UDM - AY - OS Clinic Protocol & Ex. Evaluation
  • 198.
    Post-extraction patient management AbedYakan DDS, PGDip, MS, PhD - OMFS Division of Clinical Dentistry - Oral & Maxillofacial Surgery University of Detroit Mercy UDM - AY - Post-extraction patient management
  • 199.
    Contents: I. Post-extraction careof tooth socket. II. Post-extraction instructions. III. Control of post-extraction hemorrhage. IV. Control of post-extraction sequelae. V. Post-extraction follow-up. VI. Operative (post-extraction) note. UDM - AY - Post-extraction patient management
  • 200.
    I. Post-extraction Careof Tooth Socket ➢ The bottom of the socket is curetted carefully (as long as the tooth is nonvital) with a periapical curette, to remove any periapical lesion from the area. ➢ The sharp alveolar margin is smoothed using rongeur forceps or a bone file . ➢ The lingual and buccal plates are compressed using finger pressure. ➢ Hemostasis is aided by the patient applying pressure on moistened gauze placed over the socket for 30–45 min.. UDM - AY - Post-extraction patient management
  • 201.
    II. Post-extraction Instructions ➢Once the surgical procedure has been completed, patients should be given proper instructions. ➢ The instructions should be given to the patient verbally and also written or printed on paper. ➢ Postoperative instructions should explain what the patient is likely to experience, and how to manage and control typical postoperative situations. ➢ These postoperative instructions should describe the most common complications. ➢ The instructions should also include a telephone number at which the surgeon or doctor can be reached in an emergency.. UDM - AY - Post-extraction patient management
  • 202.
    III. Control ofPost-extraction Hemorrhage ➢ Place a small piece of moistened gauze directly over the socket. ➢ Large packs that cover the occlusal surfaces of the adjacent teeth is ineffective! ➢ Biting firmly on this gauze for at least 30 minutes. ➢ Ooze is normal for up to 24 hours after the extraction procedure. ➢ With more bleeding, reapplying the gauze for as long as 1 hour to gain control of bleeding. ➢ Biting on a tea bag for 30 minutes..
  • 203.
    ➢ AVOID thefollowings after extraction: • All activities that disturb the blood clots. • Talking minimum for 2 to 3 hours. • Smoking for the first 12 hours. • Sucking on a straw when drinking. • Spiting during the first 12 hours. • Strenuous exercise for the first 12 to 24 hours. Prolonged oozing, bright red bleeding, or large clots in the patient’s mouth are indications for a return visit.. UDM - AY - Post-extraction patient management
  • 204.
    IV. Control ofPost-extraction Sequelae Pain and Discomfort: ➢ The surgeon must help the patient to have a realistic expectation of what type of pain may occur after extraction. ➢ Patients who make a point of informing the surgeon that they expect a great deal of pain after surgery should NOT be ignored or automatically told to take an (OTC) analgesic. ➢ The surgeon who spends some time discussing these issues with the patient before surgery will be able to design the most appropriate analgesic regimen. ➢ It is important for the surgeon to assure patients that their postoperative discomfort will be effectively managed.. UDM - AY - Post-extraction patient management
  • 205.
    ➢ Patients whoare expected to have a higher level of pain should be given a prescription analgesic that will control the pain. ➢ The patient should be told to take at least ibuprofen or acetaminophen postoperatively to prevent initial discomfort when the effect of the local anesthetic disappears. ➢ The surgeon should also take care to advise the patient that the goal of analgesic medication is management of pain and NOT elimination of all discomfort. ➢ The three characteristics of the pain that occur after routine tooth extraction: (1) The pain is usually not severe and can be managed with mild OTC analgesics. (2) The peak pain experience occurs about 12 hours after the extraction. (3) Significant pain from extraction rarely persists longer than 2 days after surgery.. UDM - AY - Post-extraction patient management
  • 206.
    ➢ Postoperative painis much more difficult to manage if administration of analgesic medication is delayed until the pain is severe. ➢ The first dose of analgesic medication should be taken before the effects of the local anesthetic subside, and it may take 60 to 90 minutes to become fully effective. ➢ All patients should be given instruction concerning analgesics before they are discharged.. UDM - AY - Post-extraction patient management
  • 207.
    ✓ Ibuprofen: NSAID- Has antiplatelet effect but not significant in postoperative bleeding. ✓ Acetaminophen: Does not interfere with platelet function. ✓ Opioids: Produce drowsiness and gastrointestinal upset. The Drug Enforcement Administration (DEA) controls narcotic analgesics. To write prescriptions for these drugs, the dentist must have a DEA permit and number.. UDM - AY - Post-extraction patient management
  • 208.
    UDM - AY- Post-extraction patient management
  • 209.
    Diet: ➢ A high-calorie,high-volume liquid or soft diet is best for the first 12 to 24 hours. ➢ The patient must have an adequate intake of fluids, usually at least 2 liters (L), during the first 24 hours. ➢ Food in the first 12 hours should be soft and cool to keep the local area comfortable and have less tendency to cause local trauma or initiate rebleeding episodes. ➢ The patient should be advised to return to a normal diet as soon as possible. ➢ Patients who have diabetes should be encouraged to return to their normal insulin and caloric intake as soon as possible.. UDM - AY - Post-extraction patient management
  • 210.
    Oral Hygiene: ➢ Keepingthe whole mouth reasonably clean results in a more rapid healing. ➢ May gently brush the teeth that are away from the area of surgery in the usual fashion. ➢ Avoid brushing the extraction site to prevent a new bleeding episode. ➢ Avoid disturbing sutures. ➢ The next day, patients should begin gentle rinses with dilute salt water. ➢ The water should be warm but not hot enough to burn the tissue. ➢ Most patients can resume their preoperative oral hygiene measures by the third or fourth day after surgery.. UDM - AY - Post-extraction patient management
  • 211.
    Edema: ➢ Simple singleextraction will probably not result in swelling that the patient can see. ➢ Surgical extraction may result in moderately large amounts of swelling. ➢ Swelling usually reaches its maximum 36 to 48 hours. ➢ Swelling begins to subside on the third or fourth day. ➢ It is usually resolved by the end of the first week.. UDM - AY - Post-extraction patient management
  • 212.
    What help inreduce swelling after extraction? • Using Ice bag immediately for 20 min on and 20 min off for 12 to 24 hours. • Second day, neither ice nor heat should be applied to the face. • Third day, application of heat may help resolve the swelling more quickly. • Sleeping in a more upright position by using extra pillows will help reduce facial edema.. UDM - AY - Post-extraction patient management
  • 213.
    Prevention and Recognitionof Infection: ➢ Adhere carefully to the basic principles of surgery: • Minimize tissue damage. • Remove sources of infection. • Clean the wound. ➢ Patients with immune deficiency may require antibiotics to prevent infection. ➢ Antibiotics after routine extraction are usually not necessary in healthy patients. ➢ Infections after routine extractions are unusual.. UDM - AY - Post-extraction patient management
  • 214.
    ➢ The typicalsigns of infection are: • Fever. • Increased swelling. • Reddening of skin. • A foul taste in the mouth. • Worsening pain 3 to 4 days after surgery. • Oral wounds looked inflamed. • Some purulence is usually present.. UDM - AY - Post-extraction patient management
  • 215.
    Trismus: (limitation inmouth opening). Trismus is usually not severe and does not hamper the patient’s normal activities. How may it result? ➢ Trauma and the resulting inflammation involving the muscles of mastication: • Surgical extraction of impacted mandibular third molars usually results in some degree of trismus because the inflammatory response to the surgical procedure is sufficiently widespread to involve several muscles of mastication. ➢ Multiple injections of the local anesthetic and penetrate the muscles: • The muscle most likely to be involved is the medial pterygoid muscle, which may be penetrated by the local anesthetic needle during the IAN block. Patients should be warned that Trismus might occur and will likely resolve within a week.. UDM - AY - Post-extraction patient management
  • 216.
    Ecchymosis: ➢ Blood oozessubmucosally and subcutaneously, which appears as a bruise, is known as ecchymosis. ➢ Ecchymosis is not dangerous and does not increase pain or infection. ➢ Ecchymosis is usually seen in older patients because of their: • Decreased tissue tone, • Increased capillary fragility, • Weaker intercellular attachments. ➢ Typically, the onset of ecchymosis is 2 to 4 days after surgery and usually resolves within 7 to 10 days.. UDM - AY - Post-extraction patient management
  • 217.
    V. Post-extraction Follow-up ➢The surgeon can check the patient’s progress after the surgery. ➢ Uncomplicated procedures, a follow-up visit at 1 week is usually adequate. ➢ Sutures should be removed, as needed, at the 1-week postoperative appointment. ➢ If any problem arises, patient should request an earlier follow-up visit. ➢ The most likely reasons for an earlier follow-up visit are: • Prolonged bleeding. • Pain that is not responsive to the prescribed medication. • And suspected infection. • Dry socket.. UDM - AY - Post-extraction patient management
  • 218.
    VI. Operative (Post-extraction)Note ➢ The surgeon must enter into the records a note of what transpired during each visit. ➢ Whenever surgery is performed, some critical factors should be entered into the chart: These details may be recorded in various ways, depending on the software program used..
  • 219.
    Post-extraction note (Simple) •Extractionof tooth number(s): •Vitals and chair-side tests: --------------- •PMH, Meds, and Allergies reviewed. •Risks and benefits of procedure reviewed. •Consent read, signed, and understood. •STO: student name, assistant name, faculty name, Time: -------- am / pm. •Patient was prepped and draped in a normal oral surgical manner. •----- carpules of -------was / were used to anesthetize the -------Nerve / Nerves. •A periosteal elevator was used to separate the gingiva from the tooth/root. •A straight elevator was then used to luxate the tooth. •The tooth/root was removed using ----- forceps. * • The extraction site was inspected and all granulation and / or infected tissue was removed.* •A hemostatic pack was placed. •The patient was given verbal and written post-operative instructions. •The patient signed the postoperative instructions. •There were no intraoperative complications, and the patient tolerated the procedure well. •Good hemostasis was obtained, and the patient was discharged home. •Follow-up: PRN / ------------ •Prescriptions: None / ------------ ** Post-extraction note (Surgical) ADD: • A full thickness buccal mucoperiosteal envelope flap was raised. • The tooth was sectioned with a hall drill and removed using -------. • The bone edges were smoothed with a bone file. • The wound was irrigated with normal saline and debris were suctioned. • The flap was replaced in its anatomic position and held with ---- sutures. UDM - AY - Post-extraction patient management
  • 220.
    Thank You For YourKind Attention yakanab@udmercy.edu Office Hours by Appointment - Room 358 UDM - AY - Post-extraction patient management