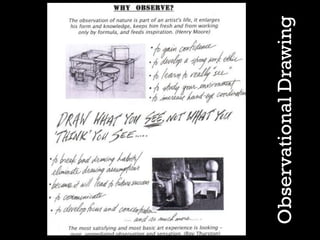
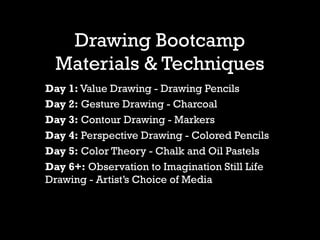
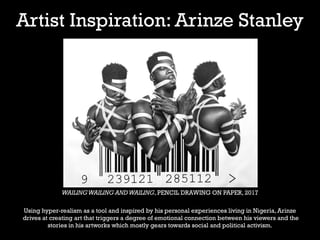
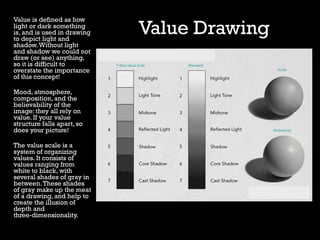
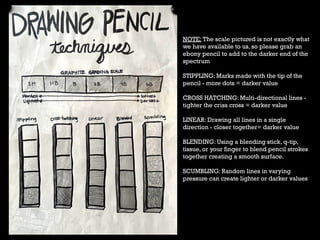
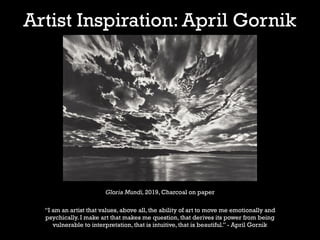
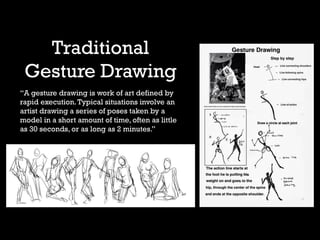
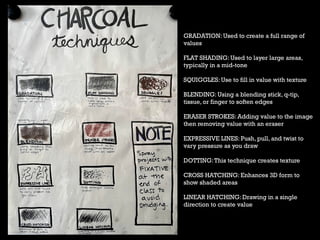
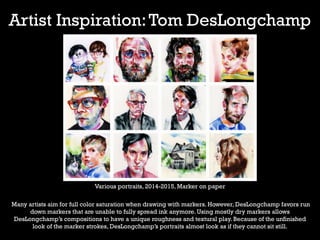
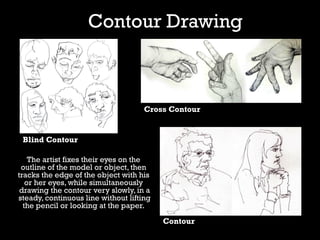
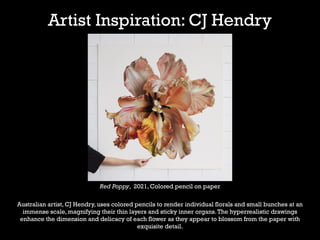
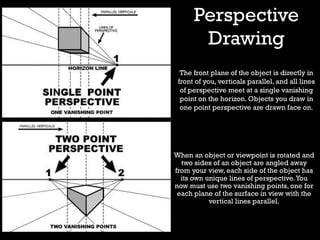
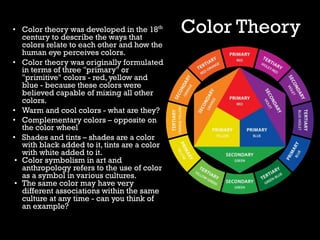
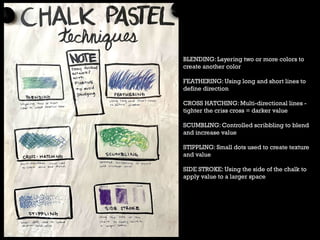
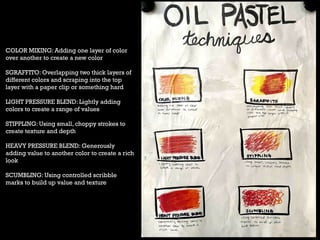
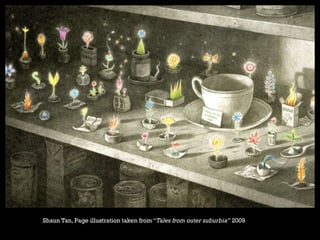
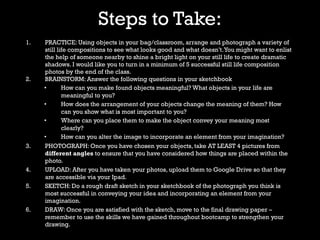
2. Drawing Bootcamp
Materials & Techniques
Day 1: Value Drawing - Drawing Pencils
Day 2: Gesture Drawing - Charcoal
Day 3: Contour Drawing - Markers
Day 4: Perspective Drawing - Colored Pencils
Day 5: Color Theory - Chalk and Oil Pastels
Day 6+: Observation to Imagination Still Life
Drawing - Artistās Choice of Media
3. Artist Inspiration: Arinze Stanley
WAILINGWAILING ANDWAILING, PENCIL DRAWING ON PAPER, 2017
Using hyper-realism as a tool and inspired by his personal experiences living in Nigeria, Arinze
drives at creating art that triggers a degree of emotional connection between his viewers and the
stories in his artworks which mostly gears towards social and political activism.
4. Value Drawing
Value is defined as how
light or dark something
is, and is used in drawing
to depict light and
shadow.Without light
and shadow we could not
draw (or see) anything,
so it is difficult to
overstate the importance
of this concept!
Mood, atmosphere,
composition, and the
believability of the
image: they all rely on
value. If your value
structure falls apart, so
does your picture!
The value scale is a
system of organizing
values. It consists of
values ranging from
white to black, with
several shades of gray in
between.These shades
of gray make up the meat
of a drawing, and help to
create the illusion of
depth and
three-dimensionality.
5. NOTE: The scale pictured is not exactly what
we have available to us, so please grab an
ebony pencil to add to the darker end of the
spectrum
STIPPLING: Marks made with the tip of the
pencil - more dots = darker value
CROSS HATCHING: Multi-directional lines -
tighter the criss cross = darker value
LINEAR: Drawing all lines in a single
direction - closer together= darker value
BLENDING: Using a blending stick, q-tip,
tissue, or your finger to blend pencil strokes
together creating a smooth surface.
SCUMBLING: Random lines in varying
pressure can create lighter or darker values
6. Drawing Bootcamp
Materials & Techniques
Day 1: Value Drawing - Drawing Pencils
Day 2: Gesture Drawing - Charcoal
Day 3: Contour Drawing - Markers
Day 4: Perspective Drawing - Colored Pencils
Day 5: Color Theory - Chalk and Oil Pastels
Day 6+: Observation to Imagination Still Life
Drawing - Artistās Choice of Media
7. Artist Inspiration: April Gornik
Gloria Mundi, 2019, Charcoal on paper
āI am an artist that values, above all, the ability of art to move me emotionally and
psychically. I make art that makes me question, that derives its power from being
vulnerable to interpretation, that is intuitive, that is beautiful.ā - April Gornik
8. Traditional
Gesture Drawing
āA gesture drawing is work of art defined by
rapid execution.Typical situations involve an
artist drawing a series of poses taken by a
model in a short amount of time, often as little
as 30 seconds, or as long as 2 minutes.ā
9. GRADATION: Used to create a full range of
values
FLAT SHADING: Used to layer large areas,
typically in a mid-tone
SQUIGGLES: Use to fill in value with texture
BLENDING: Using a blending stick, q-tip,
tissue, or finger to soften edges
ERASER STROKES: Adding value to the image
then removing value with an eraser
EXPRESSIVE LINES: Push, pull, and twist to
vary pressure as you draw
DOTTING:This technique creates texture
CROSS HATCHING: Enhances 3D form to
show shaded areas
LINEAR HATCHING: Drawing in a single
direction to create value
10. Drawing Bootcamp
Materials & Techniques
Day 1: Value Drawing - Drawing Pencils
Day 2: Gesture Drawing - Charcoal
Day 3: Contour Drawing - Markers
Day 4: Perspective Drawing - Colored Pencils
Day 5: Color Theory - Chalk and Oil Pastels
Day 6+: Observation to Imagination Still Life
Drawing - Artistās Choice of Media
11. Artist Inspiration:Tom DesLongchamp
Various portraits, 2014-2015, Marker on paper
Many artists aim for full color saturation when drawing with markers. However, DesLongchamp favors run
down markers that are unable to fully spread ink anymore. Using mostly dry markers allows
DesLongchampās compositions to have a unique roughness and textural play. Because of the unfinished
look of the marker strokes, DesLongchampās portraits almost look as if they cannot sit still.
12. Contour Drawing
The artist fixes their eyes on the
outline of the model or object, then
tracks the edge of the object with his
or her eyes, while simultaneously
drawing the contour very slowly, in a
steady, continuous line without lifting
the pencil or looking at the paper.
Blind Contour
Cross Contour
Contour
13. CONTOUR SHADING: Using directional lines
to create shape and value
HATCHING: Single-direction lines to create
value
STIPPLING: Using dots to create value
CROSS HATCHING: Multi-directional lines to
create value
OUTLINING:Tracing the outline with a darker
color to create contrast
LAYERING: Layering darker colors over
lighter colors to create texture
14. Drawing Bootcamp
Materials & Techniques
Day 1: Value Drawing - Drawing Pencils
Day 2: Gesture Drawing - Charcoal
Day 3: Contour Drawing - Markers
Day 4: Perspective Drawing - Colored Pencils
Day 5: Color Theory - Chalk and Oil Pastels
Day 6+: Observation to Imagination Still Life
Drawing - Artistās Choice of Media
15. Artist Inspiration: CJ Hendry
Red Poppy, 2021, Colored pencil on paper
Australian artist, CJ Hendry, uses colored pencils to render individual florals and small bunches at an
immense scale, magnifying their thin layers and sticky inner organs.The hyperrealistic drawings
enhance the dimension and delicacy of each flower as they appear to blossom from the paper with
exquisite detail.
16. Perspective
Drawing
The front plane of the object is directly in
front of you, verticals parallel, and all lines
of perspective meet at a single vanishing
point on the horizon. Objects you draw in
one point perspective are drawn face on.
When an object or viewpoint is rotated and
two sides of an object are angled away
from your view, each side of the object has
its own unique lines of perspective.You
now must use two vanishing points, one for
each plane of the surface in view with the
vertical lines parallel.
17. VARYING PRESSURE: Pressing softer of
heavier while coloring to create different
values
SCRIBBLING: Random lines in varying
pressure can create lighter or darker values
TEXTURING: Used to create depth in 3D
shapes and textures
STIPPLING: Marks made with the tip of the
pencil - more dots = darker value
HATCHING: Drawing all lines in a single
direction - closer together= darker value
STROKES: Using a blunt pencil to draw in the
direction of the objectās texture. Helpful when
drawing grass, hair, etc.
LAYERING: Building up layers of color to
create new colors
CROSS HATCHING: Multi-directional lines -
tighter the criss cross = darker value
BURNISHING: Blending to create a smooth
surface, filling the texture of the paper
18. Drawing Bootcamp
Materials & Techniques
Day 1: Value Drawing - Drawing Pencils
Day 2: Gesture Drawing - Charcoal
Day 3: Contour Drawing - Markers
Day 4: Perspective Drawing - Colored Pencils
Day 5: Color Theory - Chalk and Oil Pastels
Day 6+: Observation to Imagination Still Life
Drawing - Artistās Choice of Media
19. Artist Inspiration: Zaria Foreman
Perito Moreno Glacier,Argentina No. 1, 2018, Chalk pastel on paper
Zaria Forman documents climate change with pastel drawings. She travels to remote regions of the
world to collect images and inspiration for her work, which is exhibited worldwide. She has flown
with NASA on several Operation IceBridge missions over Antarctica, Greenland, and Arctic Canada.
20. Color Theory
ā¢ Color theory was developed in the 18th
century to describe the ways that
colors relate to each other and how the
human eye perceives colors.
ā¢ Color theory was originally formulated
in terms of three "primary" or
"primitive" colors - red, yellow and
blue - because these colors were
believed capable of mixing all other
colors.
ā¢ Warm and cool colors - what are they?
ā¢ Complementary colors ā opposite on
the color wheel
ā¢ Shades and tints ā shades are a color
with black added to it, tints are a color
with white added to it.
ā¢ Color symbolism in art and
anthropology refers to the use of color
as a symbol in various cultures.
ā¢ The same color may have very
different associations within the same
culture at any time - can you think of
an example?
21. BLENDING: Layering two or more colors to
create another color
FEATHERING: Using long and short lines to
define direction
CROSS HATCHING: Multi-directional lines -
tighter the criss cross = darker value
SCUMBLING: Controlled scribbling to blend
and increase value
STIPPLING: Small dots used to create texture
and value
SIDE STROKE: Using the side of the chalk to
apply value to a larger space
22. COLOR MIXING: Adding one layer of color
over another to create a new color
SGRAFFITO: Overlapping two thick layers of
different colors and scraping into the top
layer with a paper clip or something hard
LIGHT PRESSURE BLEND: Lightly adding
colors to create a range of values
STIPPLING: Using small, choppy strokes to
create texture and depth
HEAVY PRESSURE BLEND: Generously
adding value to another color to create a rich
look
SCUMBLING: Using controlled scribble
marks to build up value and texture
23. Drawing Bootcamp
Materials & Techniques
Day 1: Value Drawing - Drawing Pencils
Day 2: Gesture Drawing - Charcoal
Day 3: Contour Drawing - Markers
Day 4: Perspective Drawing - Colored Pencils
Day 5: Color Theory - Chalk and Oil Pastels
Day 6+: Observation to Imagination Still Life
Drawing - Artistās Choice of Media
24. Artist Inspiration: Anna Valdez
A Cabinet of Curiosities, 2020, Paint on canvas
Working across painting, drawing, printmaking, collage, ceramics and digital media,Valdez examines the relationship
between material and cultural identity.Valdez incorporates articles found in domestic spaces such as plants, textiles,
vessels and keepsakes into her work as a method of storytelling. Her colorful work invites the viewer to consider objects
as emblematic of personal and collective experience, shifting between still life, landscape and portraiture.
25. Observational Still Life Drawing
The magic of still life artworks is that they can show us a new way
of looking at the ordinary objects around us. Once they are placed
into a specific arrangement and then captured in pencil, charcoal,
pastel, or any other medium - the objects take on a whole new
meaning.They are imbued with a life beyond the ordinary.Their
existence becomes recorded in time.
The way that the objects are depicted can evoke a wide variety of
emotions, depending on their arrangement, as well as the
lighting, color choice, and handling of the medium.These are all
things to take into account when viewing a still life artwork.They
are especially important to consider when you are creating one. A
still life gives the artist more freedom in the arrangement of
elements within a composition than do artworks of other types of
subjects such as landscape or portraiture.
26.
27. Project Requirements:
o One drawing of at least 3 objects.Think about WHERE you
place the objects because that will add to your concept also.
o Objects should be photographed so that there are visible
shadows and highlights. EVERYTHING in your photograph
will need to be drawn, so make sure to consider what is in the
background as well. How can the background add meaning
to your drawing?
o Objects must be photographed from at least 4 different
viewpoints to ensure you have a successful composition.
Photos are to be uploaded to your Google Drive. No cell
phones can be used in referencing your photos.
o One photograph will be translated into a still life drawing that
incorporates an element from your imagination.You may use
any of the materials we covered in this unit.
28. Shaun Tan, Page illustration taken from āTales from outer suburbiaā 2009
29. Steps to Take:
1. PRACTICE: Using objects in your bag/classroom, arrange and photograph a variety of
still life compositions to see what looks good and what doesnāt.You might want to enlist
the help of someone nearby to shine a bright light on your still life to create dramatic
shadows. I would like you to turn in a minimum of 5 successful still life composition
photos by the end of the class.
2. BRAINSTORM: Answer the following questions in your sketchbook
ā¢ How can you make found objects meaningful? What objects in your life are
meaningful to you?
ā¢ How does the arrangement of your objects change the meaning of them? How
can you show what is most important to you?
ā¢ Where can you place them to make the object convey your meaning most
clearly?
ā¢ How can you alter the image to incorporate an element from your imagination?
3. PHOTOGRAPH: Once you have chosen your objects, take AT LEAST 4 pictures from
different angles to ensure that you have considered how things are placed within the
photo.
4. UPLOAD: After you have taken your photos, upload them to Google Drive so that they
are accessible via your Ipad.
5. SKETCH: Do a rough draft sketch in your sketchbook of the photograph you think is
most successful in conveying your idea and incorporating an element from your
imagination.
6. DRAW: Once you are satisfied with the sketch, move to the final drawing paper ā
remember to use the skills we have gained throughout bootcamp to strengthen your
drawing.