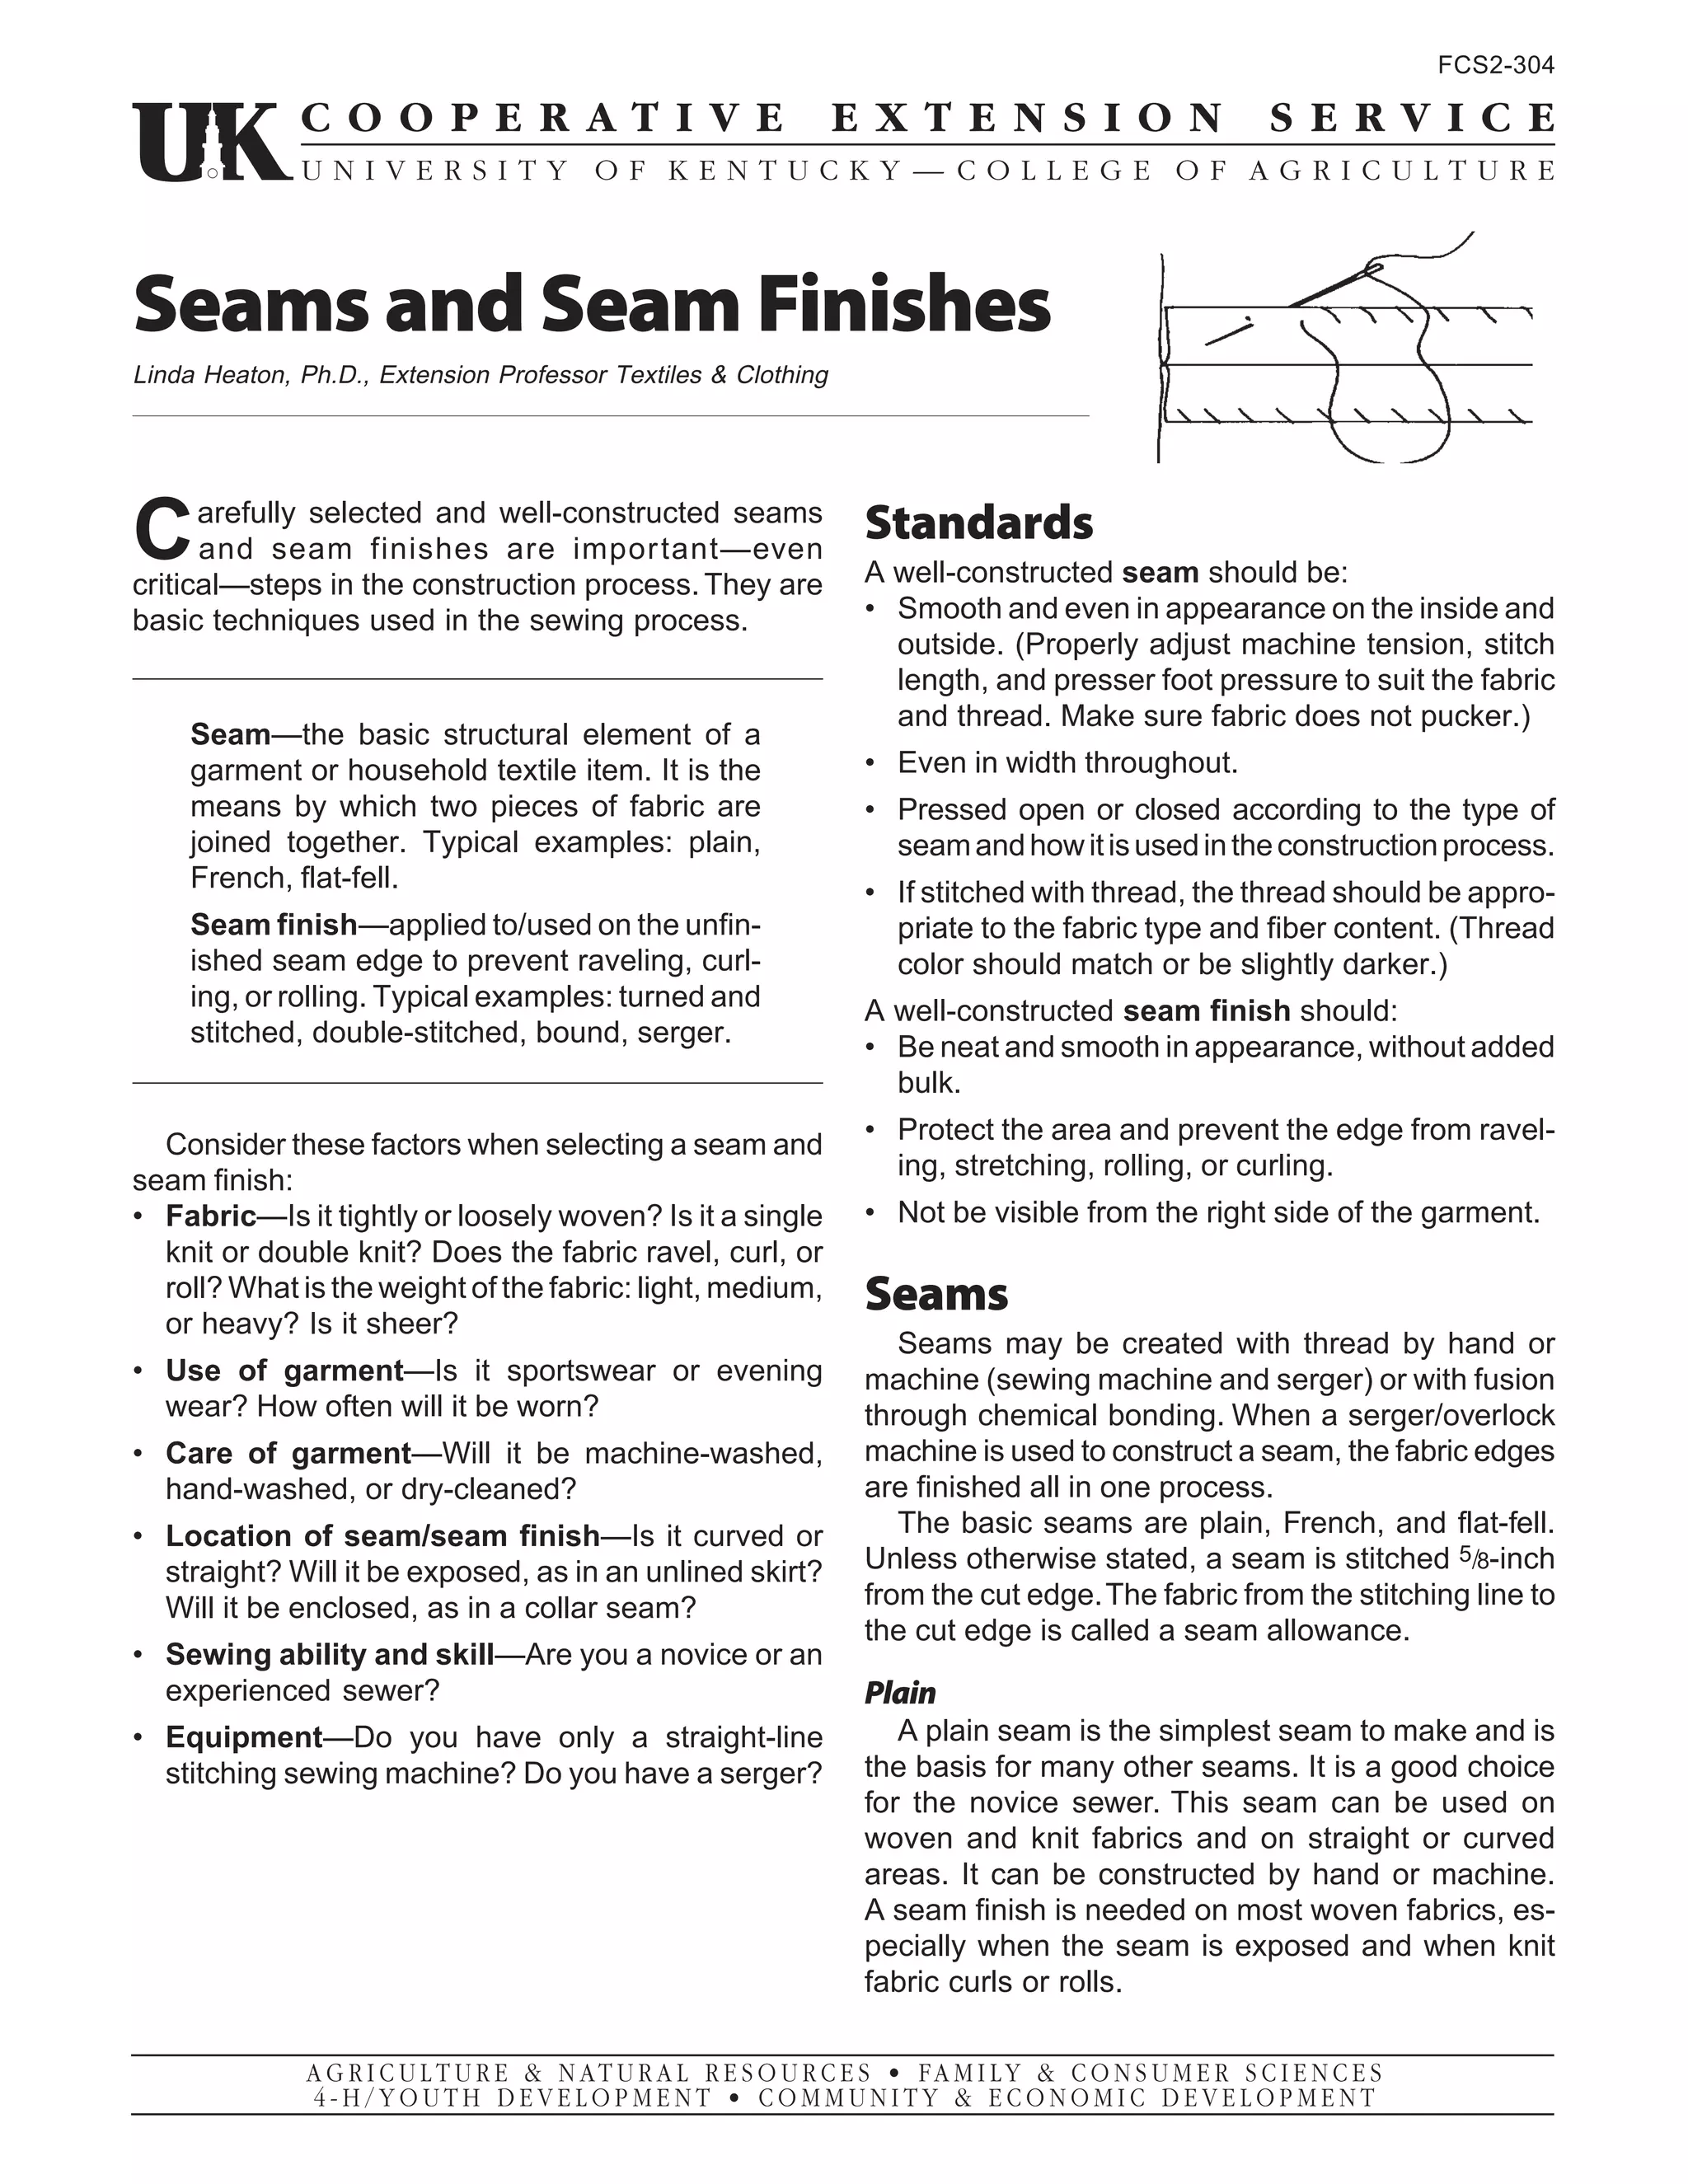
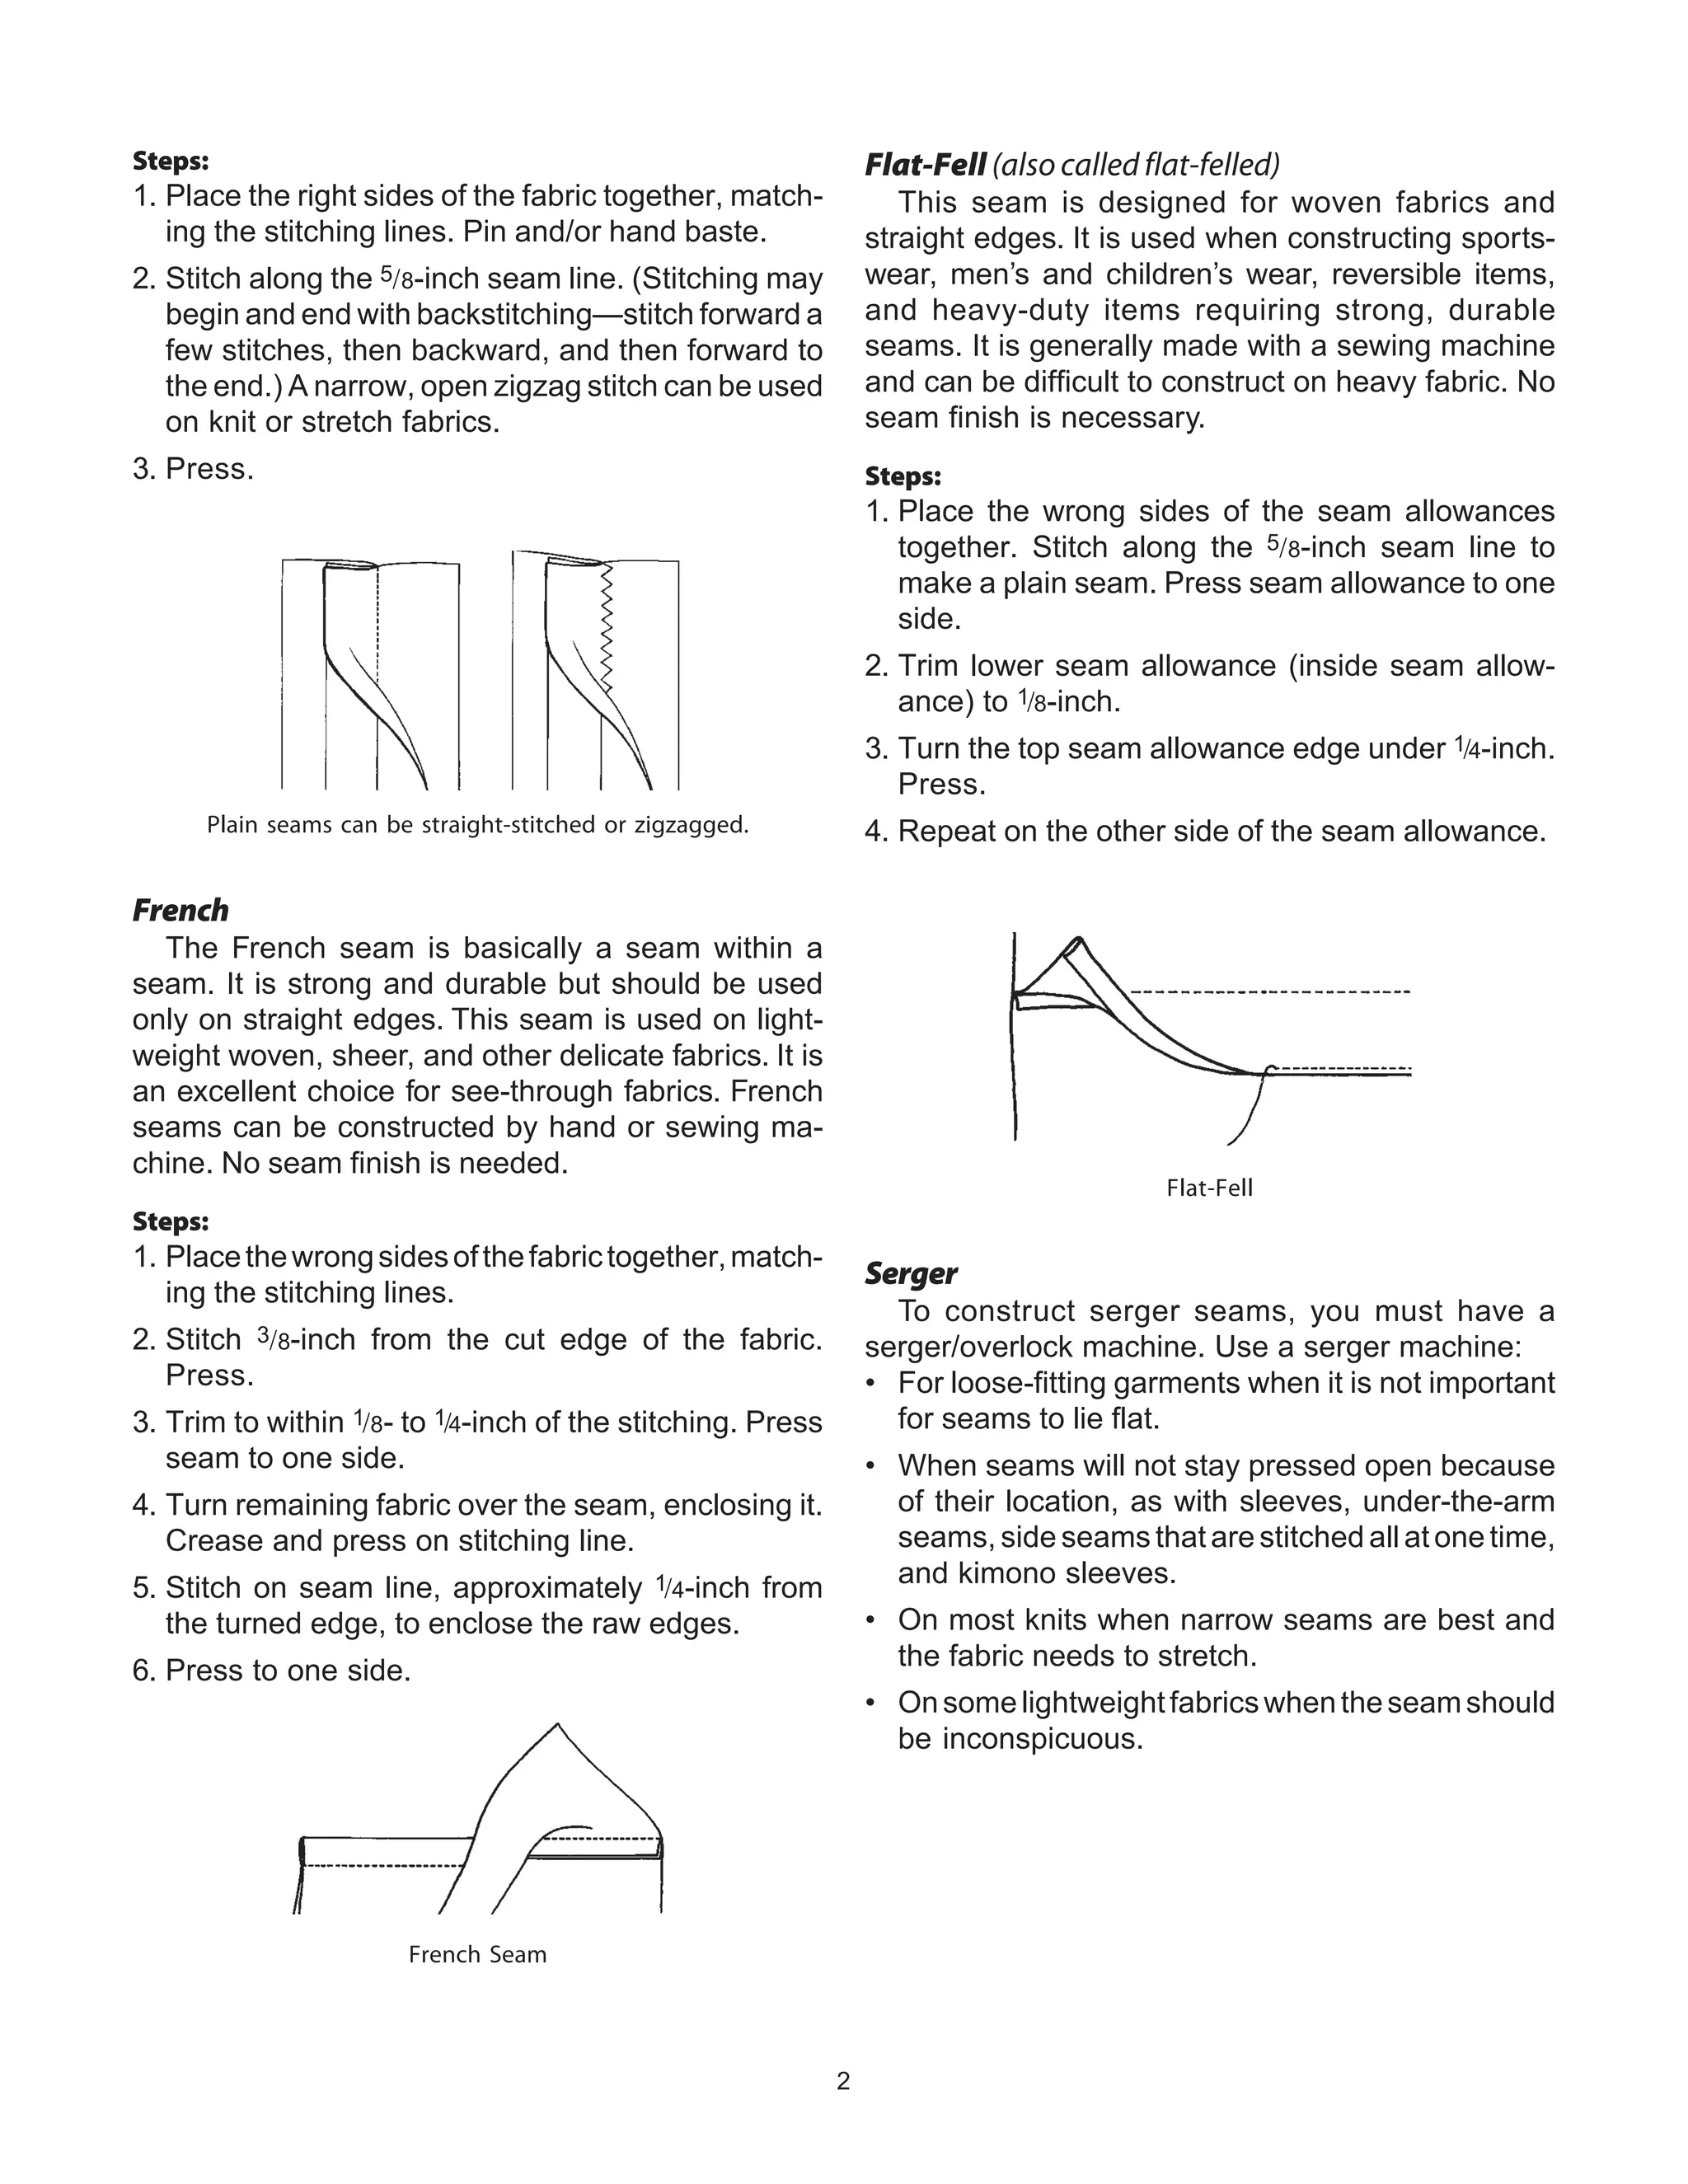
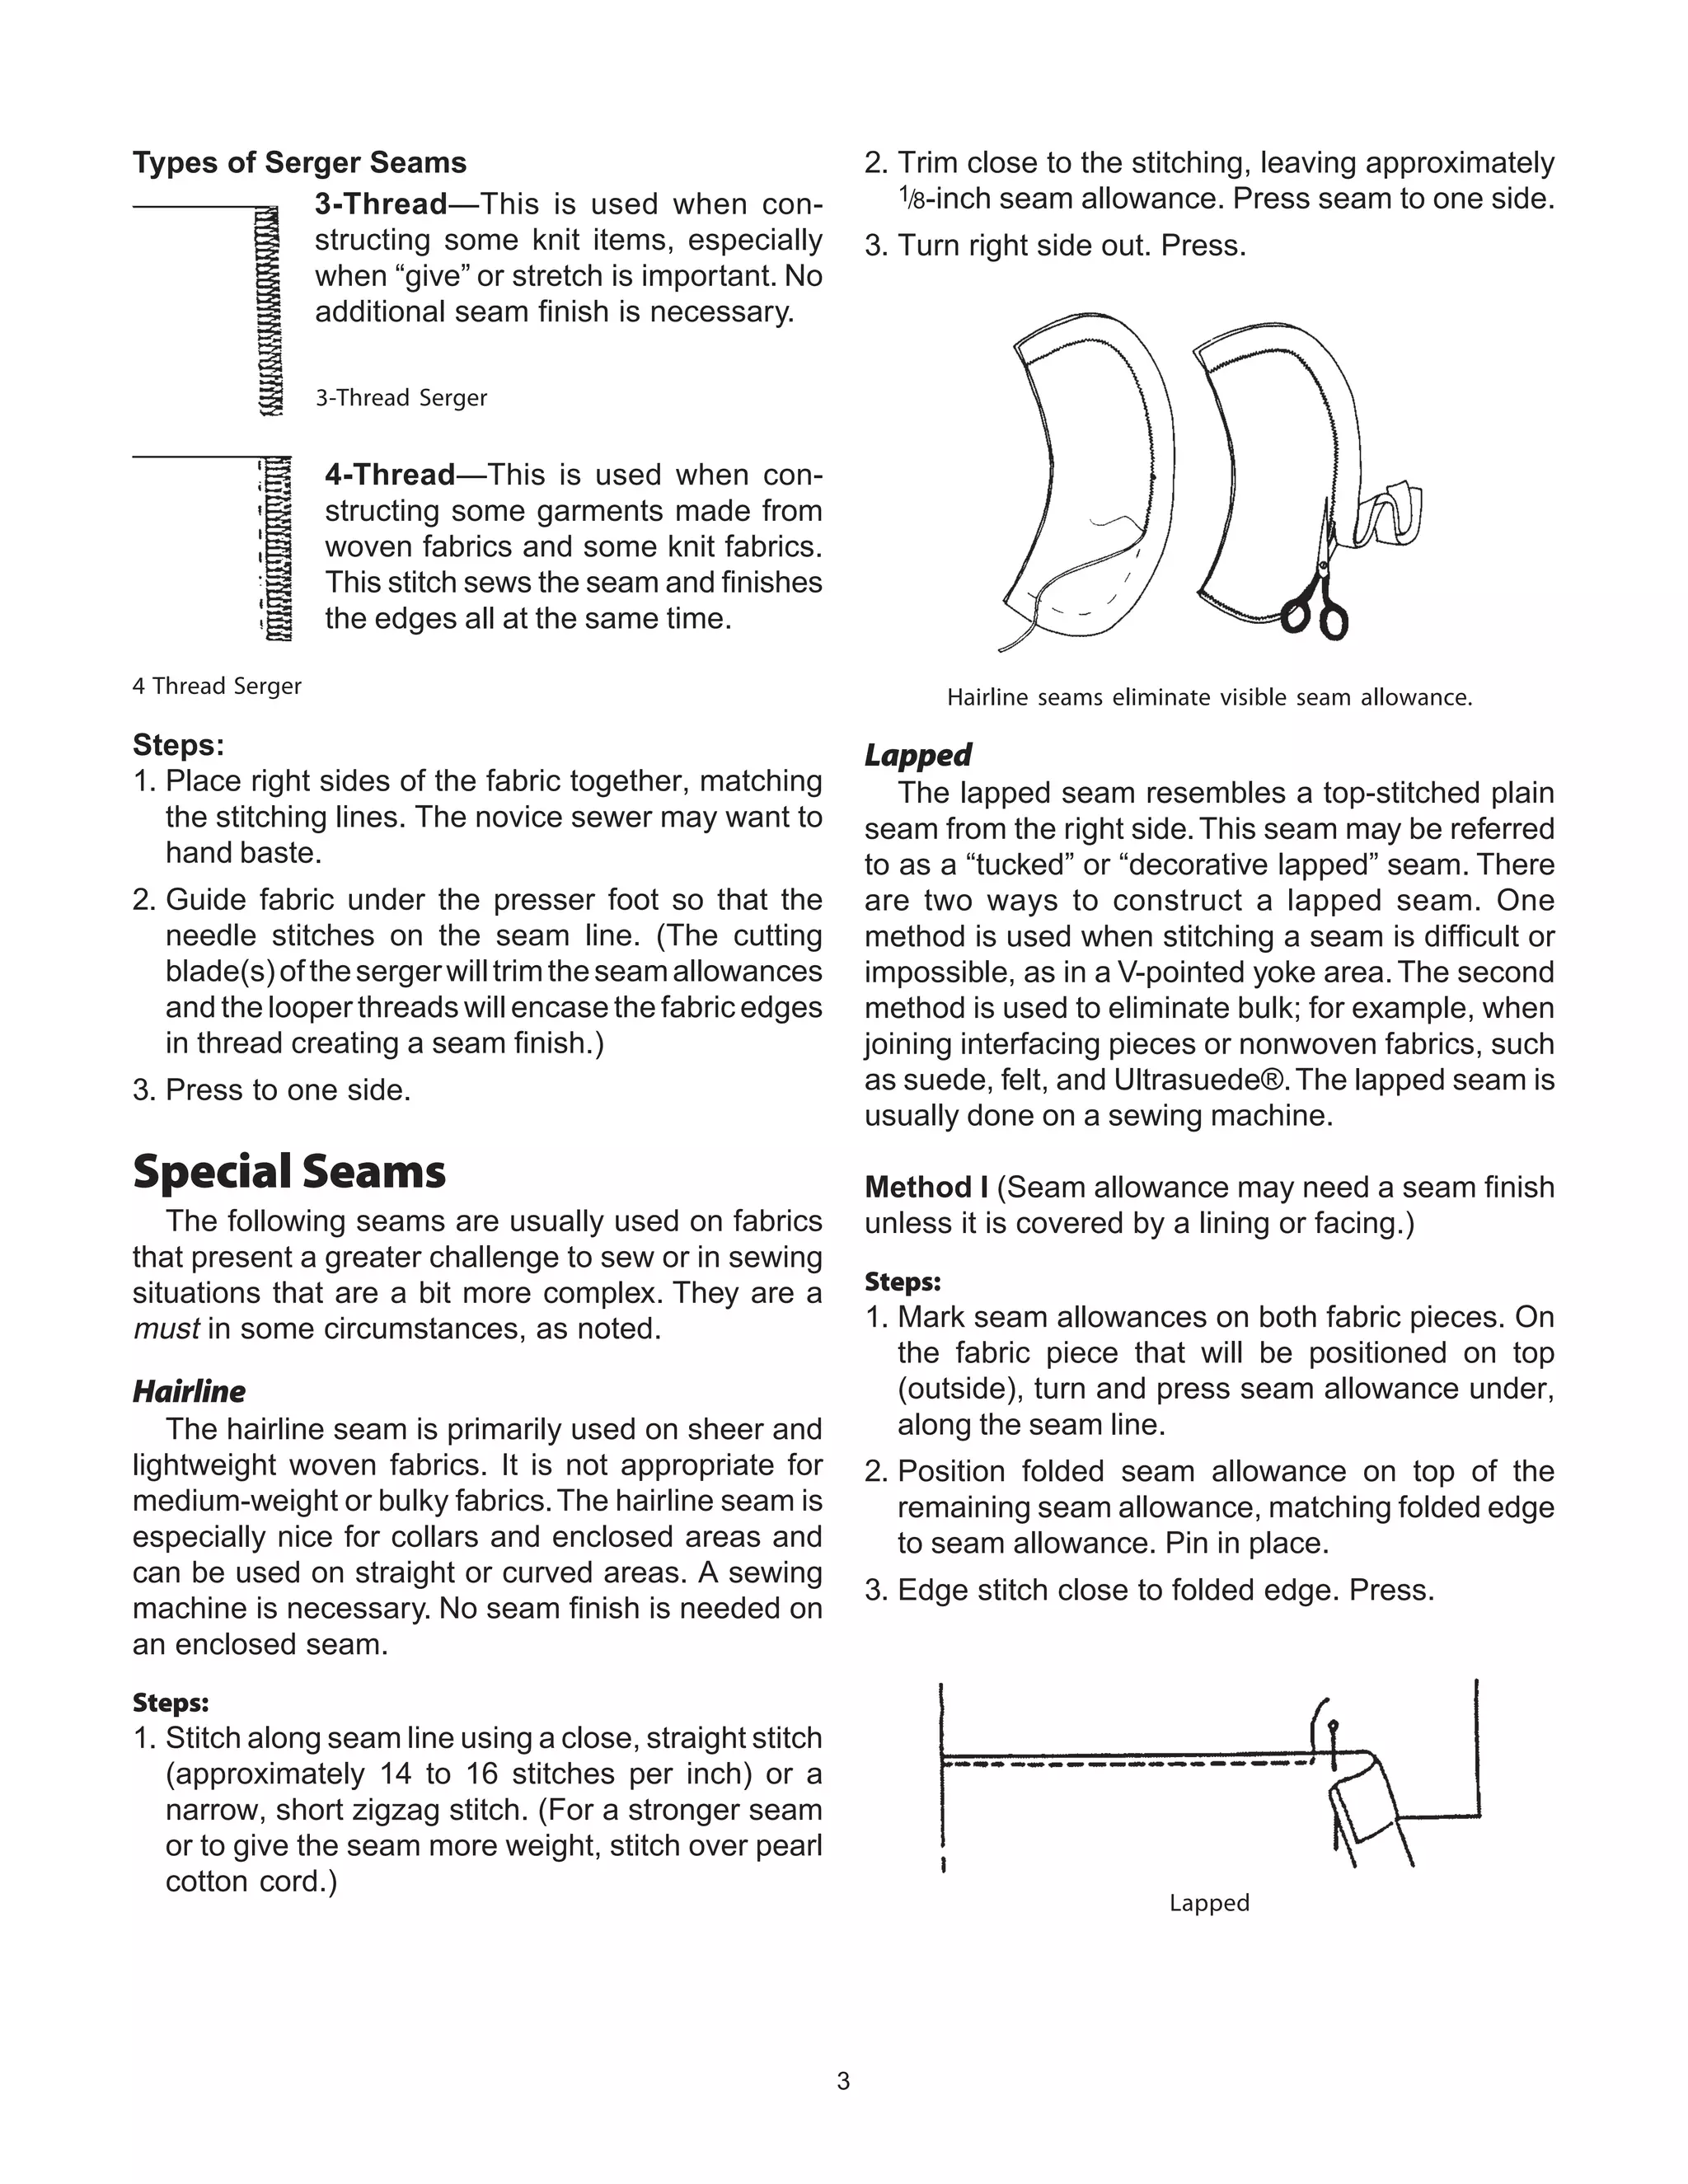
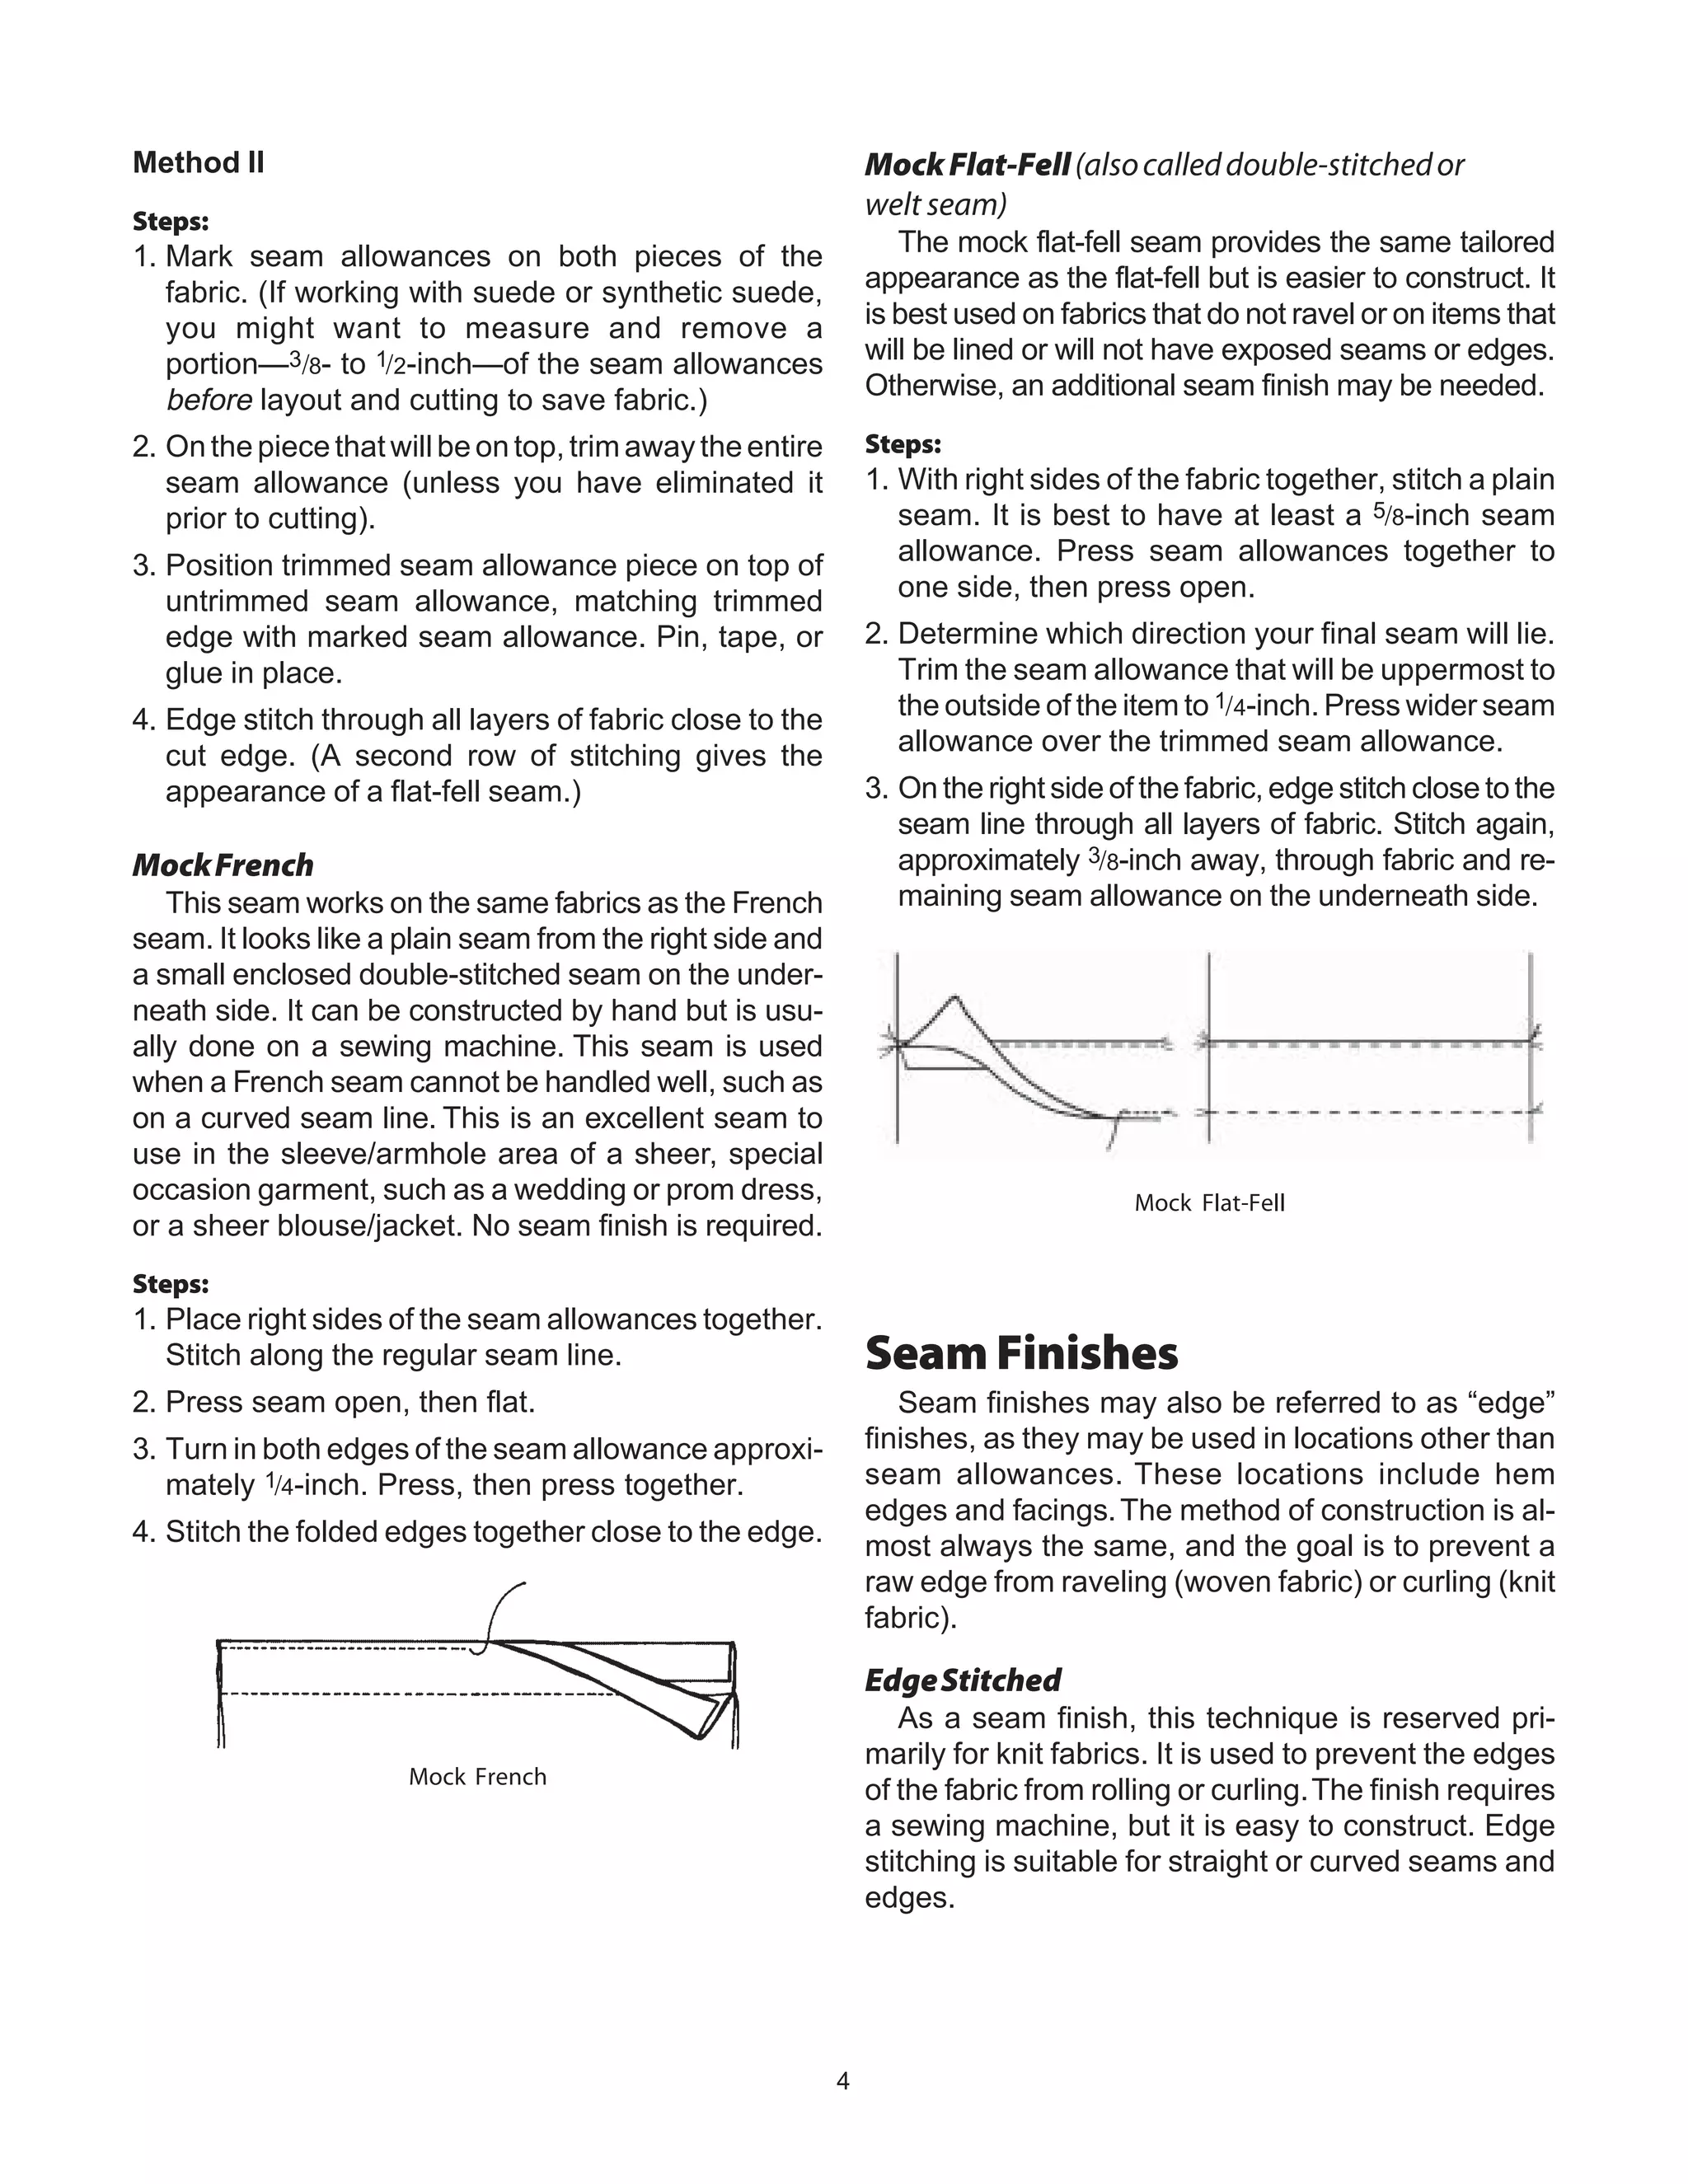
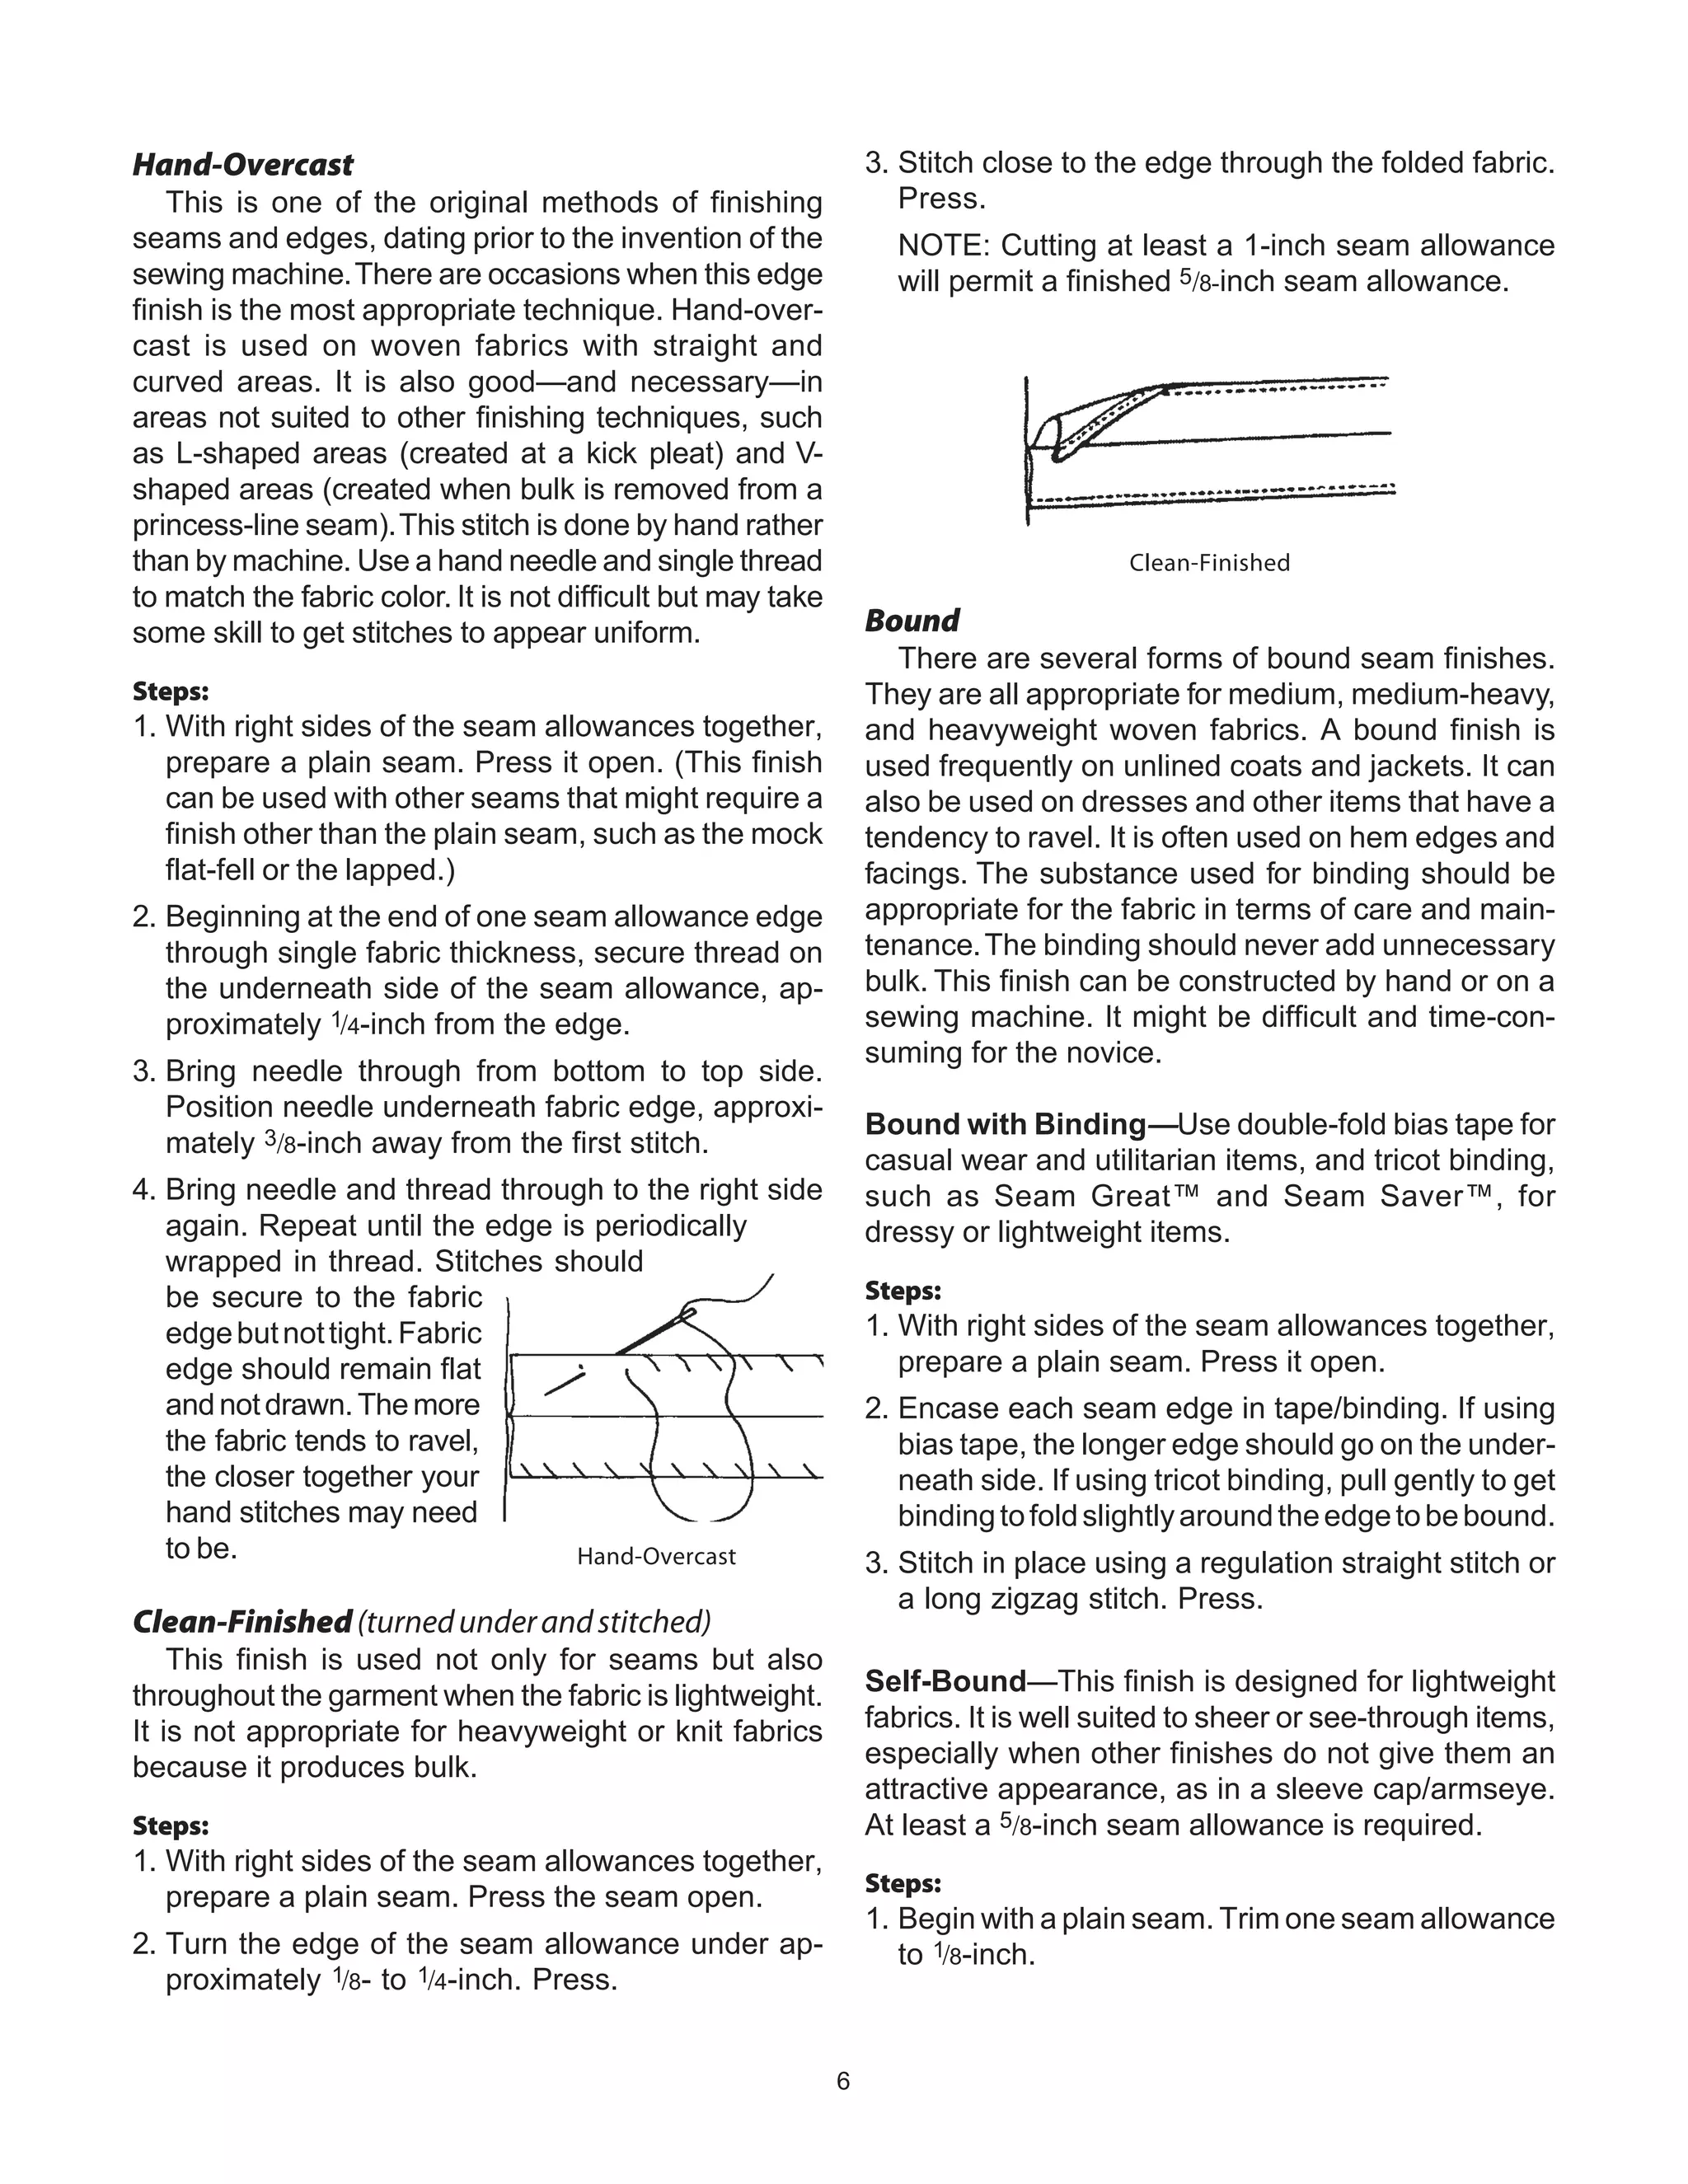
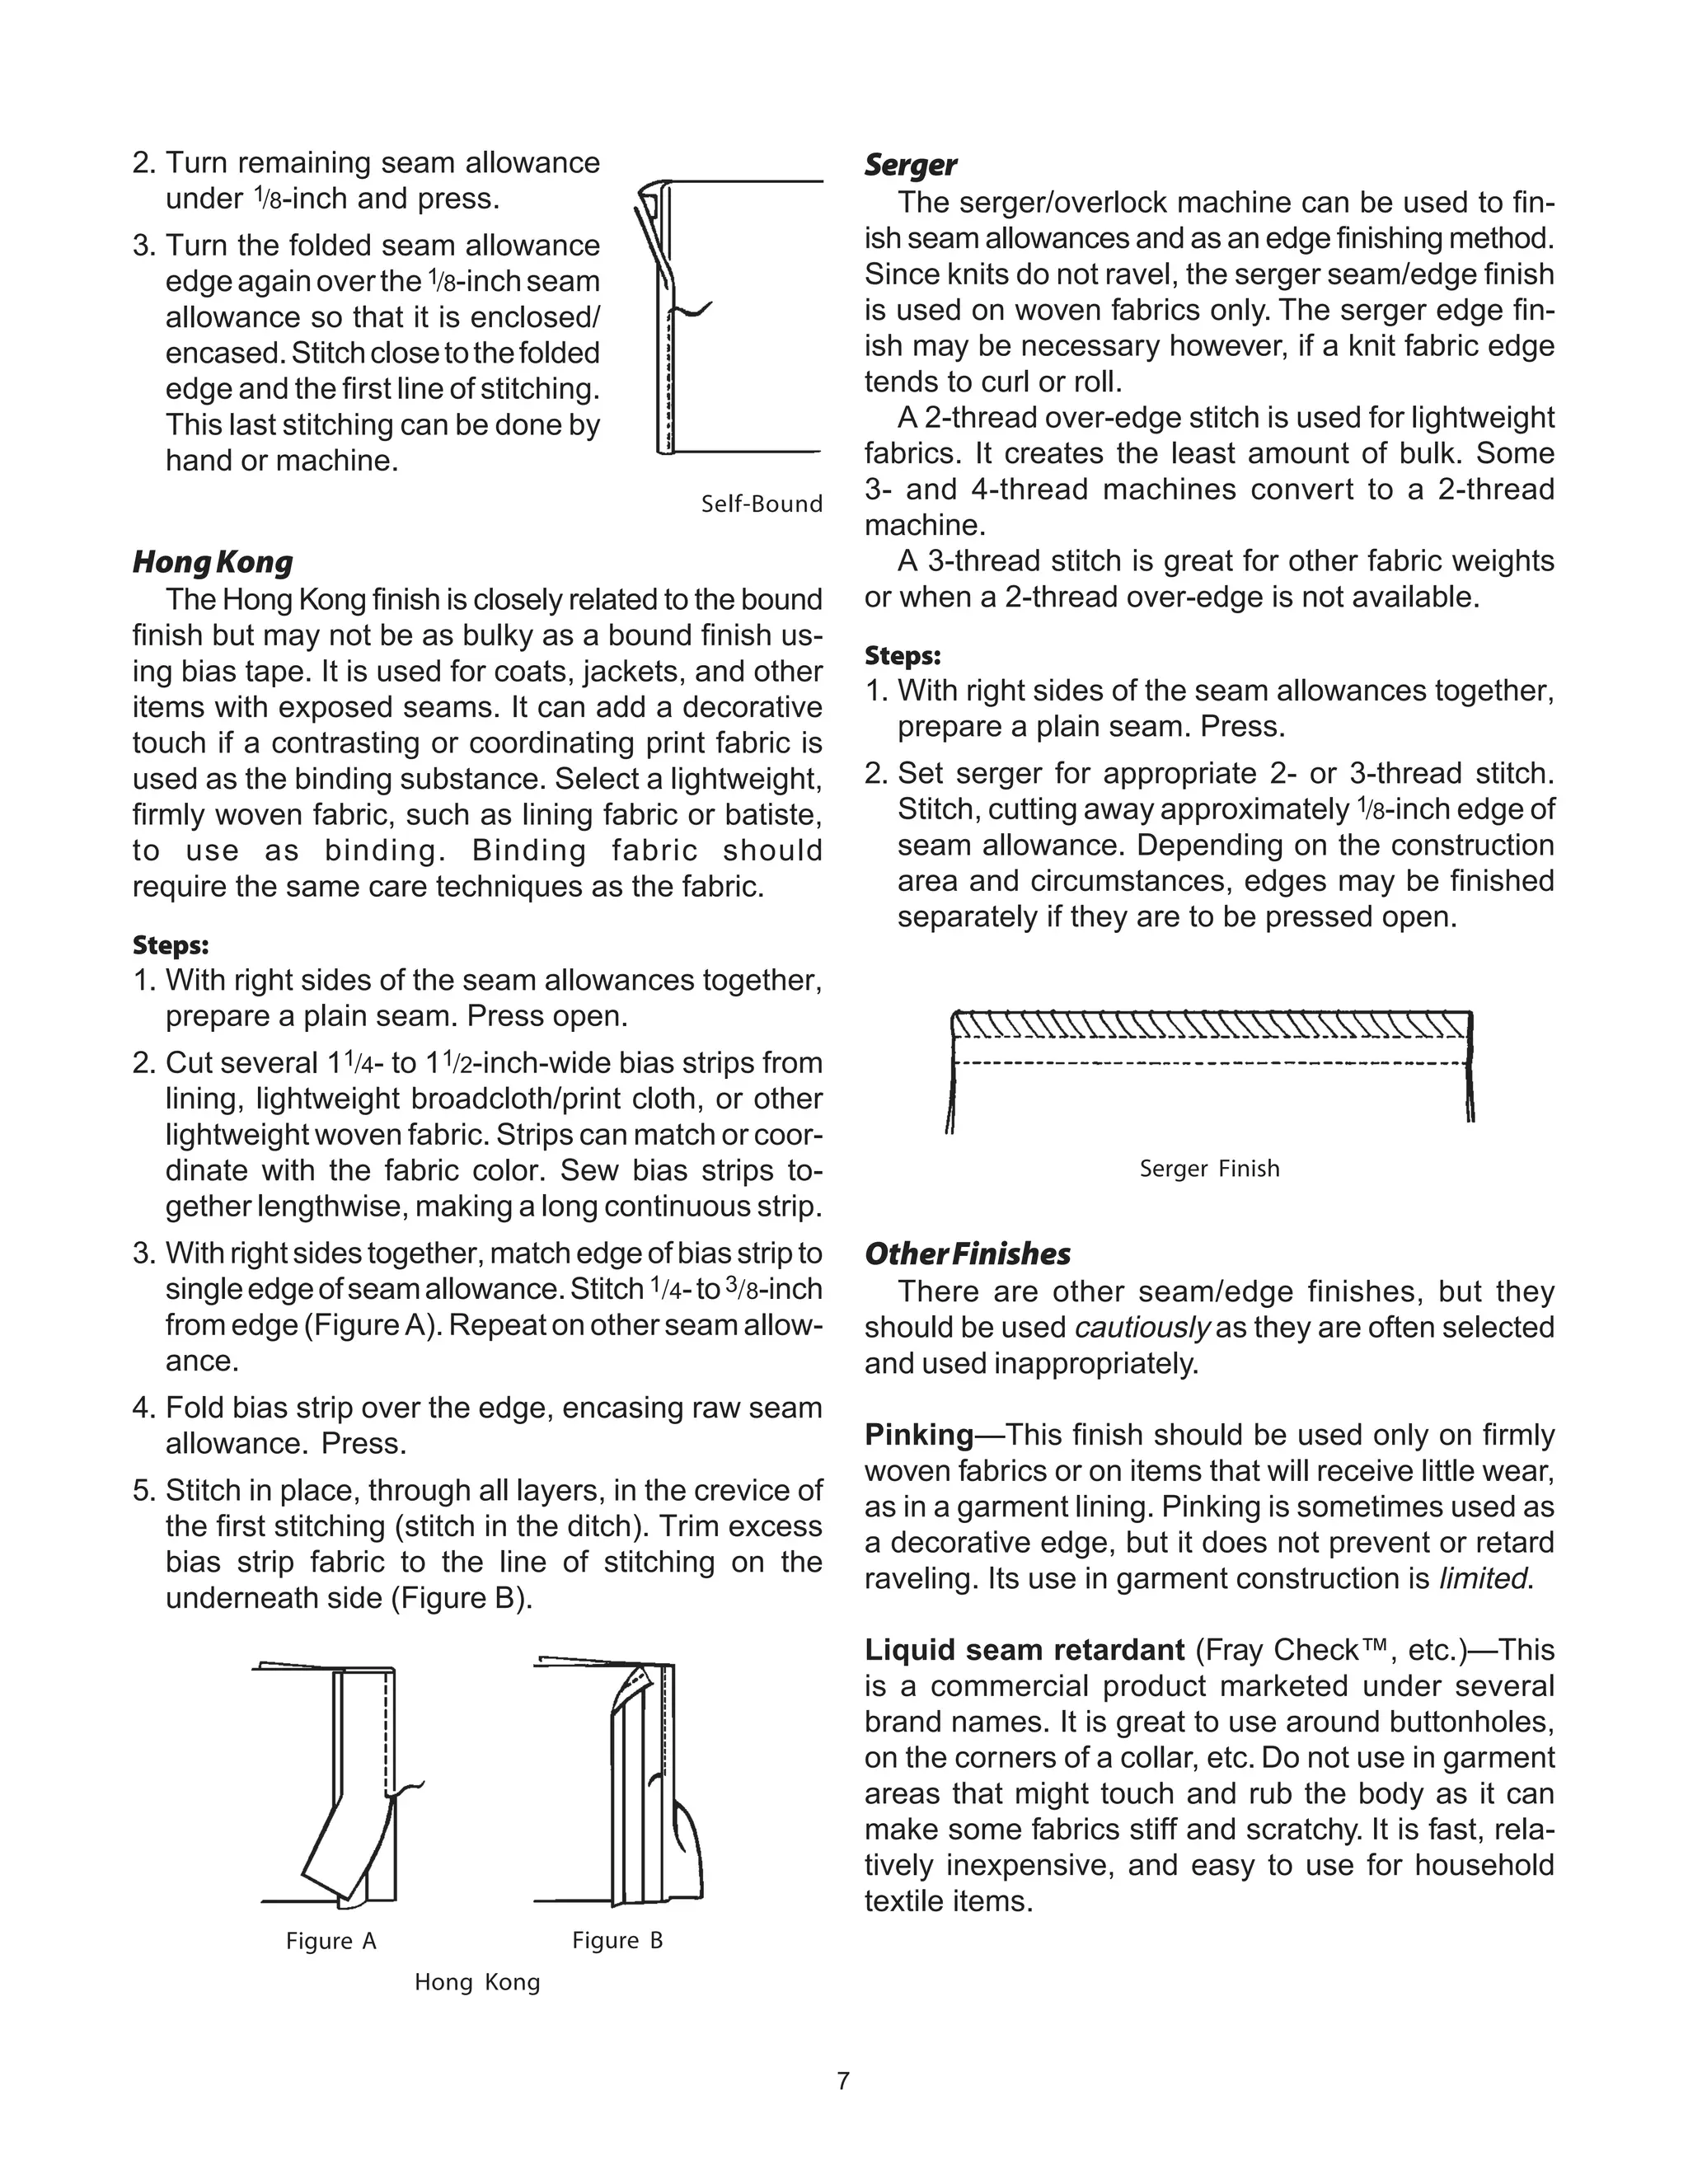
SlideShare a Scribd company logo
Carefully selected and well-constructed seams
and seam finishes are important—even
critical—steps in the construction process.They are
basic techniques used in the sewing process.
Seam—the basic structural element of a
garment or household textile item. It is the
means by which two pieces of fabric are
joined together. Typical examples: plain,
French, flat-fell.
Seam finish—applied to/used on the unfin-
ished seam edge to prevent raveling, curl-
ing, or rolling. Typical examples: turned and
stitched, double-stitched, bound, serger.
Consider these factors when selecting a seam and
seam finish:
• Fabric—Is it tightly or loosely woven? Is it a single
knit or double knit? Does the fabric ravel, curl, or
roll? What is the weight of the fabric: light, medium,
or heavy? Is it sheer?
• Use of garment—Is it sportswear or evening
wear? How often will it be worn?
• Care of garment—Will it be machine-washed,
hand-washed, or dry-cleaned?
• Location of seam/seam finish—Is it curved or
straight? Will it be exposed, as in an unlined skirt?
Will it be enclosed, as in a collar seam?
• Sewing ability and skill—Are you a novice or an
experienced sewer?
• Equipment—Do you have only a straight-line
stitching sewing machine? Do you have a serger?
FCS2-304
Seams and Seam Finishes
Linda Heaton, Ph.D., Extension Professor Textiles & Clothing
Standards
A well-constructed seam should be:
• Smooth and even in appearance on the inside and
outside. (Properly adjust machine tension, stitch
length, and presser foot pressure to suit the fabric
and thread. Make sure fabric does not pucker.)
• Even in width throughout.
• Pressed open or closed according to the type of
seamandhowitisusedintheconstructionprocess.
• If stitched with thread, the thread should be appro-
priate to the fabric type and fiber content. (Thread
color should match or be slightly darker.)
A well-constructed seam finish should:
• Be neat and smooth in appearance, without added
bulk.
• Protect the area and prevent the edge from ravel-
ing, stretching, rolling, or curling.
• Not be visible from the right side of the garment.
Seams
Seams may be created with thread by hand or
machine (sewing machine and serger) or with fusion
through chemical bonding. When a serger/overlock
machine is used to construct a seam, the fabric edges
are finished all in one process.
The basic seams are plain, French, and flat-fell.
Unless otherwise stated, a seam is stitched 5/8-inch
from the cut edge.The fabric from the stitching line to
the cut edge is called a seam allowance.
Plain
A plain seam is the simplest seam to make and is
the basis for many other seams. It is a good choice
for the novice sewer. This seam can be used on
woven and knit fabrics and on straight or curved
areas. It can be constructed by hand or machine.
A seam finish is needed on most woven fabrics, es-
pecially when the seam is exposed and when knit
fabric curls or rolls.
2
Steps:
1. Place the right sides of the fabric together, match-
ing the stitching lines. Pin and/or hand baste.
2. Stitch along the 5/8-inch seam line. (Stitching may
begin and end with backstitching—stitch forward a
few stitches, then backward, and then forward to
the end.) A narrow, open zigzag stitch can be used
on knit or stretch fabrics.
3. Press.
Plain seams can be straight-stitched or zigzagged.
French
The French seam is basically a seam within a
seam. It is strong and durable but should be used
only on straight edges. This seam is used on light-
weight woven, sheer, and other delicate fabrics. It is
an excellent choice for see-through fabrics. French
seams can be constructed by hand or sewing ma-
chine. No seam finish is needed.
Steps:
1. Placethewrongsidesofthefabrictogether,match-
ing the stitching lines.
2. Stitch 3/8-inch from the cut edge of the fabric.
Press.
3. Trim to within 1/8- to 1/4-inch of the stitching. Press
seam to one side.
4. Turn remaining fabric over the seam, enclosing it.
Crease and press on stitching line.
5. Stitch on seam line, approximately 1/4-inch from
the turned edge, to enclose the raw edges.
6. Press to one side.
French Seam
Flat-Fell (also called flat-felled)
This seam is designed for woven fabrics and
straight edges. It is used when constructing sports-
wear, men’s and children’s wear, reversible items,
and heavy-duty items requiring strong, durable
seams. It is generally made with a sewing machine
and can be difficult to construct on heavy fabric. No
seam finish is necessary.
Steps:
1. Place the wrong sides of the seam allowances
together. Stitch along the 5/8-inch seam line to
make a plain seam. Press seam allowance to one
side.
2. Trim lower seam allowance (inside seam allow-
ance) to 1/8-inch.
3. Turn the top seam allowance edge under 1/4-inch.
Press.
4. Repeat on the other side of the seam allowance.
Flat-Fell
Serger
To construct serger seams, you must have a
serger/overlock machine. Use a serger machine:
• For loose-fitting garments when it is not important
for seams to lie flat.
• When seams will not stay pressed open because
of their location, as with sleeves, under-the-arm
seams, side seams that are stitched all at one time,
and kimono sleeves.
• On most knits when narrow seams are best and
the fabric needs to stretch.
• Onsomelightweightfabricswhentheseamshould
be inconspicuous.
3
Types of Serger Seams
3-Thread—This is used when con-
structing some knit items, especially
when “give” or stretch is important. No
additional seam finish is necessary.
4-Thread—This is used when con-
structing some garments made from
woven fabrics and some knit fabrics.
This stitch sews the seam and finishes
the edges all at the same time.
Steps:
1. Place right sides of the fabric together, matching
the stitching lines. The novice sewer may want to
hand baste.
2. Guide fabric under the presser foot so that the
needle stitches on the seam line. (The cutting
blade(s)ofthesergerwilltrimtheseamallowances
and the looper threads will encase the fabric edges
in thread creating a seam finish.)
3. Press to one side.
Special Seams
The following seams are usually used on fabrics
that present a greater challenge to sew or in sewing
situations that are a bit more complex. They are a
must in some circumstances, as noted.
Hairline
The hairline seam is primarily used on sheer and
lightweight woven fabrics. It is not appropriate for
medium-weight or bulky fabrics.The hairline seam is
especially nice for collars and enclosed areas and
can be used on straight or curved areas. A sewing
machine is necessary. No seam finish is needed on
an enclosed seam.
Steps:
1. Stitch along seam line using a close, straight stitch
(approximately 14 to 16 stitches per inch) or a
narrow, short zigzag stitch. (For a stronger seam
or to give the seam more weight, stitch over pearl
cotton cord.)
2. Trim close to the stitching, leaving approximately
1/8-inch seam allowance. Press seam to one side.
3. Turn right side out. Press.
Hairline seams eliminate visible seam allowance.
Lapped
The lapped seam resembles a top-stitched plain
seam from the right side.This seam may be referred
to as a “tucked” or “decorative lapped” seam. There
are two ways to construct a lapped seam. One
method is used when stitching a seam is difficult or
impossible, as in a V-pointed yoke area.The second
method is used to eliminate bulk; for example, when
joining interfacing pieces or nonwoven fabrics, such
as suede, felt, and Ultrasuede®.The lapped seam is
usually done on a sewing machine.
Method I (Seam allowance may need a seam finish
unless it is covered by a lining or facing.)
Steps:
1. Mark seam allowances on both fabric pieces. On
the fabric piece that will be positioned on top
(outside), turn and press seam allowance under,
along the seam line.
2. Position folded seam allowance on top of the
remaining seam allowance, matching folded edge
to seam allowance. Pin in place.
3. Edge stitch close to folded edge. Press.
Lapped
4 Thread Serger
3-Thread Serger
4
Method II
Steps:
1. Mark seam allowances on both pieces of the
fabric. (If working with suede or synthetic suede,
you might want to measure and remove a
portion—3/8- to 1/2-inch—of the seam allowances
before layout and cutting to save fabric.)
2. On the piece that will be on top, trim away the entire
seam allowance (unless you have eliminated it
prior to cutting).
3. Position trimmed seam allowance piece on top of
untrimmed seam allowance, matching trimmed
edge with marked seam allowance. Pin, tape, or
glue in place.
4. Edge stitch through all layers of fabric close to the
cut edge. (A second row of stitching gives the
appearance of a flat-fell seam.)
MockFrench
This seam works on the same fabrics as the French
seam. It looks like a plain seam from the right side and
a small enclosed double-stitched seam on the under-
neath side. It can be constructed by hand but is usu-
ally done on a sewing machine. This seam is used
when a French seam cannot be handled well, such as
on a curved seam line. This is an excellent seam to
use in the sleeve/armhole area of a sheer, special
occasion garment, such as a wedding or prom dress,
or a sheer blouse/jacket. No seam finish is required.
Steps:
1. Place right sides of the seam allowances together.
Stitch along the regular seam line.
2. Press seam open, then flat.
3. Turn in both edges of the seam allowance approxi-
mately 1/4-inch. Press, then press together.
4. Stitch the folded edges together close to the edge.
Mock French
MockFlat-Fell(alsocalleddouble-stitchedor
welt seam)
The mock flat-fell seam provides the same tailored
appearance as the flat-fell but is easier to construct. It
is best used on fabrics that do not ravel or on items that
will be lined or will not have exposed seams or edges.
Otherwise, an additional seam finish may be needed.
Steps:
1. With right sides of the fabric together, stitch a plain
seam. It is best to have at least a 5/8-inch seam
allowance. Press seam allowances together to
one side, then press open.
2. Determine which direction your final seam will lie.
Trim the seam allowance that will be uppermost to
the outside of the item to 1/4-inch. Press wider seam
allowance over the trimmed seam allowance.
3. On the right side of the fabric, edge stitch close to the
seam line through all layers of fabric. Stitch again,
approximately 3/8-inch away, through fabric and re-
maining seam allowance on the underneath side.
Mock Flat-Fell
Seam Finishes
Seam finishes may also be referred to as “edge”
finishes, as they may be used in locations other than
seam allowances. These locations include hem
edges and facings.The method of construction is al-
most always the same, and the goal is to prevent a
raw edge from raveling (woven fabric) or curling (knit
fabric).
EdgeStitched
As a seam finish, this technique is reserved pri-
marily for knit fabrics. It is used to prevent the edges
of the fabric from rolling or curling.The finish requires
a sewing machine, but it is easy to construct. Edge
stitching is suitable for straight or curved seams and
edges.
5
Steps:
1. With right sides of the seam allowances together,
prepare a plain seam. Press it open.
2. Take one side of the seam allowance (single
thickness) and stitch a line of regulation machine
stitching (approximately 12 to 14 stitches per inch)
about 1/4-inch from the cut edge.
3. Repeat on the other seam al-
lowance. (Stitching along the
edge of the seam allowance
prevents rolling or curling.)
Edge Stitched
Double-Stitched
The double-stitched finish also begins with a plain
seam. It is used for knit fabrics and on seam allow-
ances that are pressed together to one side and
treated as one. When used on lightweight knit fab-
rics, it is to prevent seam allowances from rolling or
curling.The technique is ideal for the beginning sewer
and may be done several ways. It requires a sewing
machine. Some methods require a sewing machine
with zigzag or decorative stitch capability.
Steps:
1. With right sides of the seam allowances together,
prepare a plain seam. Press seam together.
2. Stitch a second row of stitching into the seam
allowance area, approximately 1/8-inch away from
first line of stitching. The second row of stitching
can be a straight conventional
stitch, a medium-width zigzag,
or a machine over-edge/over-
cast stitch.
NOTE:Themachineover-edge
stitch is recommended for rav-
eling woven fabrics, not knits.
3. Press seam to one side.
Double-Stitched
MachineZigzag
A large seam allowance (up to 1 inch) may be al-
lowed when cutting out the garment, since finished
seam allowance will be 1/8- to 1/4 inch smaller.
This finish is used on a plain seam on woven fab-
ric. It requires a sewing machine that has a zigzag
stitch capability. The finish is used on medium- to
heavyweight fabrics, including corduroy. The zigzag
stitch length (coverage) must be adjusted to accom-
modate and prevent fabric raveling.The more the fab-
ric ravels, the closer together the stitches need to be
(tighten or shorten stitch length).
Steps:
1. With right sides of the seam allowances together,
prepare a plain seam. Press it open.
2. Adjust machine to the appropriate zig-
zag stitch and length.
3. On one seam allowance (single thick-
ness), stitch close to, but not on, fabric
edge (approximately 1/8-inch from raw
edge).
4. Trim excess fabric close to the line of
stitching. Press.
Machine Zigzag
MachineOver-Edge(overcast)
Some sewing machines have a special over-edge
presser foot and/or machine setting to overcast (sew
over) the edges of the fabric without causing the fab-
ric or thread to jam the machine. If your machine has
this capability, use this stitch instead of the machine
zigzag technique previously described.The overcast
technique does not have to be trimmed, nor do you
have to allow for larger seam allowances when cut-
ting out the garment.
Steps:
1. With right sides of the seam allowance together,
prepare a plain seam. Press open.
2. Adjust sewing machine for over-edge or overcast
setting. (Change presser foot and adjust tension
and/or stitch length if necessary.)
3. On one seam allowance (single
thickness) edge, align machine
needle to stitch approximately 1/8- to
1/4-inch from the edge, allowing it to
wrap a thread around the edge as it
moves right to left.
4. Repeatontheothersideoftheseam
allowance.
Machine Over-Edge
6
Hand-Overcast
This is one of the original methods of finishing
seams and edges, dating prior to the invention of the
sewing machine.There are occasions when this edge
finish is the most appropriate technique. Hand-over-
cast is used on woven fabrics with straight and
curved areas. It is also good—and necessary—in
areas not suited to other finishing techniques, such
as L-shaped areas (created at a kick pleat) and V-
shaped areas (created when bulk is removed from a
princess-line seam).This stitch is done by hand rather
than by machine. Use a hand needle and single thread
to match the fabric color. It is not difficult but may take
some skill to get stitches to appear uniform.
Steps:
1. With right sides of the seam allowances together,
prepare a plain seam. Press it open. (This finish
can be used with other seams that might require a
finish other than the plain seam, such as the mock
flat-fell or the lapped.)
2. Beginning at the end of one seam allowance edge
through single fabric thickness, secure thread on
the underneath side of the seam allowance, ap-
proximately 1/4-inch from the edge.
3. Bring needle through from bottom to top side.
Position needle underneath fabric edge, approxi-
mately 3/8-inch away from the first stitch.
4. Bring needle and thread through to the right side
again. Repeat until the edge is periodically
wrapped in thread. Stitches should
be secure to the fabric
edgebutnottight.Fabric
edge should remain flat
andnotdrawn.Themore
the fabric tends to ravel,
the closer together your
hand stitches may need
to be.
Clean-Finished(turnedunderandstitched)
This finish is used not only for seams but also
throughout the garment when the fabric is lightweight.
It is not appropriate for heavyweight or knit fabrics
because it produces bulk.
Steps:
1. With right sides of the seam allowances together,
prepare a plain seam. Press the seam open.
2. Turn the edge of the seam allowance under ap-
proximately 1/8- to 1/4-inch. Press.
3. Stitch close to the edge through the folded fabric.
Press.
NOTE: Cutting at least a 1-inch seam allowance
will permit a finished 5/8-inch seam allowance.
Clean-Finished
Bound
There are several forms of bound seam finishes.
They are all appropriate for medium, medium-heavy,
and heavyweight woven fabrics. A bound finish is
used frequently on unlined coats and jackets. It can
also be used on dresses and other items that have a
tendency to ravel. It is often used on hem edges and
facings. The substance used for binding should be
appropriate for the fabric in terms of care and main-
tenance.The binding should never add unnecessary
bulk. This finish can be constructed by hand or on a
sewing machine. It might be difficult and time-con-
suming for the novice.
Bound with Binding—Use double-fold bias tape for
casual wear and utilitarian items, and tricot binding,
such as Seam Great™ and Seam Saver™, for
dressy or lightweight items.
Steps:
1. With right sides of the seam allowances together,
prepare a plain seam. Press it open.
2. Encase each seam edge in tape/binding. If using
bias tape, the longer edge should go on the under-
neath side. If using tricot binding, pull gently to get
bindingtofoldslightlyaroundtheedgetobebound.
3. Stitch in place using a regulation straight stitch or
a long zigzag stitch. Press.
Self-Bound—This finish is designed for lightweight
fabrics. It is well suited to sheer or see-through items,
especially when other finishes do not give them an
attractive appearance, as in a sleeve cap/armseye.
At least a 5/8-inch seam allowance is required.
Steps:
1. Begin with a plain seam. Trim one seam allowance
to 1/8-inch.
Hand-Overcast
7
2. Turn remaining seam allowance
under 1/8-inch and press.
3. Turn the folded seam allowance
edgeagainoverthe1/8-inchseam
allowance so that it is enclosed/
encased.Stitchclosetothefolded
edge and the first line of stitching.
This last stitching can be done by
hand or machine.
Self-Bound
HongKong
The Hong Kong finish is closely related to the bound
finish but may not be as bulky as a bound finish us-
ing bias tape. It is used for coats, jackets, and other
items with exposed seams. It can add a decorative
touch if a contrasting or coordinating print fabric is
used as the binding substance. Select a lightweight,
firmly woven fabric, such as lining fabric or batiste,
to use as binding. Binding fabric should
require the same care techniques as the fabric.
Steps:
1. With right sides of the seam allowances together,
prepare a plain seam. Press open.
2. Cut several 11/4- to 11/2-inch-wide bias strips from
lining, lightweight broadcloth/print cloth, or other
lightweight woven fabric. Strips can match or coor-
dinate with the fabric color. Sew bias strips to-
gether lengthwise, making a long continuous strip.
3. With right sides together, match edge of bias strip to
singleedgeofseamallowance.Stitch1/4-to3/8-inch
from edge (Figure A). Repeat on other seam allow-
ance.
4. Fold bias strip over the edge, encasing raw seam
allowance. Press.
5. Stitch in place, through all layers, in the crevice of
the first stitching (stitch in the ditch). Trim excess
bias strip fabric to the line of stitching on the
underneath side (Figure B).
Hong Kong
Serger
The serger/overlock machine can be used to fin-
ish seam allowances and as an edge finishing method.
Since knits do not ravel, the serger seam/edge finish
is used on woven fabrics only. The serger edge fin-
ish may be necessary however, if a knit fabric edge
tends to curl or roll.
A 2-thread over-edge stitch is used for lightweight
fabrics. It creates the least amount of bulk. Some
3- and 4-thread machines convert to a 2-thread
machine.
A 3-thread stitch is great for other fabric weights
or when a 2-thread over-edge is not available.
Steps:
1. With right sides of the seam allowances together,
prepare a plain seam. Press.
2. Set serger for appropriate 2- or 3-thread stitch.
Stitch, cutting away approximately 1/8-inch edge of
seam allowance. Depending on the construction
area and circumstances, edges may be finished
separately if they are to be pressed open.
Serger Finish
OtherFinishes
There are other seam/edge finishes, but they
should be used cautiously as they are often selected
and used inappropriately.
Pinking—This finish should be used only on firmly
woven fabrics or on items that will receive little wear,
as in a garment lining. Pinking is sometimes used as
a decorative edge, but it does not prevent or retard
raveling. Its use in garment construction is limited.
Liquid seam retardant (Fray Check™, etc.)—This
is a commercial product marketed under several
brand names. It is great to use around buttonholes,
on the corners of a collar, etc. Do not use in garment
areas that might touch and rub the body as it can
make some fabrics stiff and scratchy. It is fast, rela-
tively inexpensive, and easy to use for household
textile items.
Figure A Figure B
Educational programs of the Kentucky Cooperative Extension Service serve all people regardless of race, color, age, sex, religion, disability, or national origin. Issued in furtherance of Cooperative
Extension work, Acts of May 8 and June 30, 1914, in cooperation with the U.S. Department of Agriculture, M. Scott Smith, Director of Cooperative Extension Service, University of Kentucky College
of Agriculture, Lexington, and Kentucky State University, Frankfort. Copyright © 2003 for materials developed by the University of Kentucky Cooperative Extension Service. This publication may be
reproduced in portions or its entirety for educational or nonprofit purposes only. Permitted users shall give credit to the author(s) and include this copyright notice. Publications are also available on
the World Wide Web at www.ca.uky.edu. Revised 6-2003
Mention or display of a trademark, proprietary product, or firm in text or figures does not constitute an
endorsement and does not imply approval to the exclusion of other suitable products or firms.

More Related Content

What's hot

Seams And Stitching Problems And Causes
Seams And Stitching Problems And CausesSeams And Stitching Problems And Causes
Seams And Stitching Problems And Causes
g l
 

What's hot (20)

Weft Knitting
Weft KnittingWeft Knitting
Weft Knitting
 
Seam
SeamSeam
Seam
 
Garment pattern and fabric
Garment pattern and fabricGarment pattern and fabric
Garment pattern and fabric
 
Bdft ii, types of knitting & knitting machine , tmt, unit-ii
Bdft ii, types of knitting & knitting machine , tmt, unit-iiBdft ii, types of knitting & knitting machine , tmt, unit-ii
Bdft ii, types of knitting & knitting machine , tmt, unit-ii
 
Evaluating Garment Quality
Evaluating Garment QualityEvaluating Garment Quality
Evaluating Garment Quality
 
Seams and stitches
Seams and stitchesSeams and stitches
Seams and stitches
 
Knitting types
Knitting typesKnitting types
Knitting types
 
Seams And Stitching Problems And Causes
Seams And Stitching Problems And CausesSeams And Stitching Problems And Causes
Seams And Stitching Problems And Causes
 
Knitting
KnittingKnitting
Knitting
 
Working of common seams
Working of common seamsWorking of common seams
Working of common seams
 
Seam And its Classification with seam problem
Seam And its Classification with seam problemSeam And its Classification with seam problem
Seam And its Classification with seam problem
 
Trims & Accessories
Trims & AccessoriesTrims & Accessories
Trims & Accessories
 
Sewing needle
Sewing needleSewing needle
Sewing needle
 
Fabric for clothing knit
Fabric for clothing knitFabric for clothing knit
Fabric for clothing knit
 
Industrial pattern making
Industrial pattern makingIndustrial pattern making
Industrial pattern making
 
The art of garment pattern grading
The art of garment pattern gradingThe art of garment pattern grading
The art of garment pattern grading
 
Huckaback weave
Huckaback weaveHuckaback weave
Huckaback weave
 
Marker making
Marker makingMarker making
Marker making
 
Special Fabrics
Special FabricsSpecial Fabrics
Special Fabrics
 
Pattern making
Pattern makingPattern making
Pattern making
 

Similar to Seam

Glossary of sewing terms
Glossary of sewing termsGlossary of sewing terms
Glossary of sewing terms
Faddy Oraha
 

Similar to Seam (20)

SEAMS AND THEIR TYPES
SEAMS AND THEIR TYPESSEAMS AND THEIR TYPES
SEAMS AND THEIR TYPES
 
Divya Vijayvargiya ,Fashion Design ,Dezyne E'cole College
Divya Vijayvargiya ,Fashion Design ,Dezyne E'cole CollegeDivya Vijayvargiya ,Fashion Design ,Dezyne E'cole College
Divya Vijayvargiya ,Fashion Design ,Dezyne E'cole College
 
Monika Mehra, Fashion Design ,Dezyne E'cole College
Monika Mehra, Fashion Design ,Dezyne E'cole CollegeMonika Mehra, Fashion Design ,Dezyne E'cole College
Monika Mehra, Fashion Design ,Dezyne E'cole College
 
Advanced Garment Technology
Advanced Garment TechnologyAdvanced Garment Technology
Advanced Garment Technology
 
Lesson 1-clothing-construction
Lesson 1-clothing-constructionLesson 1-clothing-construction
Lesson 1-clothing-construction
 
Kriti Tolani ,Fashion Design ,Dezyne E'cole College
 Kriti Tolani ,Fashion Design ,Dezyne E'cole College Kriti Tolani ,Fashion Design ,Dezyne E'cole College
Kriti Tolani ,Fashion Design ,Dezyne E'cole College
 
Geeta Kumari ,Fashion Design ,Dezyne E'cole College
Geeta Kumari  ,Fashion Design ,Dezyne E'cole CollegeGeeta Kumari  ,Fashion Design ,Dezyne E'cole College
Geeta Kumari ,Fashion Design ,Dezyne E'cole College
 
Tanuja Sahu,Fashion Design ,Dezyne E'cole College
Tanuja Sahu,Fashion Design ,Dezyne E'cole CollegeTanuja Sahu,Fashion Design ,Dezyne E'cole College
Tanuja Sahu,Fashion Design ,Dezyne E'cole College
 
Dimple Chouhan ,Fashion Design ,Dezyne E'cole College
Dimple Chouhan ,Fashion Design ,Dezyne E'cole CollegeDimple Chouhan ,Fashion Design ,Dezyne E'cole College
Dimple Chouhan ,Fashion Design ,Dezyne E'cole College
 
HANDLING SPECIAL FABRICS.pdfhandling special fabrics notes
HANDLING SPECIAL FABRICS.pdfhandling special fabrics notesHANDLING SPECIAL FABRICS.pdfhandling special fabrics notes
HANDLING SPECIAL FABRICS.pdfhandling special fabrics notes
 
HORIZONTAL BODY MEASUREMENT.pptx
HORIZONTAL BODY MEASUREMENT.pptxHORIZONTAL BODY MEASUREMENT.pptx
HORIZONTAL BODY MEASUREMENT.pptx
 
Fabric Spreading
Fabric SpreadingFabric Spreading
Fabric Spreading
 
8 CLASSES SEAM
8 CLASSES SEAM8 CLASSES SEAM
8 CLASSES SEAM
 
Seams and Seam Finishes
Seams and Seam FinishesSeams and Seam Finishes
Seams and Seam Finishes
 
Fabric Cutting .ppt
Fabric Cutting .pptFabric Cutting .ppt
Fabric Cutting .ppt
 
operating specialized industrial garment machines level 2.1.ppt
operating specialized industrial garment machines level 2.1.pptoperating specialized industrial garment machines level 2.1.ppt
operating specialized industrial garment machines level 2.1.ppt
 
Glossary of sewing terms
Glossary of sewing termsGlossary of sewing terms
Glossary of sewing terms
 
Discussion kinds of seams
Discussion kinds of seamsDiscussion kinds of seams
Discussion kinds of seams
 
U 3 introduction to pattern making
U 3 introduction to pattern makingU 3 introduction to pattern making
U 3 introduction to pattern making
 
What are seams
What are seamsWhat are seams
What are seams
 

Seam

  • 1. Carefully selected and well-constructed seams and seam finishes are important—even critical—steps in the construction process.They are basic techniques used in the sewing process. Seam—the basic structural element of a garment or household textile item. It is the means by which two pieces of fabric are joined together. Typical examples: plain, French, flat-fell. Seam finish—applied to/used on the unfin- ished seam edge to prevent raveling, curl- ing, or rolling. Typical examples: turned and stitched, double-stitched, bound, serger. Consider these factors when selecting a seam and seam finish: • Fabric—Is it tightly or loosely woven? Is it a single knit or double knit? Does the fabric ravel, curl, or roll? What is the weight of the fabric: light, medium, or heavy? Is it sheer? • Use of garment—Is it sportswear or evening wear? How often will it be worn? • Care of garment—Will it be machine-washed, hand-washed, or dry-cleaned? • Location of seam/seam finish—Is it curved or straight? Will it be exposed, as in an unlined skirt? Will it be enclosed, as in a collar seam? • Sewing ability and skill—Are you a novice or an experienced sewer? • Equipment—Do you have only a straight-line stitching sewing machine? Do you have a serger? FCS2-304 Seams and Seam Finishes Linda Heaton, Ph.D., Extension Professor Textiles & Clothing Standards A well-constructed seam should be: • Smooth and even in appearance on the inside and outside. (Properly adjust machine tension, stitch length, and presser foot pressure to suit the fabric and thread. Make sure fabric does not pucker.) • Even in width throughout. • Pressed open or closed according to the type of seamandhowitisusedintheconstructionprocess. • If stitched with thread, the thread should be appro- priate to the fabric type and fiber content. (Thread color should match or be slightly darker.) A well-constructed seam finish should: • Be neat and smooth in appearance, without added bulk. • Protect the area and prevent the edge from ravel- ing, stretching, rolling, or curling. • Not be visible from the right side of the garment. Seams Seams may be created with thread by hand or machine (sewing machine and serger) or with fusion through chemical bonding. When a serger/overlock machine is used to construct a seam, the fabric edges are finished all in one process. The basic seams are plain, French, and flat-fell. Unless otherwise stated, a seam is stitched 5/8-inch from the cut edge.The fabric from the stitching line to the cut edge is called a seam allowance. Plain A plain seam is the simplest seam to make and is the basis for many other seams. It is a good choice for the novice sewer. This seam can be used on woven and knit fabrics and on straight or curved areas. It can be constructed by hand or machine. A seam finish is needed on most woven fabrics, es- pecially when the seam is exposed and when knit fabric curls or rolls.
  • 2. 2 Steps: 1. Place the right sides of the fabric together, match- ing the stitching lines. Pin and/or hand baste. 2. Stitch along the 5/8-inch seam line. (Stitching may begin and end with backstitching—stitch forward a few stitches, then backward, and then forward to the end.) A narrow, open zigzag stitch can be used on knit or stretch fabrics. 3. Press. Plain seams can be straight-stitched or zigzagged. French The French seam is basically a seam within a seam. It is strong and durable but should be used only on straight edges. This seam is used on light- weight woven, sheer, and other delicate fabrics. It is an excellent choice for see-through fabrics. French seams can be constructed by hand or sewing ma- chine. No seam finish is needed. Steps: 1. Placethewrongsidesofthefabrictogether,match- ing the stitching lines. 2. Stitch 3/8-inch from the cut edge of the fabric. Press. 3. Trim to within 1/8- to 1/4-inch of the stitching. Press seam to one side. 4. Turn remaining fabric over the seam, enclosing it. Crease and press on stitching line. 5. Stitch on seam line, approximately 1/4-inch from the turned edge, to enclose the raw edges. 6. Press to one side. French Seam Flat-Fell (also called flat-felled) This seam is designed for woven fabrics and straight edges. It is used when constructing sports- wear, men’s and children’s wear, reversible items, and heavy-duty items requiring strong, durable seams. It is generally made with a sewing machine and can be difficult to construct on heavy fabric. No seam finish is necessary. Steps: 1. Place the wrong sides of the seam allowances together. Stitch along the 5/8-inch seam line to make a plain seam. Press seam allowance to one side. 2. Trim lower seam allowance (inside seam allow- ance) to 1/8-inch. 3. Turn the top seam allowance edge under 1/4-inch. Press. 4. Repeat on the other side of the seam allowance. Flat-Fell Serger To construct serger seams, you must have a serger/overlock machine. Use a serger machine: • For loose-fitting garments when it is not important for seams to lie flat. • When seams will not stay pressed open because of their location, as with sleeves, under-the-arm seams, side seams that are stitched all at one time, and kimono sleeves. • On most knits when narrow seams are best and the fabric needs to stretch. • Onsomelightweightfabricswhentheseamshould be inconspicuous.
  • 3. 3 Types of Serger Seams 3-Thread—This is used when con- structing some knit items, especially when “give” or stretch is important. No additional seam finish is necessary. 4-Thread—This is used when con- structing some garments made from woven fabrics and some knit fabrics. This stitch sews the seam and finishes the edges all at the same time. Steps: 1. Place right sides of the fabric together, matching the stitching lines. The novice sewer may want to hand baste. 2. Guide fabric under the presser foot so that the needle stitches on the seam line. (The cutting blade(s)ofthesergerwilltrimtheseamallowances and the looper threads will encase the fabric edges in thread creating a seam finish.) 3. Press to one side. Special Seams The following seams are usually used on fabrics that present a greater challenge to sew or in sewing situations that are a bit more complex. They are a must in some circumstances, as noted. Hairline The hairline seam is primarily used on sheer and lightweight woven fabrics. It is not appropriate for medium-weight or bulky fabrics.The hairline seam is especially nice for collars and enclosed areas and can be used on straight or curved areas. A sewing machine is necessary. No seam finish is needed on an enclosed seam. Steps: 1. Stitch along seam line using a close, straight stitch (approximately 14 to 16 stitches per inch) or a narrow, short zigzag stitch. (For a stronger seam or to give the seam more weight, stitch over pearl cotton cord.) 2. Trim close to the stitching, leaving approximately 1/8-inch seam allowance. Press seam to one side. 3. Turn right side out. Press. Hairline seams eliminate visible seam allowance. Lapped The lapped seam resembles a top-stitched plain seam from the right side.This seam may be referred to as a “tucked” or “decorative lapped” seam. There are two ways to construct a lapped seam. One method is used when stitching a seam is difficult or impossible, as in a V-pointed yoke area.The second method is used to eliminate bulk; for example, when joining interfacing pieces or nonwoven fabrics, such as suede, felt, and Ultrasuede®.The lapped seam is usually done on a sewing machine. Method I (Seam allowance may need a seam finish unless it is covered by a lining or facing.) Steps: 1. Mark seam allowances on both fabric pieces. On the fabric piece that will be positioned on top (outside), turn and press seam allowance under, along the seam line. 2. Position folded seam allowance on top of the remaining seam allowance, matching folded edge to seam allowance. Pin in place. 3. Edge stitch close to folded edge. Press. Lapped 4 Thread Serger 3-Thread Serger
  • 4. 4 Method II Steps: 1. Mark seam allowances on both pieces of the fabric. (If working with suede or synthetic suede, you might want to measure and remove a portion—3/8- to 1/2-inch—of the seam allowances before layout and cutting to save fabric.) 2. On the piece that will be on top, trim away the entire seam allowance (unless you have eliminated it prior to cutting). 3. Position trimmed seam allowance piece on top of untrimmed seam allowance, matching trimmed edge with marked seam allowance. Pin, tape, or glue in place. 4. Edge stitch through all layers of fabric close to the cut edge. (A second row of stitching gives the appearance of a flat-fell seam.) MockFrench This seam works on the same fabrics as the French seam. It looks like a plain seam from the right side and a small enclosed double-stitched seam on the under- neath side. It can be constructed by hand but is usu- ally done on a sewing machine. This seam is used when a French seam cannot be handled well, such as on a curved seam line. This is an excellent seam to use in the sleeve/armhole area of a sheer, special occasion garment, such as a wedding or prom dress, or a sheer blouse/jacket. No seam finish is required. Steps: 1. Place right sides of the seam allowances together. Stitch along the regular seam line. 2. Press seam open, then flat. 3. Turn in both edges of the seam allowance approxi- mately 1/4-inch. Press, then press together. 4. Stitch the folded edges together close to the edge. Mock French MockFlat-Fell(alsocalleddouble-stitchedor welt seam) The mock flat-fell seam provides the same tailored appearance as the flat-fell but is easier to construct. It is best used on fabrics that do not ravel or on items that will be lined or will not have exposed seams or edges. Otherwise, an additional seam finish may be needed. Steps: 1. With right sides of the fabric together, stitch a plain seam. It is best to have at least a 5/8-inch seam allowance. Press seam allowances together to one side, then press open. 2. Determine which direction your final seam will lie. Trim the seam allowance that will be uppermost to the outside of the item to 1/4-inch. Press wider seam allowance over the trimmed seam allowance. 3. On the right side of the fabric, edge stitch close to the seam line through all layers of fabric. Stitch again, approximately 3/8-inch away, through fabric and re- maining seam allowance on the underneath side. Mock Flat-Fell Seam Finishes Seam finishes may also be referred to as “edge” finishes, as they may be used in locations other than seam allowances. These locations include hem edges and facings.The method of construction is al- most always the same, and the goal is to prevent a raw edge from raveling (woven fabric) or curling (knit fabric). EdgeStitched As a seam finish, this technique is reserved pri- marily for knit fabrics. It is used to prevent the edges of the fabric from rolling or curling.The finish requires a sewing machine, but it is easy to construct. Edge stitching is suitable for straight or curved seams and edges.
  • 5. 5 Steps: 1. With right sides of the seam allowances together, prepare a plain seam. Press it open. 2. Take one side of the seam allowance (single thickness) and stitch a line of regulation machine stitching (approximately 12 to 14 stitches per inch) about 1/4-inch from the cut edge. 3. Repeat on the other seam al- lowance. (Stitching along the edge of the seam allowance prevents rolling or curling.) Edge Stitched Double-Stitched The double-stitched finish also begins with a plain seam. It is used for knit fabrics and on seam allow- ances that are pressed together to one side and treated as one. When used on lightweight knit fab- rics, it is to prevent seam allowances from rolling or curling.The technique is ideal for the beginning sewer and may be done several ways. It requires a sewing machine. Some methods require a sewing machine with zigzag or decorative stitch capability. Steps: 1. With right sides of the seam allowances together, prepare a plain seam. Press seam together. 2. Stitch a second row of stitching into the seam allowance area, approximately 1/8-inch away from first line of stitching. The second row of stitching can be a straight conventional stitch, a medium-width zigzag, or a machine over-edge/over- cast stitch. NOTE:Themachineover-edge stitch is recommended for rav- eling woven fabrics, not knits. 3. Press seam to one side. Double-Stitched MachineZigzag A large seam allowance (up to 1 inch) may be al- lowed when cutting out the garment, since finished seam allowance will be 1/8- to 1/4 inch smaller. This finish is used on a plain seam on woven fab- ric. It requires a sewing machine that has a zigzag stitch capability. The finish is used on medium- to heavyweight fabrics, including corduroy. The zigzag stitch length (coverage) must be adjusted to accom- modate and prevent fabric raveling.The more the fab- ric ravels, the closer together the stitches need to be (tighten or shorten stitch length). Steps: 1. With right sides of the seam allowances together, prepare a plain seam. Press it open. 2. Adjust machine to the appropriate zig- zag stitch and length. 3. On one seam allowance (single thick- ness), stitch close to, but not on, fabric edge (approximately 1/8-inch from raw edge). 4. Trim excess fabric close to the line of stitching. Press. Machine Zigzag MachineOver-Edge(overcast) Some sewing machines have a special over-edge presser foot and/or machine setting to overcast (sew over) the edges of the fabric without causing the fab- ric or thread to jam the machine. If your machine has this capability, use this stitch instead of the machine zigzag technique previously described.The overcast technique does not have to be trimmed, nor do you have to allow for larger seam allowances when cut- ting out the garment. Steps: 1. With right sides of the seam allowance together, prepare a plain seam. Press open. 2. Adjust sewing machine for over-edge or overcast setting. (Change presser foot and adjust tension and/or stitch length if necessary.) 3. On one seam allowance (single thickness) edge, align machine needle to stitch approximately 1/8- to 1/4-inch from the edge, allowing it to wrap a thread around the edge as it moves right to left. 4. Repeatontheothersideoftheseam allowance. Machine Over-Edge
  • 6. 6 Hand-Overcast This is one of the original methods of finishing seams and edges, dating prior to the invention of the sewing machine.There are occasions when this edge finish is the most appropriate technique. Hand-over- cast is used on woven fabrics with straight and curved areas. It is also good—and necessary—in areas not suited to other finishing techniques, such as L-shaped areas (created at a kick pleat) and V- shaped areas (created when bulk is removed from a princess-line seam).This stitch is done by hand rather than by machine. Use a hand needle and single thread to match the fabric color. It is not difficult but may take some skill to get stitches to appear uniform. Steps: 1. With right sides of the seam allowances together, prepare a plain seam. Press it open. (This finish can be used with other seams that might require a finish other than the plain seam, such as the mock flat-fell or the lapped.) 2. Beginning at the end of one seam allowance edge through single fabric thickness, secure thread on the underneath side of the seam allowance, ap- proximately 1/4-inch from the edge. 3. Bring needle through from bottom to top side. Position needle underneath fabric edge, approxi- mately 3/8-inch away from the first stitch. 4. Bring needle and thread through to the right side again. Repeat until the edge is periodically wrapped in thread. Stitches should be secure to the fabric edgebutnottight.Fabric edge should remain flat andnotdrawn.Themore the fabric tends to ravel, the closer together your hand stitches may need to be. Clean-Finished(turnedunderandstitched) This finish is used not only for seams but also throughout the garment when the fabric is lightweight. It is not appropriate for heavyweight or knit fabrics because it produces bulk. Steps: 1. With right sides of the seam allowances together, prepare a plain seam. Press the seam open. 2. Turn the edge of the seam allowance under ap- proximately 1/8- to 1/4-inch. Press. 3. Stitch close to the edge through the folded fabric. Press. NOTE: Cutting at least a 1-inch seam allowance will permit a finished 5/8-inch seam allowance. Clean-Finished Bound There are several forms of bound seam finishes. They are all appropriate for medium, medium-heavy, and heavyweight woven fabrics. A bound finish is used frequently on unlined coats and jackets. It can also be used on dresses and other items that have a tendency to ravel. It is often used on hem edges and facings. The substance used for binding should be appropriate for the fabric in terms of care and main- tenance.The binding should never add unnecessary bulk. This finish can be constructed by hand or on a sewing machine. It might be difficult and time-con- suming for the novice. Bound with Binding—Use double-fold bias tape for casual wear and utilitarian items, and tricot binding, such as Seam Great™ and Seam Saver™, for dressy or lightweight items. Steps: 1. With right sides of the seam allowances together, prepare a plain seam. Press it open. 2. Encase each seam edge in tape/binding. If using bias tape, the longer edge should go on the under- neath side. If using tricot binding, pull gently to get bindingtofoldslightlyaroundtheedgetobebound. 3. Stitch in place using a regulation straight stitch or a long zigzag stitch. Press. Self-Bound—This finish is designed for lightweight fabrics. It is well suited to sheer or see-through items, especially when other finishes do not give them an attractive appearance, as in a sleeve cap/armseye. At least a 5/8-inch seam allowance is required. Steps: 1. Begin with a plain seam. Trim one seam allowance to 1/8-inch. Hand-Overcast
  • 7. 7 2. Turn remaining seam allowance under 1/8-inch and press. 3. Turn the folded seam allowance edgeagainoverthe1/8-inchseam allowance so that it is enclosed/ encased.Stitchclosetothefolded edge and the first line of stitching. This last stitching can be done by hand or machine. Self-Bound HongKong The Hong Kong finish is closely related to the bound finish but may not be as bulky as a bound finish us- ing bias tape. It is used for coats, jackets, and other items with exposed seams. It can add a decorative touch if a contrasting or coordinating print fabric is used as the binding substance. Select a lightweight, firmly woven fabric, such as lining fabric or batiste, to use as binding. Binding fabric should require the same care techniques as the fabric. Steps: 1. With right sides of the seam allowances together, prepare a plain seam. Press open. 2. Cut several 11/4- to 11/2-inch-wide bias strips from lining, lightweight broadcloth/print cloth, or other lightweight woven fabric. Strips can match or coor- dinate with the fabric color. Sew bias strips to- gether lengthwise, making a long continuous strip. 3. With right sides together, match edge of bias strip to singleedgeofseamallowance.Stitch1/4-to3/8-inch from edge (Figure A). Repeat on other seam allow- ance. 4. Fold bias strip over the edge, encasing raw seam allowance. Press. 5. Stitch in place, through all layers, in the crevice of the first stitching (stitch in the ditch). Trim excess bias strip fabric to the line of stitching on the underneath side (Figure B). Hong Kong Serger The serger/overlock machine can be used to fin- ish seam allowances and as an edge finishing method. Since knits do not ravel, the serger seam/edge finish is used on woven fabrics only. The serger edge fin- ish may be necessary however, if a knit fabric edge tends to curl or roll. A 2-thread over-edge stitch is used for lightweight fabrics. It creates the least amount of bulk. Some 3- and 4-thread machines convert to a 2-thread machine. A 3-thread stitch is great for other fabric weights or when a 2-thread over-edge is not available. Steps: 1. With right sides of the seam allowances together, prepare a plain seam. Press. 2. Set serger for appropriate 2- or 3-thread stitch. Stitch, cutting away approximately 1/8-inch edge of seam allowance. Depending on the construction area and circumstances, edges may be finished separately if they are to be pressed open. Serger Finish OtherFinishes There are other seam/edge finishes, but they should be used cautiously as they are often selected and used inappropriately. Pinking—This finish should be used only on firmly woven fabrics or on items that will receive little wear, as in a garment lining. Pinking is sometimes used as a decorative edge, but it does not prevent or retard raveling. Its use in garment construction is limited. Liquid seam retardant (Fray Check™, etc.)—This is a commercial product marketed under several brand names. It is great to use around buttonholes, on the corners of a collar, etc. Do not use in garment areas that might touch and rub the body as it can make some fabrics stiff and scratchy. It is fast, rela- tively inexpensive, and easy to use for household textile items. Figure A Figure B
  • 8. Educational programs of the Kentucky Cooperative Extension Service serve all people regardless of race, color, age, sex, religion, disability, or national origin. Issued in furtherance of Cooperative Extension work, Acts of May 8 and June 30, 1914, in cooperation with the U.S. Department of Agriculture, M. Scott Smith, Director of Cooperative Extension Service, University of Kentucky College of Agriculture, Lexington, and Kentucky State University, Frankfort. Copyright © 2003 for materials developed by the University of Kentucky Cooperative Extension Service. This publication may be reproduced in portions or its entirety for educational or nonprofit purposes only. Permitted users shall give credit to the author(s) and include this copyright notice. Publications are also available on the World Wide Web at www.ca.uky.edu. Revised 6-2003 Mention or display of a trademark, proprietary product, or firm in text or figures does not constitute an endorsement and does not imply approval to the exclusion of other suitable products or firms.