1. I started off with a very
basic version of the
layout that I had
imagined it to be.
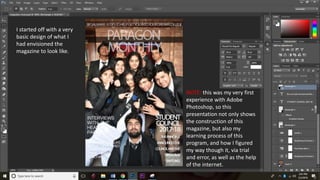
I started off with a very
basic design of what I
had envisioned the
magazine to look like.
NOTE: this was my very first
experience with Adobe
Photoshop, so this
presentation not only shows
the construction of this
magazine, but also my
learning process of this
program, and how I figured
my way though it, via trial
and error, as well as the help
of the internet.
2. After some color
correction, and putting
translucent rectangles
behind the taglines,
they started to become
more readable, and the
magazine started to
look a little more
professional.
3. Next, I started to build
on the ‘simple’
aesthetic of the cover.
4. I added some more
taglines as well to
the cover, and it
started to come
together.
The school logo
added a very nice
touch to the
magazine cover.
I also realized how I
very much so enjoyed
the look of a gradient
on the rectangles, so
that they faded to
transparent. It greatly
aided the aesthetic I
was in pursuit of.
5. After conducting
research on magazine
dimensions, I realized the
dimensions for my cover
were off so I changed it
to the standard 8.75’’ by
11.25’’.
6. Out of curiosity, I put
on a different picture
as the background
image, a picture I
took off of the
balcony on one of
the school floors,
and a pleasant
surprise: it
completely changed
the look for the
better!
7. I followed by making
slight adjustments in
terms of color
correction of the
background, masthead,
and taglines.
8. The main problem was the
lack of visibility of the text,
due to the vibrancy of the
background image, as well
as other issues. However,
the main problem
remained about the colors.
9. Hence, further color correction and other
small adjustments brought me to my final
image for the front cover
BEFORE AFTER