The document provides instructions for using a school administration software. It covers setting up the business, school, contacts, classes, and reports. Key steps include setting up business features like payments and discounts, creating age groups, class levels, locations, and semesters. Instructions are provided for adding faculty, students, and classes, as well as registering students for classes and viewing reports. The software allows customization and management of all aspects of running a school.
How to succeed in college by Seth Furtadosethfurtado
This document is a collection of photo credits from various photographers. It includes 12 photos from photographers such as Definitive HDR Photography, Robert S. Donovan, NatBat, wstera2, stevendepolo, Andrew Scott, hummingcrow, sean dreilinger, lodge28, British Council Russia, sleepinyourhat, and Penn State Libraries Pictures Collection. The document encourages the reader to get started creating their own presentation.
The document provides advice for college students on how to be prepared, motivated, and successful. It recommends that students do their homework and follow school rules to pass classes. Students should also take initiative by going to tutoring or asking questions if they need help. To stay motivated, the document advises setting realistic goals and taking advantage of opportunities. It emphasizes reading the syllabus, visiting counselors, doing research on school resources, and asking questions.
This document provides an overview of HDR photography, including what it is, how to shoot photos for it, and how to process HDR images. HDR photography involves taking multiple exposures of the same scene at different brightness levels and combining them to produce an image with a wider dynamic range than a single photo. To shoot HDR photos, a photographer mounts their camera on a tripod and takes at least three exposures of the scene - one correctly exposed, one underexposed, and one overexposed. They then use HDR processing software to merge the exposures into a single image that better represents the full brightness range.
This document provides tips for college success including organization, time management, and utilizing resources. It recommends having a daily planner, viewing school as a priority job, and knowing what campus resources are available such as the library and tutoring. Students are advised to get academic advising, find their optimal study times, ask questions, and network with classmates.
The document provides 10 tips for succeeding in college from John Roland, Director of Alumni Services & Student Success at Luther Rice University. The tips are: 1) choose professors over classes, 2) guard your time efficiently, 3) always go to class, 4) take care of yourself, 5) pray and be patient, 6) do not settle and learn, 7) befriend your professors, 8) learn research from librarians, 9) take good notes, and 10) write better. The overall message is to make the most of college opportunities by choosing engaging professors, managing time well, taking academics and health seriously, learning through exploration, and developing strong research, note-taking, and writing skills.
Watching graduation rates soar; increasing on-time graduation; boosting student retention and persistence; improving the overall student experience. These all sit high on the priority list for most colleges and universities. For some, departmental silos or lack of quality data act as barriers to student success. However, others have embraced the concept of campus collaboration and committed to leveraging investments in systems across multiple departments. Join us to learn how Fresno Pacific is using the power and flexibility of the Salesforce Platform to track and help administer a variety of Student Services, despite very limited staffing dedicated to development. Applications are active for Tutoring, Campus Nurse/Medical Records, Mentoring and Retention, Fitness Center, Helpdesk, Conduct Management (discipline), with plans for continued expansion.
The document discusses various aspects of courses on Moodle including:
1. Courses are spaces where teachers add learning materials and are created by admins or managers. Teachers can organize the content.
2. It describes how to add new courses and categories, set course settings like format, availability and language. Guest access and group settings are also covered.
3. Common course formats like weekly are explained which organize content by week with a start date. Other settings like roles, progress tracking and preventing edits to fields are summarized.
A payment plan allows a studio to offer discounted rates to members or teams by setting up membership levels and payment plans. The document provides steps to set up memberships by defining membership fees, number of family members covered, and number of classes affected. Once set up, students can purchase payment plans to access discounted class prices automatically when booking classes on the studio's website. Without a membership, students will not receive discounted rates.
Study Island is an online educational resource that aligns to state standards. It uses lessons, practice questions, and explanations to reinforce classroom concepts. Teachers can create classes, assign topics and assessments, monitor student progress in real-time, and access reports on student performance. Customer support is available to help teachers implement Study Island and motivate student learning.
This user guide provides instructions for using key features of Blackboard, including:
- Turning edit mode on/off to view or edit a course
- Using the Control Panel to access course tools, evaluation, users/groups, customization, and help
- Customizing the courses displayed on the My Blackboard page
- Adding, modifying, removing, and moving menu items
- Copying materials from a previous course
- Combining multiple course sections into a single Blackboard course using CLIPS
- Importing an archived course package
- Enrolling and modifying user roles
The Savvy Academy Learning Management System (LMS) provides learning opportunities and tracks user progress. Users can access courses, resources, and a catalog from their dashboard. Courses can be launched from the dashboard. Completed courses are displayed separately. The system supports various user roles like learners, managers, and instructors. Notifications and calendar integration help users manage their learning. Learning paths allow assigning series of courses that must be completed in order.
Study Island is an online educational resource that aligns to state standards. It uses lessons, practice questions, and explanations to reinforce classroom concepts. Teachers can assign topics, writing prompts, and custom assessments. They can create classes, view reports, and communicate with students. Study Island provides various tools to help teachers implement the program and motivate students.
1) A marking guide is similar to a rubric but simpler, providing a comment and maximum score for each criterion to grade assignments in a precise way.
2) Instructors can create marking guides in Moodle by defining criteria based on the assignment, adding comments, and setting point values for each criterion.
3) Students can view the marking guide before submitting to know what they will be graded on, and instructors can grade submissions using the guide.
The document provides guidance for teachers on using the EnglishCentral platform to teach English. It outlines 13 steps for teachers: 1) registering an account; 2) creating a class; 3) inviting students; 4) selecting video curriculum; 5) setting student goals; 6) tracking student progress; 7) using teacher tools; 8) accessing the class video channel; 9) managing profile settings; 10) purchasing premium seats; 11) allocating premium seats to students; 12) using the teacher forum for questions; and 13) getting additional help. The platform allows teachers to sign up students, select video lessons, assign goals and track progress to make English learning fun and effective.
This document provides an overview of the educational platform Edmodo and how it can be used. It discusses that Edmodo is a more user-friendly alternative to traditional paper-based methods that also allows sharing of documents and is not blocked like other sites. The document then outlines how to create an Edmodo account and navigate the various features, including posting notes, assignments, and polls; creating groups and communities; using the gradebook, library, and notification features; and customizing profile and account settings. Videos are available to demonstrate many of these functions.
1) Courseeplus is an online learning platform that connects teachers and students through online courses, forums, groups and other features.
2) Teachers can create courses by adding sections, units, content like videos and documents, assignments, and setting course details like duration and pricing.
3) The platform allows teachers to manage student enrollment, track their progress, and communicate with students through various features in their dashboard.
Odoo E-learning module can be used to create courses, configure quizzes and earn badges while attending courses. This is helpful for conducting internal training at the company for employees and helps in easy onboarding. Integrated gamification makes it a more joyful
The document provides an overview and getting started guide for GradeBookWizard, an online gradebook and classroom management program. It outlines key features like the home page, gradebook, assignments, report cards, attendance tracking, and preferences setup. It guides educators through initial account setup and configuration, and explains how to create classes, students, assignments, and more within the program.
This document provides a tutorial for practitioners new to online learning through Moodle/LiteracyTent. It covers setting up a Moodle account, navigating a Moodle course, and comparing online and face-to-face learning. The tutorial is divided into three parts: setting up an account, navigating courses, and comparing learning formats. It describes how to register, set up an account, log in, navigate course sections and lessons, participate in discussions, and take quizzes. It also highlights advantages and disadvantages of online learning compared to face-to-face and provides tips for online success.
The document provides instructions for navigating the Lincoln Interactive online learning platform. It explains how to log in, access courses and lessons, view announcements, use discussion boards, submit assignments, monitor progress, and access completed assignments and grades. Key steps include logging in with a username based on name and last 4 digits of SSN, clicking on courses from the top right or My Classes tab, and using the EdMastery link at the bottom of lessons to access and submit graded assignments.
Forethought allows administrators to assign teachers and assistants delegate access to manage course scope and sequences. To add a delegate, enter their name or email and select the courses they will manage. Delegates can edit groups and standards by default but additional permissions must be set to allow publishing or other actions. Courses and permissions can later be modified or removed from each delegate's access as needed.
How to Moodle Course Creator essential 2.7 ManualStefanus Tjen
The document provides instructions for creating and managing courses in Moodle, including adding courses, setting course formats and settings, adding and configuring various activities and resources, and using tools like forums, assignments, and wikis. Key sections covered include creating a new course, course settings, course homepage and blocks, common activities and resources like labels, pages, books, files, folders, forums, and quizzes, and tools like the text editor and file picker.
1) Courseeplus is an online social learning platform that connects knowledge providers and seekers through online courses, forums, and events.
2) The platform allows users to sign up for free and take over 100 online courses on topics like big data, with features like teacher-student communication forums, course progress tracking, and certificates that can be shared on LinkedIn.
3) To use the platform, users register with an email and password, then access courses, track progress, message instructors, and view notifications and friends' activities through the dashboard and different tabs.
This document provides instructions for students on how to navigate and use the Blackboard learning management system. It outlines how to log in to Blackboard, view course content, submit assignments, check grades, contact professors and peers, participate in discussion boards and blogs, and get troubleshooting help. The goal is to enhance the educational experience by providing interactive tools for communication and collaboration between students and teachers.
This document discusses a Blackboard workshop on managing grade columns in the Grade Center. The workshop will cover the three types of columns: user columns, grade columns, and calculated columns. It will teach participants how to create and manage these columns, as well as generate reports on student grades. Examples are provided of setting the grading period and schema, adding columns to categories, and viewing calculated and historical grade data. The goal is for participants to gain a working understanding of the Grade Center and how to identify and create the different column types.
The document provides instructions for using the NovaNET online courseware and management tools to create classes, assign students to classes, and select curricula. It outlines how teachers can use the administrative functions of NovaNET to create online student accounts and assign academic content to enhance students' skills. It guides workshop participants through logging into NovaNET, creating classes/sections for their courses, adding students to those sections with the proper naming convention, and resolving any issues that come up in the process.
Google classroom ppt for teachers.pptxRoySuparman1
Google Classroom is a free web-based platform developed by Google for schools to streamline classwork distribution, submission, and grading. It allows teachers to create classes, distribute assignments, send announcements, and give feedback to students. Students can access and submit classwork, get notifications, and stay organized. Teachers can track completion of assignments and provide feedback directly within Classroom. The mobile app allows students to access work on any device.
Google Classroom is a free web-based platform developed by Google for schools to streamline classwork distribution, submission, and grading. It allows teachers to create classes, distribute assignments, send announcements, and give feedback to students. Students can access and submit classwork, get notifications, and stay organized. Teachers can track completion of assignments and provide feedback directly within Google Classroom. The mobile app allows students to access classwork on any device.
To upload and insert an image into your website content: go to the media section and upload images to the desired folder; select the image when adding content and set the width to 100% or less than 700 pixels for best display; the height will auto adjust, then insert and publish the image.
The document provides instructions for adding images to a gallery on a new Umbraco dance studio website. It outlines uploading images to the media folder, creating a new gallery, naming and selecting a single image for the gallery, and saving and publishing the image so it appears in the media gallery. The steps are to login, go to media and upload photos under 900px, go to content and right click to create a new gallery, name and select a single image, choose the image, pick the item, and save and publish.
This document provides instructions for posting a photo or video to Instagram and sharing it to other social media platforms like Facebook and Twitter. It outlines a 6 step process: open the Instagram app and select a photo or video, add a filter if desired, choose other apps to share to like Facebook and Twitter, write a caption including the studio's hashtag, then click share to instantly post across Instagram and other selected social media accounts.
The document provides an overview of strategies for dance studios to grow their enrollment in the digital age. It discusses the importance of having an optimized website as the central hub for online marketing efforts. Additional tips include using search engine optimization techniques like keyword-dense content and social media platforms like Facebook, Twitter, and Pinterest to drive traffic to the website. The presentation emphasizes focusing on one strategy at a time and using available tools like the School Empower system to streamline operations and marketing.
School Empower Complete: School Management SystemSchoolEmpower
School Empower is a global online registration, customer relationship management, and e-commerce platform designed to help schools and studios grow enrollment and manage business operations. It seeks investment to improve its product, add new features, and expand marketing and sales. The presentation provides details on School Empower's management team and technology, the size of the education market opportunity, and its competitive advantages over other school management software solutions.
Image Sizes for Dance Studios Web Design WebsitesSchoolEmpower
There are 5 main optimal image sizes for a website to provide the best viewing experience: homepage top scroller, homepage boxes, homepage photo, small scroller, and content images. Homepage boxes and photo images can link to any site area and should be no larger than 800x800, while content images should be no wider than 640 pixels and between 355-800 pixels long. Class description images are smaller and appear to the right of text.
This document provides instructions for setting up a home page by uploading images of optimal size 250x300 pixels and linking them to categories. The instructions are presented in 8 steps: 1) access the home page icon, 2) click create new, 3) upload the pre-prepared image and name it, 4) add a description, 5) select display order, 6) choose what to link the image to, 7) select the specific link category, and 8) save the changes.
This document provides instructions for setting up contact types or groups in 7 steps. Step 1 explains that contact types allow users to assign contacts to groups like "Competition" for email purposes. Step 2 instructs users to click "Create New" and type a name for the new contact type. Step 3 covers marking a type as obsolete. Steps 4-6 describe how the contact type will appear when registering students and how to search for members of a specific type. Step 7 explains exporting search results to an excel spreadsheet.
This document discusses how to create session packs for classes or sessions that students pay for using session cards. Session packs offer discounts by allowing students to purchase multiple sessions or classes together at a reduced rate compared to paying individually. The steps to create a session pack include entering a name, sale price, number of sessions in the pack, and individual session price. This allows students to view and purchase session packs that bundle classes together for a discounted total cost.
The document outlines 9 steps to create discounts in the admin panel of a school scheduling system:
1. Navigate to the DISCOUNT icon in the School Setup section to begin creating a new discount.
2. Name the discount, such as "Buy 2 classes, get 10% off second," without specifying details visible to students.
3. Set rules like students must purchase one class at full price before receiving 10% off the second class.
The document then explains how to set additional discount details like percentage, number of classes it applies to, and whether it applies to family accounts. Completed discounts will automatically apply at checkout.
This document describes how to establish class levels in an online system. Users can create new class levels with a name and assigned color. The class level will then appear in the calendar view using that color. When viewing student class descriptions, the assigned level will also appear.
This document discusses age groups in school setup. It explains how to create new age groups by clicking the CREATE NEW button in the Age Groups section. When creating a new age group, the name and minimum and maximum ages must be provided. Age groups are then used to filter student searches and are featured in class descriptions to organize students by age.
This document provides instructions for adding new administrators and defining their permissions in four steps: search for the contact, select the appropriate permissions, click select contact, and the contact will now have administrative rights. It also defines the different administrator roles including contact administrator, course administrator, reports administrator, and school administrator and their respective permissions.
Credits, gift certificates, scholarshipsSchoolEmpower
This document discusses the different types of student accounts including prepaid credit, session packs, gift certificates, and scholarships. Students can prepay credit using checks, purchase session packs, gift certificates can be purchased for other students, and scholarships can be granted as full or partial amounts to provide financial aid. These accounts can be used to pay for classes and any remaining balances can be applied to pending items.
Classes can be searched by name, instructor, semester, category, code, age group, level, or day in the navigation panel under the Classes tab by clicking the Search icon or link. The Class Search allows filtering by various fields to find the needed class.
This document discusses setting up pricing and recurring billing for classes. It explains that prices can be set for members versus non-members, and per session or for a full class if all sessions are purchased. Recurring billing allows automatic collection of fees from students on a schedule, with options to set a deposit percentage, number of payments, dates and time between payments. All recurring billing data is displayed and saved after being entered.
The document provides instructions for creating a schedule and pricing for a class in three main steps:
1. Select the class status, dates, times, location and sessions for the class schedule.
2. Name individual sessions and set pricing either per session or for the full class, including costs for members vs non-members.
3. For semester-based classes, set up recurring billing by entering the deposit percentage, number of payments, payment dates and time between payments to automatically collect fees from students.
The document provides instructions for setting up semesters and categories in a school registration system. It describes clicking on the classes tab and semesters icon in the navigation panel to access semester setup. Users can create multiple non-overlapping semesters defined by start and end dates, registration fees, and online registration windows. The document also explains accessing the categories section to define different types of classes offered, such as by genre or format. Categories are created, edited, and deleted as needed then saved.
The document provides instructions for viewing classes in calendar view. It explains that calendar view displays all classes side by side for each date, allows the user to set the date to view and change color filters. It also notes that clicking a session name opens an edit window to modify that session.
This document provides instructions for managing school classes in an online system. It describes how to view all classes, add new classes, search classes by various criteria, create class categories and semesters, and view classes on a course calendar. Users can also quickly search for classes and find recently modified classes. The document explains how to access an "All Classes" page by clicking on the Classes tab and icon in the navigation panel. It notes that individual classes can have multiple schedules to define elements like dates, times, locations, prices and semester for a main class that defines consistent attributes.
Enhancing Adoption of AI in Agri-food: IntroductionCor Verdouw
Introduction to the Panel on: Pathways and Challenges: AI-Driven Technology in Agri-Food, AI4Food, University of Guelph
“Enhancing Adoption of AI in Agri-food: a Path Forward”, 18 June 2024
High-Quality IPTV Monthly Subscription for $15advik4387
Experience high-quality entertainment with our IPTV monthly subscription for just $15. Access a vast array of live TV channels, movies, and on-demand shows with crystal-clear streaming. Our reliable service ensures smooth, uninterrupted viewing at an unbeatable price. Perfect for those seeking premium content without breaking the bank. Start streaming today!
https://rb.gy/f409dk
SATTA MATKA DPBOSS KALYAN MATKA RESULTS KALYAN CHART KALYAN MATKA MATKA RESULT KALYAN MATKA TIPS SATTA MATKA MATKA COM MATKA PANA JODI TODAY BATTA SATKA MATKA PATTI JODI NUMBER MATKA RESULTS MATKA CHART MATKA JODI SATTA COM INDIA SATTA MATKA MATKA TIPS MATKA WAPKA ALL MATKA RESULT LIVE ONLINE MATKA RESULT KALYAN MATKA RESULT DPBOSS MATKA 143 MAIN MATKA KALYAN MATKA RESULTS KALYAN CHART
SATTA MATKA DPBOSS KALYAN MATKA RESULTS KALYAN MATKA MATKA RESULT KALYAN MATKA TIPS SATTA MATKA MATKA COM MATKA PANA JODI TODAY BATTA SATKA MATKA PATTI JODI NUMBER MATKA RESULTS MATKA CHART MATKA JODI SATTA COM INDIA SATTA MATKA MATKA TIPS MATKA WAPKA ALL MATKA RESULT LIVE ONLINE MATKA RESULT KALYAN MATKA RESULT DPBOSS MATKA 143 MAIN MATKA KALYAN MATKA RESULTS KALYAN CHART KALYAN CHART
The report *State of D2C in India: A Logistics Update* talks about the evolving dynamics of the d2C landscape with a particular focus on how brands navigate the complexities of logistics. Third Party Logistics enablers emerge indispensable partners in facilitating the growth journey of D2C brands, offering cost-effective solutions tailored to their specific needs. As D2C brands continue to expand, they encounter heightened operational complexities with logistics standing out as a significant challenge. Logistics not only represents a substantial cost component for the brands but also directly influences the customer experience. Establishing efficient logistics operations while keeping costs low is therefore a crucial objective for brands. The report highlights how 3PLs are meeting the rising demands of D2C brands, supporting their expansion both online and offline, and paving the way for sustainable, scalable growth in this fast-paced market.
AI Transformation Playbook: Thinking AI-First for Your BusinessArijit Dutta
I dive into how businesses can stay competitive by integrating AI into their core processes. From identifying the right approach to building collaborative teams and recognizing common pitfalls, this guide has got you covered. AI transformation is a journey, and this playbook is here to help you navigate it successfully.
SATTA MATKA DPBOSS KALYAN MATKA RESULTS KALYAN CHART KALYAN MATKA MATKA RESULT KALYAN MATKA TIPS SATTA MATKA MATKA COM MATKA PANA JODI TODAY BATTA SATKA MATKA PATTI JODI NUMBER MATKA RESULTS MATKA CHART MATKA JODI SATTA COM INDIA SATTA MATKA MATKA TIPS MATKA WAPKA ALL MATKA RESULT LIVE ONLINE MATKA RESULT KALYAN MATKA RESULT DPBOSS MATKA 143 MAIN MATKA KALYAN MATKA RESULTS KALYAN CHART
Adani Group's Active Interest In Increasing Its Presence in the Cement Manufa...Adani case
Time and again, the business group has taken up new business ventures, each of which has allowed it to expand its horizons further and reach new heights. Even amidst the Adani CBI Investigation, the firm has always focused on improving its cement business.
SATTA MATKA DPBOSS KALYAN MATKA RESULTS KALYAN CHART KALYAN MATKA MATKA RESULT KALYAN MATKA TIPS SATTA MATKA MATKA COM MATKA PANA JODI TODAY BATTA SATKA MATKA PATTI JODI NUMBER MATKA RESULTS MATKA CHART MATKA JODI SATTA COM INDIA SATTA MATKA MATKA TIPS MATKA WAPKA ALL MATKA RESULT LIVE ONLINE MATKA RESULT KALYAN MATKA RESULT DPBOSS MATKA 143 MAIN MATKA KALYAN MATKA RESULTS KALYAN CHART
Prescriptive analytics BA4206 Anna University PPTFreelance
Business analysis - Prescriptive analytics Introduction to Prescriptive analytics
Prescriptive Modeling
Non Linear Optimization
Demonstrating Business Performance Improvement
The Most Inspiring Entrepreneurs to Follow in 2024.pdfthesiliconleaders
In a world where the potential of youth innovation remains vastly untouched, there emerges a guiding light in the form of Norm Goldstein, the Founder and CEO of EduNetwork Partners. His dedication to this cause has earned him recognition as a Congressional Leadership Award recipient.
Satta matka fixx jodi panna all market dpboss matka guessing fixx panna jodi kalyan and all market game liss cover now 420 matka office mumbai maharashtra india fixx jodi panna
Call me 9040963354
WhatsApp 9040963354
NIMA2024 | De toegevoegde waarde van DEI en ESG in campagnes | Nathalie Lam |...BBPMedia1
Nathalie zal delen hoe DEI en ESG een fundamentele rol kunnen spelen in je merkstrategie en je de juiste aansluiting kan creëren met je doelgroep. Door middel van voorbeelden en simpele handvatten toont ze hoe dit in jouw organisatie toegepast kan worden.
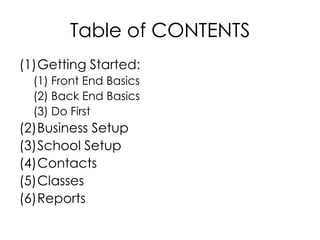
1. Table of CONTENTS
(1)Getting Started:
(1) Front End Basics
(2) Back End Basics
(3) Do First
(2)Business Setup
(3)School Setup
(4)Contacts
(5)Classes
(6)Reports
3. Front End Basics: Homepage
STUDENT HOME PAGE
This is the homepage that your
students will see, often called
THE FRONT END.
Every element on this page is
customizable from the admin
panel (also known as THE BACK
END), including:
Semesters
Ages
Faculty
Categories
Homepage pictures and
categories
3
4. Front End Basics:STUDENT HOME PAGE
Search Page
From the homepage your
students can search for any
number of classes. This is the
Search Result Page.
From this page the student
can choose her classes.
4
5. Front End Basics: Class Page
CLASS DESCRIPTION
Here‟s a class description that shows
Ages, Level and Class Cost. It also has links to the teacher‟s
profile ( )
1. These are all customized elements in the school admin. 5
6. Back End Basics
This is the login page to the admin panel which only your
school administration will see, known as THE BACK END. The
back end controls all of the semesters, ages, class
levels, instructors, and classes which are visible to students and
their parents.
7. Back End Basics: Dashboard
DASHBOARD
When you first login, you will come to the DASHBOARD.
Top Navigation links to different areas of the admin panel. You‟ll
notice that the links in the top navigation correspond to sections in
these help topics.
Recently Modified Contacts lets you know which contacts have been
recently changed, for easy access.
Action Buttons let you quickly select the action you need
7
Quick Search to find a specific contact using name, id, or email
8. ICON TIPS
Rolling over the buttons will give you a tip on how to use each action
button.
Recently modified contact widget allows for quick in-studio
registration.
8
9. Do First:
• 1) Business Setup: Start with the BUSINESS SETUP
because there are features that must be added
before you add classes or students.
– Manage business features
• 2) school setup
– Age groups
– Class levels
– locations
• 3) contacts: faculty must be added before you
add classes
– Add contact
• 4) classes
– Add classes
11. BUSINESS SETUP
This is your business setup, where you‟ll manage critical elements
of your business:
Discounts for managing class discounts and pricing packages
Member Levels for creating different member groups and levels
Session Packs for creating packages of same-cost classes
Manage Business Features to set up the features you want for your school.
11
12. Discounts
Customize discounts on this page. You will be able to use the
discounts for families too.
An example discount is buy 1 class and get 10% off a second class.
Students do not have to purchase classes all at the same time to
receive discounts.
You can use these discounts to drive sales and increase enrollments.
12
13. Discounts
You can have multiple discounts. So a second discount can say, Buy
2, get 15% off next 1 (or the third class)
This states: you must buy 1 class to get 10% off second class.
You can apply to a family, or make it inactive.
Make sure to save your discount.
You can prioritize them. Student will get discount automatically upon
registering for a class.
See how it works 13
13
14. Member Levels
For various levels of supporters, you can set up membership levels.
In your class setup, you can create separate prices for members
and non-members.
NOTE: You do NOT have to enable membership levels.
Boxes on the right allow you to edit or delete different memberships.
Refers to the number of people who will receive membership from
this level of membership
14
15. Session Packs
If your school has “drop in” classes or session cards, you may want to
use session packs. Your students can use these session cards online to
pay for their courses.
You can create new, delete, or edit session packs.
You can also create a discounted price for your session packs, making the
pricing more enticing for students.
15
16. Create a New Session Pack
Here is an example of a session pack discount. This session pack is 10
classes for $300 instead of $400. Nice deal!!
Name the session pack. This will appear in the Accounts tab of the student‟s
contact page in the back end.
The SALE PRICE is the discounted price of the pack
The cost of the sessions for which this pack is usable.
16
17. Manage Business Features
Business set up allows you to enable the features listed about.
Most important to the majority of schools are:
Scholarships
Gift Certificates
Session packs
Enable recurring billing
Enable online purchase 17
18. Business Features: Payment Keys
Please call School Empower to help you set up Payment Keys:
Your integration with Payment Gateway. You can link with
either Authorize.net or Paypal.
18
19. Business Features: Integration
If you want your School Empower site to link to any external
site(s), provide the URLs
19
21. SCHOOL SETUP
Allows you to easily find students and parents.
Edit admin logins to set up permissions and roles for your staff.
Age Groups lets you set age ranges for your classes (e.g. a teen class)
Class Levels lets you separate the beginning dancers from the experts
Create a location for each of your classes (e.g. studio 1)
Create different contact types or groups(e.g. student, parent, team)
Set up your homepage and edit the html for your main site.
Create terms and conditions for your school. 21
22. Admin Logins
In the Admin Logins Page you can change
your administration positions and edit users‟
roles. These permissions will change what
each administrator can or cannot see in
their own login dashboard.
Choose a user to give admin permissions
23. Age Groups
Age groups are used the show the appropriate age level for a given
class, so you can have an adults-only ballet class or a teens-only
karate course. Students will be able to search for classes based on
the age groups you create.
Create and customize the age groups of your school.
You can also edit and delete age groups from this screen.
23
24. Class Levels
Establish the expertise level of your classes.
The color shown will be used to represent the given class level in your
school‟s class calendars
24
25. Locations
Use the locations tool if you have more than one room or multiple
locations. You can easily add, delete or edit locations from this tool.
These locations are used when setting up your school‟s classes.
25
26. Contact Types
This enables you to assign a GROUP to a student in order to
communicate to segments.
For example, if you only want to email your TEAM, you can set up a
group called TEAM. When they are registered, they will be a TEAM
student.
You can also give a GROUP a discount. So if team members receive a
discount, when you register them, it will apply.
26
27. Homepage
Here is where you will upload and manage the images you want the
public to see on your homepage.
You can easily edit the html of the page here. 27
28. T&C‟s
Enter any permissions, releases, etc. that are needed here. When
your student registers, they will be presented with your terms and
conditions and need to check off their agreement.
28
29. (4) Contacts
NOTE: you can not delete Faculty that are teaching a class or
students that are enrolled in a class.
30. CONTACTS
You can view all of your contacts here.
Faculty must be in the system before any classes can be added.
Students must be registered before they can sign up for classes.
Parents can also be entered and linked to students.
Search for contacts based on various descriptors
View your waitlisted students and re-enroll or remove them from the
waitlist here. 30
31. Contacts
A list of all your contacts where you can edit, register or delete.
NOTE: You can not delete faculty that are teaching classes or
students who are enrolled in a class
34. Add Contact
NOTE: Save & Edit will
allow you to continue
editing your contact.
Save will save your
contact and bring you
to your contacts list.
34
35. Edit Contact: Overview
Once you have saved your contact‟s data you can edit contact.
The contact navigation will appear.
Notes about your contact
classes your contact has/is taking or has/is teaching; also registration.
purchased and donated memberships listed here.
stored credit, scholarships, and other prepayments.
classes and items which are in the contact‟s cart.
a customizable bio of your contact
related contacts (e.g. parents, siblings, guardians) can be linked here.
all transactions which your contact has performed. 35
36. Edit Contact : Classes
Students‟ past, present, and future classes are all listed on this page.
Teachers‟ past, present, and future classes are also listed.
REGISTER FOR CLASS to add more classes to this contact‟s schedule.
36
37. Edit Contact : Memberships
Contacts‟ current memberships are self-purchased. Beneficiary
memberships are memberships given by another contact.
Register the contact for membership.
37
38. Edit Contact : Register Memberships
Contacts‟ current memberships are self-purchased. Beneficiary
memberships are memberships given by another contact.
Register the contact for membership.
38
39. Edit Contact : Accounts
Prepaid credit, sessions, gift certificate accounts, and scholarship
money are „Accounts‟ which the contact can use to pay for classes
and are all listed on this page.
Purchase a session pack here. Edit your session packs
Students can prepay credit using checks. More Info Here.
Enables the contact to purchase a gift certificate for another contact. 39
You can grant this contact a full or partial scholarship.
40. Edit Contact : Accounts: Prepay Credit
Contacts can prepay credit using check here. The system will
automatically expire credit once the expiration date is passed.
Name the transaction
40
41. Edit Contact : Accounts: Purchase Gift Certificates
Contacts can purchase gift certificates for other contacts.
Select the certificate owner from the list, or search for the owner.
Name the certificate 41
42. Edit Contact : Accounts: Grant Scholarship
Grant a Scholarship to the current contact to provide financial aid for
any students or reward students for good work.
Name the scholarship
Scholarship can be full or partial, depending on the dollar amount which
you wish to procure for the scholarship. 42
43. CONTACTS: Pending Items
Pending items are items that have not yet been purchased.
Name lists the kind of item: Course, Gift certificate, Session pack name, etc.
Text description of the item: Course name, Certificate name, etc.
Recurring Billing option: lets you select recurring (installment) payment 43
44. CONTACTS: Linked Contacts
Linking contacts can help you connect contacts to friends, parents,
siblings, and guardians. This way you can easily find a student‟s
parent or vice versa.
44
Link another contact
45. CONTACTS: Linked Contacts
Linking contacts:
Filter lets you filter the choices
Choose the desired contact to link
State the relationship to the current contact: (e.g. Jean Behame is the child
of Senor Partucky) 45
46. CONTACTS: Txn Report (Transaction Report)
The Txn Report tab lists all transactions for a single contact.
Filter the contact‟s transactions by payment type, date, or semester
If you scroll this bar to the right, you can view more data about each
transaction.
Export all of the filtered transactions to an excel file. 46
47. CONTACTS: Txn Report (Print Receipts)
Printing a single transaction:
Use the side-scroll function to the “Transaction
rec” column
Click “print” next to the desired transaction
A popup will appear. You can view the
transaction receipt and print.
47
48. CONTACTS: Register for class
A class search will pop up.
Use any or all of the fields to search for your desired class.
Select one or more classes
ADD TO PENDING ITEMS.
48
49. CONTACTS: Register for class
You will be automatically redirected to the pending items tab.
This class was set up with recurring billing. How do I set up recurring
billing?
49
50. CONTACTS: Register for class
If your contact has scholarships, prepaid credit, or other
accounts, you can apply any of these accounts towards your
pending items. Enter the amount in . 50
51. CONTACTS: Register for class
Collect credit card information, check or cash and
proceed to payment. 51
52. CONTACTS: Register for class
The class now appears in the student‟s Classes tab.
Withdraw student from class by clicking this arrow.
52
53. Advanced Search
Basic Search lets you search contacts by first/last name
show „advanced search‟: search using ID, phone, contact type, and more.
email/mailing list export: easily send emails to all students or faculty by
exporting a list of their emails. Search for specific types, semesters, or class
categories and export all relevant contacts. 53
55. Classes
View all your school‟s classes.
Add a new class. (before you add a class, complete DO FIRST)
Search all classes, using name, instructor, semester, categories, age, level, etc.
Create and edit class categories.
Create and edit semesters: registration fees, start/end dates, registration dates
View all classes together on a course calendar.
Find all recently modified classes here
Quick search for a class
56. Classes
When you create a class, it can have more than one schedule.
Main Class (shown in white) has elements that can‟t be changed in different
schedules: name, instructor, age, level, enrollment, class type and categories.
Schedules (shown in grey) have the elements:
date, times, locations, prices, semester.
You can also set the status of each schedule to current, canceled, or pending
58. Semesters
Semesters can be used to define the calendar period of a recurring
class or series of sessions.
The registration fee for a specific semester can be edited here
Semester start/end date defines the calendar period of the semester
defines when contacts can begin registering for a specific semester
after this date, contacts can no longer register for classes in this semester.
create a new semester
59. Add Class
Set the course name, instructor, and description. This will all be seen by your potential
students, so make it interesting!
Set age group and level for your class
Enrollment sets the class size. Once the class becomes full, new students are added to the
waitlist for the course.
Decide whether your class is session or semester-based. Semester classes are courses that
are recurring for a semester period. Students cannot enroll mid-semester and take all
classes within the semester. Session based classes can be taken individually.
60. Add Class: Schedule and Pricing
Once you have edited and saved the class information, you can now create
a schedule for your class. NOTE: students cannot see your class on the front
end unless there is a schedule for it.
Create a new schedule to begin.
61. Add Class: Create Schedule
Class status: current means
that the class is scheduled
and available for registration.
Cancelled means the class
will not take place and
students will be unable to see
this class on the front end.
Pending means that the class
will possibly take place, but is
not fully finalized. TIP: if you
decide last-minute to cancel
a class, you can easily do so.
Choose a semester, start and
end dates, and times for our
class. If your class has varying
times, you can edit that later.
Select the day(s) of the week
on which your class takes
place.
62. Add Class: Create Schedule
Set the location for your
classes. If you have different
locations for individual classes
you can manually edit that
later.
Once you‟ve selected the
class days (previous page
(3)), the “# of sessions” will
automatically fill in. NOTE: you
can also manually add more
sessions if you have more
sessions.
You can now click this tab to
view (and edit) individual
sessions.
63. Add Class: Create Schedule
When you select the view/hide sessions tab it allows you to view/hide
individual sessions so you can edit them.
You can name each individual session to let students know what they can
expect in the class. (ex: “Salsa” “Pointe work” “Dress rehearsal”, etc.)
If a specific session has a different date/time/location than others, you can
edit its information here.
Action buttons: the ( ) button allows you to delete individual sessions.
The ( ) button allows you to view the class roster for individual sessions
(roster edit button present only with Session-based classes)
64. Add Class: Create Schedule
Edit the class costs here. If you
have memberships you can set
different prices for members
and for non-members
(Regular).
If your class is session-
based, you can set the cost for
individual sessions. Please note:
if your class is session-
based, the “Per Session Cost”
applies for individual
sessions, but if ALL the sessions
are purchased, then the “Full
Class Cost” is used. (ex: Zumba
has 4 classes, costing $20 per
session. However, the “Full Class
Cost” may be $75, giving
students the incentive to
register for all four classes)
Additional costs? Enter them
here.
65. Add Class: Create Schedule
Review all your class costs.
If the class is session-based,
then you will not see this
section. If the class is semester-
based, then you can set up
recurring billing. See more
about recurring billing.
67. Add Class: Categories
Check all categories relevant to the class. This will help your contacts
find the classes in which they are interested.
New categories can be created here.
69. Calendar View
Calendar View lets you see your classes, side-by-side, for each date.
Set the shown date
Change the colors of calendar view based on these fields
Clicking the session name opens an Edit Session popup where you can
modify the selected session.
74. Membership
A list of all contacts who have become members, within given dates.
Set date range
Benefactor: contacts who have also receive membership with the
purchase of a level of membership (i.e. a family membership will have
multiple benefactors)
Export all the resulting contacts to an Excel format.
76. Waitlist
From this screen you can use the square icons to either „re-enroll‟
students or „remove‟ them from the waitlist.
Set semester or instructor
Re-enroll: put this contact into the class (if there is space in the given roster)
Remove: removes the contact from the waitlist. The delete selected button
lets you select more than one contact to remove from the waitlist.
77. Recurring Billing
Recurring billing only works with semester-based classes. It allows
students to pay for their classes in installments. Generate reports so
you can make sure that payments are being sent to you on time.
Set date range
States contact, ID, payment amount, Due Date, time until/since due date,
and reason (payment state).
78. Setting up Recurring Billing
To set up recurring billing: first select your class.
Use either All Classes,
Quick Search,
or Advanced Search to find a class
79. Setting up Recurring Billing
To set up recurring billing: first select your class.
Use either All Classes, Quick Search, or Advanced Search to find a class
*what to write for the different pages: have a description?
*what are the differences between different admin positions
Search contacts allows you to search your contacts via name, contact ID, phone number, contact type, email, zip code and more. Need to email or mail all of your students or faculty? Search for the corresponding contact type and select “email list export” or “mailing list export” to get a list of mailing addresses.
Any class you create can have multiple schedules:View all your classes on one page.Main class: defines the name, instructor, age, level, enrollment, class type and categories. Schedule: defines the dates, times, locations, prices, semester.Current, canceled, pending
To set up recurring billing for any given class:Select the given class (you can find it via the CLASSES tab and use Advanced Search or manually browse All Classes to find it) Under the Schedule & Pricing tab, select the square edit icon next to your desired schedule.
3) At the bottom of the Edit Schedule popup is a checkbox labeled “Enable Recurring Payment Plan”. Select.4) The initial deposit percentage is the first payment which students must pay upon registration. You can select the number of payments as well as the start date and time between payments as necessary.5) Save your changes.
6) When a student is enrolled in a course with recurring billing, the option to choose recurring billing will be provided in their Pending Items.If you select recurring billing (Pay in installments), make sure to click the blue RECALCULATE button so their Pending Items will update to show the installment payments.