1. Admin Logins
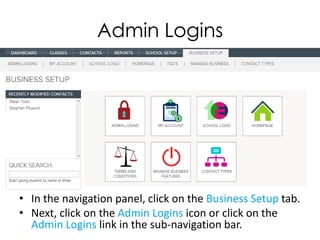
• In the navigation panel, click on the Business Setup tab.
• Next, click on the Admin Logins icon or click on the
Admin Logins link in the sub-navigation bar.
2. Step 1: Add new admin
Here you can see all the contacts you have granted administrative
access to, as well as what permissions they have been given.
Click the ADD USER TO ROLES button.
3. Step 2 and 3: Add new admin
1. 2.Find the Contact you
want to make an
administrator by typing the
name in the Filter Box.
Click on that user.
2. 3. Select the appropriate
permissions by checking
off the boxes below.
4. Step 4: Add new admin
.
• Click SELECT CONTACT when
you are finished.
• That person will now have
administrative rights to the
system.
5. Admin definitions
Contact Administrator:
Edits Contacts.
Course Administrator:
Edits Classes.
Reports Administrator:
View and access Reports.
School Administrator:
Access to all features.