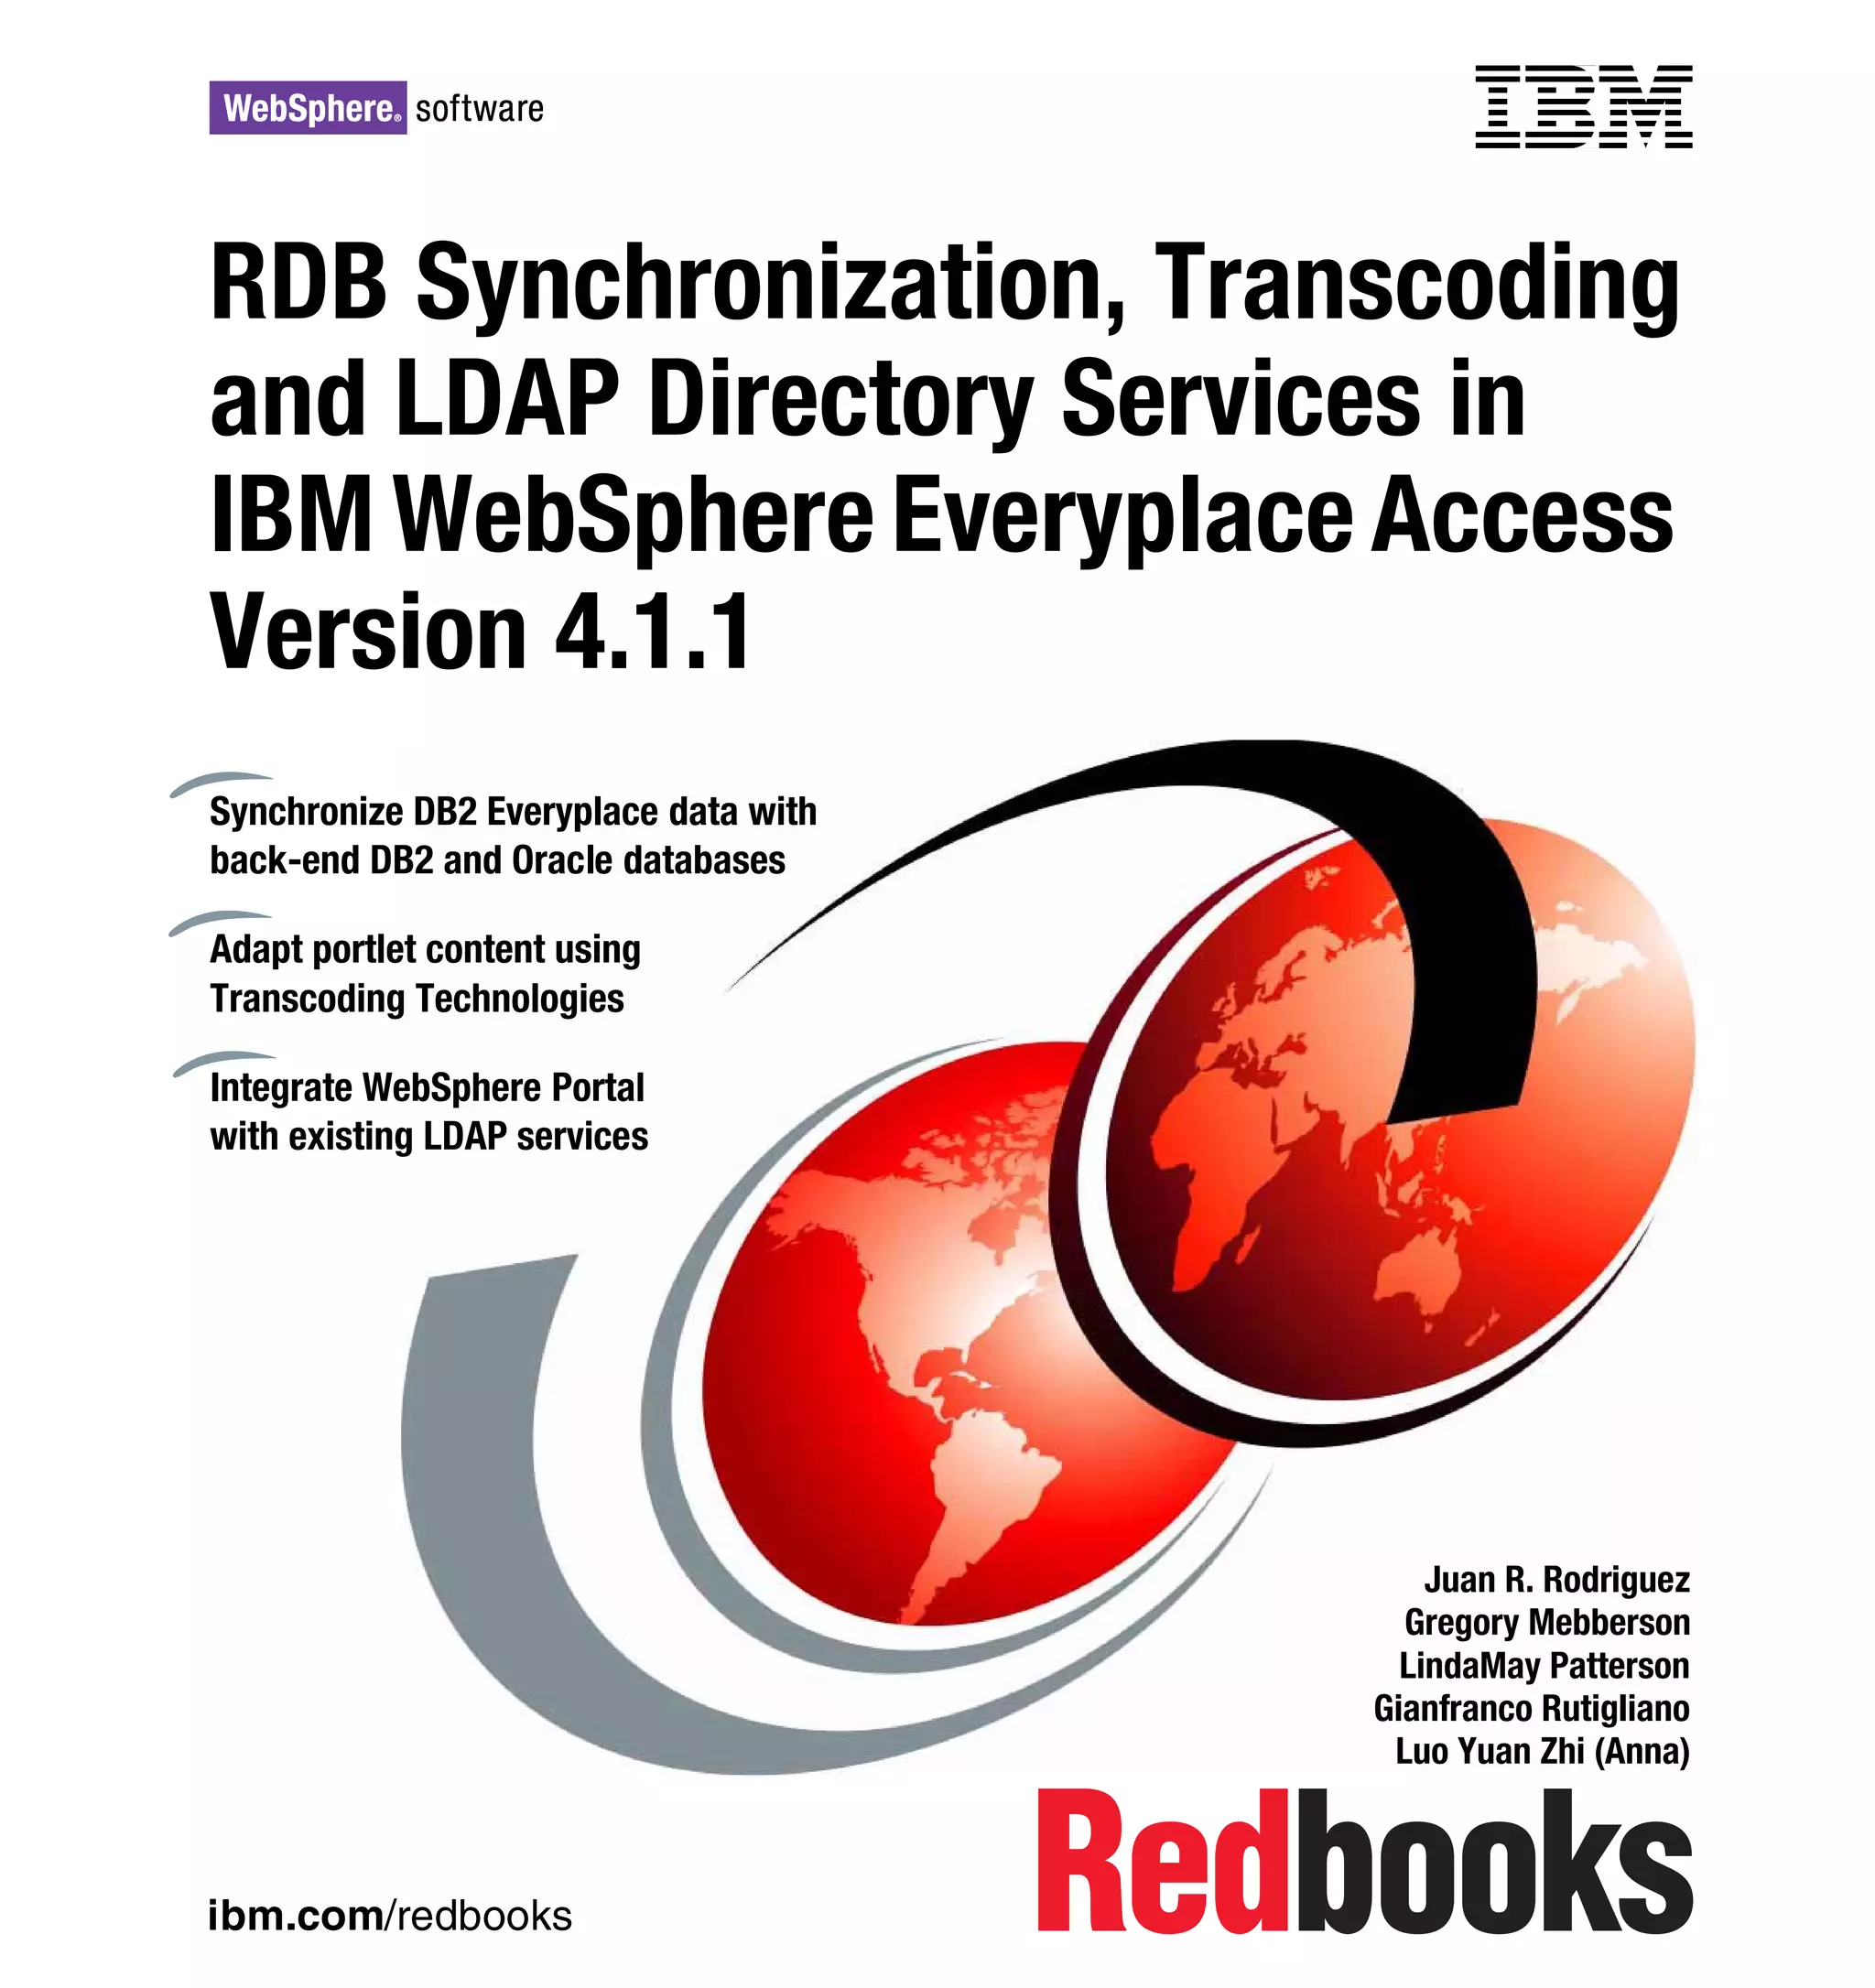
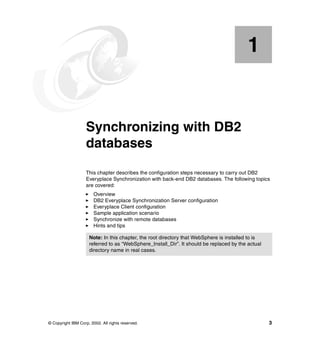
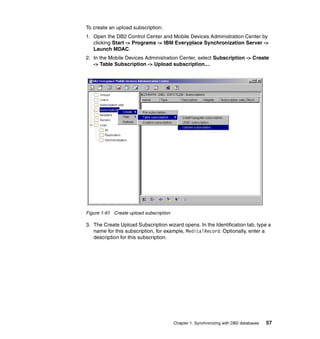
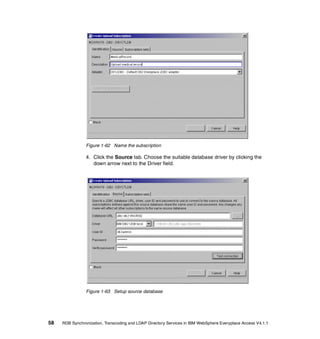
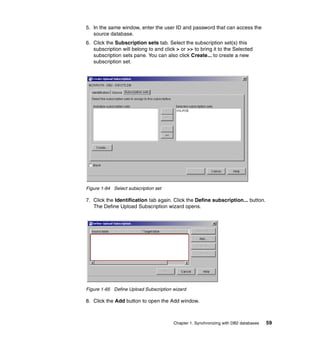
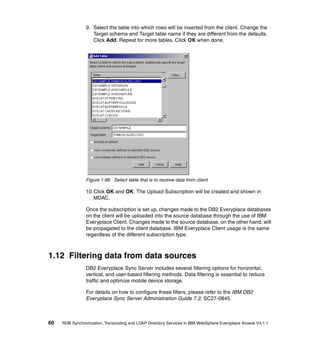
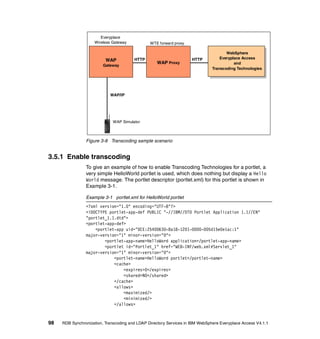
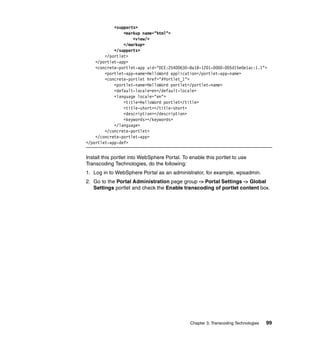
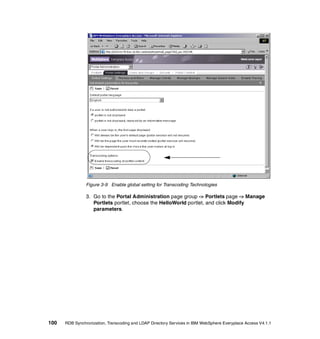
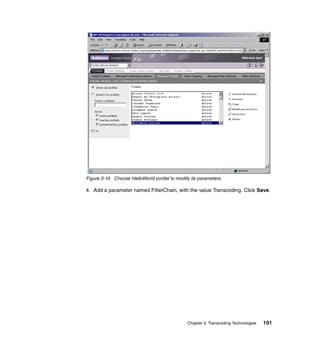
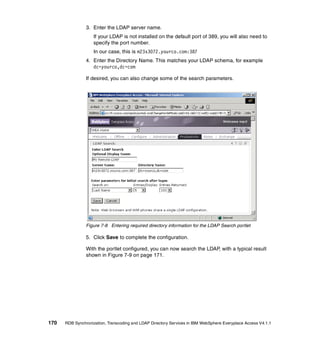
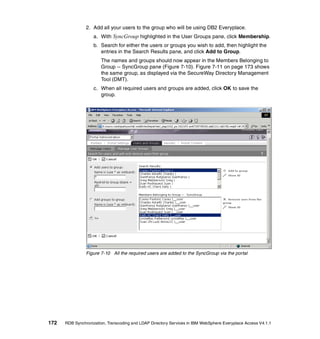
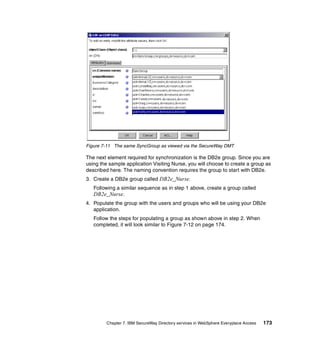
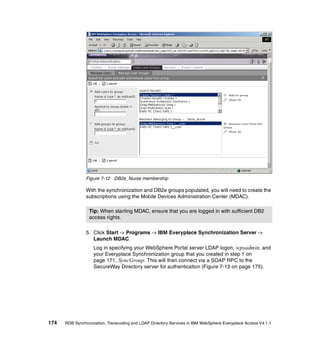
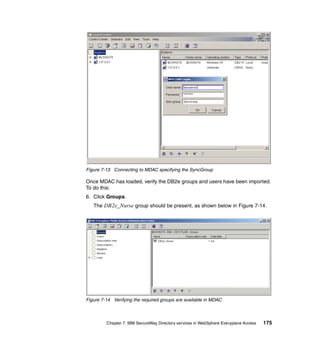
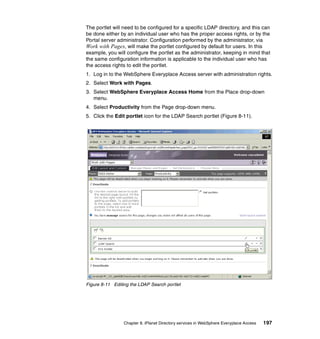
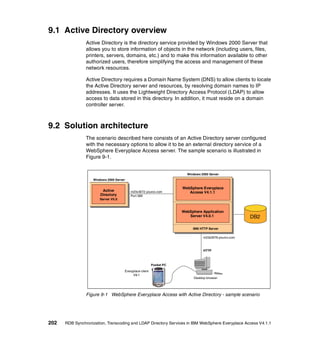
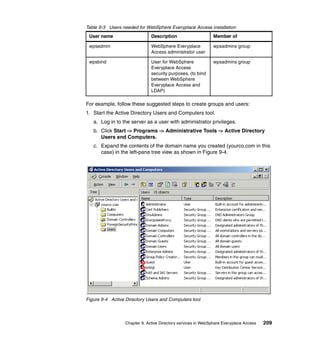
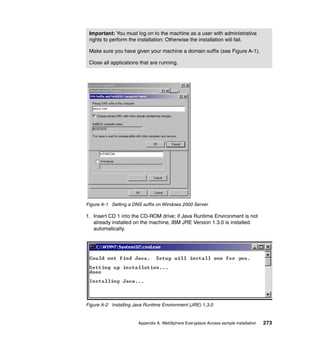
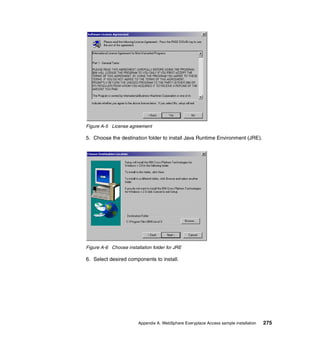
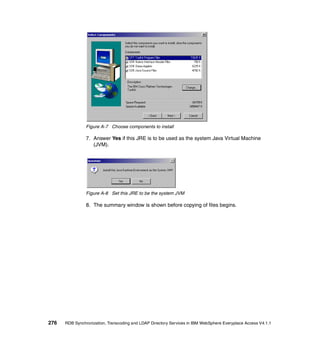
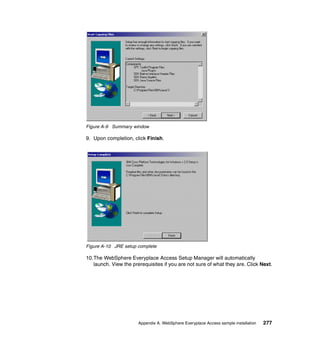
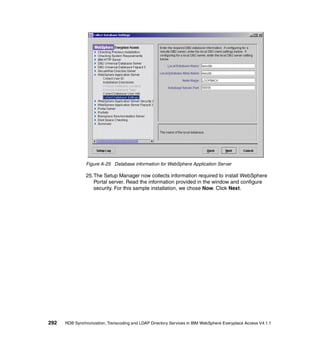
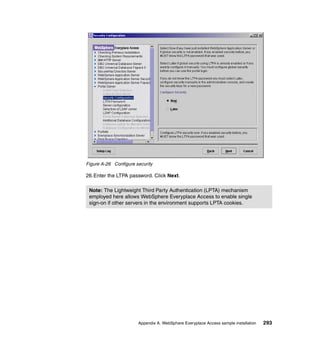
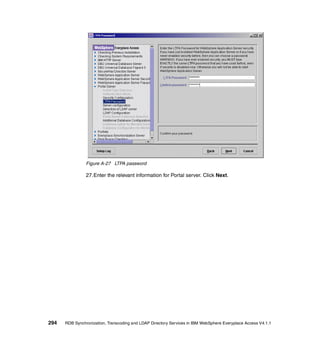
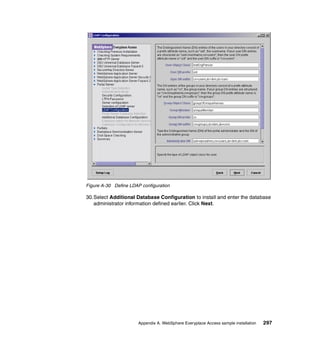
This document provides an overview and instructions for synchronizing data between mobile databases and back-end databases using IBM WebSphere Everyplace Access Version 4.1.1. It also covers using transcoding technologies to adapt portlet content for different devices. The key topics covered include:
- Configuring database synchronization between DB2 Everyplace and backend DB2 or Oracle databases
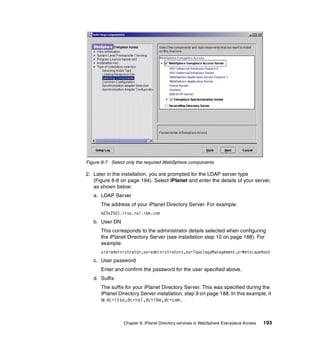
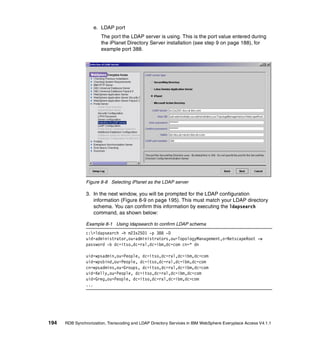
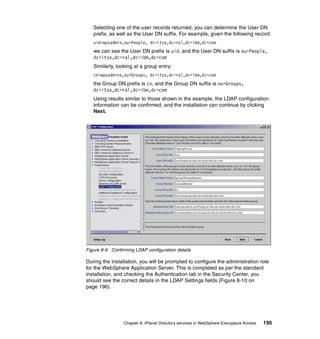
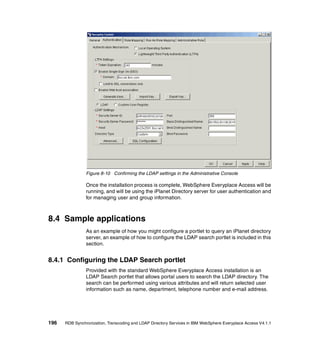
- Using transcoding technologies like XML stylesheets and annotations to customize content for devices
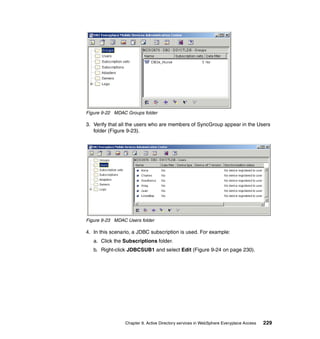
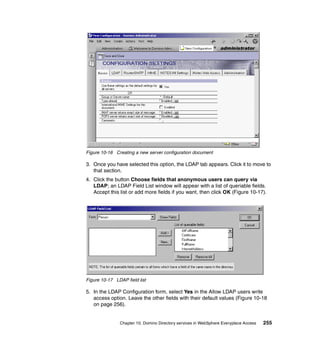
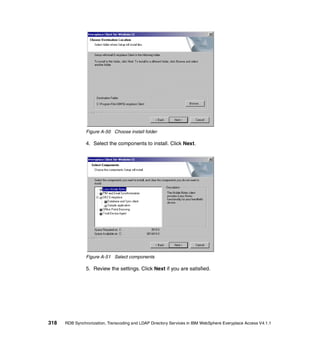
- A sample application demonstrating how to clip content from documents using internal and external annotation


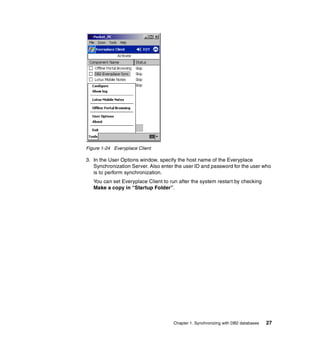


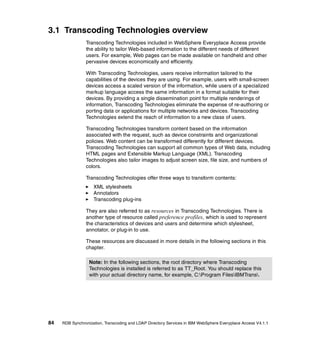
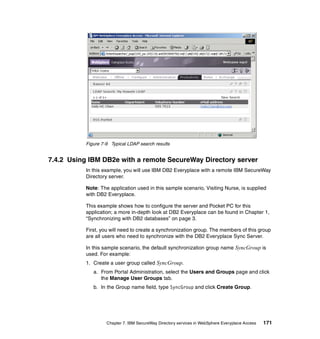
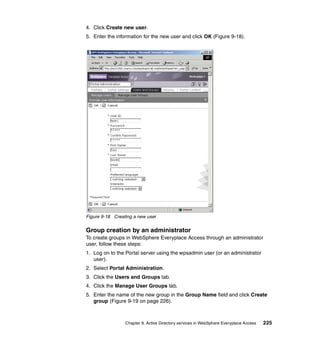
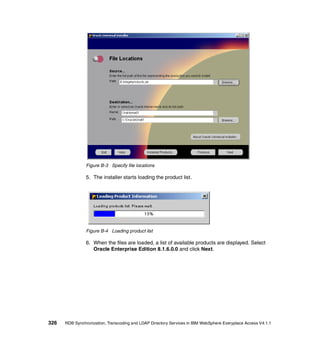
![User preference profiles are represented by .prop files located in:
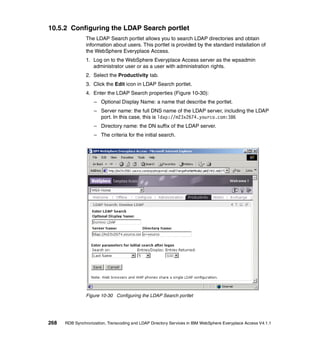
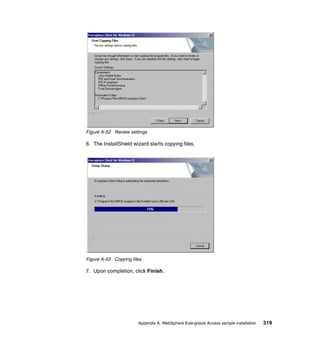
<TT_Root>etcpreferencesuser
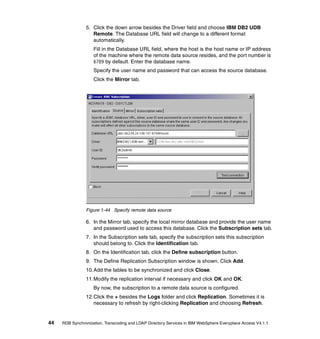
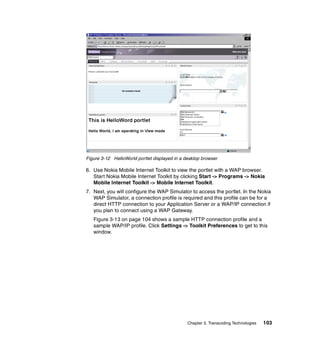
If the X-IBM-PVC-Device-Type field is present in the HTTP header, Transcoding
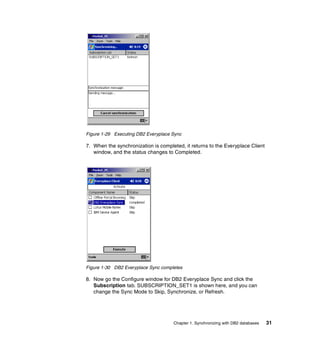
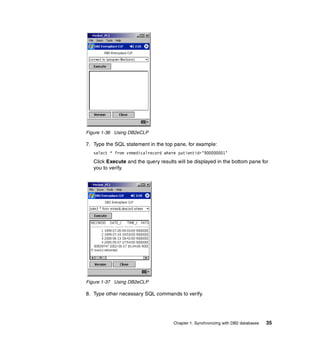
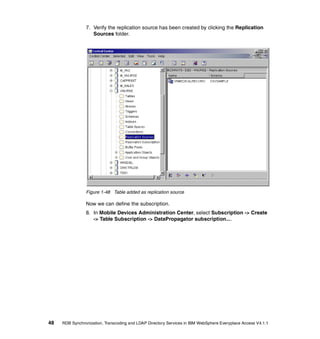
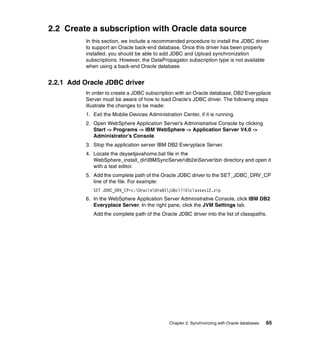
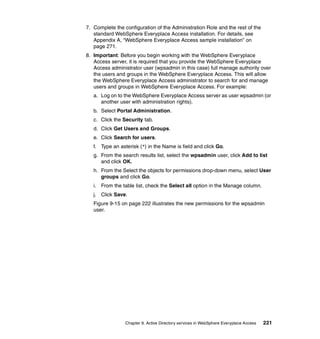
Technologies use the device profile whose file name matches the value specified
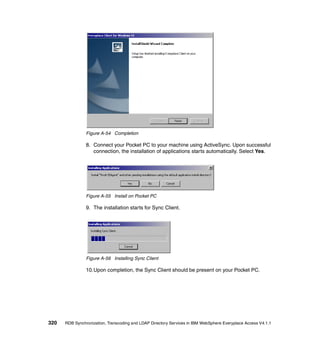
for that field. The value of the X-IBM-PVC-Device-Type field is set by WebSphere
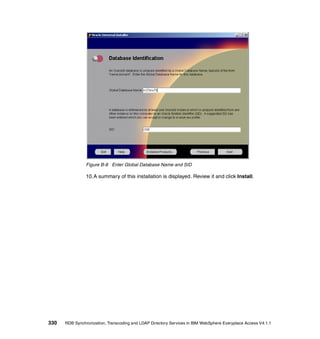
Portal’s preference aggregation.
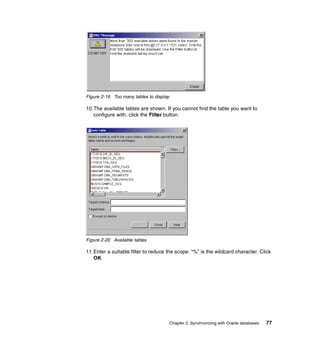
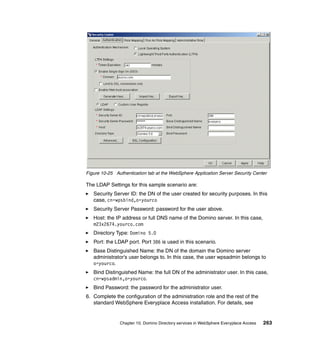
For example, if the value of X-IBM-PVC-Device-Type is
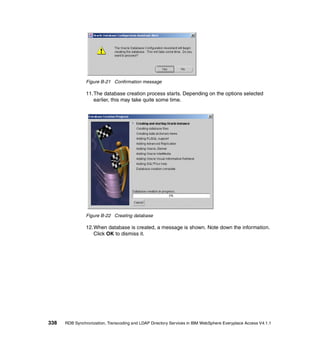
Microsoft!Internet+Explorer!6.0, the following device preference profile will be
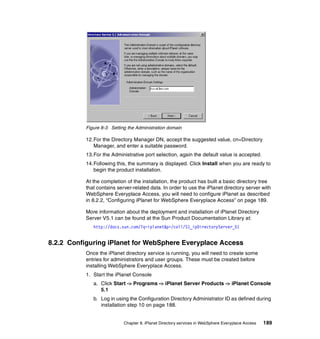
used:
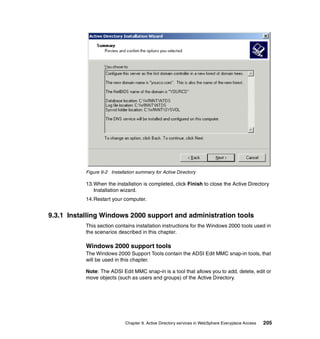
TT_RootetcpreferencesdeviceMicrosoft!Internet+Explorer!6.0.prop
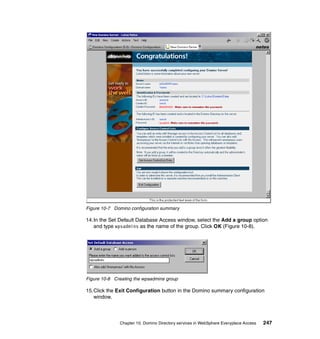
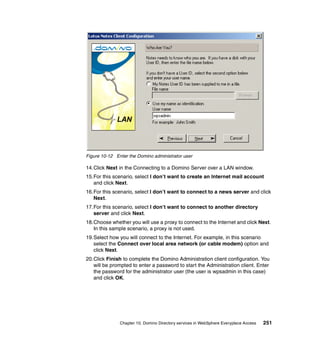
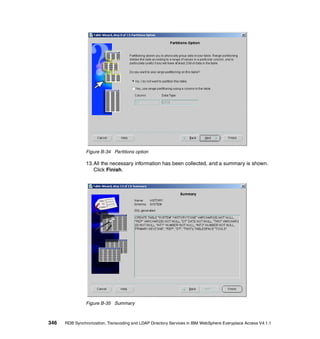
Figure 3-2 illustrates the properties file for Microsoft Internet Explorer Version 6.
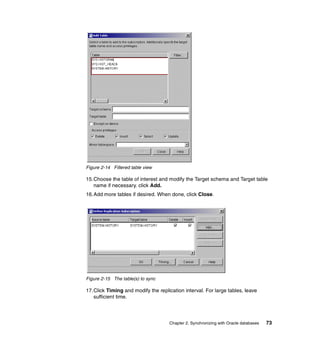
#version = 1.0
#Wed Jul 10 12:55:23 CDT 2002
framesSupported=true
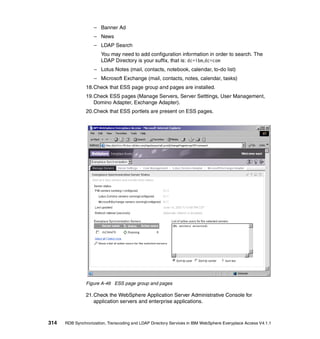
deviceRule=(User_Agent%e*MSIE 6.0*)
javaAppletsSupported=true
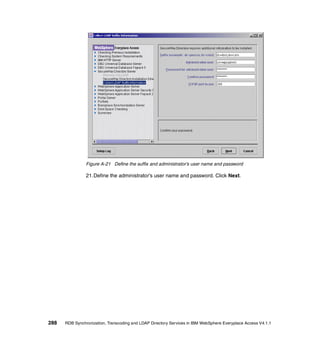
portalOrdinal=360
portalMarkupVersion=ie
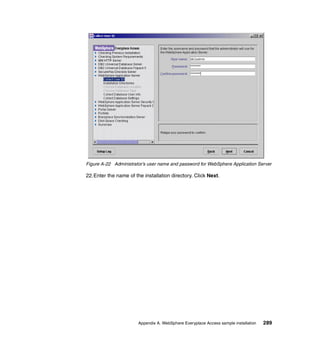
createCHTML=false
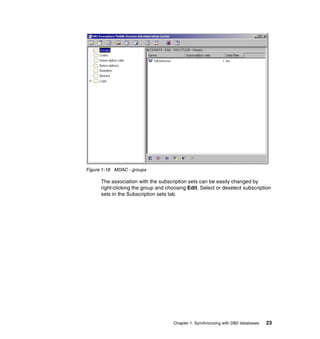
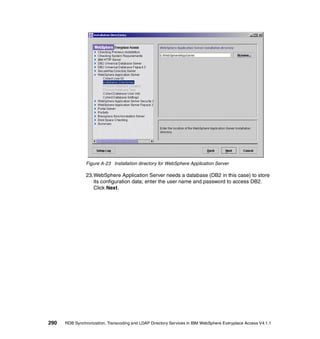
portalClient=true
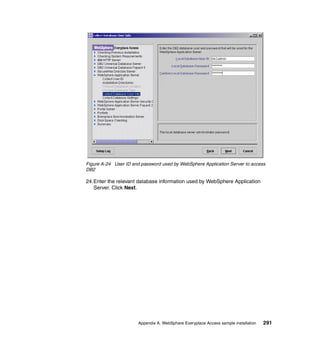
desiredContentTypes=[text/html]
parent=NT.InternetExplorer
javaScriptSupported=true
Figure 3-2 Microsoft!Internet+Explorer!6.0.prop
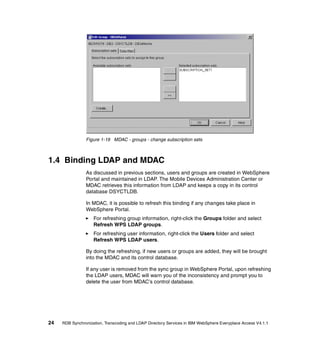
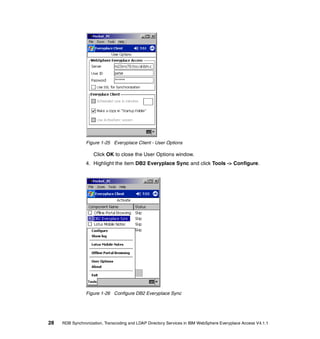
If the X-IBM-PVC-Device-Type field is not present in the HTTP header,
Transcoding Technologies use the device profile whose user-agent value
matches the value of the user-agent field in the HTTP header. If no matching
profile is found, Transcoding Technologies use the default device profile.
User resources are not maintained through Transcoding Technologies. However,
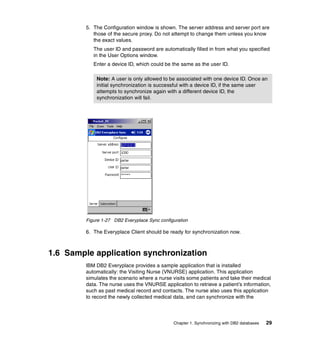
other programs can pass information to Transcoding Technologies specifying the
use of a user profile. A user profile is selected for a request in the following way.
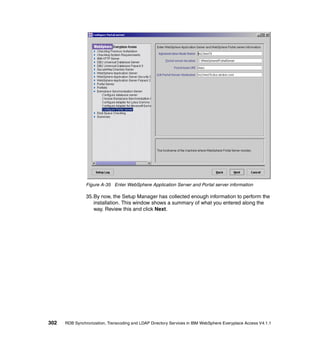
If a value is specified for userAndSessionExtractor in etc/localConfig.prop,
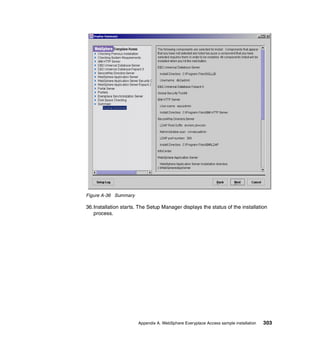
Transcoding Technologies try to execute the referenced implementation of the
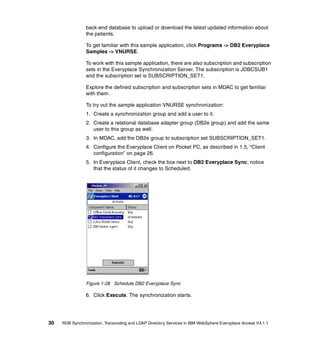
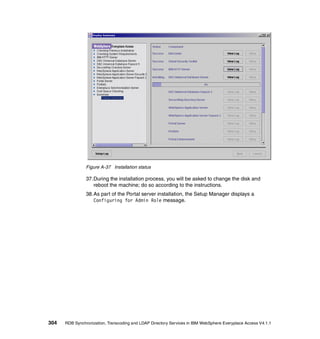
UserAndSessionExtractor interface to obtain user and session names and select
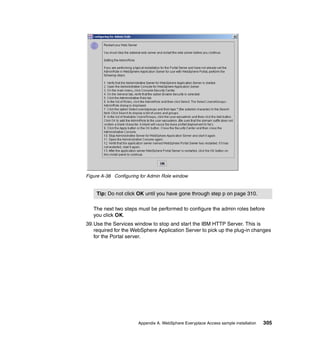
the user profile that matches the user name.
You can specify a field in the HTTP header to be used to select a user profile by
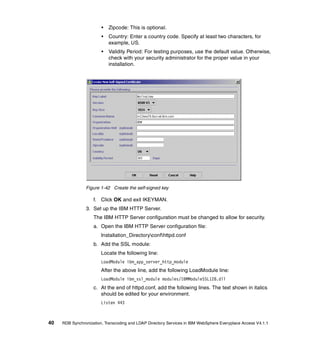
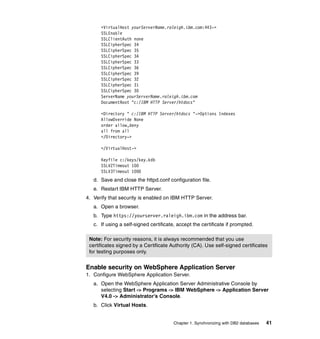
setting the httpUserIdField value in etc/localConfig.prop. For example, if you
Chapter 3. Transcoding Technologies 87](https://image.slidesharecdn.com/rdb-synchronization-transcoding-and-ldap-directory-services4801/85/RDB-Synchronization-Transcoding-and-LDAP-Directory-Services-103-320.jpg)


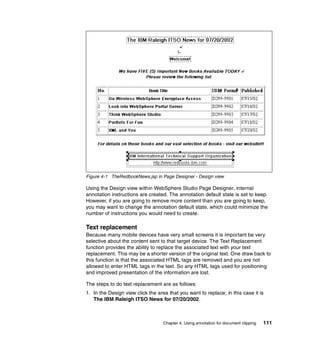
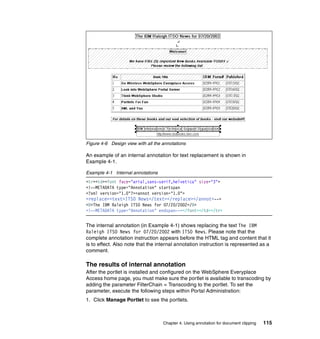
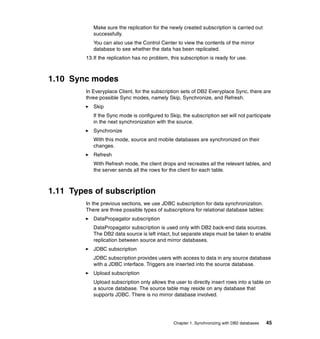
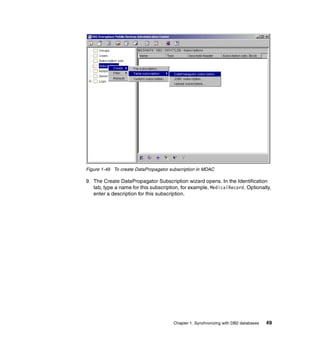
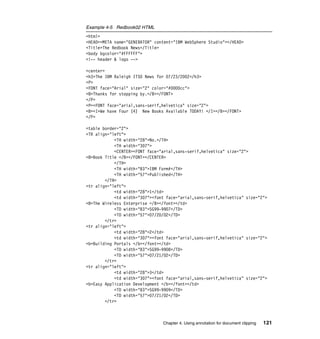
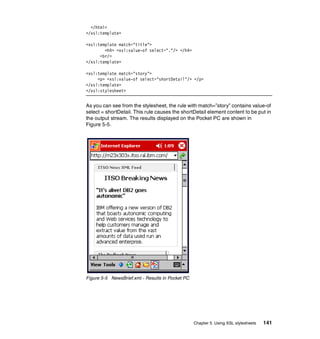
![There are two key parts to an annotation instruction, which are:
1. Annotation markup action: The particular action to be taken against the
HTML element(s)
2. XPath location: The exact location of the element(s) within the HTML source
to take the action against
For internal annotations the XPath was not necessary because the annotation
instruction was located in relationship to the HTML tag(s); they were intended to
effect. However, the external annotations are in a separate file, so the XPath
provides the location of the element(s) to be effected.
XPath is a Worldwide Web Consortium (W3C) specification that provides the
syntax used to identify the location of all the elements and content within an
HTML or XML document.
4.3.1 The external annotation language
Because the external annotation language is an XML dialect, the first entry within
the file is the XML version statement, represented as <?xml version='1.0' ?>.
Next is the root element for the annotation language represented as <annot
version=2.0>.
Each annotation instruction is represented in a <description> element, which can
consist of:
condition = text Defines the condition that must be true for the
annotation action to be applied. This is an
optional attribute.
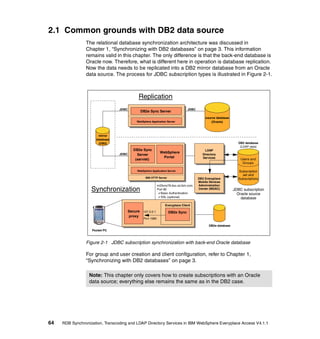
take-effect = before or after Identifies when the annotation is to occur,
either before or after the target node.
target = XPath Identifies the target node (as defined by the
XPath to a given element).
<action> element A child element that states the action to be
taken. There are several actions (some of the
most important ones are included), which are;
<inserthtml>, <insertmarkup>, <keep>,
<remove>, <replace>, <replacewithhtml>,
<setpreferences>, <splitpoint>, <table>.
Example 4-4 on page 120 shows an annotation instruction. This particular
annotation shows replacing the text at location
target="/HTML[1]/BODY[1]/CENTER[1]/H3[1]/text()[1]" with the text ITSO
Redbook News.
Chapter 4. Using annotation for document clipping 119](https://image.slidesharecdn.com/rdb-synchronization-transcoding-and-ldap-directory-services4801/85/RDB-Synchronization-Transcoding-and-LDAP-Directory-Services-135-320.jpg)
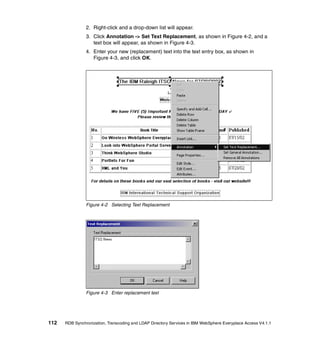
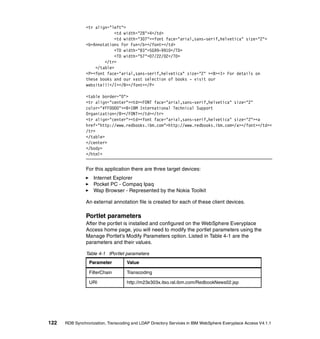
![Example 4-4 External annotation description element
<description target="/HTML[1]/BODY[1]/CENTER[1]/H3[1]/text()[1]">
<replace><text>ITSO Redbook News</text> </replace>
</description>
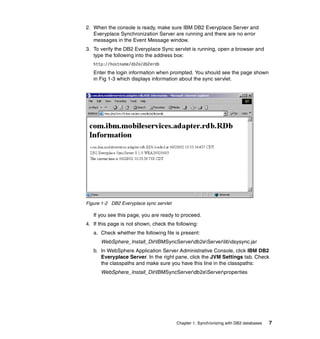
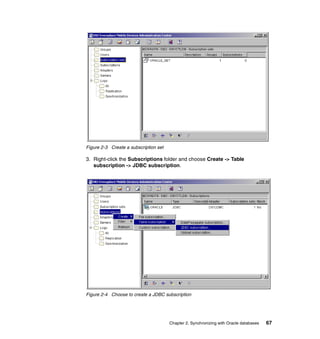
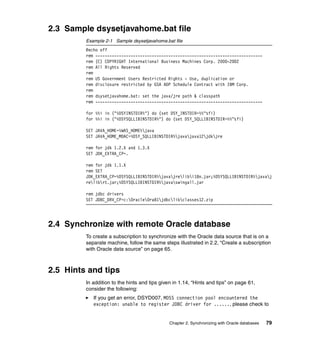
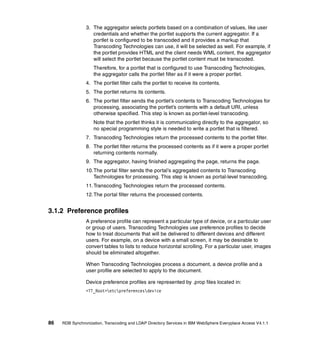
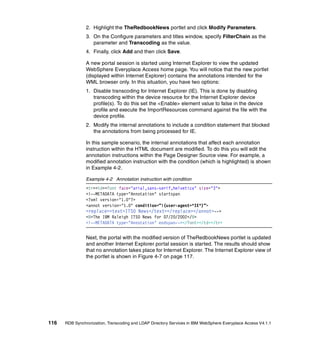
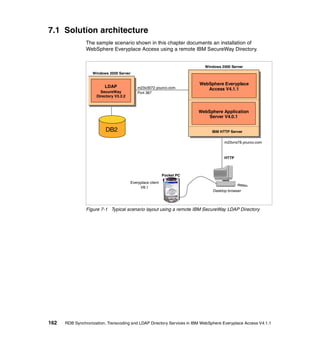
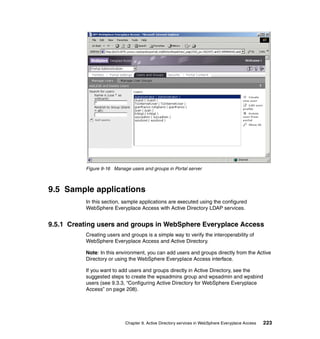
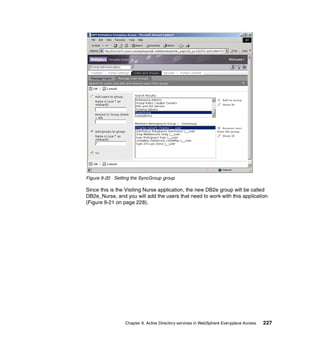
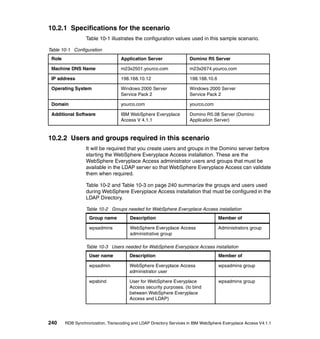
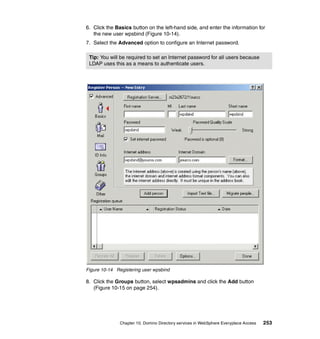
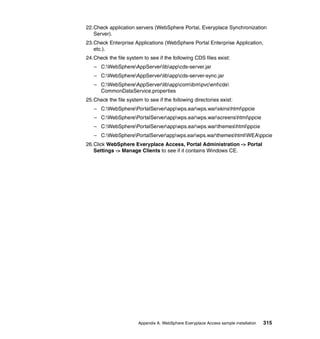
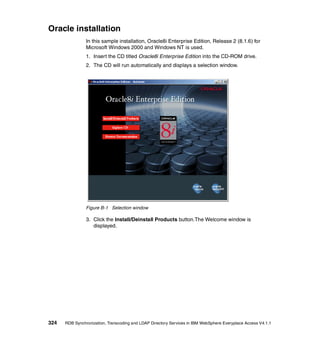
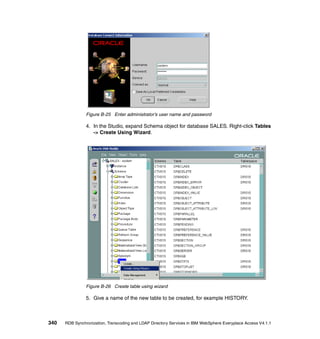
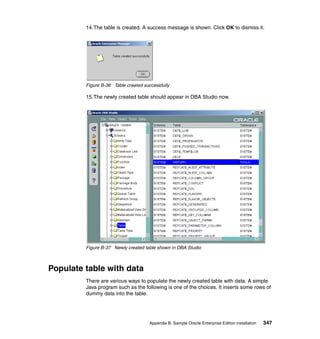
4.3.2 Sample scenario: RedbookNews02
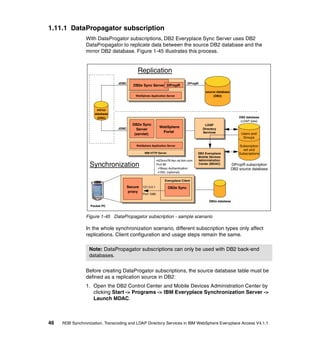
In this sample scenario, the RedbookNews02 application is used to show
external annotations. This sample is a variation of the Redbook News application
(used for internal annotations). The RedbookNews02 application consists of the
RedbookNews02.java portlet and the RedbookNews02.jsp, which emits the
HTML. The HTML consists of headings, text, and tables allowing us to show
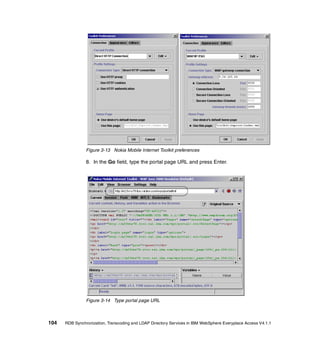
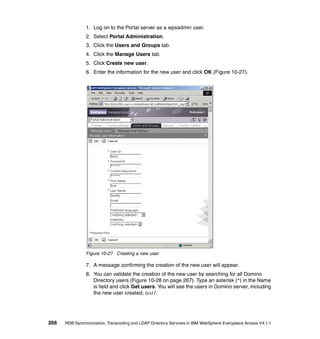
various annotation instructions. The RedbookNews02 application, without any
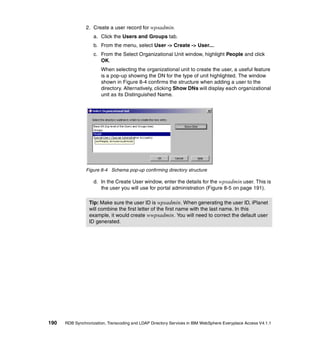
annotations applied, is shown in Figure 4-10.
Figure 4-10 RedbookNews02 without annotations
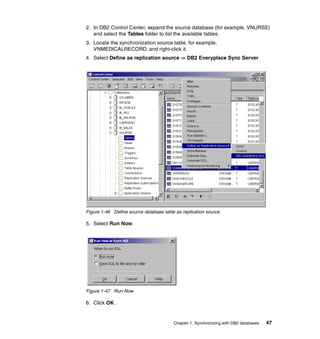
The HTML document itself is seen in Example 4-5 on page 121.
120 RDB Synchronization, Transcoding and LDAP Directory Services in IBM WebSphere Everyplace Access V4.1.1](https://image.slidesharecdn.com/rdb-synchronization-transcoding-and-ldap-directory-services4801/85/RDB-Synchronization-Transcoding-and-LDAP-Directory-Services-136-320.jpg)
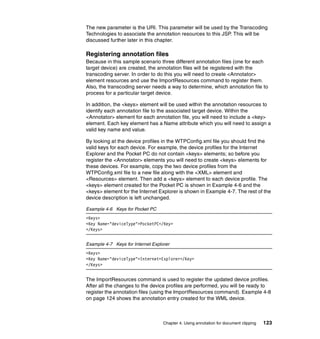
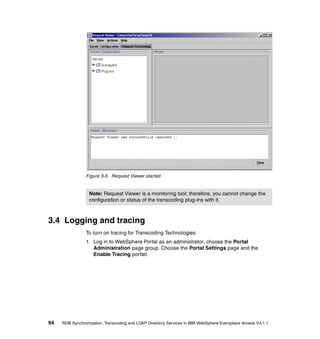
![Example 4-8 Annotator for WML browser
<Annotator>
<Folder>ibm/itsotest</Folder>
<SelectorName>RedbookNews02WML02</SelectorName>
<Name>RedbookNews02WML02</Name>
<Description>This ann file is for the Redbook News 02 </Description>
<URL>http://m23x303x.itso.ral.ibm.com/RedbookNews02.jsp</URL>
<Location>C:/Stylesheets/Redbook02WML.ann</Location>
<Keys><Key Name="deviceType">WML Device</Key>
</Keys>
<Enable>true</Enable>
</Annotator>
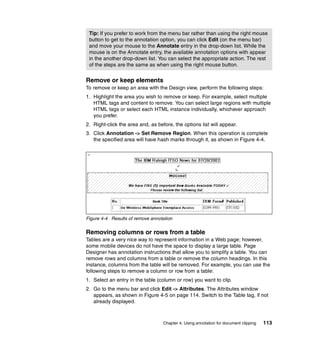
Please take note that the annotator’s <URL> element contains the same
information as the portlet’s URI parameter. These must match in order for the
transcoding server to match the JSP with the annotation file.
Internet Explorer - External annotation
Even though you do not need to annotate the HTML document for Internet
Explorer, it is a good way to show a simple annotation file. Internet Explorer’s
annotation file contains these annotations:
Replace text.
Remove the first paragraph.
Keep the rest of the document. Notice that this entry is not necessary
because the default state is keep but it was included anyway.
The annotation file for Internet Explorer is shown in Example 4-9.
Example 4-9 External annotation for Internet Explorer
<?xml version='1.0' ?>
<annot version="2.0">
<description target="/HTML[1]/BODY[1]/CENTER[1]/H3[1]/text()[1]">
<replace> <text>ITSO Redbook News</text> </replace>
</description>
<description take-effect="before" target="/HTML[1]/BODY[1]/CENTER[1]/P[1]">
<remove/> </description>
<description take-effect="before" target="/HTML[1]/BODY[1]/CENTER[1]/P[2]">
<keep/> </description>
</annot>
124 RDB Synchronization, Transcoding and LDAP Directory Services in IBM WebSphere Everyplace Access V4.1.1](https://image.slidesharecdn.com/rdb-synchronization-transcoding-and-ldap-directory-services4801/85/RDB-Synchronization-Transcoding-and-LDAP-Directory-Services-140-320.jpg)
![<annot version="2.0">
<description target="/HTML[1]/BODY[1]/CENTER[1]/H3[1]/text()[1]">
<replace> <text>ITSO Redbook News</text> </replace>
</description>
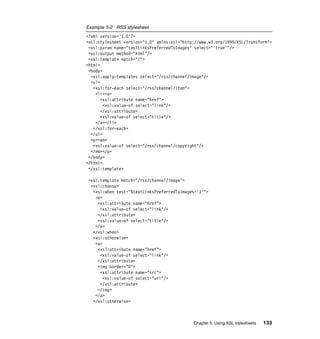
<description take-effect="before" target="/HTML[1]/BODY[1]/CENTER[1]/P[1]">
<remove/> </description>
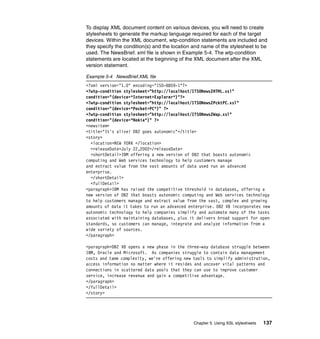
<description take-effect="before" target="/HTML[1]/BODY[1]/CENTER[1]/P[2]">
<remove/> </description>
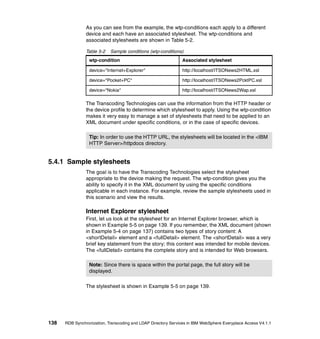
<description take-effect="before" target="/HTML[1]/BODY[1]/CENTER[1]/TABLE[1]">
<keep/> </description>
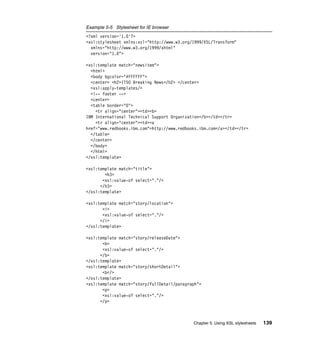
<description take-effect="before"
target="/HTML[1]/BODY[1]/CENTER[1]/TABLE[1]/TBODY[1]/TR[1]">
<keep/> </description>
<description take-effect="before"
target="/HTML[1]/BODY[1]/CENTER[1]/TABLE[1]/TBODY[1]/TR[1]/TH[1]">
<remove/> </description>
<description take-effect="before"
target="/HTML[1]/BODY[1]/CENTER[1]/TABLE[1]/TBODY[1]/TR[1]/TH[2]">
<keep/> </description>
<description take-effect="before"
target="/HTML[1]/BODY[1]/CENTER[1]/TABLE[1]/TBODY[1]/TR[1]/TH[3]">
<keep/> </description>
<description take-effect="before"
target="/HTML[1]/BODY[1]/CENTER[1]/TABLE[1]/TBODY[1]/TR[1]/TH[4]">
<remove/> </description>
<description take-effect="before"
target="/HTML[1]/BODY[1]/CENTER[1]/TABLE[1]/TBODY[1]/TR[2]">
<keep/> </description>
<description take-effect="before"
target="/HTML[1]/BODY[1]/CENTER[1]/TABLE[1]/TBODY[1]/TR[2]/TD[1]">
<remove/> </description>
<description take-effect="before"
target="/HTML[1]/BODY[1]/CENTER[1]/TABLE[1]/TBODY[1]/TR[2]/TD[2]">
<keep/> </description>
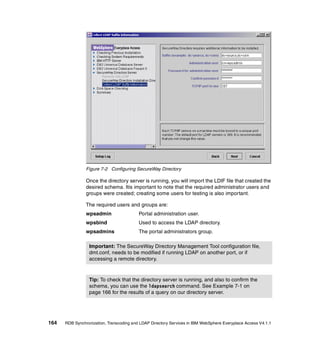
<description take-effect="before"
target="/HTML[1]/BODY[1]/CENTER[1]/TABLE[1]/TBODY[1]/TR[2]/TD[3]">
<keep/> </description>
<description take-effect="before"
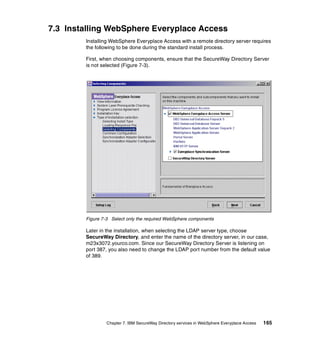
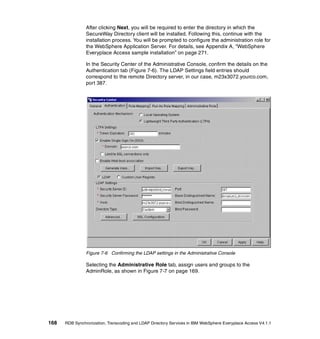
target="/HTML[1]/BODY[1]/CENTER[1]/TABLE[1]/TBODY[1]/TR[2]/TD[4]">
<remove/> </description>
--------repeat these instructions for Table Row 3, 4 & 5 -------
<description
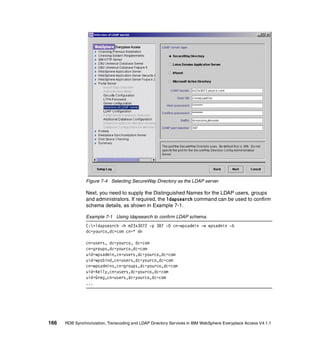
target="/HTML[1]/BODY[1]/CENTER[1]/P[3]/FONT[1]/B[1]/I[1]/text()[1]">
<replace> <text>Details at our website:</text> </replace>
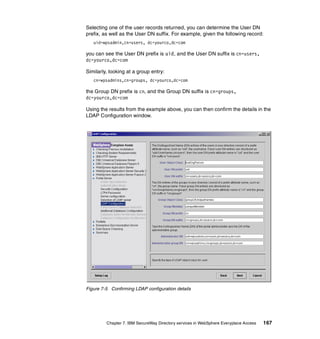
</description>
<description take-effect="before" target="/HTML[1]/BODY[1]/CENTER[1]/TABLE[2]">
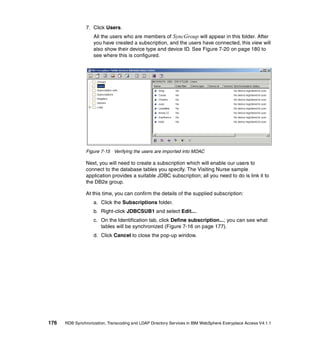
<keep/> </description>
<description take-effect="before"
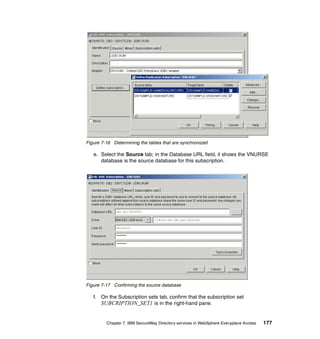
target="/HTML[1]/BODY[1]/CENTER[1]/TABLE[2]/TBODY[1]/TR[1]">
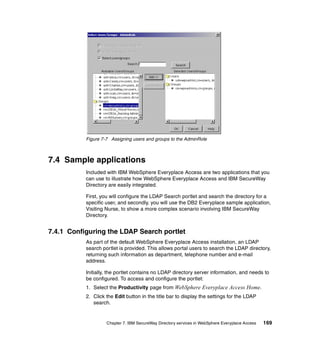
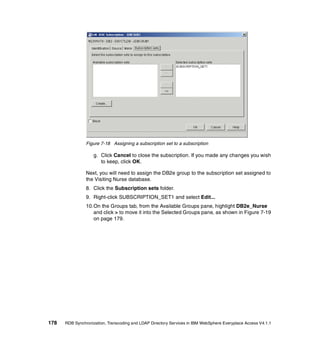
126 RDB Synchronization, Transcoding and LDAP Directory Services in IBM WebSphere Everyplace Access V4.1.1](https://image.slidesharecdn.com/rdb-synchronization-transcoding-and-ldap-directory-services4801/85/RDB-Synchronization-Transcoding-and-LDAP-Directory-Services-142-320.jpg)
![<remove/> </description>
<description take-effect="before"
target="/HTML[1]/BODY[1]/CENTER[1]/TABLE[2]/TBODY[1]/TR[2]">
<keep/> </description>
</annot>
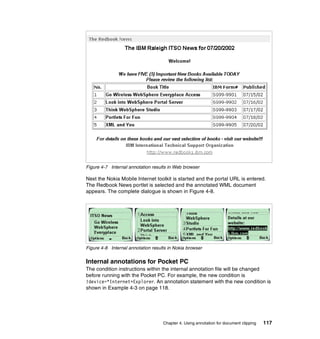
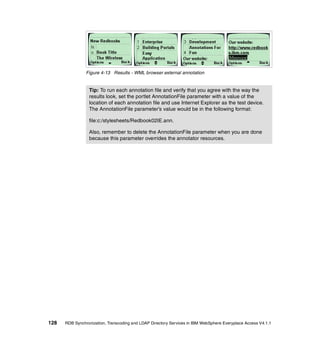
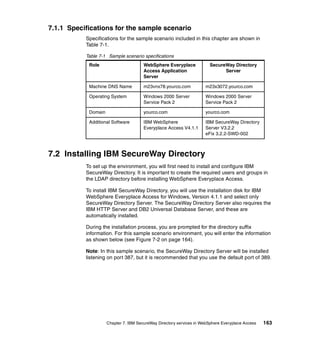
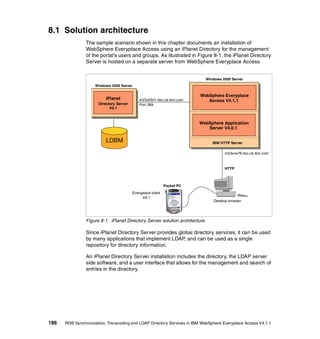
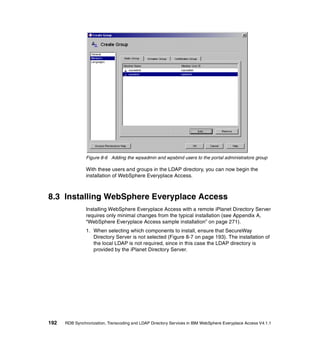
The results of the Pocket PC external annotations are shownin Figure 4-12.
Figure 4-12 Results - Pocket PC external annotation
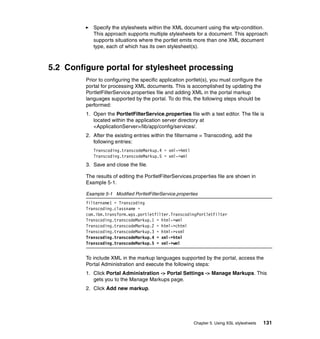
WML browser - External annotation
The external annotations for the WML browser (Nokia Toolkit) are similar to the
external annotation instructions for the Pocket PC, except that you keep columns
1 and 2 (the number and the book title) of the Book table. The results displayed
on the Nokia Toolkit are shown in Figure 4-13.
Chapter 4. Using annotation for document clipping 127](https://image.slidesharecdn.com/rdb-synchronization-transcoding-and-ldap-directory-services4801/85/RDB-Synchronization-Transcoding-and-LDAP-Directory-Services-143-320.jpg)

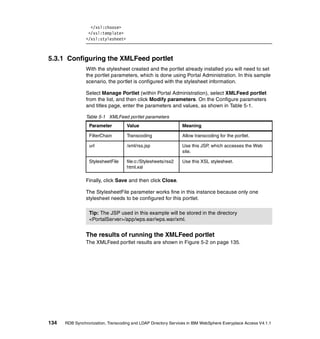
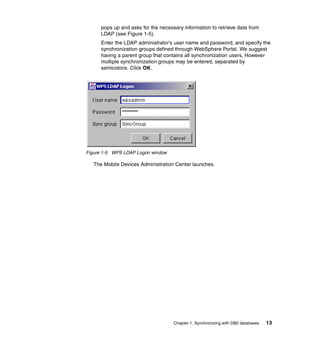
![<Key Name="deviceType">WML Device</Key>
<Key Name="convertTablesToUnorderedLists">false</Key>
<Key Name="fixedImageScale">true</Key>
<Key Name="textLinksPreferredToImages">true</Key>
<Key Name="WMLMaximumDeckSize">2880</Key>
<Key Name="screenCapability">low</Key>
<Key Name="supportedImages">[wbmp]</Key>
</Keys>
<Enable>true</Enable>
</Device>
i-mode (cHTML): The maximum size value is 2048 bytes by default. There is
no parameter as with WML. i-mode phones can also have different cache
sizes. The size is specified in the User-Agent field in the HTTP header. For
example, User-Agent DoCoMo/1.0/N502/c8 specifies an 8 KB cache. In this
case, the fragmentor adjusts fragmentation size based on this cache size. If
the cache size is c8 (8 KB), the fragmentor sets the maximum size to 3000
bytes. If the cache size is c10 (10 KB), the fragmentor sets the maximum size
to 4000 bytes.
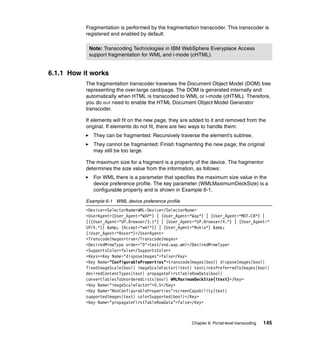
In addition to splitting up the deck/page into smaller chunks, the fragmentor adds
links to each of the generated pieces to allow navigation from one piece to the
next and the previous one. The Continue link allows you to move to the next
fragment and the Return link moves you to the previous one. The first fragment
has no Return link and the last no Continue link.
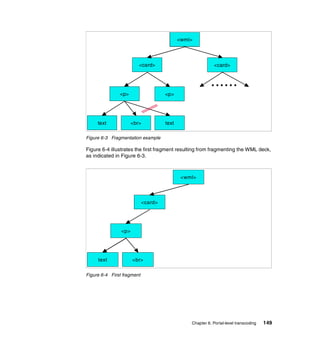
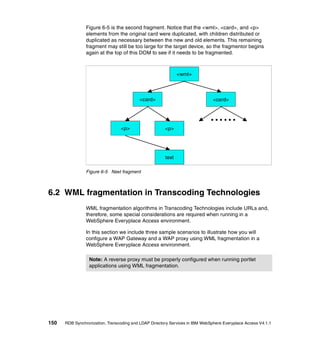
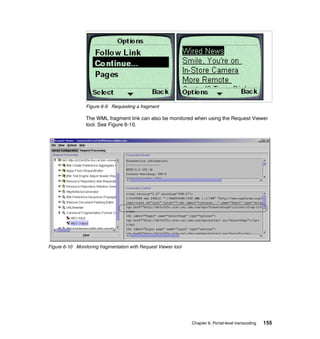
Figure 6-2 on page 147 shows an example of WML fragmentation. A single
oversized WML deck is fragmented into two smaller pieces. The Continue and
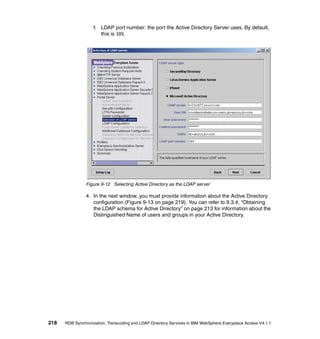
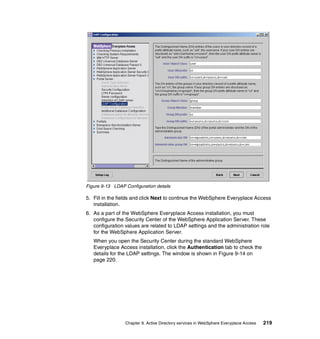
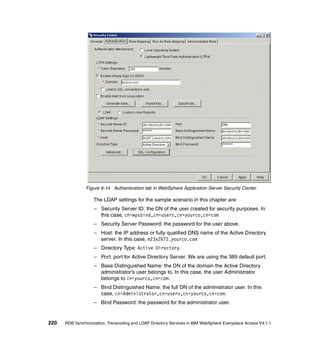
Return links are inserted into the fragments to allow for navigation between the
fragments. Also, any intra-deck links in the original deck are fixed to point to the
target in whatever deck/card in which they are placed.
146 RDB Synchronization, Transcoding and LDAP Directory Services in IBM WebSphere Everyplace Access V4.1.1](https://image.slidesharecdn.com/rdb-synchronization-transcoding-and-ldap-directory-services4801/85/RDB-Synchronization-Transcoding-and-LDAP-Directory-Services-162-320.jpg)


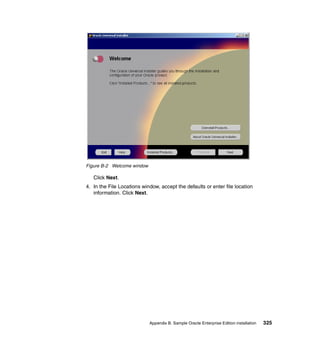
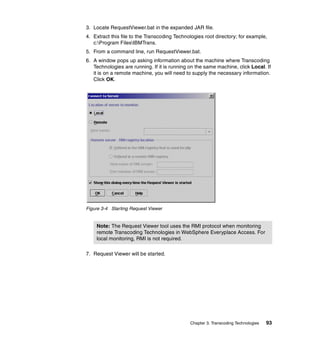
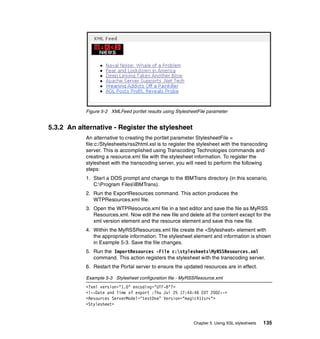
![Before running this program, make sure your Java environment is properly set up
and Oracle JDBC driver files (for example
C:OracleOra81jdbclibclasses12.zip) are in the system classpath.
Example: B-1 InsertHistoryDBOracle.java
import java.sql.*;
public class InsertHistoryDBOracle {
public static void main(String[] args) {
try {
Class.forName("oracle.jdbc.driver.OracleDriver");
} catch (ClassNotFoundException e) {
System.out.println (e.toString());
}
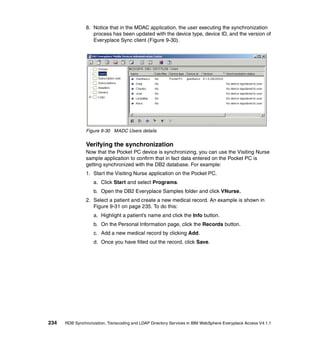
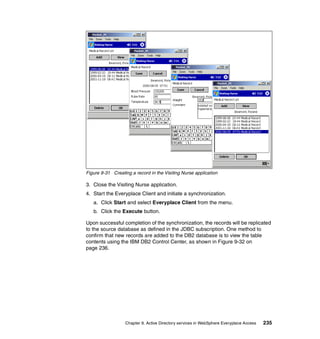
try {
Connection conn= DriverManager.getConnection("jdbc:oracle:oci8:@SALES",
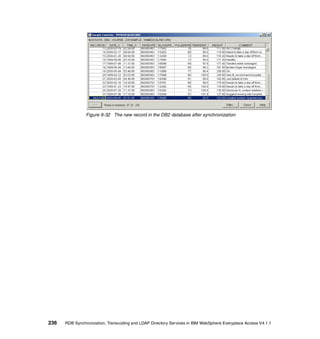
"system", "manager");
PreparedStatement ps = conn.prepareStatement("INSERT INTO SYSTEM.HISTORY
(REP, ONE, DT, TWO, INT1, INT2) VALUES ('E01', ?, to_date('Jan 23, 1982
12:00:00AM','MON DD, YYYY HH12:MI:SS PM'), ?, 1, 1)");
for (int i=0; i<=11000; i++)
{
ps.setString(1, Integer.toString(i));
ps.setString(2, Integer.toString(i));
ps.executeUpdate();
}
}
catch (SQLException e) {
System.out.println (e.toString());
}
}
Compile this program in a command window:
javac InsertHistoryDBOracle.java
Run it in the command window:
java InsertHistoryDBOracle
When the program returns, the table is populated.
348 RDB Synchronization, Transcoding and LDAP Directory Services in IBM WebSphere Everyplace Access V4.1.1](https://image.slidesharecdn.com/rdb-synchronization-transcoding-and-ldap-directory-services4801/85/RDB-Synchronization-Transcoding-and-LDAP-Directory-Services-364-320.jpg)