Download to read offline


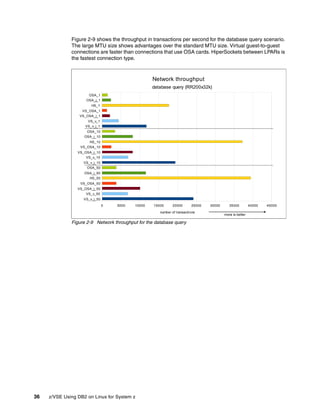
![Chapter 2. Planning DB2 25
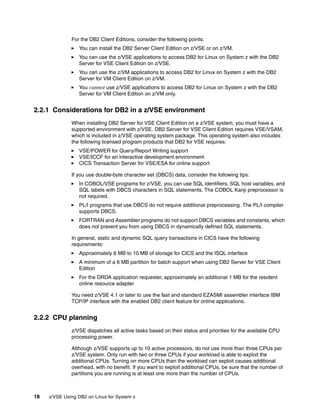
Completely fair queuing scheduler (cfq scheduler)
With this scheduling policy, all users of a particular disk can execute about the same
number of I/O requests over a given time. It does not distinguish between reads and writes.
Noop scheduler
Linux performs only request merging without sorting the requests.
Anticipatory scheduler (as scheduler)
This scheduler uses physical disks and not storage subsystems. It works well only on
desktop computers with built-in disk drives.
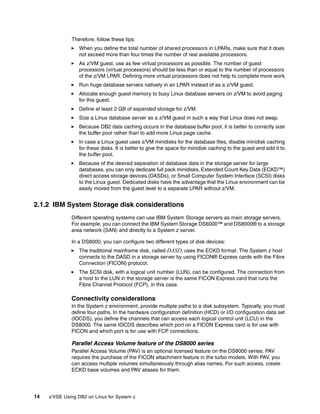
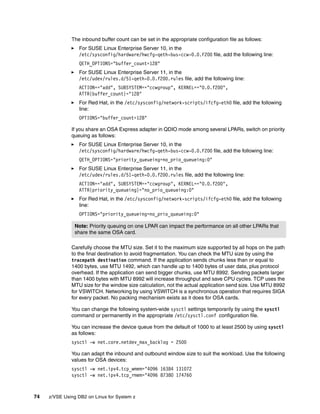
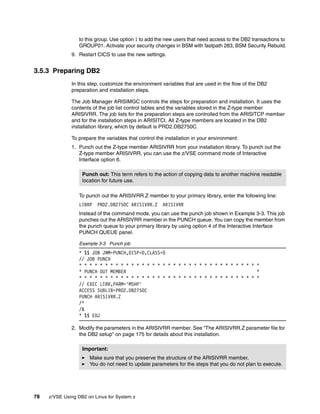
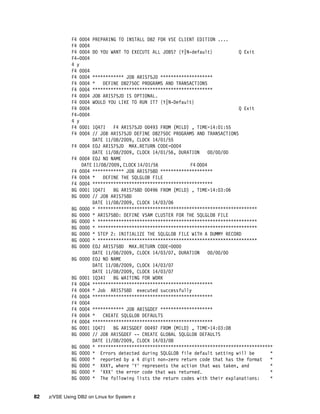
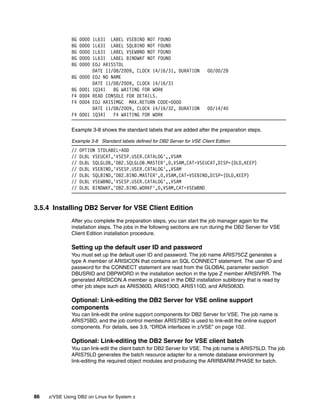
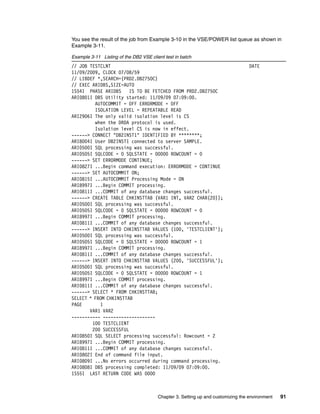
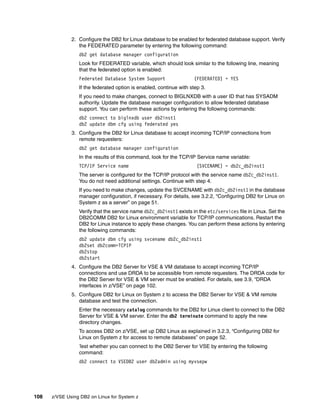
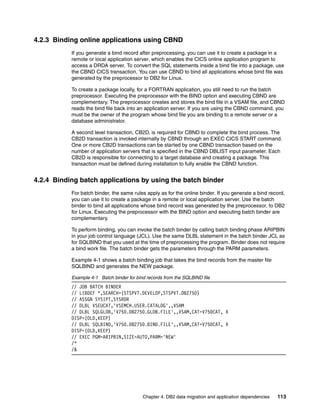
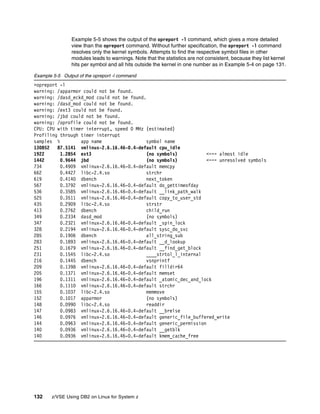
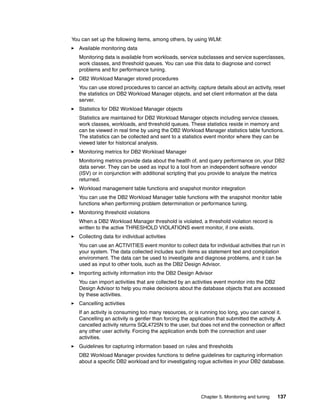
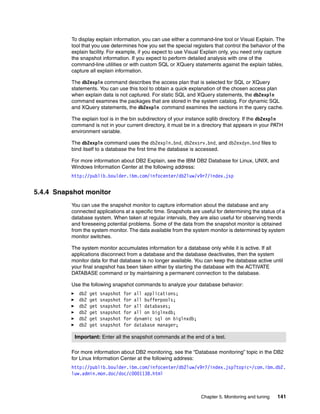
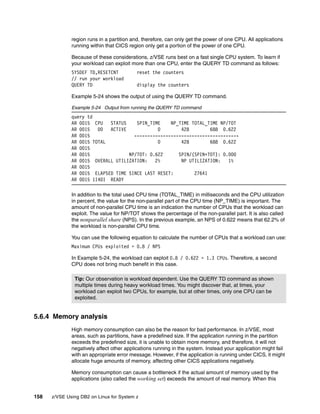
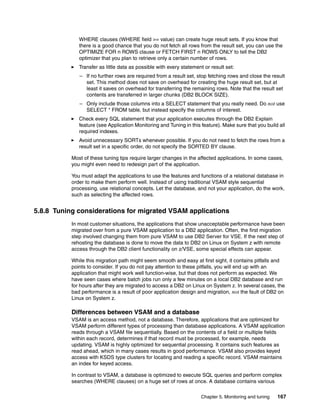
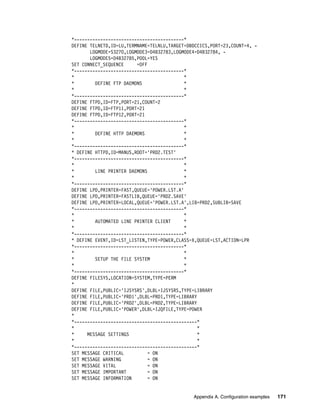
The I/O scheduler can be set in the /etc/zipl.conf file as shown in Example 2-5.
Example 2-5 I/O scheduler settings
[ipl2GB8CPUdeadl]
target = /boot/zipl
image = /boot/image
ramdisk = /boot/initrd
parameters = "maxcpus=<n> dasd=<dev-nr> root=/dev/dasda1 elevator=deadline"
Possible values for elevator are deadline, cfq, noop, and as. As a good practice, specify
elevator=deadline.
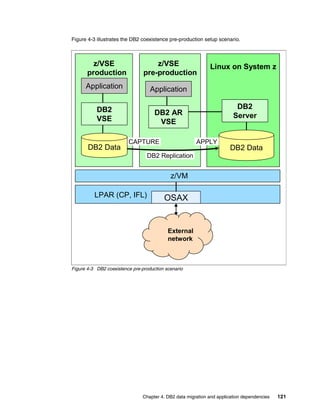
2.3.5 I/O options
Apart from the standard I/O processing, you can set two special I/O options, direct I/O and
asynchronous I/O.
Direct I/O
On a block device, the direct I/O option works similar to the raw devices from the older Linux
kernels of release 2.4. The I/O bypasses the Linux page cache and avoids the copy operation
to or from the page cache.
Direct I/O offers the following advantages:
Direct I/O avoids copy operations, which saves processor cycles.
Direct I/O saves memory because the Linux page cache is not used.
Direct I/O has the following disadvantages:
Direct I/O might not merge I/O requests as extensively as when the page cache is used.
Direct I/O operations to a file require that all requests to this file from all applications must
use this option. Otherwise inconsistencies and data corruption can occur if a program
relies on the page cache contents of a file and another program modifies the same file
directly on the disk.
Asynchronous I/O
In the “normal” I/O mode, the issuer of a read request waits until the data is available and the
process is blocked meanwhile. If you use asynchronous I/O, the application can issue an I/O
request to the kernel and continue normal operation. Later it checks the state of the I/O
request. The process does not wait until the kernel has executed the request.
Asynchronous I/O offers the advantage that, instead of waiting, the process performs other
work in the same application.](https://image.slidesharecdn.com/zvseusingdb2onlinuxforsystemz-151014005044-lva1-app6892/85/BOOK-IBM-Z-vse-using-db2-on-linux-for-system-z-39-320.jpg)


![134 z/VSE Using DB2 on Linux for System z
5.3.7 Linux on System z system check
If you want to do an overall system check, IBM provides a script to collect important system
data from Linux. The generation of this information is done by the dbginfo.sh script, which is
included in the s390-tools package. This information is written to the
/tmp/DBGINFO-[date]-[time]-[hostname].tgz file. [date] and [time] are the date and time
when debug data is collected. [hostname] indicates the host name of the system from which
the data was collected. The output files are compressed into a .tgz file.
The .tgz file can be sent to problem determination or performance analysis experts as initial
material for investigation. The file contains a consistent view of versions, processors, memory,
modules, peripheral devices, error messages, and configuration files. If your system runs as a
z/VM guest, it contains some z/VM guest specific information.
The script does not read user data and does not modify any settings or add anything to the
system. You have to run the dbginfo.sh script from the user root. Otherwise parts of the script
cannot be executed because of missing privileges.
5.3.8 Additional tools for Linux and z/VM monitoring
You can use the following additional tools, among others, for z/VM and Linux on System z
monitoring:
IBM Tivoli® OMEGAMON® XE on z/VM and Linux
This tool gives you the ability to view data that is collected from multiple systems in one,
flexible interface called the Tivoli Enterprise Portal. With Tivoli OMEGAMON XE on z/VM
and Linux, you can monitor z/VM data obtained from the Performance Toolkit for VM. You
can simultaneously monitor the performance data for the Linux on System z systems
running on z/VM.
The Tivoli OMEGAMON XE on z/VM was enhanced for z/VM V5R4 with the following
functions:
– Reporting of new data for control unit cache, DASD cache, virtual disks, virtual
switches, and spin locks
– A default workspace to the z/VM systems in the navigation tree
– Enhanced functionality for modifications of the network workspace
Performance Toolkit for VM
The Performance Toolkit for VM provides capabilities to monitor and report performance
data for a z/VM system. It includes the following functions:
– Management of multiple z/VM systems, local or remote
– Post-processing of Performance Toolkit for VM history files and VM monitor data
captured by the MONWRITE utility
– The ability to view performance monitor data using either Web browsers or PC-based
3270 emulator graphics
– TCP/IP performance reporting
In addition to analyzing VM performance data, the Performance Toolkit for VM processes
Linux performance data that is obtained from the Resource Management Facility (RMF)
Linux tool, rmfpms. The Linux performance data obtained from RMF can be viewed and
printed similarly to the way z/VM data is presented.](https://image.slidesharecdn.com/zvseusingdb2onlinuxforsystemz-151014005044-lva1-app6892/85/BOOK-IBM-Z-vse-using-db2-on-linux-for-system-z-148-320.jpg)


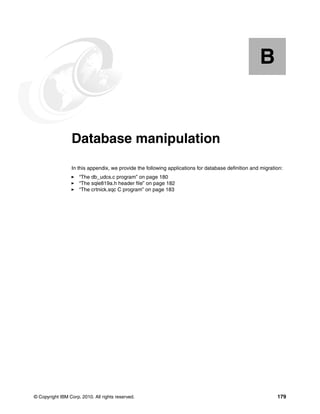
![180 z/VSE Using DB2 on Linux for System z
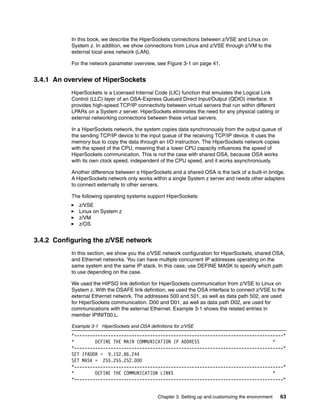
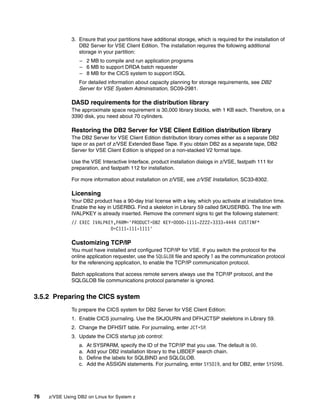
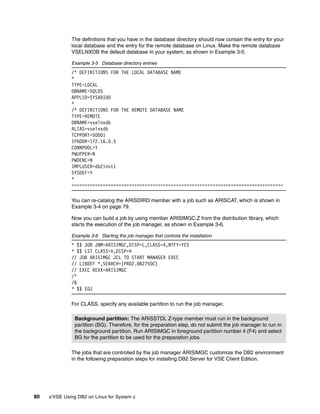
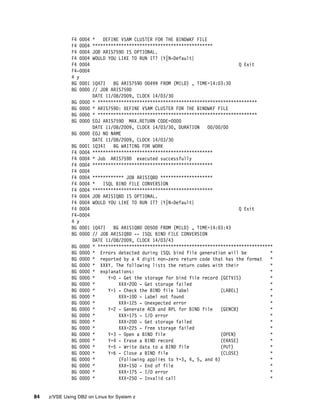
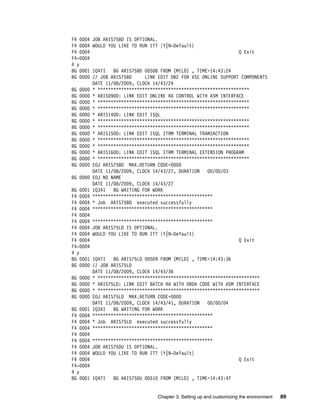
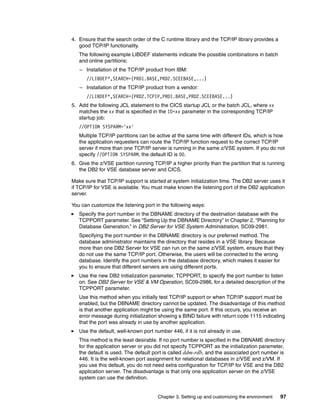
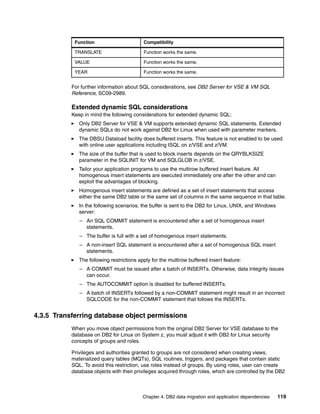
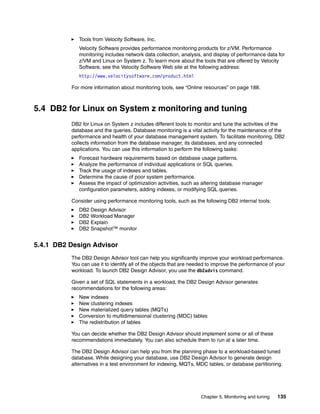
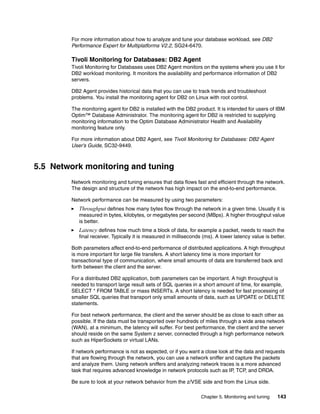
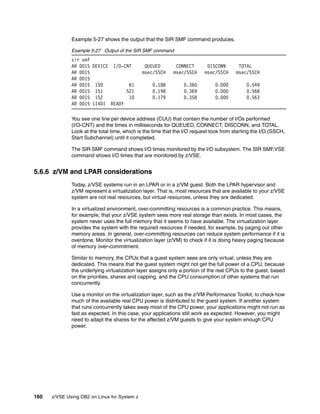
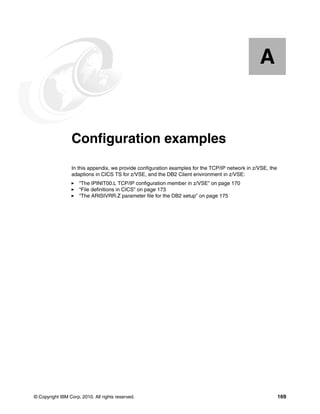
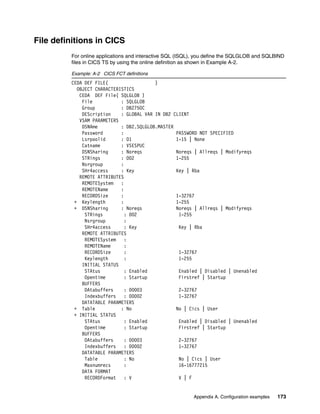
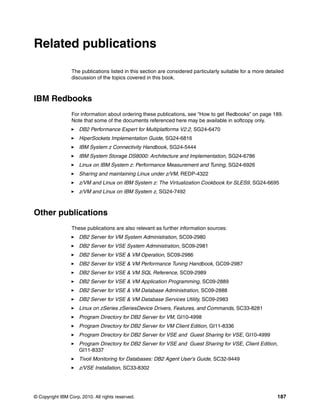
The db_udcs.c program
Example B-1 shows the program that defines a database in Linux with an EBCDIC
user-defined collated sequence.
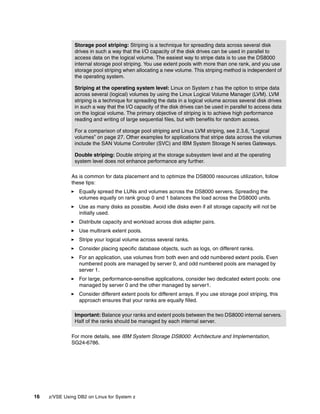
Example: B-1 The db_udcs.c program
/*******************************************************************************
**
** Source File Name = db_udcs.c
**
** Licensed Materials - Property of IBM
**
** Governed under the terms of the International
** License Agreement for Non-Warranted Sample Code.
**
** (C) COPYRIGHT International Business Machines Corp. 1996 - 2002
** All Rights Reserved.
**
** US Government Users Restricted Rights - Use, duplication or
** disclosure restricted by GSA ADP Schedule Contract with IBM Corp.
**
** PURPOSE :
** This program is an example of how APIs are implemented in order to
** CREATE a DATABASE with a user-defined collating sequence
**
** A user-defined collating sequence allows the user to specify the
** collating behavior of the database. This can be used by
** applications that require compatibility to the collating
** behavior of host database products. For example, simulating
** the collating behavior of DB2 VSE / VM CCSID 500 (EBCDIC International)
** can be achived by specifying a colating sequence that maps
** codepage 819 characters to CCSID 500 characters when the
** database is created.
**
** APIs USED :
** INSTANCE ATTACH sqleatin()
** CREATE DATABASE sqlecrea()
** DROP DATABASE sqledrpd()
**
** STRUCTURES USED :
** sqledbdesc
** sqledbcountryinfo
** sqlca
**
** OTHER FUNCTIONS USED :
** 'C' COMPILER LIBRARY :
** stdio.h - printf
**
** external :
** check_error : Checks for SQLCODE error, and prints out any
** [in util.c] related information available.
** This procedure is located in the util.c file.
**
**](https://image.slidesharecdn.com/zvseusingdb2onlinuxforsystemz-151014005044-lva1-app6892/85/BOOK-IBM-Z-vse-using-db2-on-linux-for-system-z-194-320.jpg)
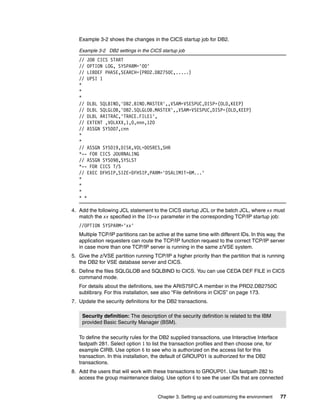
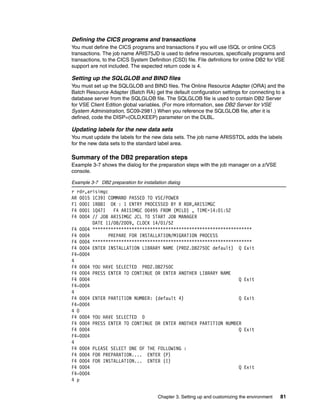
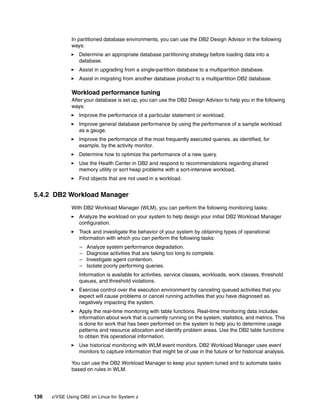
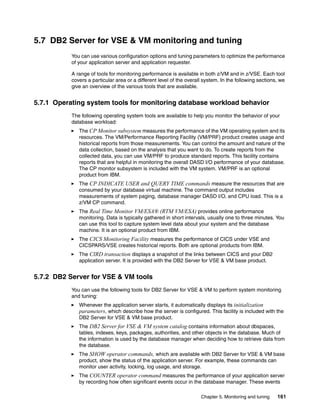
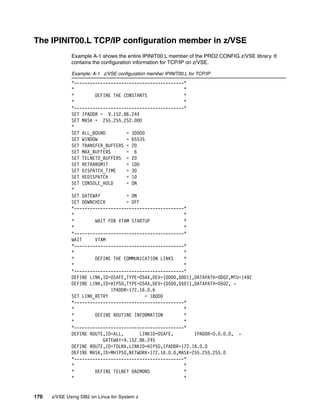
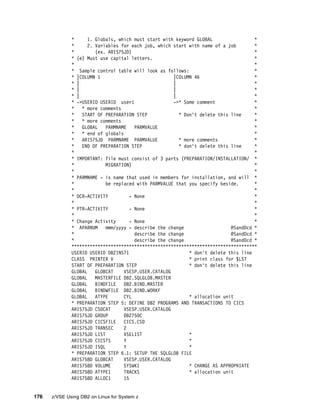
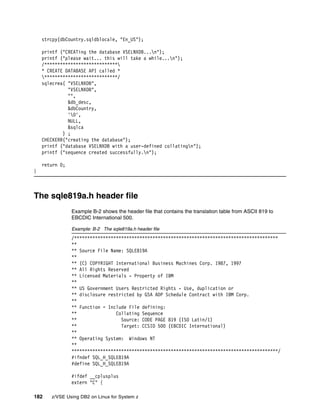
![Appendix B. Database manipulation 181
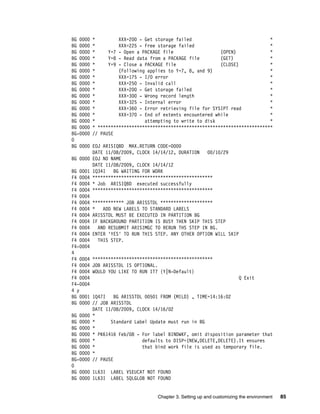
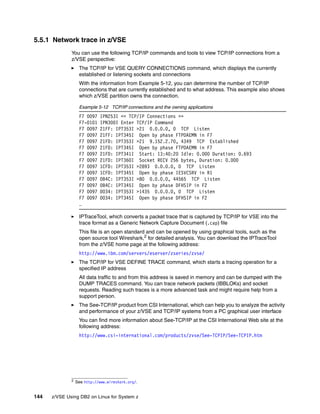
** EXTERNAL DEPENDENCIES :
** - Compiling and linking with a language C compiler supported on your platform.
** - a database by the name of "VSELNXDB" does not exist.
**
** Invocation of the program: db_udcs [userid password remote_nodename]
*******************************************************************************/
#include <stdio.h>
#include <stdlib.h>
#include <string.h>
#include <sqle819a.h> /* collating sequence mapping 819 to 500 */
#include <sqlutil.h>
#include <sqlenv.h>
#include "util.h"
#define CHECKERR(CE_STR) if (check_error (CE_STR, &sqlca) != 0) return 1;
int main (int argc, char* argv[]) {
struct sqlca sqlca;
struct sqledbdesc db_desc;
struct sqledbcountryinfo dbCountry;
char userid[9];
char passwd[19];
char nodename[9];
if (argc == 4) {
strcpy (userid, argv[1]);
strcpy (passwd, argv[2]);
strcpy (nodename, argv[3]);
/*************************/
/* ATTACH API called */
/*************************/
sqleatin (nodename, userid, passwd, &sqlca);
}
else if (argc != 1) {
printf("nUSAGE: db_udcs [userid password remote_nodename]n");
return 1;
}
strcpy(db_desc.sqldbdid, SQLE_DBDESC_2);
db_desc.sqldbccp = 0;
db_desc.sqldbcss = -1;
memcpy(db_desc.sqldbudc, sqle_819_500, SQL_CS_SZ);
db_desc.sqldbcmt[0] = 0x00;
db_desc.sqldbsgp = 0;
db_desc.sqldbnsg = 10;
db_desc.sqltsext = -1;
db_desc.sqlcatts = NULL;
db_desc.sqlusrts = NULL;
db_desc.sqltmpts = NULL;
strcpy(dbCountry.sqldbcodeset, "ISO8859-1");](https://image.slidesharecdn.com/zvseusingdb2onlinuxforsystemz-151014005044-lva1-app6892/85/BOOK-IBM-Z-vse-using-db2-on-linux-for-system-z-195-320.jpg)
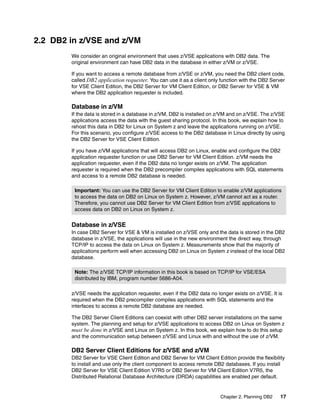
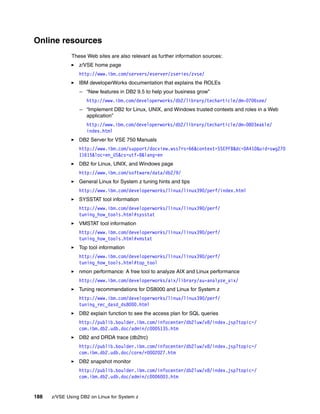
![Appendix B. Database manipulation 183
#endif
unsigned char sqle_819_500[256] = {
0x00,0x01,0x02,0x03,0x37,0x2d,0x2e,0x2f,0x16,0x05,0x25,0x0b,0x0c,0x0d,0x0e,0x0f,
0x10,0x11,0x12,0x13,0x3c,0x3d,0x32,0x26,0x18,0x19,0x3f,0x27,0x1c,0x1d,0x1e,0x1f,
0x40,0x4f,0x7f,0x7b,0x5b,0x6c,0x50,0x7d,0x4d,0x5d,0x5c,0x4e,0x6b,0x60,0x4b,0x61,
0xf0,0xf1,0xf2,0xf3,0xf4,0xf5,0xf6,0xf7,0xf8,0xf9,0x7a,0x5e,0x4c,0x7e,0x6e,0x6f,
0x7c,0xc1,0xc2,0xc3,0xc4,0xc5,0xc6,0xc7,0xc8,0xc9,0xd1,0xd2,0xd3,0xd4,0xd5,0xd6,
0xd7,0xd8,0xd9,0xe2,0xe3,0xe4,0xe5,0xe6,0xe7,0xe8,0xe9,0x4a,0xe0,0x5a,0x5f,0x6d,
0x79,0x81,0x82,0x83,0x84,0x85,0x86,0x87,0x88,0x89,0x91,0x92,0x93,0x94,0x95,0x96,
0x97,0x98,0x99,0xa2,0xa3,0xa4,0xa5,0xa6,0xa7,0xa8,0xa9,0xc0,0xbb,0xd0,0xa1,0x07,
0x20,0x21,0x22,0x23,0x24,0x15,0x06,0x17,0x28,0x29,0x2a,0x2b,0x2c,0x09,0x0a,0x1b,
0x30,0x31,0x1a,0x33,0x34,0x35,0x36,0x08,0x38,0x39,0x3a,0x3b,0x04,0x14,0x3e,0xff,
0x41,0xaa,0xb0,0xb1,0x9f,0xb2,0x6a,0xb5,0xbd,0xb4,0x9a,0x8a,0xba,0xca,0xaf,0xbc,
0x90,0x8f,0xea,0xfa,0xbe,0xa0,0xb6,0xb3,0x9d,0xda,0x9b,0x8b,0xb7,0xb8,0xb9,0xab,
0x64,0x65,0x62,0x66,0x63,0x67,0x9e,0x68,0x74,0x71,0x72,0x73,0x78,0x75,0x76,0x77,
0xac,0x69,0xed,0xee,0xeb,0xef,0xec,0xbf,0x80,0xfd,0xfe,0xfb,0xfc,0xad,0xae,0x59,
0x44,0x45,0x42,0x46,0x43,0x47,0x9c,0x48,0x54,0x51,0x52,0x53,0x58,0x55,0x56,0x57,
0x8c,0x49,0xcd,0xce,0xcb,0xcf,0xcc,0xe1,0x70,0xdd,0xde,0xdb,0xdc,0x8d,0x8e,0xdf
};
#ifdef __cplusplus
}
#endif
#endif /* SQL_H_SQLE819A */
The crtnick.sqc C program
Use the crtnick.sqc (Example B-3) program to automate the migration of the database table
definitions and the data load from DB2 on z/VSE to DB2 on Linux.
When you run this program against a DB2 VSE database, the following output files are
created:
The crtNickname.ddl file
You can use this file to define the nicknames in the federated database VSELNXDB on
Linux.
The crtLoad.ddl file
You can use this file to migrate the data from DB2 on z/VSE to DB2 on Linux.
Example: B-3 Language C program crtnick.sqc
/******************************************************************************
* This program generates 2 files to create nicknames and load statements
* for relocating tables and data from DB2 VSE to Db2 Linux on System z
******************************************************************************/
#include <stdio.h>
#include <string.h>
#include <stdlib.h>
#include <sqlenv.h>
#ifdef DB268K
/* Need to include ASLM for 68K applications */](https://image.slidesharecdn.com/zvseusingdb2onlinuxforsystemz-151014005044-lva1-app6892/85/BOOK-IBM-Z-vse-using-db2-on-linux-for-system-z-197-320.jpg)
![184 z/VSE Using DB2 on Linux for System z
#include <LibraryManager.h>
#endif
EXEC SQL INCLUDE SQLCA; /* :rk.1:erk. */
/*********************************************************************
* BAD RETURN CODE - PUT OUT SQLCA STRUCTURE *
*********************************************************************/
void putsqlca(struct sqlca sqlca)
{
char string[32]; /* work field */
printf("SQLCODE : %dn", sqlca.sqlcode);
printf("SQLERRD1: %ldn", sqlca.sqlerrd[0]);
printf("SQLERRD2: %ldn", sqlca.sqlerrd[1]);
printf("SQLERRD3: %ldn", sqlca.sqlerrd[2]);
printf("SQLERRD4: %ldn", sqlca.sqlerrd[3]);
printf("SQLERRD5: %ldn", sqlca.sqlerrd[4]);
printf("SQLERRD6: %ldn", sqlca.sqlerrd[5]);
sprintf(string,"SQLERRM : %%%-u.%-usn",
sqlca.sqlerrml, sqlca.sqlerrml);
printf(string, sqlca.sqlerrmc);
printf("SQLERRP : %8.8sn", sqlca.sqlerrp);
printf("SQLWARN0: %cn", SQLWARN0);
printf("SQLWARN1: %cn", SQLWARN1);
printf("SQLWARN2: %cn", SQLWARN2);
printf("SQLWARN3: %cn", SQLWARN3);
printf("SQLWARN4: %cn", SQLWARN4);
printf("SQLWARN5: %cn", SQLWARN5);
printf("SQLWARN6: %cn", SQLWARN6);
printf("SQLWARN7: %cn", SQLWARN7);
printf("SQLWARN8: %cn", SQLWARN8);
printf("SQLWARN9: %cn", SQLWARN9);
printf("SQLWARNA: %cn", SQLWARNA);
printf("SQLSTATE: %sn", sqlca.sqlstate);
return;
}
int main(int argc, char *argv[]) {
EXEC SQL BEGIN DECLARE SECTION; /* :rk.2:erk. */
char userid[9];
char passwd[19];
char db[19];
char schema[9];
char table[19];
EXEC SQL END DECLARE SECTION;
char c1[255];
FILE *crtNickname; /* Output file name that contains CREATE NICKNAME commands */
FILE *crtLoad; /* Output file name that contains DECLARE CURSOR and LOAD commands */
#ifdef DB268K
/* Before making any API calls for 68K environment, need to initialize the Library Manager */
InitLibraryManager(0,kCurrentZone,kNormalMemory);
atexit(CleanupLibraryManager);
#endif
if (argc == 4) {
strcpy (db, argv[1]);
strcpy (userid, argv[2]);
strcpy (passwd, argv[3]);
EXEC SQL CONNECT TO :db USER :userid USING :passwd; /* :rk.3:erk. */](https://image.slidesharecdn.com/zvseusingdb2onlinuxforsystemz-151014005044-lva1-app6892/85/BOOK-IBM-Z-vse-using-db2-on-linux-for-system-z-198-320.jpg)


The document is a technical guide about using DB2 on Linux for System z. It provides information on planning, setting up, and customizing a DB2 environment where some data is hosted on z/VSE and accessed using DB2 on Linux for System z. The guide covers topics like hardware planning, database considerations, installing and configuring DB2 and related software, and setting up networking and connectivity between the z/VSE and Linux systems.


![[Telme]Air Gate User Guide Esp](https://cdn.slidesharecdn.com/ss_thumbnails/telmeairgateuserguideesp-1231702232091089-1-thumbnail.jpg?width=640&height=640&fit=bounds)


![Getting Started with Apache Spark: Big Data Made Simple [Free Meetup]](https://cdn.slidesharecdn.com/ss_thumbnails/apachesparkgettingstarted-260203175547-8361bcc3-thumbnail.jpg?width=640&height=640&fit=bounds)
