Downloaded 187 times


![Progress Database Administration Guide and Reference
xxviii
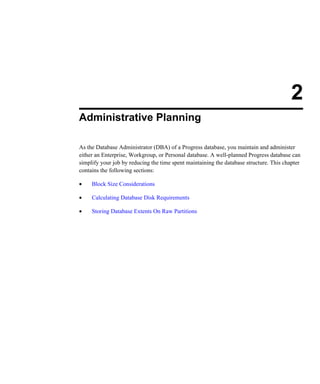
• Square brackets ([ ]) around an item indicate that the item, or a choice of one of the
enclosed items, is optional.
In this example, STREAM stream, UNLESS-HIDDEN, and NO-ERROR are optional:
In some instances, square brackets are not a syntax notation, but part of the language.
For example, this syntax for the INITIAL option uses brackets to bound an initial value
list for an array variable definition. In these cases, normal text brackets ( [ ] ) are used:
NOTE: The ellipsis (...) indicates repetition, as shown in a following description.
• Braces ({ }) around an item indicate that the item, or a choice of one of the enclosed
items, is required.
In this example, you must specify the items BY and expression and can optionally specify
the item DESCENDING, in that order:
In some cases, braces are not a syntax notation, but part of the language.
For example, a called external procedure must use braces when referencing arguments
passed by a calling procedure. In these cases, normal text braces ( { } ) are used:
SYNTAX
DISPLAY [ STREAM stream ] [ UNLESS-HIDDEN ] [ NO-ERROR ]
SYNTAX
INITIAL [ constant [ , constant ] ... ]
SYNTAX
{ BY expression [ DESCENDING ] }
SYNTAX
{ &argument-name }](https://image.slidesharecdn.com/progress-database-administration-guide-and-reference3170-130618021328-phpapp01/85/Progress-OpenEdge-database-administration-guide-and-reference-28-320.jpg)
![Preface
xxix
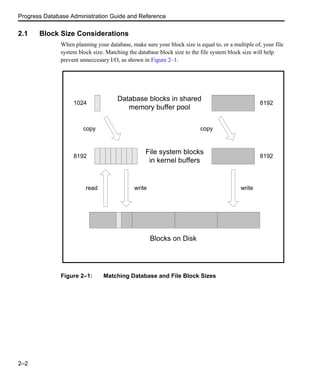
• A vertical bar (|) indicates a choice.
In this example, EACH, FIRST, and LAST are optional, but you can only choose one:
In this example, you must select one of logical-name or alias:
• Ellipses (...) indicate that you can choose one or more of the preceding items. If a group
of items is enclosed in braces and followed by ellipses, you must choose one or more of
those items. If a group of items is enclosed in brackets and followed by ellipses, you can
optionally choose one or more of those items.
In this example, you must include two expressions, but you can optionally include more.
Note that each subsequent expression must be preceded by a comma:
In this example, you must specify MESSAGE, then at least one of expression or SKIP, but
any additional number of expression or SKIP is allowed:
SYNTAX
PRESELECT [ EACH | FIRST | LAST ] record-phrase
SYNTAX
CONNECTED ( { logical-name | alias } )
SYNTAX
MAXIMUM ( expression , expression [ , expression ] ... )
SYNTAX
MESSAGE { expression | SKIP [ (n) ] } ...](https://image.slidesharecdn.com/progress-database-administration-guide-and-reference3170-130618021328-phpapp01/85/Progress-OpenEdge-database-administration-guide-and-reference-29-320.jpg)
![Progress Database Administration Guide and Reference
xxx
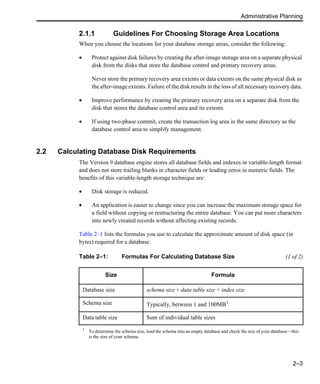
In this example, you must specify {include-file, then optionally any number of argument
or &argument-name = "argument-value", and then terminate with }:
• In some examples, the syntax is too long to place in one horizontal row. In such cases,
optional items appear individually bracketed in multiple rows in order, left-to-right and
top-to-bottom. This order generally applies, unless otherwise specified. Required items
also appear on multiple rows in the required order, left-to-right and top-to-bottom. In cases
where grouping and order might otherwise be ambiguous, braced (required) or bracketed
(optional) groups clarify the groupings.
In this example, WITH is followed by several optional items:
In this example, ASSIGN requires one of two choices: either one or more of field, or one
of record. Other options available with either field or record are grouped with braces and
brackets. The open and close braces indicate the required order of options:
SYNTAX
{ include-file
[ argument | &argument-name = "argument-value" ] ... }
SYNTAX
WITH [ ACCUM max-length ] [ expression DOWN ]
[ CENTERED ] [ n COLUMNS ] [ SIDE-LABELS ]
[ STREAM-IO ]
SYNTAX
ASSIGN { { [ FRAME frame ]
{ field [ = expression ] }
[ WHEN expression ]
} ...
| { record [ EXCEPT field ... ] }
}](https://image.slidesharecdn.com/progress-database-administration-guide-and-reference3170-130618021328-phpapp01/85/Progress-OpenEdge-database-administration-guide-and-reference-30-320.jpg)


![Progress Database Administration Guide and Reference
3–2
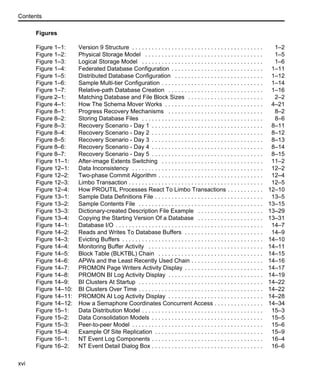
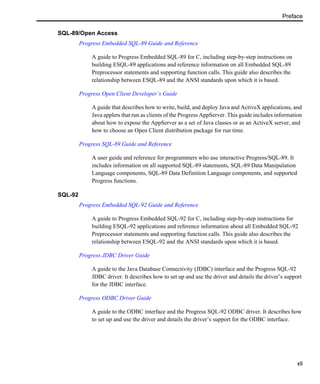
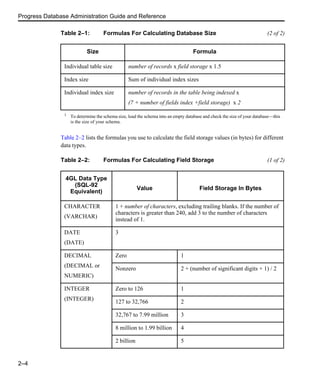
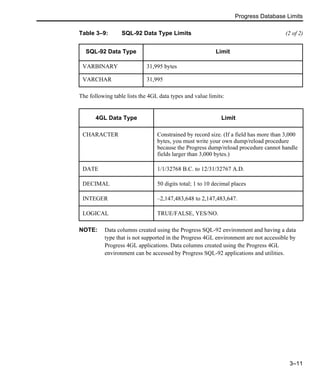
3.1 Database Block Sizes
Progress supports the following database block sizes:
• 1024 bytes (1K)
• 2048 bytes (2K)
• 4096 bytes (4K)
• 8192 bytes (8K)
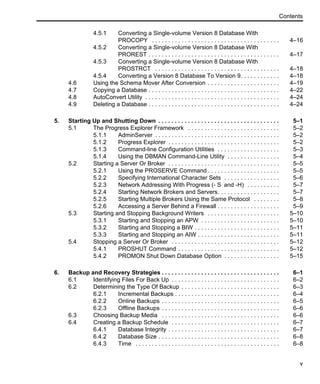
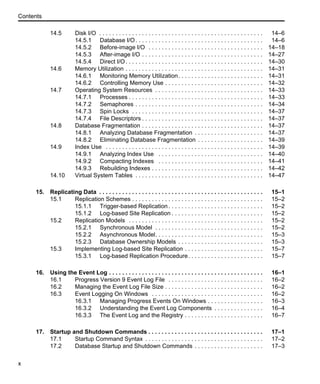
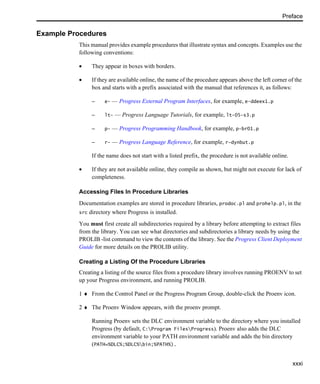
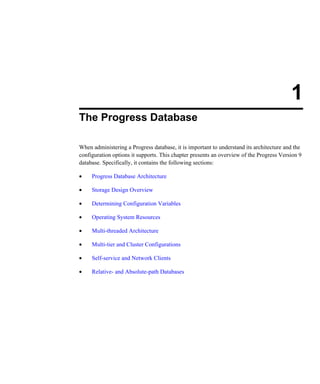
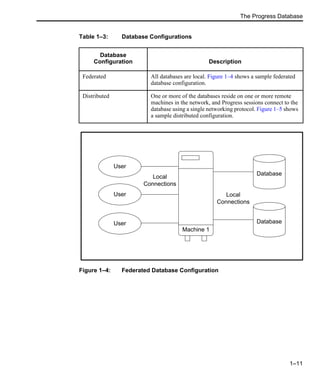
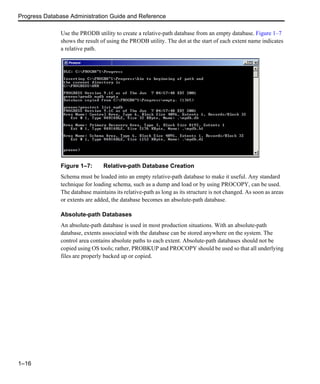
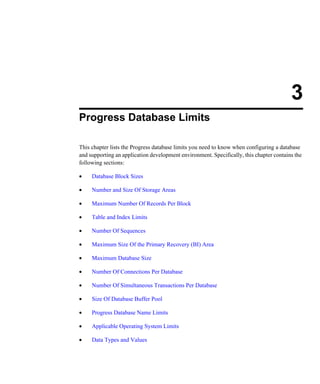
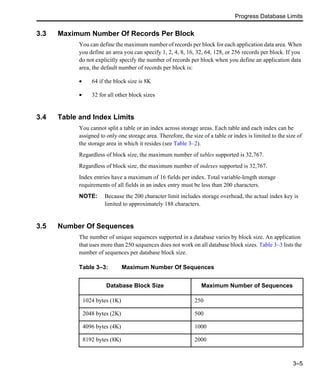
3.2 Number and Size Of Storage Areas
A Progress database supports a maximum of 1,000 storage areas, including 994 application data
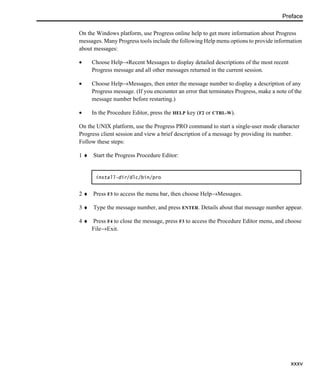
storage areas. Storage areas are identified by their names. Table 3–1 describes the area types in
a Progress database.
Application data and schema data storage areas allow you to specify the maximum number of
records per block for each area. Table 3–2 describes the maximum application data storage area
size determined by database block size and records per block.
Table 3–1: Storage Area Types
Reserved Area Name Contents File Extension
Control Physical Database Structure .db
Primary Recovery Recovery Log Data .b[n]
Transaction Log Two-phase Commit
Transaction Log
.t[n]
After Image After-image Log Data .a[n]
Schema Schema Data .d[n]
None Application Data .d[n]](https://image.slidesharecdn.com/progress-database-administration-guide-and-reference3170-130618021328-phpapp01/85/Progress-OpenEdge-database-administration-guide-and-reference-72-320.jpg)


![Progress Database Administration Guide and Reference
3–8
Progress allows you to specify some number of buffers in the buffer pool as private read-only
buffers. The -Bp (Private Read-Only Buffers) startup parameter allows you to specify what
number of buffers you wish to be private read-only buffers. The default number of private
read-only buffers that a single user can request is 64 and the maximum number is limited by the
-bpmax parameter. The maximum number of private read-only buffers for all simultaneous
Progress users is limited to 25% of the database buffer pool.
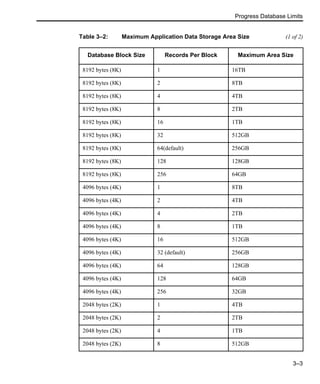
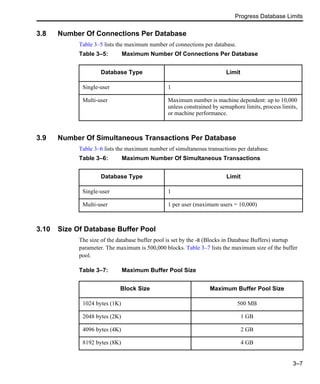
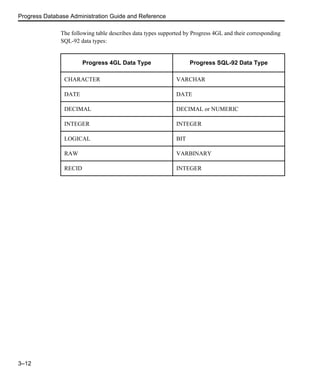
3.11 Progress Database Name Limits
Table 3–8 lists the database name limits for each operating system.
Database names can consist of any combination of English letters and numbers, beginning with
A–Z or a–z. They cannot include Progress 4GL or SQL-92 reserved words, any accented letters,
or the following special characters:
3.12 Applicable Operating System Limits
Progress uses file handles (a UNIX term, roughly equivalent to the number of open files) when
reading and writing to the Progress database and related files. Most operating systems limit the
number of file handles a user process can allocate at one time. Most versions of UNIX guarantee
at least 20. Therefore, before you can effectively design a database, you must know your
operating system limits and how Progress will use the file handles that are available to it.
Table 3–8: Database Name Limits
Name
Type
Limit
Database names One to 11 characters, excluding the pathname. You cannot use a file
extension.
Pathnames One to 255 characters, including the database name.
" ’ * ; | ? [ ] ( ) ! { } < > @ + = : ~](https://image.slidesharecdn.com/progress-database-administration-guide-and-reference3170-130618021328-phpapp01/85/Progress-OpenEdge-database-administration-guide-and-reference-78-320.jpg)

![Creating and Deleting Databases
4–5
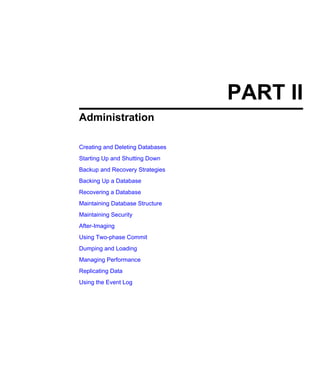
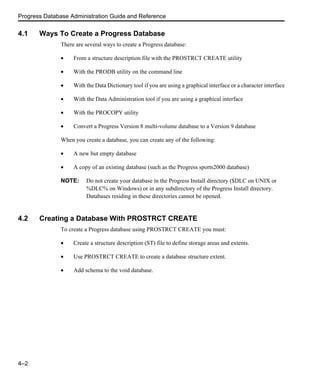
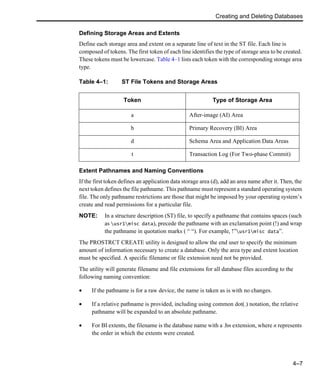
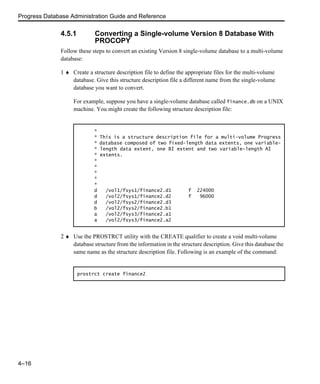
The following is a syntax description of the line format for a structure description (ST) file:
Note that you can comment the ST file and use blank lines. Precede comments with a pound
sign (#), colon (:), or asterisk (*) in the first column of each comment line.
CR = blank line
LINE = comment | areatype pathname [ sizeinfo ]
comment = * | : | #
areatype = a | b | d | t [ areainfo ]
areainfo = [“areaname”[:areanum ][, recsPerBlock ] ]
areaname = string
areanum = numeric value
recsPerBlock = numeric value
pathname = . | string | !”string 2"
sizeinfo = extentType size
extentType = fixed (f) | raw device (r) | variable length (v)
size = numeric value > 32](https://image.slidesharecdn.com/progress-database-administration-guide-and-reference3170-130618021328-phpapp01/85/Progress-OpenEdge-database-administration-guide-and-reference-89-320.jpg)


![Progress Database Administration Guide and Reference
5–4
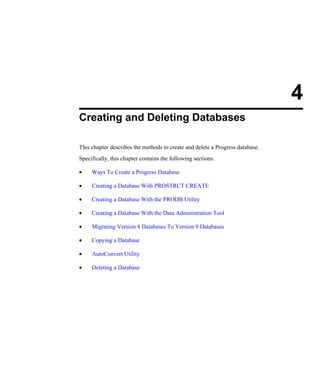
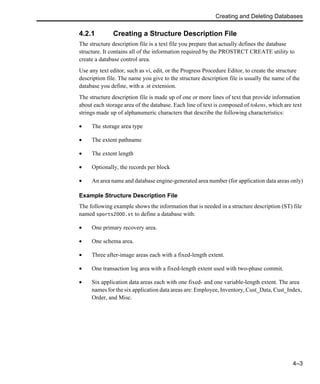
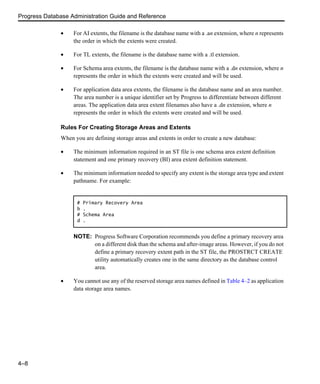
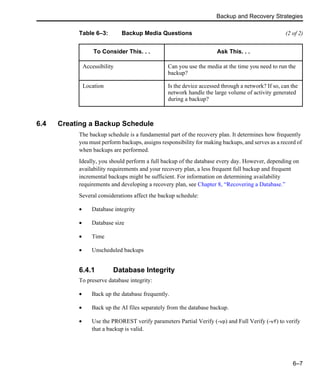
5.1.4 Using the DBMAN Command-Line Utility
After you use Progress Explorer to create the database configuration and store it in the
conmgr.properties file, use the DBMAN command-line utility to start, stop, or query a
database:
The dbman command-line utility supports the following parameters:
-database db-name
Specifies the name of the database you want to start. It must match the name of a database
in the conmgr.properties file.
-config config-name
Specifies the name of the configuration with which you want to start the database.
-start
Starts the database db-name as defined by the configuration config-name.
-stop
Stops the database db-name.
-query
Queries the Connection Manager for the status of the database db-name.
-host host-name
Identifies the host machine where the AdminServer is running. The default is the local
host. If your AdminServer is running on a remote host, you must use the -host host-name
parameter to identify the host where the remote AdminServer is running.
-port port-number|service-name
Identifies the port that the AdminServer is listening on. If your AdminServer is running on
a remote host, you must use the -port port-number parameter to identify the port on
which the remote AdminServer is listening. The default port number is 20931.
dbman [-host host-name -port port-number | service-name -user user-name ]
-database db-name [-config config-name -start|-stop|-query]](https://image.slidesharecdn.com/progress-database-administration-guide-and-reference3170-130618021328-phpapp01/85/Progress-OpenEdge-database-administration-guide-and-reference-112-320.jpg)
![Starting Up and Shutting Down
5–5
-user user-name
If your AdminServer is running on a remote host, you must use the -user user-name
parameter to supply a valid user name for that host. You will be prompted for the
password.
5.2 Starting a Server Or Broker
The server process coordinates all the database requests from all the users using a single
database.
NOTE: On UNIX and Windows NT systems that run shared-memory versions of Progress,
the main database server is called the broker. The broker process manages shared
resources and starts servers for remote users, if necessary. For more information, see
the “Operating System Resources” section in Chapter 1, “The Progress Database.”
5.2.1 Using the PROSERVE Command
Use Progress Explorer or use the PROSERVE startup command to start the server process:
-db db-name
Specifies the database you want to start Progress against. (-db is implicit)
-servergroup servergroup-name
Specifies the logical collection of server processes to start. The servergroup-name you
specify must match the name of a servergroup in the conmgr.properties file. You create
servergroups using the Progress Explorer Database Configuration Tools, which saves
them in the conmgr.properties file.
parameters
Specifies the startup parameters for the broker/server. See Chapter 18, “Database Startup
Parameters,” for a list of broker/server startup parameters.
For more information about the PROSERVE command see Chapter 17, “Startup and Shutdown
Commands.”
proserve -db db-name | -servergroup servergroup-name [ parameters ]](https://image.slidesharecdn.com/progress-database-administration-guide-and-reference3170-130618021328-phpapp01/85/Progress-OpenEdge-database-administration-guide-and-reference-113-320.jpg)


![Progress Database Administration Guide and Reference
7–2
7.1 Performing a Progress Backup
Using the Progress Backup utility (PROBKUP) you can perform an online full backup, an
online incremental backup, an offline full backup, or an offline incremental backup. Which you
use is determined by your backup plan. See Chapter 6, “Backup and Recovery Strategies,” to
learn more about creating a backup plan. The syntax below details the parameters to use with
PROBKUP:
online
Performs an online backup.
db-name
Specifies the database you want to back up.
incremental
Performs an incremental backup. If you do not specify this parameter, PROBKUP
performs a full backup. Perform a full backup of a database before performing the first
incremental backup. Following the first incremental backup, you can perform any number
of incremental backups. However, you should perform a full backup at least once a week.
device-name
Identifies a special device (for example, a tape drive) or a standard file. If device-name
identifies a special device, Progress assumes the device has removable media, such as a
tape or a floppy diskette. For Windows NT, use .tape0 for the device name if you are
backing up to a tape drive.
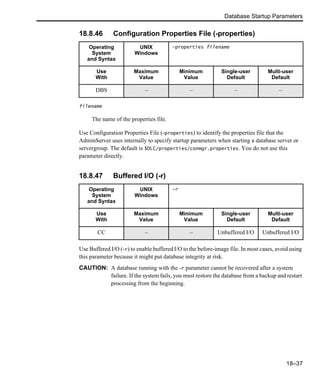
-estimate
Gives a rough estimate of the amount of media required for offline backups.
NOTE: PROBKUP does not perform a backup when the -estimate parameter is used.
probkup [ online ] db-name [ incremental ] device-name
[-estimate
| -vs n
| -bf n
| -verbose](https://image.slidesharecdn.com/progress-database-administration-guide-and-reference3170-130618021328-phpapp01/85/Progress-OpenEdge-database-administration-guide-and-reference-140-320.jpg)
![Backing Up a Database
7–3
-vs n
Indicates the volume size in database blocks that can be written to each removable volume.
Before PROBKUP writes each volume, it displays a message that tells you to prepare the
next volume. After writing each volume, a message tells you to remove the volume.
If you use the Volume Size (parameter, the value must be greater than the value of the
Blocking Factor (-bf) parameter. For example, do not specify a zero value with the
Volume Size parameter. See the “UNIX Incremental Backup Example” section for an
example of how to use the Volume Size parameter.
If you do not use the Volume Size parameter, PROBKUP assumes there is no limit and
writes the backup until completion or until the volume is full. When the volume is full,
PROBKUP prompts you for the next volume.
-bf n
Improves the transfer speed to tape-backup devices by specifying that the data is
transferred in amounts optimal for the particular backup device. It indicates the blocking
factor for blocking data output to the backup device. The blocking factor specifies how
many blocks of data are buffered before being transferred to the backup device. NT uses
a variable block size up to 4K. For all other operating systems, each block is the size of
one disk block (1K on UNIX). The default for the blocking factor parameter is 34.
-verbose
Directs the PROBKUP utility to display information during the backup. If you specify the
Verbose parameter, PROBKUP displays “Backed up n blocks in hh:mm:ss” every 10
seconds. If you do not specify the Verbose parameter, the message appears only once
when the backup is complete.
For more information, see the description of the PROBKUP utility in Chapter 19, “Database
Administration Utilities.”
7.1.1 Performing an Online Full Backup With PROBKUP
To perform an online, full backup, run PROBKUP from the operating system prompt using the
following command syntax:
probkup online db-name device-name [ parameters ]](https://image.slidesharecdn.com/progress-database-administration-guide-and-reference3170-130618021328-phpapp01/85/Progress-OpenEdge-database-administration-guide-and-reference-141-320.jpg)

![Backing Up a Database
7–5
As the full offline backup of devel.db begins, the following report appears:
The number of backup blocks is the number of -bf units written to the tape. Backup blocks
contain data, primary recovery, and error-correction blocks.
This example backs up a very small database. Using the -red parameter on a larger
database increases the amount of time and backup media required for the backup. Also,
PROBKUP displays the number of blocks and the amount of backup required for an
uncompressed database because you cannot specify the -scan parameter for an online
backup.
3 ♦ If you enable after-imaging, back up the AI files to a separate tape or disk using a UNIX
backup utility.
7.1.2 Progress Backup Options
By default, PROBKUP performs a full backup. To perform an incremental backup, specify the
incremental qualifier:
online
Performs an online backup.
db-name
Specifies the database you want to back up.
64 bi blocks will be dumped.
336 out of 336 blocks in devel will be dumped.
This will require 369664 bytes of backup media.
This backup will require a minimum of 400 blocks to restore.
1 volume will be required.
Backed up 400 blocks in 00:00:05.
Wrote a total of 18 backup blocks using 369664
bytes of media.
Backup complete.
probkup online db-name incremental device-name [parameters]](https://image.slidesharecdn.com/progress-database-administration-guide-and-reference3170-130618021328-phpapp01/85/Progress-OpenEdge-database-administration-guide-and-reference-143-320.jpg)


![Backing Up a Database
7–9
7.2 Performing an Offline Progress Backup
You can perform both full and incremental backups offline. You must perform a full backup
before performing an incremental backup. Following the first full backup, you can perform any
number of incremental backups. However, you should perform a full backup at least once a
week.
Follow these steps to perform an offline backup, either full or incremental:
1 ♦ Verify that the database is not in use.
If you are performing an offline backup, the database must not be in use. The server must
be shut down and no single-user session can be active. PROBKUP does not allow access
to the database during a full offline backup.
On UNIX systems that support file locking and where backup utilities (for example, cpio)
honor file locks, an attempt to back up a database in use causes the utility to hang, waiting
for the Progress session to end. On all other systems, there is no way to prevent you from
backing up a database in use.
Use the PROUTIL BUSY utility to determine whether the database is in use:
The BUSY qualifier returns a code indicating whether the database is in use. You can use
the codes returned by the BUSY qualifier in scripts, files, or procedures. For more
information about this qualifier, see the description of the PROUTIL utility in Chapter 19,
“Database Administration Utilities.”
2 ♦ Shut down the database server.
Before you back up the database, you must shut down the database server. See Chapter 5,
“Starting Up and Shutting Down,” for information about shutting down the database
server.
3 ♦ Perform the offline backup.
Use PROBKUP to perform either a full or incremental offline backup. Run PROBKUP
from the operating system prompt:
proutil db-name -C busy
probkup db-name device-name [ parameters ]](https://image.slidesharecdn.com/progress-database-administration-guide-and-reference3170-130618021328-phpapp01/85/Progress-OpenEdge-database-administration-guide-and-reference-147-320.jpg)
![Progress Database Administration Guide and Reference
7–10
For more information about this qualifier, see the description of PROBKUP parameters
listed earlier in this chapter, or see the description of the PROUTIL utility in Chapter 19,
“Database Administration Utilities.”
By default, PROBKUP performs a full backup. To perform an incremental backup,
specify the incremental qualifier.
As you begin the full backup of a database, a report appears on your terminal that indicates
how many:
• Bytes are required on the backup media
• Active data blocks are written to the backup media
• Blocks are dumped
• Blocks are required to restore the database
When the backup successfully completes, the report displays the total number of bytes on
the backup media and how long it took to complete the backup.
NOTE: If a system failure occurs while you are performing the full backup, perform the
backup again.
7.3 Performing an Online Progress Backup
Use PROBKUP to perform either a full or incremental online backup. Run PROBKUP from the
operating system prompt. Use the following command syntax:
By default, PROBKUP performs a full backup. To perform an incremental backup, specify the
incremental qualifier:
probkup online db-name device-name [ parameters ]
probkup online db-name incremental device-name [ parameters ]](https://image.slidesharecdn.com/progress-database-administration-guide-and-reference3170-130618021328-phpapp01/85/Progress-OpenEdge-database-administration-guide-and-reference-148-320.jpg)

![Progress Database Administration Guide and Reference
7–12
5 ♦ Use the PROSTRCT utility with the REPAIR qualifier to update the shared memory and
semaphore identification information to reflect the offline status of the fractured version
of the database, and to update the file list information for a database with the information
in the updated .st file:
dbname
Specifies the name of the database for which you are repairing the extent list and
master block.
description-file
Specifies the name of the structure description (.st) file.
6 ♦ Use the PROBKUP utility with the -norecover startup parameter to back up the fractured
version of the database:
dbname
Specifies the name of the fractured version of the database.
NOTE: The -norecover parameter prevents Progress from performing crash recovery or
switching to a new AI extent as part of the backup process. Use of the -norecover
parameter is noted as an entry in the .lg file.
prostrct repair dbname [ description-file ]
probkup dbname -norecover](https://image.slidesharecdn.com/progress-database-administration-guide-and-reference3170-130618021328-phpapp01/85/Progress-OpenEdge-database-administration-guide-and-reference-150-320.jpg)


![Progress Database Administration Guide and Reference
7–24
Progress also cannot recover a corrupted block if the error-correction block itself has a CRC
check failure. In this case, the following message appears:
If Progress encounters 10 unrecoverable errors during the verify pass or during the database
restore, you can terminate the verify operation:
7.8 CRC Codes and Redundancy In Backup Recovery
To recover corrupted backup blocks, Progress relies on:
• CRC codes to identify bad blocks. A CRC code is automatically calculated for each
Progress backup block whether or not you specify a redundancy factor.
• Error-correction blocks to recover bad blocks. Error-correction blocks are included in the
backup only if you explicitly request them with the -red parameter of the backup utility.
7.8.1 CRC Codes
When Progress writes a block of data to the backup media, it calculates a CRC code based on
the contents of the block and stores it with the block. When restoring, Progress reexamines the
contents of the block and verifies that they are consistent with the accompanying CRC code. If
the block contents are not consistent with the CRC code, the backup block is corrupted.
If the backup includes error-correction blocks, Progress automatically uses the information in
those blocks to recover the corrupted block. If the backup does not include error-correction
blocks, Progress cannot recover the corrupted block when you restore the database.
Unable to recover previous block in error
10 read errors have occurred.
Do you want to continue? [y/n]](https://image.slidesharecdn.com/progress-database-administration-guide-and-reference3170-130618021328-phpapp01/85/Progress-OpenEdge-database-administration-guide-and-reference-162-320.jpg)


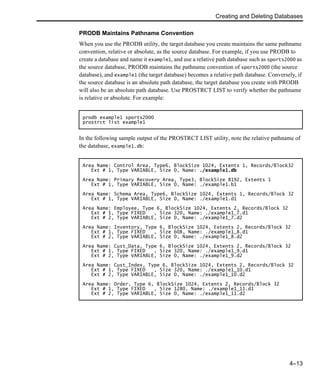
![Maintaining Database Structure
9–3
For example, this command displays database storage information for the database
/usr/joe/service.db:
If a full backup has not yet been performed against service.db, the message would read “NO
FULL BACKUP HAS BEEN DONE.”
9.3 Progress Structure List Utility
Your structure description file must reflect the current information in your database control area
to ensure continuity and ease database management. Therefore, update the structure description
file any time you make changes to the structure of a database, such as adding, moving, or
removing extents. Use the Progress Structure List (PROSTRCT LIST) utility to update your
structure description file. PROSTRCT LIST produces a new structure description file for the
database you name, using the current information stored in the database control area.
NOTE: You can use PROSTRCT LIST with an online database.
To update the structure description file with the current information stored in the database
control area, use the PROSTRCT LIST utility:
db-name
Specifies the database whose structure description file you want to update.
structure-description-file
Specifies the structure description file to create. If you do not specify the structure
description file, PROSTRCT LIST uses the base name of the database and appends a .st
extension. It replaces an existing file of the same name.
For example, to update the structure description file for /user/joe/service, enter the
following command:
prostrct statistics /usr/joe/service.db
prostrct list db-name [ structure-description-file ]
prostrct list /user/joe/service](https://image.slidesharecdn.com/progress-database-administration-guide-and-reference3170-130618021328-phpapp01/85/Progress-OpenEdge-database-administration-guide-and-reference-201-320.jpg)


![Progress Database Administration Guide and Reference
9–8
9.5 Progress Structure Remove Utility
Use the Progress Structure Remove (PROSTRCT REMOVE) to remove extents from storage
areas. After all the extents are removed from a storage area, PROSTRCT REMOVE removes
the storage area. Follow these steps to remove storage areas:
1 ♦ If the extent to be removed is in the BI area, use the PROUTIL TRUNCATE BI utility to
truncate the primary recovery area to be removed. For example:
If the storage area to be removed is an application data area, remove all tables and indexes,
then use the PROUTIL TRUNCATE AREA utility to truncate the application data area.
For example:
NOTE: You must disable after-imaging before you can remove an AI extent. You must
also disable two-phase commit before you can remove a transaction-log (TL)
extent.
For more information about truncating areas, see the “PROUTIL TRUNCATE AREA
Qualifier” section in Chapter 19, “Database Administration Utilities.”
2 ♦ Use PROSTRCT REMOVE to remove extents from the storage area. For example:
NOTE: Use the area-name parameter only to remove application data extents. If the area
name contains a space, supply double-quotes around the area name. For example:
"test data."
proutil db-name -C truncate bi
proutil db-name -C truncate area area-name
prostrct remove db-name extent-type-token [area-name]](https://image.slidesharecdn.com/progress-database-administration-guide-and-reference3170-130618021328-phpapp01/85/Progress-OpenEdge-database-administration-guide-and-reference-206-320.jpg)
![Maintaining Database Structure
9–9
You can remove one extent at a time. After you have removed all of the extents from a
storage area, PROSTRCT REMOVE removes the storage area and outputs descriptive
information such as:
3 ♦ Run PROSTRCT LIST after removing any areas. PROSTRCT LIST will overwrite your
existing ST file to reflect the changes made to the structure of your database.
9.6 Maintaining Indexes and Tables
You can add tables and indexes to existing storage areas in a database using the Create Table
and Create Index commands from the Progress 4GL Data Dictionary. However, you cannot add
tables or indexes to existing storage areas using the Modify Table command or the Index
property sheet. The following sections detail how to move tables and indexes and how to
compact indexes.
9.6.1 Moving Tables
Use the PROUTIL TABLEMOVE utility to move a table and its associated indexes from one
storage area to another while the database remains online. For example:
NOTE: For the complete syntax description, see Chapter 19, “Database Administration
Utilities.”
If you omit the index-area parameter the indexes associated with the table will not be moved.
Moving the records of a table from one area to another invalidates all the ROWIDs and indexes
of the table. Therefore the indexes are rebuilt automatically by the utility whether you move
them or not. You can move the indexes to an application data area other than the one to which
you are moving the table. If you want to move only the indexes of a table to a separate
application data area, use the PROUTIL IDXMOVE utility.
solaris:90a$ prostrct remove service d chris
/user/joe/service_9.d3 successfully removed
solaris:90a$ prostrct remove service d chris
/user/joe/service_9.d2 successfully removed
solaris:90a$ prostrct remove service d chris
/user/joe/service_9.d1 successfully removed
proutil db-name -C tablemove [owner-name.]table-name table-area
[ index-area ]](https://image.slidesharecdn.com/progress-database-administration-guide-and-reference3170-130618021328-phpapp01/85/Progress-OpenEdge-database-administration-guide-and-reference-207-320.jpg)

![Maintaining Database Structure
9–11
9.6.2 Moving Indexes
Use the PROUTIL IDXMOVE utility to move an index from one application data area to
another while the database remains online. You might be able to improve performance by
moving indexes that are heavily used to an application data area on a faster disk. For example:
NOTE: For the complete syntax description, see Chapter 19, “Database Administration
Utilities.”
The PROUTIL IDXMOVE utility operates in two phases:
• Phase 1: The new index is being constructed in the new area. The old index remains in the
old area and all users can continue to use the index for read operations.
• Phase 2: The old index is being removed and all the blocks of the old index are being
removed to the free block chain. For a large index this phase can take a significant amount
of time. During this phase all operations on the index are blocked until the new index is
available; users accessing the index might experience a freeze in their application.
The _UserStatus virtual system table displays the utility’s progress.
NOTE: While you can move indexes online, no writes to the table or its indexes are allowed
during the move. The IDXMOVE utility acquires a SHARE lock on the table, which
blocks all attempts to modify records in the table. Progress Software Corporation
recommends that you run the utility during a period when the system is relatively
idle, or when users are doing work that does not access the table.
9.6.3 Compacting Indexes
When the DBANALYS utility indicates that space utilization of an index is reduced to 60% or
less, use the PROUTIL IDXCOMPACT utility to perform index compaction online. Performing
index compaction increases space utilization of the index block to the compacting percentage
specified. For example:
NOTE: For the complete syntax description, see Chapter 19, “Database Administration
Utilities.”
proutil db-name -C idxmove [owner-name.]indexname area-name
proutil db-name -C idxcompact [ owner-name.]table-name.index-name [ n ]](https://image.slidesharecdn.com/progress-database-administration-guide-and-reference3170-130618021328-phpapp01/85/Progress-OpenEdge-database-administration-guide-and-reference-209-320.jpg)


![After-Imaging
11–7
11.5.2 Switching To a New AI File
You switch to a new AI extent for the following reasons:
• As part of the backup schedule
• When the current fixed-length AI extent is full, or when the disk holding the current
variable-length AI extent is full
• Before archiving an AI extent
Except when you switch to a new extent because the current extent is full, switching to a new
AI extent establishes a starting point for backup; after you restore the backup, you roll forward
starting from that extent.
NOTE: When you perform an online backup, PROBKUP automatically switches over to a
new extent as long as the next extent is empty. Before you perform the online backup,
make sure that the next extent is empty.
A fixed-length extent has a predefined size, so the database engine can determine when the
extent becomes full.
In contrast to a fixed-length extent, a variable-length extent does not have a predefined
maximum size. Therefore, the database engine cannot anticipate when the extent is about to
become full. Unless you force a switch using the RFUTIL AIMAGE NEW utility, the database
engine continues writing to the extent until there is no more room left on the disk or the 2GB
addressable AI file limit is reached. When the extent becomes full, the database engine
automatically switches to the next extent, provided that the next extent is empty.
If the next extent is full, the database engine shuts down the database. However, you can use the
After-image Stall (-aistall) parameter to suspend database activity and send a message to the
log file or you can use the RFUTIL qualifier AIMAGE AIOFF to disable after-imaging. If you
use -aistall, you can archive the extent and mark it as empty. The system will then
automatically switch to that extent and the database activity automatically resumes. For more
information on the -aistall parameter, see Chapter 18, “Database Startup Parameters.” If you
use RFUTIL AIMAGE AIOFF, after-imaging becomes disabled and can no longer write notes.
NOTE: You can only use the -aistall parameter and RFUTIL AIMAGE AIOFF in
multi-user mode.]](https://image.slidesharecdn.com/progress-database-administration-guide-and-reference3170-130618021328-phpapp01/85/Progress-OpenEdge-database-administration-guide-and-reference-233-320.jpg)


![Progress Database Administration Guide and Reference
11–10
Performing the Backup
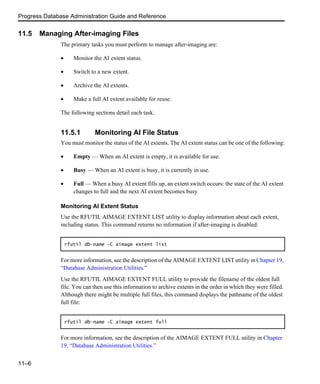
You must use an operating system utility to back up the AI files regardless of whether you are
using a single AI file or multiple AI files. Table 11–2 presents some of the backup options
available for each operating system.
Ensure that the backup technique backs up the entire file. On many UNIX systems, certain
utilities (for example, cpio) will back up only the first part of files over a certain size (controlled
by the ULIMIT parameter). Backups of partial AI files are invalid and unusable.
Marking an AI File As Empty
After you back up a file, you must mark the file as empty so that the database engine can reuse
the file. To mark a file as empty, use the AIMAGE EXTENT EMPTY qualifier of the RFUTIL
utility. After you mark the file as empty, the database engine overwrites the contents of the file.
Use the following command to mark the AI file as empty:
db-name
Specifies the database you are using.
extent-number
Specifies the number of the file you want to mark as empty.
Table 11–2: Operating System Backup Utilities
Operating
System Available Backup Utilities
UNIX tar, cpio, or a manufacturer-supplied backup utility.
Windows Windows Backup or any backup utility that can back up and restore
individual files.
rfutil db-name -C aimage extent empty [ extent-number | extent-path ]](https://image.slidesharecdn.com/progress-database-administration-guide-and-reference3170-130618021328-phpapp01/85/Progress-OpenEdge-database-administration-guide-and-reference-236-320.jpg)


![Using Two-phase Commit
12–7
12.3 Enabling Two-phase Commit
PROUTIL provides two-phase commit protection only if you enable two-phase commit on two
or more of the databases involved in a distributed transaction. For example, if a transaction
involves three databases and you enable two-phase commit for two of them, PROUTIL provides
two-phase commit protection for the two databases. However, PROUTIL protects only the
databases that you enable, so the transaction is not completely protected from failure. For true
integrity, enable two-phase commit for all three databases.
NOTE: You must create and maintain a transaction log (TL) area for your database in order
to use two-phase commit. For more information, see the “Transaction Log Area”
section. For a complete description of database storage areas see Chapter 1, “The
Progress Database.”
You enable two-phase commit with the PROUTIL 2PHASE BEGIN qualifier. When you
enable two-phase commit, you can specify the database that should serve as the coordinator
database. You can also specify an alternate name (nickname) for the coordinator database.
This is the syntax for enabling two-phase commit:
db-name
Specifies the database you are using.
-crd
Specifies that the database can serve as a coordinator database. For example, if you enable
two-phase commit for three databases (db1, db2, and db3) and you specify the -crd
parameter for db3, PROUTIL assigns db3 as the coordinator database. However, if you
specify the -crd parameter for more than one database, PROUTIL arbitrarily assigns a
coordinator database from the databases that received the -crd parameter. If you do not
assign any database as a coordinator, all two-phase-commit-enabled databases are
potential coordinator databases. PROUTIL randomly assigns a coordinator database from
one of these databases.
Choose a database on a reliable machine to serve as the coordinator database. This way,
you can be more certain that you have a reliable record of all transactions that occur. You
can also be more certain that a hardware or software failure does not affect the coordinator
database.
proutil db-name -C 2phase begin [ -crd | -tp nickname ]](https://image.slidesharecdn.com/progress-database-administration-guide-and-reference3170-130618021328-phpapp01/85/Progress-OpenEdge-database-administration-guide-and-reference-247-320.jpg)
![Progress Database Administration Guide and Reference
12–8
-tp
Specifies a unique nickname that PROUTIL uses to identify the coordinator database. If
you do not specify a nickname, PROUTIL automatically chooses the name of the database
(without the .db extension) as the nickname.
For example, if you have a database named /usr/dbs/appl.db, the nickname for the
database is appl. If PROUTIL assigns appl.db as the coordinator database, it writes the
nickname appl to the BI file instead of the database’s full path name. Specify nicknames
of up to eight characters. Specifying a shorter nickname decreases the size of the notes that
must be written.
NOTE: Be sure to specify a unique nickname. If you must resolve limbo transactions
with two databases that have the same path name but are on different machines,
PROUTIL does not distinguish between the two databases.
12.3.1 Modifying the Database Nickname and Priority
If you want to change the nickname of a database, or if you want to change the priority of your
databases, use the 2PHASE MODIFY qualifier of the PROUTIL utility:
db-name
Specifies the database you are using.
-crd
Switches whether or not the database can serve as a coordinator database. If you specify
-crd against a database that is a candidate for coordinator database, it is no longer a
candidate. If you specify -crd against a database that is not a candidate, it becomes a
candidate.
-tp
Identifies a new nickname for the coordinator database.
proutil db-name -C 2phase modify [ -crd | -tp nickname ]](https://image.slidesharecdn.com/progress-database-administration-guide-and-reference3170-130618021328-phpapp01/85/Progress-OpenEdge-database-administration-guide-and-reference-248-320.jpg)


![Progress Database Administration Guide and Reference
13–10
13.3.1 Dumping Table Contents With PROUTIL
Use the following PROUTIL command to perform a binary dump:
db-name
Specifies the database from which you want to dump. You must completely define the
path.
owner-name
Specifies the owner of the table containing the data you want to dump. You must specify
an owner name unless the table’s name is unique within the database, or the table is owned
by PUB. By default, Progress 4GL tables are owned by PUB.
table-name
Specifies the name of the table containing the data you want to dump.
directory
Specifies the name of the target directory where the data will be dumped.
[-index num]
Specifies an index to use to dump the table’s contents. If you choose not to use this option,
the command uses the primary index to dump the table.
You can use the PROUTIL IDXANALYS utility to help determine what the index number
is. For the complete syntax of the PROUTIL IDXANALYS utility, see Chapter 19,
“Database Administration Utilities.”
Results Of a Binary Dump With PROUTIL
PROUTIL DUMP writes data from a table to a dump file. The name of the resulting dump file
depends on the owner of the table. By default, Progress 4GL tables are owned by PUB. When
tables owned by PUB are dumped to a file, the filename is the table name with .bd appended.
For example, tablename.bd.
However, when tables owned by anyone other than PUB are dumped to a file, the resulting
filename contains the owner name and table name. For example, ownername_tablename.bd.
proutil db-name -C dump [owner-name.]table-name directory [-index num]](https://image.slidesharecdn.com/progress-database-administration-guide-and-reference3170-130618021328-phpapp01/85/Progress-OpenEdge-database-administration-guide-and-reference-272-320.jpg)

![Progress Database Administration Guide and Reference
13–12
Section numbers that appear in the file header correspond to a binary dump file created by
PROUTIL DUMP when the table was larger than the UNIX 2GB file size limitation. (See the
“Results Of a Binary Dump With PROUTIL” section.) For example, Section 1 corresponds to
the binary dump file named customer.bd, Section 2 corresponds to customer.bd2, Section 3
corresponds to customer.bd3, and Section 4 corresponds to the customer.bd4 binary dump
file.
NOTE: To support the dump and load of binary large objects (BLOBS), PROUTIL DUMP
adds more items to the header of the binary dump file.
13.3.2 Dumping Field Contents With PROUTIL
Use the following syntax to perform a selective binary dump:
SYNTAX
db-name
Specifies the database from which the dump will occur. You must completely define the
path.
owner-name
Specifies the owner of the table containing the data you want to dump. You must specify
an owner name unless the table’s name is unique within the database, or the table is owned
by “PUB.” By default, Progress 4GL tables are owned by PUB.
table-name
Specifies the name of the table containing the data you want to dump.
field-name
Specifies the name of the field containing the data you want to dump.
operator
Specifies the operator to be used: EQ (equals to), GT (greater than), GE (greater than or
equal), LT (less than), or LE (less than or equal).
Operating
System Syntax
UNIX
Windows
proutil db-name -C dumpspecified
[owner-name.]table-name.field-name operator field-value
directory](https://image.slidesharecdn.com/progress-database-administration-guide-and-reference3170-130618021328-phpapp01/85/Progress-OpenEdge-database-administration-guide-and-reference-274-320.jpg)


![Progress Database Administration Guide and Reference
13–28
Follow these steps to load table contents with the Bulk Loader utility:
1 ♦ Create a Bulk Loader description file using the Data Administration tool, Data Dictionary,
or a text editor. If you use the Data Dictionary or Data Administration tool, it automatically
writes the description file. If you use a text editor, you must create the file.
Using a text editor to modify a description file that the Bulk Loader has created allows you
to customize the file to suit your needs. For more information see the “Creating a Bulk
Loader Description File” section.
2 ♦ Verify that the table definitions are in the database.
3 ♦ Run the Bulk Loader utility using the PROUTIL BULKLOAD command:
db-name
Specifies the database you are using.
-yy n
Indicates the start of a 100-year period iin which any two-digit DATE value is defined; n
specifies a four-digit year (1900, for example) that determines the start of the 100-year
period. The default is 1950, but the -yy n value must match the -yy n value used when the
data was dumped.
fd-file
Identifies the bulk loader description file you are using.
-Bn
Blocks in DataBase Buffers startup parameter; n specifies the number of blocks.
See Chapter 19, “Database Administration Utilities,” for information about the PROUTIL
utility and the BULKLOAD qualifier.
NOTE: On a minimally configured PC, you might encounter memory problems when using
the Bulk Loader utility. To work around these problems, split the description file into
several smaller files.
proutil db-name [ -yy n ] -C bulkload fd-file [ -Bn ]](https://image.slidesharecdn.com/progress-database-administration-guide-and-reference3170-130618021328-phpapp01/85/Progress-OpenEdge-database-administration-guide-and-reference-290-320.jpg)


![Managing Performance
14–29
Increasing the AI Block Size
As with before-imaging, the database engine reads and writes information to the AI file in
blocks. Increasing the size of AI blocks lets the engine read and write more AI data at one time.
This can reduce I/O rates on disks where the AI files are located. In general, the default AI block
size (8K) is sufficient for systems with low transaction rates. However, if performance
monitoring indicates that AI writes are a performance bottleneck and your platform’s I/O
subsystem can take advantage of larger writes, increasing the AI block size might improve
performance. A larger AI block size might also improve performance for roll-forward recovery
processing.
Follow these steps to change the AI block size:
1 ♦ Use the PROSHUT command or the PROMON Shutdown a Database option to shut down
the database.
2 ♦ If after-imaging is enabled, disable it by entering the following command:
For more specific information on this command, see the description of the RFUTIL utility
AIMAGE END qualifier in Chapter 19, “Database Administration Utilities.”
3 ♦ Truncate the BI file to bring the database and BI files up to date and eliminate any need
for database recovery. To do this, enter the following command:
Typically, if you change the AI block size, you should also change the BI block size. If
you have not already, you might want to use this command to do so. For more information
on the BI block size, see the “Increasing the BI Block Size” section.
For more details on this command, see the description of the PROUTIL utility in Chapter
19, “Database Administration Utilities.”
4 ♦ Change the AI block size by entering the following command:
rfutil db-name -C aimage end
rfutil db-name -C truncate bi- [ -bi size | -biblocksize size ]
rfutil db-name -C aimage truncate -aiblocksize size [ -a aifilename ]](https://image.slidesharecdn.com/progress-database-administration-guide-and-reference3170-130618021328-phpapp01/85/Progress-OpenEdge-database-administration-guide-and-reference-329-320.jpg)


![Managing Performance
14–41
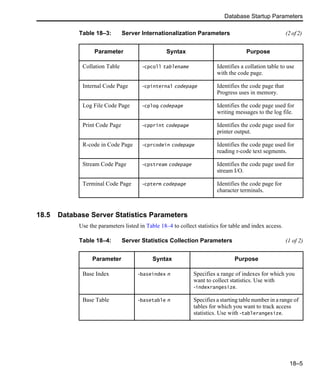
The Levels field shows the number of reads PROUTIL performs in each index per entry. The
Blocks and Bytes fields show you the size of each index. The Factor field is based on the
utilization and size of the index; it is an indicator of when you should rebuild indexes. Table
14–3 provides a description of the different ranges of values for the Factor field. When you use
the Factor field to decide whether to rebuild an index, consider the context of how the particular
index is used. For example, if an index is highly active, with continuous insertions and deletions,
its utilization rate varies greatly, and a rebuild is inadvisable. However, a static index with a high
factor value benefits from a rebuild.
14.9.2 Compacting Indexes
When space utilization of an index is reduced to 60% or less as indicated by the PROUTIL
IDXANALYS utility, use the PROUTIL IDXCOMPACT utility to perform index compaction
online. Performing index compaction increases space utilization of the index block to the
compacting percentage specified. For example:
NOTE: For the complete syntax description see Chapter 19, “Database Administration
Utilities.”
Table 14–3: Factor Values
Factor Range Description
1 to 2 The index is well-utilized and balanced. You do not have to
rebuild it.
2 to 2.5 The index is less than 50 percent utilized and/or the index is
unbalanced. You should consider a rebuild.
2.5 to 3 The index is less than 25 percent utilized and/or the index is very
unbalanced. You should rebuild this index.
proutil db-name -C idxcompact [ owner-name.]table-name.index-name [n]](https://image.slidesharecdn.com/progress-database-administration-guide-and-reference3170-130618021328-phpapp01/85/Progress-OpenEdge-database-administration-guide-and-reference-341-320.jpg)
![Progress Database Administration Guide and Reference
14–42
Performing index compaction reduces the number of blocks in the B-tree and possibly the
number of B-tree levels, which improves query performance.
The index compacting utility operates in phases:
• Phase 1: If the index is a unique index, the delete chain is scanned and the index blocks
are cleaned up by removing deleted entries.
• Phase 2: The nonleaf levels of the B-tree are compacted starting at the root working toward
the leaf level.
• Phase 3: The leaf level is compacted.
The _UserStatus virtual system table displays the utility's progress. For more information see
Chapter 9, “Maintaining Database Structure.”
NOTE: Because index compacting is performed online, other users can use the index
simultaneously for read or write operation with no restrictions. Index compacting
only locks 1 to 3 index blocks at a time, for a short time. This allows full concurrency.
14.9.3 Rebuilding Indexes
Use the IDXBUILD (Index Rebuild) qualifier of the PROUTIL utility to:
• Compress index blocks to minimize space usage.
• Activate all deactivated indexes in the database.
• Repair corrupted indexes in the database. (Index corruption is normally signaled by error
messages.)
NOTE: When you run the Index Rebuild qualifier, the database must not be in use.
To run the IDXBUILD qualifier with PROUTIL, enter the following command:
db-name
Specifies the name of the database whose indexes you want to build.
To improve performance, use the Merge Number (-TM) and Speed Sort (-TB) startup parameters.
For details, see the “Maximizing Index Rebuild Performance” section.
proutil db-name -C idxbuild [ all ] [ -TB ] [ -TM ]](https://image.slidesharecdn.com/progress-database-administration-guide-and-reference3170-130618021328-phpapp01/85/Progress-OpenEdge-database-administration-guide-and-reference-342-320.jpg)


![Startup and Shutdown Commands
17–2
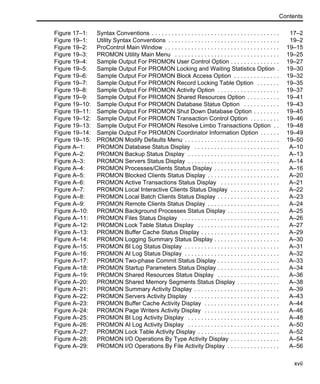
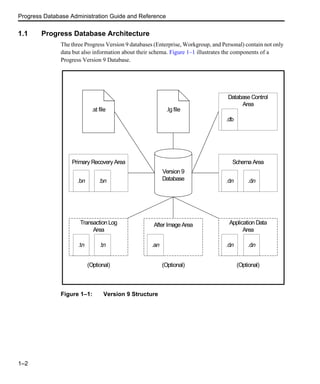
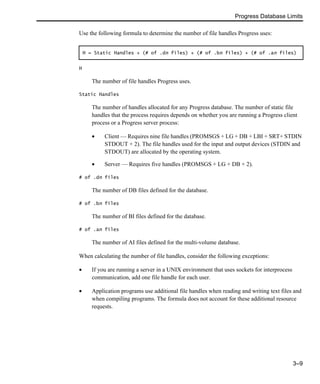
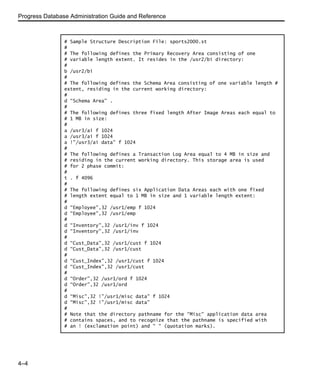
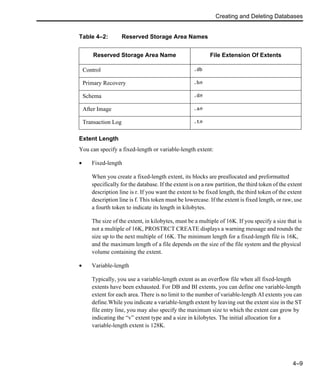
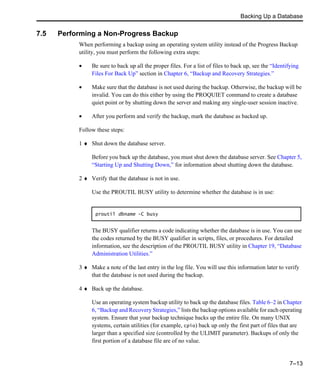
17.1 Startup Command Syntax
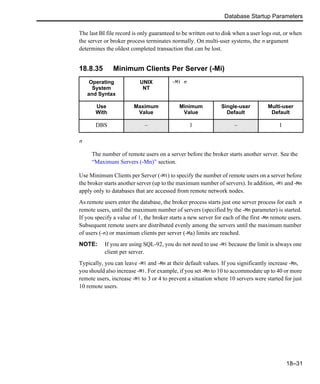
Figure 17–1 shows the conventions used in command syntax descriptions.
Figure 17–1: Syntax Conventions
For example, the following command allows 100 users to access the sports database and then
set values for the database connection, performance, and network parameters.
Table 17–1 describes each of the command components.
NOTE: On both UNIX and Windows, enter parameters exactly as shown in the syntax
descriptions.
command [ db-name ] [ parameter ] [ value ] . . .
proserve sports -n 100 -B 30000 -L 1000 -S sprtsv -H sys27
Table 17–1: Progress Command Components
Component Description
command On UNIX, the command runs a script that executes a
Progress executable with appropriate parameters. On
Windows, some commands run a batch file that
executes a Progress executable with appropriate
parameters. Other commands run a Progress executable
directory.
db-name Name of the database you want to connect to.
parameter, qualifier Operating criteria for the command.
value Numeric value or file specification for the parameter.](https://image.slidesharecdn.com/progress-database-administration-guide-and-reference3170-130618021328-phpapp01/85/Progress-OpenEdge-database-administration-guide-and-reference-370-320.jpg)


![PROSERVE Command
17–9
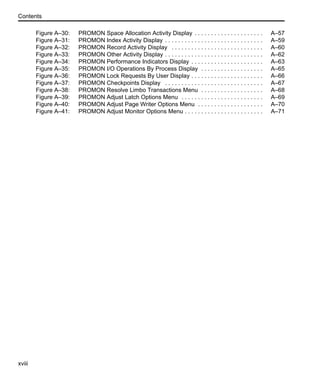
PROSERVE Command
Starts the broker, which in turn spawns the server. The server process coordinates all access to
the specified Progress database.
SYNTAX
-servergroup servergroup-name
Specifies the logical collection of server processes to start. The servergroup-name you
specify must match the name of a servergroup in the conmgr.properties file. You create
servergroups using the Progress Explorer Database Configuration Tools, which saves
them in the conmgr.properties file.
db-name
Specifies the specific database you want to start.
parameters
Specifies the startup parameters for the broker/server. See Chapter 19, “Database
Administration Utilities,” for a list of broker/server startup parameters.
NOTES
• You can specify only one database name when using PROSERVE to start a broker or
servergroup.
• Servergroups manage network connections four separate ways:
– Accept no network connections
– Accept SQL-92 and 4GL network connections
– Accept only SQL-92 network connections
– Accept only 4GL network connections
Operating
System
Syntax
UNIX
Windows
proserve { db-name | -servergroup [ servergroup-name ]}
[ parameters ]](https://image.slidesharecdn.com/progress-database-administration-guide-and-reference3170-130618021328-phpapp01/85/Progress-OpenEdge-database-administration-guide-and-reference-377-320.jpg)

![PROSHUT Command
17–11
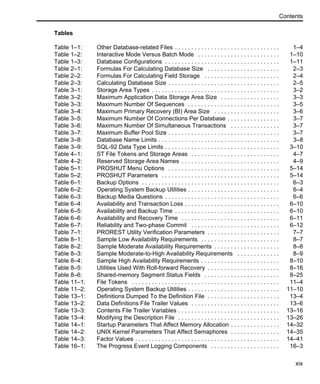
PROSHUT Command
Shuts down the Progress database server and individual processes. Before you shut down the
broker, have all application users quit their Progress sessions. If necessary, you can disconnect
users by using the PROSHUT command’s Disconnect a User or Unconditional Shutdown
parameters.
SYNTAX
db-name
Specifies the database the server is running against.
-b
Directs PROSHUT to perform a batch shutdown. When no client is connected, the
database automatically shuts down. When one or more clients are connected, PROSHUT
prompts the user to enter “yes” to perform an unconditional batch shutdown and to
disconnect all active users; or “no” to perform a batch shutdown only if there are no active
users. The -b parameter combines the functionality of the -by or -bn parameters.
Operating
System Syntax
UNIX
Windows
proshut db-name[-b
| -by
| -bn
| -C list
| -C disconnect usernum
| -F
| -Gw
| -H host-name
| -S service-name
| -cpinternal codepage
| -cpstream codepage
] ...](https://image.slidesharecdn.com/progress-database-administration-guide-and-reference3170-130618021328-phpapp01/85/Progress-OpenEdge-database-administration-guide-and-reference-379-320.jpg)


![Database Administration Utilities
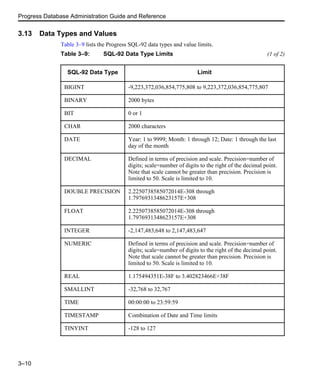
19–2
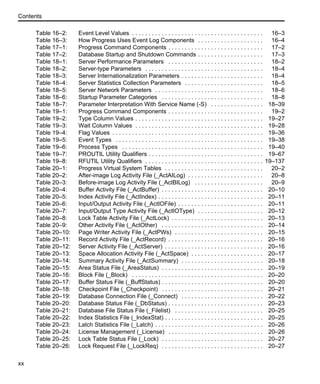
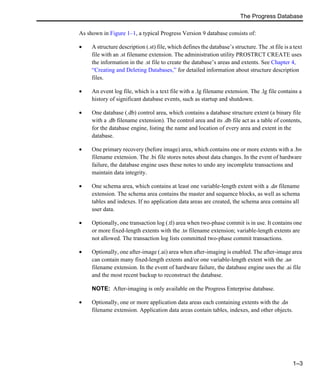
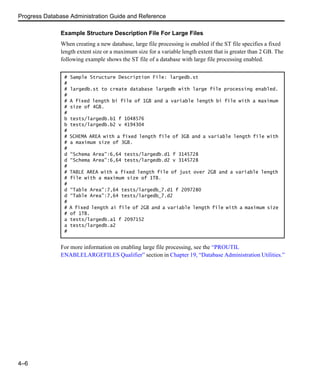
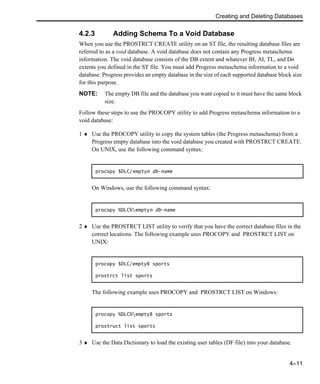
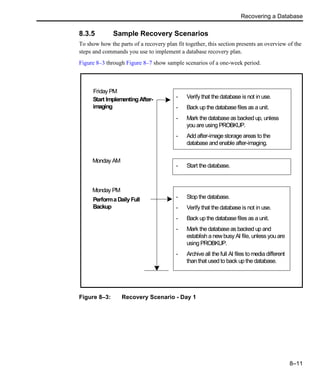
Figure 19–1 shows the conventions used in utility command syntax.
Figure 19–1: Utility Syntax Conventions
Table 19–1 describes each of the command components.
NOTE: Enter parameters on UNIX and Windows exactly as shown in the syntax
descriptions.
Table 19–1: Progress Command Components
Component Description
command Progress executable
qualifier Additional command specification
parameter Operating criteria for the command
value Numeric value or file specification
command db-name [ qualifier ] [ parameter value ]
UNIXand Windows
pr obkup spor t s i ncr ement al - vs 708](https://image.slidesharecdn.com/progress-database-administration-guide-and-reference3170-130618021328-phpapp01/85/Progress-OpenEdge-database-administration-guide-and-reference-428-320.jpg)
![DBMAN Utility
19–3
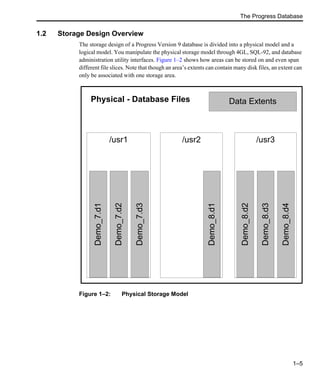
DBMAN Utility
Starts, stops, or queries a database. Before you can use the DBMAN command-line utility, you
must use the Progress Explorer Database Configuration Tool to create the database
configuration and store it in the conmgr.properties file.
SYNTAX
-database db-name
Specifies the name of the database you want to start. It must match the name of a database
in the conmgr.properties file.
-config config-name
Specifies the name of the configuration with which you want to start the database.
-start
Starts the database db-name as defined by the configuration config-name.
-stop
Stops the database db-name.
-query
Queries the Connection Manager for the status of the database db-name.
-host host-name
Identifies the host machine where the AdminServer is running. The default is the local
host. If your AdminServer is running on a remote host, you must use the -host host-name
parameter to identify the host where the remote AdminServer is running.
Operating
System Syntax
UNIX
Windows
dbman [ -host host-name -port port-number | service-name
-user user-name ]
-database db-name
[-config config-name -start|-stop|-query]](https://image.slidesharecdn.com/progress-database-administration-guide-and-reference3170-130618021328-phpapp01/85/Progress-OpenEdge-database-administration-guide-and-reference-429-320.jpg)

![DBMAN Utility
19–5
• The conmgr.properties file stores the database, configuration, and servergroup
properties. For example:
(1 of 2)
# Connection Manager Properties File
#
%% version 1.0
#
# The following are optional configuration properties and their default
# values. The legacy option, if applicable, is listed after the second
# comment. Property values set at this level become the default values for
# all configuration subgroups.
#
[configuration]
# afterimagebuffers=5 # -aibufs
# afterimagestall=true # -aistall
# beforeimagebufferedwrites=false # -r
# beforeimagebuffers=5 # -bibufs
# beforeimageclusterage=60 # -G
# beforeimagedelaywrites=3 # -Mf
# blocksindatabasebuffers=0 # -B (calculated s 8*(-n))
# logcharacterset=iso8859-1 #
# collationtable=basic # -cpcoll
# crashprotection=true # -i
# databasecodepage=basic # -cpdb
# directio=false # -directio
# hashtableentries=0 # -hash (calculated as (-B)/4)
# locktableentries=10000 # -L
# maxservers=4 # -Mn
# maxusers=20 # -n
# nap=1 # -nap
# napmax=1 # -napmax
# pagewritermaxbuffers=25 # -pwwmax
# pagewriterqueuedelay=100 # -pwqdelay
# pagewriterqueuemin=1 # -pwqmin
# pagewriterscan=1 # -pwscan
# pagewriterscandelay=1 # -pwsdelay
# semaphoresets=1 # -semsets
# sharedmemoryoverflowsize=0 # -Mxs
# spinlockretries=0 # -spin
# sqlyearoffset=1950 # -yy
[configuration.sports2000.default]
database=sports2000
displayname=default
servergroups=sports2000.default.default4gl,
sports2000.default.defaultsql](https://image.slidesharecdn.com/progress-database-administration-guide-and-reference3170-130618021328-phpapp01/85/Progress-OpenEdge-database-administration-guide-and-reference-431-320.jpg)
![DBMAN Utility
19–6
# The following are optional database properties and their default
# values. Property values set at this level become the default values for
# all database subgroups.
#
[database]
# autostart=false # autostart the defaultconfiguration
# databasename=mydemo # absolute or relative path + database name
#defaultconfiguration=defaultdb.defaultconfig
[database.sports2000]
autostart=true
configurations=sports2000.default
databasename=[[work-dir]]sports2000
defaultconfiguration=sports2000.default
displayname=Sports2000
[environment]
# The following are optional server group properties and their default
# values. The legacy option, if applicable, is listed after the second
# comment. Property values set at this level become the default values for
# all servergroup subgroups.
#
[servergroup]
# host=localhost # -H
# initialserver=0
# maxclientsperserver=0 # -Ma (calculated value)
# maxdynamicport=0 # -maxport (5000 for NT;2000 for UNIX)
# messagebuffersize=350 # -Mm (4gl only)
# minclientperserver=1 # -Mi
# mindynamicport=3000 # -miniport (3000 - NT; 2000 - UNIX)
# networkclientsupport=true # false for self-service
# port=0 # -S ; Must be non-zero
# # when networkclientsupport=true
#reportinginterval=1 # -rpint (4gl only)
#serverexe=<4gl server location> # -mprosrv (4gl only)
#servicename= # -
#type=4gl # -
[servergroup.sports2000.default.default4gl]
configuration=sports2000.default
displayname=default4gl
port=2500
type=4gl
[servergroup.sports2000.default.defaultsql]
configuration=sports2000.default
displayname=defaultsql
port=2500
type=sql
(2 of 2)](https://image.slidesharecdn.com/progress-database-administration-guide-and-reference3170-130618021328-phpapp01/85/Progress-OpenEdge-database-administration-guide-and-reference-432-320.jpg)
![_DBUTIL CMPDB Qualifier
19–7
_DBUTIL CMPDB Qualifier
Allows you to compare two databases.
SYNTAX
db-name1
Name of the first database to be compared.
db-name2
Name of the second database to be compared.
-t
Tight compare. Checks all fields including backup counters and master block fields.
-l
Loose compare. Does not report differences in the master block last modification date or
the back up update counter.
-l2
Second loose compare. Does not report differences in the incremental backup field of the
database block headers.
NOTE
• Note that in Version 9, CMPDB is no longer an executable. It must be run as a qualifier to
_DBUTIL.
Operating
System
Syntax
UNIX
Windows
_dbutil cmpdb db-name1 db-name2 [-t|-l|-l2]](https://image.slidesharecdn.com/progress-database-administration-guide-and-reference3170-130618021328-phpapp01/85/Progress-OpenEdge-database-administration-guide-and-reference-433-320.jpg)
![PROADSV Utility
19–8
PROADSV Utility
Starts, stops, or queries the current installation of an AdminServer on UNIX.
SYNTAX
-start
Starts the AdminServer.
-stop
Stops the AdminServer.
-query
Displays AdminServer status.
-port port-number
Specifies the listening port number for online command utilities, such as DBMAN. If a
port number is not specified, it defaults to 20931.
-adminport port-number
Specifies the listening port number for communication between a servergroup and an
AdminServer. The default port-number is 7832.
-help
Displays command-line help.
Operating
System Syntax
UNIX proadsv { -start | -stop | -query }
[ -port port-number ]
[ -adminport port-number ]
[ -help ]](https://image.slidesharecdn.com/progress-database-administration-guide-and-reference3170-130618021328-phpapp01/85/Progress-OpenEdge-database-administration-guide-and-reference-434-320.jpg)

![PROBKUP Utility
19–10
PROBKUP Utility
Backs up a Progress database, including the database, before-image files, and transaction log
(TL) extents.
SYNTAX
online
Indicates the backup is an online backup.
db-name
Specifies the database you want to back up.
incremental
Indicates the backup is an incremental backup.
device-name
Identifies a special device (for example, a tape drive) or a standard file. If device-name
identifies a special device, Progress assumes the device has removable media, such as a
tape or a floppy diskette. For Windows NT, use .tape0 for the device name if you are
backing up to a tape drive.
Operating
System Syntax
UNIX
Windows
probkup [ online ] db-name [ incremental ] device-name
[ -estimate
| -vs n
| -bf n
| -verbose
| -scan
| -io i
| -com
| -red i
| -no recover
] ...](https://image.slidesharecdn.com/progress-database-administration-guide-and-reference3170-130618021328-phpapp01/85/Progress-OpenEdge-database-administration-guide-and-reference-436-320.jpg)


![PRODB Utility
19–19
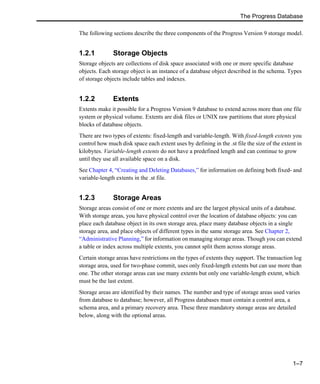
PRODB Utility
Creates a new Progress database.
PRODB creates a new database from a specified source database. PRODB creates a new
database using the structure of the source database and places all of the extents in the current
working directory. You can use PRODB to make a copy of any of the demonstration or empty
Progress databases.
SYNTAX
new-db-name
Specifies the name of the database you are creating. If you specify a directory without a
filename, Progress returns an error.
The value you specify can be any combination of letters and numbers, starting with a letter.
Do not use Progress 4GL keywords or special characters, such as commas or semicolons.
The maximum length of new-db-name varies, depending on the underlying operating
system. For specific limits, see Chapter 3, “Progress Database Limits.”
Operating
System Syntax
UNIX
Windows
prodb [ new-db-name ]
[ empty
| sports
| isports
| sports2000
| old-db-name
| demo
]](https://image.slidesharecdn.com/progress-database-administration-guide-and-reference3170-130618021328-phpapp01/85/Progress-OpenEdge-database-administration-guide-and-reference-445-320.jpg)


![PROSTRCT Utility
19–54
PROSTRCT Utility
Creates and maintains a Progress database. For example, you can use PROSTRCT and its
qualifiers to perform the following tasks:
• Create a new database from an existing structure description (ST) file.
• Display storage usage statistics including information about storage areas in a database.
• Add areas and extents to a database.
• Remove areas and extents from a database.
SYNTAX
qualifier
Specifies the qualifier that you want to use. You can supply the following qualifiers:
• ADD
• BUILDDB
• CREATE
• LIST
• REMOVE
• REPAIR
• STATISTICS
• UNLOCK
Details of the above qualifiers are found in the PROSTRCT subsections listed in the
following pages.
Operating
System Syntax
UNIX
Windows
prostrct qualifier db-name [ structure-description-file ]](https://image.slidesharecdn.com/progress-database-administration-guide-and-reference3170-130618021328-phpapp01/85/Progress-OpenEdge-database-administration-guide-and-reference-480-320.jpg)

![PROSTRCT ADD Qualifier
19–56
PROSTRCT ADD Qualifier
Appends the files from a new structure description (ST) file to a Progress database. For
example, you can use PROSTRCT ADD to add new storage areas and extents to new or existing
storage areas.
SYNTAX
db-name
Specifies the database you are using.
structure-description-file
Specifies the new structure description (ST) file. Do not use db-name.st.
NOTES
• You can use PROSTRCT ADD to add areas and extents only when the database is offline.
• The new structure description file cannot identify existing extent files. It can only contain
the definitions for new extent files. See Chapter 4, “Creating and Deleting Databases,” for
a complete description of structure description (ST) files and storage areas.
Operating
System Syntax
UNIX
Windows prostrct add db-name [ structure-description-file ]](https://image.slidesharecdn.com/progress-database-administration-guide-and-reference3170-130618021328-phpapp01/85/Progress-OpenEdge-database-administration-guide-and-reference-482-320.jpg)
![PROSTRCT BUILDDB Qualifier
19–57
PROSTRCT BUILDDB Qualifier
Re-creates a control area from the structure description (ST) of an existing database. Use to
recover when an existing database control (DB) area is lost or damaged.
SYNTAX
db-name
Specifies the database you are using.
structure-description-file
Specifies the existing structure description (ST) file.
NOTES
• BUILDDB does only minimal validation of the resulting control area.
Operating
System Syntax
UNIX
Windows prostrct builddb db-name [ structure-description-file ]](https://image.slidesharecdn.com/progress-database-administration-guide-and-reference3170-130618021328-phpapp01/85/Progress-OpenEdge-database-administration-guide-and-reference-483-320.jpg)
![PROSTRCT CREATE Qualifier
19–58
PROSTRCT CREATE Qualifier
Creates a void Progress database from a previously defined structure description (ST) file. The
newly created database does not contain any Progress metaschema information. Rather, it
consists of the database control (DB) area and whatever primary recovery (BI), after-image
(AI), two-phase commit transaction log (TL), and application data (Dn) areas you defined in the
ST file.
After you create a void database, you must add metaschema information. Therefore, Progress
provides empty databases each the size of a supported database block size. The empty database
and the database you want to copy it to must have the same block size.
NOTE: Never use operating system file commands to copy a Progress Version 9 database.
Instead, use the PROCOPY or PRODB utilities.
SYNTAX
db-name
Specifies the Progress database you want to create.
structure-description-file
Specifies the structure description (ST) file you want Progress to access for file
information.
-blocksize
Specifies the Progress database block size in bytes (for example -blocksize 1024). The
maximum number of indexes allowed in a database is based on the database blocksize. For
more information of database limits, see Chapter 3, “Progress Database Limits.”
Operating
System
Syntax
UNIX
Windows
prostrct create db-name [ structure-description-file ]
[ -blocksize blocksize ]](https://image.slidesharecdn.com/progress-database-administration-guide-and-reference3170-130618021328-phpapp01/85/Progress-OpenEdge-database-administration-guide-and-reference-484-320.jpg)

![PROSTRCT LIST Qualifier
19–60
PROSTRCT LIST Qualifier
Creates a structure description (ST) file for a Progress database. It provides storage area,
transaction log, and records per block information in the structure description (ST) file it
produces. Also, PROSTRCT LIST displays storage area names and extent information
including the extent type, size, number, and name.
SYNTAX
db-name
Specifies the multi-volume database whose structure description file you want to update.
structure-description-file
Specifies the structure description file Progress creates. If you do not specify the structure
description file, Progress uses the base name of the database and appends a .st extension.
It replaces an existing file of the same name.
NOTES
• You can use this utility with an online database.
• Use PROSTRCT LIST any time you make changes to the structure of the database to
verify that the change was successful.
• See Chapter 9, “Maintaining Database Structure,” for more information about the LIST
qualifier with the PROSTRCT utility.
Operating
System Syntax
UNIX
Windows prostrct list db-name [ structure-description-file ]](https://image.slidesharecdn.com/progress-database-administration-guide-and-reference3170-130618021328-phpapp01/85/Progress-OpenEdge-database-administration-guide-and-reference-486-320.jpg)


![PROSTRCT REPAIR Qualifier
19–63
PROSTRCT REPAIR Qualifier
Updates a database’s control information after an extent is moved or renamed.
SYNTAX
db-name
Specifies the database you are using.
structure-description-file
Specifies the structure description (ST) file containing the updated extent information. If
you omit the structure-description-file, PROSTRCT REPAIR uses the db-name.st
file to update the control information.
NOTES
• Start with a current copy of the database ST file.
• The .st extension on the new structure description file is optional.
• You cannot use the REPAIR qualifier to add or remove extents. You can only use it to
change the location of existing extents.
• You must manually move the .db file or the data extent. PROSTRCT REPAIR simply
updates the file list of the .db file to reflect the new locations of database extents.
Operating
System Syntax
UNIX
Windows prostrct repair db-name [ structure-description-file ]](https://image.slidesharecdn.com/progress-database-administration-guide-and-reference3170-130618021328-phpapp01/85/Progress-OpenEdge-database-administration-guide-and-reference-489-320.jpg)


![PROSTRCT UNLOCK Qualifier
19–66
PROSTRCT UNLOCK Qualifier
Allows you to access a damaged database structure and correct inconsistencies between the
creation date and the open date in the database file header block and the master block. This is
especially useful when trying to force open a database or when recovering a lost database file.
CAUTION: Use this utility as a last resort. Call Progress Software Technical Support for
further direction.
SYNTAX
db-name
Specifies the database where you want to force access.
-extents
Replaces missing extents with empty extents if any database files are missing.
NOTES
• When Progress finds an inconsistency among the data and recovery log, it generates an
error message and stops any attempt to open the database. Typically, inconsistencies
between files are a result of accidental misuse of operating system copy utilities, deletion
mistakes, or incorrectly administered backup and restore procedures.
• If the first data file (.d1) is missing, the database cannot open because of the missing
master block. PROSTRCT UNLOCK with the -extents parameter, however, creates an
empty file with the same name and location as the missing file that allows the database to
open. This function helps enable access to a severely damaged database.
• PROSTRCT UNLOCK does not repair damaged databases. It opens databases with
inconsistencies in dates and missing extents, but these databases still need to be repaired
before they can be used. For information on repairing databases, see the “Restoring a
Database” section in Chapter 7, “Backing Up a Database.”
Operating
System Syntax
UNIX
Windows prostrct unlock db-name [ -extents ]](https://image.slidesharecdn.com/progress-database-administration-guide-and-reference3170-130618021328-phpapp01/85/Progress-OpenEdge-database-administration-guide-and-reference-492-320.jpg)


![PROUTIL 2PHASE BEGIN Qualifier
19–71
PROUTIL 2PHASE BEGIN Qualifier
Enables two-phase commit for a Progress database.
SYNTAX
db-name
Specifies the database you are using.
-crd
Specifies that the database receive top priority when Progress assigns a coordinator
database. If you do not specify a database, Progress randomly assigns a coordinator
database from the available databases.
Specifying a single coordinator database can greatly simplify the process of resolving
limbo transactions because Progress does not have to consult several different
coordinating databases.
-tp nickname
Identifies a unique nickname or alternate name that Progress uses to identify the
coordinator database. If you do not specify a nickname, Progress automatically assigns the
name of the database without the .db extension as the nickname.
Specifying a nickname simplifies resolving limbo transactions when two databases have
the same pathname but are on different machines.
Operating
System
Syntax
UNIX
Windows
proutil db-name -C 2phase begin [ -crd | -tp nickname ] ...](https://image.slidesharecdn.com/progress-database-administration-guide-and-reference3170-130618021328-phpapp01/85/Progress-OpenEdge-database-administration-guide-and-reference-497-320.jpg)


![PROUTIL 2PHASE MODIFY Qualifier
19–75
PROUTIL 2PHASE MODIFY Qualifier
Changes the nickname or priority of a Progress database for two-phase commit.
SYNTAX
db-name
Specifies the database you are using.
-crd
Switches whether or not the database can serve as a coordinator database. If you specify
-crd against a database that is a candidate for coordinator database, it is no longer a
candidate. If you specify -crd against a database that is not a candidate, it becomes a
candidate.
-tp nickname
Identifies a new nickname for the coordinator database.
Specifying a nickname simplifies resolving limbo transactions when two databases have
the same pathname but are on different machines.
Operating
System
Syntax
UNIX
Windows
proutil db-name -C 2phase modify [ -crd | -tp nickname ] ...](https://image.slidesharecdn.com/progress-database-administration-guide-and-reference3170-130618021328-phpapp01/85/Progress-OpenEdge-database-administration-guide-and-reference-501-320.jpg)

![PROUTIL BIGROW Qualifier
19–77
PROUTIL BIGROW Qualifier
Specifies the number of BI clusters to preformat for a database.
SYNTAX
db-name
Specifies the database where you want to create BI clusters.
n
Specifies the number of BI clusters to create for the specified database. Note that Progress
creates 4 BI clusters at startup. If you specify a BIGROW value of 5, then you will have a
total of 9 BI clusters.
-r
Nonreliable I/O startup parameter; turns off reliability.
NOTES
• You can calculate the number of BI clusters for a database by dividing the BI file physical
size by the BI cluster size. For example, a database BI file with a BI cluster size of 128K
and a physical size of 917,504 has 7 BI clusters.
• By default, Progress creates 4 BI clusters at startup.
• The database must be offline to use the BIGROW qualifier.
• Use the BIGROW qualifier immediately after truncating the BI file.
• See Chapter 14, “Managing Performance,” for information about using the BIGROW
qualifier.
Operating
System Syntax
UNIX
Windows
proutil db-name -C bigrow n [ -r ]](https://image.slidesharecdn.com/progress-database-administration-guide-and-reference3170-130618021328-phpapp01/85/Progress-OpenEdge-database-administration-guide-and-reference-503-320.jpg)
![PROUTIL BULKLOAD Qualifier
19–78
PROUTIL BULKLOAD Qualifier
Loads data files into a database.
NOTE: The bulk loader works only with Progress databases. Some non-Progress databases
offer a similar bulk-loading tool. If such a tool is not available, use the standard load
option in the Progress Data Administration tool or Data Dictionary.
SYNTAX
db-name
Specifies the database you are using.
-yy n
Century Year Offsett startup parameter; n specifies a four-digit year (1900, for example)
that determines the start of a 100-year period in which any two-digit DATE value is
defined. The default is 1950, but the -yy n value must match the -yy n value used when
the data was dumped.
fd-file
Identifies the bulk loader description file you are using.
-Bn
Blocks in DataBase Buffers startup parameter; n specifies the number of blocks.
NOTE
You must create the bulk loader description file and load the data definitions (.df) files for the
database before you can run the Bulk Loader utility. See Chapter 13, “Dumping and Loading,”
for information about creating the bulk loader description file and loading data definitions files.
Operating
System Syntax
UNIX
Windows
proutil db-name [ -yy n ] -C BULKLOAD fd-file [ -Bn ]](https://image.slidesharecdn.com/progress-database-administration-guide-and-reference3170-130618021328-phpapp01/85/Progress-OpenEdge-database-administration-guide-and-reference-504-320.jpg)

![PROUTIL BUSY Qualifier
19–80
EXAMPLE
• This example shows how you might use the BUSY qualifier on UNIX in a script that tests
whether the database is busy:
proutil mydb -C busy
if [ $? != 0 ]
then
echo
echo "Do you want to use ‘proshut’ to force users off
the system?"
read ans
if [ "$ans" = y ]
then
proshut -by mydb
else
echo "Backup will not be performed."
exit
fi
fi
echo "Beginning backup."
# Backup procedure](https://image.slidesharecdn.com/progress-database-administration-guide-and-reference3170-130618021328-phpapp01/85/Progress-OpenEdge-database-administration-guide-and-reference-506-320.jpg)


![PROUTIL CONVCHAR Qualifier
19–84
PROUTIL CONVCHAR Qualifier
Converts a database’s character set or identifies a database’s character set (for undefined
databases). When converting a database’s character set, PROUTIL CONVCHAR converts all
of the textual data in the database.
SYNTAX
db-name
Specifies the database you are converting.
analyze
Scans the database and displays the fields that would be converted using the convert
function.
charscan
Searches every character field for the occurrence of any character from the provided
character list and reports the table name, field name, record ID of a match, and the total
number of occurrences. In addition, PROUTIL CONVCHAR CHARSCAN performs the
same analysis that PROUTIL CONVCHAR ANALYSIS performs.
If invalid data are entered with the charscan option, PROUTIL CONVCHAR generates
an error message and continues with the scan.
convert
Converts a database’s character data to the target code page and labels the database.
Operating
System
Syntax
UNIX
Windows
proutil db-name -C convchar [analyze|charscan|convert]
[codepage] [character-list]](https://image.slidesharecdn.com/progress-database-administration-guide-and-reference3170-130618021328-phpapp01/85/Progress-OpenEdge-database-administration-guide-and-reference-510-320.jpg)


![PROUTIL CONVFILE Qualifier
19–87
PROUTIL CONVFILE Qualifier
Converts a text file from one character set to any other character set.
SYNTAX
file-name
Specifies the name of the file you are converting or analyzing.
convert using table-name
Specifies the name of the file containing the conversion table. This file requires the
following format:
where source-codepage-name is the name of the character set of file-name, and
target-codepage-name is the name of the desired character set for file-name.
Operating
System
Syntax
UNIX
Windows
proutil -C convfile
{ file-name convert using table-name | file-name [analyze]}
# optional comment lines begin with the # character
SOURCE source-codepage-name
TARGET target-codepage-name
/*000-015*/000 001 002 003 004 005 006 007 008 009 010 011 012 013 014 015
/*016-031*/016 017 018 019 020 021 022 023 024 025 026 027 028 029 030 031
/*032-047*/032 033 034 035 036 037 038 039 040 041 042 043 044 045 046 047
.
.
.
/*240-255*/240 241 242 243 244 245 246 247 248 249 250 251 252 253 254 255](https://image.slidesharecdn.com/progress-database-administration-guide-and-reference3170-130618021328-phpapp01/85/Progress-OpenEdge-database-administration-guide-and-reference-513-320.jpg)


![PROUTIL DUMP Qualifier
19–94
PROUTIL DUMP Qualifier
Performs a binary dump of a database table to a file. PROUTIL DUMP writes data from a table
to a dump file. When the procedure finishes, it reports the number of records written to the dump
file.
SYNTAX
db-name
Specifies the database where the dump will occur. If the database is not within the current
working directory, you need to define the complete path.
owner-name
Specifies the owner of the table containing the data you want to dump. You must specify
an owner name unless the table’s name is unique within the database, or the table is owned
by “PUB.” By default, Progress 4GL tables are owned by PUB.
table-name
Specifies the name of the table containing the data you want to dump.
directory
Specifies the name of the target directory where the data will be dumped.
-index num
Specifies the index to use to dump the table’s contents. If you choose not to use this option,
the command uses the primary index to dump the table.
Operating
System Syntax
UNIX
Windows
proutil db-name -C dump [ owner-name.]table-name directory
[ -index num ]](https://image.slidesharecdn.com/progress-database-administration-guide-and-reference3170-130618021328-phpapp01/85/Progress-OpenEdge-database-administration-guide-and-reference-520-320.jpg)


![PROUTIL DUMPSPECIFIED
19–97
PROUTIL DUMPSPECIFIED
Performs a binary dump of a database field to a file.
SYNTAX
db-name
Specifies the database where the dump will occur. You must completely define the path.
owner-name
Specifies the owner of the table containing the data you want to dump. You must specify
an owner name unless the table’s name is unique within the database, or the table is owned
by “PUB.” By default, Progress 4GL tables are owned by PUB.
table-name
Specifies the name of the table containing the data you want to dump.
field-name
Specifies the name of the field containing the data you want to dump.
operator
Specifies the operator to be used: EQ (equals to), GT (greater than), LT (less than), GE
(greater than or equal to), or LE (less than or equal to).
field-value
Specifies the value against which the filed contents will be compared.
directory
Specifies the name of the target directory where the data will be dumped. A directory must
be specified.
Operating
System Syntax
UNIX
Windows
proutil db-name -C dumpspecified
[owner-name.]table-name.field-name operator field-value
directory](https://image.slidesharecdn.com/progress-database-administration-guide-and-reference3170-130618021328-phpapp01/85/Progress-OpenEdge-database-administration-guide-and-reference-523-320.jpg)


![PROUTIL IDXBUILD Qualifier
19–104
PROUTIL IDXBUILD Qualifier
Packs or consolidates index records to use disk space as efficiently as possible. It also:
• Compresses index blocks to minimize space usage.
• Activates deactivated indexes in the database.
• Repairs corrupted indexes in the database. (Index corruption is typically signaled by error
messages.)
SYNTAX
db-name
Specifies the database you are using.
all
Specifies that you want to rebuild all your indexes. PROUTIL automatically rebuilds all
your indexes without asking about disk space requirements.
If you do not specify all, the following menu appears:
Operating
System Syntax
UNIX
Windows
proutil db-name -C idxbuild [ all ]
[ -T dir-name ] [ -TB blocksize ]
[ -TM n] [ -B n ]
Index Rebuild Utility
------------------------
Select one of the following
All - Rebuild all of the indexes
Some - Rebuild only some of the indexes
Quit - Quit, do not rebuild
Enter your selection:](https://image.slidesharecdn.com/progress-database-administration-guide-and-reference3170-130618021328-phpapp01/85/Progress-OpenEdge-database-administration-guide-and-reference-530-320.jpg)


![PROUTIL IDXCHECK Qualifier
19–107
PROUTIL IDXCHECK Qualifier
Checks Progress database indexes to determine whether an index is corrupt, and if it is,
diagnoses the problem. This lets you know whether you have to perform an index rebuild before
actually running PROUTIL IDXBUILD.
SYNTAX
db-name
Specifies the database whose index you are checking.
all
Specifies that you want to check all your indexes.
If you do not specify all, the following menu appears:
The following table describes the options:
Operating
System Syntax
UNIX
Windows
proutil db-name -C idxcheck [ all ]
Index Check Utility
----------------------------
Select one of the following:
All - Check all the indexes
Some - Check only some of the indexes
Quit - Quit, do not check
Enter your selection:
Option Action
All Checks all the indexes.
Some Prompts you for the indexes you want to check.
Quit Quits without checking any indexes.](https://image.slidesharecdn.com/progress-database-administration-guide-and-reference3170-130618021328-phpapp01/85/Progress-OpenEdge-database-administration-guide-and-reference-533-320.jpg)

![PROUTIL IDXCOMPACT Qualifier
19–109
PROUTIL IDXCOMPACT Qualifier
Performs index compaction online. This is recommended when the PROUTIL IDXANALYS
utility indicates that space utilization of an index is reduced to 60% or less. Index compaction
increases space utilization of the index block to the compacting percentage specified by n.
SYNTAX
db-name
Specifies the source database name.
owner-name
Specifies the owner of the table containing the data you want to dump. You must specify
an owner name unless the table’s name is unique within the database, or the table is owned
by “PUB.” By default, Progress 4GL tables are owned by PUB.
table-name
Specifies the source table containing the source index to be compacted.
index-name
Specifies the source index to be compacted.
n
Specifies the degree of index compaction. You can specify an integer >=50 and <=100.
The default value is 80. If you do not specify n, 80 is used.
Operating
System Syntax
UNIX
Windows
proutil db-name -C idxcompact
[owner-name.]table-name.index-name [n]](https://image.slidesharecdn.com/progress-database-administration-guide-and-reference3170-130618021328-phpapp01/85/Progress-OpenEdge-database-administration-guide-and-reference-535-320.jpg)


![PROUTIL IDXMOVE Qualifier
19–114
PROUTIL IDXMOVE Qualifier
Moves an index from one application data area to another while the database remains online.
You might be able to improve performance by moving indexes that are heavily used to an
application data area on a faster disk.
The PROUTIL IDXMOVE utility operates in two phases:
• Phase 1: The new index is being constructed in the new area. The old index remains in the
old area, and all users can continue to use the index for read operations.
• Phase 2: The old index is being killed, and all the blocks of the old index are being
removed to the free block chain. For a large index, this phase might take a significant
amount of time. During this phase all operations on the index are blocked until the new
index is available; users accessing the index might experience a freeze in their
applications.
NOTE: The _UserStatus virtual system table displays the utility’s progress. For more
information see Chapter 9, “Maintaining Database Structure.”
SYNTAX
db-name
Specifies the name of the database containing the table.
owner-name
Specifies the owner of the table containing the data you want to dump. You must specify
an owner name unless the table’s name is unique within the database, or the table is owned
by “PUB.” By default, Progress 4GL tables are owned by PUB.
table-name
Specifies the source table containing the index to be moved.
Operating
System Syntax
UNIX
Windows
proutil db-name -C idxmove
[owner-name.]table-name.index-name area-name](https://image.slidesharecdn.com/progress-database-administration-guide-and-reference3170-130618021328-phpapp01/85/Progress-OpenEdge-database-administration-guide-and-reference-540-320.jpg)


![PROUTIL LOAD Qualifier
19–118
PROUTIL LOAD Qualifier
Performs a binary load of database contents.
SYNTAX
db-name
Specifies the database where you want to load the data. You must completely define the
path.
filename
Specifies the binary dump file that you want to load. You must completely define the path.
build indexes
Indicates that PROUITL LOAD will simultaneously build the indexes and perform the
load.
-TB n
Specifies that the index rebuild will be performed using Speed Sort. n indicates the
allocated block size, in kilobytes. For more information on the Speed Sort (-TB) parameter,
see the Progress Startup Command and Parameter Reference.
-TM n
Specifies the merge number. n indicates the number of blocks or streams to be merged
during the sort process. For more information on the Merge Number (-TM) parameter, see
the Progress Startup Command and Parameter Reference.
-T dir-name
Specifies the name of the directory in which the temporary files are stored. If you do not
use this parameter, PROUTIL places temporary files in the current working directory. For
more information about the Temporary Directory (-T) parameter, see the Progress Startup
Command and Parameter Reference.
Operating
System Syntax
UNIX
Windows
proutil db-name -C load filename [build indexes [-TB
blocksize] [-TM n] [-T dir-name] | [-SS
sort-file-directory-specification]]](https://image.slidesharecdn.com/progress-database-administration-guide-and-reference3170-130618021328-phpapp01/85/Progress-OpenEdge-database-administration-guide-and-reference-544-320.jpg)


![PROUTIL TABLEMOVE Qualifier
19–127
PROUTIL TABLEMOVE Qualifier
Moves a table and optionally its associated indexes from one storage area to another while the
database remains online.
NOTE: The _UserStatus virtual system table displays the utility’s progress. For more
information see Chapter 9, “Maintaining Database Structure.”
SYNTAX
db-name
Specifies the name of the database containing the table.
owner-name
Specifies the owner of the table containing the data you want to dump. You must specify
an owner name unless the table’s name is unique within the database, or the table is owned
by “PUB.” By default, Progress 4GL tables are owned by PUB.
table-name
Specifies the name of the table to be moved.
table-area
Specifies the area name of the target application data area into which the table is to be
moved. Area names with spaces in the name must be quoted, for example, “Area Name.”
index-area
Optionally, specifies the name of the target index area. If the target index area is supplied,
the indexes will be moved to that area. Otherwise they will be left in their existing location.
You can move indexes to an area other than the area to which the table is being moved.
Area names with spaces in the name must be quoted, for example, “Area Name”.
Operating
System Syntax
UNIX
Windows
proutil db-name -C tablemove
[owner-name.]table-name table-area [index-area]](https://image.slidesharecdn.com/progress-database-administration-guide-and-reference3170-130618021328-phpapp01/85/Progress-OpenEdge-database-administration-guide-and-reference-553-320.jpg)


![PROUTIL TRUNCATE BI Qualifier
19–132
PROUTIL TRUNCATE BI Qualifier
Performs three functions:
• Uses the information in the before-image (BI) files to bring the database and after-image
(AI) files up to date, waits to verify that the information has been successfully written to
the disk, then truncates the before-image file to its original length.
• Sets the BI cluster size using the Before-image Cluster Size (-bi) parameter.
• Sets the BI block size using the Before-image Block Size (-biblocksize) parameter.
SYNTAX
db-name
Specifies the database you are using.
-G n
Specifies the number of seconds the TRUNCATE BI qualifier waits after bringing the
database and AI files up to date and before truncating the BI file. The default wait period
is 60 seconds. You might specify a shorter period for practice or test purposes. However,
do not do so for any significant database, because a system crash could damage the
database if the BI file is truncated before the writes to the database and AI files are flushed
from the operating system buffer cache.
-bi size
Specifies the size of the cluster in kilobytes. The number must be a multiple of 16 ranging
from 16 to 262,128 (16K to 256MB). The default cluster size is 524K. If you use a value
that is not a multiple of 16, PROUTIL rounds the value up to the next multiple of 16.
-biblocksize size
Specifies the size of the BI blocks in each buffer in kilobytes. The valid values are 1, 2, 4,
8, and 16. The default -biblocksize is 8K. A value of 0 tells Progress to use the default
block size. The block size cannot be smaller than the database block size.
Operating
System Syntax
UNIX
Windows
proutil db-name -C truncate bi
{ [ -G n ] | -bi size | -biblocksize size }](https://image.slidesharecdn.com/progress-database-administration-guide-and-reference3170-130618021328-phpapp01/85/Progress-OpenEdge-database-administration-guide-and-reference-558-320.jpg)


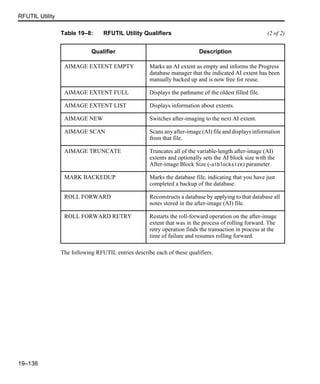


![RFUTIL AIMAGE EXTENT EMPTY Qualifier
19–142
RFUTIL AIMAGE EXTENT EMPTY Qualifier
Marks an AI extent as empty and informs the Progress database manager that the indicated AI
extent has been manually backed up and is now free for reuse.
SYNTAX
db-name
Specifies the database you are using.
extent-number
Specifies the number of the extent you want to mark as empty.
extent-path
Specifies the pathname of the extent you want to mark as empty.
NOTES
• Use RFUTIL AIMAGE EXTENT LIST or RFUTIL AIMAGE EXTENT FULL to
determine the extent-number or extent-pathname.
• If you do not specify either an extent number or an extent path, RFUTIL marks the oldest
full extent as empty.
Operating
System Syntax
UNIX
Windows
rfutil db-name -C aimage extent empty
[ extent-number | extent-path ]](https://image.slidesharecdn.com/progress-database-administration-guide-and-reference3170-130618021328-phpapp01/85/Progress-OpenEdge-database-administration-guide-and-reference-568-320.jpg)


![RFUTIL AIMAGE SCAN Qualifier
19–146
RFUTIL AIMAGE SCAN Qualifier
Scans any after-image (AI) file and displays information from that file.
SYNTAX
db-name
Specifies the database you are using.
verbose
Provides more information from the AI area, including the transaction number, the date
and time the transaction began or ended, and the user ID of the user who initiated the
transaction. You might want to try this on a small test AI area before running it on the
after-image file associated with your database.
-a ai-name
Identifies the AI area of the specified database.
NOTES
• The AIMAGE SCAN qualifier fails if:
– You omit the After-image area (-a) parameter
– It cannot open the AI area
• The specified database does not have to be the database that corresponds to the AI area.
You can use a dummy database to use this command with an AI area for an online
database.
Operating
System Syntax
UNIX
Windows
rfutil db-name -C aimage scan [ verbose ]
-a ai-name](https://image.slidesharecdn.com/progress-database-administration-guide-and-reference3170-130618021328-phpapp01/85/Progress-OpenEdge-database-administration-guide-and-reference-572-320.jpg)


![RFUTIL ROLL FORWARD Qualifier
19–150
RFUTIL ROLL FORWARD Qualifier
Reconstructs a database by applying to that database all notes stored in the after-image (AI) file.
The ROLL FORWARD qualifier displays the following information:
• The start and end dates of the AI area being applied to the database
• The number of completed transactions reapplied to the database
• The number of transactions that were active after all AI notes were applied.
SYNTAX
db-name
Specifies the database you are using.
verbose
Produces information for every note in the AI area.
-a ai-name
Identifies the AI area of the specified database.
endtime
Specifies to roll forward to a certain time. You must specify the ending time as a string of
digits and separate the date and time components with a colon. Transactions are included
in the partial roll forward only if they end before the specified time. For example, to roll
forward to 5:10 PM on July 18, 2002, type 2002:07:18:17:10:00. For Progress to include
a transaction in this partial roll forward, the transaction must have ended on or before
2002:07:18:17:09:59.
Operating
System Syntax
UNIX
Windows
rfutil db-name -C roll forward [ verbose ]
[ endtime yyyy:mm:dd:hh:mm:ss
| endtrans transaction-number
]
[ -B n ] [ -r ] -a ai-name](https://image.slidesharecdn.com/progress-database-administration-guide-and-reference3170-130618021328-phpapp01/85/Progress-OpenEdge-database-administration-guide-and-reference-576-320.jpg)

![RFUTIL ROLL FORWARD RETRY Qualifier
19–152
RFUTIL ROLL FORWARD RETRY Qualifier
Enhances the support of 24 X 7 database operations. The use of this qualifier is limited to
RFUTIL roll-forward operations that fail because of power outages or system failures. The
ROLL FORWARD RETRY qualifier restarts the roll-forward operation on the after-image
extent that was in the process of rolling forward. The retry operation finds the transaction in
process at the time of failure and resumes rolling forward. It recovers the (transaction log) TL
extents. Entries noting the use of the retry operation appear in the LG file of the database. If
subsequent failures occur during the retry operation, the retry operation can be restarted.
SYNTAX
db-name
Specifies the database you are using.
endtime
Specifies to roll forward to a certain point in time. You must specify the ending time as a
string of digits and separate the date and time components with a colon. Transactions are
included in the partial roll forward only if they end before the specified time. For example,
to roll forward to 5:10 PM on July 18, 2002, type 2002:07:18:17:10:00. For Progress to
include a transaction in this partial roll forward, the transaction must have ended on or
before 2002:07:18:17:09:59.
endtrans
Specifies to roll forward up to but not including the transaction beginning that contains the
transaction-number. For example, if you specify endtrans 1000, Progress rolls forward
the AI area to transaction 999. If you want to include transaction 1000, you must specify
endtrans 1001.
Operating
System Syntax
UNIX
Windows
rfutil db-name -C roll forward retry
[ endtime yyyy:mm:dd:hh:mm:ss
| endtrans transaction-number
]
[ -B n ] [ -r ] [ verbose ]
-a ai-area](https://image.slidesharecdn.com/progress-database-administration-guide-and-reference3170-130618021328-phpapp01/85/Progress-OpenEdge-database-administration-guide-and-reference-578-320.jpg)

![SQLDUMP Utility
19–154
SQLDUMP Utility
A command-line utility that dumps application data from SQL-92 tables into one or more files.
You can load the data from the files into another database with the SQLLOAD utility. The
SQLDUMP utility does not dump data from Progress 4GL tables.
Before you can execute SQLDUMP against a database server, the server must be configured to
accept SQL connections and must be running. See Chapter 4, “Creating and Deleting
Databases,” for instructions on creating a database and Chapter 5, “Starting Up and Shutting
Down,” for information about starting a Progress database or database server.
SYNTAX
-u user_name
Specifies the user id SQLDUMP used to connect to the database. If you omit the
user_name and password parameter values, SQLDUMP prompts you for the values. If you
omit user_name and supply a password, SQLDUMP uses the value defined in the USER
environment variable as the user_name value.
-a password
Specifies the password used by the database for authentication.
Operating
System Syntax
UNIX
Windows
sqldump -u user_name [ -a password ] [ -C code-page-name ]
-t [ owner_name.]table_name1
[ [,owner_name.]table_name2, ... ]
database_name](https://image.slidesharecdn.com/progress-database-administration-guide-and-reference3170-130618021328-phpapp01/85/Progress-OpenEdge-database-administration-guide-and-reference-580-320.jpg)


![SQLLOAD Utility
19–159
SQLLOAD Utility
A command-line utility that loads user data from a formatted file into an SQL-92 database.
Typically, the source file for the load is created by executing the SQLDUMP utility. The
SQLLOAD utility can process a source file created by another application or utility, if the
format of the file conforms to SQLLOAD requirements. The file extension made available to
SQLLOAD for processing must be .dsql. See the entry on SQLDUMP for a description of the
required file format.
Before you can execute SQLLOAD against a database server, the server must be configured to
accept SQL connections and must be running. See Chapter 4, “Creating and Deleting
Databases,” for instructions on creating a database and Chapter 5, “Starting Up and Shutting
Down,” for information about starting a Progress database or database server.
SYNTAX
-u user_name
Specifies the user SQLLOAD uses to connect to the database. If you omit the user_name
and password, SQLLOAD prompts you for these parameter values. If you omit the
user_name and supply a password, SQLLOAD uses the value defined in the USER
environment variable.
-a password
Specifies the password used by the database for authentication.
Operating
System Syntax
UNIX
Windows
sqlload -u user_name [ -a password ]
-t [ owner_name.]table_name1
[ [,owner_name.]table_name2, ... ]
[ -l log_file_name ]
[ -b badfile_name ]
[ -e max_errors ]
[ -s skipcount ]
[ -m maxrows ]
[ -F comma | quote ]
database_name](https://image.slidesharecdn.com/progress-database-administration-guide-and-reference3170-130618021328-phpapp01/85/Progress-OpenEdge-database-administration-guide-and-reference-585-320.jpg)


![SQLSCHEMA Utility
19–164
SQLSCHEMA Utility
A command-line utility that writes SQL-92 database schema components to an output file
selectively. You can capture table definitions including table constraints, views, stored
procedures including related privileges, and triggers. At the command line you specify which
components to dump. To load database schema information into a database, use the SQL
Explorer tool. See the Progress SQL-92 Guide and Reference for information about SQL
Explorer.
Before you can execute SQLSCHEMA against a database server, the server must be configured
to accept SQL connections and must be running. See Chapter 4, “Creating and Deleting
Databases,” for instructions on creating a database and Chapter 5, “Starting Up and Shutting
Down,” for information about starting a Progress database or database server.
SYNTAX
-u user_name
Specifies the user id that SQLSCHEMA employs to connect to the database. If you omit
the user_name and password, SQLSCHEMA prompts you for these values. If you omit
the user_name and supply a password, SQLSCHEMA uses the value defined by the USER
environment variable.
-a password
Specifies the password used by the database for authentication.
Operating
System Syntax
UNIX
Windows
sqlschema -u user_name [ -a password ]
[ -t [ owner_name.]table_name1
[,owner_name.]table_name2, ... ]
[ -p [ owner_name.] procedure_name, ... ]
[ -T [ owner_name.] trigger_name, ... ]
[ -g [ owner_name.]table_name, ... ]
[ -s [ owner_name.]table_name, ... ]
[ -o output_file_name ]
database_name](https://image.slidesharecdn.com/progress-database-administration-guide-and-reference3170-130618021328-phpapp01/85/Progress-OpenEdge-database-administration-guide-and-reference-590-320.jpg)


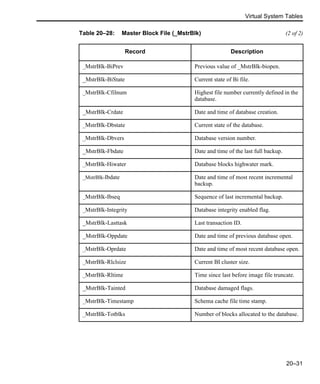


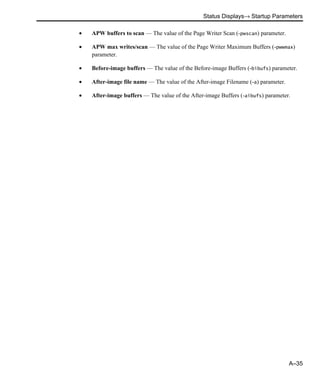


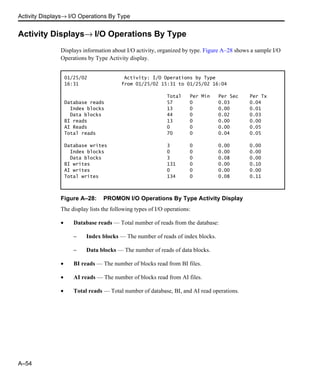


![Progress Database Administration Guide and Reference
B–6
Within ProControl you can choose to have the database server started automatically or not. If
you have only one cluster shared disk, you should allow ProControl to start the database servers
automatically when ProControl starts ProService.
However, if you have multiple cluster shared disks and you have chosen to have each node act
as the primary node for specific database servers, this approach is not recommended. At this
time, ProControl only knows three commands, Start, Stop, and Status. Therefore, if you have
database servers running on both nodes and if one node fails and those database servers failover
to the secondary node, you would have to Stop and Start ProControl in order to start the
automatic database server startup. Doing this disrupts current users of the secondary node.
In the single cluster shared disk model, ProControl should not be already running on the
nonprimary node. So, in a failover, you start ProControl with automatic database server startup
set and your database servers will be started for you.
Continue creating Failover Groups and adding/modifying ProControl for each database server
on each shared disk.
After this is done, use the Cluster Administrator to create Script Failover Objects to be placed
in your Progress Failover Groups. These script objects can be either actual scripts or the direct
command-line interface into ProControl. In either case, you must use the ProControl
command-line interface. The following sections describe the command-line interface and give
you some examples for scripts.
B.3.1 ProControl Command-line Interface
In order to start Progress database servers on an NT node, ProControl simply runs the PCCmd
command. This image controls either starting or stopping ProService and the various database
servers. For the entire syntax of the PCCmd command, see the Progress Startup Command and
Parameter Reference.
Within your scripts or script objects, use the following syntax and parameters based on your
requirements:
%DLC% is a system-wide environment variable defined during Progress installation. The
parameters to ppcmd.exe dictate what is done. The following is the list of parameters you will
need:
SYNTAX
%DLC%BINpccmd.exe P1 P2 [P3]](https://image.slidesharecdn.com/progress-database-administration-guide-and-reference3170-130618021328-phpapp01/85/Progress-OpenEdge-database-administration-guide-and-reference-708-320.jpg)
![Setting Up Progress To Utilize Compaq’s NT Clusters
B–7
P1 - Parameter 1
Use P1 to specify one of the following values for the type parameter:
• PROSERVICE for ProService options
• DATABASE for Database options
P2 - Parameter 2
Use P2 to specify one of the following values for the command parameter.
START to start either ProService or the Database Server named in P3.
STOP to stop either ProService or the Database Server named in P3.
STATUS to return one of the following:
• Current status of ProService or the Database Server in P3
• Use %ERRORLEVEL% to detect return status in script
• A return of 0 indicates request is running (started)
• A return of 1 indicates request is not running (stopped)
• Else, check if %DLC% is defined correctly.
[P3] - Parameter 3
Use [P3] to specify a value for the identifier parameter. [P3] is required if Parameter 1 is
DATABASE.
If a wrong parameter is passed to PCCmd, it will be signaled to the standard output and no action
will be taken.
EXAMPLES
Some command-line examples include:
A return of 0 from this call means ProService is already running:
%DLC%binpccmd.exe ProService Status
%DLC%binpccmd.exe ProService Start](https://image.slidesharecdn.com/progress-database-administration-guide-and-reference3170-130618021328-phpapp01/85/Progress-OpenEdge-database-administration-guide-and-reference-709-320.jpg)


The document is a guide and reference for Progress Database Administration. It discusses Progress database architecture, storage design, configuration variables, limits, and procedures for creating and deleting databases. The guide contains information to help plan, administer, and optimize Progress databases.


![[Think Next] Gói giải pháp bản địa hóa QAD ERP cho thị trường Việt Nam (VIE)](https://cdn.slidesharecdn.com/ss_thumbnails/thinknextvasandlocalizationsolutionqaderpforvietnamregionvn-210604023901-thumbnail.jpg?width=640&height=640&fit=bounds)
![[Think Next] VAS and Localization Solution QAD ERP for Vietnam Region (EN)](https://cdn.slidesharecdn.com/ss_thumbnails/thinknextvasandlocalizationsolutionqaderpforvietnamregionen-210604023735-thumbnail.jpg?width=640&height=640&fit=bounds)


![[Think Next] Cẩm nang làm việc từ xa work from home (WFH)](https://cdn.slidesharecdn.com/ss_thumbnails/thinknextwfh-210604020349-thumbnail.jpg?width=640&height=640&fit=bounds)