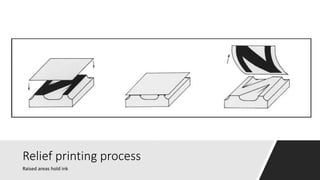
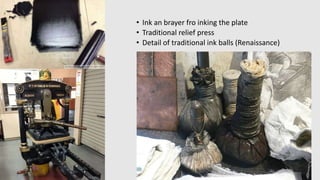
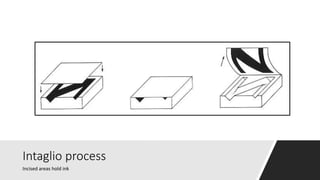
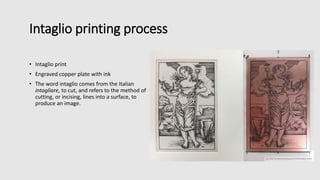
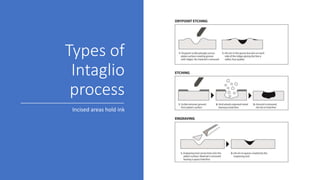
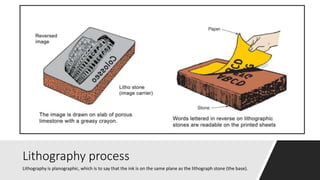
Image to Print History of Printing II
Image to print
How does that work? Relief Printing – Woodcut
Relief printing process
Raised areas hold ink
Wood Cut Relief Printing Process
• Wooden plate with ink
• Woodcut print
• Woodcuts are relief prints – like
lino cuts.
https://21stcenturyrenaissanceprintmaker.wordpress.com/
• Ink an brayer fro inking the plate
• Traditional relief press
• Detail of traditional ink balls (Renaissance)
Renaissance Woodcut
Image to print
How does that work? Intaglio printing process
Intaglio process
Incised areas hold ink
Intaglio printing process
• Intaglio print
• Engraved copper plate with ink
• The word intaglio comes from the Italian
intagliare, to cut, and refers to the method of
cutting, or incising, lines into a surface, to
produce an image.
• Inking the plate
• Cleaning the surface of the plate
• Detail of the plate without ink
Detail of printing
Types of
Intaglio
process
Incised areas hold ink
The etching process
Abraham Bosse
Maniere de jetter leau forte sur la Planche
Engraving
France, 1645
The etching process
Image to print
How does that work? Lithography – Stone
Lithography process
Lithography is planographic, which is to say that the ink is on the same plane as the lithograph stone (the base).
Stone Lithography
Lithography, literally printing from stone, is a
printing process which was discovered around
1797 by Aloïs Senefelder in Southern Germany.
Technics Lithography is based on the principle
that water and grease repel each other. It works
as follows. A wax crayon or ink is used to draw
on a polished flat block of limestone which is
approximately 12 centimetres thick. The stone
is slightly porous an thus absorbs the grease
from the crayon or ink. Nitric acid is then
rubbed on the stone. The acid penetrates the
stone where there is no drawing and ensures
that no grease be absorbed in those areas.
After 24 hours the preparation is dry and the
stone ready for use. The drawing is removed
with turpentine but the grease from the crayon
or ink remains on the stone. The latter is
dampened with a moist sponge. The parts of
the stone where the drawing was are now
covered in grease and therefore repel the water
and remain dry. It is now possible to ink the
image any colour with an ink roller. The ink only
adheres to the dry parts of the stone. Once this
has been done, a sheet of paper is placed on
top of the stone and a press is applied with
great force. The result is a print. The stone is
again moistened and rolled with ink an this
process repeated until the required number of
prints have been made.
http://www.jeroen-hermkens.nl/en/about-lithography/
Color lithography
• In color lithographs, a different
stone is used for each colour. First, all
the prints are made with the first
colour. Then the second stone is
placed on the press and the second
colour is printed sheet by sheet on
top of the first colour. Then comes
the third colour, and so forth.
Stone Lithography
• There are a range of materials which can be
used to draw and paint onto the stone surface, all
of which contain grease, which absorbs into the
top layer of the stone.
• Examples of which are lithographic crayons,
rubbing block,(both ranging from hard to soft),
and lithographic tusche, (grease suspended in
water). Once processed, it is the drawn areas
which will print.
• Lithography begins with the application of the
art to the stone surface.
Processing the Stone
• The stone is processed using gum arabic, with a very
small amount of nitric acid.
• The purpose of the gum is to chemically separate the
image and the non-image areas, so that the greasy image
areas become water repellent or ‘hydrophobic’ and the
non-image areas be come water receptive or ‘hydrophilic’,
so that when printed, only the image areas receive the ink
and print.
• The stone is re-gummed with plain gum, buffed down to
a thin layer and dried.
• Non-drying black ink is then rolled onto the stone using
a nap roller, until the image in the stone is clearly visible,
re-damping the stone between rolls to keep the surface
from drying out.
• Once the image is fully rolled up, the stone is then dried
and dusted with french chalk, before a second gum arabic
etch is applied.
Printing the Stone
• First the stone is washed out and rolled up – as before. (The stone is
gummed and dried, then washed out with turps, and then the gum
washed off.)
• While the stone is damp, greasy printing ink is rolled on using either a
‘nap’ or a ‘glazed’ roller. The first few proofs are usually taken onto
newsprint, and after that damp paper is usually used to ensure the
maximum amount of detail is picked up from the stone.
• The paper is laid onto the stone, and a few sheets of newsprint packing
laid on top. The stone and paper are then rolled through the direct
transfer press, and the paper is then pulled back from the stone to
reveal the printed image.
http://www.leicesterprintworkshop.com/printmaking/step_by_step_guide_to_stone_lithography/
The lithographic process
Image to print
How does that work? Pochoir – Stencils as prints
Various applications of stencils through time.
Stencil process
Applying a pattern, design, words, to a surface, using
of a thin sheet of cardboard, metal, or other material
from which figures or letters have been cut out, a
coloring substance, ink, being rubbed, brushed, or
pressed over the sheet, passing through the
perforations and on to the surface.
Pochoir
• The use of stencils dates back to as early
as 500 C.E. and was also used in Europe
from the 1500’s onward to decorate
playing cards, postcards and to create
simple prints.
• It was, however, the increase in popularity
of Japanese prints in the middle of the
19th century that spurred the refinement
of the use of stencils culminating in the
development of pochoir.
• At the peak of its popularity in the early
20th century, there were as many as thirty
graphic design studios in France, each
employing up to 600 workers.
Pochoir was employed to create prints or to
add color to pre-existing prints.
Pochoir was primarily used to create prints
devoted to fashion, patterns, and architectural
design and is most often associated with Art
Nouveau and Art Deco. workers.
Pochoir
Multi Color
Silkscreen
Opaque ink printed in layers.

Printing processes

  • 1.
    Image to PrintHistory of Printing II
  • 2.
    Image to print Howdoes that work? Relief Printing – Woodcut
  • 3.
  • 4.
    Wood Cut ReliefPrinting Process • Wooden plate with ink • Woodcut print • Woodcuts are relief prints – like lino cuts. https://21stcenturyrenaissanceprintmaker.wordpress.com/
  • 5.
    • Ink anbrayer fro inking the plate • Traditional relief press • Detail of traditional ink balls (Renaissance)
  • 6.
  • 7.
    Image to print Howdoes that work? Intaglio printing process
  • 8.
  • 9.
    Intaglio printing process •Intaglio print • Engraved copper plate with ink • The word intaglio comes from the Italian intagliare, to cut, and refers to the method of cutting, or incising, lines into a surface, to produce an image.
  • 10.
    • Inking theplate • Cleaning the surface of the plate • Detail of the plate without ink
  • 11.
  • 12.
  • 13.
    The etching process AbrahamBosse Maniere de jetter leau forte sur la Planche Engraving France, 1645
  • 14.
  • 15.
    Image to print Howdoes that work? Lithography – Stone
  • 16.
    Lithography process Lithography isplanographic, which is to say that the ink is on the same plane as the lithograph stone (the base).
  • 17.
    Stone Lithography Lithography, literallyprinting from stone, is a printing process which was discovered around 1797 by Aloïs Senefelder in Southern Germany. Technics Lithography is based on the principle that water and grease repel each other. It works as follows. A wax crayon or ink is used to draw on a polished flat block of limestone which is approximately 12 centimetres thick. The stone is slightly porous an thus absorbs the grease from the crayon or ink. Nitric acid is then rubbed on the stone. The acid penetrates the stone where there is no drawing and ensures that no grease be absorbed in those areas. After 24 hours the preparation is dry and the stone ready for use. The drawing is removed with turpentine but the grease from the crayon or ink remains on the stone. The latter is dampened with a moist sponge. The parts of the stone where the drawing was are now covered in grease and therefore repel the water and remain dry. It is now possible to ink the image any colour with an ink roller. The ink only adheres to the dry parts of the stone. Once this has been done, a sheet of paper is placed on top of the stone and a press is applied with great force. The result is a print. The stone is again moistened and rolled with ink an this process repeated until the required number of prints have been made. http://www.jeroen-hermkens.nl/en/about-lithography/
  • 18.
    Color lithography • Incolor lithographs, a different stone is used for each colour. First, all the prints are made with the first colour. Then the second stone is placed on the press and the second colour is printed sheet by sheet on top of the first colour. Then comes the third colour, and so forth.
  • 19.
    Stone Lithography • Thereare a range of materials which can be used to draw and paint onto the stone surface, all of which contain grease, which absorbs into the top layer of the stone. • Examples of which are lithographic crayons, rubbing block,(both ranging from hard to soft), and lithographic tusche, (grease suspended in water). Once processed, it is the drawn areas which will print. • Lithography begins with the application of the art to the stone surface.
  • 20.
    Processing the Stone •The stone is processed using gum arabic, with a very small amount of nitric acid. • The purpose of the gum is to chemically separate the image and the non-image areas, so that the greasy image areas become water repellent or ‘hydrophobic’ and the non-image areas be come water receptive or ‘hydrophilic’, so that when printed, only the image areas receive the ink and print. • The stone is re-gummed with plain gum, buffed down to a thin layer and dried. • Non-drying black ink is then rolled onto the stone using a nap roller, until the image in the stone is clearly visible, re-damping the stone between rolls to keep the surface from drying out. • Once the image is fully rolled up, the stone is then dried and dusted with french chalk, before a second gum arabic etch is applied.
  • 21.
    Printing the Stone •First the stone is washed out and rolled up – as before. (The stone is gummed and dried, then washed out with turps, and then the gum washed off.) • While the stone is damp, greasy printing ink is rolled on using either a ‘nap’ or a ‘glazed’ roller. The first few proofs are usually taken onto newsprint, and after that damp paper is usually used to ensure the maximum amount of detail is picked up from the stone. • The paper is laid onto the stone, and a few sheets of newsprint packing laid on top. The stone and paper are then rolled through the direct transfer press, and the paper is then pulled back from the stone to reveal the printed image. http://www.leicesterprintworkshop.com/printmaking/step_by_step_guide_to_stone_lithography/
  • 22.
  • 23.
    Image to print Howdoes that work? Pochoir – Stencils as prints
  • 24.
    Various applications ofstencils through time.
  • 25.
    Stencil process Applying apattern, design, words, to a surface, using of a thin sheet of cardboard, metal, or other material from which figures or letters have been cut out, a coloring substance, ink, being rubbed, brushed, or pressed over the sheet, passing through the perforations and on to the surface.
  • 26.
    Pochoir • The useof stencils dates back to as early as 500 C.E. and was also used in Europe from the 1500’s onward to decorate playing cards, postcards and to create simple prints. • It was, however, the increase in popularity of Japanese prints in the middle of the 19th century that spurred the refinement of the use of stencils culminating in the development of pochoir. • At the peak of its popularity in the early 20th century, there were as many as thirty graphic design studios in France, each employing up to 600 workers.
  • 27.
    Pochoir was employedto create prints or to add color to pre-existing prints. Pochoir was primarily used to create prints devoted to fashion, patterns, and architectural design and is most often associated with Art Nouveau and Art Deco. workers. Pochoir
  • 29.