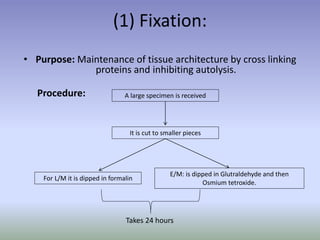
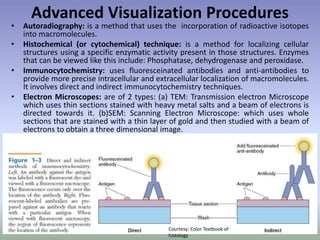
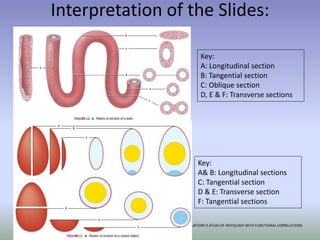
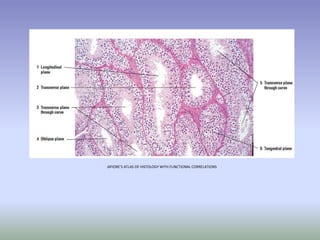
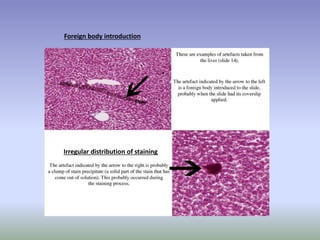
HISTOLOGY:
Made Absolutely
Easy
Objectives:
How to Use this Presentation:
• It serves as a great review – especially if you have
already read your text
• It is a great way to revise for your exam.
• As an adjunct to your regular classes.
• To clear any doubts that you may have
• I have basically tried to consolidate a lot of the data
about histology on the web in one place
Good Luck and Enjoy!!!
Table of Contents:
(a) The Tissues:
• Introduction to Histology
• The Cell
• Epithelial Tissue
• Connective Tissue
• Cartilage and Bone
• Blood
• Muscle Tissue
• Nervous Tissue
Table of Contents Contd.
(b) The Organs:
• Circulatory System
• Lymphoid System
• Integumantary System
• Digestive System
• Respiratory System
• Urinary System
• Endocrine System
• Male reproductive System
• Female Reproductive System
• Organs of special senses.
Introduction to Histology:
Definition of Histology:
“Histo” comes from Greek which
means “web” or “tissue”
Introduction To Microscopes:
Histology requires the use of “Microscopes” to view
the structures under increasing magnifications. This
requires preparation of slides that will then be
viewed under microscopes.
How to Prepare a Slide
In order to view the cellular components of a tissue, it has to be processed in a step
wise manner to produce a “slide” which can be viewed under a microscope.
Fixation
Dehydration
Embedding
Sectioning
Mounting Staining Observation
(Junqueira’s Basic Histology)
(1) Fixation:
• Purpose: Maintenance of tissue architecture by cross linking
proteins and inhibiting autolysis.
Procedure: A large specimen is received
It is cut to smaller pieces
For L/M it is dipped in formalin
E/M: is dipped in Glutraldehyde and then
Osmium tetroxide.
Takes 24 hours
(2) Dehydration & Clearing:
• Purpose: To remove all the water because the Paraffin
(embedding medium) is immiscible in water.
• Dehydration: Solution is placed in increasing concentrations
of alcohol beginning with 50% to 100%. Each step takes about
2 to 3 hours.
• Clearing: This involves removing the alcohol and replacing it
with a chemical that is miscible in both alcohol and paraffin.
The chemical is Xylene solution which will now infiltrate the
tissues. Smaller tissues take upto an hour. Larger ones require
2 to 4 hours.
(3) Embedding:
• Tissues are then placed in an oven containing liquid Paraffin
that “Infiltrates” it.
• The high temperatures of 52-60⁰C evaporates the Xylene.
• A block of Paraffin obtained.
• L/M: uses Paraffin and plastic resins.
• E/M : uses resins as embedding medium.
• Advantages of Paraffin: it stains reliably and is easy to work
with
• Disadvantages: slices cannot be cut very thinly.
(4) Sectioning:
• “Trimming” is the process in which excess
paraffin is removed from the block to expose
the tissue to be cut by the microtome.
• “Sectioning” involves using a machine
called a microtome that cuts sections very
thinly in the form of ribbons .
• Sections are cut from these ribbons and
mounted on to the glass slide.
• L/M: the sections are usually 5-10μm thick
• E/M: 0.02-0.1μm thick.
• The disadvantage of thick sections: Overlapping and therefore
decreased resolution.
(5) Mounting & Staining:
• Mounting: the thin sections obtained from the microtome are
mounted upon glass slides.
• Staining: The most common stains are Hematoxylin and Eosin.
Hematoxylin:
• Is a BASIC dye.
•It colors the “Acidic Components” of cells
giving them a bluish tint.
•Egs. Of structures stained by it are usually
protein rich areas like Nuclei, RER. And also
Extracellular matrix like the collagen matrix.
Eosin:
• Is an Acidic dye.
•It colors the “Basic Components” of cells
giving them a pinkish tint.
•Egs. cytoplasm, Collagen fibres,
Mitochondria, lysosomes, muscle, connective
tissue, colloid, red blood cells.
Nuclei are
stained with
hematoxylin
Remaining
cytoplasm stains
with Eosin
Nuclei are
stained with
hematoxylin
Muscle fibers
stained with
Eosin
Courtesy: Color Textbook of histology
Microscope: Types of Light Microscopes:
1. Bright-field microscopy: Widely used
by histology students. Involves use of
fixed and then stained slides to view
slides under an ordinary light.
2. Phase contrast microscopy: uses
modified objective lenses and
condenser to allow the viewing of
living tissue without prior fixing or
staining.
3. Fluorescence microscopy: used to
view inherently fluorescent substances
or those tissues that have been
labeled by fluorescent stains. Uses a
light of a different wavelength (UV
light) is focused onto the cells which in
turn emit light in the visible spectrum
that can be viewed.
4. Confocal microscopy: a bright-field
microscope uses large light source to
project light thus reducing the contrast
in the image and hence poor
resolution. The confocal microscope
therefore uses a small yet intense
source of light- the laser and also a
plate bearing a pin-hole aperture to
reduce scattering of light
Light microscope has a maximum resolving power
of approximately 0.2 μm. This power is sufficient to
magnify the image 1000-1500 times.
Different Parts of the Microscope:
Eyepiece: The lens through which the viewer looks at the specimen. Magnifies image
10X.
Body tube (Head): Connects the eyepiece to the objective lenses.
Arm: Connects the body tube to the base of the microscope.
Nosepiece: A rotating disc that bears objective lenses of varying magnifications.
Objective lenses: Used to magnify the specimen. A standard microscope has objective
lenses of 4X , 10X, 40X upto 100X.
Stage: The flat platform where the slide is placed.
Aperture: The hole in the center of the stage that allows light to reach the specimen.
Stage clips: Metal clips that hold the slide in place.
Iris diaphragm: Adjusts the amount of light that reaches the specimen.
Coarse adjustment: moves the stage up and down in greater increments.
Fine adjustment: Fine tunes the focus by the moving the stage in smaller increments.
Stage Control: Moves the stage left and right.
Condenser: Collects and focuses light from the illuminator onto the specimen.
Illumination: The light source for a microscope.
Base: Supports the microscope and bears the illumination.
On/off switch: Switch on the base of the microscope to turn the light source on and
off.
How to use a microscope:
1. Turn the light on, adjust the brightness.
2. Examine the slide by eye by viewing it through the eyepiece.
3. Put the x4 objective in position,
4. Put the slide on the stage,
5. Focus with the coarse focus knob
6. Once specimen is visible, then use the fine focus to clearly view it.
7. Fine-tune the condenser and the iris diaphragm to adjust the
amount of light reaching the specimen.
8. Examine the specimen.
9. Examine the slide with the x10 objective and x40 objective using the
steps 3-8 with the respective lenses.
10. Once finished replace the slide back in the slide box.
11. Turn off your microscope.
Advanced Visualization Procedures
• Autoradiography: is a method that uses the incorporation of radioactive isotopes
into macromolecules.
• Histochemical (or cytochemical) technique: is a method for localizing cellular
structures using a specific enzymatic activity present in those structures. Enzymes
that can be viewed like this include: Phosphatase, dehydrogenase and peroxidase.
• Immunocytochemistry: uses fluoresceinated antibodies and anti-antibodies to
provide more precise intracellular and extracellular localization of macromolecules.
It involves direct and indirect immunocytochemistry techniques.
• Electron Microscopes: are of 2 types: (a) TEM: Transmission electron Microscope
which uses thin sections stained with heavy metal salts and a beam of electrons is
directed towards it. (b)SEM: Scanning Electron Microscope: which uses whole
sections that are stained with a thin layer of gold and then studied with a beam of
electrons to obtain a three dimensional image.
Courtesy: Color Textbook of
histology
Interpretation of the Slides:
Key:
A: Longitudinal section
B: Tangential section
C: Oblique section
D, E & F: Transverse sections
Key:
A& B: Longitudinal sections
C: Tangential section
D & E: Transverse section
F: Tangential sections
diFIORE’S ATLAS OF HISTOLOGY WITH FUNCTIONAL CORRELATIONS
Artifacts in the Slides:• Are imperfections in the technique of slide preparation and must not be thought of as a
feature of the tissue.
• Wrinkles or folds: well-defined dense-staining regions in the section where detail is
obscured.
Foreign body introduction
Irregular distribution of staining
A torn slide:
Histology Made Easy: Chap 1: Introduction to Histology

Histology Made Easy: Chap 1: Introduction to Histology

  • 1.
  • 2.
    Objectives: How to Usethis Presentation: • It serves as a great review – especially if you have already read your text • It is a great way to revise for your exam. • As an adjunct to your regular classes. • To clear any doubts that you may have • I have basically tried to consolidate a lot of the data about histology on the web in one place Good Luck and Enjoy!!!
  • 3.
    Table of Contents: (a)The Tissues: • Introduction to Histology • The Cell • Epithelial Tissue • Connective Tissue • Cartilage and Bone • Blood • Muscle Tissue • Nervous Tissue
  • 4.
    Table of ContentsContd. (b) The Organs: • Circulatory System • Lymphoid System • Integumantary System • Digestive System • Respiratory System • Urinary System • Endocrine System • Male reproductive System • Female Reproductive System • Organs of special senses.
  • 5.
    Introduction to Histology: Definitionof Histology: “Histo” comes from Greek which means “web” or “tissue”
  • 6.
    Introduction To Microscopes: Histologyrequires the use of “Microscopes” to view the structures under increasing magnifications. This requires preparation of slides that will then be viewed under microscopes.
  • 7.
    How to Preparea Slide In order to view the cellular components of a tissue, it has to be processed in a step wise manner to produce a “slide” which can be viewed under a microscope. Fixation Dehydration Embedding Sectioning Mounting Staining Observation (Junqueira’s Basic Histology)
  • 8.
    (1) Fixation: • Purpose:Maintenance of tissue architecture by cross linking proteins and inhibiting autolysis. Procedure: A large specimen is received It is cut to smaller pieces For L/M it is dipped in formalin E/M: is dipped in Glutraldehyde and then Osmium tetroxide. Takes 24 hours
  • 9.
    (2) Dehydration &Clearing: • Purpose: To remove all the water because the Paraffin (embedding medium) is immiscible in water. • Dehydration: Solution is placed in increasing concentrations of alcohol beginning with 50% to 100%. Each step takes about 2 to 3 hours. • Clearing: This involves removing the alcohol and replacing it with a chemical that is miscible in both alcohol and paraffin. The chemical is Xylene solution which will now infiltrate the tissues. Smaller tissues take upto an hour. Larger ones require 2 to 4 hours.
  • 10.
    (3) Embedding: • Tissuesare then placed in an oven containing liquid Paraffin that “Infiltrates” it. • The high temperatures of 52-60⁰C evaporates the Xylene. • A block of Paraffin obtained. • L/M: uses Paraffin and plastic resins. • E/M : uses resins as embedding medium. • Advantages of Paraffin: it stains reliably and is easy to work with • Disadvantages: slices cannot be cut very thinly.
  • 11.
    (4) Sectioning: • “Trimming”is the process in which excess paraffin is removed from the block to expose the tissue to be cut by the microtome. • “Sectioning” involves using a machine called a microtome that cuts sections very thinly in the form of ribbons . • Sections are cut from these ribbons and mounted on to the glass slide. • L/M: the sections are usually 5-10μm thick • E/M: 0.02-0.1μm thick. • The disadvantage of thick sections: Overlapping and therefore decreased resolution.
  • 12.
    (5) Mounting &Staining: • Mounting: the thin sections obtained from the microtome are mounted upon glass slides. • Staining: The most common stains are Hematoxylin and Eosin. Hematoxylin: • Is a BASIC dye. •It colors the “Acidic Components” of cells giving them a bluish tint. •Egs. Of structures stained by it are usually protein rich areas like Nuclei, RER. And also Extracellular matrix like the collagen matrix. Eosin: • Is an Acidic dye. •It colors the “Basic Components” of cells giving them a pinkish tint. •Egs. cytoplasm, Collagen fibres, Mitochondria, lysosomes, muscle, connective tissue, colloid, red blood cells.
  • 13.
    Nuclei are stained with hematoxylin Remaining cytoplasmstains with Eosin Nuclei are stained with hematoxylin Muscle fibers stained with Eosin
  • 14.
  • 15.
    Microscope: Types ofLight Microscopes: 1. Bright-field microscopy: Widely used by histology students. Involves use of fixed and then stained slides to view slides under an ordinary light. 2. Phase contrast microscopy: uses modified objective lenses and condenser to allow the viewing of living tissue without prior fixing or staining. 3. Fluorescence microscopy: used to view inherently fluorescent substances or those tissues that have been labeled by fluorescent stains. Uses a light of a different wavelength (UV light) is focused onto the cells which in turn emit light in the visible spectrum that can be viewed. 4. Confocal microscopy: a bright-field microscope uses large light source to project light thus reducing the contrast in the image and hence poor resolution. The confocal microscope therefore uses a small yet intense source of light- the laser and also a plate bearing a pin-hole aperture to reduce scattering of light Light microscope has a maximum resolving power of approximately 0.2 μm. This power is sufficient to magnify the image 1000-1500 times.
  • 16.
    Different Parts ofthe Microscope: Eyepiece: The lens through which the viewer looks at the specimen. Magnifies image 10X. Body tube (Head): Connects the eyepiece to the objective lenses. Arm: Connects the body tube to the base of the microscope. Nosepiece: A rotating disc that bears objective lenses of varying magnifications. Objective lenses: Used to magnify the specimen. A standard microscope has objective lenses of 4X , 10X, 40X upto 100X. Stage: The flat platform where the slide is placed. Aperture: The hole in the center of the stage that allows light to reach the specimen. Stage clips: Metal clips that hold the slide in place. Iris diaphragm: Adjusts the amount of light that reaches the specimen. Coarse adjustment: moves the stage up and down in greater increments. Fine adjustment: Fine tunes the focus by the moving the stage in smaller increments. Stage Control: Moves the stage left and right. Condenser: Collects and focuses light from the illuminator onto the specimen. Illumination: The light source for a microscope. Base: Supports the microscope and bears the illumination. On/off switch: Switch on the base of the microscope to turn the light source on and off.
  • 17.
    How to usea microscope: 1. Turn the light on, adjust the brightness. 2. Examine the slide by eye by viewing it through the eyepiece. 3. Put the x4 objective in position, 4. Put the slide on the stage, 5. Focus with the coarse focus knob 6. Once specimen is visible, then use the fine focus to clearly view it. 7. Fine-tune the condenser and the iris diaphragm to adjust the amount of light reaching the specimen. 8. Examine the specimen. 9. Examine the slide with the x10 objective and x40 objective using the steps 3-8 with the respective lenses. 10. Once finished replace the slide back in the slide box. 11. Turn off your microscope.
  • 18.
    Advanced Visualization Procedures •Autoradiography: is a method that uses the incorporation of radioactive isotopes into macromolecules. • Histochemical (or cytochemical) technique: is a method for localizing cellular structures using a specific enzymatic activity present in those structures. Enzymes that can be viewed like this include: Phosphatase, dehydrogenase and peroxidase. • Immunocytochemistry: uses fluoresceinated antibodies and anti-antibodies to provide more precise intracellular and extracellular localization of macromolecules. It involves direct and indirect immunocytochemistry techniques. • Electron Microscopes: are of 2 types: (a) TEM: Transmission electron Microscope which uses thin sections stained with heavy metal salts and a beam of electrons is directed towards it. (b)SEM: Scanning Electron Microscope: which uses whole sections that are stained with a thin layer of gold and then studied with a beam of electrons to obtain a three dimensional image. Courtesy: Color Textbook of histology
  • 19.
    Interpretation of theSlides: Key: A: Longitudinal section B: Tangential section C: Oblique section D, E & F: Transverse sections Key: A& B: Longitudinal sections C: Tangential section D & E: Transverse section F: Tangential sections diFIORE’S ATLAS OF HISTOLOGY WITH FUNCTIONAL CORRELATIONS
  • 20.
    diFIORE’S ATLAS OFHISTOLOGY WITH FUNCTIONAL CORRELATIONS
  • 21.
    Artifacts in theSlides:• Are imperfections in the technique of slide preparation and must not be thought of as a feature of the tissue. • Wrinkles or folds: well-defined dense-staining regions in the section where detail is obscured.
  • 22.
    Foreign body introduction Irregulardistribution of staining
  • 23.