Downloaded 150 times

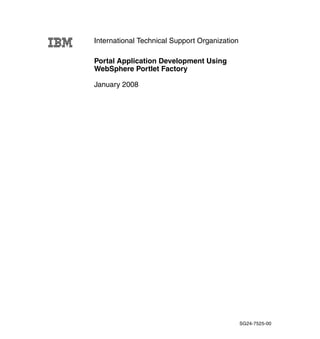
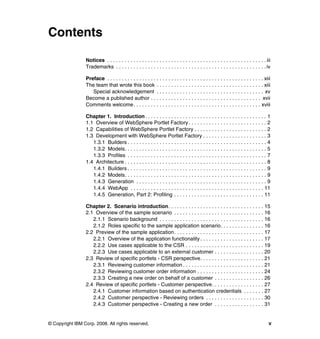
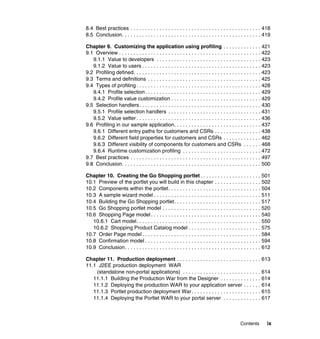


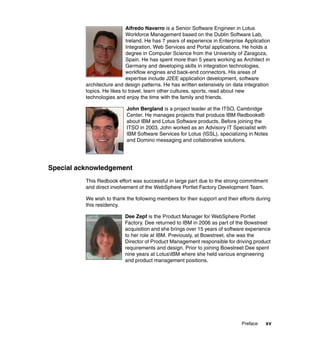

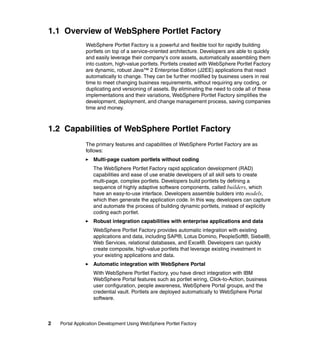
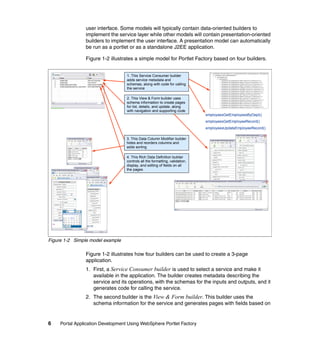
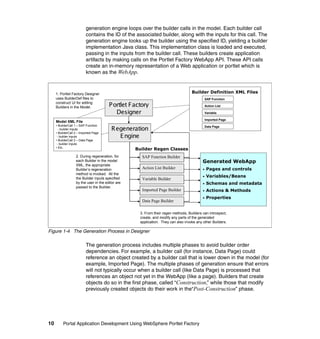

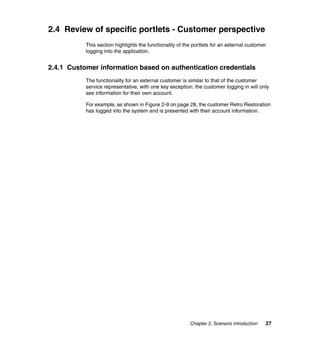

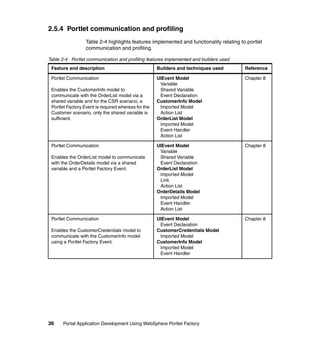

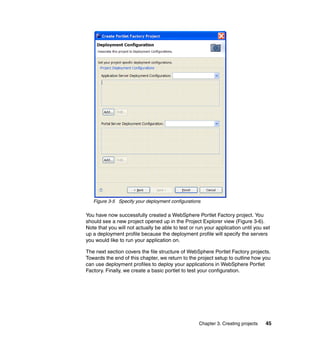
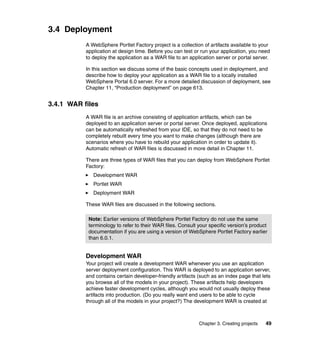

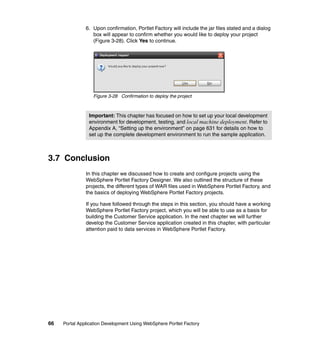

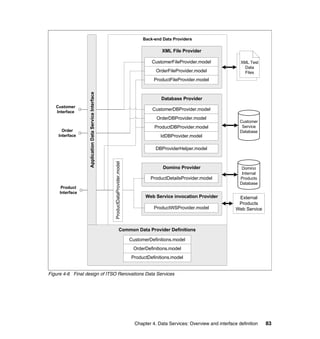
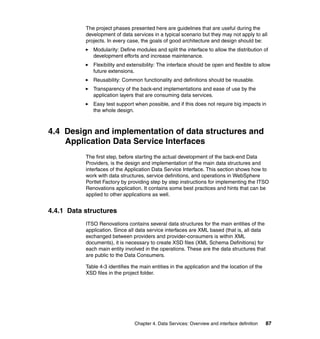

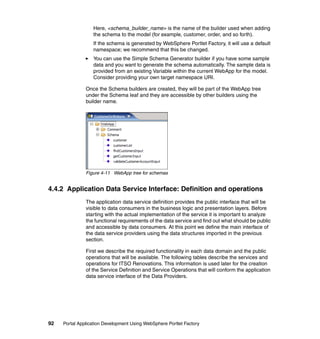
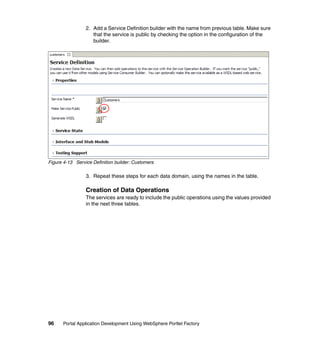
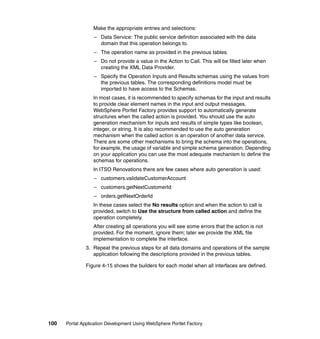

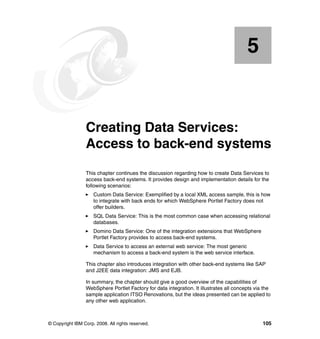

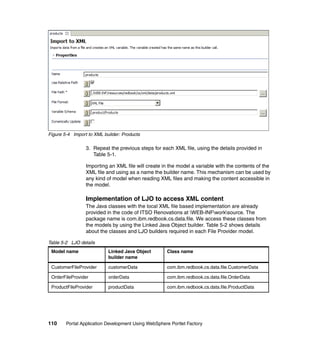

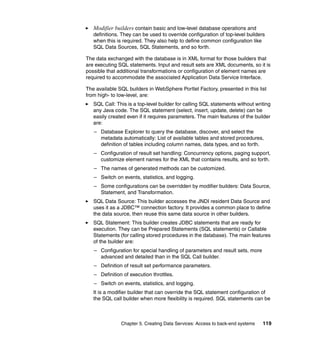
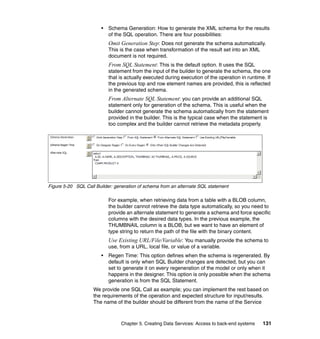
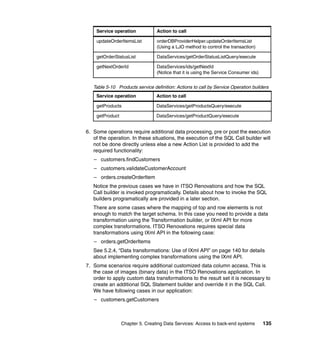
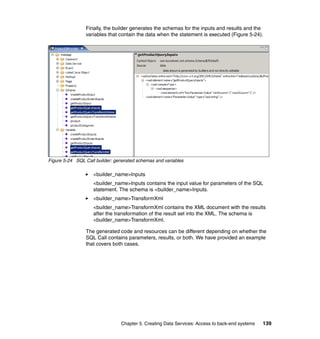
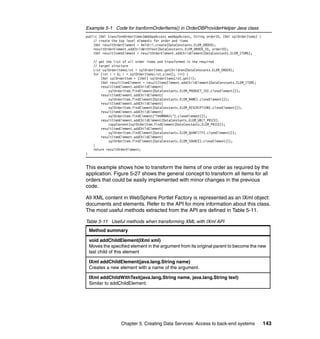
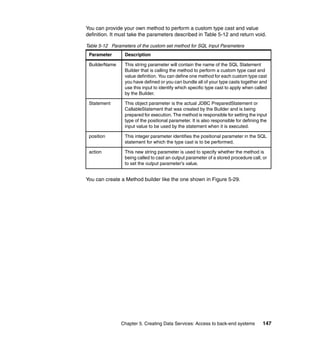

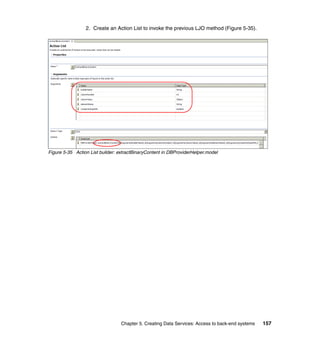
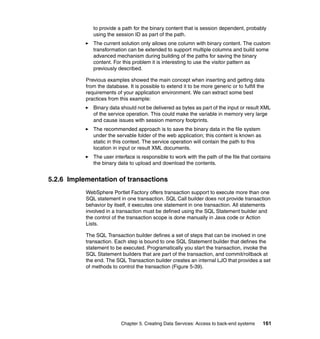
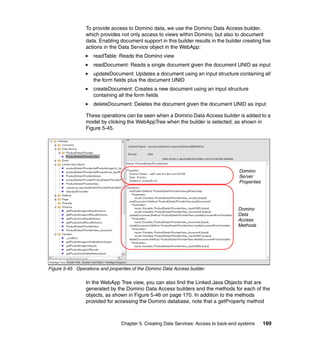
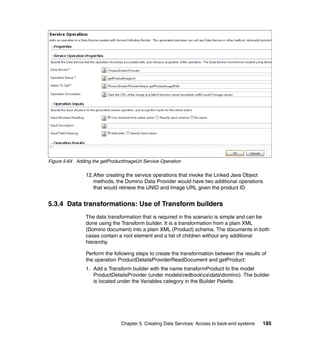
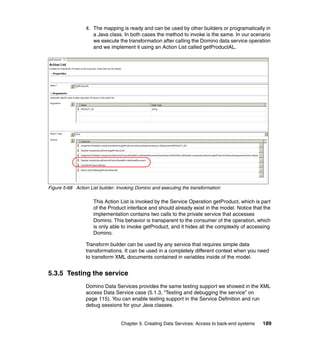
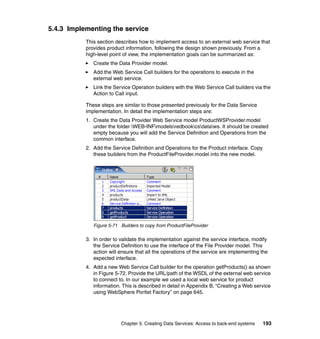
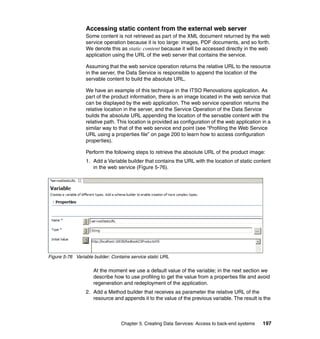
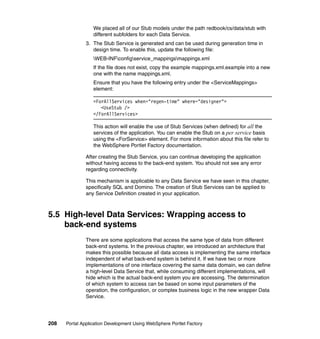
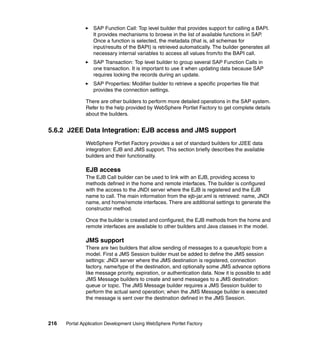
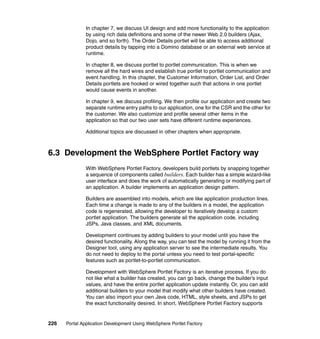
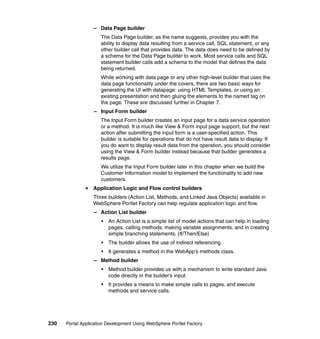
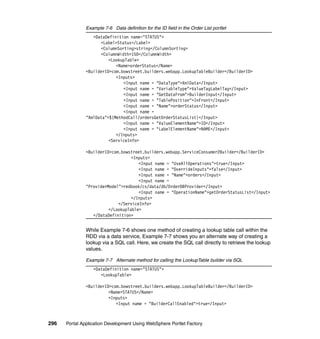
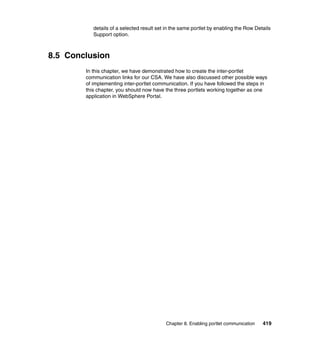
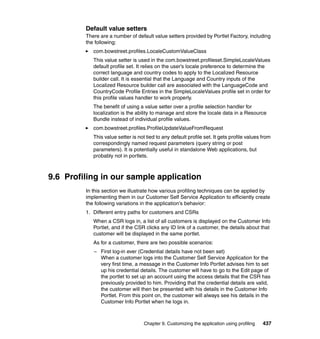
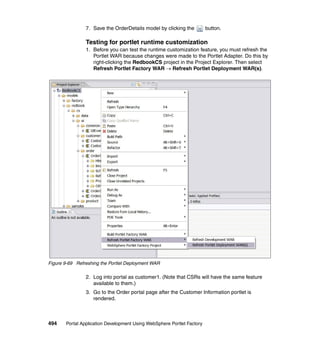
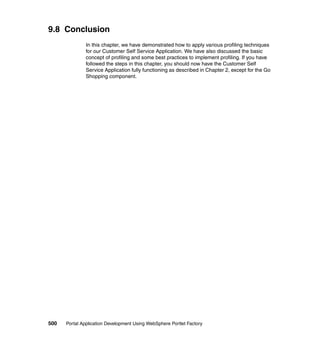
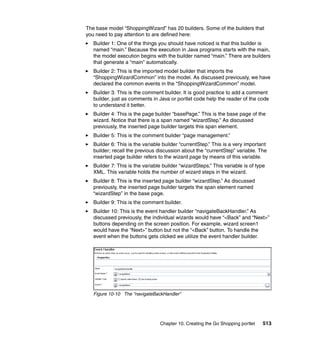
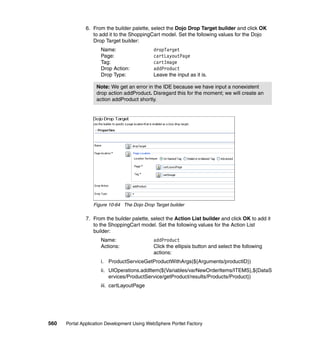
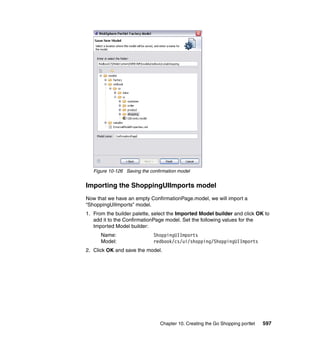
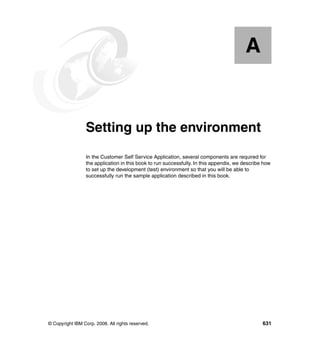
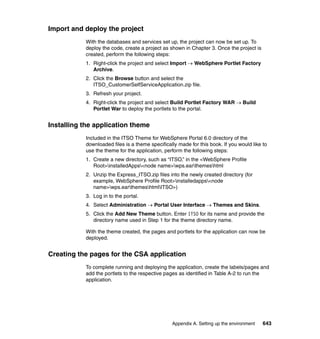
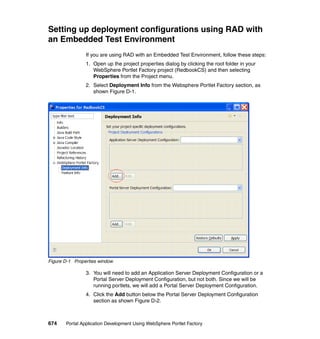
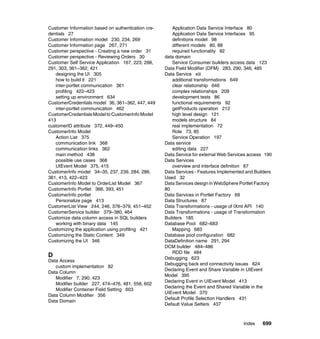
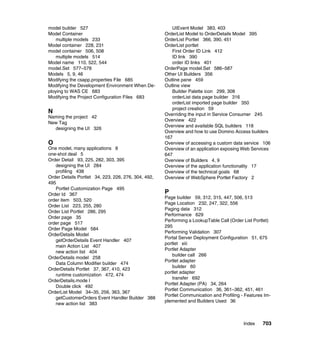
![As previously discussed, it is only possible to provide Method or Action List
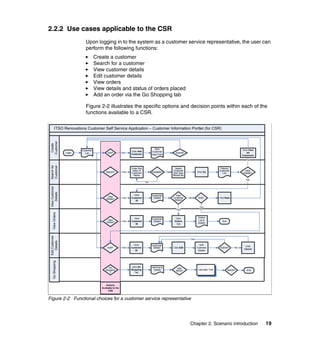
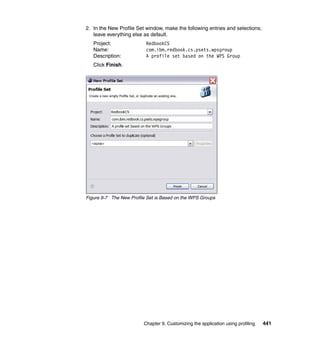
builder calls as Transform Method. Following the same design we introduced for
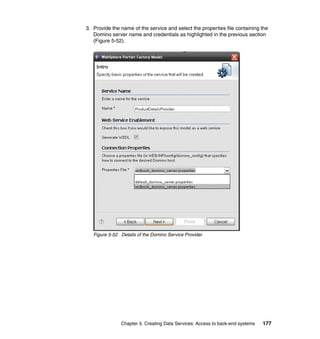
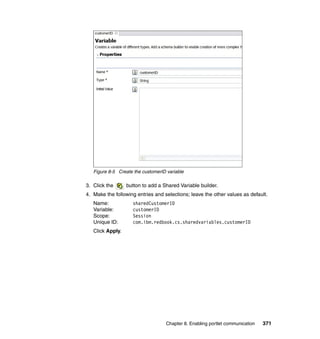
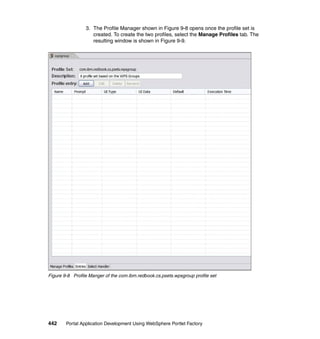
inserting a record with an image, the implementation steps for selecting binary
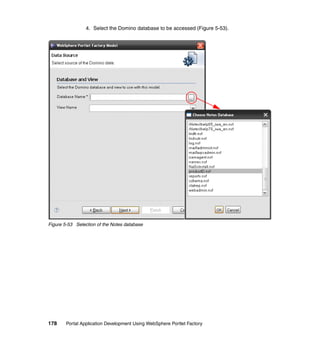
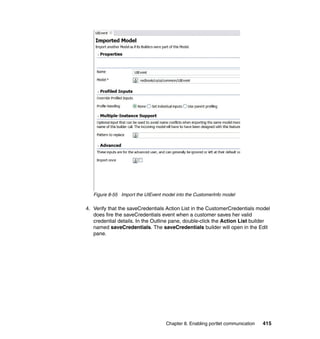
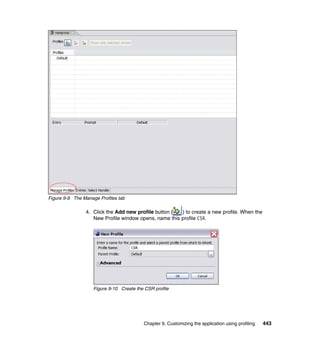
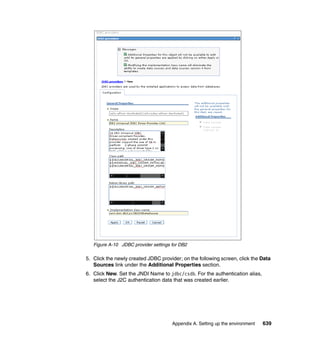
content are as follows:
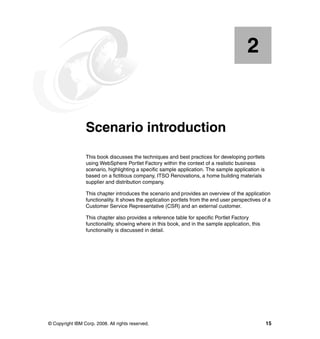
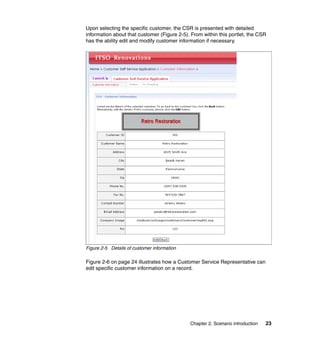
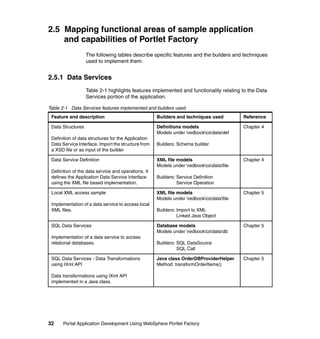
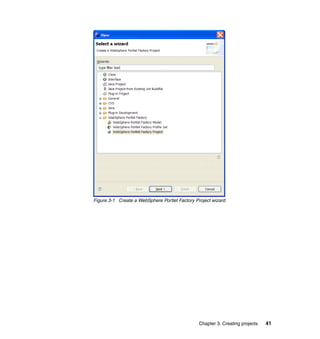
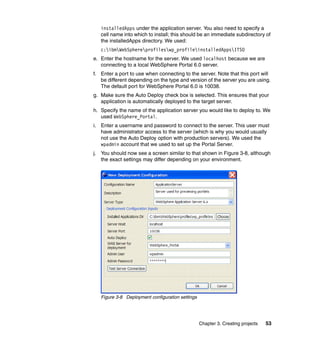
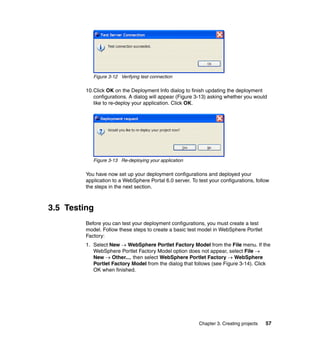
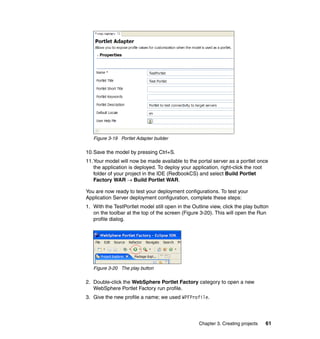
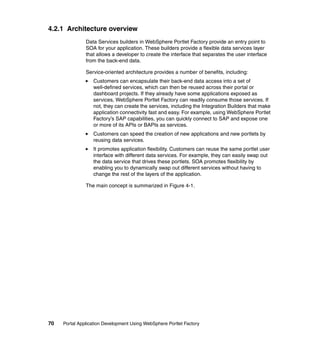
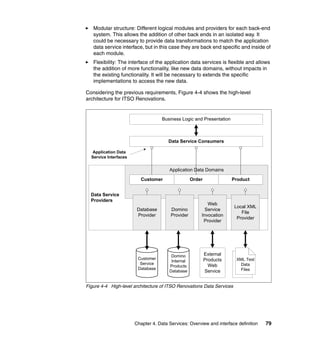
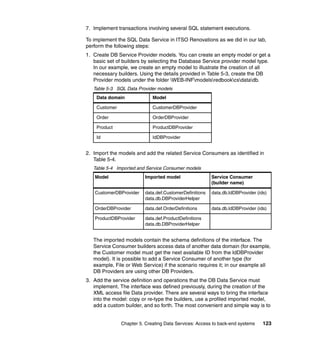
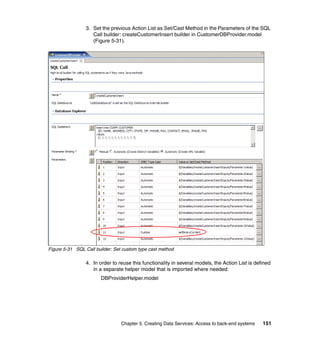
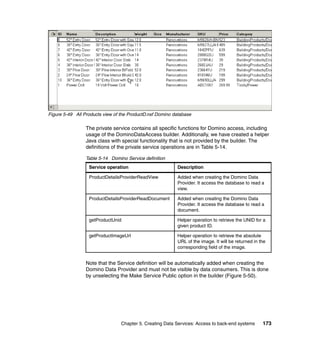
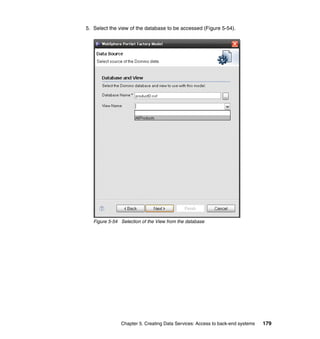
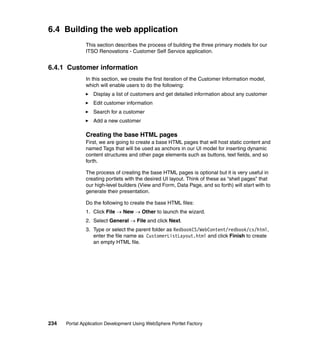
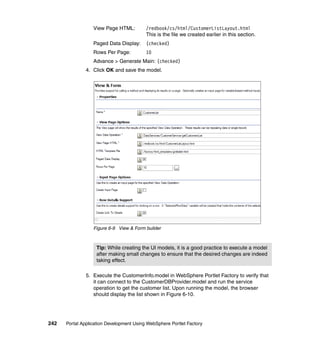
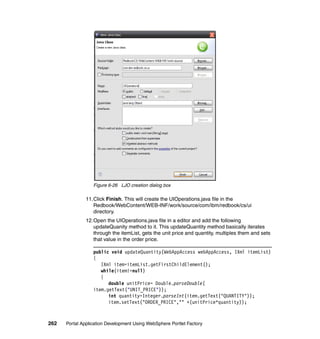
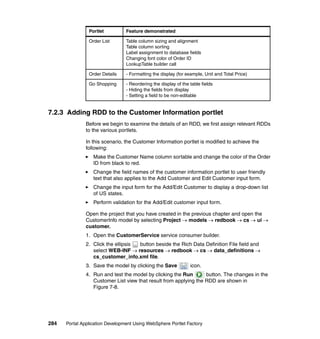
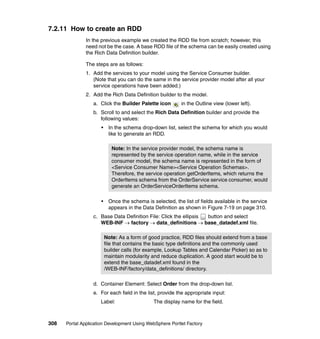
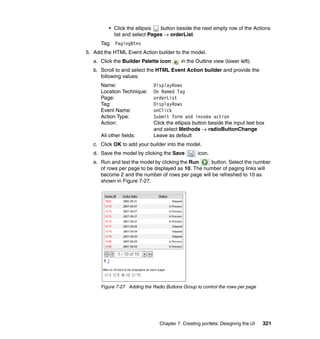
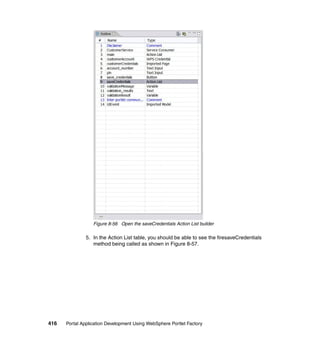
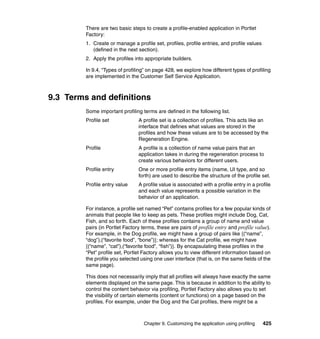
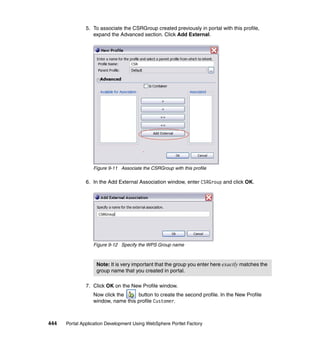
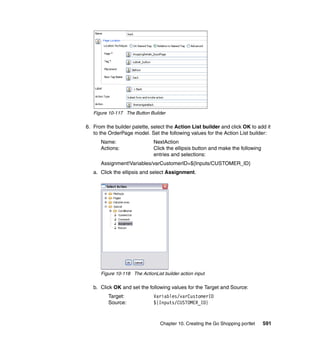
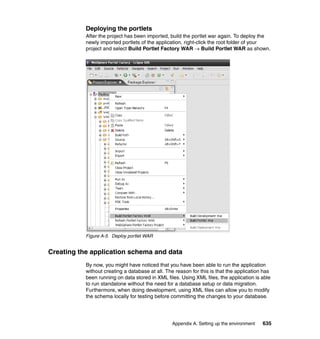
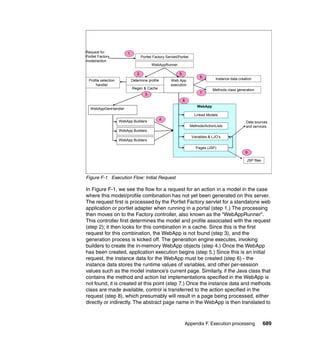
1. Implement the logic to extract the binary content in the DB helper Java class:
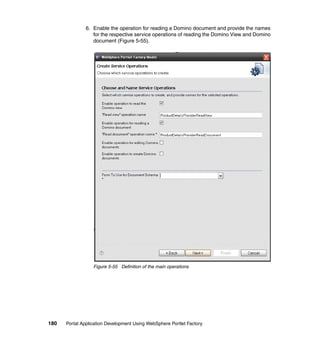
com.ibm.redbook.cs.data.db.DBProviderHelper.java.
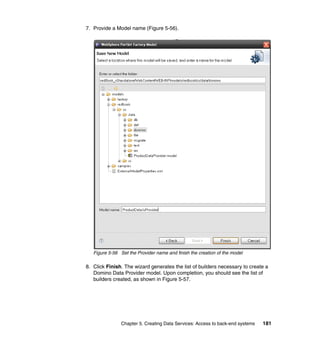
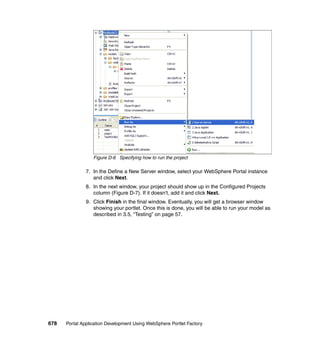
Example 5-3
public IXml extractBinaryContent(WebAppAccess webAppAccess, String builderName, int columnNumber,
Object columnValue, String elementName, boolean createVerboseXML) {
final IXml result = XmlUtil.create(elementName);
try {
switch (columnNumber) {
case 1:
webAppAccess.getVariables().setString("tmpContentPath",
builderName + "_" + Integer.toString(columnNumber)
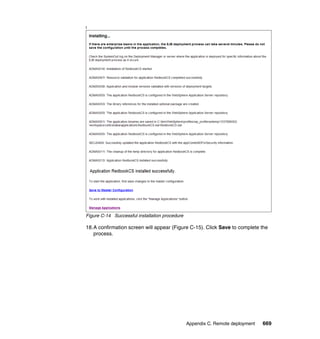
+ "_" + columnValue.toString() + ".tmp");
result.setText(columnValue.toString());
break;
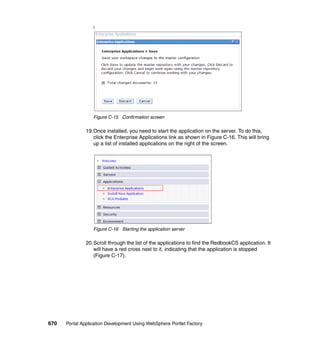
case 4:
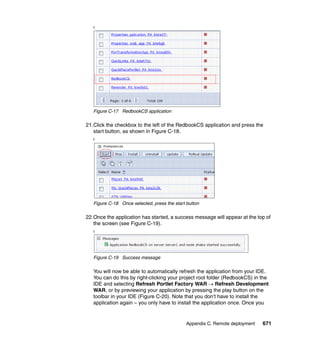
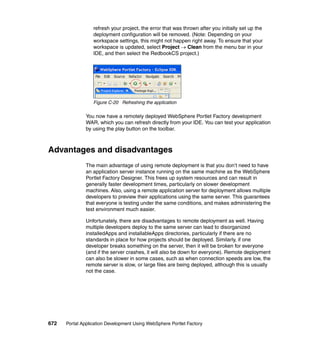
case 11:
final String filePath = webAppAccess.getVariables().getString("tmpContentPath");
// Extract the blob content and write it into the file.
final Blob blobContent = (Blob) columnValue;
if (blobContent != null) {
final InputStream inputStream = blobContent.getBinaryStream();
final byte[] buffer = new byte[4096];
int bytesRead = 0;
try {
final File file = new File(BSConfig.getHtmlRootDir() +
BINARY_TMP_PATH + "" + filePath);
final FileOutputStream outputStream = new FileOutputStream(file);
while ((bytesRead = inputStream.read(buffer)) > -1) {
outputStream.write(buffer, 0, bytesRead);
}
outputStream.close();
// Return a relative URL for the file just written.
result.setText(BINARY_TMP_URL + "/" + filePath);
}
catch (FileNotFoundException ex) {
// ignore if the file is not found, go on without binary content
}
}
break;
}
} catch (Exception e) {
throw new WebAppRuntimeException(e);
}
return result;
}
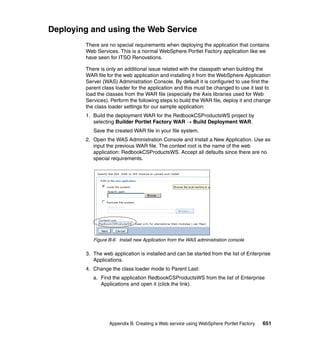
156 Portal Application Development Using WebSphere Portlet Factory](https://image.slidesharecdn.com/portalapplicationdevelopmentusingwebsphereportletfactorysg247525-111020070342-phpapp02/85/Portal-application-development-using-Websphere-Portlet-Factory-176-320.jpg)
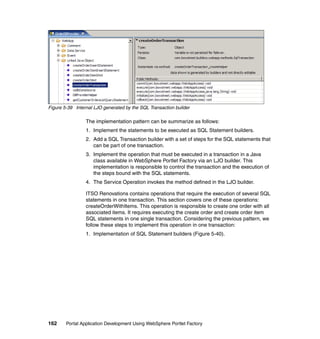
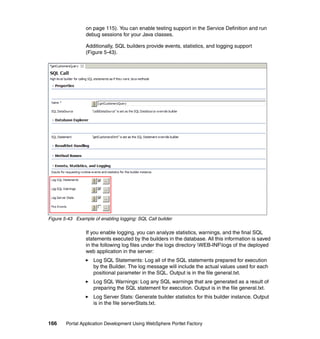
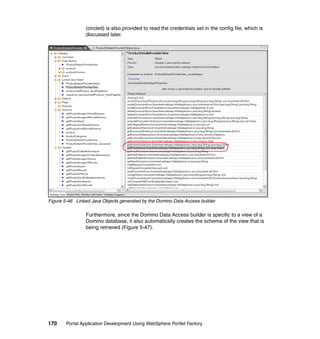
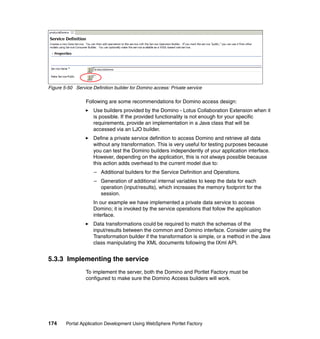
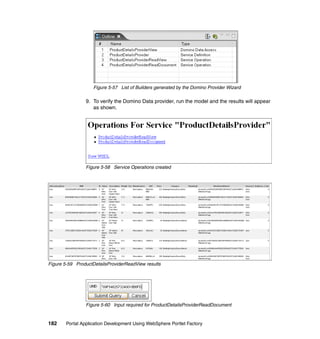
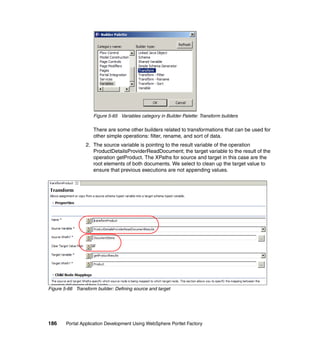
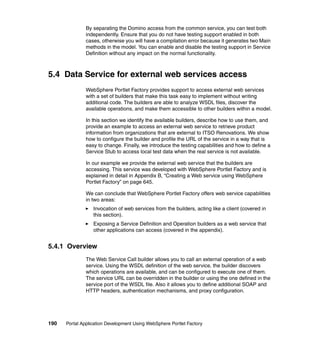
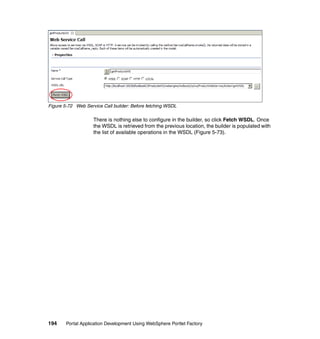
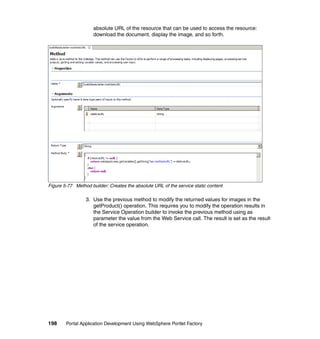


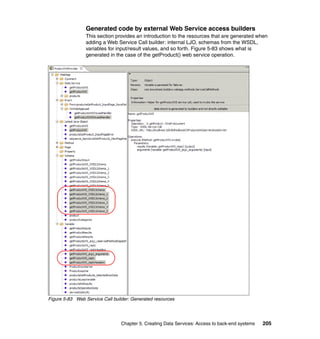
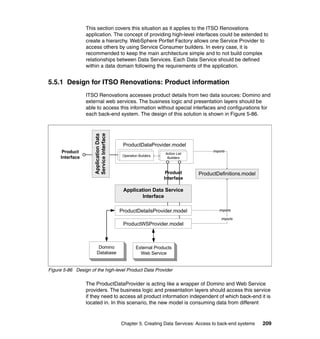
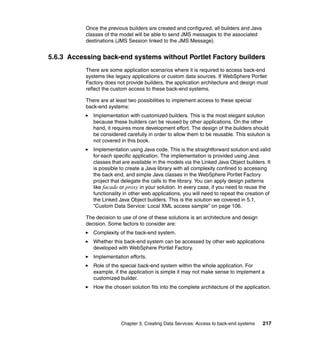


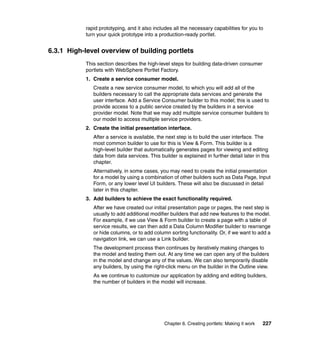
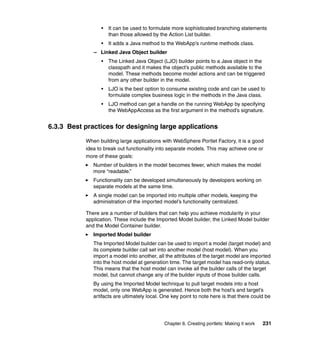
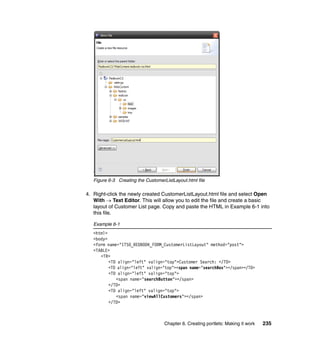
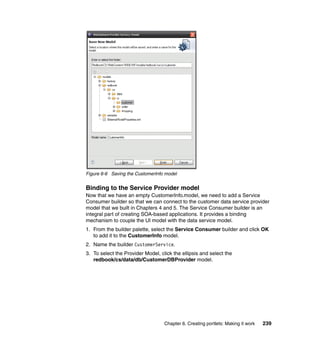
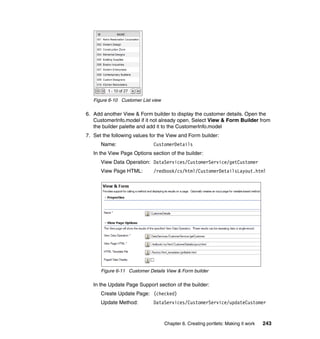
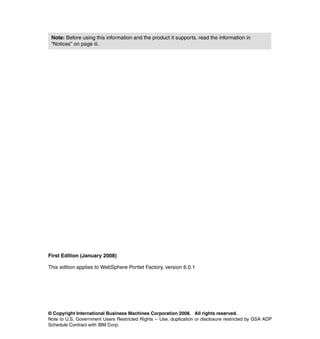
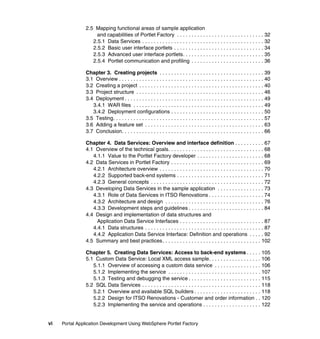
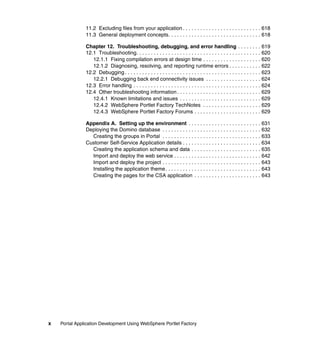
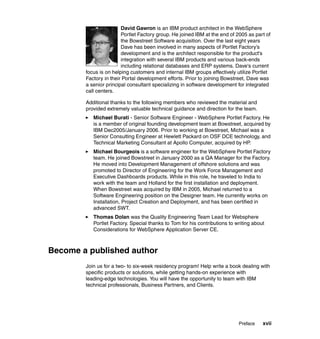
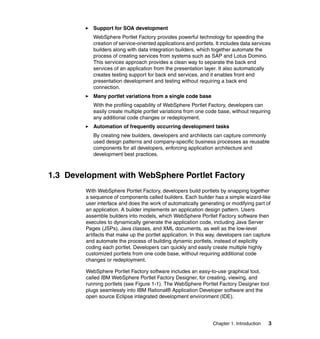
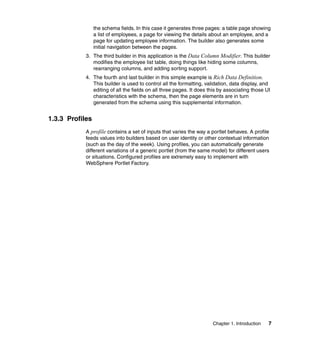
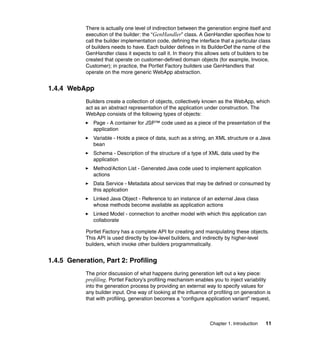
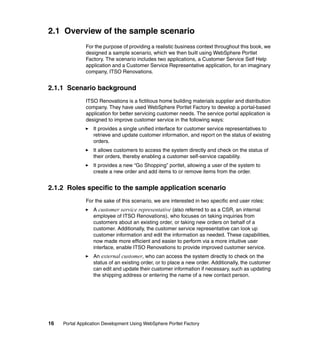
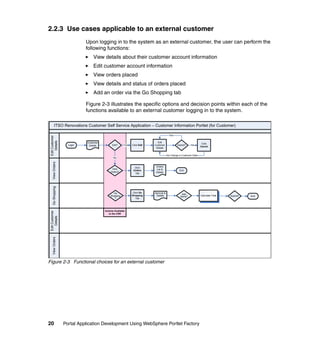
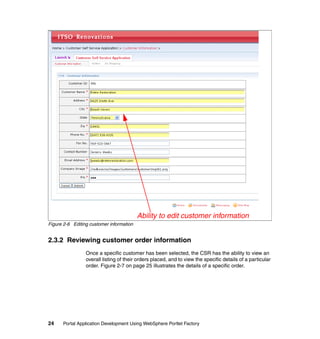
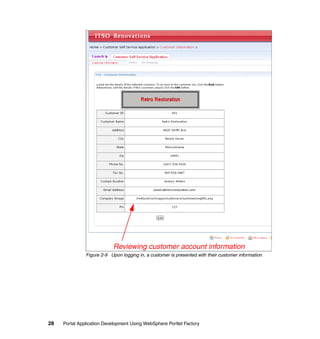
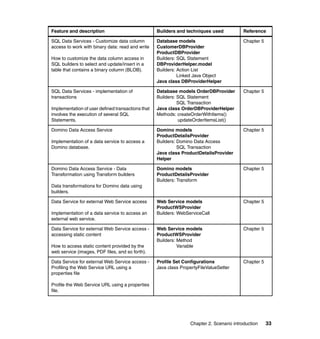
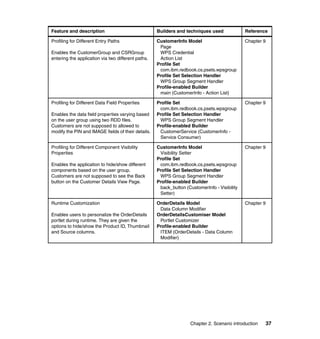
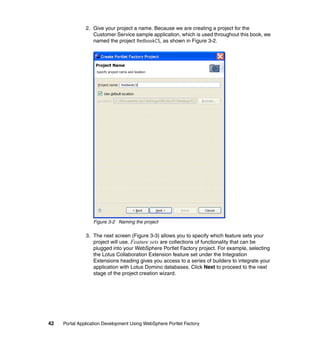
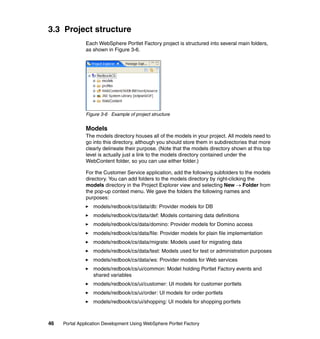
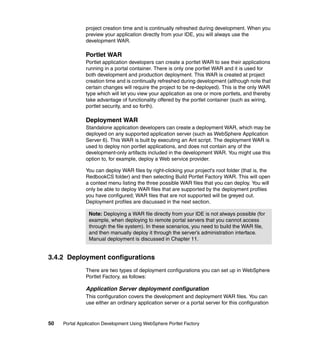
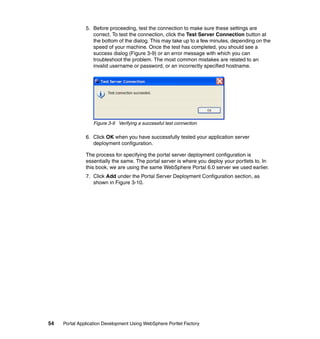
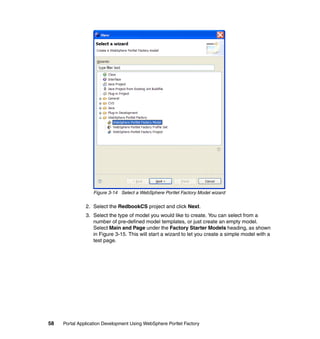
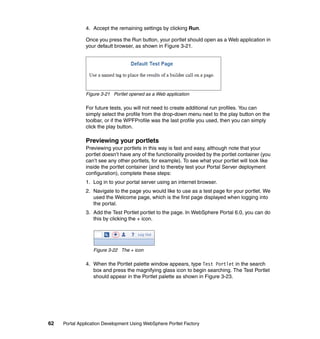
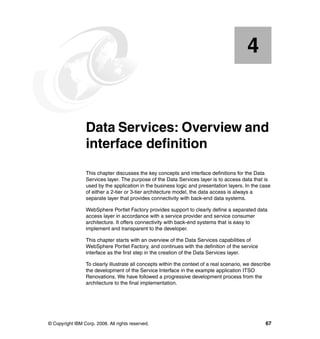
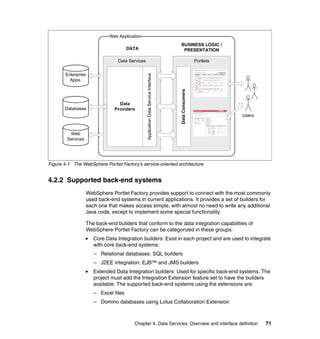
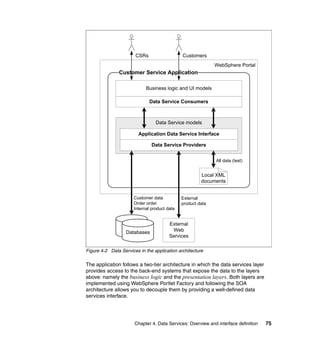
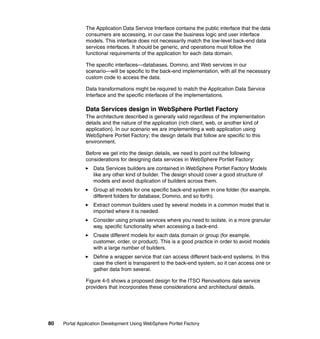
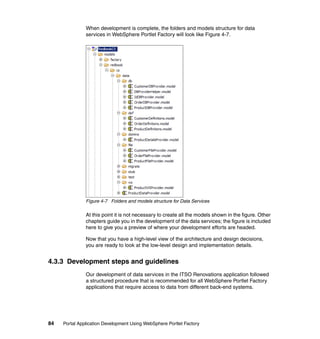
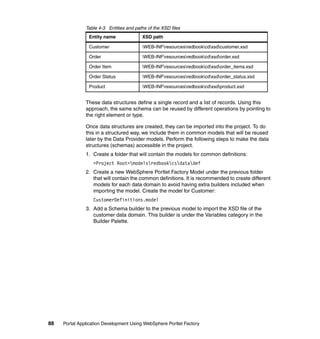
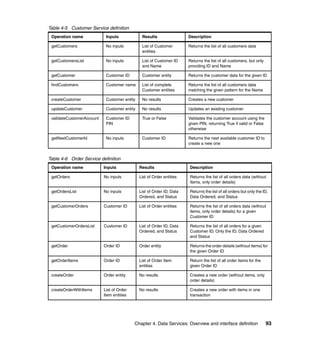
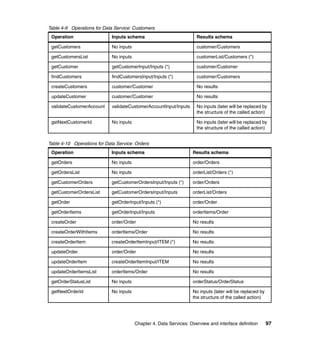
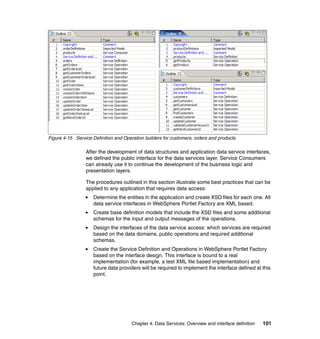
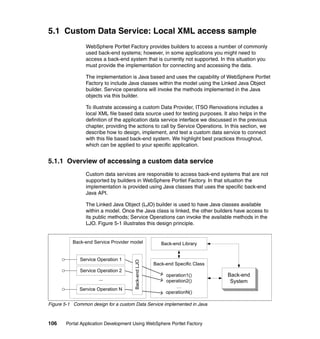
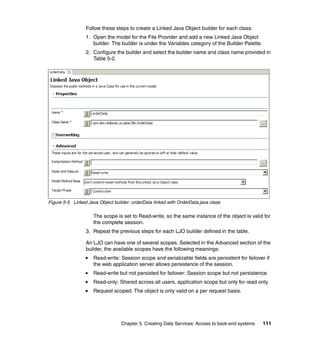
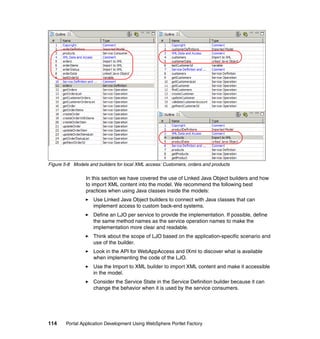
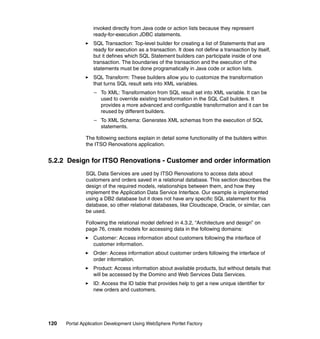
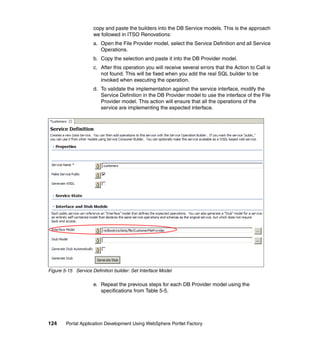
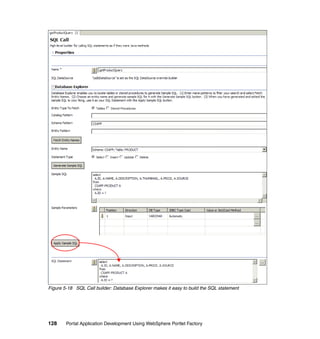
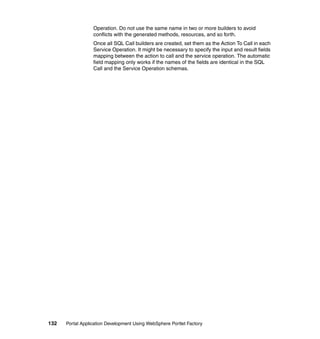
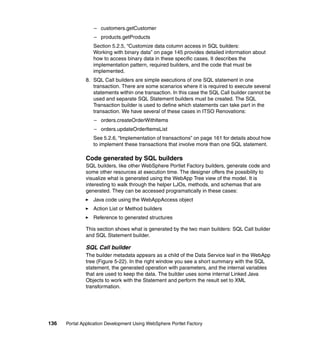
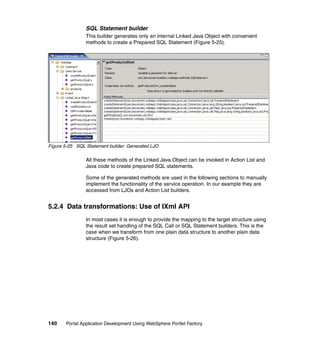
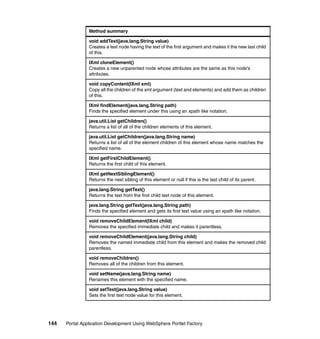
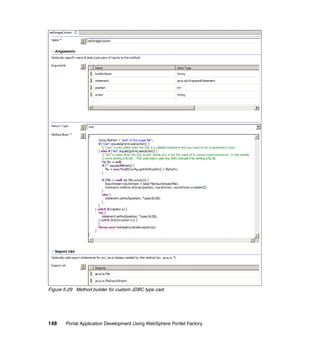
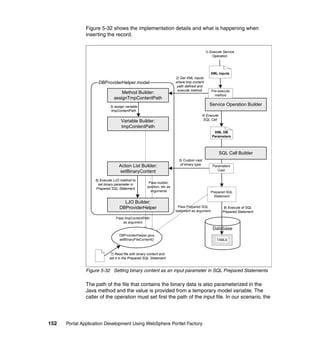
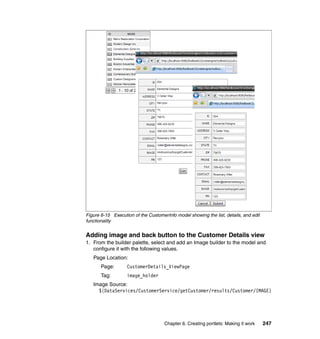
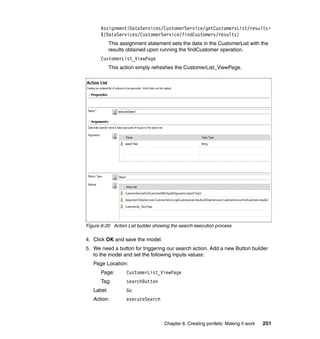
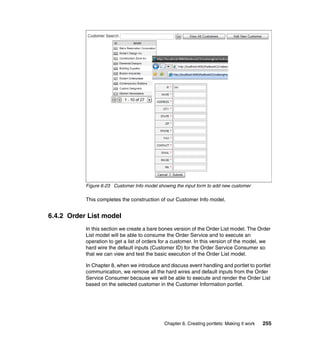
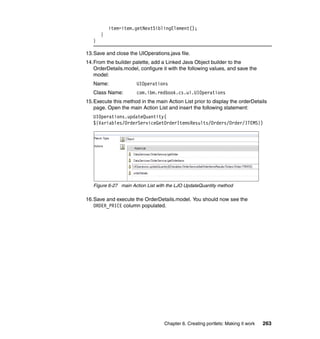
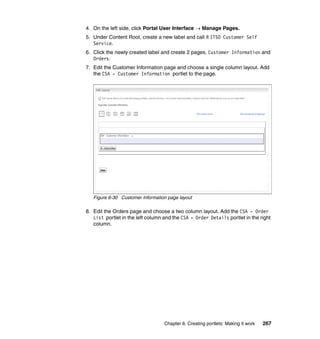
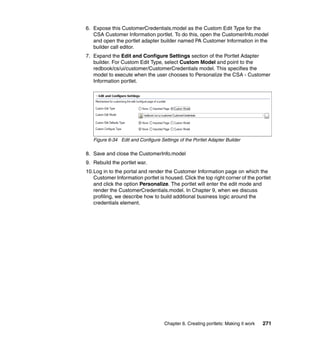
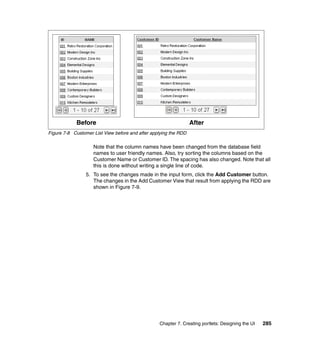
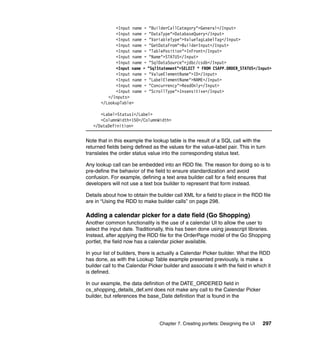
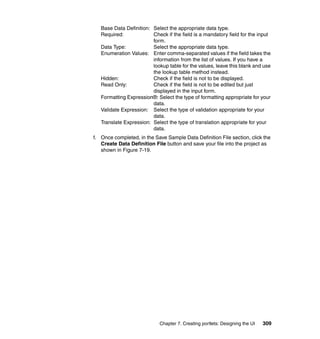
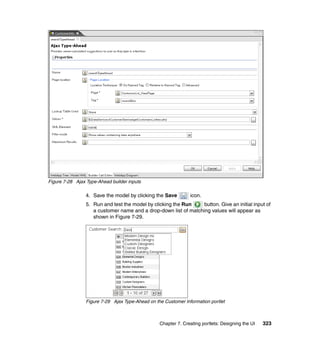
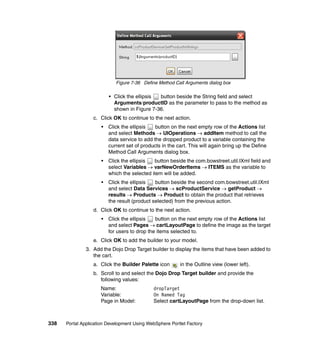
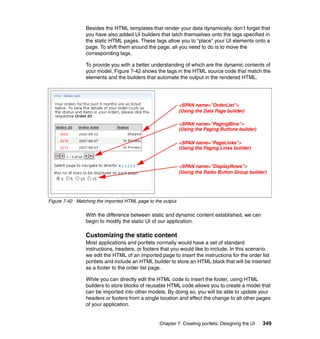
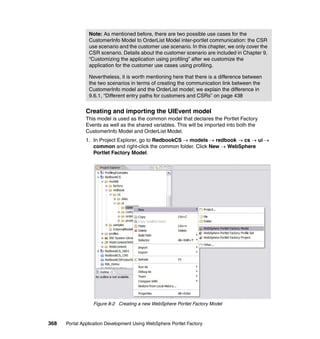
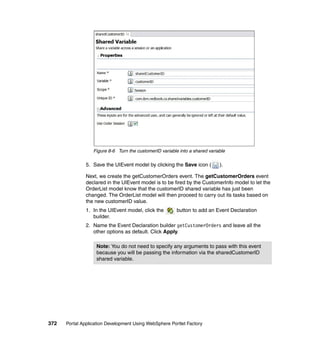
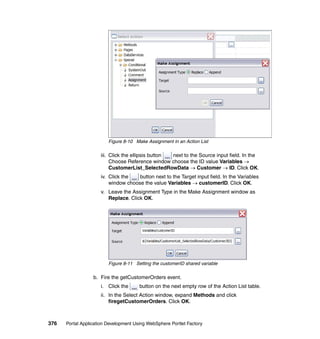
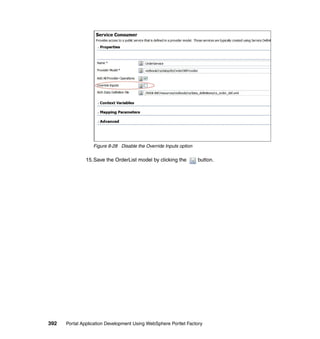
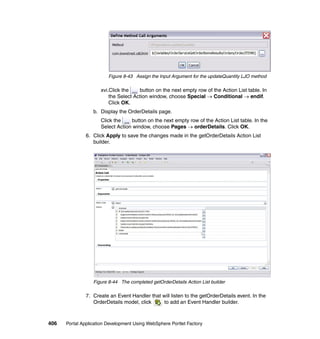
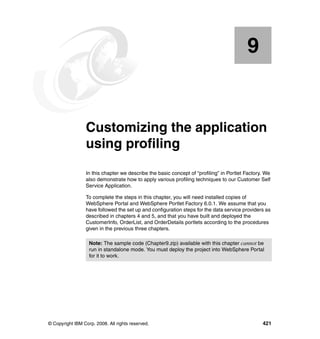
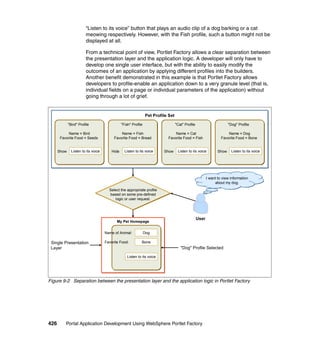
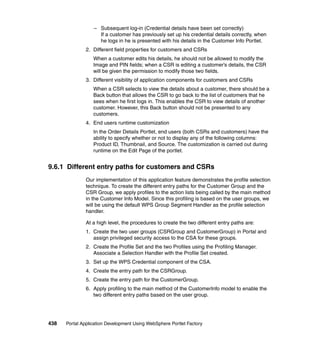
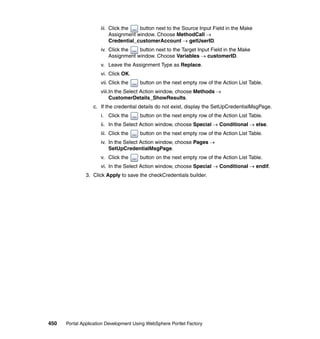
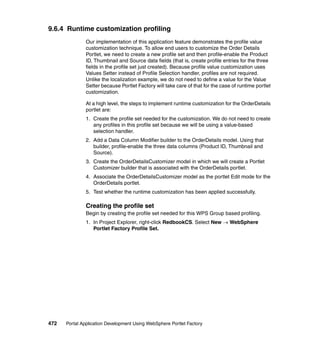
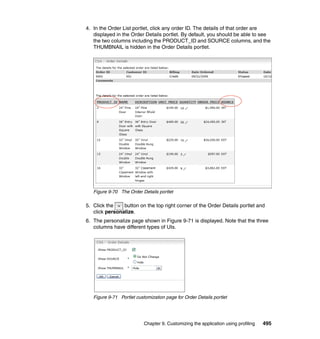
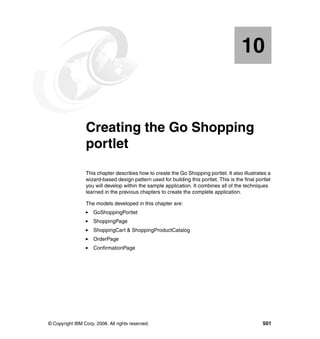
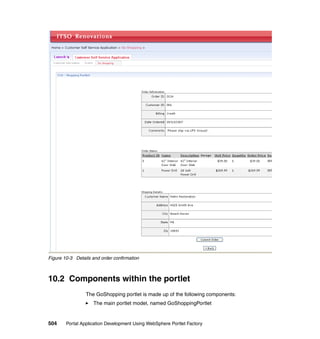
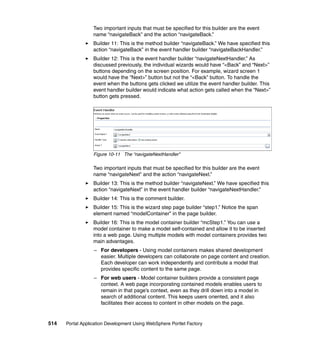
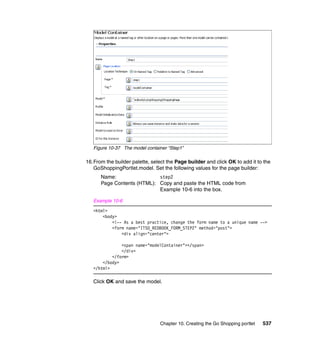
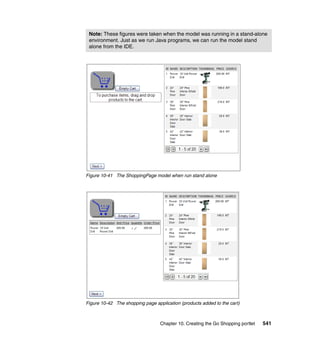
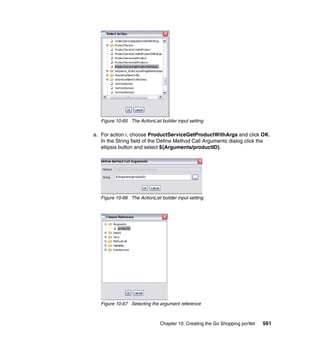
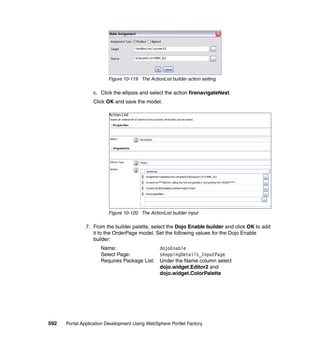
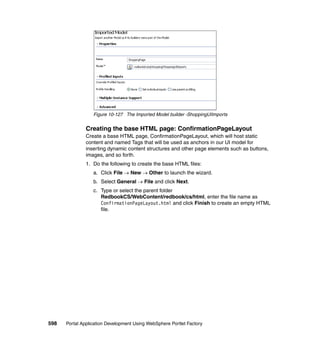
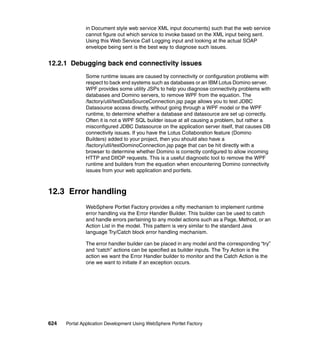
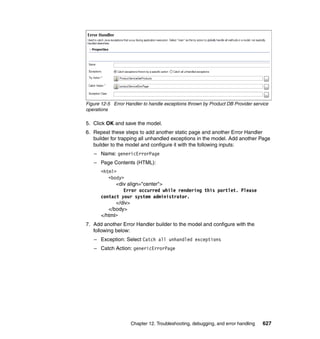
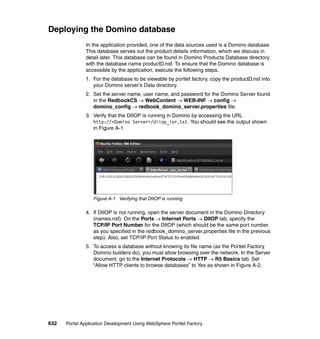
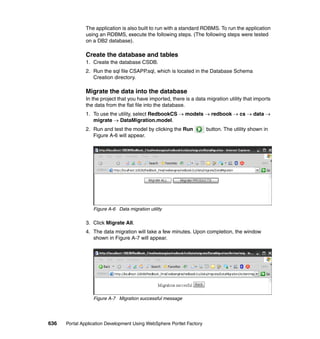
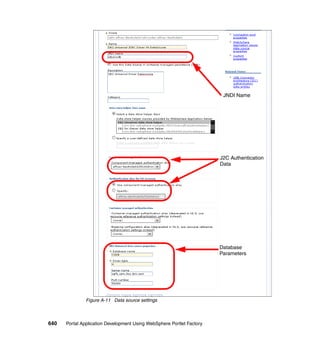
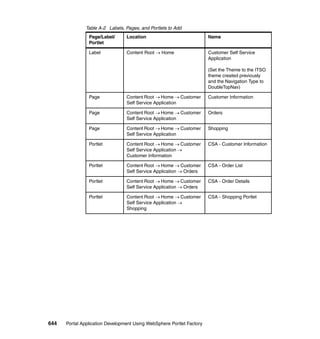
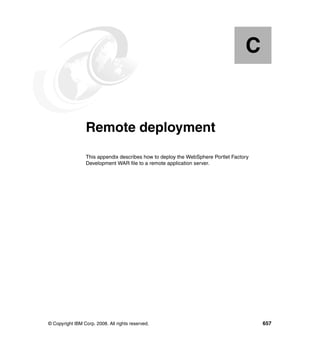
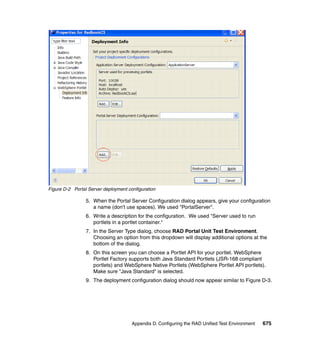
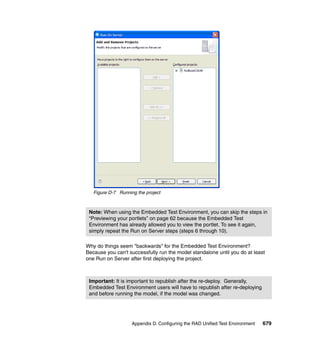
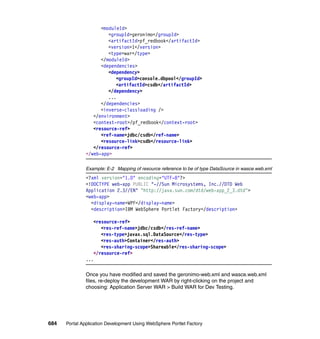
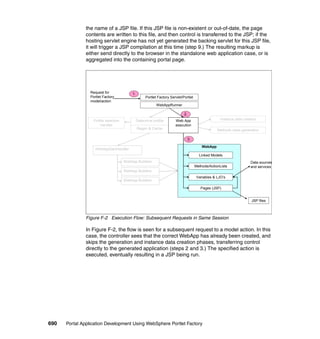
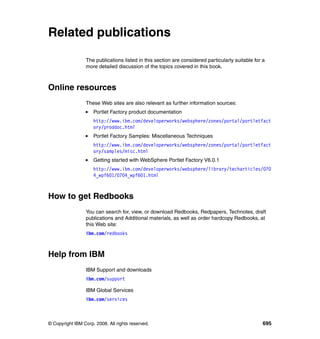
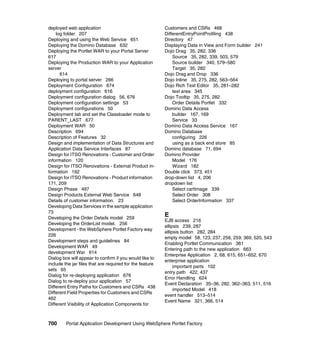
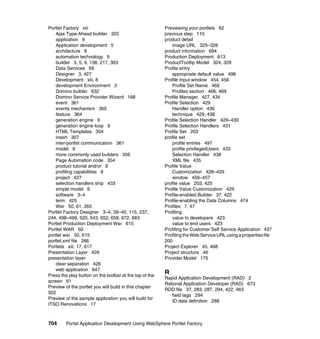
![Update Next Action: CustomerDetails_ViewPage
This input value determines the page to display after the update form has
been submitted. In our case, we would like to go back to the customer
details view page.
Figure 6-12 Customer Details View & Form builder showing update page support
Advance > Generate Main: (unchecked)
We are doing this because the first View & Form builder [CustomerList]
that we added to the model is already generating the main method for the
model.
Important: If multiple View & Form Builders in the model are generating
the main method, you will see the following error in the WebSphere Portlet
Factory Designer when the model is saved:
This Builder Call caused the following exception: Attempt to
create duplicate action main in model.
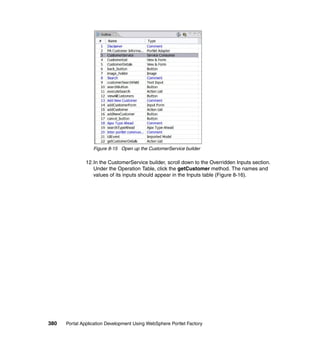
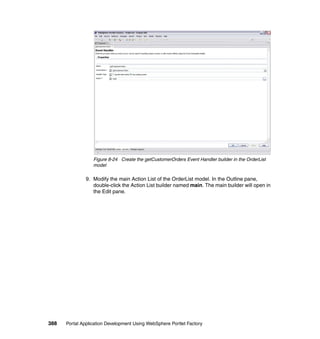
8. In this step, we link the two View and Form builders so that the users will be
allowed to click the Customer ID on the CustomerList and be able to view the
details for that customer in the CustomerDetails View.
a. Open the CustomerList View and Form builder in the Builder Call Editor.
244 Portal Application Development Using WebSphere Portlet Factory](https://image.slidesharecdn.com/portalapplicationdevelopmentusingwebsphereportletfactorysg247525-111020070342-phpapp02/85/Portal-application-development-using-Websphere-Portlet-Factory-264-320.jpg)

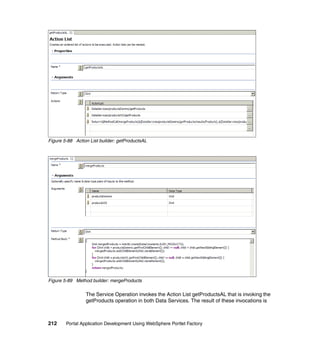
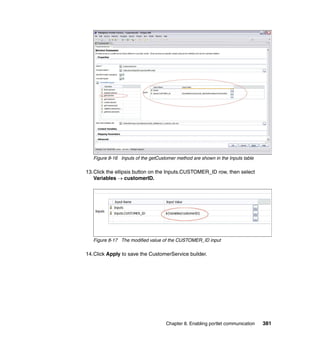
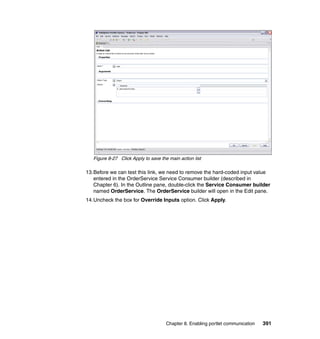
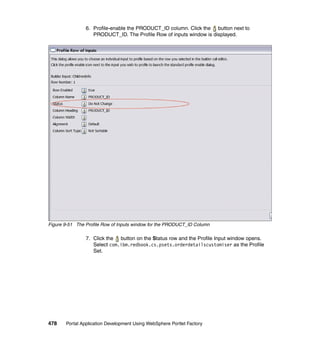
![Override Inputs: (checked)
Then set the default input for the getCustomerOrdersList operation:
Input Name: Inputs.CUSTOMER_ID
Input Value: 001
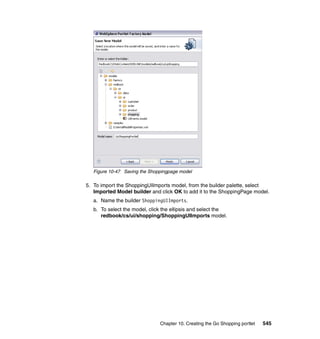
3. Click OK and save the model.
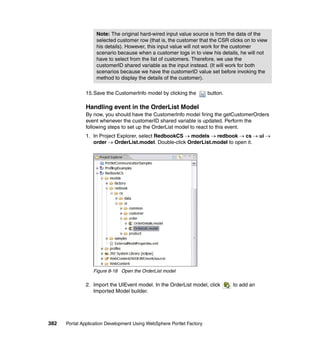
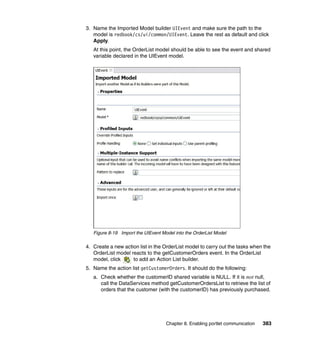
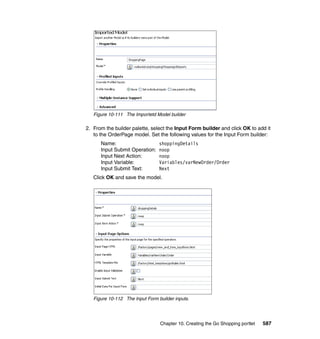
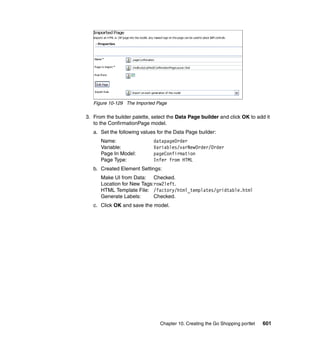
4. Add an Imported Page Builder to the OrderList model to import the base
HTML page that we created previously. Configure it with the following values:
Name: orderList
Page to Import: /redbook/cs/html/OrderListLayout.html
5. Click OK and save the model.
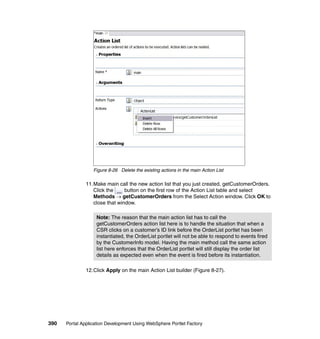
6. Add an Action List builder to the model. This will be our “main” method and
the entry point for the execution of the model. Configure it with the following
values:
Name: main
Actions:
DataServices/OrderService/getCustomerOrdersList
This method makes the call to the getCustomerOrderList operation of
the OrderService to get a list of all Orders for customer
[Customer_ID=001] that we had set as the default input.
orderList
This action renders the orderList page.
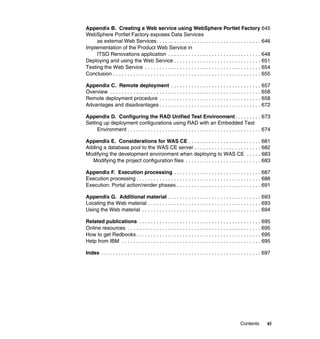
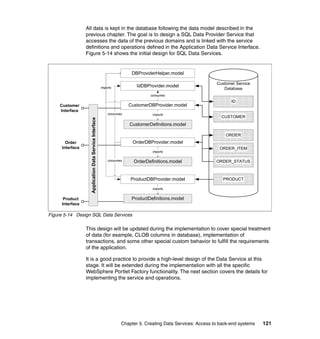
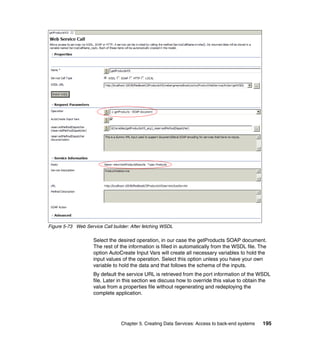
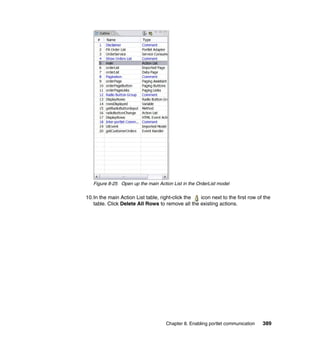
7. We need a mechanism to display the data (that is, the List of Orders) on the
orderList page. For this, we will use a Data Page builder. From the builder
palette, add a Data Page builder to the OrderList model and configure it with
the following values:
Variable: DataServices/OrderService/getCustomerOrdersList/results
Page in Model: orderList
Location for New Tags: OrderList
8. Click OK and save the model.
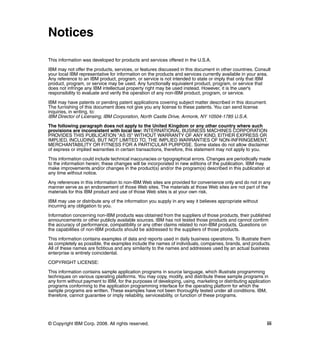
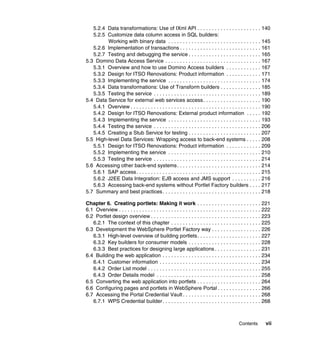
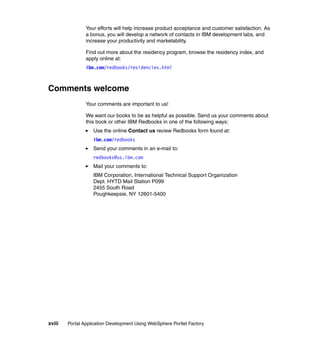
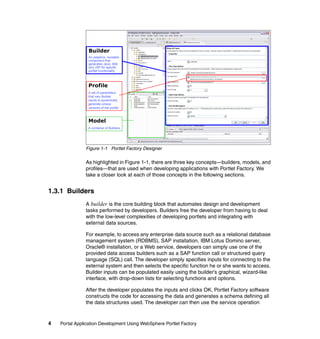
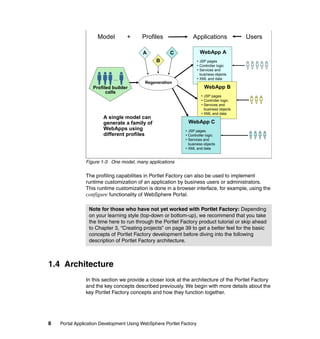
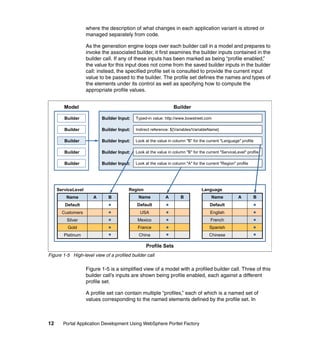
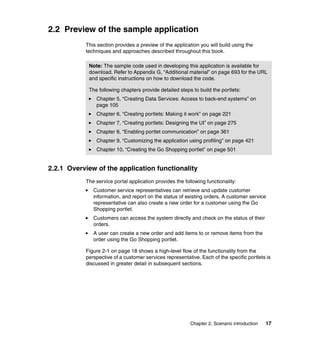
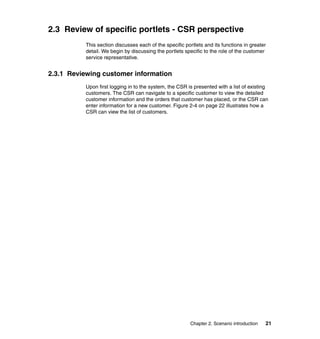
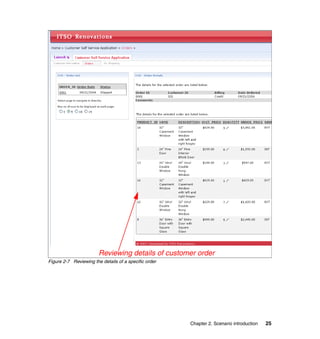
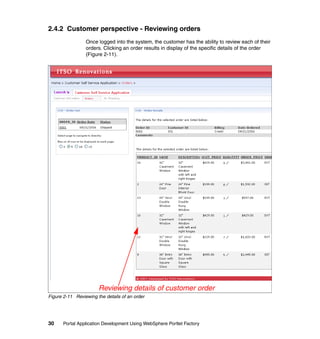
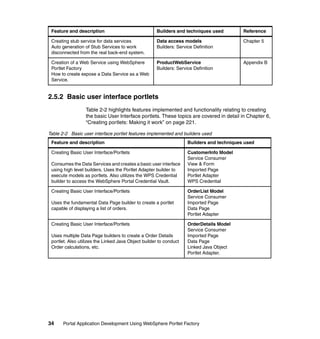
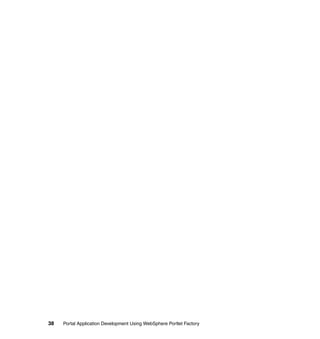
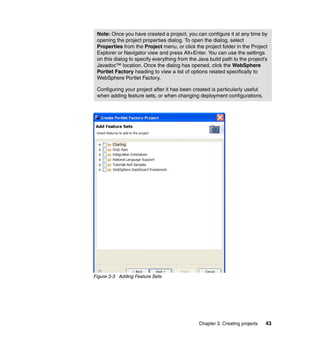
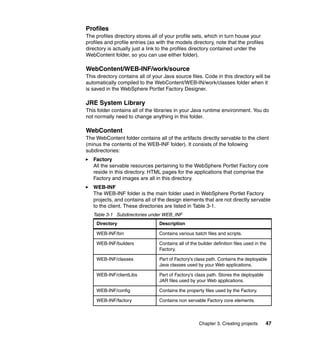
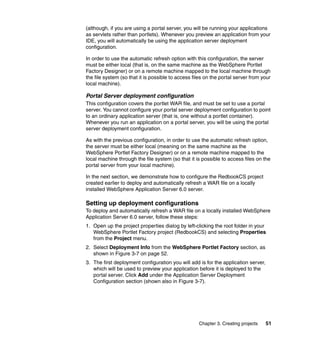
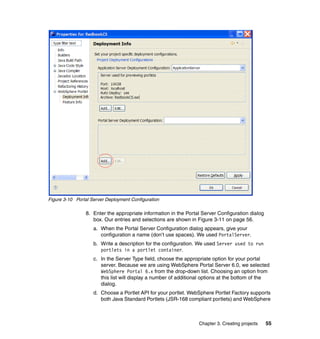
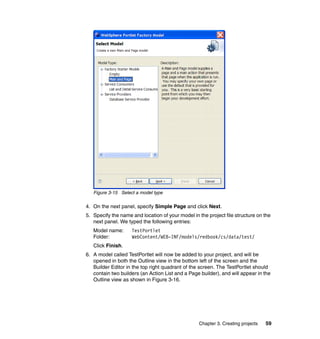
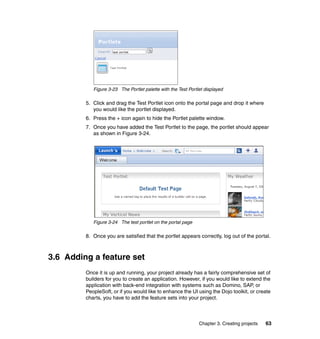
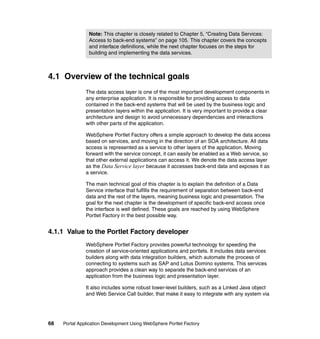
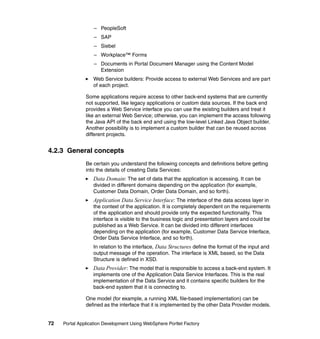
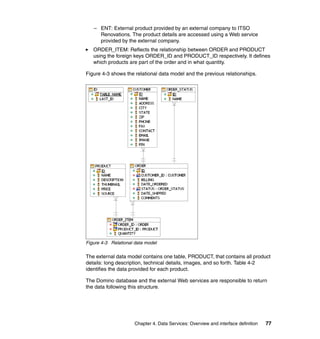
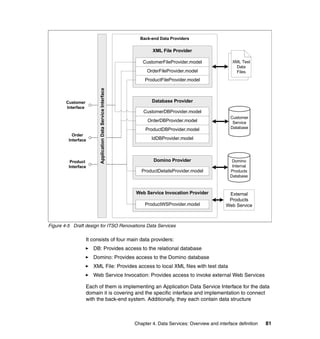
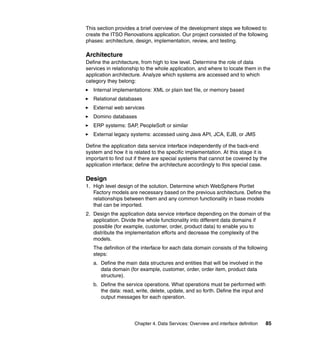
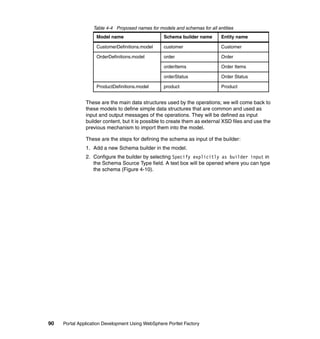
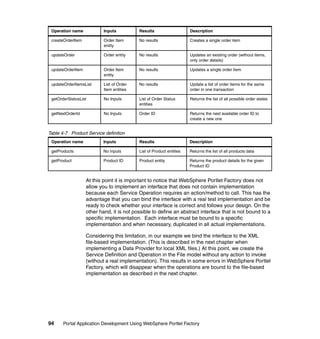
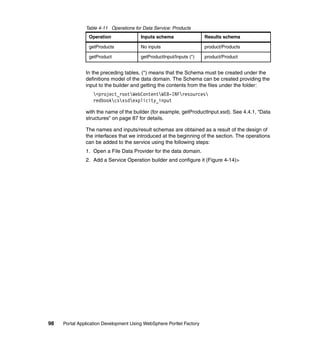
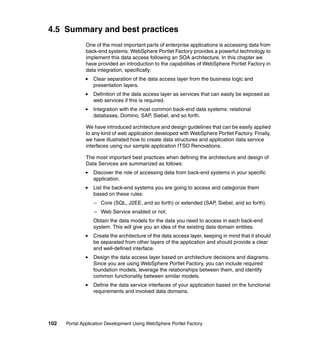
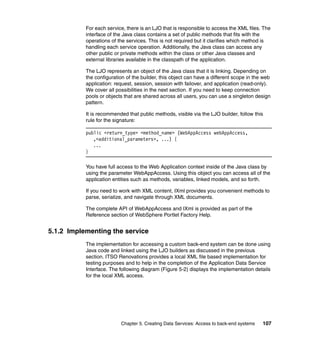
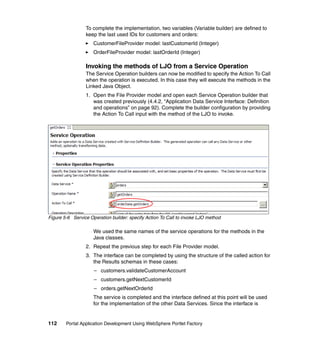
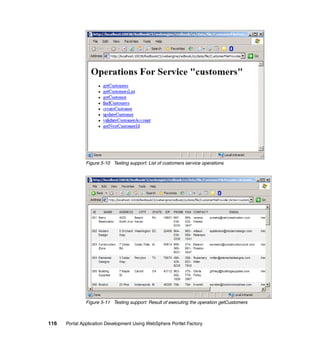
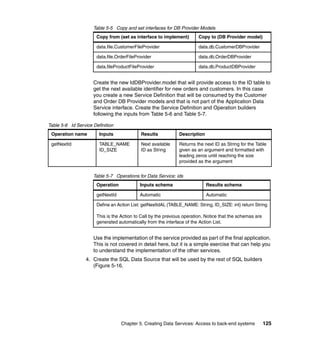
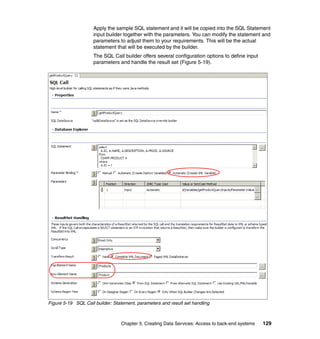
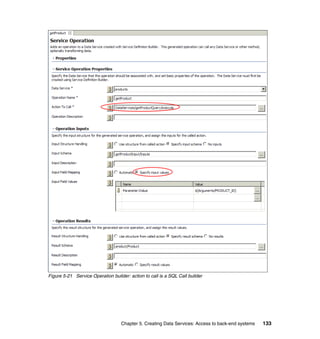
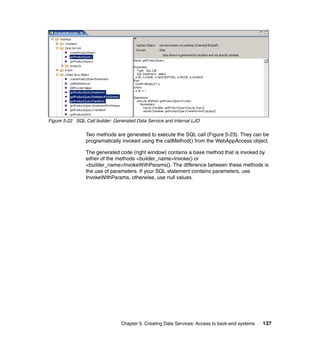
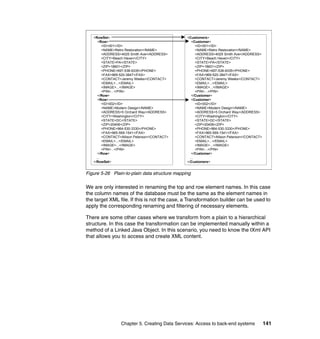
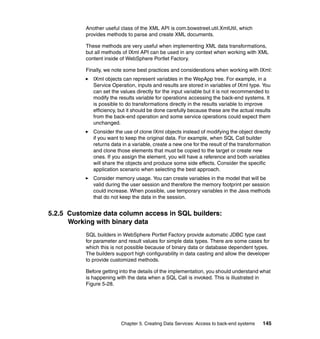
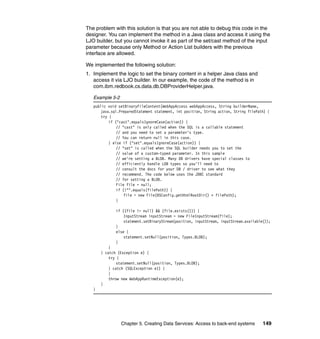
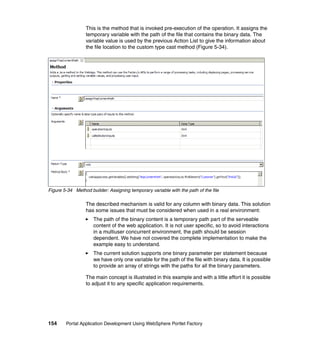
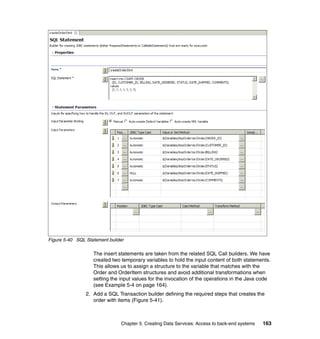
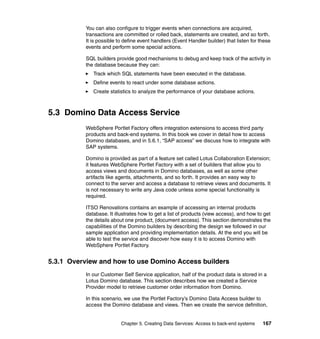
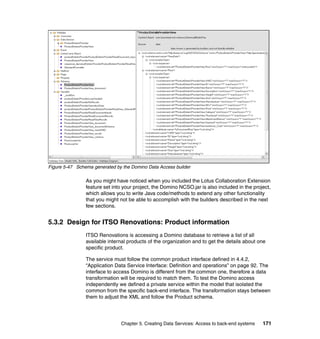
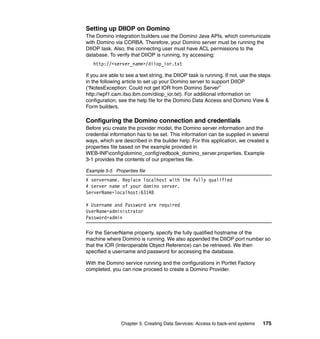
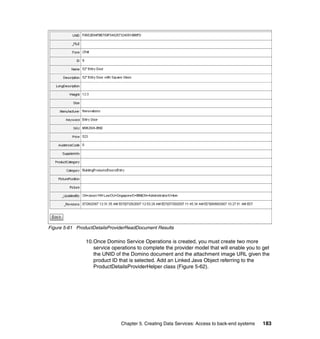
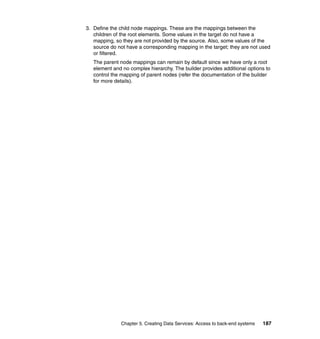
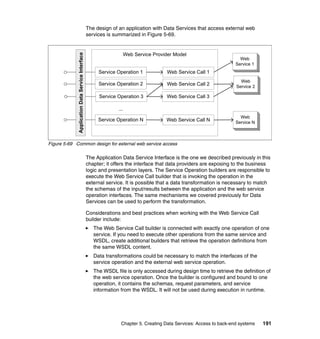
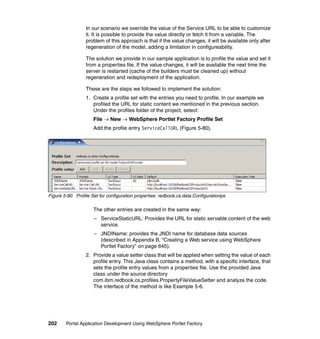
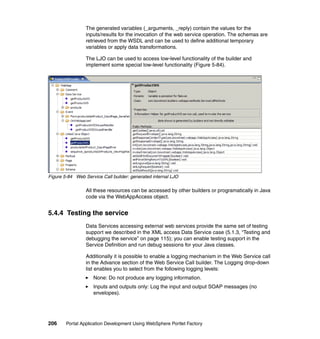
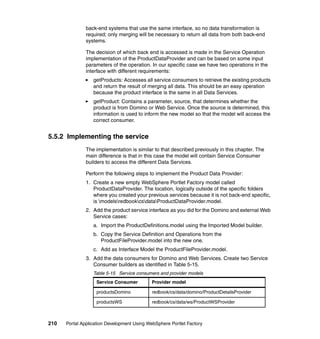
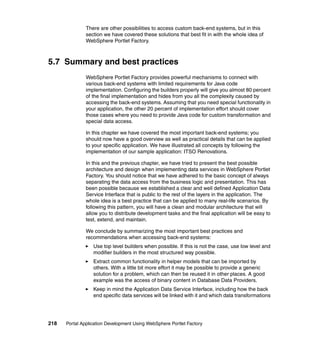
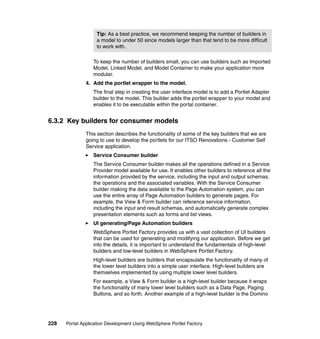
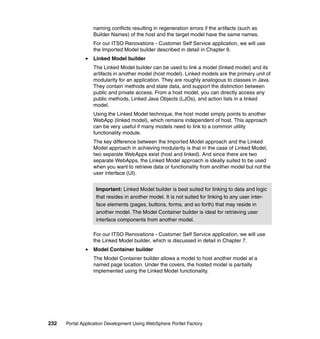
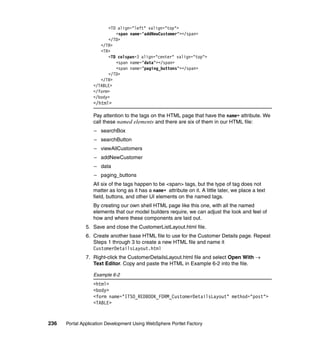
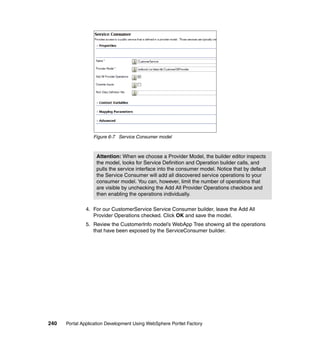
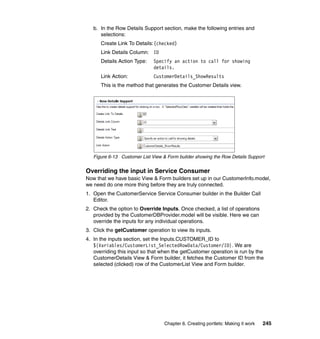
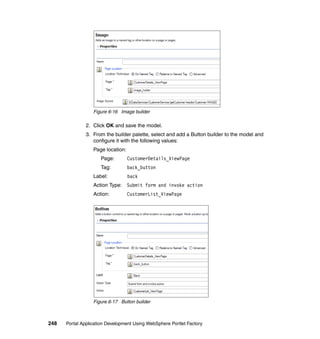
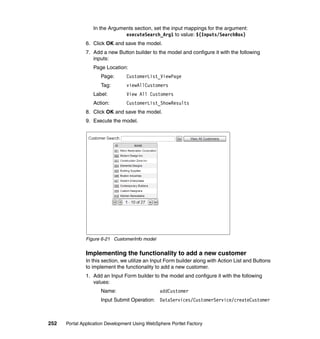
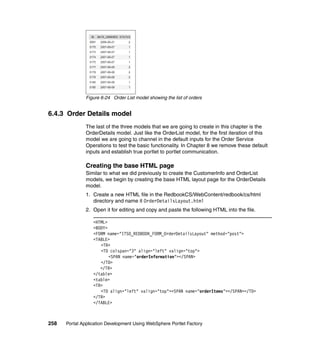
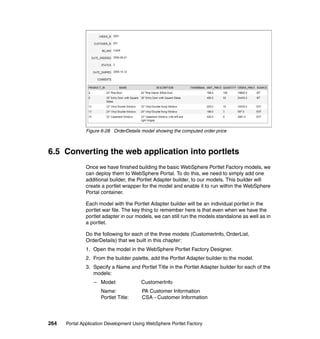
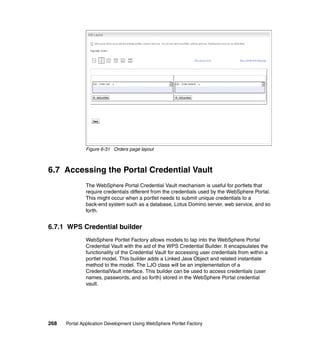
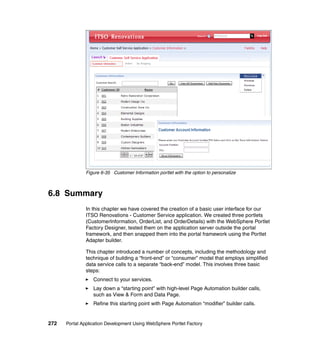
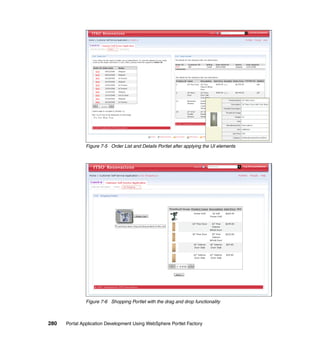
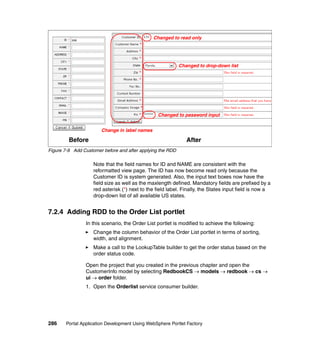
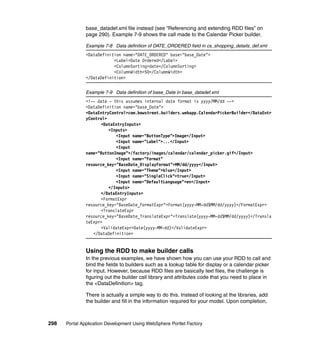
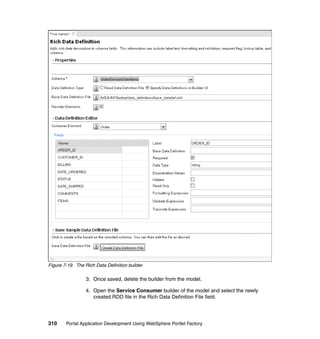
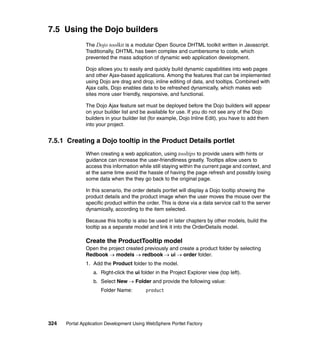
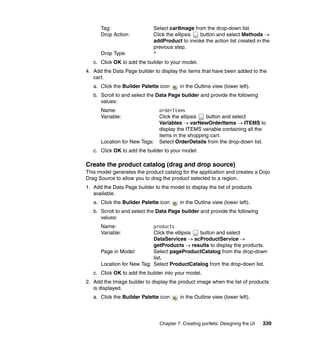
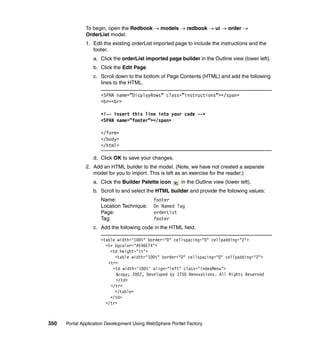
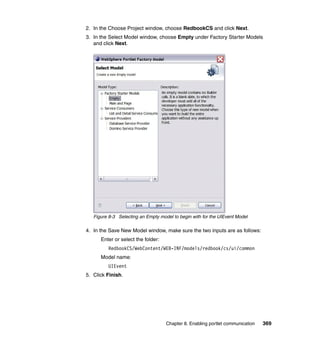
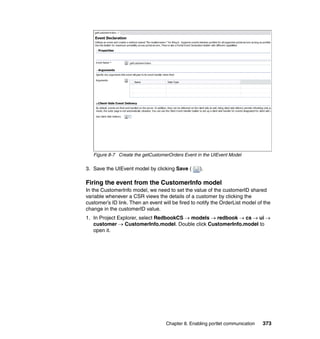
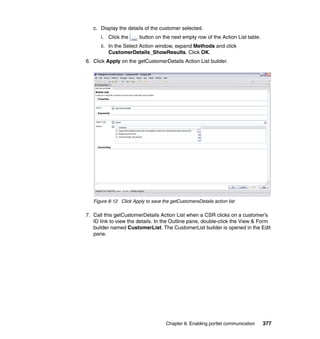
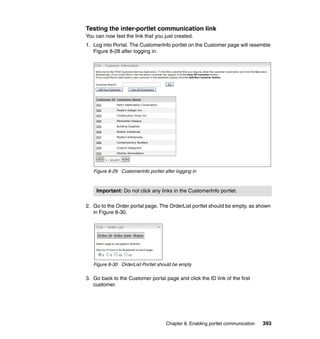
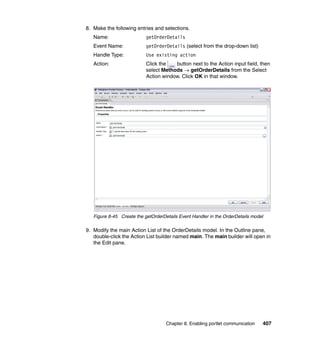
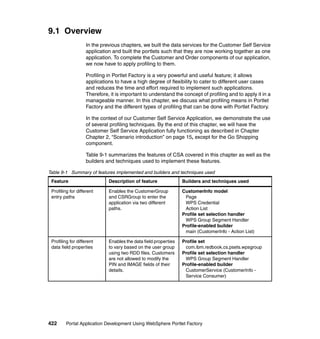
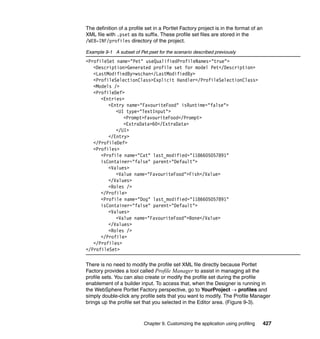
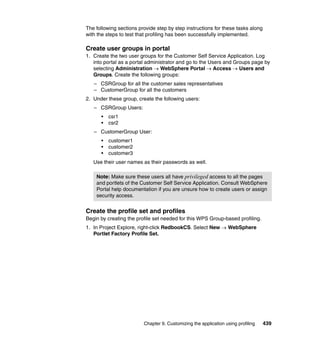
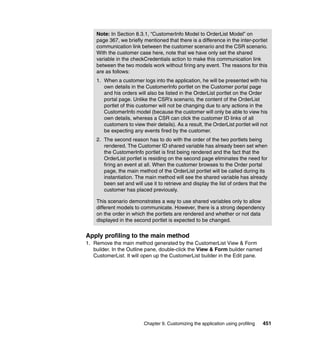
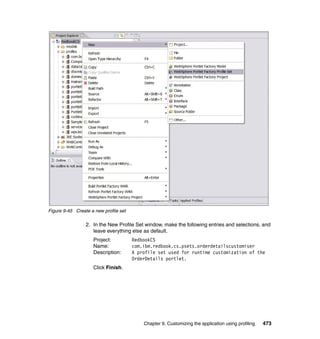
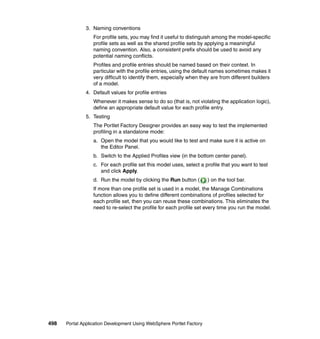
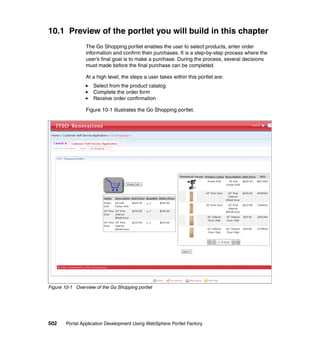
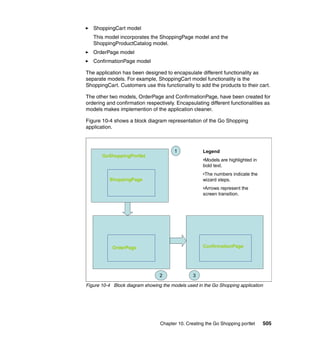
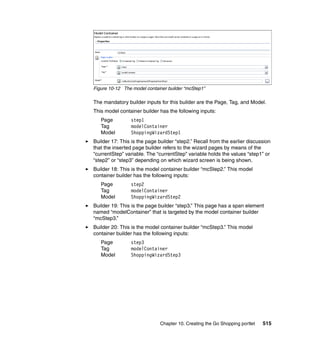
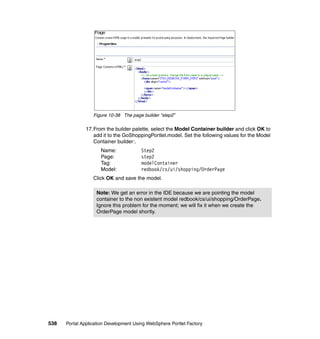
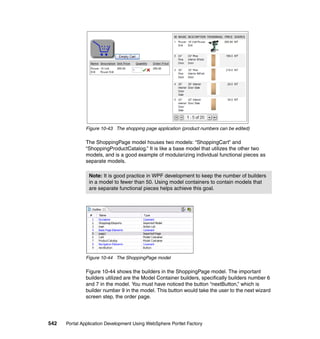
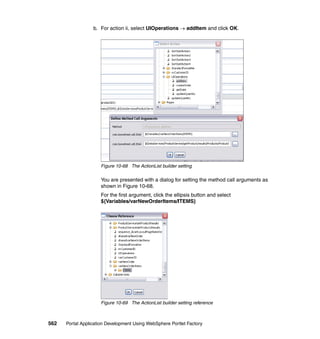
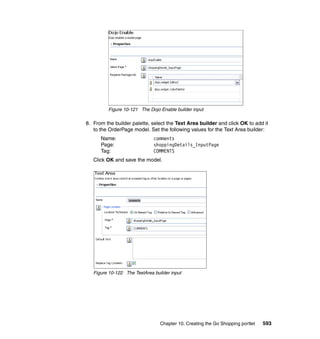
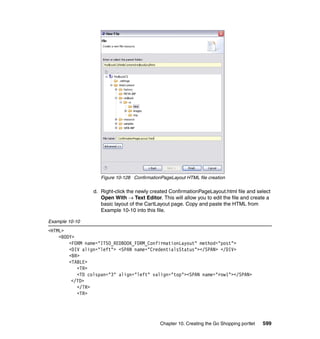
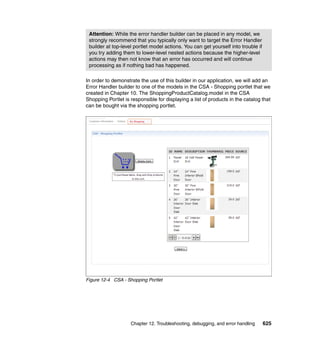
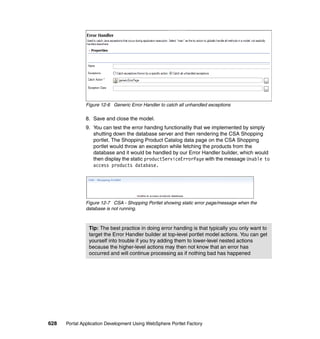
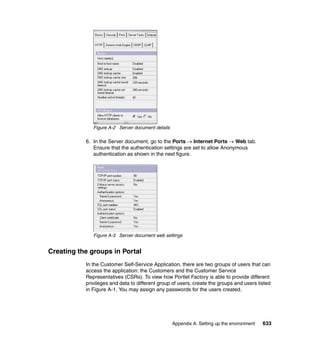
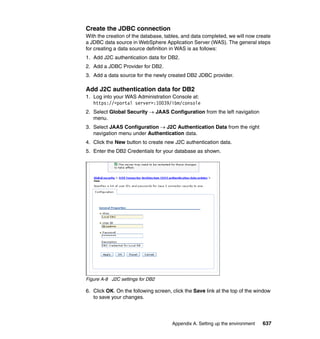
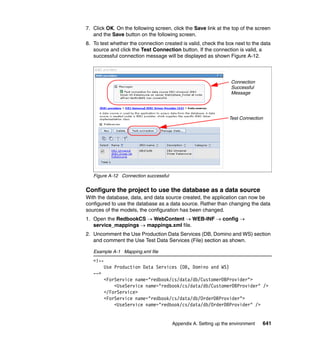
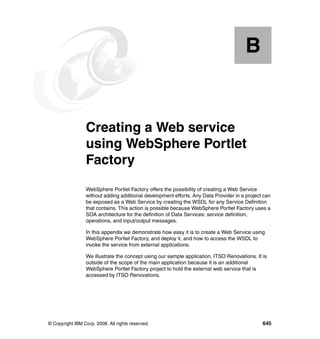
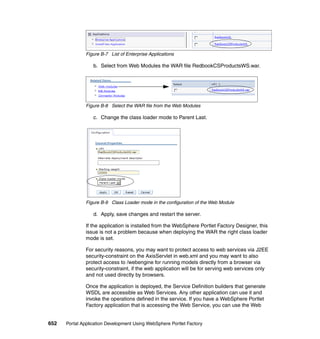
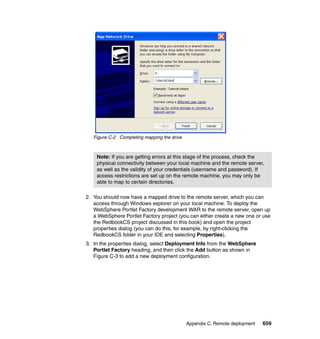
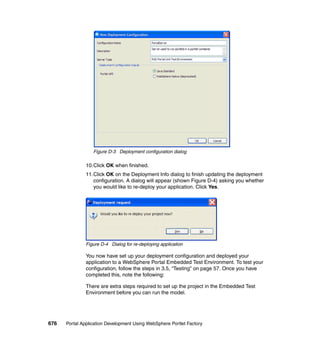
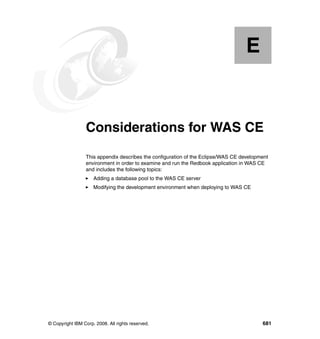
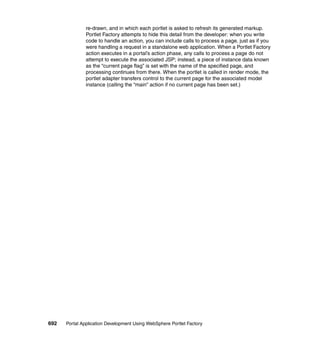
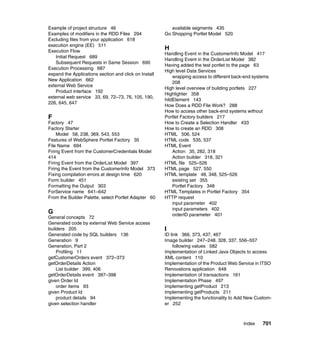
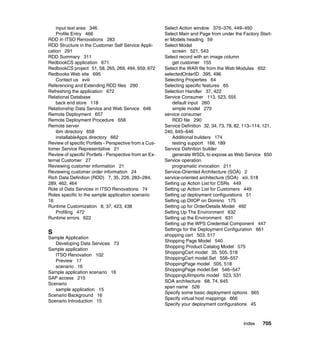
9. Execute the OrderList.model. You should see a table with a list of orders
showing the ID, DATE_ORDERED, and STATUS of orders, like the one in
Figure 6-24.
Chapter 6. Creating portlets: Making it work 257](https://image.slidesharecdn.com/portalapplicationdevelopmentusingwebsphereportletfactorysg247525-111020070342-phpapp02/85/Portal-application-development-using-Websphere-Portlet-Factory-277-320.jpg)
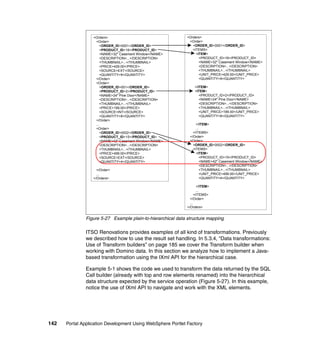
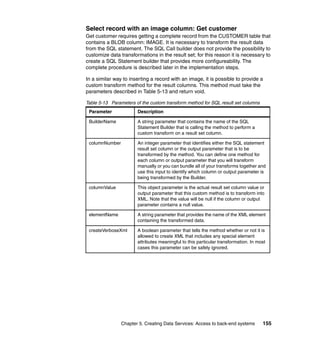
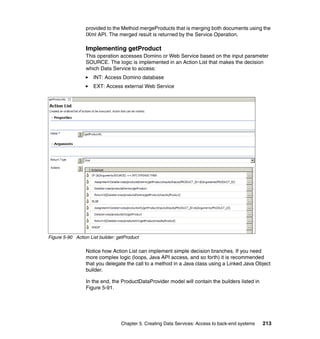
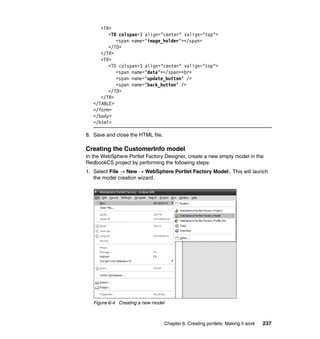
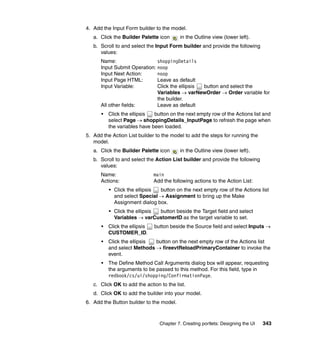
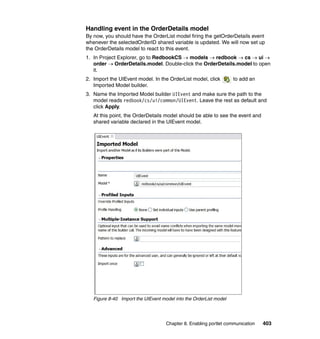
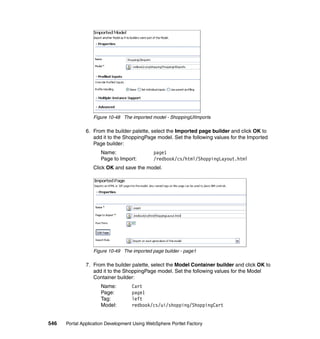
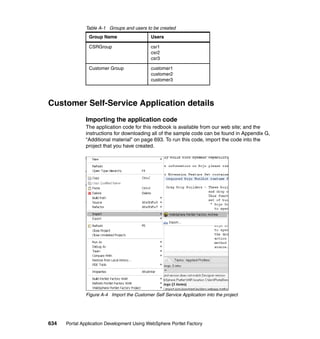
![Page in Model: orderDetails
Location for New Tags: OrderDetails
b. Click OK and save the model.
c. Add another Data Page builder to the OrderDetails.model and configure it
with the following values:
Name: orderItems
Variable: DataServices/OrderService/getOrderItems/results/
Orders/Order/ITEMS
Page in Model: orderDetails
Location for New Tags: orderItems
d. Click OK and save the model.
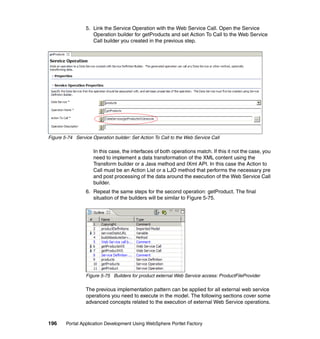
7. Add an Action List builder to the model. This will be our “main” method and
the entry point for the execution of the model. Configure it with the following
values:
Name: main
Actions:
DataServices/OrderService/getOrder
This method makes a call to the getOrder operation of the
OrderService to get the data for Order [Order_ID=0001] that we had
set as the default input in the Service Consumer.
DataServices/OrderService/getOrderItems
This method makes a call to the getOrderItems operation of the
OrderService to get a list of all items in the Order [Order_ID=0001]
orderDetails
This action renders the orderDetails page.
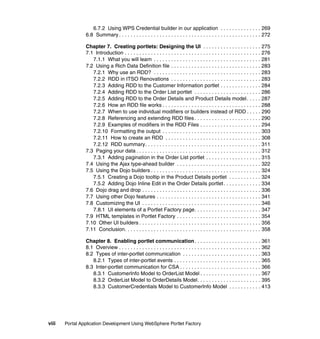
8. Click OK and save the model.
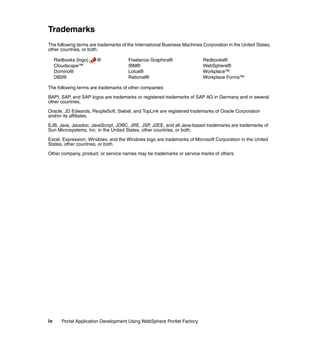
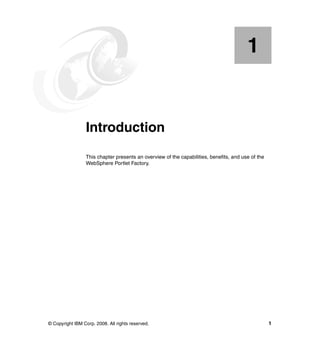
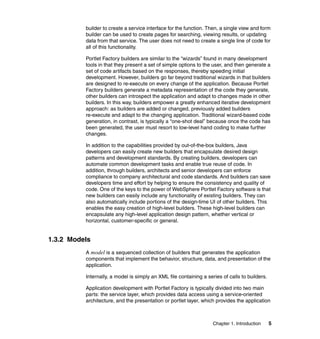
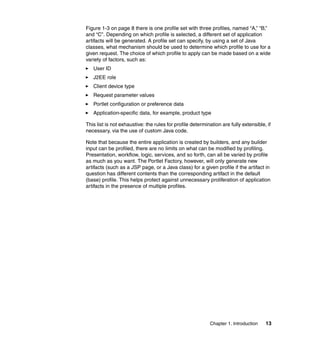
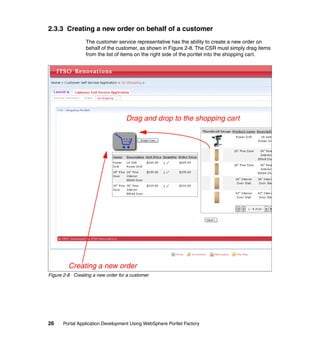
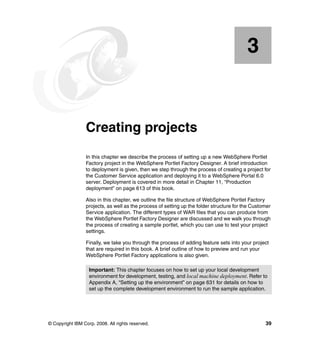
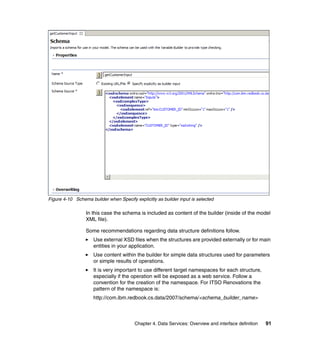
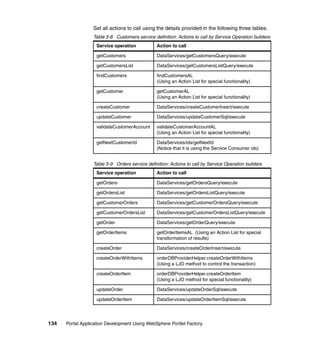
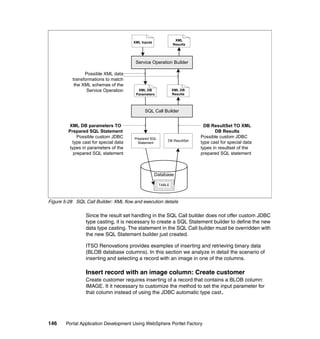
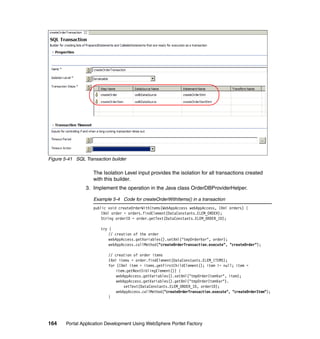
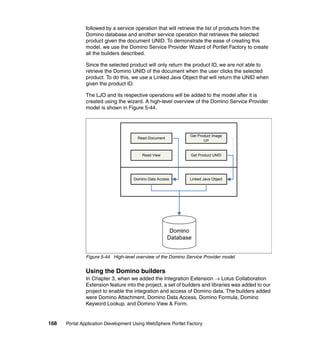
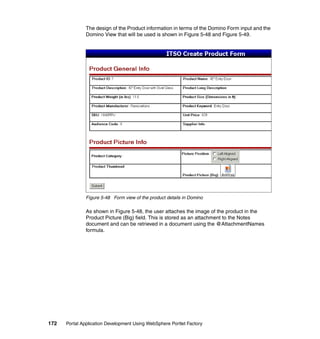
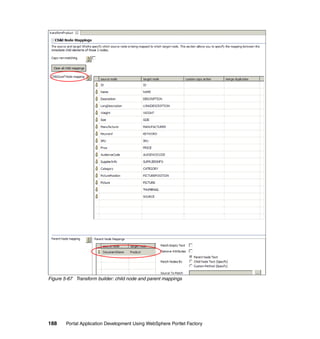
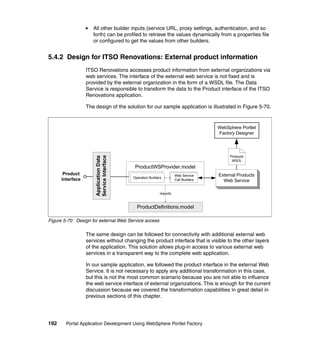
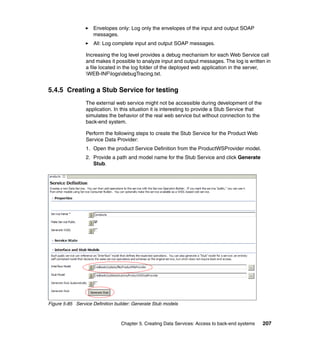
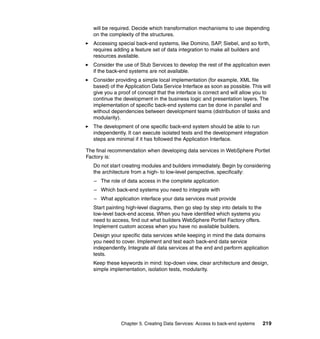
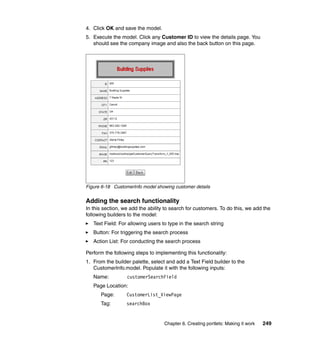
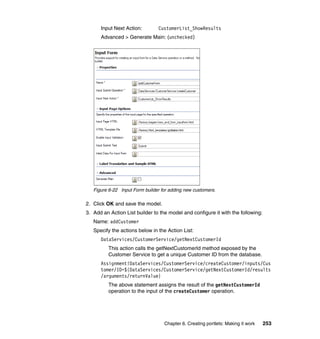
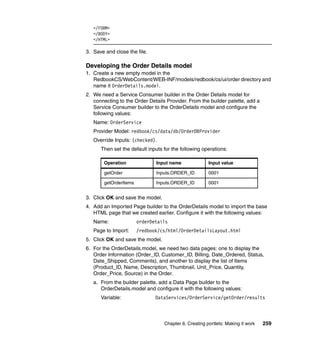
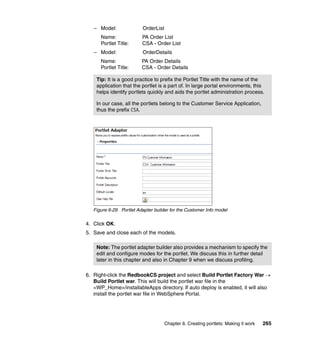
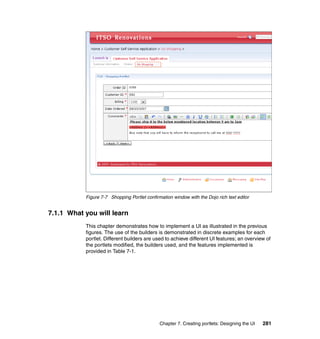
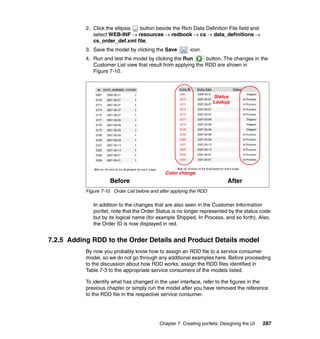
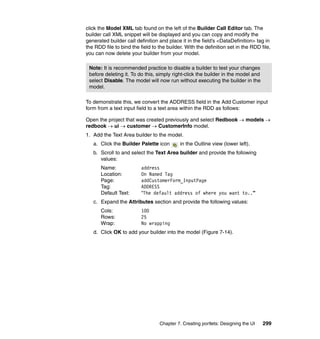
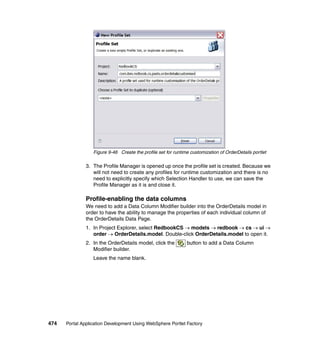
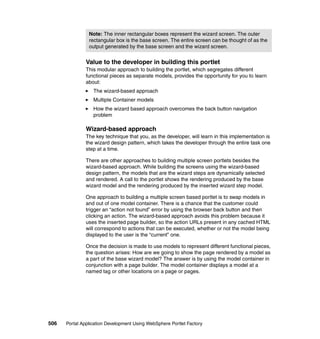
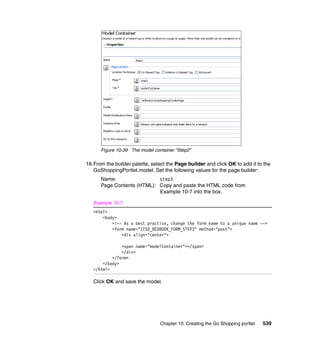
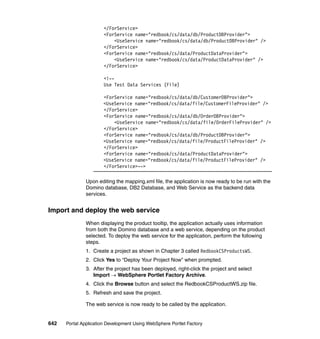
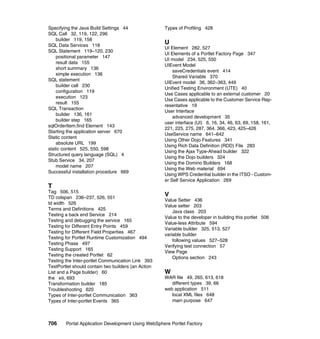
9. Execute the OrderDetails.model. You should see the Order Details page
showing two separate datapages, one displaying the order information and
the other displaying the list of items in the order in a tabular format.
260 Portal Application Development Using WebSphere Portlet Factory](https://image.slidesharecdn.com/portalapplicationdevelopmentusingwebsphereportletfactorysg247525-111020070342-phpapp02/85/Portal-application-development-using-Websphere-Portlet-Factory-280-320.jpg)
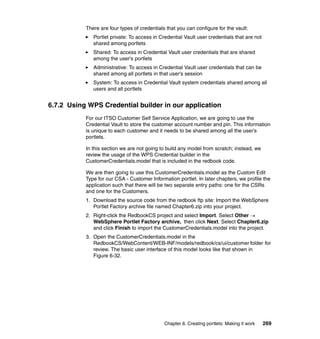


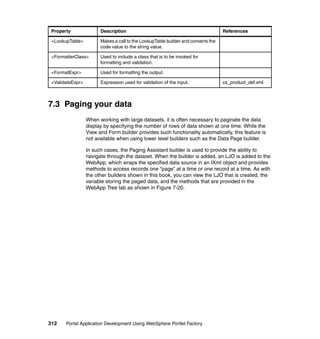
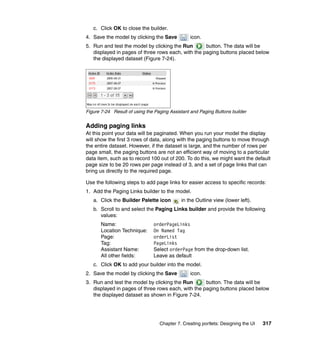

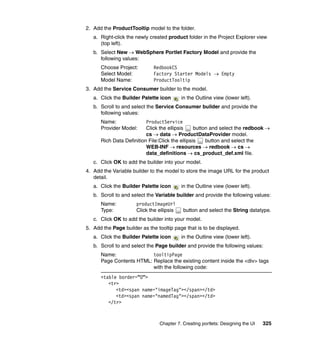

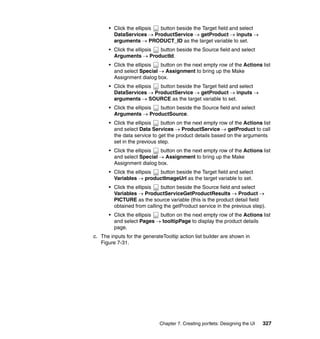

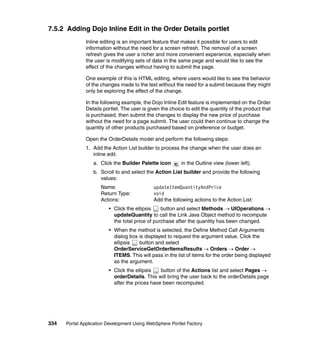
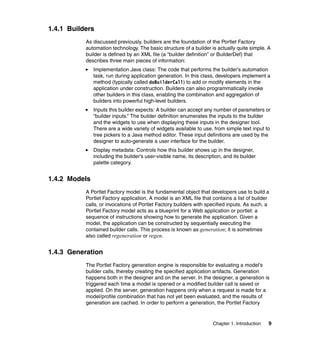
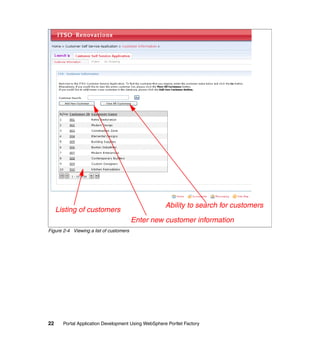
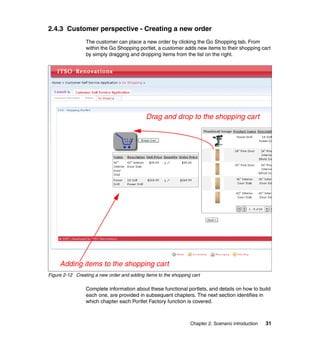
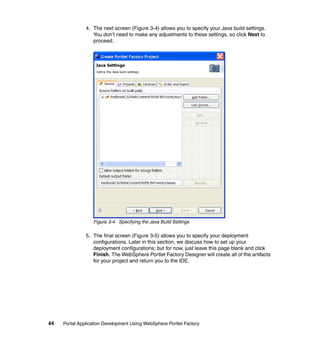
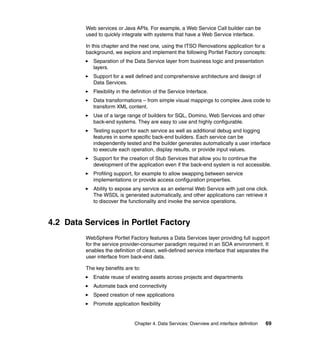
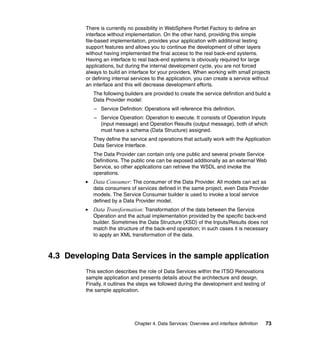
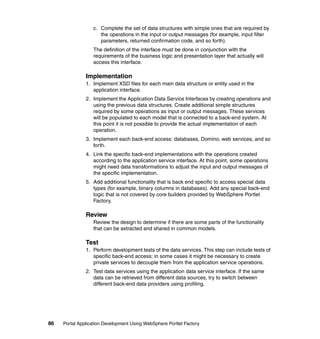
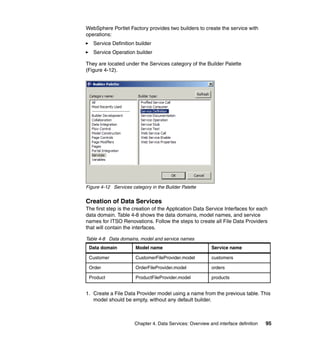
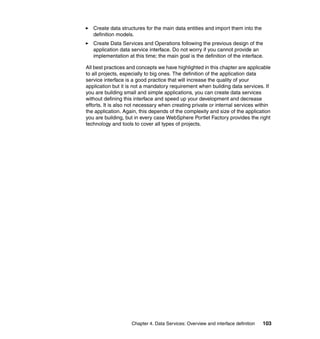
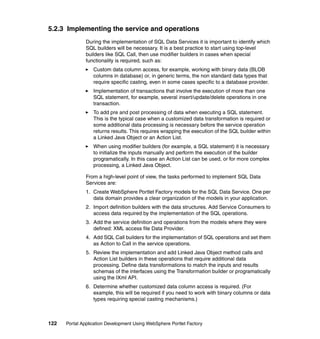
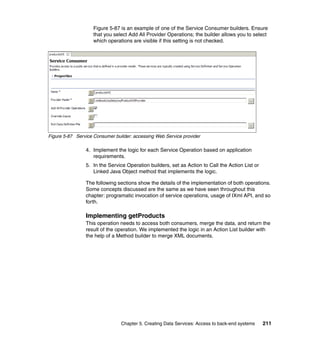
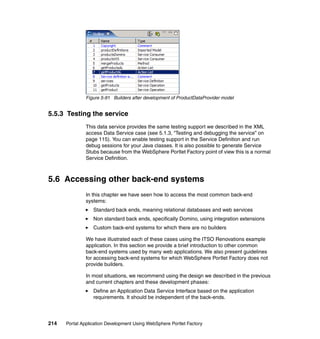
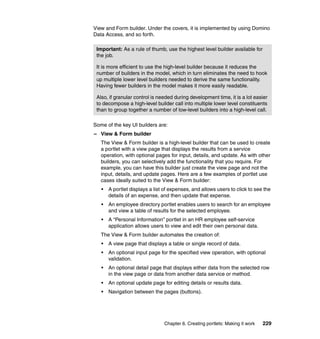
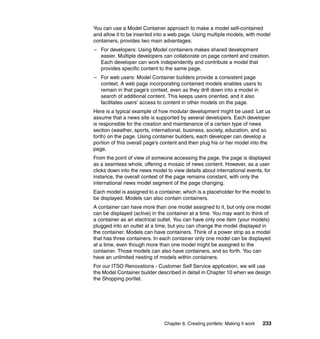
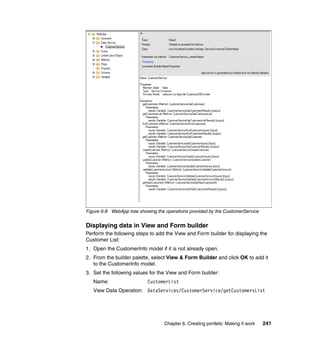
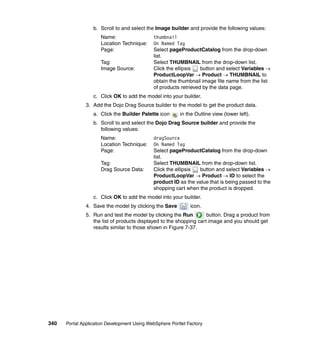
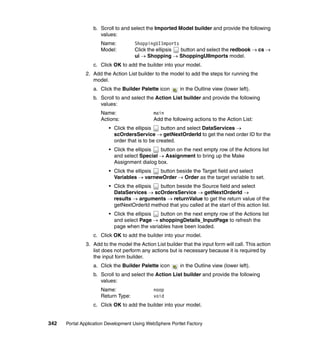
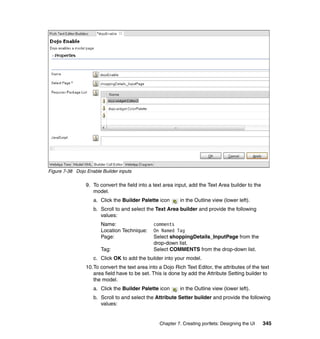
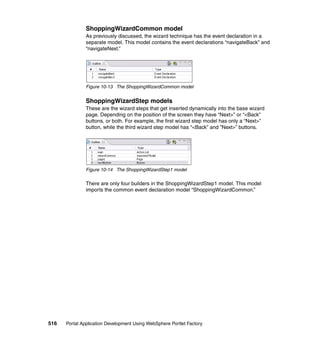
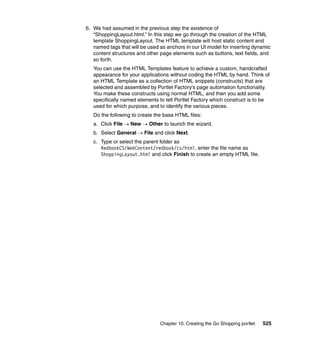
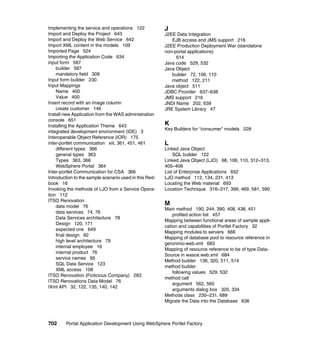
![2. Add the Dojo Inline Edit builder to include the inline editing function on a field
within the list of order items.
a. Click the Builder Palette icon in the Outline view (lower left).
b. Scroll to and select the Dojo Inline Edit builder and provide the following
values:
Name: dojoInlineEdit
Fields: Click the ellipsis button and select the
[orderDetails]orderItems → ITEMS → ITEM →
QUANTITY field. This will cause the quantity of each
item in the order items list to be inline editable.
Submit Form: Check
Action: Click the ellipsis button and select the Methods →
updateItemQuantityAndPrice method. This will fire the
action list defined in the previous step to recompute the
total price for each item.
c. Click OK to add the builder to your model.
3. Save the model by clicking the Save icon.
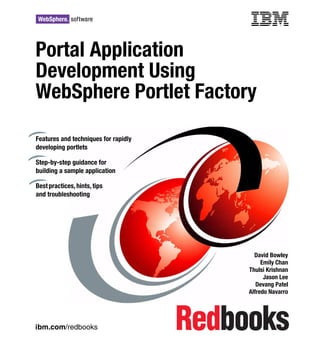
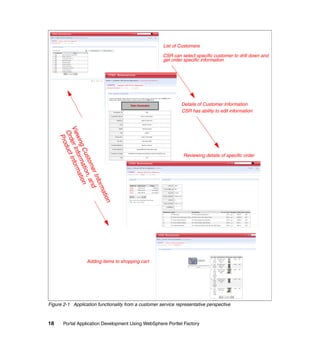
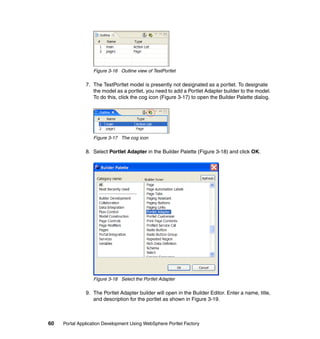
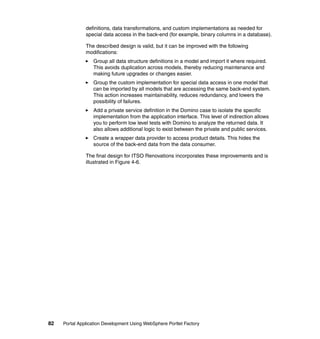
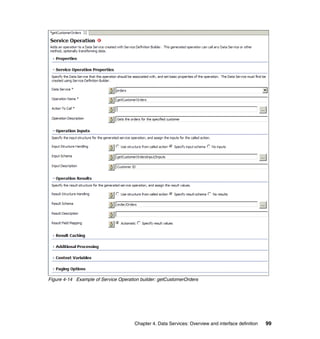
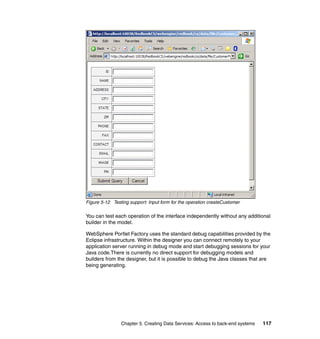
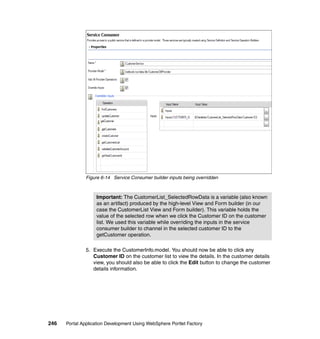
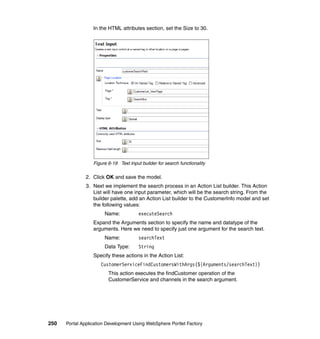
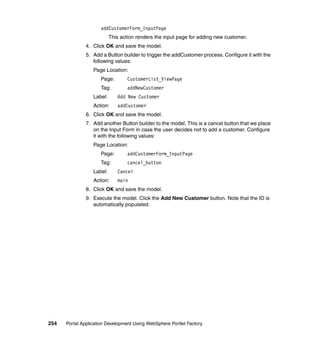
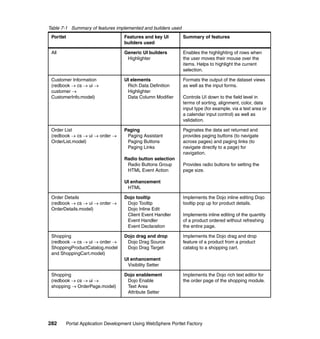
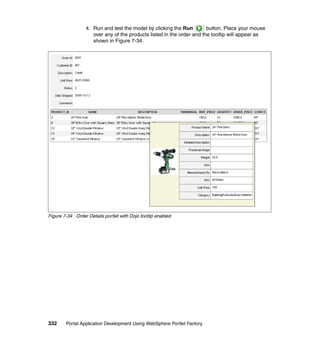
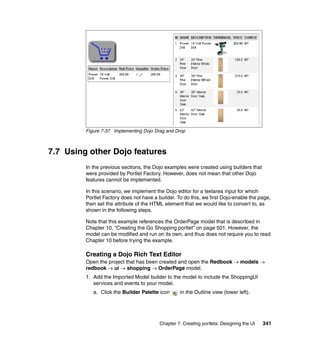
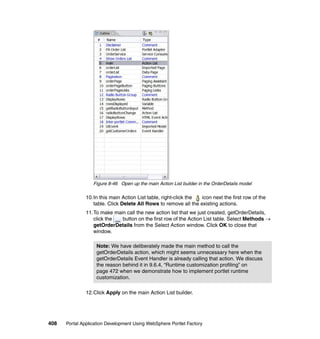
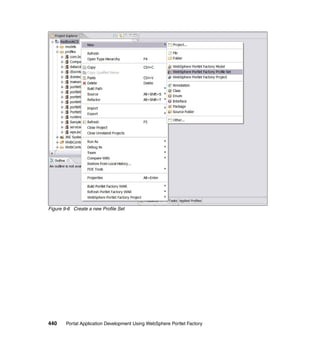
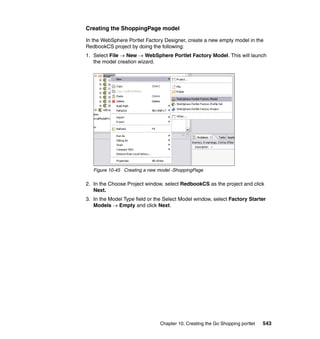
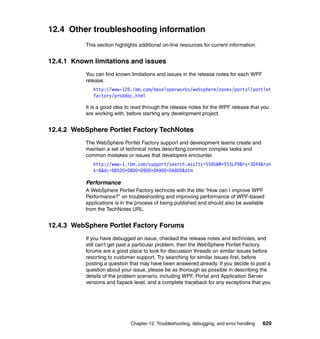
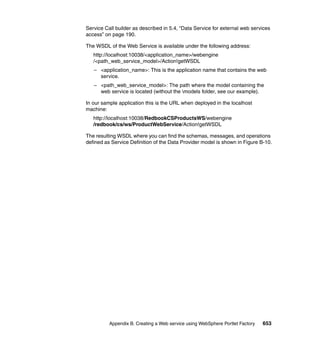
4. Run and test the model by clicking the Run button. Try to change the
quantity of the items ordered and check that the corresponding Order Price is
updated (Figure 7-35 on page 336).
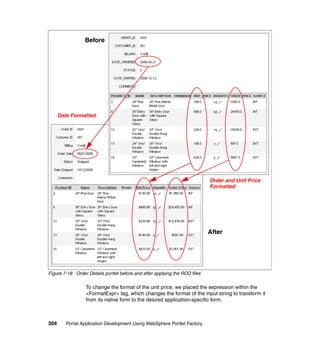
Chapter 7. Creating portlets: Designing the UI 335](https://image.slidesharecdn.com/portalapplicationdevelopmentusingwebsphereportletfactorysg247525-111020070342-phpapp02/85/Portal-application-development-using-Websphere-Portlet-Factory-355-320.jpg)
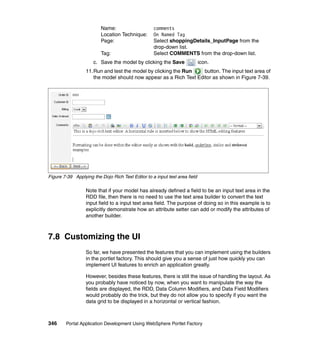
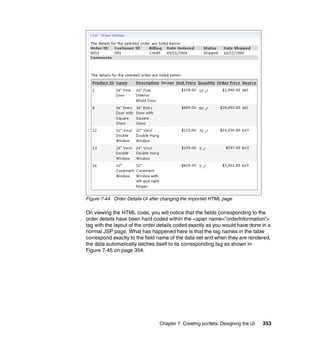


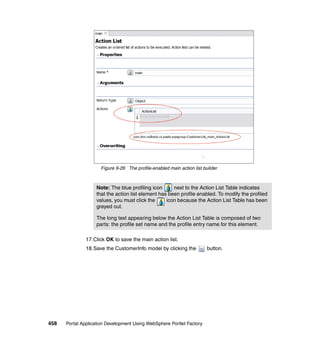
![Note: Two other components are generated behind the scenes when the
Link builder is created:
Order ID Links on JSP page
The Link builder generates a set of order ID links in the OrderList
portlet. In order to identify each individual ID link, the Link builder uses
the unique orderID value as a parameter of the href property of each
link. For example, the first order may have
<a href=“http://...?orderID=001” />
whereas the second one may have
<a href=“http://...?orderID=002” />
Looking at the WebAppTree, here is the exact code generated for the
set of ID links:
<a name="ID" ...
href='<%= JSPSupport.getActionURL(webAppAccess,"_gen_call_getOrderDetails",
new String[] {"orderID", ""+ webAppAccess.getVariables().getXmlText(
"OrderLoopVar","Order/ORDER_ID") }) %>'>
...
</a>
Basically, it uses the orderID value of each order to generate a unique
link; to identify which link is selected, we need to parse through the
HTTP request parameters to retrieve the “orderID” value.
Wrapper method (_gen_call_getOrderDetails)
A wrapper method is generated automatically when the Link builder is
created. Its basic function is to use the OrderLoopVar variable as a
reference to retrieve the orderID parameter from the HTTP request. It
then passes this orderID value to the Link builder Action (which is
getOrderDetails in this case). The getOrderDetails action then carries
out its tasks based on the input value.
The time to evaluate the input argument is crucial because it may result
in passing an incorrect value to the getOrderDetails action. To examine
the differences between the two options of when the argument should
be evaluated, we look at the codes generated in the WebApp Tree.
Chapter 8. Enabling portlet communication 401](https://image.slidesharecdn.com/portalapplicationdevelopmentusingwebsphereportletfactorysg247525-111020070342-phpapp02/85/Portal-application-development-using-Websphere-Portlet-Factory-421-320.jpg)
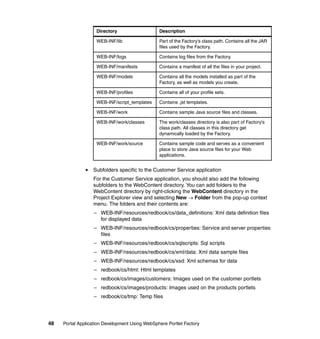
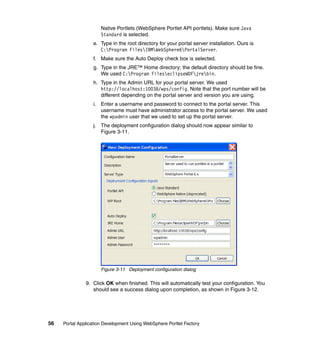
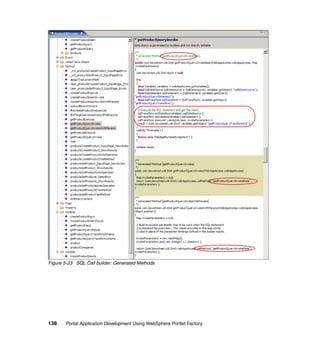
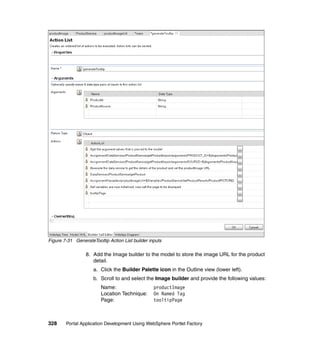
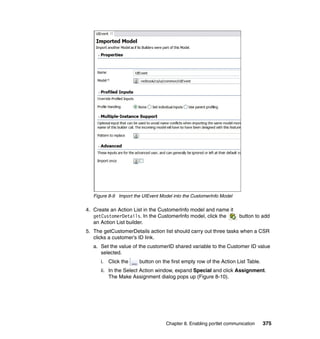
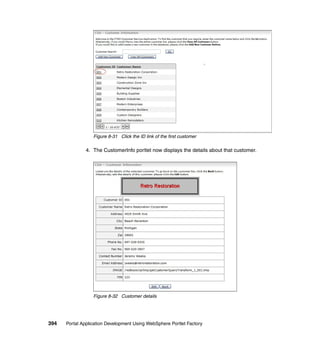
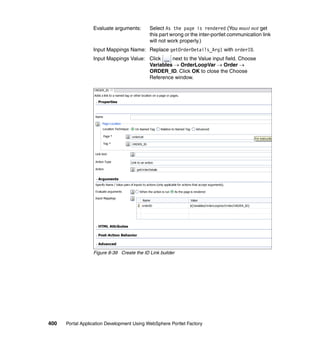
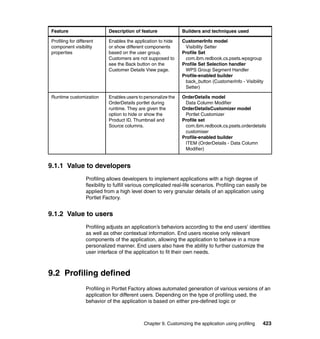
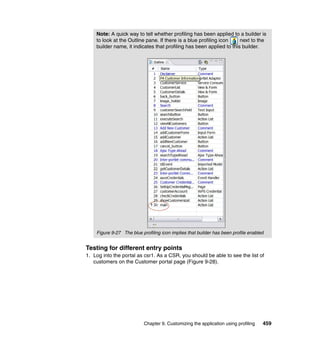
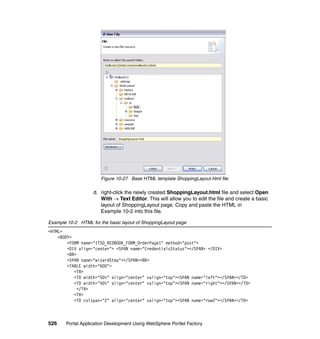
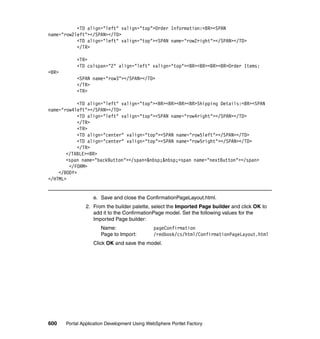
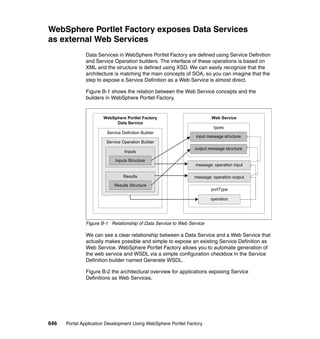
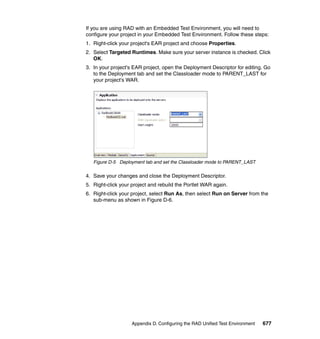
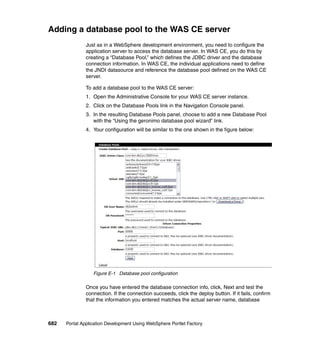
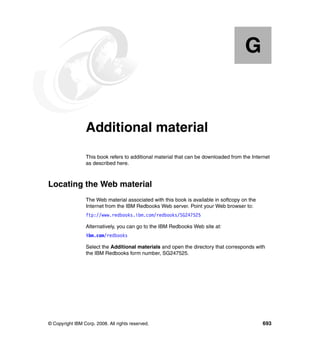
![If the As the page is rendered option is chosen, the wrapper method
looks like this:
public Object _gen_call_getOrderDetails(WebAppAccess webAppAccess){
...
returnValue = webAppAccess.callMethod("getOrderDetails", new Object[] {
webAppAccess.getRequestInputs().getInputValue("orderID") });
...
}
Notice that it actually parses through the input parameters of the HTTP
request to retrieve the “orderID” value and then passes it to the
getOrderDetails function.
Now, we look at the codes generated if the When the action is run
option is chosen:
public Object _gen_call_getOrderDetails(WebAppAccess webAppAccess){
...
returnValue = webAppAccess.callMethod("getOrderDetails", new Object[] {
webAppAccess.getVariables().getXmlText("OrderLoopVar", "Order/ORDER_ID")
});
...
}
Notice that with this option, the actual value of the Order/ORDER_ID of
the OrderLoopVar variable is being passed to getOrderDetails, instead
of the input parameter in the HTTP request. As the OrderLoopVar
variable loops through the entire result set, it will always have the last
result as the last instance (that is, choosing this option implies that no
matter which order ID link you click, you will always only be able to see
the order details of the last order).
Tip: You will find that in most cases when a LoopVar variable is involved,
the “As the page is rendered” option is mostly likely the choice, whereas
when a form is being submitted, the “When the action is run” option is most
likely chosen.
7. Click Apply to save the ID link builder.
8. Save the OrderList model by clicking the button.
402 Portal Application Development Using WebSphere Portlet Factory](https://image.slidesharecdn.com/portalapplicationdevelopmentusingwebsphereportletfactorysg247525-111020070342-phpapp02/85/Portal-application-development-using-Websphere-Portlet-Factory-422-320.jpg)
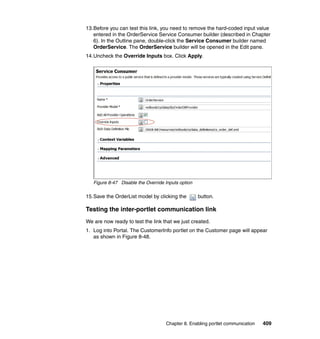
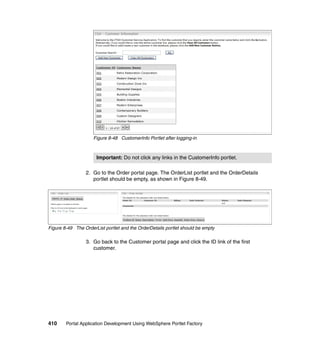


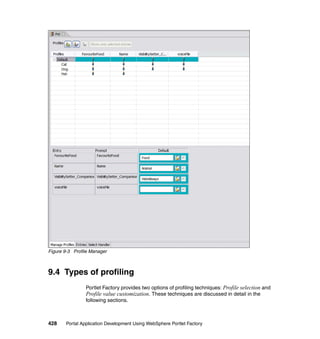
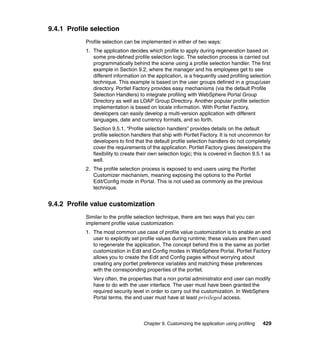
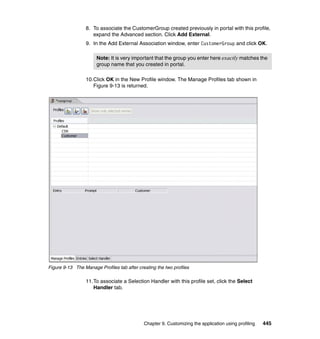
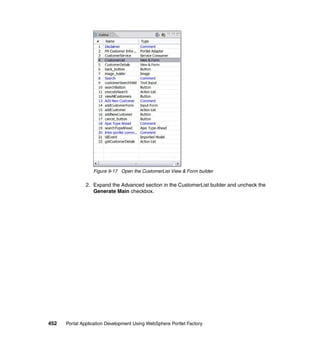

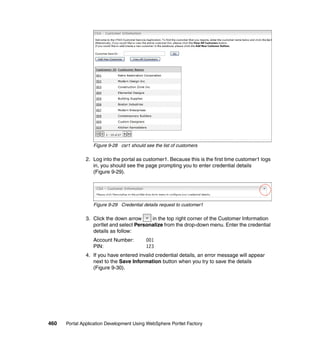
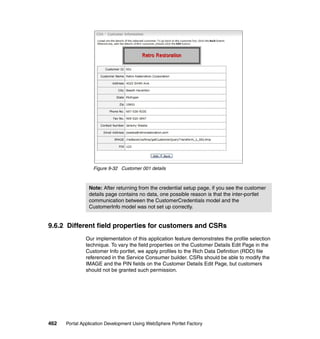

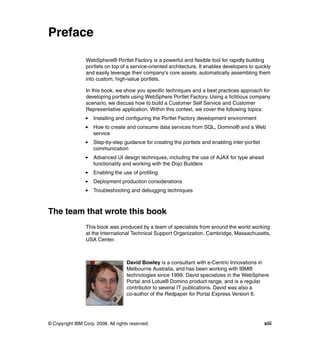
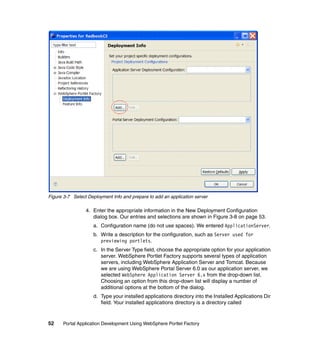
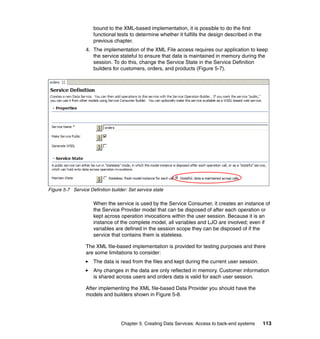
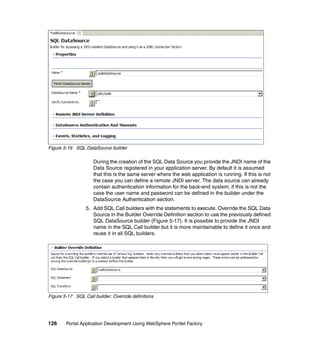
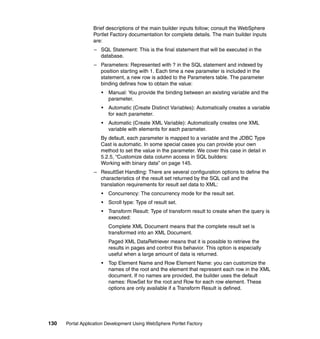
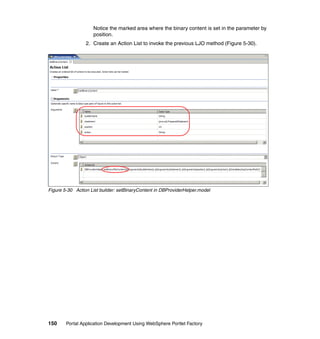
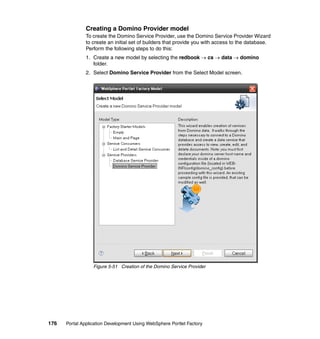
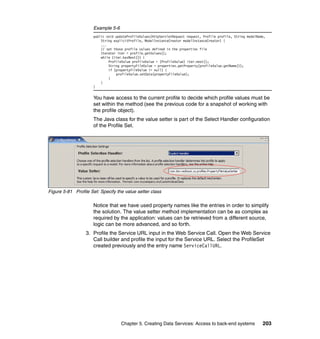
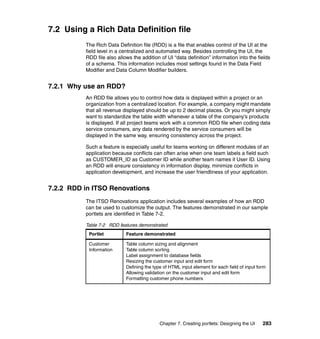
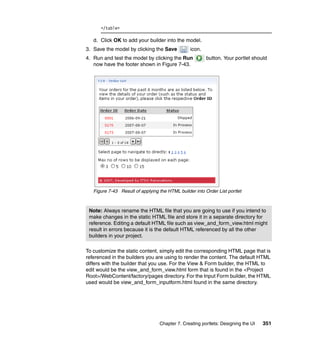
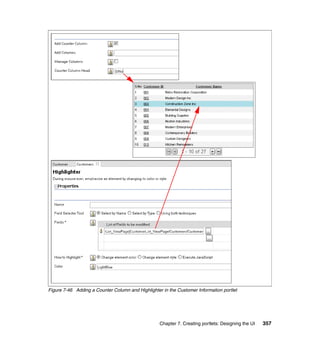
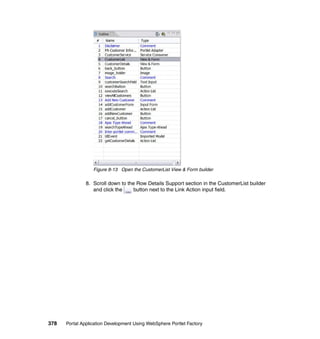
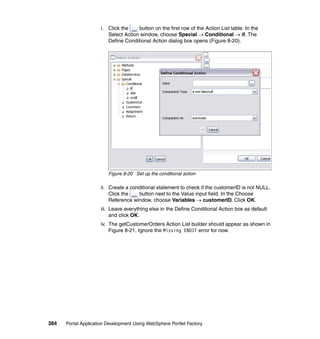
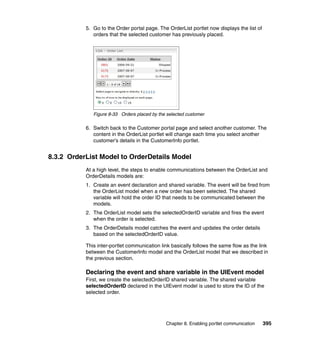
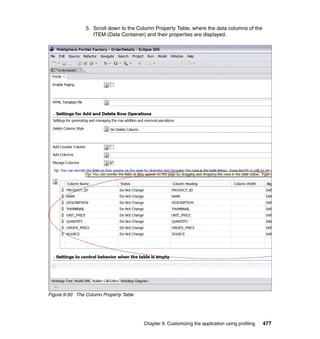
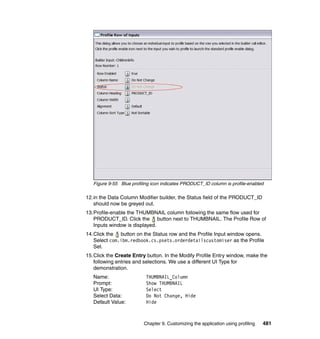
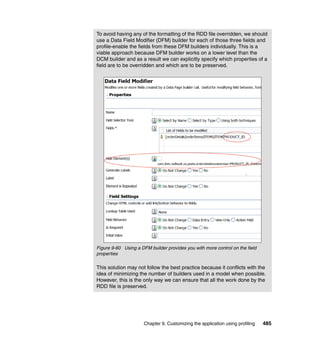
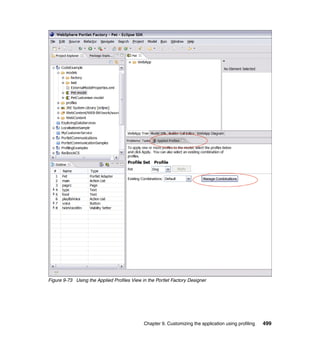
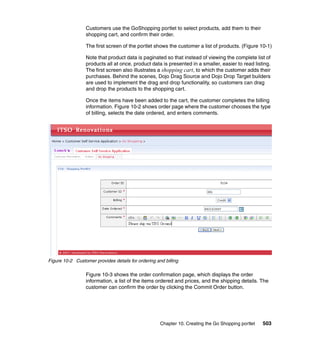
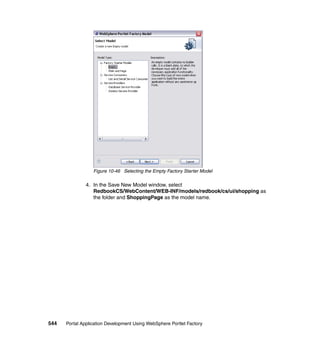
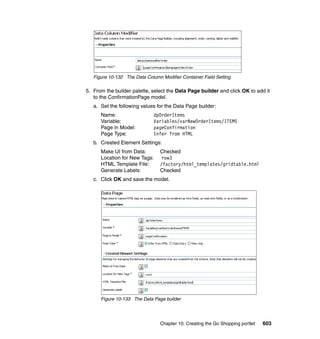
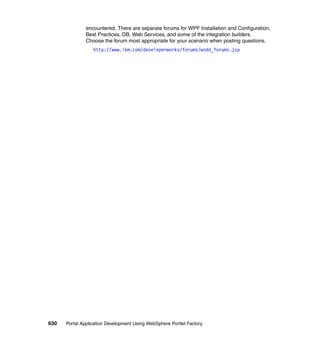
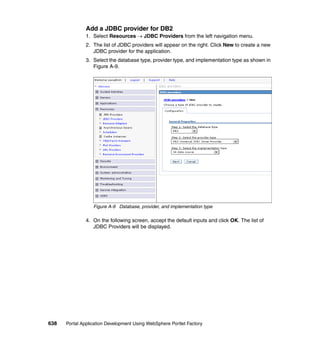
![Figure 9-47 Leave the name of the Data Column Modifier blank
3. In the Container Field row, click the button. Select
[orderDetails]orderItems → ITEMS → ITEM.
Figure 9-48 Choose the Container Field value for the data column modifier
4. Click OK in the Data Page Field Chooser window. The original Data Column
Modifier builder will expand and appear as shown in Figure 9-49.
Chapter 9. Customizing the application using profiling 475](https://image.slidesharecdn.com/portalapplicationdevelopmentusingwebsphereportletfactorysg247525-111020070342-phpapp02/85/Portal-application-development-using-Websphere-Portlet-Factory-495-320.jpg)

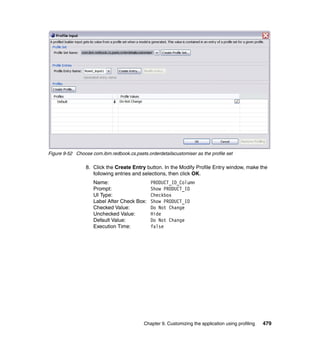


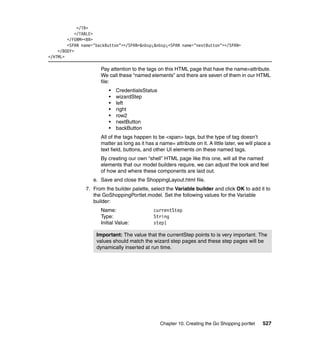
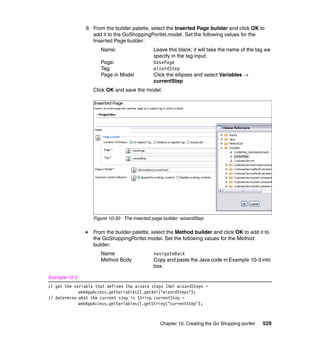
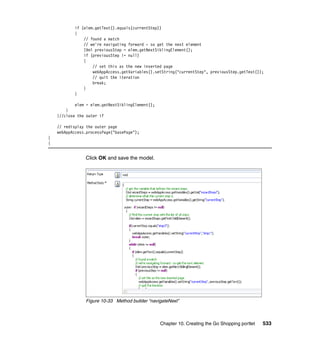
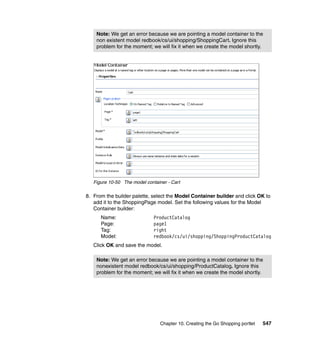

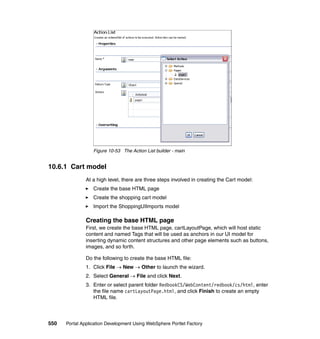

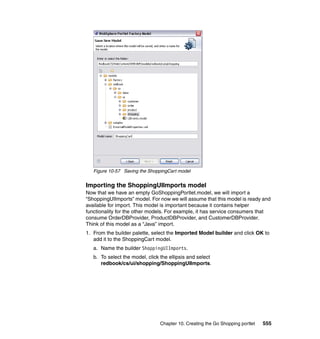
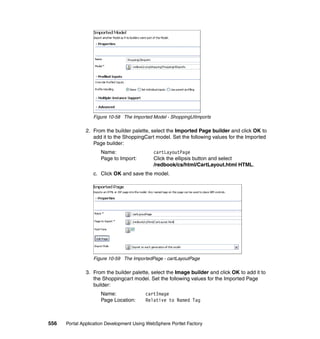
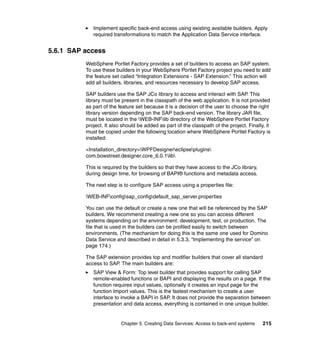
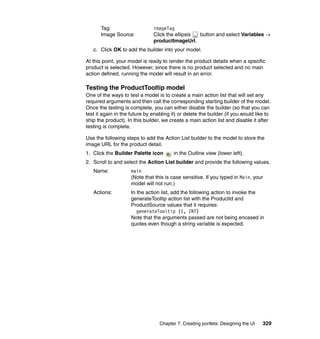
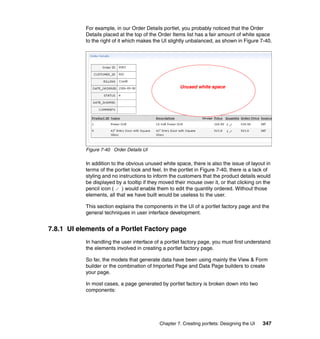
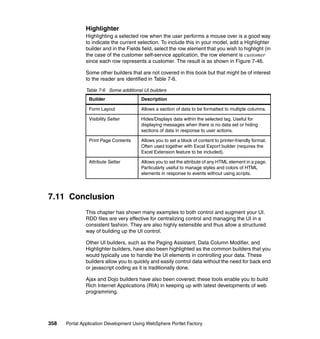
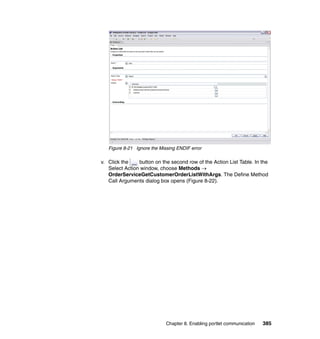
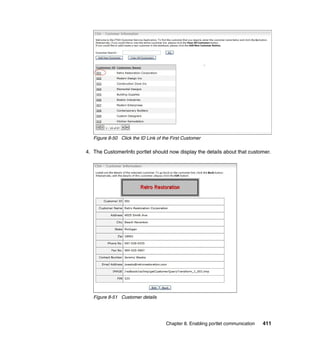
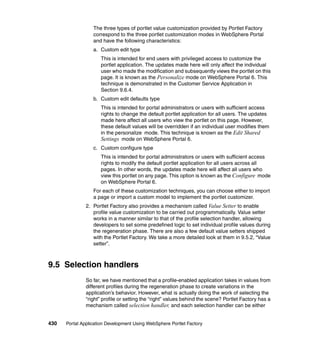
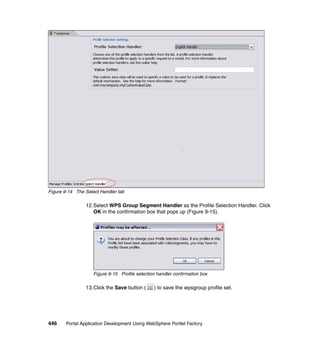
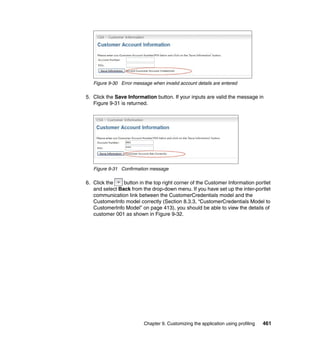
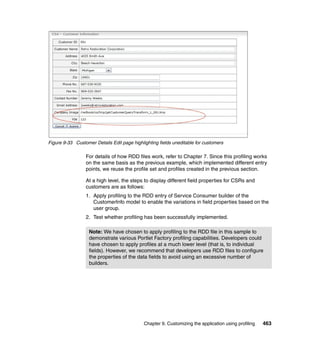
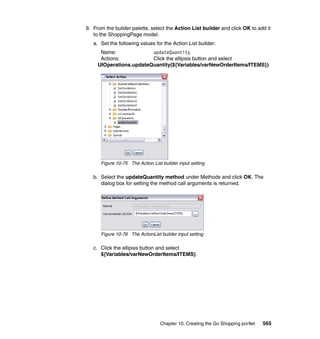
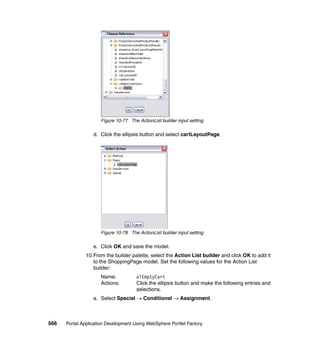
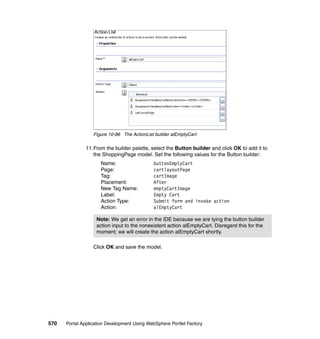
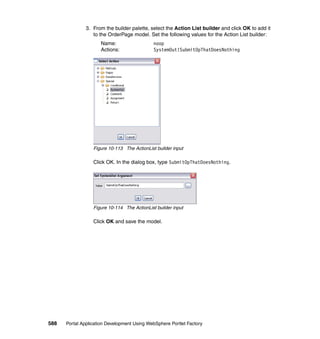
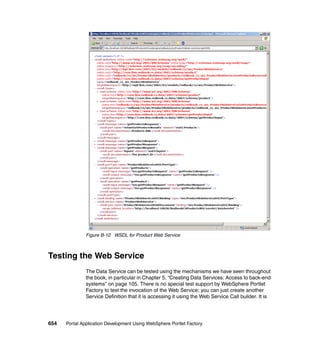
![Click OK and save the model.
Figure 10-61 The Data Page - OrderItems
5. From the builder palette, select the Data Column Modifier builder and click
OK to add it to the ShoppingCart model. Set the following values for the Data
Column Modifier builder:
Name: dataColumnModifierOrderItems
Container Field: Click the ellipsis button and select
[cartLayoutPage]OrderItems/ITEMS/ITEM
Manage Columns: Selected
Modify the Status and Column Sort Type selections
for the columns named in Table 10-1 and
Table 10-2.
Figure 10-62 DataColumnModifier builder - dataColumnModifierOrderItems
558 Portal Application Development Using WebSphere Portlet Factory](https://image.slidesharecdn.com/portalapplicationdevelopmentusingwebsphereportletfactorysg247525-111020070342-phpapp02/85/Portal-application-development-using-Websphere-Portlet-Factory-578-320.jpg)
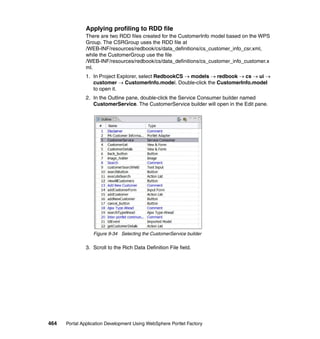
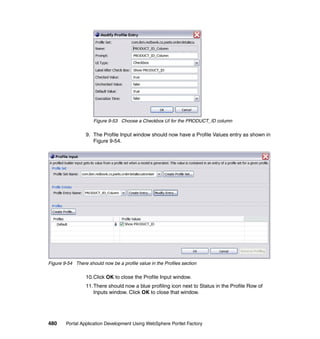
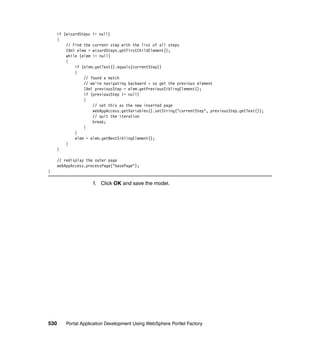
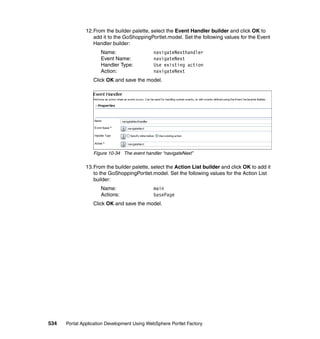
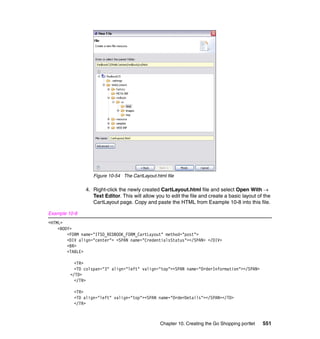
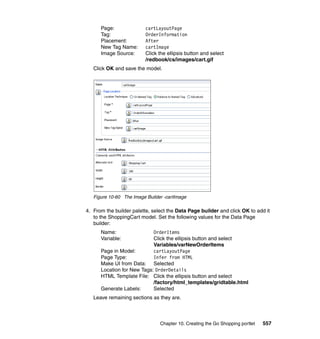
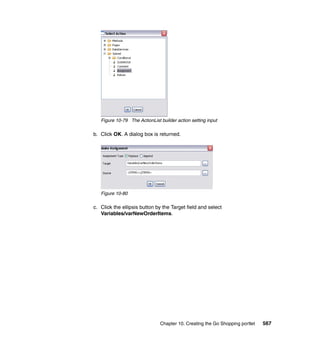
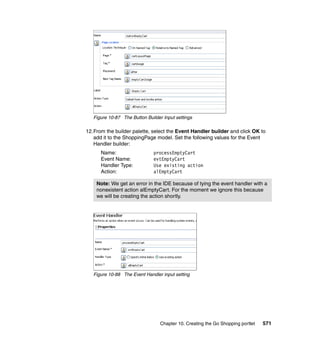
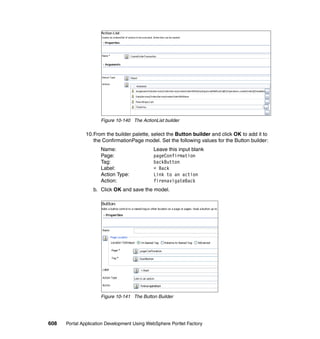
![For the second argument, click the ellipsis button and select
${DataServices/ProductService/getProduct/results/Products/Product}
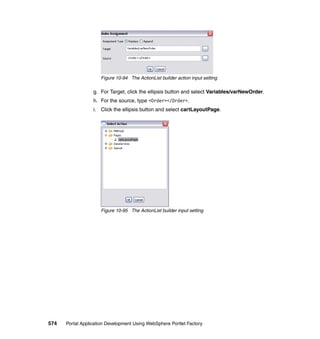
Figure 10-70 The ActionList builder setting
c. For action iii, click the ellipsis button and select cartLayoutPage.
Figure 10-71 The ActionList builder setting
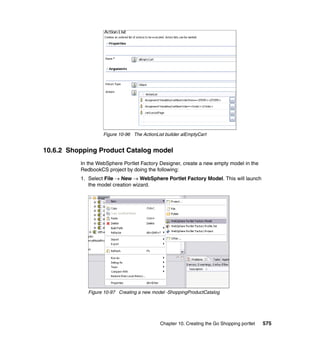
8. From the builder palette, select the Dojo Inline Edit builder and click OK to
add it to the ShoppingCart model.
a. Set the following values for the Dojo Inline Edit builder:
Name: editQuantity
Fields: Click the ellipsis and select
[cartLayoutPage]OrderItems/ITEMS/ITEM/QUANTITY
Chapter 10. Creating the Go Shopping portlet 563](https://image.slidesharecdn.com/portalapplicationdevelopmentusingwebsphereportletfactorysg247525-111020070342-phpapp02/85/Portal-application-development-using-Websphere-Portlet-Factory-583-320.jpg)

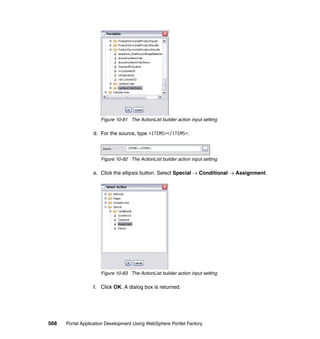
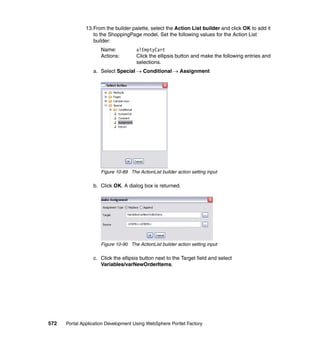
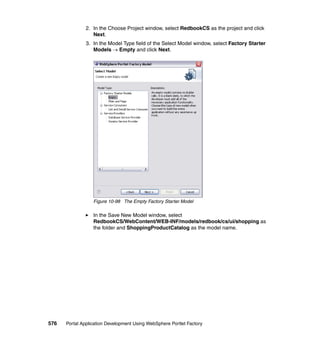
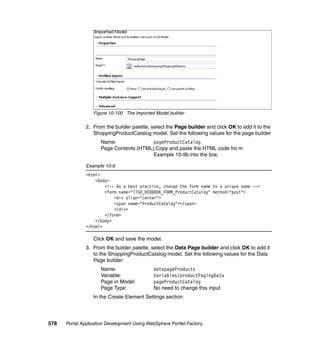
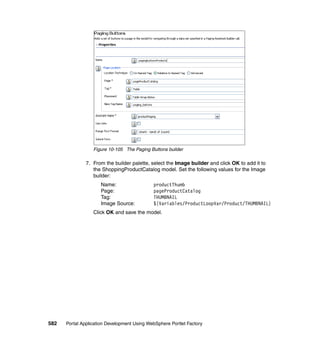
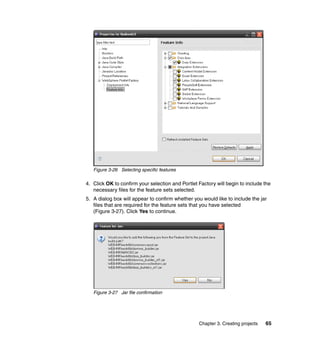
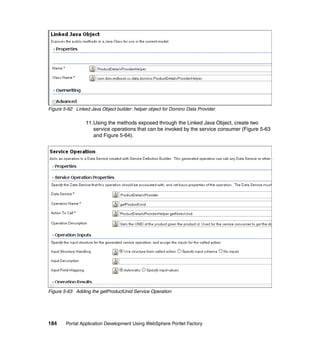
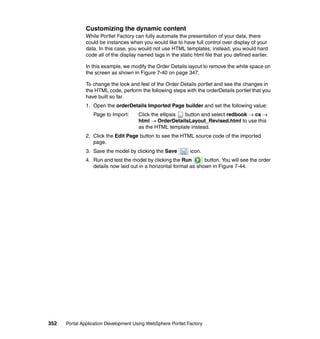
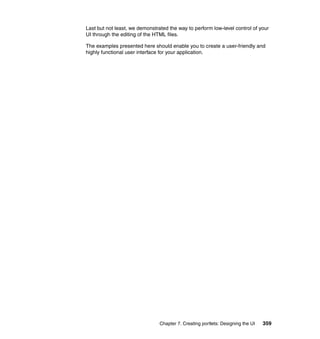
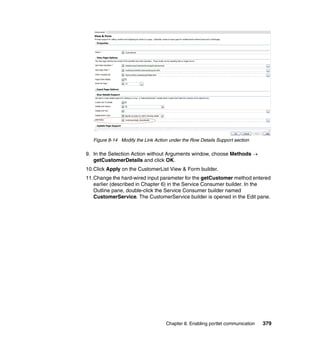
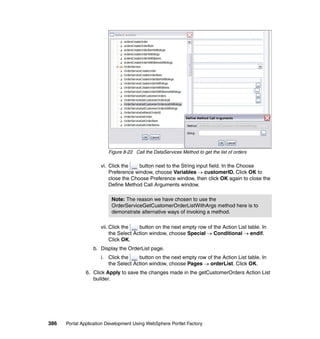
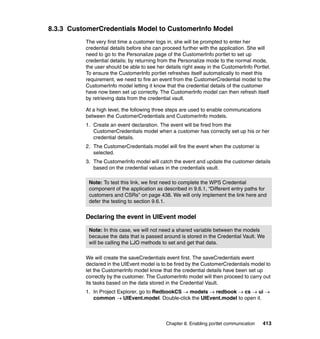
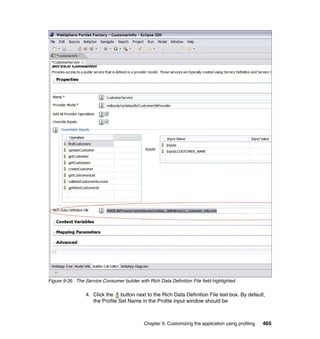
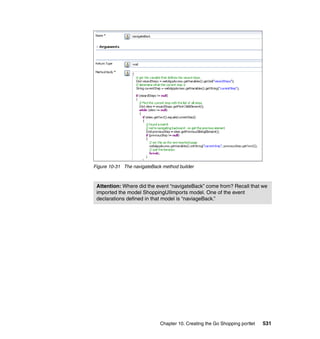
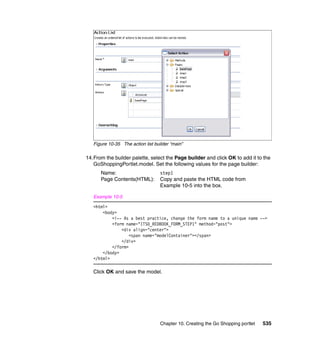
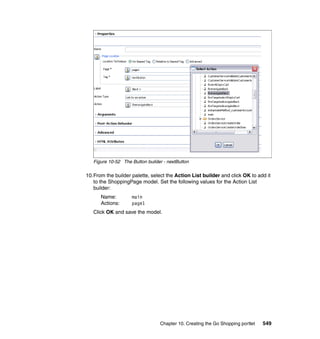
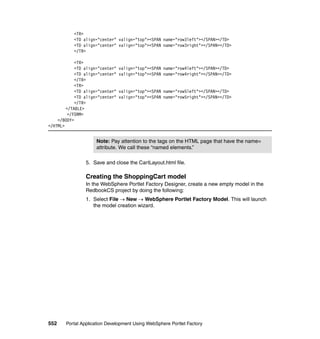
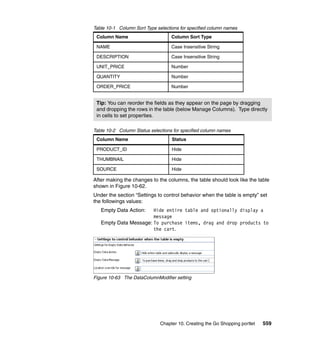
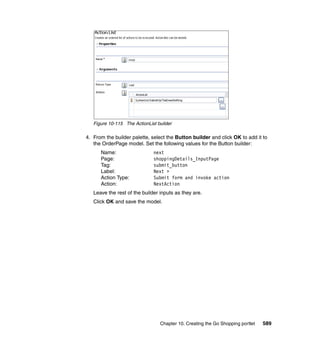
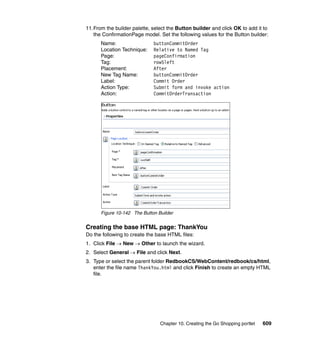
![Figure 10-106 The Image builder input
8. From the builder palette, select the Highlighter builder and click OK to add it
to the ShoppingProductCatalog model. Set the following values for the
Highlighter builder:
Name: highlightRows
Filed Selector Tool: Select by Name
Fields: [pageProductCatalog]datapageProducts/Products/Product
How to Highlight: Change element color
Color: LightBlue
Click OK and save the model.
Figure 10-107 The Highlighter builder -highlightRows
Chapter 10. Creating the Go Shopping portlet 583](https://image.slidesharecdn.com/portalapplicationdevelopmentusingwebsphereportletfactorysg247525-111020070342-phpapp02/85/Portal-application-development-using-Websphere-Portlet-Factory-603-320.jpg)
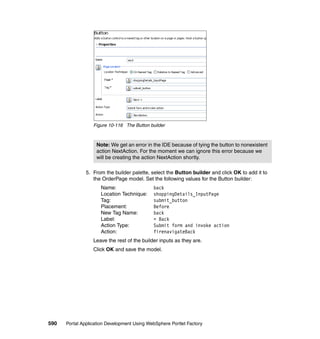
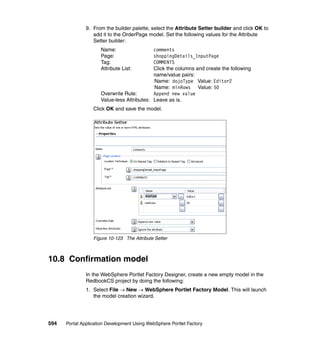


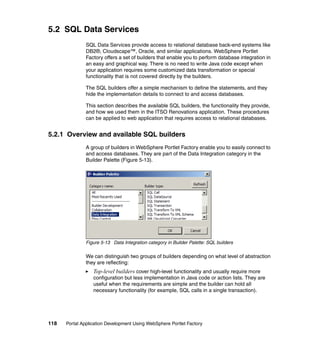
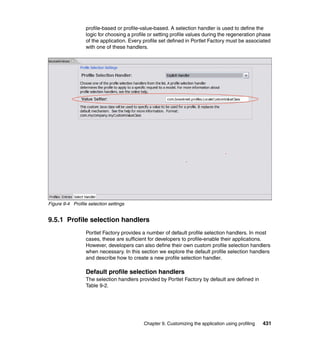
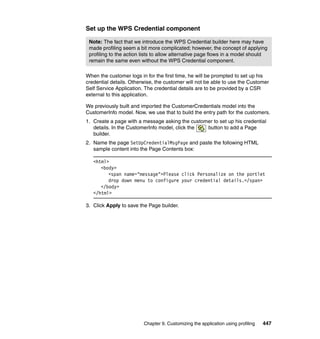
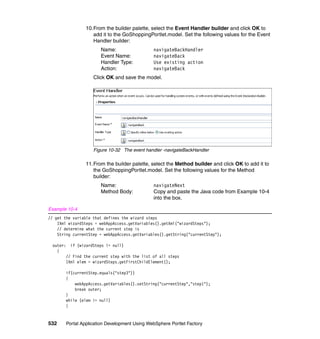
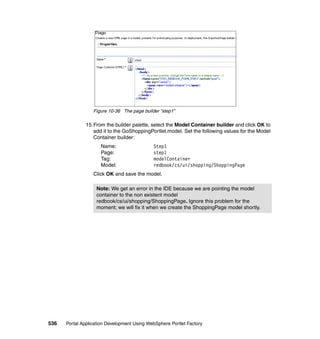
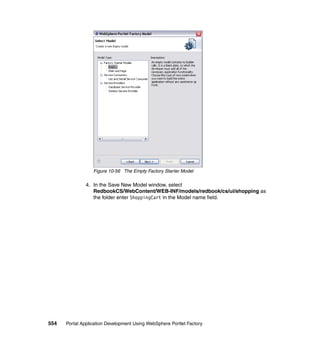
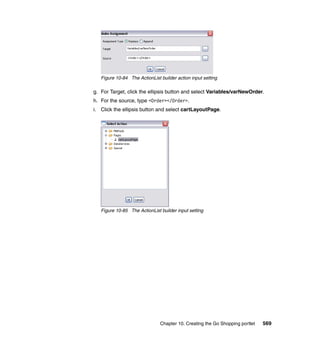
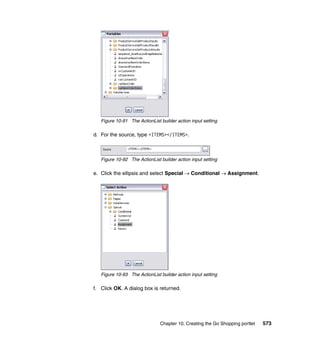
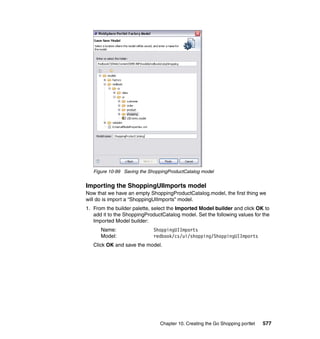
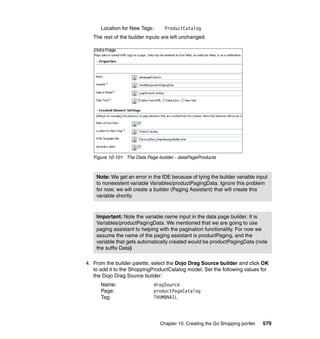
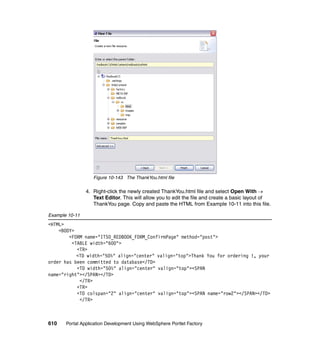
![Figure 10-130 Data Page builder
4. From the builder palette, select the Data Column Modifier builder and click
OK to add it to the ConfirmationPage model. Set the following values for the
Data Column Modifier builder:
Name: datacolumnmodifierOrder
Container Field: [pageConfirmation]datapageOrder/Order
Manage Columns: Change the status of the following Column Names:
STATUS: Hide
DATE_SHIPPED: Hide
Figure 10-131 The Data Column Modifier Manage Columns
Click OK and save the model.
602 Portal Application Development Using WebSphere Portlet Factory](https://image.slidesharecdn.com/portalapplicationdevelopmentusingwebsphereportletfactorysg247525-111020070342-phpapp02/85/Portal-application-development-using-Websphere-Portlet-Factory-622-320.jpg)
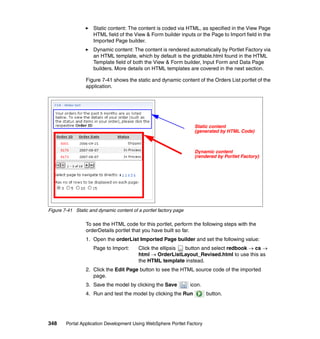
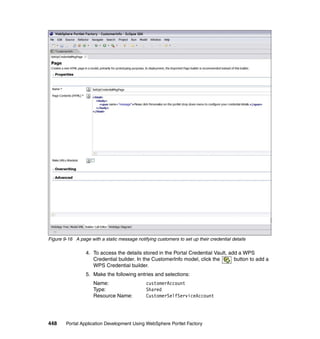
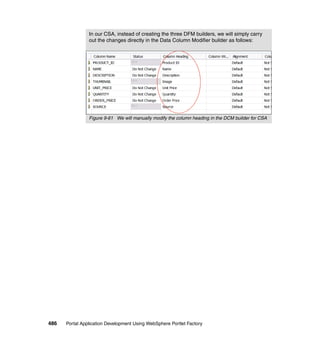
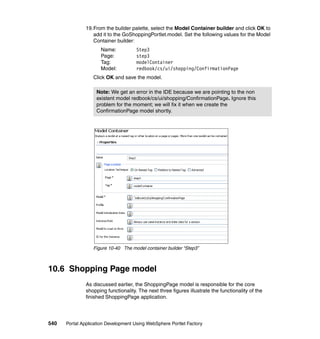
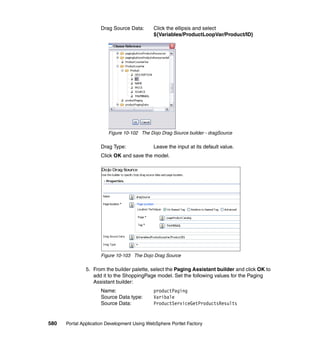
![6. From the builder palette, select the Data Column Modifier builder and click
OK to add it to the ConfirmationPage model. Set the following values for the
Data Column Modifier builder:
Name: dcmOrderItems
Container Field: [pageConfirmation]dpOrderItems/ITEMS/ITEM
Manage Columns: Change the Column Sort Type of the following
Column Names:
PRODUCT_ID Case Insensitive String
NAME Case Insensitive String
DESCRIPTION Case Insensitive String
THUMBNAIL Not Sortable
UNIT_PRICE Number
QUANTITY Number
ORDER_PRICE Number
SOURCE Case Insensitive String
Figure 10-134 The Data Column Modifier
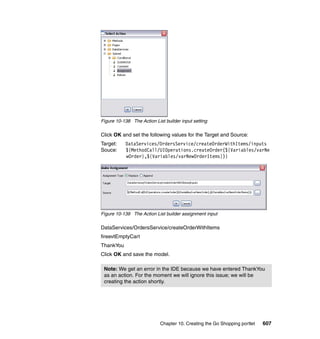
7. From the builder palette, select the Data Page builder and click OK to add it
to the ConfirmationPage model.
a. Set the following values for the Data Page builder:
Name: datapageShippingAddress
Variable: DataServices/CustomerService/getCustomer/results
Page in Model: pageConfirmation
b. Created Element Settings:
Make UI from Data: Checked
Location for New Tags: row4left
HTML Template File: /factory/html_templates/gridtable.html
Generate Labels: Checked
604 Portal Application Development Using WebSphere Portlet Factory](https://image.slidesharecdn.com/portalapplicationdevelopmentusingwebsphereportletfactorysg247525-111020070342-phpapp02/85/Portal-application-development-using-Websphere-Portlet-Factory-624-320.jpg)
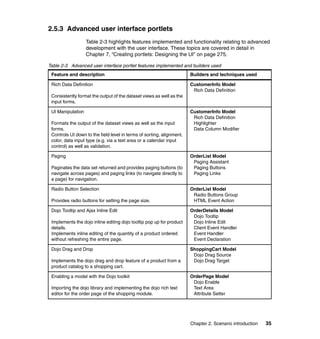
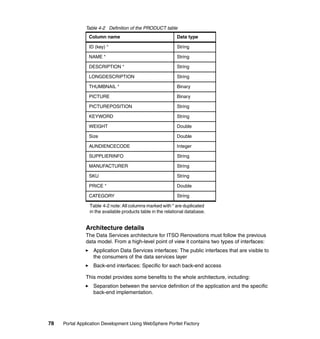
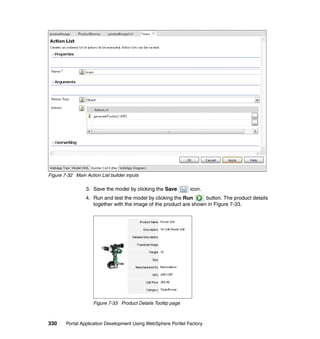
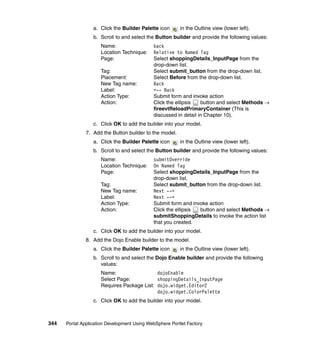
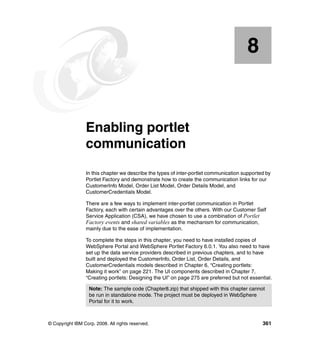
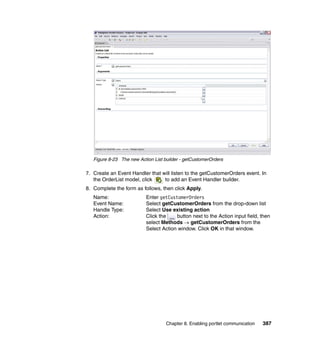
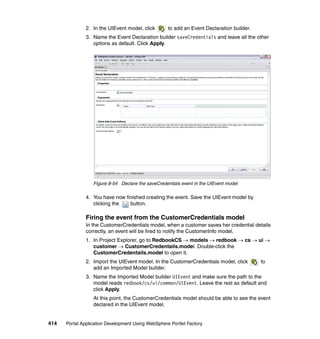
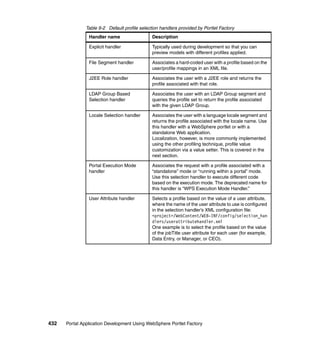
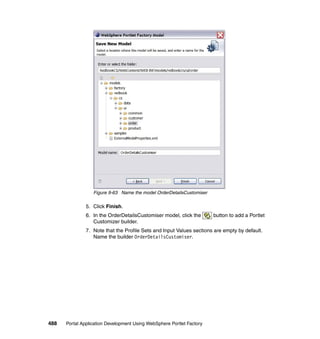
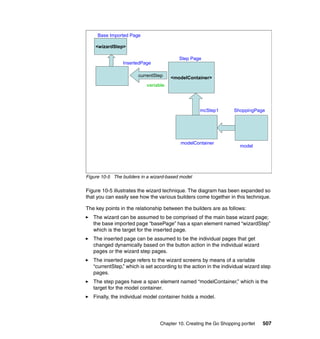
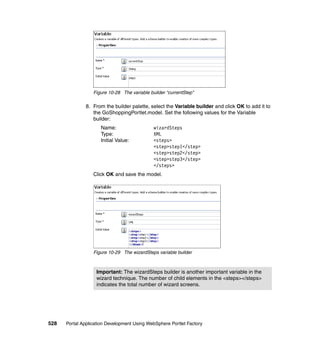
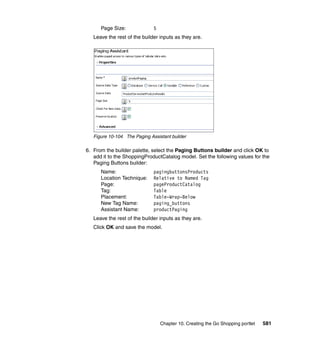
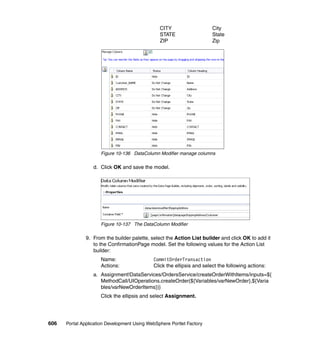
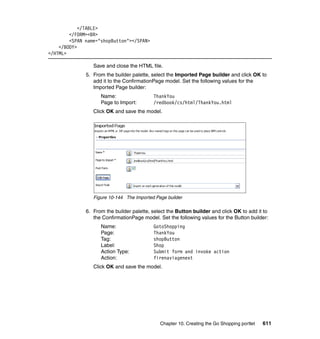
![c. Click OK and save the model.
Figure 10-135 The Data Page builder
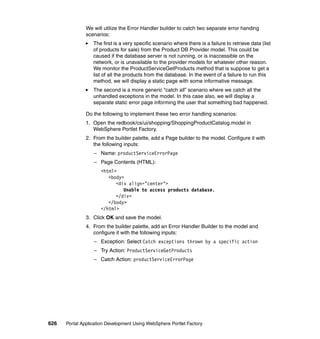
8. From the builder palette, select the Data Column Modifier builder and click
OK to add it to the ConfirmationPage model. Set the following values for the
Data Column Modifier builder:
Name: datacolumnmodifierShippingAddress
Container Field: [pageConfirmation]datapageShippingAddress/Customer
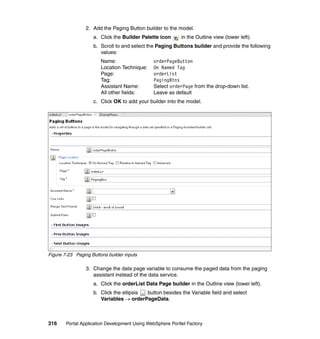
Manage Columns: Set the Status of the following Column Names:
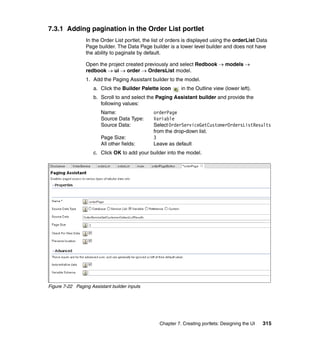
ID Hide
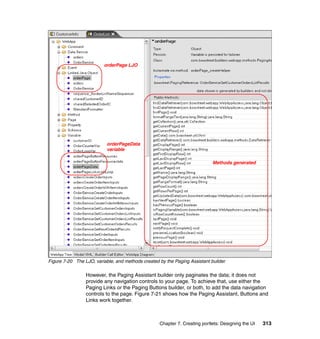
Customer_Name Do not Change
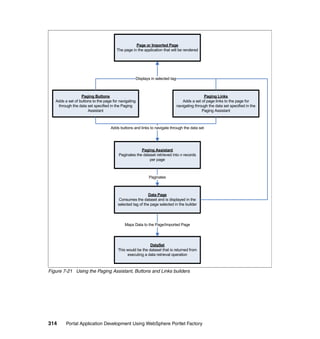
ADDRESS Do not Change
CITY Do not Change
STATE Do not Change
ZIP Do not Change
PHONE Hide
FAX Hide
CONTACT Hide
EMAIL Hide
IMAGE Hide
PIN Hide
Set the Column Heading values of the following
Column Names:
Customer_Name Name
ADDRESS Address
Chapter 10. Creating the Go Shopping portlet 605](https://image.slidesharecdn.com/portalapplicationdevelopmentusingwebsphereportletfactorysg247525-111020070342-phpapp02/85/Portal-application-development-using-Websphere-Portlet-Factory-625-320.jpg)


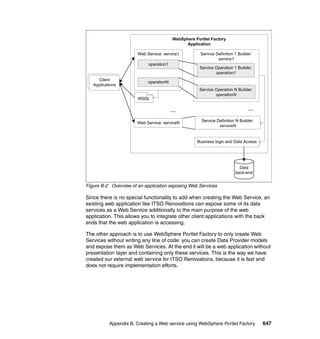
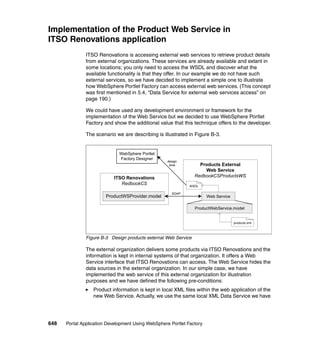
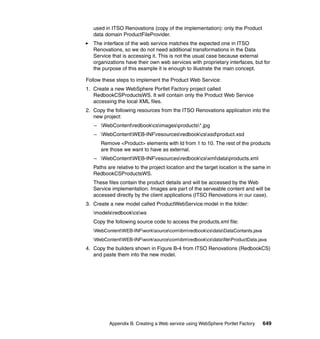
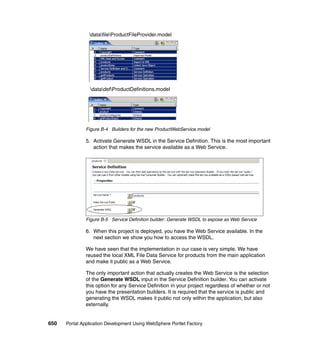


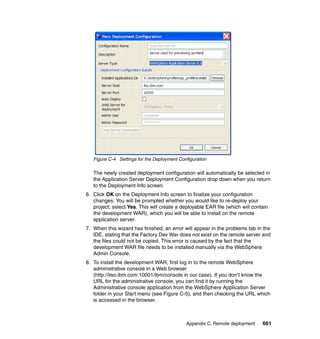
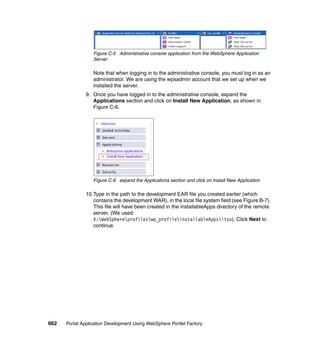
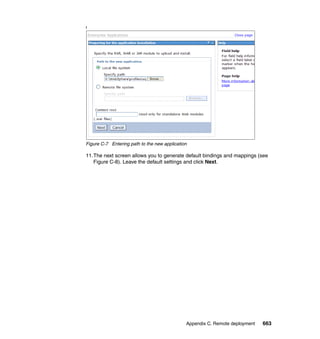
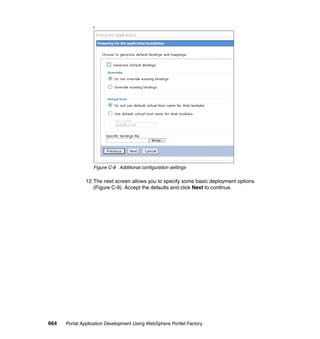
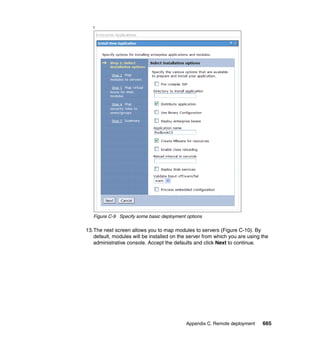
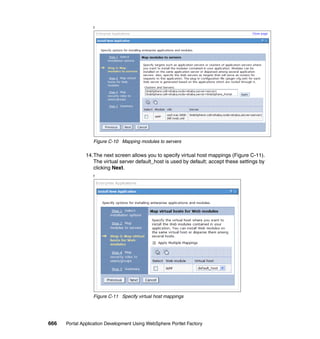
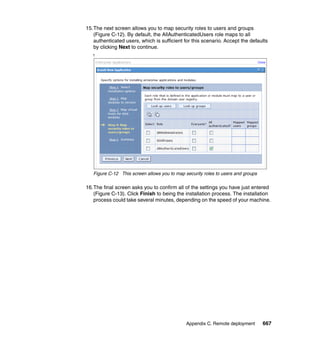
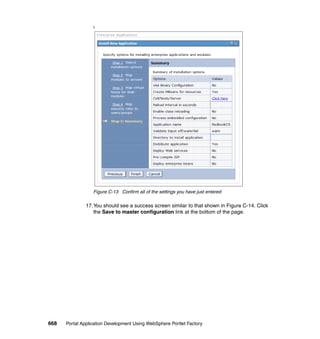


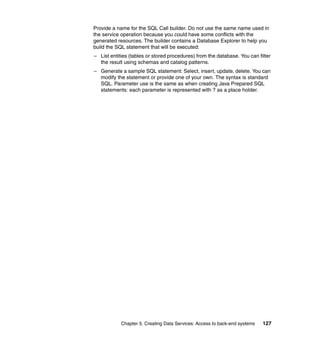
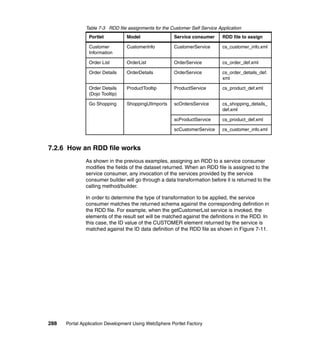
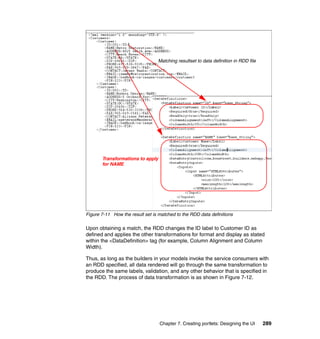
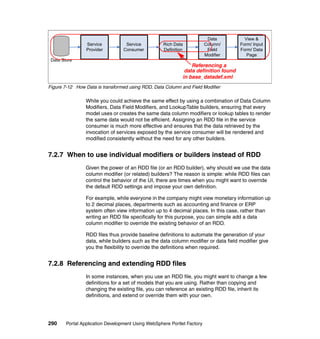
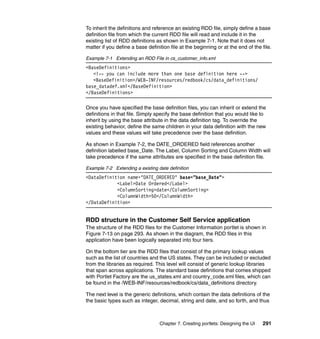
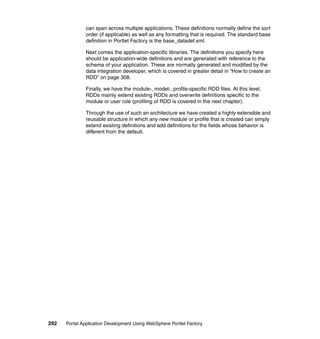
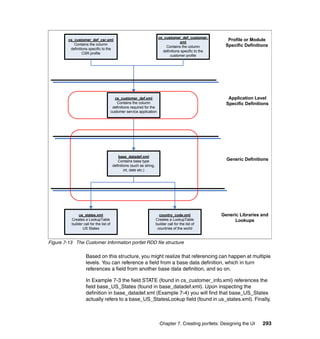
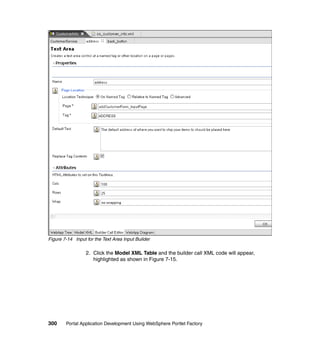
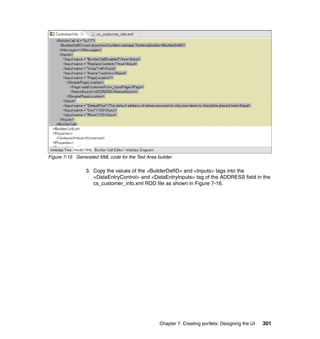
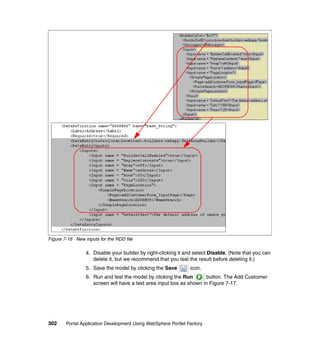
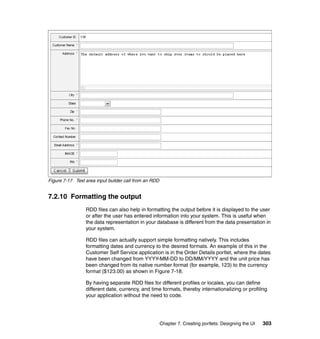
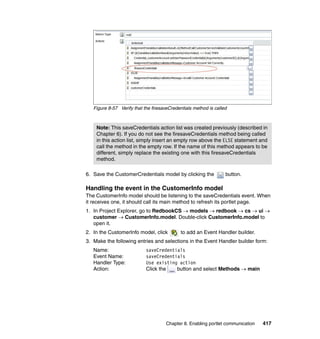
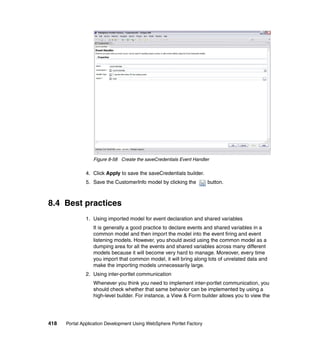
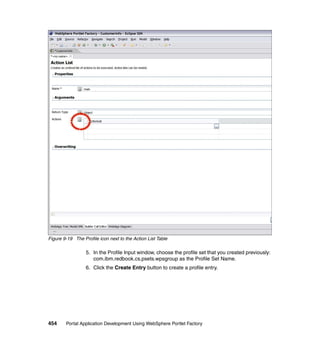
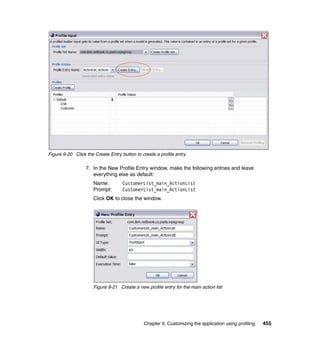
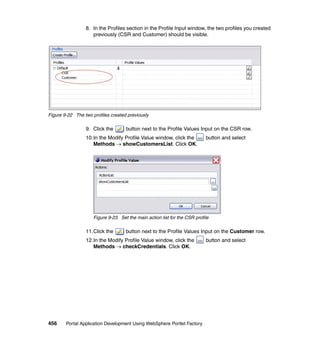
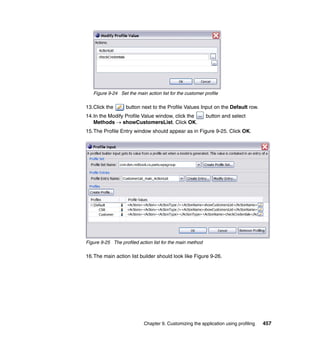
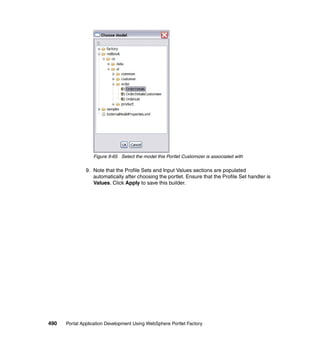
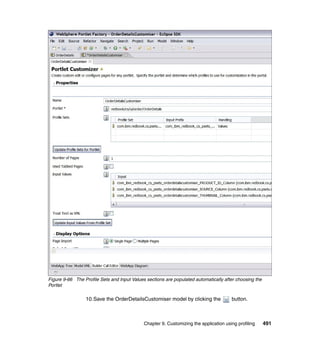
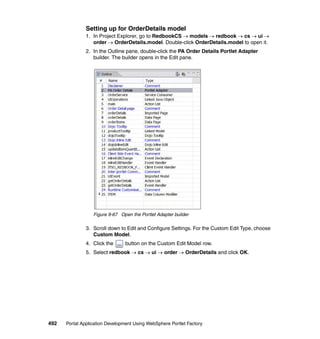
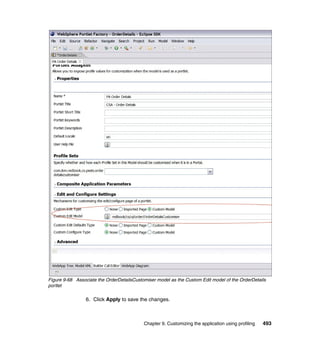
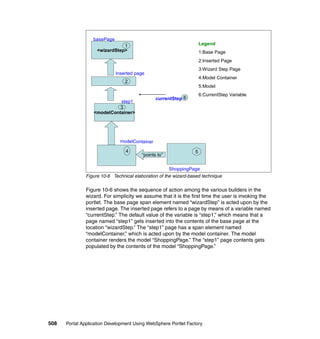
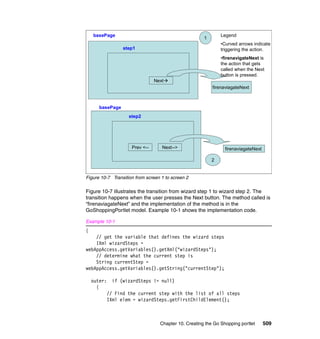
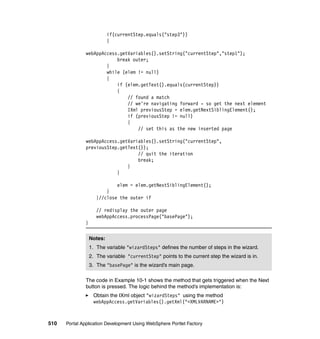
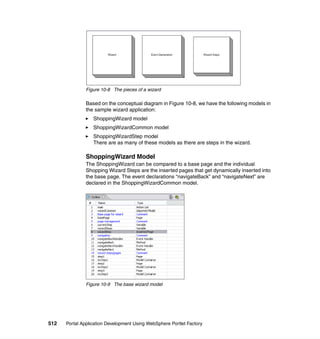
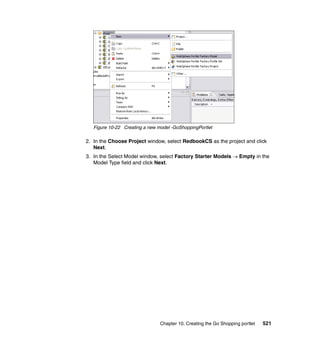
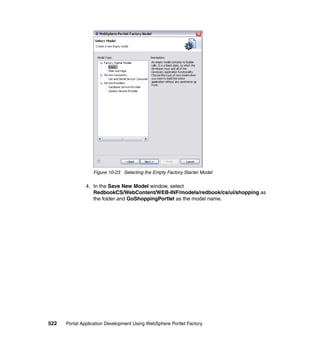
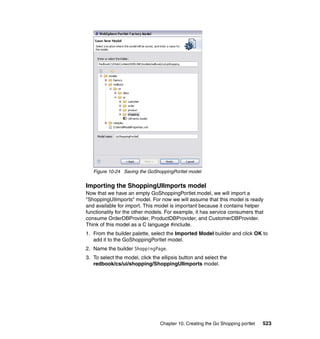
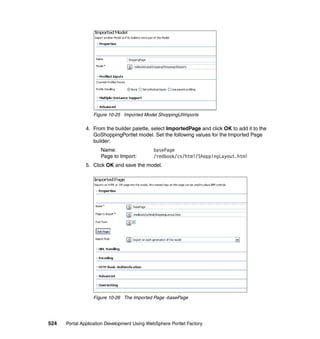
This document provides an overview and introduction to developing portal applications using WebSphere Portlet Factory. It describes the key capabilities and features of WebSphere Portlet Factory for rapidly developing portlets. The document includes best practices, guidance for building a sample application, and technical details about the architecture and development process in WebSphere Portlet Factory. It aims to provide step-by-step guidance for developers to create portal applications.