Downloaded 11 times


![Adobe InDesign CS5 Scripting Tutorial Getting started 9
JavaScript: .jsx
VBScript: .vbs
NOTE: If you are entering the JavaScript examples shown in this document, it is very important to use the
same capitalization shown in the example. JavaScript is case-sensitive, and the scripts will fail if they do
not use the capitalization shown. The AppleScript and VBScript examples are not case-sensitive. Again, it’s
better to use the script files that come with this tutorial.
NOTE: If you are copying and pasting scripts from this document, be aware that line breaks caused by the
layout of the document can cause errors in your script. As it can be very difficult to find such errors, we
recommend that you use the scripts that come with this tutorial.
Your first InDesign script
Next, we will create an InDesign script that creates a new document, adds a text frame, and enters text in
the text frame. This demonstrates how to do the following:
X Establish communication with InDesign.
X Create a new document.
X Create a text frame on a specific page.
X Add text to a text frame.
AppleScript
Start the Script Editor application (you can find it in your Applications folder, inside the AppleScript folder).
Enter the following script (or open the HelloWorld.applescript tutorial script):
tell application "Adobe InDesign CS5"
set myDocument to make document
tell page 1 of myDocument
set myTextFrame to make text frame
set geometric bounds of myTextFrame to {"6p", "6p", "24p", "24p"}
set contents of myTextFrame to "Hello World!"
end tell
end tell
Save the script as text with the file extension .applescript to the Scripts Panel folder (see “Installing
scripts” on page 6). To run the script, double-click the script name in the Scripts panel or click Run in the
Script Editor window.
JavaScript
Start the ExtendScript Toolkit (or a text editor). Enter the following script (or open the HelloWorld.jsx
tutorial script):
var myDocument = app.documents.add();
var myTextFrame = myDocument.pages.item(0).textFrames.add();
myTextFrame.geometricBounds = ["6p", "6p", "24p", "24p"];
myTextFrame.contents = "Hello World!";](https://image.slidesharecdn.com/indesigncs5scriptingtutorial-141126034747-conversion-gate02/85/In-designcs5-scripting-tutorial-9-320.jpg)
![Adobe InDesign CS5 Scripting Tutorial Getting started 10
Save the script as a plain-text file with the .jsx file extension to the Scripts Panel folder (see “Installing
scripts” on page 6). To run the script, double-click the script name in the Scripts panel, or select InDesign
from the application target pop-up menu in the ExtendScript Toolkit and then click the Run button).
VBScript
Start a text editor (for example, Notepad) and enter the following script (or open the HelloWorld.vbs
tutorial script):
Set myInDesign = CreateObject("InDesign.Application")
Set myDocument = myInDesign.Documents.Add
Set myTextFrame = myDocument.Pages.Item(1).TextFrames.Add
myTextFrame.GeometricBounds = Array("6p", "6p", "24p", "24p")
myTextFrame.Contents = "Hello World!"
Save the script as a text file with the .vbs file extension to the Scripts Panel folder (see “Installing scripts”
on page 6). To run the script, double-click the script name in the Scripts panel.
Walking through the script
Here is a step-by-step analysis of what the Hello World script does (in each scripting language):
1. Establish communication with the InDesign application object:
AppleScript: tell application "Adobe InDesign CS5"
JavaScript: Refer to the application as app.
VBScript: Set myInDesign = CreateObject("InDesign.Application")
2. Create a new document and a reference to the document:
AppleScript: Set myDocument to make document
JavaScript: Var myDocument = app.documents.add();
VBScript: Set myDocument = myInDesign.Documents.Add
3. Create a new text frame on the first page and a create a reference to the text frame.:
AppleScript: tell page 1 of myDocument
set myTextFrame to make text frame
JavaScript: var myTextFrame = myDocument.pages.item(0).textFrames.add();
VBScript: Set myTextFrame = myDocument.Pages.Item(1).TextFrames.Add
4. Set the geometric bounds (the location of the top, left, bottom, and right edges) of the text frame. In
this step, the script uses measurement overrides (“p” for picas) to ensure the text frame is the correct
size, regardless of your default measurement units. The locations are provided as a list, or array, of
values; each scripting language has a slightly different way of creating an array. For more on array
variables, see “Array variables” on page 14.
AppleScript: set geometric bounds of myTextFrame to {"6p", "6p", "24p", "24p"}
JavaScript: myTextFrame.geometricBounds = ["6p", "6p", "24p", "24p"];](https://image.slidesharecdn.com/indesigncs5scriptingtutorial-141126034747-conversion-gate02/85/In-designcs5-scripting-tutorial-10-320.jpg)

![Adobe InDesign CS5 Scripting Tutorial Scripting and the InDesign object model 12
The type of a value defines what sort of data the value contains. For example, the value type of the
contents of a word is a text string, and the value type of the leading of a paragraph is a number. Usually,
the values used in scripts are numbers or text. The following table explains the value types most
commonly used in InDesign scripting:
Value type What it is Example
Boolean Logical True or False. True
Integer Whole numbers (no decimal
points). Integers can be positive
or negative. In VBScript, you can
use the long data type for
integers. In AppleScript, you
also can use the fixed or long
data types for both integers and
real numbers.
14
Double (VBScript),
fixed or real
(AppleScript),
number (JavaScript)
A high-precision number that
can contain a decimal point.
13.9972
String A series of text characters.
Strings appear inside (straight)
quotation marks.
"I am a string"
Array (VBScript,
JavaScript)
or list (AppleScript)
A list of values (the values can
be any type).
AppleScript:
{"0p0", "0p0", "16p4", "20p6"}
VBScript:
Array("0p0", "0p0", "16p4", "20p6")
JavaScript:
["0p0", "0p0", "16p4", "20p6"]
Converting values from one type to another
All scripting languages supported by InDesign provide ways to convert variable values from one type to
another. The most common conversions involve converting numbers to strings (so you can enter them in
text or display them in dialog boxes) or converting strings to numbers (so you can use them to set a point
size or page location). See the following examples.
Apple-
Script
--To convert from a number to a string:
set myNumber to 2
set myString to (myNumber as string)
--To convert from a string to a number:
set myString to "2"
set myNumber to (myString as integer)
--if your string contains a decimal value, use "as real" rather than "as integer"](https://image.slidesharecdn.com/indesigncs5scriptingtutorial-141126034747-conversion-gate02/85/In-designcs5-scripting-tutorial-12-320.jpg)

![Adobe InDesign CS5 Scripting Tutorial Scripting and the InDesign object model 14
NOTE: In JavaScript, all variables not preceded by var are considered global by default; that is, they are not
bound to a specific function. var is not required, but we recommend that you use var in any script with
more than one function. In AppleScript and VBScript, variables are local unless specifically defined as
global variables. This means the variables do not persist outside the function in which they are created.
Try to use descriptive names for your variables, like firstPage or corporateLogo, rather than x or c. This
makes your script easier to read. Longer names do not affect the execution speed of the script.
Variable names must be one word, but you can use internal capitalization (myFirstPage) or underscore
characters (my_first_page) to create more readable names. Variable names cannot begin with a number,
and they cannot contain punctuation or quotation marks.
Array variables
AppleScript, JavaScript, and VBScript support arrays, which is a variable type that is a list of values. In
AppleScript, an array is called a list. Examples of defining arrays are shown below:
Language Examples of defining arrays
AppleScript set myArray to {1, 2, 3, 4}
JavaScript myArray = [1, 2, 3, 4];
VBScript myArray = Array(1, 2, 3, 4)
Visual
Basic.NET
myArray = New Double (1, 2, 3, 4)
To refer to an item in an array, refer to the item by its index in the array. The first item in an array in VBScript
and JavaScript is item 0; in AppleScript, item 1. Examples of referring to items in an array are shown in the
following table:
Language Examples of referring to an item in an array
AppleScript set myFirstArrayItem to item 1 of myArray
JavaScript var myFirstArrayItem = myArray[0];
VBScript myFirstArrayItem = myArray(0)
NOTE: The Visual Basic OptionBase statement can be used to set the first item of an array to item 1. In the
examples in this document, the first item in an array is item 0, not item 1, because that is the default. If you
set OptionBase to 1, you must adjust all array references in the sample scripts accordingly.
Arrays can include other arrays, as shown in the following table:
Language Examples
AppleScript set myArray to {{0, 0}, {72, 72}}
JavaScript var myArray = [[0,0], [72,72]];](https://image.slidesharecdn.com/indesigncs5scriptingtutorial-141126034747-conversion-gate02/85/In-designcs5-scripting-tutorial-14-320.jpg)


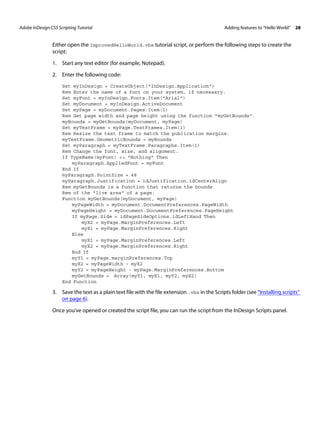
![Adobe InDesign CS5 Scripting Tutorial Adding features to “Hello World” 27
1. Enter the following JavaScript in a new text file:
//Improved Hello World!
//Enter the name of a font on your system, if necessary.
try{
myFont = app.fonts.item("Arial");
}
catch (myError){};
var myDocument = app.documents.item(0);
with(myDocument){
var myPage = pages.item(0);
var myBounds = myGetBounds(myPage,myDocument);
with(myDocument.pages.item(0)){
//Get a reference to the text frame.
var myTextFrame = textFrames.item(0);
//Change the size of the text frame.
myTextFrame.geometricBounds = myBounds;
var myParagraph = myTextFrame.paragraphs.item(0);
myParagraph.appliedFont = myFont;
myParagraph.justification = Justification.centerAlign;
myParagraph.pointSize = 48;
}
}
//myGetBounds is a function that returns the bounds
//of the "live area" of a page.
function myGetBounds(myDocument, myPage){
var myPageWidth = myDocument.documentPreferences.pageWidth;
var myPageHeight = myDocument.documentPreferences.pageHeight
if(myPage.side == PageSideOptions.leftHand){
var myX2 = myPage.marginPreferences.left;
var myX1 = myPage.marginPreferences.right;
}
else{
var myX1 = myPage.marginPreferences.left;
var myX2 = myPage.marginPreferences.right;
}
var myY1 = myPage.marginPreferences.top;
var myX2 = myPageWidth - myX2;
var myY2 = myPageHeight - myPage.marginPreferences.bottom;
return [myY1, myX1, myY2, myX2];
}
2. Save the script as a plain text file with the file extension .jsx in the Scripts Panel folder (see “Installing
scripts” on page 6).
Once you’ve opened or created the script file, you can run the script from the ExtendScript Toolkit or from
the InDesign Scripts panel.
VBScript
Make sure you have the Hello World document open—this script relies on objects we created in that
script. If you closed the document without saving it, simply run the HelloWorld.vbs script again to make
a new document.](https://image.slidesharecdn.com/indesigncs5scriptingtutorial-141126034747-conversion-gate02/85/In-designcs5-scripting-tutorial-27-320.jpg)


![Adobe InDesign CS5 Scripting Tutorial Constructing a document 34
AppleScript
set myLeftPage to page 1 of myMasterSpread
set myRightPage to page 2 of myMasterSpread
tell myLeftPage
set myLeftFooter to make text frame
set geometric bounds of myLeftFooter to {728, 70, 742, 528}
set first baseline offset of text frame preferences of myLeftFooter to leading
offset
set contents of myLeftFooter to auto page number
set point size of character 1 of parent story of myLeftFooter to 11
set leading of character 1 of myLeftFooter to 14
end tell
tell myRightPage
set myRightFooter to make text frame
set geometric bounds of myRightFooter to {728, 84, 742, 542}
set first baseline offset of text frame preferences of myRightFooter to leading
offset
set contents of myRightFooter to auto page number
set point size of character 1 of parent story of myRightFooter to 11
set leading of character 1 of myRightFooter to 14
set justification of character 1 of myRightFooter to right align
end tell
JavaScript
var myMasterSpread = myDocument.masterSpreads.item(0);
var myLeftPage = myMasterSpread.pages.item(0);
var myRightPage = myMasterSpread.pages.item(1);
var myLeftFooter = myLeftPage.textFrames.add();
myLeftFooter.geometricBounds = [728, 70, 742, 528];
myLeftFooter.textFramePreferences.firstBaselineOffset = FirstBaseline.leadingOffset;
myLeftFooter.contents = SpecialCharacters.autoPageNumber;
myLeftFooter.parentStory.characters.item(0).pointSize = 11;
myLeftFooter.parentStory.characters.item(0).leading = 14;
var myRightFooter = myRightPage.textFrames.add();
myRightFooter.geometricBounds = [728, 84, 742, 542];
myRightFooter.textFramePreferences.firstBaselineOffset = FirstBaseline.leadingOffset;
myRightFooter.contents = SpecialCharacters.autoPageNumber;
myRightFooter.parentStory.characters.item(0).pointSize = 11;
myRightFooter.parentStory.characters.item(0).leading = 14;
myRightFooter.parentStory.characters.item(0).justification =
Justification.rightAlign;](https://image.slidesharecdn.com/indesigncs5scriptingtutorial-141126034747-conversion-gate02/85/In-designcs5-scripting-tutorial-34-320.jpg)

![Adobe InDesign CS5 Scripting Tutorial Constructing a document 36
AppleScript
tell myLeftPage
set myLeftTextFrame to make text frame
set geometric bounds of myLeftTextFrame to {70, 70, 714, 528}
set first baseline offset of text frame preferences of myLeftTextFrame to leading
offset
set text column count of text frame preferences of myLeftTextFrame to 3
set text column gutter of text frame preferences of myLeftTextFrame to 14
--Add a label to make the frame easier to find later on.
set label of myLeftTextFrame to "BodyTextFrame"
end tell
tell myRightPage
set myRightTextFrame to make text frame
set geometric bounds of myRightTextFrame to {70, 84, 714, 542}
set first baseline offset of text frame preferences of myRightTextFrame to leading
offset
set text column count of text frame preferences of myRightTextFrame to 3
set text column gutter of text frame preferences of myRightTextFrame to 14
--Add a label to make the frame easier to find later on.
set label of myRightTextFrame to "BodyTextFrame"
end tell
--Link the two frames using the next text frame property.
set next text frame of myLeftTextFrame to myRightTextFrame
JavaScript
var myLeftPage = myMasterSpread.pages.item(0);
var myRightPage = myMasterSpread.pages.item(1);
var myLeftTextFrame = myLeftPage.textFrames.add();
myLeftTextFrame.geometricBounds = [70, 70, 714, 528];
myLeftTextFrame.textFramePreferences.firstBaselineOffset =
FirstBaseline.leadingOffset;
myLeftTextFrame.textFramePreferences.textColumnCount = 3;
myLeftTextFrame.textFramePreferences.textColumnGutter = 14;
//Add a label to make the frame easier to find later on.
myLeftTextFrame.label = "BodyTextFrame";
var myRightTextFrame = myRightPage.textFrames.add();
myRightTextFrame.geometricBounds = [70, 84, 714, 542];
myRightTextFrame.textFramePreferences.firstBaselineOffset =
FirstBaseline.leadingOffset;
myRightTextFrame.textFramePreferences.textColumnCount = 3;
myRightTextFrame.textFramePreferences.textColumnGutter = 14;
//Add a label to make the frame easier to find later on.
myRightTextFrame.label = "BodyTextFrame";
//Link the two frames using the nextTextFrame property.
myLeftTextFrame.nextTextFrame = myRightTextFrame;
VBScript
Set myLeftTextFrame = myLeftPage.TextFrames.Add
myLeftTextFrame.GeometricBounds = Array(70, 70, 714, 528)
myLeftTextFrame.TextFramePreferences.FirstBaselineOffset =
idFirstBaseline.idLeadingOffset
myLeftTextFrame.TextFramePreferences.TextColumnCount = 3
myLeftTextFrame.TextFramePreferences.TextColumnGutter = 14](https://image.slidesharecdn.com/indesigncs5scriptingtutorial-141126034747-conversion-gate02/85/In-designcs5-scripting-tutorial-36-320.jpg)


![Adobe InDesign CS5 Scripting Tutorial Constructing a document 39
end try
--Now set the formatting of the paragraph style.
try
set applied font of myParagraphStyle to "Arial"
set font style of myParagraphStyle to "Bold"
end try
set point size of myParagraphStyle to 24
set space after of myParagraphStyle to 24
set space before of myParagraphStyle to 24
set fill color of myParagraphStyle to color "Red" of myDocument
--Apply the style to the paragraph.
tell paragraph 1 of myTextFrame to apply paragraph style using myParagraphStyle with
clearing overrides
--You could also use:
--set applied paragraph style of paragraph 1 of myTextFrame to myParagraphStyle
JavaScript
var myParagraphStyle = myDocument.paragraphStyles.item("Heading 1");
try {
var myName = myParagraphStyle.name;
}
catch (myError){
//The paragraph style did not exist, so create it.
myParagraphStyle = myDocument.paragraphStyles.add({name:"Heading 1"});
}
//We'll need to create a color. Check to see if the color already exists.
var myColor = myDocument.colors.item("Red");
try {
myName = myColor.name;
}
catch (myError){
//The color did not exist, so create it.
myColor = myDocument.colors.add({name:"Red", model:ColorModel.process,
colorValue:[0,100,100,0]});
}
//Now set the formatting of the paragraph style.
myParagraphStyle.appliedFont = "Arial";
myParagraphStyle.fontStyle = "Bold";
myParagraphStyle.pointSize = 24;
myParagraphStyle.spaceAfter = 24;
myParagraphStyle.spaceBefore = 24;
myParagraphStyle.fillColor = myDocument.colors.item("Red");
//Apply the style to the paragraph.
myDocument.pages.item(0).textFrames.item(0).paragraphs.item(0).applyParagraphStyle(
myParagraphStyle, true);
//You could also use:
//myDocument.pages.item(0).textFrames.item(0).paragraphs.item(0).appliedParagraphStyl
e = myParagraphStyle;](https://image.slidesharecdn.com/indesigncs5scriptingtutorial-141126034747-conversion-gate02/85/In-designcs5-scripting-tutorial-39-320.jpg)


![Adobe InDesign CS5 Scripting Tutorial Constructing a document 43
JavaScript
//Display a standard open file dialog box to select a graphic file.
var myGraphicFile = File.openDialog("Choose a graphic file");
//If a graphic file was selected, and if you didn't press Cancel,
//place the graphic file on the page.
if((myGraphicFile != "")&&(myGraphicFile != null)){
var myGraphic = myDocument.pages.item(0).place(myGraphicFile);
//Since you can place multiple graphics at once, the place method
//returns an array. To get the graphic you placed, get the first
//item in the array (JavaScript arrays start with item 0).
myGraphic = myGraphic[0];
//Create an object style to apply to the graphic frame.
var myObjectStyle = myDocument.objectStyles.item("GraphicFrame");
try {
var myName = myObjectStyle.name;
}
catch (myError){
//The object style did not exist, so create it.
myObjectStyle = myDocument.objectStyles.add({name:"GraphicFrame"});
}
myObjectStyle.enableStroke = true;
myObjectStyle.strokeWeight = 3;
myObjectStyle.strokeType = myDocument.strokeStyles.item("Solid");
myObjectStyle.strokeColor = myDocument.colors.item("Red");
//The frame containing the graphic is the parent of the graphic.
var myFrame = myGraphic.parent;
myFrame.applyObjectStyle(myObjectStyle, true);
//Resize the frame to a specific size.
myFrame.geometricBounds = [0,0,144,144];
//Fit the graphic to the frame proportionally.
myFrame.fit(FitOptions.proportionally);
//Next, fit frame to the resized graphic.
myFrame.fit(FitOptions.frameToContent);
var myBounds = myFrame.geometricBounds;
var myGraphicWidth = myBounds[3]-myBounds[1];
//Move the graphic frame.
var myPageWidth = myDocument.documentPreferences.pageWidth;
var myTopMargin = myDocument.pages.item(0).marginPreferences.top;
myFrame.move([myPageWidth-myGraphicWidth, myTopMargin]);
//Apply a text wrap to the graphic frame.
myFrame.textWrapPreferences.textWrapMode = TextWrapModes.BOUNDING_BOX_TEXT_WRAP;
myFrame.textWrapPreferences.textWrapOffset = [24, 12, 24, 12];
}](https://image.slidesharecdn.com/indesigncs5scriptingtutorial-141126034747-conversion-gate02/85/In-designcs5-scripting-tutorial-43-320.jpg)


The Adobe InDesign CS5 Scripting Tutorial provides guidelines for using scripts with Adobe InDesign, including installation, running scripts, and using various scripting languages such as JavaScript, AppleScript, and VBScript. It emphasizes the importance of copyright laws regarding incorporated material in projects and outlines the legal protections associated with the guide's content. Additionally, it contains a structured approach to scripting terminology and practical examples for users to enhance their InDesign experience.

![www.webre24h.com - [Wordware] advanced javascript, 3rd ed. - [easttom]](https://cdn.slidesharecdn.com/ss_thumbnails/wordware-advancedjavascript3rded-160421130838-thumbnail.jpg?width=640&height=640&fit=bounds)