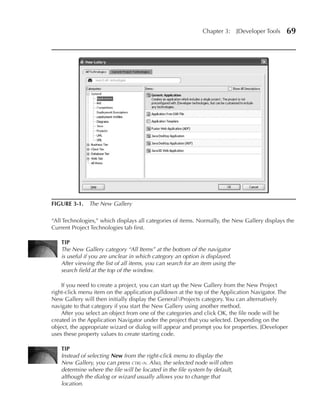
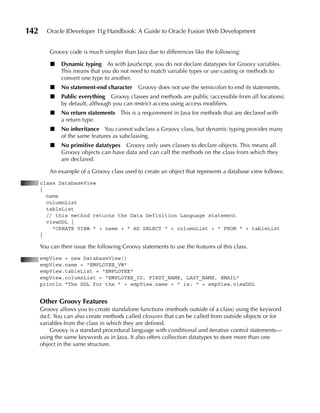
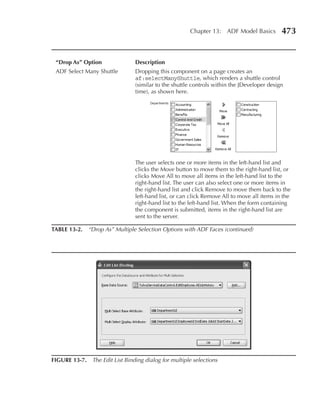
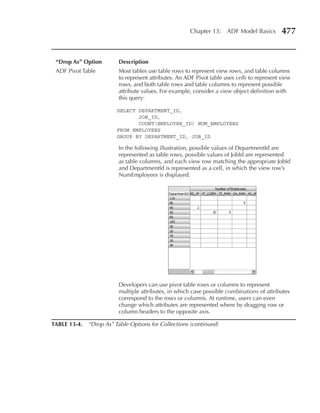
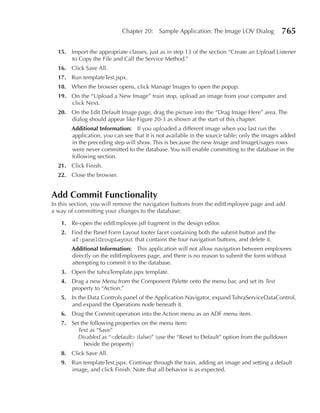
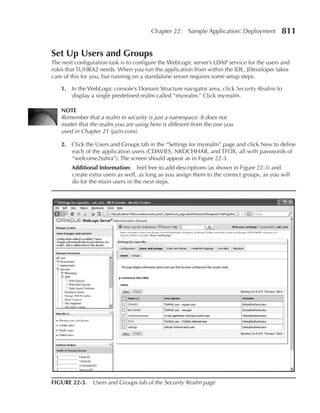
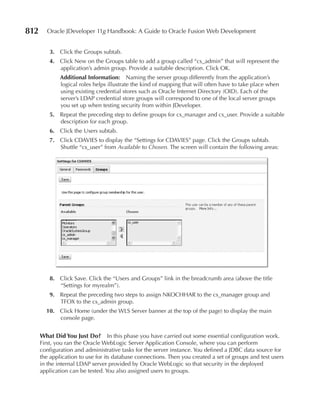
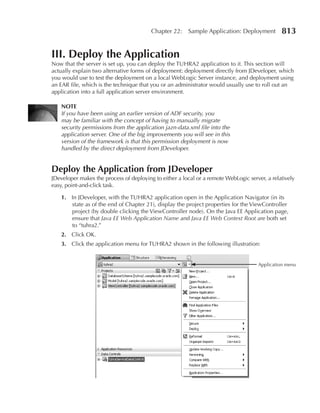
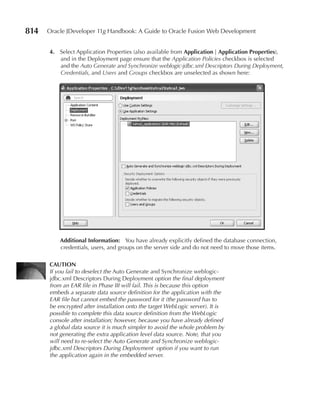
This document provides an overview of the following:
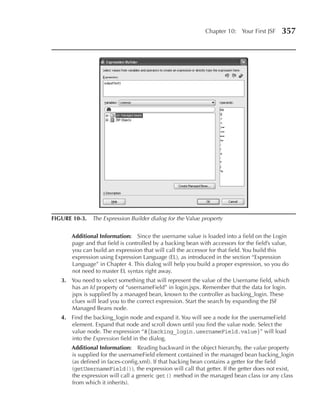
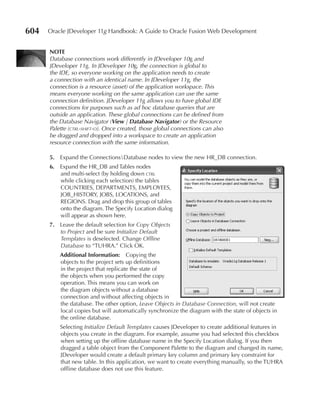
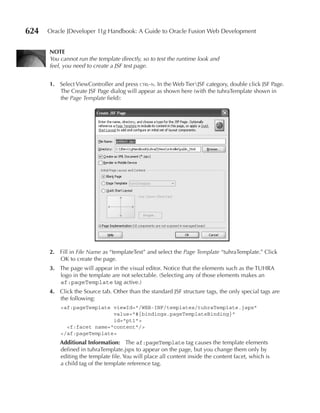
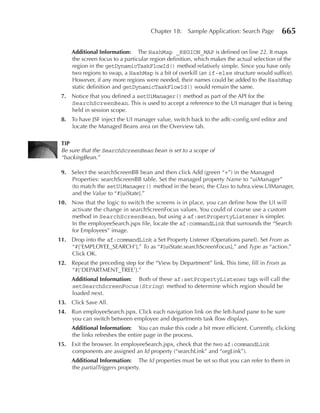
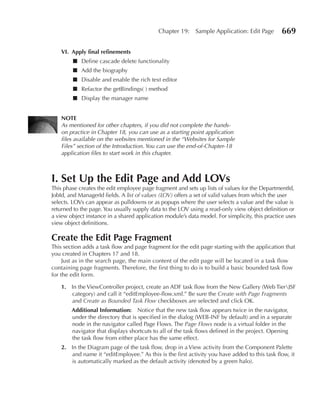
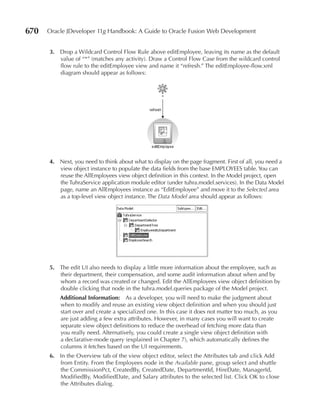
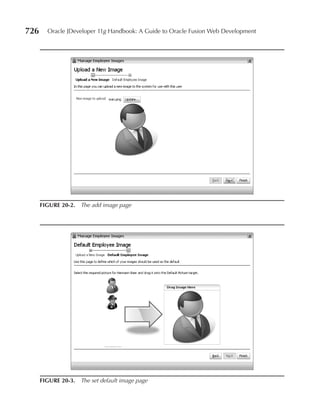
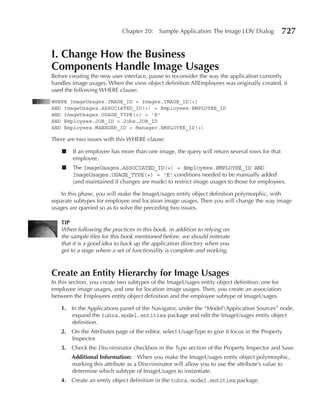
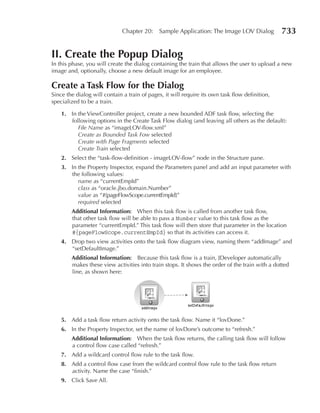
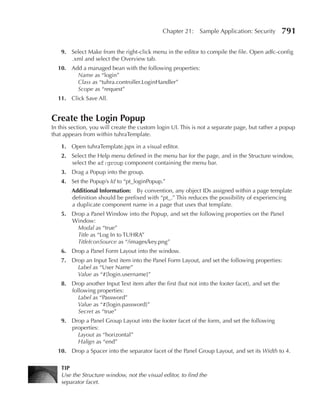
- It is a guide to developing Oracle Fusion web applications using Oracle JDeveloper 11g and the Application Development Framework (ADF).
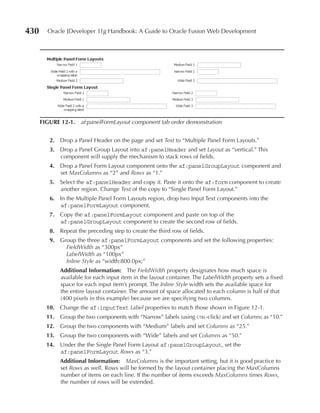
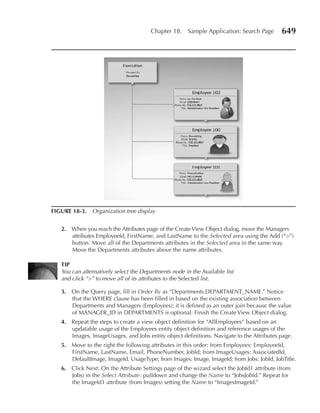
- It contains 22 chapters organized into 5 parts covering topics such as overviews of Fusion development and ADF, developing ADF business components and data models, using the ADF Model, View and Controller, and developing a sample application.
- It is authored by Duncan Mills, Peter Koletzke and Avrom Roy-Faderman with the goal of providing a comprehensive guide to building Oracle Fusion web applications.


![148 Oracle JDeveloper 11g Handbook: A Guide to Oracle Fusion Web Development
“If everybody minded their own business,”
the Duchess said, in a hoarse growl,
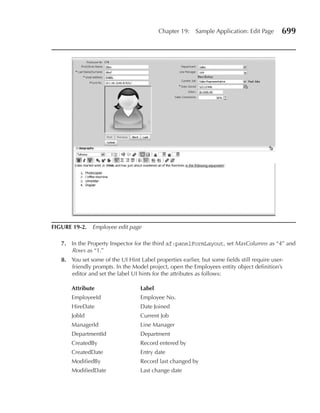
“the world would go round a great deal faster than it does.”
—Lewis Carroll [Charles Lutwidge Dodgson] (1832–1898),
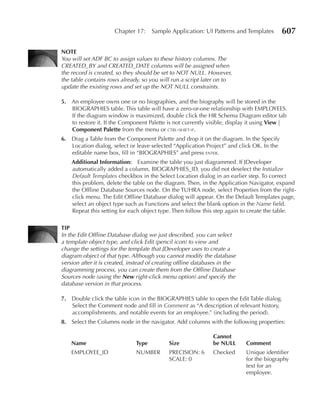
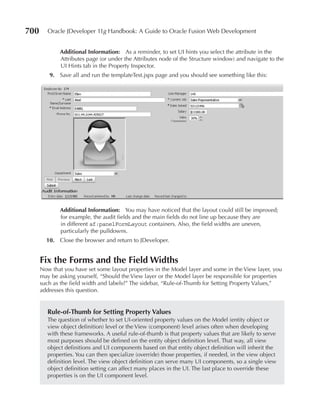
Alice’s Adventures in Wonderland
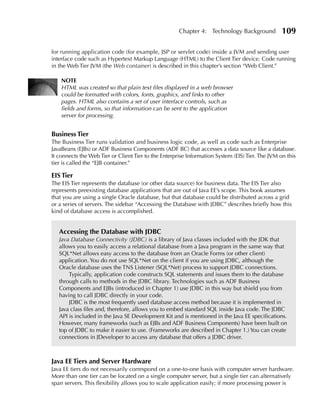
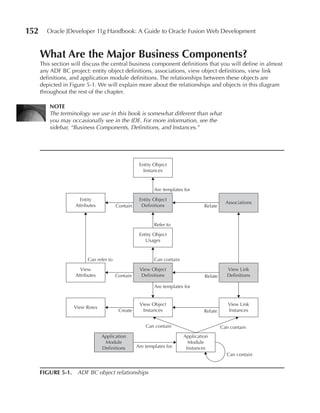
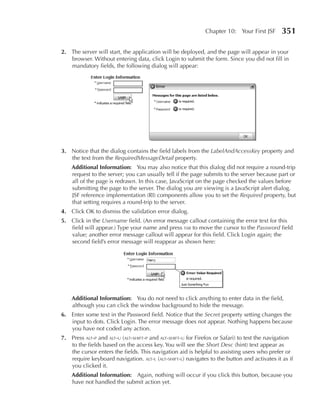
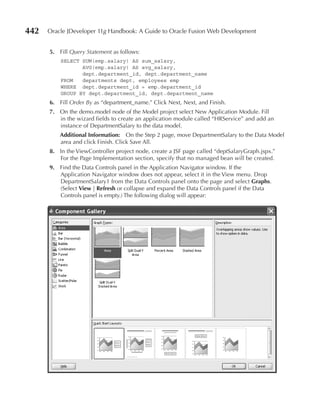
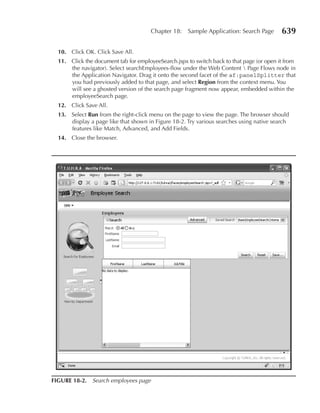
O
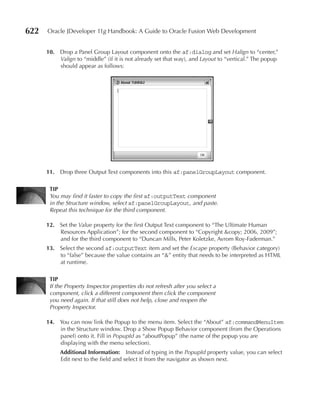
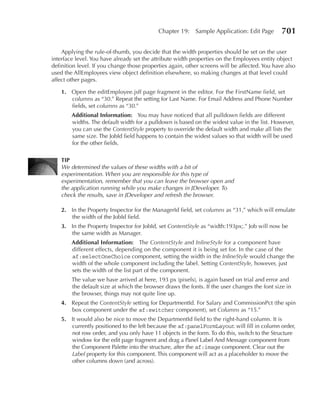
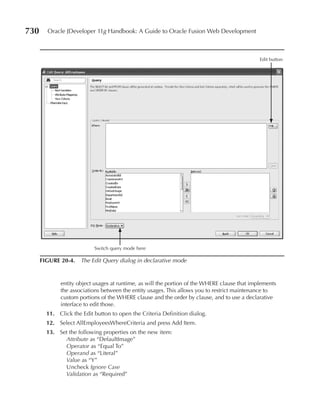
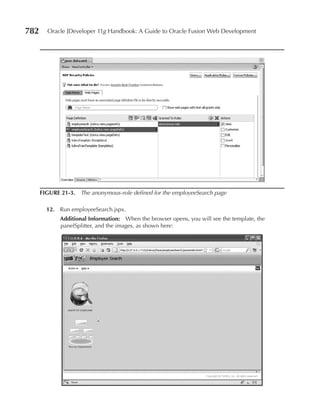
racle ADF Business Components (ADF BC) is the Oracle Fusion Java EE technology
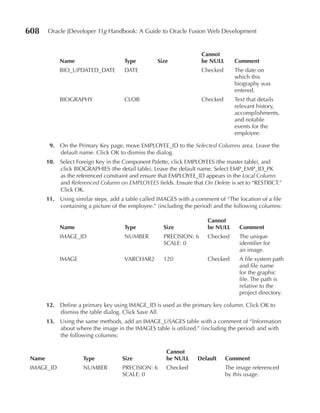
for creating business services. Business services provide object/relational (O/R)
mappings, business logic, queries, transaction handling, and data access for an
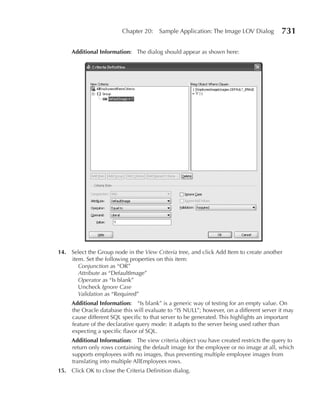
application. They do not provide a user interface or control flow. The view and
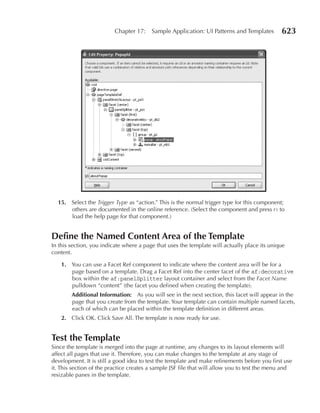
controller layers of an ADF application communicate with business services
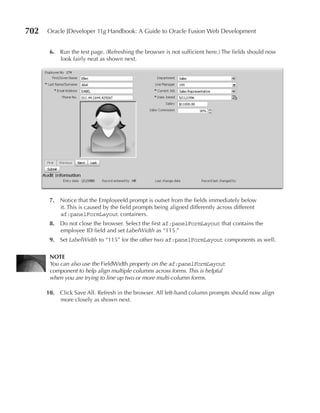
through the model layer and provide the user interface and control flow.
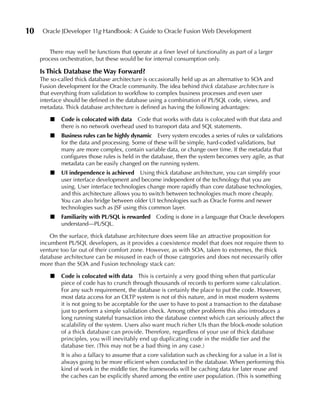
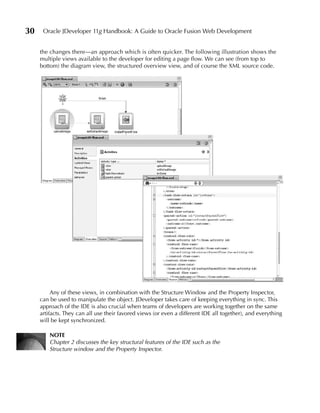
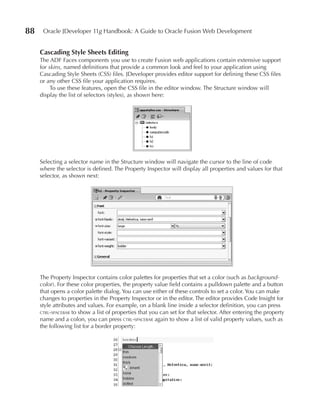
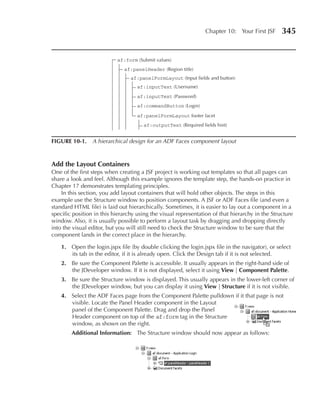
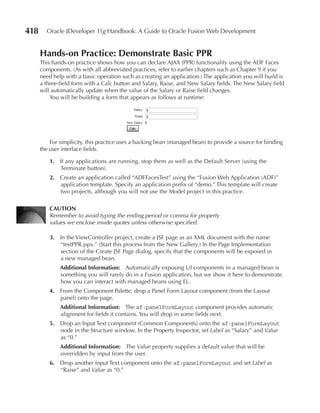
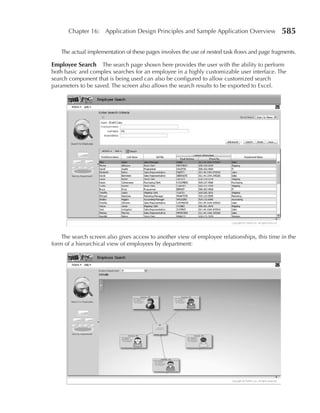
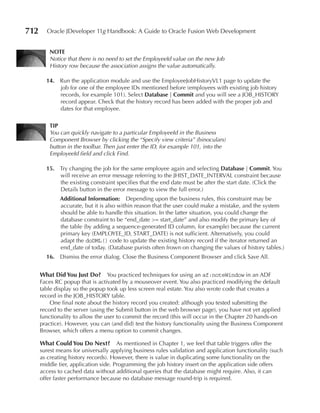
Chapters 1, 2, and 3 provided an overview of the capabilities of JDeveloper, ADF, and Fusion,
and Chapter 4 offers an overview of other technologies you will need to develop Fusion applications.
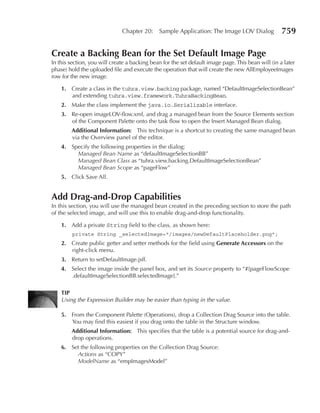
Part II discusses ADF BC, a central part of ADF, in depth. This chapter builds on the description of
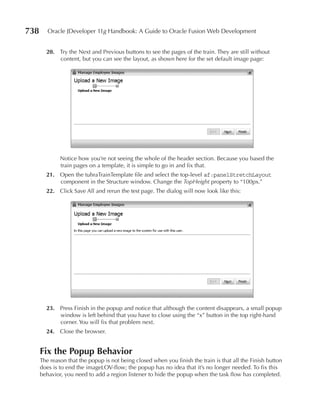
ADF BC in Chapter 1. It provides an overview of ADF BC, describing its components and how it fits
into the ADF framework. Chapter 6 explains how to create business components that provide O/R
mappings and encapsulate business logic. Chapter 7 shows how to create components that query
data from the database or provide static data, and how to assemble these components into a data
model for your application. Chapter 8 demonstrates how to encapsulate complex data operations.
This chapter answers the following questions:
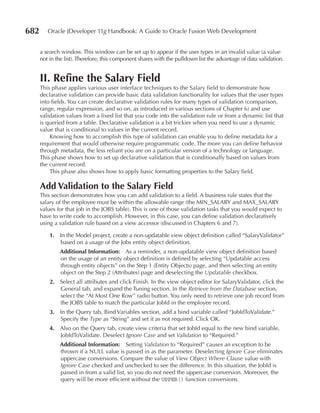
■ Why use ADF BC?
■ How do business components use Java and XML?
■ What are the major business components?
■ Which components support the major business components?
■ How can I visualize my business components?
Why Use ADF BC?
In earlier releases of JDeveloper, ADF BC (then called “BC4J”) provided two major benefits over the
available alternative business service technologies (hand-coded JDBC and Enterprise JavaBeans–EJB). It
provided declarative O/R mapping and query functionality, as well as easy hooks for binding user
interface components. Now, these two advantages are mitigated somewhat. The Java Persistence
Architecture (JPA), Oracle TopLink, and frameworks such as Hibernate offer powerful and simple O/R
mapping and query functionality; also, the ADF Model provides declarative binding of user interface
components to many business services out of the box, and to any business service with the
development of a custom data control. However, there are still reasons why ADF BC is an ideal way
to develop business services for applications, particularly for developers with more relational database
background than object orientation background. If you are concerned about using a vendor-specific
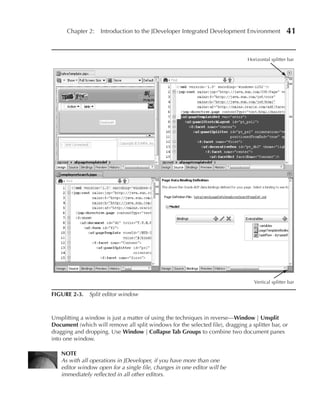
framework for business services, see the sidebar, “How Safe Is a Vendor-Specific Framework?”
Java Enterprise Design Patterns
The components that make up ADF BC already implement many of Sun’s Java Enterprise design
patterns (introduced in Chapter 4), which are part of the Java EE BluePrints documentation](https://image.slidesharecdn.com/jdeveloper11g1-100312114723-phpapp01/85/J-Developer-11g1-193-320.jpg)
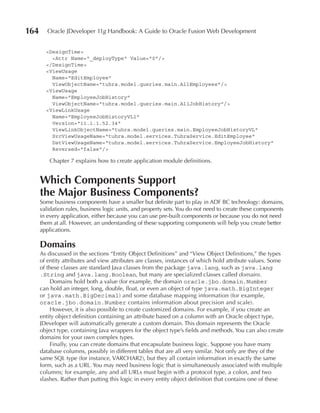


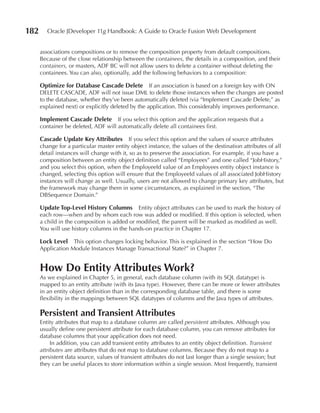

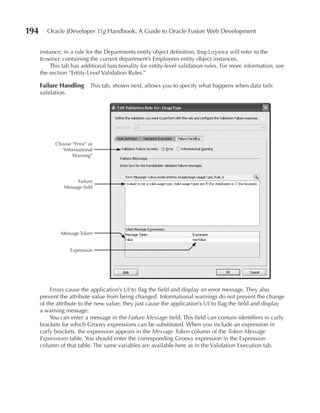
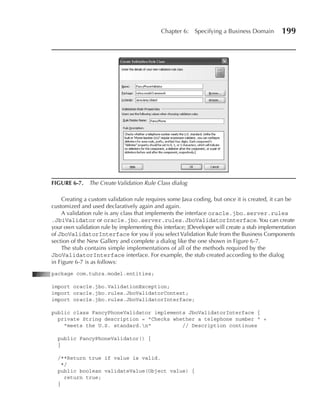
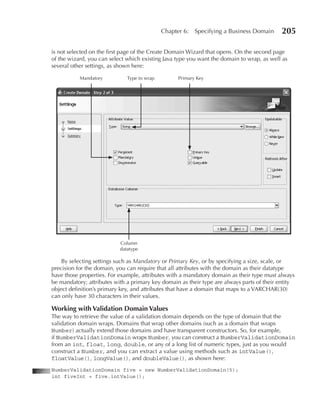
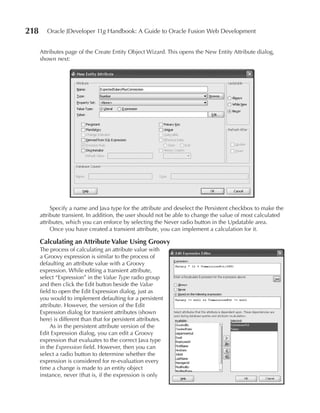
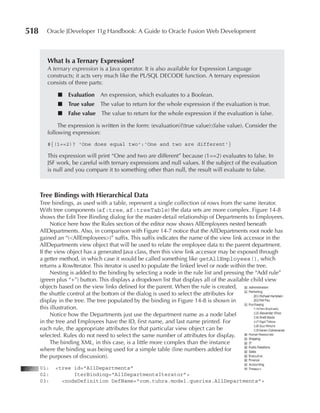
![Chapter 6: Specifying a Business Domain 197
public boolean validateSalary(Number value) {
boolean isValid = true;
EmployeesImpl mgr = getManager();
if (mgr != null && getSalary() != null) {
Number mgrSal = mgr.getSalary();
if (mgrSal != null && mgrSal.intValue() < value.intValue()) {
isValid = false;
}
return isValid;
}
When an attempt is made to change an attribute’s value, the potential new value is passed in
to the method, and validation fails if the method returns false.
The Range Validation Rule
The Range validation rule allows you to specify an inclusive range within which a value must
or must not fall. Unlike the value used in a Compare validator, these values must be specified
as literals.
The Regular Expression Validation Rule
The Regular Expression validation rule allows you to specify a Java-style regular expression that
a potential attribute value must or must not match (for an explanation of Java-style regular
expressions, which are very similar to Perl-style regular expressions, see the Javadoc for
java.util.regexp.Pattern). When you add a Regular Expression validation rule to an
attribute, you can enter your own regular expression or select from two predefined regular
expressions:
■ Email Address Uses the regular expression [A‑Z0‑9._%+‑]+@[A‑Z0‑9.‑]
+.[A‑Z]{2,4}, which matches syntactically valid email addresses (except for case,
but selecting Email Address also automatically marks the expression as case-insensitive,
as explained later in this section)
■ Phone Number (uS) Uses the regular expression [0‑9]{3}‑?[0‑9]{3}‑?[0‑9]
{4}, which matches U.S. telephone numbers in the format xxx-xxx-xxxx
You can also select any of the following options:
■ Case Insensitive Rules ignore mismatches due solely to the case of letters.
■ DotAll Rules allow the dot character in their expressions to match any character,
including line terminators (normally, dot characters do not match line terminators).
■ Multiline Rules allow the $ and ^ characters to match the beginning and end of lines
(normally, those characters only match the beginning and end of the entire input).
■ unicode Case Rules support Unicode characters (normally, rules support only ASCII
characters).
■ Canon Eq Rules use canon equality, which allows you to use escaped formats for
characters in the regular expression—for example, under canon equality, the expression
u030A matches the character ?.](https://image.slidesharecdn.com/jdeveloper11g1-100312114723-phpapp01/85/J-Developer-11g1-242-320.jpg)
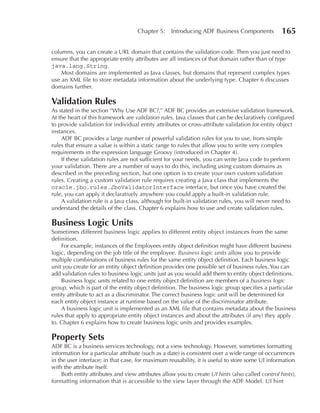
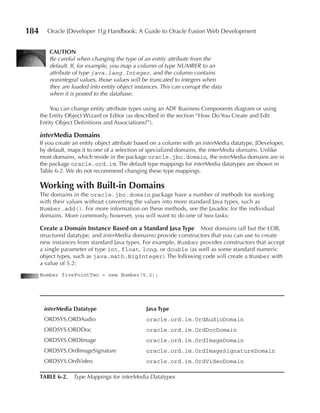
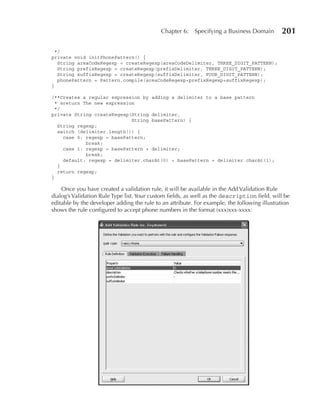
![200 Oracle JDeveloper 11g Handbook: A Guide to Oracle Fusion Web Development
/**Invoked by framework for validation.
*/
public void validate(JboValidatorContext ctx) {
if (!validateValue(ctx.getNewValue())) {
throw new ValidationException(
"com.tuhra.model.entities.FancyPhoneValidator validation failed");
}
}
/**Description of what this class validates.
*/
public String getDescription() {
return description;
}
/**Description of what this class validates.
*/
public void setDescription(String str) {
description = str;
}
}
Implementing validateValue() You should implement the validateValue() method to
return true if the value parameter is an acceptable value, and false otherwise. You can also add
fields (with getters and setters) that can be used to configure the validation rule; you can refer to
these fields within your validateValue() method. For example, to implement this validation
rule as described, you should create three additional String fields as shown next, and generate
default accessors for them.
private String areaCodeDelimiter;
private String prefixDelimiter;
private String suffixDelimiter;
Then, you can refer to these fields inside your validateValue() method, as demonstrated
here:
private static final String THREE_DIGIT_PATTERN = "[0‑9]{3}";
private static final String FOUR_DIGIT_PATTERN = "[0‑9]{4}";
private Pattern phonePattern = null; // This field is initialized when first needed
/**Return true if value is valid.
* This method uses the class java.util.regexp.Pattern to match a constructed
* regular expression against the value's String representation.
*/
public boolean validateValue(Object value) {
if (value == null) return true;
if (phonePattern == null) {
initPhonePattern();
}
return phonePattern.matcher(value.toString()).matches();
}
/**Configures the phone number Pattern based on the parameters
* provided](https://image.slidesharecdn.com/jdeveloper11g1-100312114723-phpapp01/85/J-Developer-11g1-245-320.jpg)

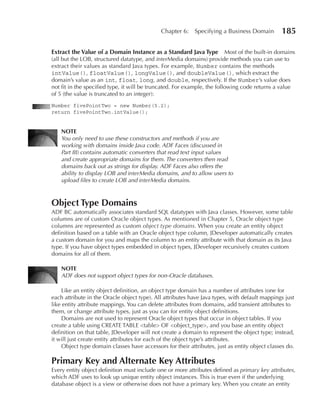
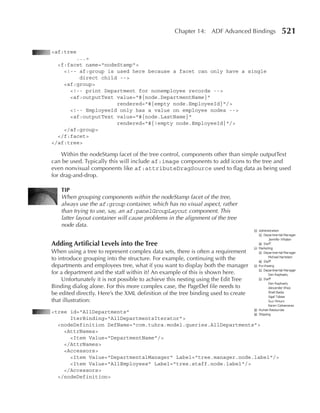
![206 Oracle JDeveloper 11g Handbook: A Guide to Oracle Fusion Web Development
Domains that wrap nondomain Java types (such as String) include constructors that take an
argument of that type (and use it as the value of the domain), and a method, getData(), that
returns the object. getData() has a return type of Object, so you must cast it to the
appropriate type to work with it, as shown here, with a domain that wraps a String:
JobIdDomain jobId = new JobIdDomain("AD_PRES");
int jobIdLength = ((String) jobId.getData()).length();
Within the domain class itself, you can refer to the domain’s value using the private field
mData, which does not need to be cast.
The validate() Method
For validation requirements more complex than requiring an attribute not be null or that it fit
into a particular size or precision and scale, you must implement a test inside the domain class’
validate() method. The Create Domain Wizard will generate a stub method for you, as
shown here:
protected void validate() {
// ### Implement custom domain validation logic here. ###
}
You should implement the method to throw an oracle.jbo.DataCreationException if
the domain’s value does not satisfy the validation rule you want to implement. There are a number
of ways to construct a DataCreationException (for full details, including how to construct a
localizable exception, consult the Javadoc for the DataCreationException class), but the one
we will use here takes three arguments:
■ A String The name of the domain throwing the exception
■ A String The error message to use
■ An Exception A root cause of the exception (which can be null in most cases)
The method does not need to do anything if the domain’s value satisfies the validation rule
you want to implement.
The following code implements the validate() method for a domain that requires its String
value to be in standard Job ID format.
private static Pattern regex = Pattern.compile("[A‑Z]{2}_[A‑Z]{2,4}");
protected void validate() {
if (mData != null && ! regex.matcher(mData).matches()) {
throw new DataCreationException(getClass().getName(),
mData + " is not a valid Job ID.",
null);
}
}
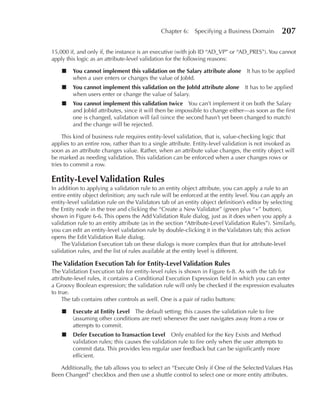
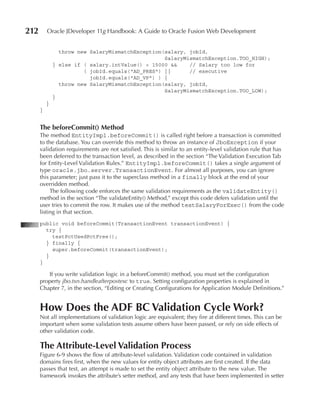
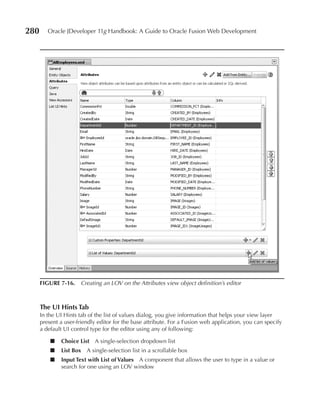
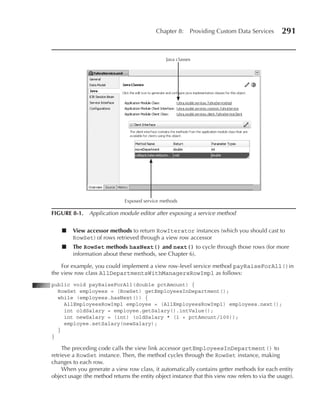
How Do You Implement Entity-Level Validation?
Some validation logic does not apply to a single attribute, but rather to multiple attributes in the
same row. For example, you might want to require that an Employees instance’s salary be over](https://image.slidesharecdn.com/jdeveloper11g1-100312114723-phpapp01/85/J-Developer-11g1-251-320.jpg)
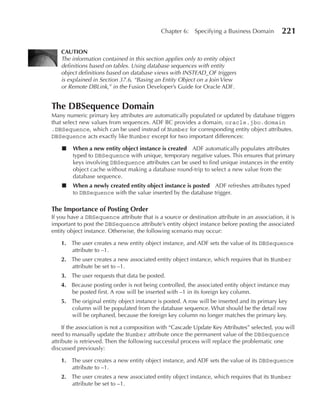

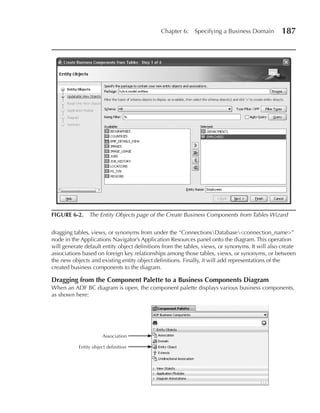
![Chapter 6: Specifying a Business Domain 223
An explanation of the preceding code follows:
■ Lines 1–2 Defines the two lists of accessors and initialize them to null (they will be lazily
loaded by the getter methods). oracle.jbo.server.AssociationDefImpl is the
class ADF uses to represent association accessors. mastersToPost will contain the
association accessors such that the other side of the association is based on one or more
DBSequence attributes, and detailsToUpdate will contain the association accessors
such that this side of the association is based on one or more DBSequence attributes.
■ Line 4 Is the beginning of the getter method for detailsToUpdate.
■ Line 5 Checks whether detailsToUpdate still needs to be loaded.
■ Line 6 Calls a method, getDbSeqAssocs(), which is shown in the next section. This
method retrieves the association accessors such that either this side or the other side of
the association (depending on the Boolean attribute passed in) is based on DBSequence
attributes.
■ Lines 11–16 Forms the getter method for mastersToPost. This uses a lazy initialization
process identical to the one in getDetailsToUpdate() except for the value passed to
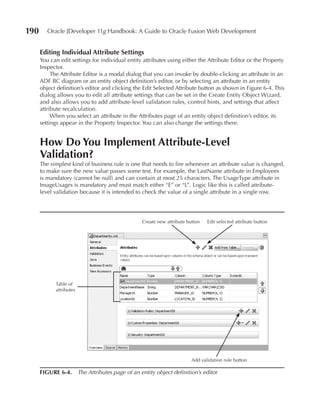
getDbSeqAssocs().
Implementing getDbSeqAssocs() The getter methods described in the preceding section both
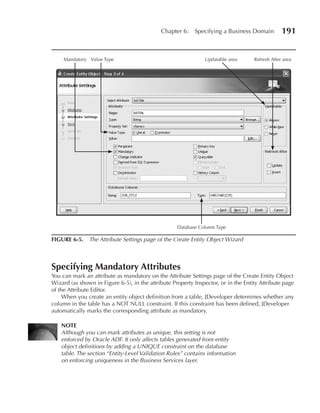
depend on the method getDbSeqAssocs(), shown here:
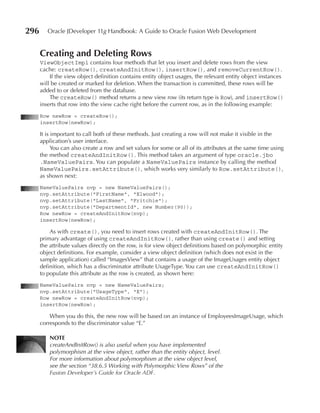
01: private List<AssociationDefImpl> getDbSeqAssocs(boolean thisSide) {
02: List<AssociationDefImpl> selectedAssocs =
03: new ArrayList<AssociationDefImpl>();
04: AssociationDefImpl[] allAssocs = getAssociationDefImpls();
05: for (AssociationDefImpl assoc:allAssocs) {
06: AssociationEnd endToCheck = thisSide ?
07: assoc.getAssociationEnd():
08: assoc.getOtherAssociationEnd();
09: if (hasDbSequenceAttr(endToCheck)) {
10: selectedAssocs.add(assoc);
11: }
12: }
13: return selectedAssocs;
14: }
The preceding code steps through the following process:
■ Lines 2–3 Creates a list to hold the association accessors as they are found.
■ Line 4 Calls the method EntityDefImpl.getAssociationDefImpls(), which
returns an array containing all the association accessors for the entity object definition.
■ Lines 6–8 Chooses an association end (represented by oracle.jbo.server
.AssociationEnd) to check for DBSequence attributes based on the parameter
passed in to the method.](https://image.slidesharecdn.com/jdeveloper11g1-100312114723-phpapp01/85/J-Developer-11g1-268-320.jpg)
![224 Oracle JDeveloper 11g Handbook: A Guide to Oracle Fusion Web Development
■ Line 9 Calls a method, hasDbSequenceAttr(), which is implemented in the
following section. This method determines whether an association end is based on at
least one DBSequence attribute.
■ Line 10 Adds the association (if the appropriate end is based on at least one DBSequence
attribute) to the list.
Implementing hasDbSequenceAttr()
The hasDbSequenceAttr() method, shown next, determines whether one of the attributes an
association end is based on is of type DbSequence.
01: private boolean hasDbSequenceAttr(AssociationEnd endToCheck) {
02: boolean foundDbSequence = false;
03: AttributeDefImpl[] attrs = endToCheck.getAttributeDefImpls();
04: for (AttributeDefImpl attr:attrs) {
05: if (DBSequence.class.isAssignableFrom(attr.getJavaType())) {
06: foundDbSequence = true;
07: break;
08: }
09: }
10: return foundDbSequence;
11: }
The preceding code steps through the following process:
■ Line 2 Initializes a variable that starts out false but will become true if a DBSequence
attribute is found in the association end.
■ Line 3 Calls the method AssociationEnd.getAttributeDefImpls() to retrieve an
array of attributes (represented by the class oracle.jbo.server.AttributeDefImpl)
that act as the defining attributes for the association end (source or destination attributes,
depending on which end of the association is being examined).
■ Lines 5–7 These are executed for each attribute and test whether the attribute’s
Java type is DBSequence or a subclass thereof (the method java.lang.Class
.isAssignableFrom() tests whether one class or interface is identical to or
is an extension or implementation of another). If the attribute passes the test,
foundDbSequence is assigned to be true and the attribute loop is broken.
Creating a Custom Entity Object Framework Class
to Control Posting Order and Cascade update Key Values
You can override the method EntityImpl.postChanges() in a custom framework entity
object class to control posting order and manually cascade update key attributes.
postChanges() is the method that performs DML operations.
Overriding EntityImpl.postChanges() The overridden method is shown here:
01: public void postChanges(TransactionEvent event) {
02: Map<AssociationDefImpl, Object> detailsToUpdateMap = null;
03: TuhraEntityDefImpl def = (TuhraEntityDefImpl) getEntityDef();
04: if (STATUS_NEW == getPostState()) {](https://image.slidesharecdn.com/jdeveloper11g1-100312114723-phpapp01/85/J-Developer-11g1-269-320.jpg)
![Chapter 6: Specifying a Business Domain 227
01: private void adjustDetails(List<AssociationDefImpl> accessorsToUpdate,
02: Map<AssociationDefImpl, Object> detailsToUpdateMap)
03: {
04: for (AssociationDefImpl assoc:accessorsToUpdate) {
05: Object detail = detailsToUpdateMap.get(assoc);
06: if (detail instanceof EntityImpl) {
07: adjustDetailEntity((EntityImpl) detail, assoc);
08: } else {
09: RowSet detailRS = (RowSet) detail;
10: while (detailRS.hasNext()) {
11: adjustDetailEntity((EntityImpl) detailRS.next(), assoc);
12: }
13: }
14: }
15: }
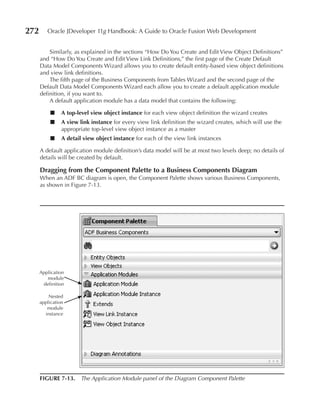
The preceding code steps through the following process:
■ Line 4 Loops through each accessor that requires a cascade update.
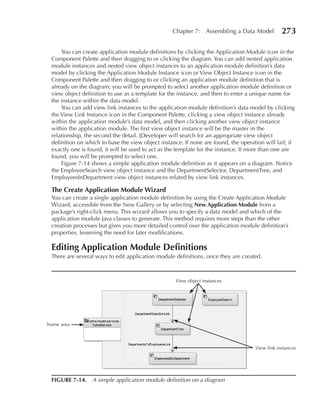
■ Line 5 Retrieves the object (EntityImpl or RowSet instance) that was associated
with this entity by the accessor before the entity was posted. The method needs to adjust
this object so that it is associated with this entity again.
■ Lines 6–7 If the object is an EntityImpl instance, these lines call the method
adjustDetailEntity(), which is implemented in the next section to adjust a single
entity instance to re-associate it with the current instance.
■ Lines 8–11 If the object is a RowSet instance, these lines loop through the RowSet
and call adjustDetailEntity() for each entity object instance it contains.
Implementing adjustDetailEntity() The adjustDetailEntity() method must adjust a single
entity object instance that contains attributes depending on DBSequence attributes from the
currently posting entity object instance. Its code is shown here:
01: private void adjustDetailEntity(EntityImpl detail
02: AssociationDefImpl accessorForDetail) {
03: AttributeDefImpl[] thisSideAttrs =
04: accessorForDetail.getAssociationEnd().getAttributeDefImpls();
05: AttributeDefImpl[] otherSideAttrs =
06: accessorForDetail.getOtherAssociationEnd().getAttributeDefImpls();
07: for (int i=0; i < thisSideAttrs.length; i++) {
08: DBSequence sequenceAttr = (DBSequence) getAttribute(thisSideAttrs[i].getIndex());
09: detail.setAttribute(otherSideAttrs[i].getIndex(),
10: sequenceAttr.getSequenceNumber()
11: }
12: }
The preceding code steps through the following operations:
■ Lines 3–4 Retrieves the definitions of attributes, in order, on the posting entity object
instance’s side of the association.](https://image.slidesharecdn.com/jdeveloper11g1-100312114723-phpapp01/85/J-Developer-11g1-272-320.jpg)


![286 Oracle JDeveloper 11g Handbook: A Guide to Oracle Fusion Web Development
Sow good services; sweet remembrances will grow them.
—Mme. de Staël [Anne de Staël-Holstein] (1776–1817)
C
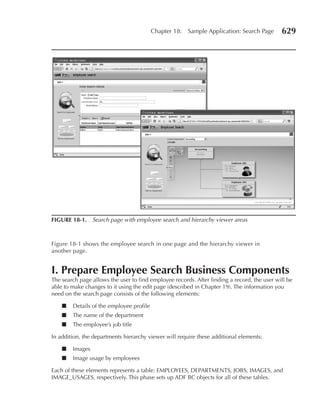
hapter 7 explains how to assemble data for other parts of your application by
creating appropriate view object, view link, and application module definitions
and assembling instances of them into a data model. Top-level application
module instances, containing view object, view link, and nested application
module instances, expose their standard services to the application, for example,
transactional commit and rollback, query-by-example (QBE) search, attribute retrieval and
setting, and row navigation, paging, creation, and deletion. Data controls (explained in
Chapter 13) expose these features to clients in a consistent way.
Sometimes, however, you want to provide custom data services that are not included in the
standard set. Such services are often compositions of the previous services, for example, searching
for rows matching a particular QBE condition, iterating through them, and performing a particular
data change on each. However, the service must encapsulate what would be for the user, or even
an automated task flow, a complex procedure into a single service call. In certain circumstances,
you might want to allow a user or the controller to perform an operation (such as dynamic
creation of a new view object instance) or retrieve information (such as table metadata) that is not
normally accessible outside of ADF business components.
This chapter discusses mechanisms for creating and exposing custom service methods,
methods in a custom application module, view object, or view row class that a data control can
expose to the controller layer of an application, to be activated with a single user click or task flow
activity. Note that not all encapsulations of complex procedures are service methods; procedures
that should execute every time a particular piece of data changes, for example, are better
implemented in a custom validation rule, validation domain, or the relevant entity attribute’s setter
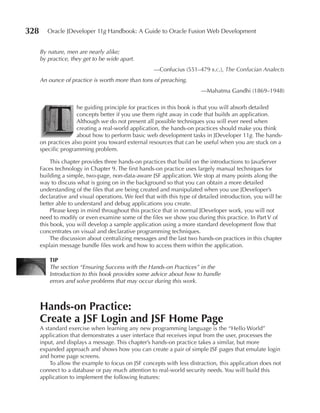
method. Service methods are best for procedures that are initiated by a specific request from the
user or task flow.
NOTe
You can create two fundamental types of service methods in your
business components layer: client service methods, which are
accessed locally (or via Remote Method Invocation [RMI], which is
beyond the scope of this book) through the ADF Model layer, and web
service methods, which are accessed via web service protocols. This
chapter deals exclusively with client service methods.
This chapter answers the following questions:
■ What sort of method can be a service method?
■ How do you expose methods as service methods?
■ How do you implement single-row methods?
■ How do you implement query-level methods?
■ How do you implement cross-query or transaction-level methods?](https://image.slidesharecdn.com/jdeveloper11g1-100312114723-phpapp01/85/J-Developer-11g1-331-320.jpg)
![294 Oracle JDeveloper 11g Handbook: A Guide to Oracle Fusion Web Development
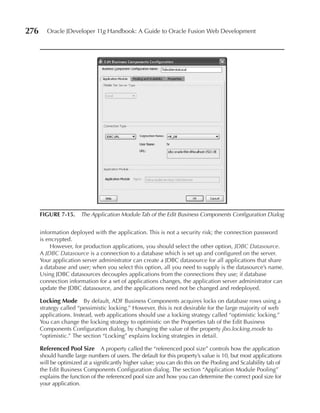
Finding a Particular Row by Key
The ADF Faces model layer provides a declarative way for the client to find a row by a key.
However, ADF also provides a programmatic way to find a row by key so that you can do it
within a service method.
Key Objects As explained in Chapter 6, a view object definition’s key is a set of view attributes
whose values uniquely identify a view row, and which includes all primary key attributes from any
updatable underlying entity object usage. Within a custom service method, you can create a key
object, a Java encapsulation of values for some or all of the attributes in the key. You can use this
key object to retrieve a RowSet or array containing some or all of the rows that match the
appropriate values.
A key object is an instance of the class oracle.jbo.Key, which you can construct by
passing an array of values into its constructor. The array of values should satisfy these requirements:
■ It should have as many elements as the view object definition has key attributes, in the
order in which the attributes occur in the view object definition.
■ Some of the elements may be null, but for each updatable entity object usage, either
all the elements corresponding to the entity object usage’s primary key attributes must
be null, or none can be. Attributes added to the key beyond the primary key attributes
from updateable entity object usages cannot be null.
Finding Rows by Key Once you have created a key object, you can use it to retrieve a
RowIterator (which you can cast to a RowSet) containing matching rows by calling the
method ViewObjectImpl.findByAltKey() (you can use this method, as explained next,
even if you are finding a row by the view object definition’s key rather than by an alternate key).
This method takes the following parameters:
■ A value of null to find rows by the view object’s key; other possible values are explained
in the section “Alternate Keys.”
■ The key object to match; if some of the key object’s values are null, they will be treated
as wildcards that match any value.
■ An int indicating the maximum number of view rows to find; a value of –1 means to
return every matching view row.
■ A boolean that should usually be false; a value of true means to ignore the current
WHERE clause of a normal or declarative SQL mode query, any WHERE clause applied
via a view criteria object, any WHERE clause applied via a view link instance, and any
WHERE clause applied via the setWhereClause() method.
For example, in the sample application, the view object definition AllEmployees has one key
attribute: EmployeeId. You could use the following code in a method on the AllEmployees view
object class to retrieve the first (and only) view row that has EmployeeId 101:
Key key = new Key(new Object[] {
new Number(101);
});
RowSet foundRows = (RowSet) findByAltKey(null, key, 1, false);](https://image.slidesharecdn.com/jdeveloper11g1-100312114723-phpapp01/85/J-Developer-11g1-339-320.jpg)
![Chapter 8: Providing Custom Data Services 295
You can also use another method, findByKey(), to search for view rows. findByKey()
takes two parameters:
■ The key object to match; if some of the key object’s values are null, they will be treated
as wildcards which match any value.
■ An int indicating the maximum number of view rows to find; a value of -1 means to
return every matching view row.
Instead of a row iterator, findByKey() returns an array of type Row[].
Alternate Keys As explained in Chapter 7, a view object definition’s alternate key is a combination
of alternate keys for some or all of its entity object usages.
Once you have created a key object for an alternate key, you can use it to retrieve a
RowIterator (which you can cast to a RowSet) containing matching rows by calling the method
ViewObjectImpl.findByAltKey(), just as you do to retrieve rows matching the view object
definition’s key. The only difference is in the first parameter you pass to findByAltKey()—instead
of a value of null, you pass the name of the alternate key you want to use.
Navigating Through the Cache
The ADF Model layer allows you to declaratively navigate through a view object instance’s cache,
moving forward or backward one or multiple rows at a time, jumping to the beginning or end of
the cache, or navigating based on key values. However, you may need to change the current row
pointer programmatically, within a service method.
ViewObjectImpl provides methods first(), previous(), next(), and last(),
which both return the appropriate row and change the current row pointer accordingly. It also
contains the methods hasPrevious() and hasNext(), Boolean tests that allow you to call
previous() and next() safely, as in the following code, which could be written inside any
view object class’ method as follows:
if (hasNext()) {
Row r = next();
}
If you have retrieved a row (for example, using findByAltKey()) that is in the view object
instance’s cache, you can move the current row pointer to that row by passing the row into
setCurrentRow(), as shown here:
Key key = new Key(new Object[] {
new Number(101)
});
RowIterator foundRows = findByAltKey(null, key, 1, false);
if (foundRows.hasNext()) {
setCurrentRow(foundRows.next());
}](https://image.slidesharecdn.com/jdeveloper11g1-100312114723-phpapp01/85/J-Developer-11g1-340-320.jpg)
![Chapter 8: Providing Custom Data Services 297
The removeCurrentRow() method removes the current row. If there is a UI component
bound to a view object instance which executes removeCurrentRow(), the ADF Model Layer
(explained in Part IV) will move the current row pointer to point to the next row, or the previous
row if there is no next row. Otherwise, the current row pointer will point to null until you move it
by calling one of the row navigation methods.
You can also delete a view row by calling remove() directly on the row object. The row
deleted in this way does not need to be current. The following example deletes the AllEmployees
view row with EmployeeId 101:
Key key = new Key(new Object[] {
new Number(101)
});
RowIterator foundRows = findByAltKey(null, key, 1, false);
if (foundRows.hasNext()) {
foundRows.next().remove();
}
NOTe
Remember that if you have jbo.locking.mode set to “pessimistic,”
deleting rows in this way will acquire a row lock immediately. If
jbo.locking.mode is set to “optimistic” (recommended for web
applications), the database will not be affected until you issue
a COMMIT or POST statement.
Modifying Queries and Filtering Rows
Chapter 7 explained a number of general techniques for allowing flexibility in view object
instances’ queries at runtime. This section explains how to modify these queries within view
object–level methods.
Setting Named Bind Variables
When you generate a custom view object class, JDeveloper will automatically add typesafe
accessors for its bind variables. These accessors do not follow standard naming conventions in
that they do not automatically capitalize the first letter of the variable name. So, for example, if
the view object definition AllEmployees had a bind variable named “queryFirstName,” its view
object class would contain methods with the following declarations:
public void setqueryFirstName(String value);
public String getqueryFirstName();
For the sake of clarity, we recommend naming bind variables with an initial capital letter. For
example, the bind parameter is actually named “QueryFirstName,” so the view object class
contains the following methods with more standard-looking names:
public void setQueryFirstName(String value);
public String getQueryFirstName();
The ADF Model automatically exposes the ability to set bind parameters and re-execute the
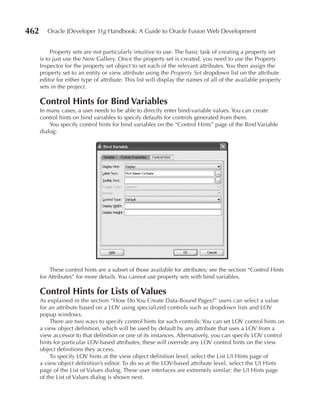
query, so that you can do so from a button or link on a page. However, you can also call these
methods from within a service method.](https://image.slidesharecdn.com/jdeveloper11g1-100312114723-phpapp01/85/J-Developer-11g1-342-320.jpg)
![304 Oracle JDeveloper 11g Handbook: A Guide to Oracle Fusion Web Development
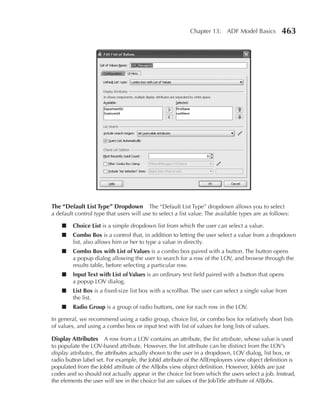
a view link from an on-the-fly view link definition by calling the method ApplicationModuleImpl.
createViewLinkFromEntityAssocName(), which takes the following arguments:
■ A name for the view link instance to be created
■ The package-qualified name of the association
■ The view object instance to be used as the master
■ The view object instance to be used as the detail
Creating View Link Instances from View Object Attributes on the Fly
You can also create a view link instance from an on-the-fly view link definition without using
associations, by specifying source and destination attributes and, optionally, a custom view link
WHERE clause. To do this, you first need to create arrays of source and destination attributes,
represented by objects of the type oracle.jbo.AttributeDef. You can retrieve one of these
objects by passing the attribute name into the method ViewObject.findAttributeDef(). For
example, to create a view link instance on-the-fly between AllJobs and EmployeeDisplay (and you
do not have any appropriate view link definition or association), you would first retrieve the view
object instances and create arrays of the source and destination attributes, as shown in the
following code:
ViewObject allJobs = getAllJobs();
ViewObject employeeDisplay = getEmployeeDisplay();
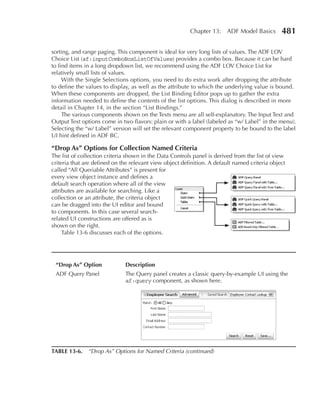
AttributeDef[] sourceAttrs = new AttributeDef() {
allJobs.findAttributeDef("JobId")
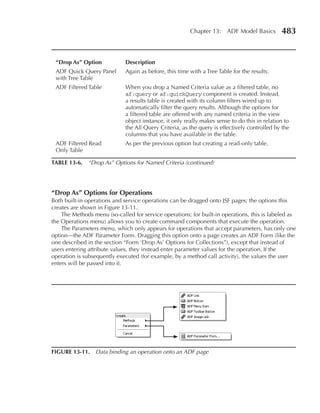
};
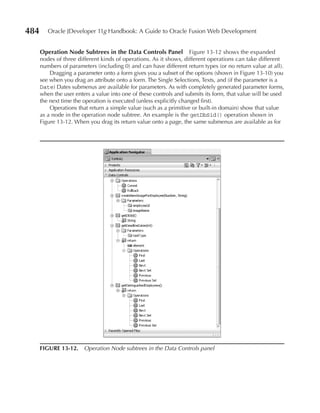
AttributeDef[] destAttrs = new AttributeDef() {
employeeDisplay.findAttributeDef("JobId");
}
Then, you could call the method ApplicationModuleImpl
.createViewLinkBetweenViewObjects(), which takes the following arguments:
■ The name of the view link instance to create.
■ An optional accessor name, which can later be passed into the getAttribute()
method on the master view object instance to retrieve a RowSet containing its details;
this is much like calling an accessor method for an ordinary view link instance. You can
use null if you do not need this functionality.
■ The master view object instance.
■ The array of source (master) attributes.
■ The detail view object instance.
■ The array of destination (detail) attributes.
■ An optional view link WHERE clause; if you pass in null for this attribute, ADF will use
the default view link WHERE clause. View link WHERE clauses are explained in Chapter 7.](https://image.slidesharecdn.com/jdeveloper11g1-100312114723-phpapp01/85/J-Developer-11g1-349-320.jpg)


![380 Oracle JDeveloper 11g Handbook: A Guide to Oracle Fusion Web Development
The Redirect Property By default, controllers such as Apache Struts, JSF, and ADFc use a
mechanism called forwarding to display a new page to the user. When a controller forwards
between pages, the one thing that the end user might notice is that the URL shown in the browser
address bar does not change. Basically, the browser is unaware that a different physical page is
being displayed. The behavior has some implications, both good and bad. On the positive side,
this is the most efficient way for the application to operate, and this is why all of the controllers
do it. On the negative side, users are sometimes confused by the content of the screen changing
but the URL staying the same. This lack of a direct relationship between the URL and the page
also has implications for both bookmarking and security (when the security mechanism is based
on matching URL patterns, as is the case for basic Java EE security).
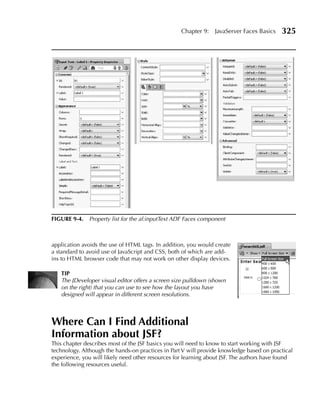
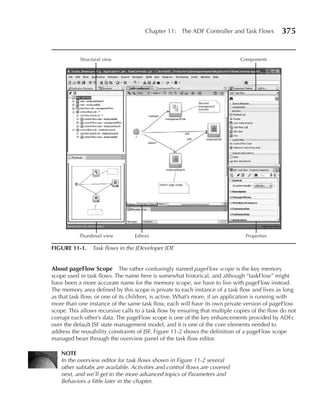
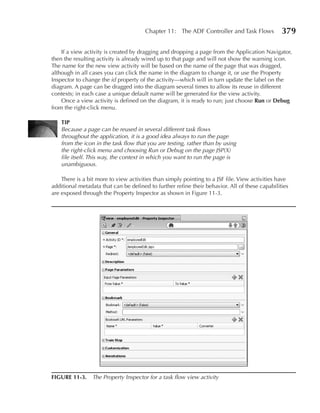
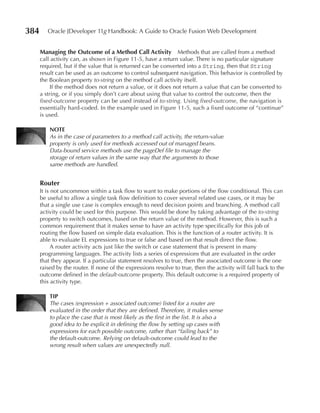
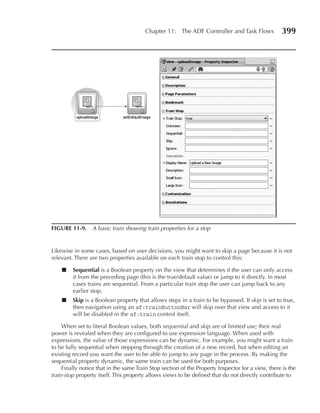
The view activity has a mechanism in the redirect property, which is exposed as a true/false
dropdown list in the General section of the Property Inspector, as shown in Figure 11-3. The
default value is false, but if set to true, then the controller will tell the browser to construct and
GET a new URL for this view activity. Setting the property will meet user expectation and cause
the URL to change as the user navigates to this page; however, there are two side effects to
consider: First of all, an extra network round-trip will be required to manage the GET request from
the browser, and second, the ADF Binding Context for the request (discussed in Chapter 14) will
be destroyed and rebuilt for the new page. This could result in certain data being unavailable for
mapping into page parameters.
We will see, later in the chapter, how ADF implements an alternative mechanism for
bookmarking, and later, in Chapter 21, for security, so there is little reason to actually set this flag.
Page Parameters The next interesting section in the Property Inspector for view activities is the
Page Parameters section. As task flow allows the developer to reuse a page in multiple places in a
flow (or in multiple flows), it is useful to be able to configure that page in some way that reflects
the context in which it is being used. Page parameters provide a basic API mechanism for the
page when it is being reused. For example, a page may need to have different titles, depending
upon the context in which it is being used. Page parameters can be used to pass in a value to be
used for this. The from‑value and to‑value shown in the Property Inspector in Figure 11-3 both use
EL expressions to map data from one place to another. Generally, the to‑value will be a variable in
viewScope that will have only a limited lifespan. The XML metadata to set a dynamic page title
and some information text using page parameters might look like the following snippet:
<view id="accessWarningScreen">
<page>/genericWarning.jspx</page>
<input-page-parameter>
<from-value>You Have Limited Access</from-value>
<to-value>#{viewScope.infoPageHeaderText}</to-value>
</input-page-parameter>
<input-page-parameter>
<from-value>#{res['reducedAccess.messageText']}</from-value>
<to-value>#{viewScope.infoPageMsg}</to-value>
</input-page-parameter>
</view>
Notice in this case that one of the parameters passes a literal value “You Have Limited
Access” to be stored in the infoPageHeaderText variable in viewScope, and the second
parameter uses expression language to read a string from a resource bundle to populate the
infoPageMsg variable.](https://image.slidesharecdn.com/jdeveloper11g1-100312114723-phpapp01/85/J-Developer-11g1-425-320.jpg)
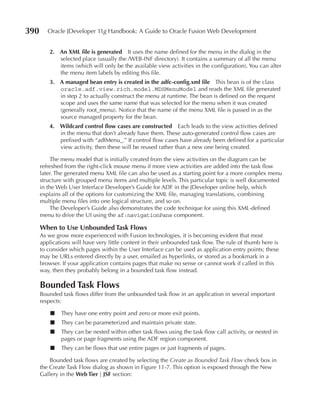
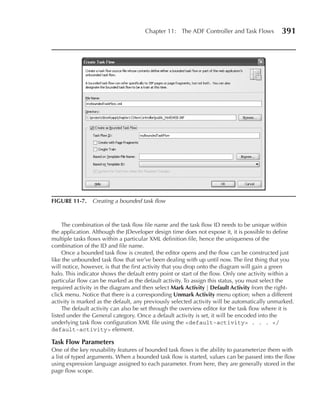
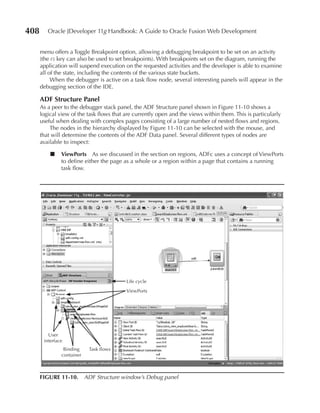
![Chapter 11: The ADF Controller and Task Flows 387
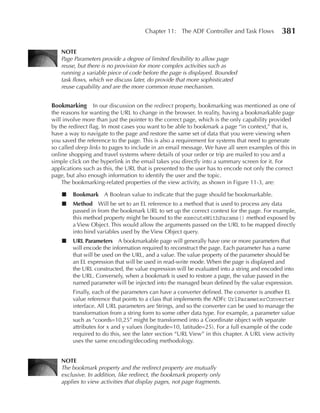
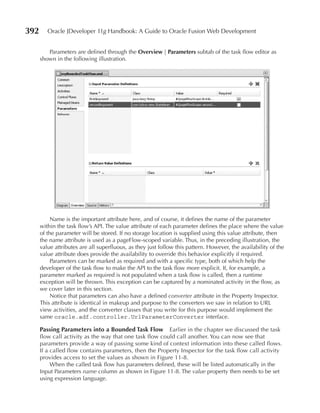
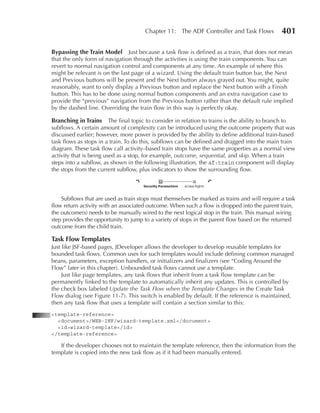
The complete xml for the URL view activity shown in Figure 11-6 is as follows:
<url-view id="goOracleHQ">
<url>http://maps.google.com/</url>
<url-parameter>
<name>z</name>
<value>#{zoomLevel}</value>
</url-parameter>
<url-parameter>
<name>t</name>
<value>#{'h'}</value>
</url-parameter>
<url-parameter>
<name>ll</name>
<value>#{oracleCoordinates}</value>
<converter>#{coordinateConverter}</converter>
</url-parameter>
</url-view>
Parameter Converters The converter used in the example from Figure 11-6 is a very simple
piece of code that will take a complex Coordinate object (implementation not shown) and
output a String (and vice versa). This is accomplished using a small Java class that implements the
oracle.adf.controller.UrlParameterConverter interface. Here is the sample code:
package com.tuhra.view;
import java.util.StringTokenizer;
import oracle.adf.controller.UrlParameterConverter;
/**
* This class implements the UrlParameterConverter to allow the expression of
* coordinates as Strings that can be passed as a URL argument and the
* reconstruction of a coordinate from a string passed in on a URL
*/
public class CoordinateURLConverter implements UrlParameterConverter {
/**
* The interface method defined for re-constructing an object from a string
* passed on the URL
* @param value Coordinate expressed as a string in the format
* "longitude,latitude" e.g.?coord=10.223,-12.234
* @return a Coordinate object
*/
public Object getAsObject(String value) {
//For simplicity assume that the string is in the correct format
String[] longLat = value.split(",");
Coordinate coord = new Coordinate();
coord.setLongitude(Double.valueOf(longLat[0]));
coord.setLatitude(Double.valueOf(longLat[1]));
return coord;
}](https://image.slidesharecdn.com/jdeveloper11g1-100312114723-phpapp01/85/J-Developer-11g1-432-320.jpg)


![524 Oracle JDeveloper 11g Handbook: A Guide to Oracle Fusion Web Development
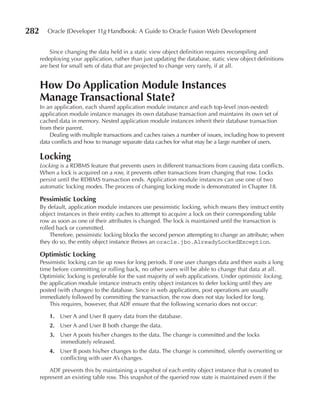
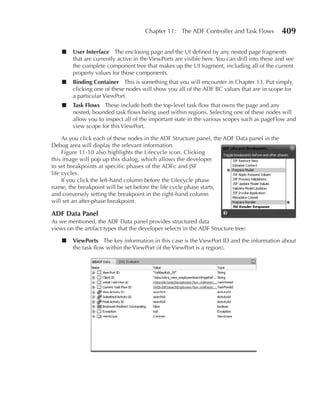
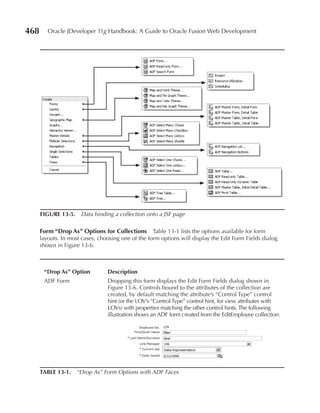
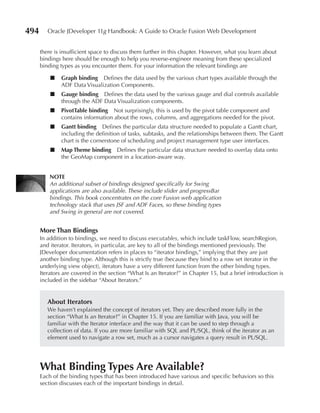
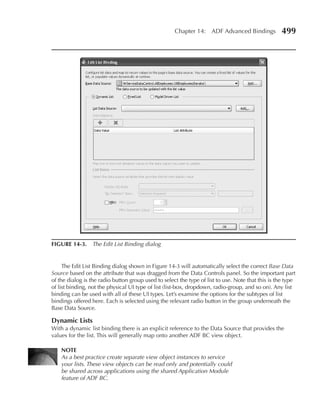
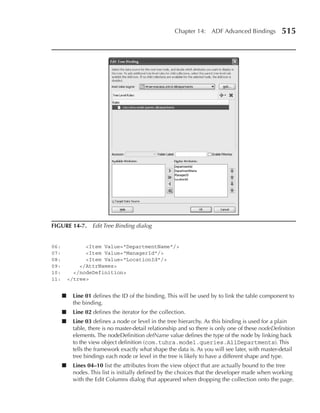
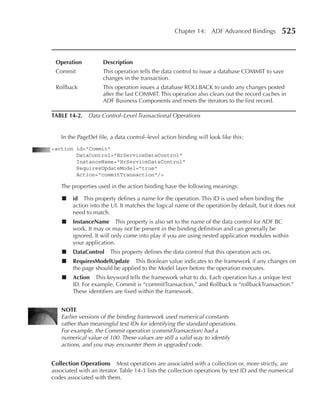
using a Table Binding
It is possible to bind an af:table component to a table binding using the expression
#{bindings.[Table Binding Name].collectionModel} as the value attribute—for example,
#{bindings.AllDepartments.collectionModel} However, it’s more common that a table
binding will be used with a looping component such as af:forEach. In this case, the expression
used is slightly different: #{bindings.[Table Binding Name].rangeSet}. Refer back to
Table 14-1 for a more of the attributes that the table binding also shares with the tree binding.
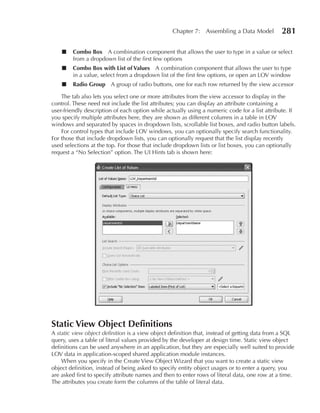
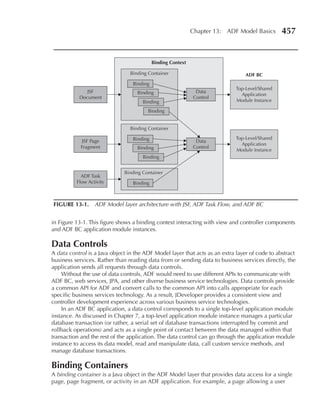
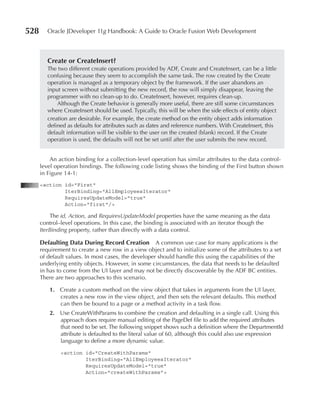
action Bindings
In addition to the data-bound fields shown in the JSF page in Figure 14-1, there are also a series
of buttons used for navigating between records. Just like the fields, these buttons are bound and
defined in the PageDef file. The buttons are bound to operations using an action binding.
Operations are data control items that perform an action on the data model. Available
operations appear in the Data Controls Panel, and you can drop them onto the page as buttons
or links (or, in some cases, as complete forms with input items and buttons). Action bindings
connect the UI element (button or link) on the page (View layer) to the operation function in
the model layer. These action bindings are defined in the PageDef file just like the data access
binding types.
TIP
If you have an Oracle Forms background, the best way to think
of operations is that they are like the Oracle Forms built-ins.
Operations are standard infrastructure functions that operate at
the collection level (like the block level in triggers) or at the
data control level (like Form-level triggers), as shown in this
illustration.
available Operations
As mentioned in Chapter 13, operations are part of the
abstraction provided by the ADFm layer, and different business
services (data control types) will support a different subset of
operations, depending on the capabilities of that service. With
ADF BC–based data controls, a large set of operations are
supported. At the other extreme, a data control that is based on
a JavaBean may not support any operations.
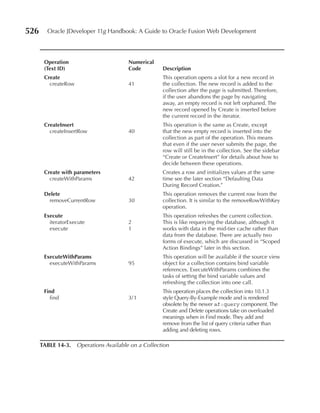
Data Control–Level Operations The data control–level
operations (shown in Table 14-2) are only exposed by ADF
BC–based data controls and any other data controls that
have the supportsTransactions property set to “true” in the
DataControls.dcx file.](https://image.slidesharecdn.com/jdeveloper11g1-100312114723-phpapp01/85/J-Developer-11g1-569-320.jpg)
![530 Oracle JDeveloper 11g Handbook: A Guide to Oracle Fusion Web Development
will refresh all collections on the page. If the button’s operation were defined on the iterator level,
only the bindings associated with the same iterator as the Execute action would be refreshed.
If you create both types of bindings (iterator and binding container) and compare them, you
will see that the only difference is the ID of the action. Iterator-level Execute, for example, has an
Action attribute of “iteratorExecute.” The same operation bound at the binding container level
has an Action attribute of “execute.” So although these action bindings are considered two
scopes or levels for the same operation, in reality, they are two separate operations. Table 14-3
shows both action codes when applicable. The lower-numbered code of any pair operates at the
whole-page level.
nOTE
The term “binding container” is the formal name for the set of
bindings on a page. All bindings defined within a PageDef file are
within the same binding container. When building JSF user interfaces,
there is generally a one-to-one relationship between a binding
container and a page or page fragment.
action Bindings in the uI
When we described tree and table bindings, you saw that the binding exposes extra features though
Expression Language. The same is true of action bindings. For example, here is the markup for the
First button shown in Figure 14-1:
<af:commandButton actionListener="#{bindings.First.execute}"
text="First"
disabled="#{!bindings.First.enabled}"/>
The first feature exposed by the operation is the enabled attribute in the expression
#{!bindings.First.enabled}. This expression implements a framework behavior that we
mentioned earlier in the chapter. Operation UI elements, such as buttons, are enabled or disabled
automatically by the framework to reflect if the operation is available.
TIP
You can use this “enabled” attribute within Expression Language
to understand if the user has made changes to the data. Bind the
Commit operation into the PageDef file and then the expression
#{bindings.Commit.enabled} can be used to detect if there
are outstanding changes.
The second interesting property is shown in the actionListener property. An actionListener in
JSF is code that will execute before the main action for a command item component. For
example, consider the following code:
<af:commandButton actionListener="#{bindings.Commit.execute}"
action="Home"
text="Save and return"/>
The actionListener operation of a commit is processed, and then the navigation implied by
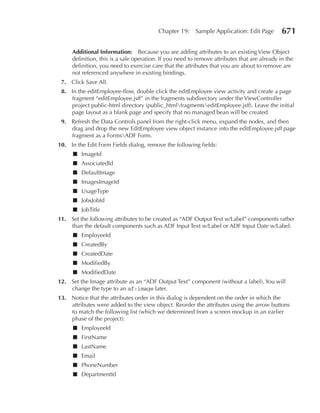
the “Home” outcome takes place. The expression #{bindings.[operation].execute} is a](https://image.slidesharecdn.com/jdeveloper11g1-100312114723-phpapp01/85/J-Developer-11g1-575-320.jpg)


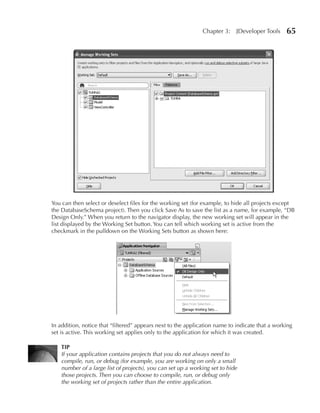
![612 Oracle JDeveloper 11g Handbook: A Guide to Oracle Fusion Web Development
6. Select run Script from the right-click menu in the script (or click the Run Script button in
the SQL Worksheet window).
Additional Information: This script will alter the database with the changes you made
in the diagram as well as the additional code for triggers and for setting the create history
columns in EMPLOYEES to NOT NULL. You can view messages from the script in the
Script Output tab at the bottom of the SQL Worksheet window.
7. Return to the diagram tab in the editor. Select Synchronize with Database | refresh from
[Hr_DB] from the right-click menu. In the Confirm Offline Object Overwrite dialog,
click Yes.
8. Visit the Edit Table dialog for EMPLOYEES to confirm that the NOT NULL constraints were
added to CREATED_BY and CREATED_DATE. Click Cancel.
9. Click Save All. Close the editor windows.
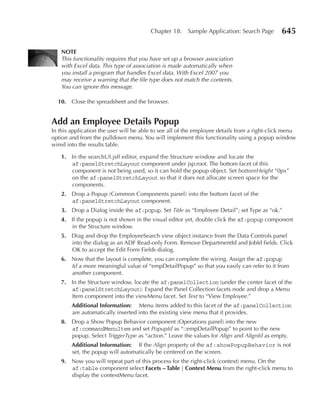
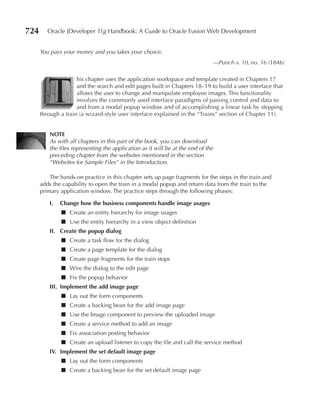
What Did You Just Do? You just modified a database schema using the JDeveloper database
diagram to visualize the changes and generate the Data Definition Language (DDL) script required
to make the changes. You also ran the DDL script in the database.
In most development environments, you perform development work in a special development
database instance separate from the production instance. When the application has been
developed, you promote the changes made to the development database into the next level in your
production process—usually a quality assurance or user acceptance test database instance—and
test the application in that environment. Eventually, the application will go live and you will make
changes to a production database. As you move through this promotion process, you can run the
DDL script you created in this phase; it is part of the process and is stored with the application files.
NOTe
It is important that any minor changes made outside of this script be
captured so that the database alteration process can be complete.
III. Set up Project Defaults
This phase creates the framework superclass files mentioned in Chapter 16. These files provide
a central place for setting up and for changing the default behavior of all application module
instances, entity object instances, and view object instances in the Model project. You will also
set properties for the ViewController project that will modify how the application runs and where
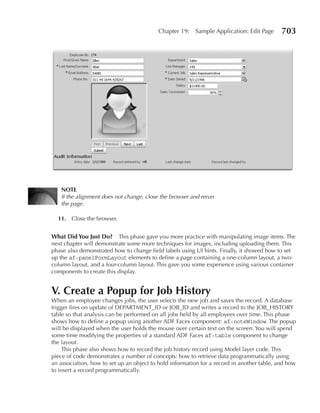
it looks for messages.
Create Model Framework Superclasses
This section adds framework superclasses to the Model project. You will add framework
superclasses to the ViewController project in a later chapter. In most development situations you
would actually want to share these same superclasses between all of your development projects
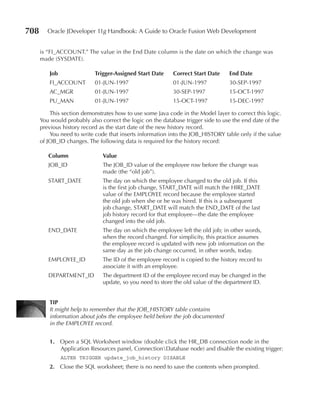
and so would be creating them in a separate workspace and deploying them in a library for reuse
in other applications. However, for simplicity here you will keep them in the Model project.
1. Select the Model project.](https://image.slidesharecdn.com/jdeveloper11g1-100312114723-phpapp01/85/J-Developer-11g1-657-320.jpg)

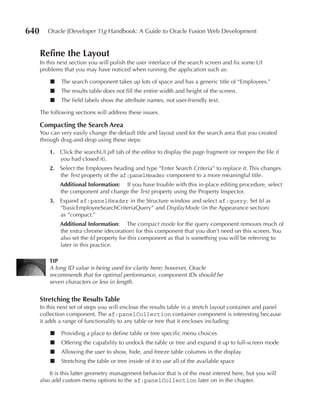


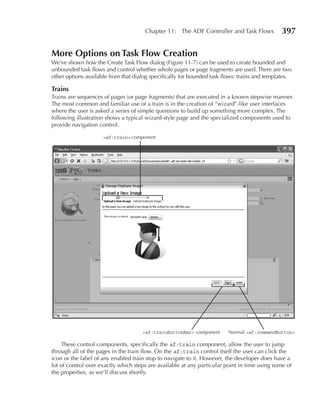
![656 Oracle JDeveloper 11g Handbook: A Guide to Oracle Fusion Web Development
Additional Information: This code surrounds the entire display with an
af:panelStretchLayout container and moves all hierarchy components to a center
facet. It also adds an empty top facet, which you will use in the next step. The Structure
window will now show nodes like the following:
8. Select Source | reformat from the right-click menu in the editor to fix the XML formatting.
9. Refresh the Data Controls panel and in the Structure Window drop the DepartmentSelector
collection into the top facet of the new af:panelStretchLayout. Select navigation |
ADF navigation List. In the Edit List Binding dialog, select Display Attribute as
“DepartmentName.” Click OK.
10. Select the af:selectOneChoice (the dropdown) component in the Structure window
(under af:panelStretchLayouttop facetaf:panelGroupLayout), and set Label
as “Explore Department.” Check that the Id property is set to a default value of “nl1.”
11. On the dvt:hierarchyViewer component (in the center facet), set partialTriggers
property (Behavior section) as “::nl1” so that the hierarchy object is refreshed when the
list changes. Click Save All.
CAuTIOn
If the Property Inspector changes the partialTriggers property to “[::nl1]”
with square brackets, remove the brackets in the source code. This is a
bug in the older versions of the product.
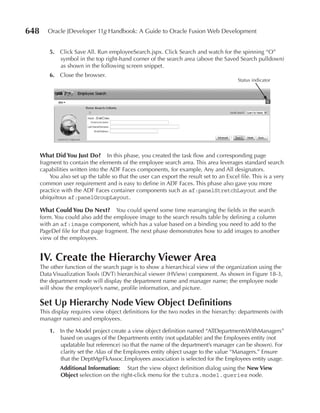
12. Run templateTest.jspx. Select a department
from the list, and the hierarchy view will only
show that department with its employees.
Try various selections from the pulldown.
(Accounting, Executive, and IT departments,
among others, should show employees.)
13. Zoom in using the control panel (accessed
with the “>>” bar on the top-left side of the
component), and you will see something like
this for a department and employee node.
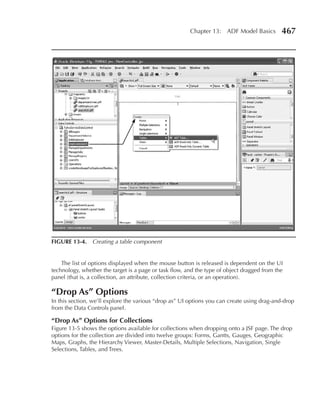
14. Close the browser.](https://image.slidesharecdn.com/jdeveloper11g1-100312114723-phpapp01/85/J-Developer-11g1-701-320.jpg)


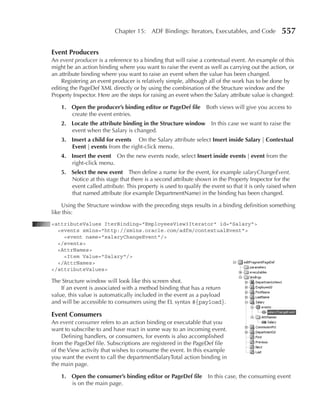
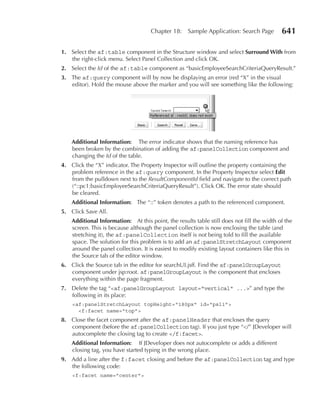
![686 Oracle JDeveloper 11g Handbook: A Guide to Oracle Fusion Web Development
Fix the Salary Validation and Change the Salary Format
You can use one of the following approaches to fix the problem that no validation error occurs
when you change just the job value to cause an invalid combination of Job and MinSalary:
■ Add a dependency, which would automatically force the Salary value to clear when the
Job changes.
■ Add the same validation to the JobId field as the salary field. (Chapter 6 explains more
about cross-attribute validation and how to solve its potential problems.)
■ Move the validation to the Entity level.
In this case it makes sense to move the validation to the Entity level.
CAUTION
Since you know that all declarative property values are written into
XML code, you might be tempted to edit the XML source code to
move the code that defines the declarative validation rule. We very
strongly urge you to resist this temptation because the XML definitions
for these two validation rules are slightly different and because the
editor automatically handles message bundle files for you. We predict
that, if you give in to this temptation, you are likely to spend more
time troubleshooting and debugging problems in the XML code than
you would spend using the declarative property editors.
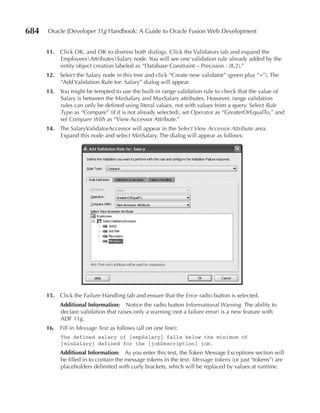
1. In the Employees entity object editor, click the Validators tab within the Overview editor
and select the Entity node, which will currently be empty.
2. Click “Create new validator” (green plus “+”) and recreate the Compare validation rule
(as in the preceding section in steps 13-18). Select Salary as the attribute to validate and
use “newValue” for the value of the empSalary token.
3. Remove the instance of the Compare validation rule on the Salary attribute (by selecting it
and clicking the “Delete selected validator(s)” (red “x”) button.
4. Run the application module again; opening the EditEmployee view object instance.
For Ellen Abel, change Salary to “4000” and move the cursor to another field. No error
message will result because the validation rule is defined on the Entity (row) level.
5. Navigate to the next record. The error message will now appear but it will contain
something like “Entity [oracle.jbo.Key[174 ]]” rather than the entered salary value.
Additional Information: This reference appears because the validation is on the entity
level, so the Groovy expression “newValue” now refers to the whole row. You can refine
the Groovy expression in the error message substitution variable to “newValue.Salary” to
refer to the Salary value within the row.
6. Close the browser. Return to the validation rule editor and change the Expression for
empSalary to “newValue.Salary.”](https://image.slidesharecdn.com/jdeveloper11g1-100312114723-phpapp01/85/J-Developer-11g1-731-320.jpg)


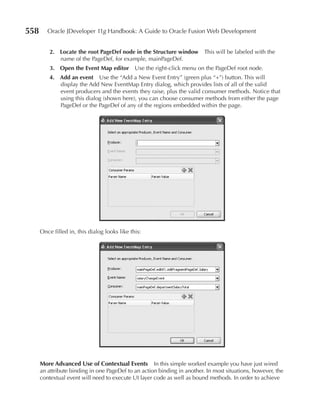
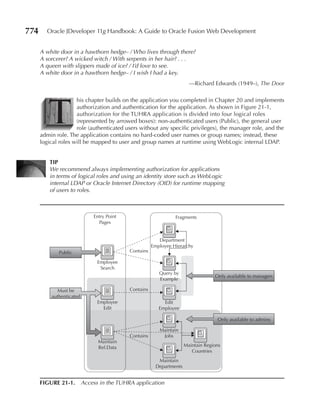
![742 Oracle JDeveloper 11g Handbook: A Guide to Oracle Fusion Web Development
18. Next you need to indicate which flow should be selected as the user opens and closes
the popup. Open the editEmployee fragment and locate the popup containing the region
in the Structure window. Select Insert inside af:popup | ADF Faces from the right-click
menu and select “Set Property Listener” in the Insert ADF Faces Item dialog.
19. The Insert Set Property Listener dialog will display. Set From to “#{viewScope.employeeEditBB
.imageTaskFlowId}.” Set To to “#{viewScope.employeeEditBB.selectedTaskFlowId}.” Set
Type to “popupFetch.”
Additional Information: When the popup is opened, you are copying the value for the
imageLOV-flow into the selected flow for display in the region.
The final step is to reset the region contents when the af:popup is closed; however, the
popup close event is private to the browser and does not automatically call server-side
code to allow you to reset the _selectedTaskFlowId, so next you will add a little
JavaScript into the page to trigger the change of _selectedTaskFlowId on the server.
20. After the last af:popup tag in the editEmployee fragment add an af:resource
component. Set the Type property to “javascript.”
Additional Information: The af:resource component allows you to embed both
JavaScript and CSS into your pages, either in-line as we are showing here, or as a
reference to an external .js or .css file. Although we are using in-line code for simplicity, in
production applications we generally recommend externalizing resources to separate files.
21. Switch to the source code editor view for the page and add the following JavaScript inside
the resource tag:
function popupClosedListener(event) {
var source = event.getSource();
var popupId = source.getClientId();
var params = {};
params['popupId'] = popupId;
var type = "serverPopupClosed";
var immediate = true;
AdfCustomEvent.queue(source, type, params, immediate);
}
Additional Information: This script uses the ADF JavaScript API to execute a custom
server-side event called “serverPopupClosed.” You will implement the handler for that
event shortly. Specifying true as the last parameter to the method means that the custom
event should trigger during the apply request values phase of the JSF lifecycle, just as
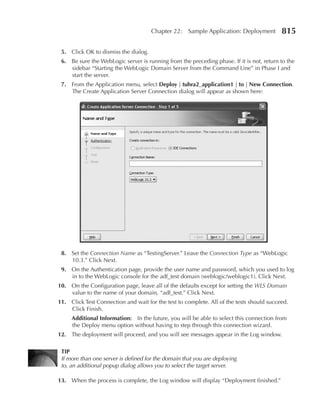
specifying immediate="true" on a server-side component does.
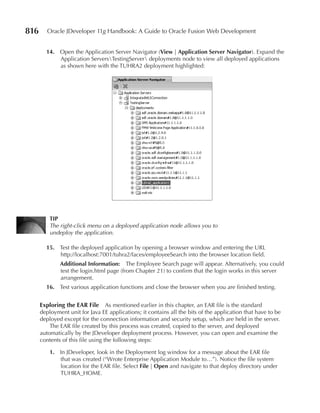
22. Next, you need to wire the popupClosedListener() JavaScript method into the
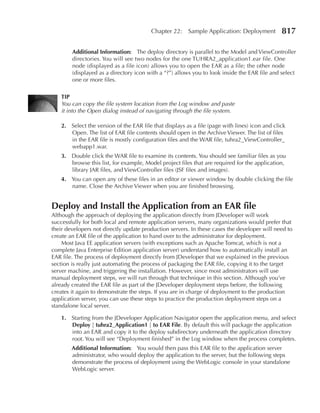
popup so that it is executed as the popup is closed. Select the second af:popup in the
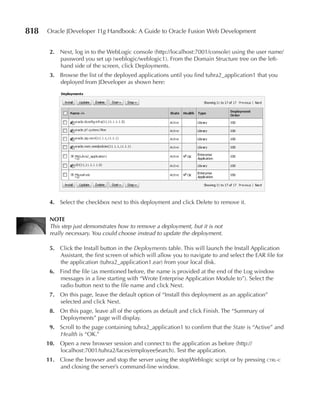
Structure window and select Insert inside af:popup | ADF Faces from the right-click
menu. Then select “Client Listener” in the Insert ADF Faces Item dialog.
Additional Information: The Client Listener component executes JavaScript methods
in the browser. A Server Listener, which you will create next, executes a Java method
on the server.](https://image.slidesharecdn.com/jdeveloper11g1-100312114723-phpapp01/85/J-Developer-11g1-787-320.jpg)

![Chapter 20: Sample Application: The Image LOV Dialog 749
12. Click the red light bulb icon beside the call to getEmpRow(), and select “Create method
getEmpRow” to generate a stub for that method.
13. Similarly, generate a stub for createAndInsertImage().
14. Implement the getEmpRow() method as follows:
private AllEmployeesRowImpl getEmpRow(Number employeeId) {
AllEmployeesRowImpl empRow = null;
TuhraViewObjectImpl empRows = this.getEditEmployee();
Key key = new Key(new Object[] {employeeId});
Row[] hits = empRows.findByKey(key, 1);
if (hits.length > 0) {
empRow = (AllEmployeesRowImpl)hits[0];
}
return empRow;
}
Additional Information: This method creates a Key object based on the passed in
employee ID (which forms the key for AllEmployees), and calls the method findByKey()
to return an array of matching rows (in this case, because the key is complete, at most one
row will match). It returns the matching row, if any, and returns null otherwise.
15. Using import assistance, import oracle.jbo.Key and oracle.jbo.Row.
16. Implement the createAndInsertImage() method as follows:
private void createAndInsertImage(AllEmployeesRowImpl empRow, String imageName) {
RowSet empImages = (RowSet) empRow.getAllEmployeeImages();
//Create an Image
EntityDefImpl imageDef =
EntityDefImpl.findDefObject("tuhra.model.entities.Images");
ImagesImpl newImage =
(ImagesImpl)imageDef.createInstance2(getDBTransaction(),null);
newImage.setImage(imageName);
//Initalize the values for, and then Create an Image Usage
//in the context of the current Employee row
NameValuePairs initializeUsage = new NameValuePairs();
initializeUsage.setAttribute("ImageId", newImage.getImageId());
initializeUsage.setAttribute("DefaultImage", "N");
AllEmployeeImagesRowImpl newUsage =
(AllEmployeeImagesRowImpl)empImages.createAndInitRow(initializeUsage);
}
Additional Information: This method retrieves the row set containing images that belong
to the employee. Then, it creates a new image, setting its image (name) value in the
process. Finally using the ID generated for the new image and a suitable value for the
DefaultImage flag as initialization values, it creates a new usage row. The row iterator
ensures that the foreign key attribute to AllEmployees is set correctly.
17. Use Import Assistance to import
■ oracle.jbo.server.EntityDefImpl
■ oracle.jbo.NameValuePairs
■ oracle.jbo.RowSet
■ tuhra.model.queries.main.AllEmployeeImagesRowImpl](https://image.slidesharecdn.com/jdeveloper11g1-100312114723-phpapp01/85/J-Developer-11g1-794-320.jpg)

![762 Oracle JDeveloper 11g Handbook: A Guide to Oracle Fusion Web Development
generated methods AllEmployeesRowImpl.getEmployeeImageUsages() and
AllEmployeesRowImpl.getImages().)
3. Implement the findImageUsagesRowByKey() method as follows:
private AllEmployeeImagesRowImpl findImageUsagesRowByKey(RowSet imageRows,
Number imageId) {
AllEmployeeImagesRowImpl retRow = null;
Key key =
new Key(new Object[] { getEmployeeId().getSequenceNumber(), imageId, "E" });
Row[] hits = imageRows.findByKey(key, 1);
if (hits.length > 0) {
retRow = (AllEmployeeImagesRowImpl)hits[0];
}
return retRow;
}
CAuTION
The ordering of the elements in the array passed to the Key constructor
assumes that the AssociatedId, ImageId, and UsageType attributes
in the AllEmployeeImages view object definition are present in
that order: with AssociatedId before ImageId, and ImageId before
UsageType (they do not need to appear consecutively). Check
and ensure this is the case; if not, either re-order the attributes in
AllEmployeeImages to match this order, or re-order the elements in
the array passed to the Key constructor to match the order that those
attributes have in the view object definition.
Additional Information: This method uses the EmployeeId of the current employee,
the supplied ImageId, and the discriminator “E” (for employee image usages) to find
a particular image row by its key. The method will have syntax errors because of the
unimported Key class; you will rectify this in the next step.
4. Use Import Assistance to import oracle.jbo.Key.
5. Open the AllEmployees view object definition in the editor.
6. Select the Java tab, and click the Edit button for the Client Row Interface panel to open
the Edit Client Row Interface dialog.
7. Shuttle the defineDefaultImage(Number):void method from the Available list to the
Selected list.
8. Click OK to close the dialog.
9. Click Save All.
Implement a Drop Listener to Call the Service Method
In this section, you will implement the drop listener created in the section “Add Drag-and-Drop
Capabilities.” This listener will analyze the drop event to discover the dragged image’s ID and
path, display the selected image in the drop target, and call the service method created in the
preceding section to set the dropped image as the new default for the employee.
1. In the ViewController project, find setDefaultImage.jsff and open it in an editor.](https://image.slidesharecdn.com/jdeveloper11g1-100312114723-phpapp01/85/J-Developer-11g1-807-320.jpg)


![786 Oracle JDeveloper 11g Handbook: A Guide to Oracle Fusion Web Development
11. Click the “Return to Employee Search” link to return to the search page.
12. Click the Maintenance link.
Additional Information: A page containing a 500 – Internal Server Error will appear.
This is because CDAVIES does not have the “admin” application role, which is required
for access to the management task flow.
13. Close the browser and terminate the server.
14. Repeat steps 8–12, this time logging in using the credentials “TFOX”/“welcome2tuhra.”
Additional Information: This time, when you click the Maintenance link, you will see
the (empty except for the template components) Maintenance page. This is because TFOX
has the required “admin” application role.
15. Close the browser and terminate the server.
Authorize Access to uI Components
When you attempted to access the Maintenance page when logged in as CDAVIES, you received
an unfriendly error page. It would be better if the Maintenance link did not appear at all for users
who did not have the required application role. In this section, you will hide that link from non-
administrative users. You will also hide the command components that link to the Edit Employee
page from anyone who is not a manager.
The reason you are hiding those components, instead of restricting access to the Edit Employee
page to managers, is that users with only the “user” role will, eventually, need to use the Edit
Employee page to edit their own record. You will implement this in the section “Allow a User to
Edit His/Her Own Records.” What an ordinary user will not be able to do is edit arbitrary records
using command components on search results.
1. Re-open the employeeSearch.jspx page in an editor.
2. Select the maintLink command link.
3. Set the Rendered property of the link to “#{securityContext.taskflowViewable['/WEB-INF/
management-flow.xml#management-flow']}.”
NOTe
You’ll need to use the Expression Builder to set the property to a value
other than “true,” “false,” or “default.”
Additional Information: Here, securityContext is a JSF managed bean that ADF Security
introduces at runtime to keep track of security information. Its taskflowViewable property
is a Map from task flows to Boolean values, containing a value of true for task flows that
the current authenticated user (or anonymous-role, for non-logged-in users) is allowed
to access. The actual value that you test for in the taskflowViewable map is a compound
value created from the name and location of the XML file containing the task flow—
“/WEB-INF/management-flow.xml,” followed by the name of the task flow in that file—
“ management-flow.” These values are separated by “#.”
You could use the much simpler #{securityContext.userInRole['admin']},
which evaluates to true if the current user is in the “admin” application role, but that
effectively creates a duplicate reference to the “admin” role: The management-flow task](https://image.slidesharecdn.com/jdeveloper11g1-100312114723-phpapp01/85/J-Developer-11g1-831-320.jpg)
![Chapter 21: Sample Application: Security 787
flow is restricted to members of that role, and the role name would also be hard-coded
in the page. If you were later to decide to change authorization for management-flow,
you would have to change both of these references. By using the more complex EL
expression, you will cause ADF to render the link for anyone authorized to access its
destination, whatever role or roles that may translate into in the future.
4. Run employeeSearch.jspx.
Additional Information: The Maintenance link is not displayed, since the user is not yet
authenticated, and management-flow is not viewable by anonymous-role.
5. Edit an employee’s record (to force a login), log in as CDAVIES, and return to the search page.
Additional Information: The Maintenance link is still not displayed, since CDAVIES does
not have the “admin” application role, which is required to view management-flow.
6. Close the browser.
7. Repeat steps 4–5, this time logging in as TFOX.
Additional Information: This time, the Maintenance link is displayed.
8. Close the browser and terminate the server.
9. Open the searchUI.jsff page fragment in a visual editor.
10. In the Structure window, expand af:panelStretchLayout and its center facet to
locate the af:panelCollection that surrounds the results table. In the menus facet
of af:panelCollection, expand the Actions menu and select the Edit Employee
command menu item.
11. Set the Rendered property on the item to “#{securityContext.userInRole['manager']}.”
Additional Information: This uses the alternative way of checking who the user
is as we mentioned earlier—in this case, checking against an absolute role name
rather than against a permission to do something. Best practice is generally to use the
taskflowViewable approach, but here this is not possible, because members of only the
“user” role can access the control flow; they just cannot access it from this menu.
12. Expand the af:table inside the af:panelCollection and locate af:popup inside
the table contextMenu facet.
13. Select the edit employee menu item nested under the popup’s menu.
14. Set the Rendered property on the item to “#{securityContext.userInRole['manager']}.”
15. Click Save All and test employeeSearch.jspx. Notice now that all of the edit links have
disappeared, and there is no way to make them appear. You will fix this problem in the
following phase.
16. Close the browser and terminate the server.
What Did You Just Do? You implemented authorization for the application, exposing the search
page to the public, restricting access to the Edit Employee page to authenticated users with the “user”
role, and restricting access to the Management page to authenticated users with the “admin” role.
Then, you hid the UI components that link to the Edit Employee and Management pages from
users not authorized to access those pages. Unfortunately, this has the effect of rendering the pages
completely inaccessible. By default, ADF only displays a login page when a non-authenticated user
tries to access a resource requiring authentication. Because you hid the links to these resources from](https://image.slidesharecdn.com/jdeveloper11g1-100312114723-phpapp01/85/J-Developer-11g1-832-320.jpg)
![788 Oracle JDeveloper 11g Handbook: A Guide to Oracle Fusion Web Development
non-authenticated users, there is now no way to trigger the display of the login page, so no way
for the user to authenticate. You will fix this problem in the following phase by allowing any
unauthenticated user to request authentication at any time.
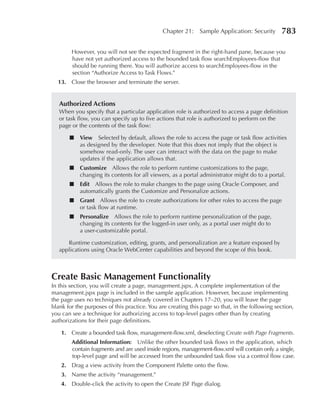
III. Implement Custom Login Functionality
The default login form functionality provided by ADF is not appropriate for the TUHRA
application. First, the default form does not have a look and feel consistent with the rest of the
application. Also, and even more important, the default functionality does not provide any way
for a user to trigger an authentication request, since all links to resources requiring authentication
are hidden from users who are not already authenticated. In this phase, you will create a login
popup that is better integrated into the application’s appearance and can be accessed by any
unauthenticated user on demand.
Implement a Managed Bean to Handle Login
In this section, you will create a managed bean that will handle login attempts in a manner
consistent with application behavior. For example, it will provide an in-context message to a
user upon failed login, rather than relying on browser behavior to handle authentication errors.
1. In the ViewController project, create a Java class, tuhra.controller.LoginHandler.
2. Create two private fields:
private String _username;
private String _password;
3. Generate or create public accessors for both fields.
4. Add the following method to the class:
01: public String performLogin() {
02: byte[] pw = _password.getBytes();
03: FacesContext ctx = FacesContext.getCurrentInstance();
04: HttpServletRequest request =
05: (HttpServletRequest)ctx.getExternalContext().getRequest();
06: CallbackHandler handler = new SimpleCallbackHandler(_username, pw);
07: try {
08: Subject mySubject = Authentication.login(handler);
09: ServletAuthentication.runAs(mySubject, request);
10: String loginUrl = "/adfAuthentication?success_url=/faces" +
11: ctx.getViewRoot().getViewId();
12: HttpServletResponse response =
13: (HttpServletResponse)ctx.getExternalContext().getResponse();
14: sendForward(request, response, loginUrl);
15: } catch (FailedLoginException fle) {
16: FacesMessage msg = new FacesMessage(FacesMessage.SEVERITY_ERROR,
17: "Incorrect Username or Password",
18: "An incorrect Username or Password" +
19: " was specified");
20: ctx.addMessage(null, msg);
21: } catch (LoginException le) {
22: reportUnexpectedLoginError("LoginException", le);
23: }
24: return null;
25: }](https://image.slidesharecdn.com/jdeveloper11g1-100312114723-phpapp01/85/J-Developer-11g1-833-320.jpg)
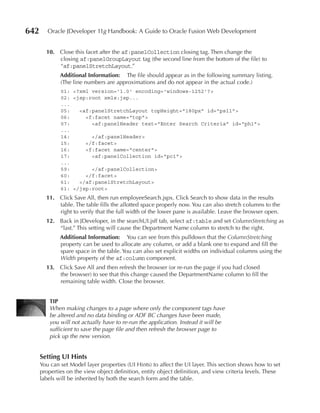
![796 Oracle JDeveloper 11g Handbook: A Guide to Oracle Fusion Web Development
10. Drop another Panel Group Layout after the new spacer, still inside the vertical
af:panelGroupLayout component, and set its Layout property to “horizontal.”
11. Drop a Spacer inside this Panel Group Layout, and set its Width to “4.”
12. Drop a Switcher after the Spacer, and set the following properties on it:
FacetName as “#{securityContext.authenticated?'loggedon':'loggedoff'}”
DefaultFacet as “loggedoff”
Additional Information: Depending on whether the user is authenticated, the switcher
will display one of two facets, “loggedon” or “loggedoff.” If the call returns null, the
switcher will display its default facet.
13. Select Insert inside af:switcher | Facet from the switcher’s right-click menu.
14. Name the facet “loggedoff.”
15. Drop an Output Formatted inside the facet, and set the following properties:
Value as “[Not Connected]”
StyleUsage as “pageStamp”
16. Repeat steps 12–14 to create a facet named “loggedon,” with an Output Formatted
with the Value “[Connected as #{bindings.FirstName.inputValue} #{bindings.LastName
.inputValue}].” The Structure window at this point will look like this (under jsp:root):
17. Click Save All.
18. Run employeeSearch.jspx.
Additional Information: The text “[Not Connected]” should appear in the page footer,
along with the copyright notice.
19. Log in as CDAVIES.
Additional Information: The text “[Connected as Curtis Davies]” should appear in the
page footer.
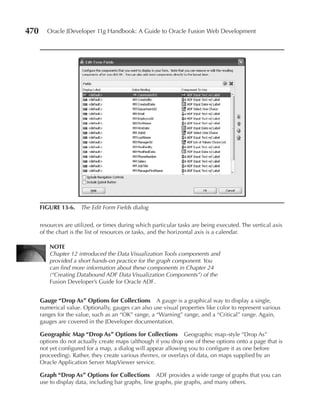
20. Close the browser and terminate the server.](https://image.slidesharecdn.com/jdeveloper11g1-100312114723-phpapp01/85/J-Developer-11g1-841-320.jpg)


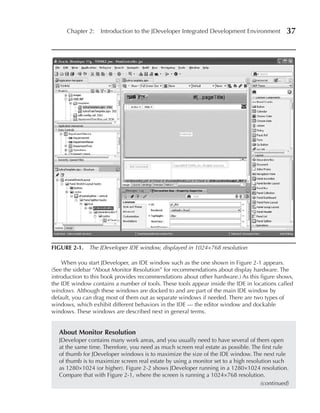
![Want your own FREE subscription?
To receive a free subscription to Oracle Magazine, you must fill out the entire card, sign it, and date
it (incomplete cards cannot be processed or acknowledged). You can also fax your application to
+1.847.763.9638. Or subscribe at our Web site at oracle.com/oraclemagazine
Yes, please send me a FREE subscription Oracle Magazine. No.
From time to time, Oracle Publishing allows our partners
exclusive access to our e-mail addresses for special promo-
tions and announcements. To be included in this program,
x
please check this circle. If you do not wish to be included, you signature (required) date
will only receive notices about your subscription via e-mail.
name title
Oracle Publishing allows sharing of our postal mailing list with
selected third parties. If you prefer your mailing address not to company e-mail address
be included in this program, please check this circle.
If at any time you would like to be removed from either mailing list, please contact
Customer Service at +1.847 .763.9635 or send an e-mail to oracle@halldata.com.
street/p.o. box
If you opt in to the sharing of information, Oracle may also provide you with
e-mail related to Oracle products, services, and events. If you want to completely
unsubscribe from any e-mail communication from Oracle, please send an e-mail to: city/state/zip or postal code telephone
unsubscribe@oracle-mail.com with the following in the subject line: REMOVE [your
e-mail address]. For complete information on Oracle Publishing’s privacy practices,
please visit oracle.com/html/privacy/html country fax
Would you like to receive your free subscription in digital format instead of print if it becomes available? Yes No
YOU MUST ANSWER ALL 10 QUESTIONS BELOW.
1 WHAT IS THE PRIMARY BUSINESS ACTIVITY 3 WHAT IS YOUR CURRENT PRIMARY OPERATING o 18 Minicomputer o 05 Hibernate o 17 SQL
OF YOUR FIRM AT THIS LOCATION? (check PLATFORM (check all that apply) o 19 Intel x86(32) o 06 J++/J# o 18 Visual Basic
one only) o 20 Intel x86(64) o 07 Java o 98 Other
o 01 Digital Equipment Corp UNIX/VAX/VMS
o 21 Network Computer o 08 JSP
o 01 Aerospace and Defense Manufacturing o 02 HP UNIX
o 22 Symmetric Multiprocessing o 09 .NET
o 02 Application Service Provider o 03 IBM AIX
o 23 Workstation Services o 10 Perl
o 03 Automotive Manufacturing o 04 IBM UNIX
o 04 Chemicals o 05 Linux (Red Hat) SERVICES o 11 PHP
o 05 Media and Entertainment o 06 Linux (SUSE) o 24 Consulting o 12 PL/SQL
o 06 Construction/Engineering o 07 Linux (Oracle Enterprise) o 25 Education/Training
o 07 Consumer Sector/Consumer Packaged o 08 Linux (other) o 26 Maintenance 10 WHAT ORACLE PRODUCTS ARE IN USE AT YOUR
Goods o 09 Macintosh o 27 Online Database SITE? (check all that apply)
o 08 Education o 10 MVS o 28 Support
o 09 Financial Services/Insurance o 11 Netware o 29 Technology-Based Training ORACLE DATABASE
o 10 Health Care o 12 Network Computing o 30 Other o 01 Oracle Database 11g
o 11 High Technology Manufacturing, OEM o 13 SCO UNIX 99 o None of the Above o 02 Oracle Database 10 g
o 12 Industrial Manufacturing o 14 Sun Solaris/SunOS o 03 Oracle9 i Database
o 13 Independent Software Vendor o 15 Windows o 04 Oracle Embedded Database
o 14 Life Sciences (biotech, pharmaceuticals) o 16 Other UNIX 6 WHAT IS YOUR COMPANY’S SIZE? (Oracle Lite, Times Ten, Berkeley DB)
o 15 Natural Resources o 98 Other (check one only) o 05 Other Oracle Database Release
o 16 Oil and Gas 99 o None of the Above 01 More than 25,000 Employees
o ORACLE FUSION MIDDLEWARE
o 17 Professional Services o 02 10,001 to 25,000 Employees o 06 Oracle Application Server
o 18 Public Sector (government) o 03 5,001 to 10,000 Employees o 07 Oracle Portal
o 19 Research 4 DO YOU EVALUATE, SPECIFY, RECOMMEND,
OR AUTHORIZE THE PURCHASE OF ANY OF o 04 1,001 to 5,000 Employees o 08 Oracle Enterprise Manager
o 20 Retail/Wholesale/Distribution o 05 101 to 1,000 Employees o 09 Oracle BPEL Process Manager
o 21 Systems Integrator, VAR/VAD THE FOLLOWING? (check all that apply)
o 06 Fewer than 100 Employees o 10 Oracle Identity Management
o 22 Telecommunications o 01 Hardware o 11 Oracle SOA Suite
o 23 Travel and Transportation o 02 Business Applications (ERP, CRM, etc.) o 12 Oracle Data Hubs
o 24 Utilities (electric, gas, sanitation, water) o 03 Application Development Tools 7 DURING THE NEXT 12 MONTHS, HOW MUCH
o 98 Other Business and Services _________ o 04 Database Products DO YOU ANTICIPATE YOUR ORGANIZATION ORACLE DEVELOPMENT TOOLS
o 05 Internet or Intranet Products WILL SPEND ON COMPUTER HARDWARE, o 13 Oracle JDeveloper
o 06 Other Software SOFTWARE, PERIPHERALS, AND SERVICES FOR o 14 Oracle Forms
2 WHICH OF THE FOLLOWING BEST DESCRIBES o 07 Middleware Products YOUR LOCATION? (check one only) o 15 Oracle Reports
YOUR PRIMARY JOB FUNCTION? 99 o None of the Above o 16 Oracle Designer
(check one only) o 01 Less than $10,000 o 17 Oracle Discoverer
o 02 $10,000 to $49,999 o 18 Oracle BI Beans
CORPORATE MANAGEMENT/STAFF 03 $50,000 to $99,999
5 IN YOUR JOB, DO YOU USE OR PLAN TO PUR- o o 19 Oracle Warehouse Builder
o 01 Executive Management (President, Chair, 04 $100,000 to $499,999
CHASE ANY OF THE FOLLOWING PRODUCTS? o o 20 Oracle WebCenter
CEO, CFO, Owner, Partner, Principal) 05 $500,000 to $999,999
(check all that apply) o o 21 Oracle Application Express
o 02 Finance/Administrative Management o 06 $1,000,000 and Over
(VP/Director/ Manager/Controller, SOFTWARE ORACLE APPLICATIONS
Purchasing, Administration) o 01 CAD/CAE/CAM o 22 Oracle E-Business Suite
o 03 Sales/Marketing Management o 02 Collaboration Software 8 WHAT IS YOUR COMPANY’S YEARLY SALES o 23 PeopleSoft Enterprise
(VP/Director/Manager) o 03 Communications REVENUE? (check one only) o 24 JD Edwards EnterpriseOne
o 04 Computer Systems/Operations o 04 Database Management o 25 JD Edwards World
Management o 05 File Management o 01 $500, 000, 000 and above o 26 Oracle Fusion
(CIO/VP/Director/Manager MIS/IS/IT, Ops) o 06 Finance o 02 $100, 000, 000 to $500, 000, 000 o 27 Hyperion
IS/IT STAFF o 07 Java o 03 $50, 000, 000 to $100, 000, 000 o 28 Siebel CRM
o 05 Application Development/Programming o 08 Multimedia Authoring o 04 $5, 000, 000 to $50, 000, 000
Management ORACLE SERVICES
o 09 Networking o 05 $1, 000, 000 to $5, 000, 000 o 28 Oracle E-Business Suite On Demand
o 06 Application Development/Programming o 10 Programming
o 29 Oracle Technology On Demand
Staff o 11 Project Management
o 30 Siebel CRM On Demand
o 07 Consulting o 12 Scientific and Engineering 9 WHAT LANGUAGES AND FRAMEWORKS DO
o 31 Oracle Consulting
o 08 DBA/Systems Administrator o 13 Systems Management YOU USE? (check all that apply)
o 32 Oracle Education
o 09 Education/Training o 14 Workflow
o 33 Oracle Support
o 10 Technical Support Director/Manager o 01 Ajax o 13 Python
HARDWARE o 98 Other
o 11 Other Technical Management/Staff o 02 C o 14 Ruby/Rails
o 98 Other o 15 Macintosh 99 o None of the Above
03 C++ 15 Spring
08014004
o o
o 16 Mainframe
o 04 C# o 16 Struts
o 17 Massively Parallel Processing](https://image.slidesharecdn.com/jdeveloper11g1-100312114723-phpapp01/85/J-Developer-11g1-913-320.jpg)