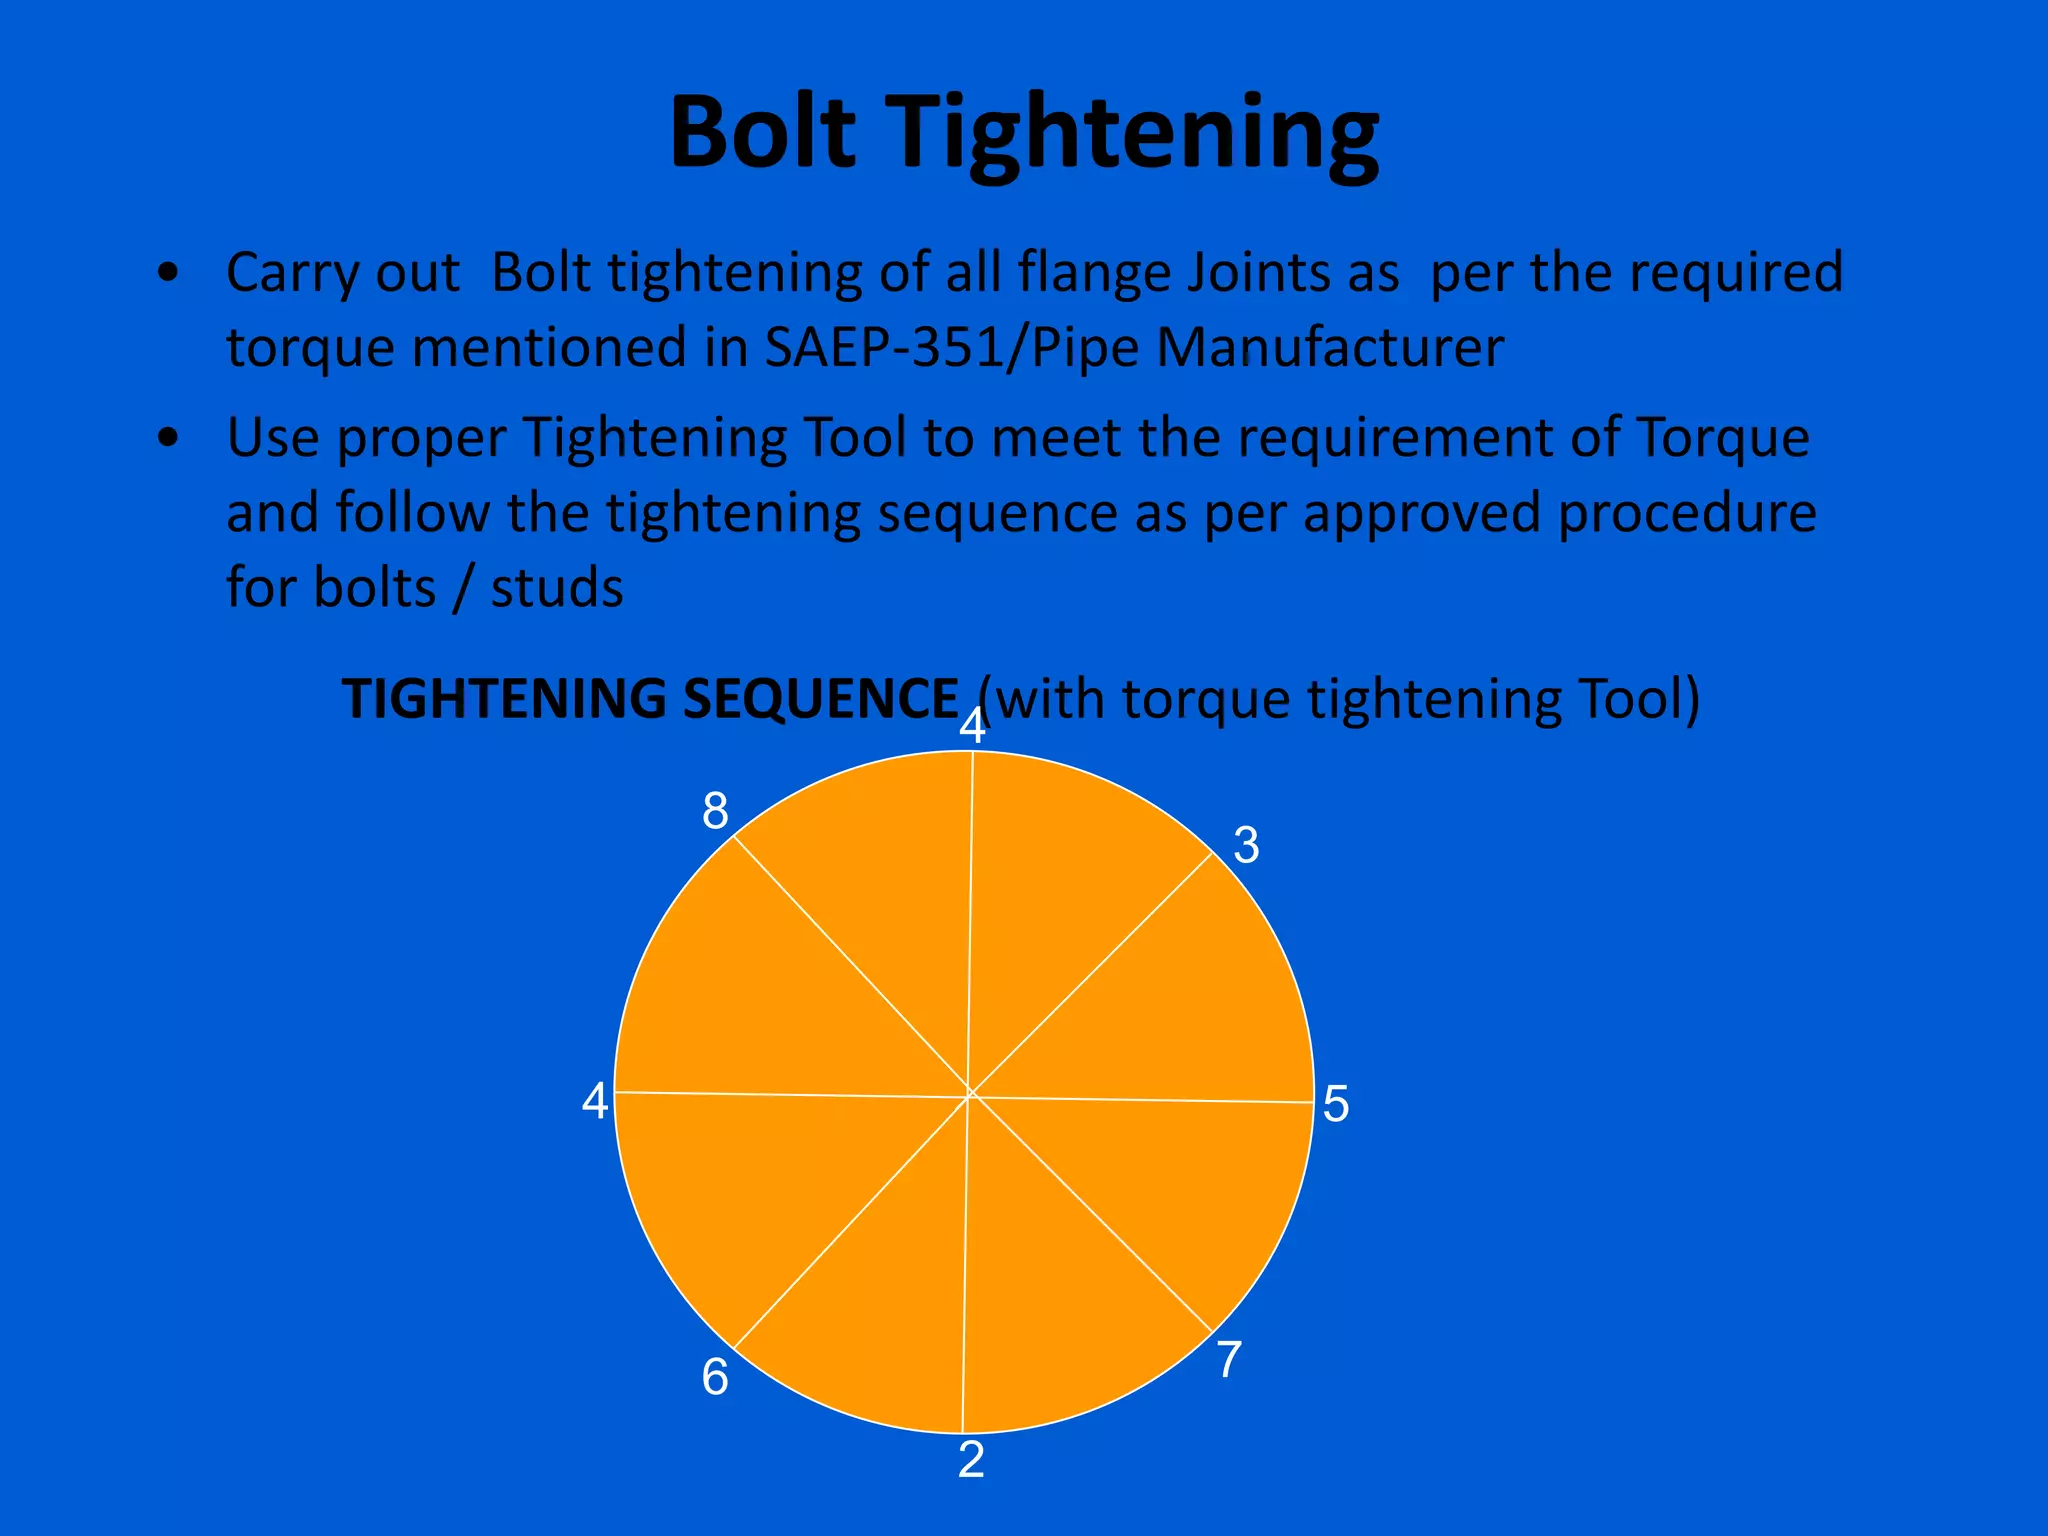
2. overview
• Pipe Inspection and Testing
• Pressure Tests
• What is hydrotest
• Why hydrotest is Required
• Where hydrotest is Required
• Requirements of Hydrotest
3. Pipe Inspection and Testing
• Once the piping system is installed, it must be inspected for
defects and tested before it is placed into operation/Service.
• The tests are of two type
A. Destructive Tests and
B. Non Destructive Tests
Destructive Test: It is a test conducted for checking the quality of
System/Material by impacting the properties of the material.
Non Destructive Test: It is a test conducted for checking the
quality of System/Material without impacting the properties of
the material.
• Pressure Test is a Non Destructive Test and is of different
types depending on requirements.
4. • Pressure Test is a test conducted to piping or equipment by
subjecting it to an internal pressure using liquid or gas to
ensure strength or tightness of the system at the test
pressure. Pressure Test may be
• Hydrostatic Test
• Pneumatic Test
• Leak test
• Revalidation Test
• Service Test
• Strength Test
• System Test
• Tightness Test
Pressure Tests
5. What is Hydrotest
• Hydrotest : A pressure test conducted using water or other
approved liquid as the test medium. Test Pressure Varies from one
code to another depending on the pipeline service and pipeline
location. For Instance
1. ASME 31.4 for “Pipeline Transportation Systems for Liquid
Hydrocarbons and Other Liquids” requires test pressure 1.25 times
the maximum operating pressure.
2. ASME 31.8 for “Gas Transmission and Distribution Piping Systems”
requires test pressure ranging from 1.25 -1.4 times the maximum
operating pressure depending on location of pipeline in populated
areas.
3. ASME31.9 for “Building Services Piping” requires test pressures 1.5
times the Design Pressure
4. In Aramco Test pressure is determined to produce 90% Specified
Minimum Yield Strength for a minimum of 2hrs, based on nominal
wall thickness as per the following formula.
P= 2t x (0.9SMYS)/D
5. Test Pressure for Utility piping system shall be as per SAES-S-070/
UPC
6. Why Hydrotest
• To ensure the integrity of Piping
• To ensure the strength of the pipe joints
• To ensures safe and reliable performance during the operational life
Hydrotest Prerequisite
• Test Package shall be prepared with Engineering and Technical
Perspective.
• Good planning is essential for completion of hydrotest in minimum
possible time.
• Calibrated Relief Valve, Gauges, Pressure and Temperature recorders,
Pump etc. shall be available.
• Location, draining, Venting shall be considered.
• Water- quantity, quality & temperature
• Torque tightening
7. Bolt Tightening
• Carry out Bolt tightening of all flange Joints as per the required
torque mentioned in SAEP-351/Pipe Manufacturer
• Use proper Tightening Tool to meet the requirement of Torque
and follow the tightening sequence as per approved procedure
for bolts / studs
1
2
3
4 5
6 7
8
TIGHTENING SEQUENCE (with torque tightening Tool)
8
4
8. • Ensure that minimum two pressure gauges are available in the
test system.
• The pressure gauges shall have a range such that the test
pressure is within 30 to 80% of the full range . Validity of
calibration shall be verified on the calibration sticker pasted on
the pressure indicators
• Ensure that the valves (top) are open for air removal prior to
water filling.
• Start filling water after confirmation of all requirements (
water chemistry report etc.)
• Let the water flow out of the top Valves so that the air is
removed
• Start the pump for pressurizing the water inside the pipe. (Set
the output pressure of pump such that it should not exceed
hydro test pressure for safer operation)
9. • Increase the pressure as per the requirement given the
approved procedure
• All safety Precautions shall be taken during pressurizing and
no one shall remain near pipe
• Hold the test pressure for 4hrs. for exposed joints and 24hrs.
for buried joints. The test pressure shall not get dropped
during the holding time.
• Check for any leakage in joints.
• If no leakage is observed, depressurizing can be started
Depressurizing :
• Reduce pressure slowly by opening valve at drain point such
that pressure drops to zero.
• While draining the pipe, the top Air vent valve shall be kept
open before opening any valve at low point. This is for
eliminating the possible collapse of pipe due to vacuum
created within the test pipe.
10. Hydrotest Package
Hydrotest Package shall be as per applicable SATIP. Below are
general contents.
1. Test Package Flow chart
2. Pressure Test Information Sheet
3. Approved Test Procedure
4. Safety Instruction Sheet
5. Hydrotest Diagram showing Test Limits, P&ID, Isometric
Drawings
6. Pre-Test Punch list
7. Flushing Report
8. Test Equipment verification checklist
9. Pressure gauge, Relief valve, Temperature and Pressure
Recorder calibration certificates
11. 10. Manifold Approval
11. Water chemistry Report
12. Filling & Pressurization checklist
13. Visual inspection at test pressure
14. Depressurization & Disposal checklist
15. Welding summary sheets, Weld map, Test Reports such
as RT,PT,MT etc.
16. Bolted flange joints Assembly checklist
17. Torque wrench certificate
18. Valves Test Report
19. Preservation of Valves(Inline Tested)
20. Layup of piping system
21. Final Punch listing checklist