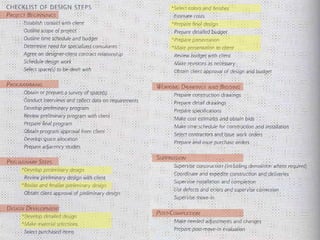
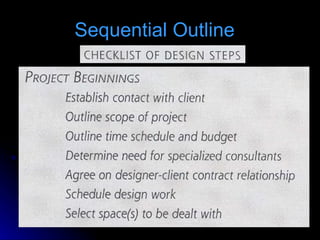
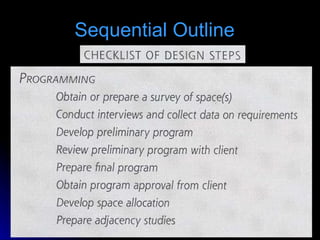
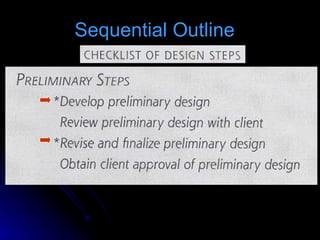
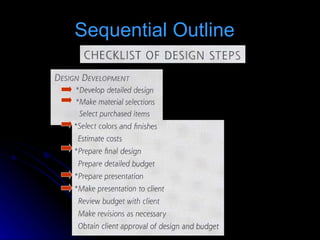
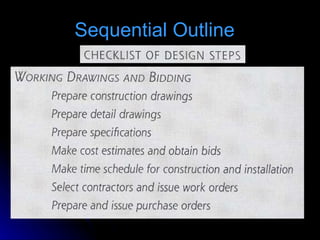
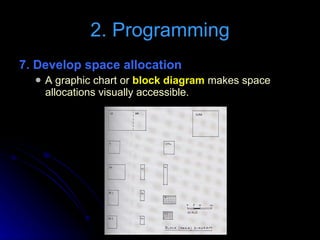
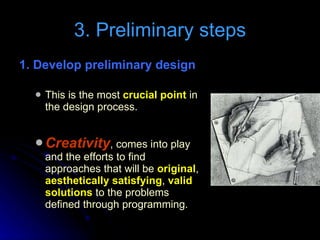
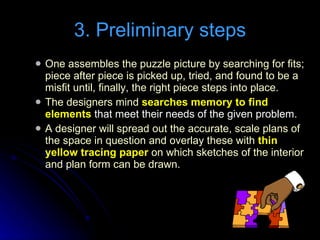
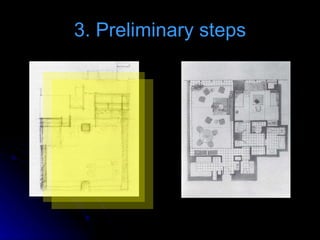
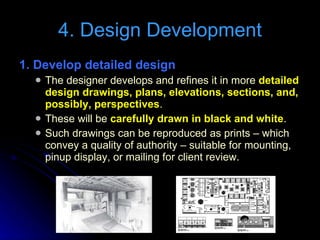
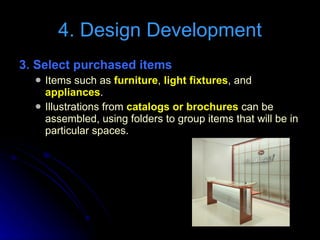
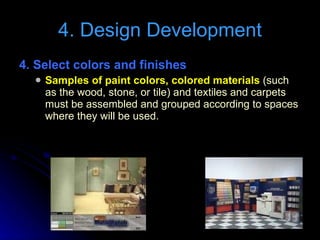
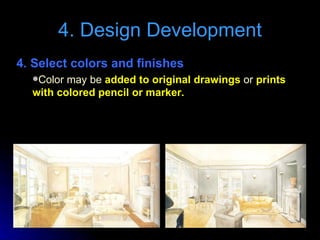
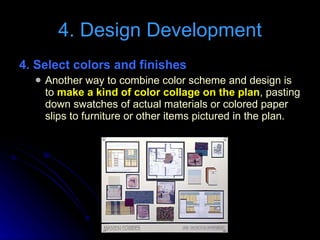
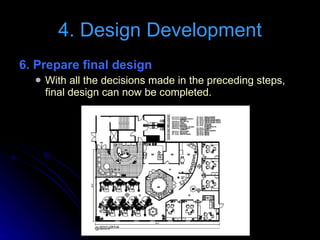
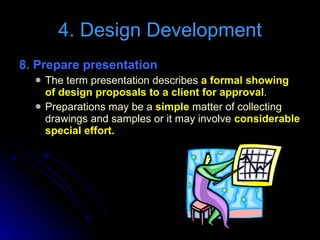
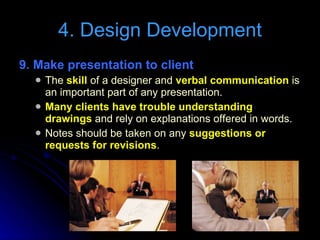
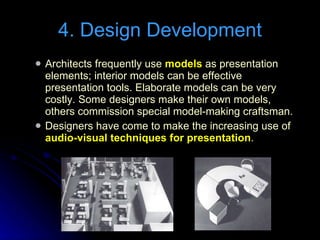
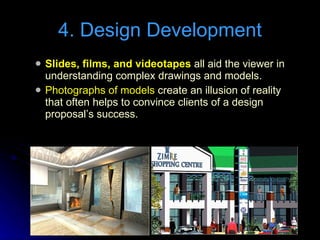
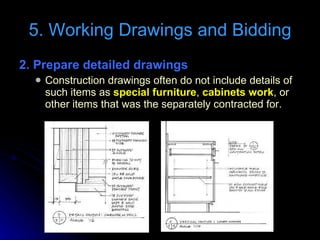
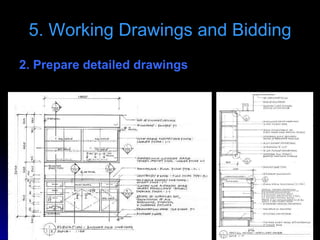
INTERIOR DESIGN  by John F. Pile  Chapter 5:  Design Process
The Design Process Until the  19 th  century , formal training for designers scarcely existed – designers were either trained by  apprenticeship  or entirely  self-taught. The apprentice learned every step of the design process by  working closely with a master . The self-taught designer learned from  experiment and mistake .
In the mid 19 th  century,  design and architecture  became subjects for formal training at the famous  École des Beaux-Arts in Paris . It is based on the  simulation of an actual projects  as it might present itself in professional practice. A  written problem  is prepared, describing the specific requirements that a client might bring to a designer. The Design Process
The design process  All of the  students  in a class are given the  problem  and asked to develop a solution in a limited period of time. Students work under the direction of an instructor or critic , who offers advice and suggestions as  sketches  are made and developed into formal presentations of  finished drawings , which are then  evaluated and graded  by a  jury .
This remarkably successful  method of teaching  is the basis for the skills of almost all currently practicing design professionals. It has some obvious  limitations . Each project begins with a written problem that must  substitute for a relationship with an actual client. The space to be worked on may be  real or imaginary. There is  no interaction with a real client . The student project ends with the  presentation and response. The Design Process
There is no way to carry through the steps that would be involved in moving forward  to  execution  of the projects in the school setting. As a result,  the graduating student is fully trained in a key stage of the design process yet has an early general knowledge of the many steps that come before and after the central phase. It is the  total process  of design projects that is the subjects of the following discussion. The Design Process
Sequential Outline  One of the striking differences between the  amateur interior designer  and a  skilled experts  is that the amateur tends to approach the project without any  work plan . It is nevertheless useful to consider a  listing of typical steps  and to examine what each step involves in some detail.
 
Sequential Outline
Sequential Outline
Sequential Outline
Sequential Outline
Sequential Outline
Sequential Outline
Sequential Outline
1. Project Beginnings  1. Establish contact with  client Designers find clients in various ways, including: reputation from previous projects,  recommendations of satisfied clients,  social contacts, and  aggressive sales efforts . The best situation is when a prospective  client approaches a designer  do with it desire to design a project. The making of sketches or design proposals as a means of attracting a client is generally regarded as a  unethical .
2. Outline  scope of projects   While it is the prospective client who must tell the designer what work is contemplated,  designer very often has an active role in helping the client define what is called for. Clients often have only a vague idea  of what a project calls for and what possibilities exist. 1. Project Beginnings
3. Outline  time schedule and budget   It is important that designer and client have a a shared a understanding of  what is desired and what is possible  in these important areas. Clients are frequently quite unrealistic in their expectations . 1. Project Beginnings
4.  Determine need for  specialized consultants . Most larger projects and smaller ones, call for the  involvement of various professionals .  There may be an  architect   already enlisted before an interior designer is selected, or the services of an architect or  engineer  may be required to deal with aspects of the interior project.  Consultants in the specialized fields of  lighting ,  acoustics , and  code compliance  may be necessary as a project progresses.  It is best to reach an understanding about  how these services will be obtained and paid for  at the beginning of a project. 1. Project Beginnings
5. Agree on designer-client contract relationship. Whether a  standard form of contract  or  a simple letter of agreement  is used, it is important to  negotiate fees ,  schedule of payment , and other business matters at the beginning of a project. 1. Project Beginnings
6. Schedule design work Scheduling  is the responsibility of the designer. Target dates  need to be set for beginning and ending each step. Charts  are often helpful in showing the relationship of steps that may overlap or be dependant on one another. PERT (Project Evaluation and Review Technique) CPM (Critical Path Method) 1. Project Beginnings
6. Schedule design work PERT (Project Evaluation and Review Technique) 1. Project Beginnings
6. Schedule design work CPM (Critical Path Method) 1. Project Beginnings
7. Select space (s) to be dealt with The selection of a  particular space  is, a necessary step before more detailed design can begin. 1. Project Beginnings
2. Programming 1. Obtain or prepare a survey of space(s) Architectural  plans may be available  for either an  existing space  or a  space not yet constructed . It is necessary to  check plans  of existing space against the actual reality,  since  built space often does not comply with available plans as a result of changes made during construction or later alterations .
1. Obtain or prepare a survey of space(s) If no plans for existing space are available, designer must make a carefully  measured survey so that drawings can be prepared. Even small projects  that involve only furniture and color selection require accurate plans for intelligent design decisions. Taking  photographs   2. Programming
2. Conduct interviews and collect data on requirements For simple projects  information on requirements can often be obtained  from a client  in some of the earlier meetings listed above. For complex projects  it is usually necessary to  interview many individuals , department heads, managers, workers, or typical users. 2. Programming
3. Develop preliminary program The preliminary program is a draft describing the  general requirements  of the project and  listing the spaces  called for, with their functions and specific needs. 2. Programming Entrance 5 m2 Living/Dining Space 40 m2 2 Bedrooms 25 m2 each Kitchen 10 m2 Bathroom 8 m2
4. Review Preliminary program with client   At this time the client has an opportunity to  add or subtract information, make changes, and correct errors. When the client is a large organization, this review may be done by a  committee  or by a number of  individuals . 2. Programming
5.  Prepare final program The program becomes a  guide  to all further design work. Specialized consultants  offer programming services independent of the work of a designer. 2. Programming
6. Obtain program approval from client  Confirmation of full  agreement  between the designer and client regarding the program requirements must be secured before work progresses. 2. Programming
7. Develop space allocation  A graphic chart or  block diagram  makes space allocations visually accessible. 2. Programming
8. Prepare adjacency studies The relationship of spaces is studied and charted using  matrix charts ,  link-value charts , and  bubble diagrams . 2. Programming
3. Preliminary steps 1. Develop preliminary design   This is the most  crucial point  in the design process. Creativity , comes into play and the efforts to find approaches that will be  original ,  aesthetically satisfying ,  valid solutions  to the problems defined through programming.
Even experienced and highly skilled designers often find it  difficult how this aspect of the design process works. They will say that they “ think about “the problem until they are “hit by an idea”. 3. Preliminary steps
“ The designer holds in memory a stock of data consisting of innumerable bits of information, abstract shapes, forms, colors, awareness of historical materials, places seen, experiences, and philosophical concepts that the mind searches in an unconscious efforts to find elements that can be combined into a new construct, a proposed solution to the problem at hand.” 3. Preliminary steps
Education , can be viewed as a matter of  building up this store of data held in the mind , the vocabulary  from which fragments of ideas can be drawn to create a new set of relationships. “ Fit and misfit variables “ The problem is viewed as  a set of demands that call for related elements that will fit the requirements,  much as one piece of a jigsaw a puzzle fits into the matching forms of adjacent pieces. 3. Preliminary steps
One assembles the puzzle picture by searching for fits; piece after piece is picked up, tried, and found to be a misfit until, finally, the right piece steps into place. The designers mind  searches memory to find elements  that meet their needs of the given problem. A designer will spread out the accurate, scale plans of the space in question and overlay these with  thin yellow tracing paper  on which sketches of the interior and plan form can be drawn. 3. Preliminary steps
3. Preliminary steps
Test alternatives  provide an ideal way to study  allocations, placement of walls and a openings, and locations of major furniture elements with generally fixed locations. Movable furniture  can be shown . Plans make it easy to see patterns of movement or circulation, using overlay diagrams to analyze these patterns to find ways to make them orderly, simple, and non-conflicting. 3. Preliminary steps
At least  one elevation or section at the same scale as a plan creates a sense of the three dimensional proportion  of the space being worked on. Move toward specific proposals. Feedback  3. Preliminary steps
Each sketch or group of sketches suggesting a preliminary design can be regarded as an effort to  fit a maximum number of variables to the requirements of the problem. The proposal can be criticized by  designer alone  or  with coworkers  in an effort to retain and develop the  aspects that work best  and to identify ways in which  improvements  can be made. 3. Preliminary steps
This  feedback  or  evaluation  will attempt to find an even better fit to the problem requirements. That idea of  solving a problem through successive approximations  helps to describe the way in which successive sketches, each improved through the feedback of evaluation, can approach the goal of a best solution. 3. Preliminary steps
In design there is no one “best” or “perfect” solution to a problem.   Many different approaches can lead to a  high level of success. A designer will often pursue different directions for a time in order to make a choice through  compassion of various proposals , anyone of which could lead to an excellent conclusion. 3. Preliminary steps
2. Review preliminary design with client   Some people may find  design sketches hard to understand  and become  confused at seeing alternatives. Others may enjoy being included in the design process  and indicate preferred directions to follow. The designer should assemble sketch plans that will give the client a clear idea of the design approach being taken. 3. Preliminary steps
3. Revise and finalize preliminary design  This step may also include many  cycles of revision  as ideas develop and, in larger design firms, as colleagues discuss design ideas with one another informally or in meetings and reviews. 3. Preliminary steps
4. Obtain client approval of preliminary design   An  affirmative approval  is needed at this point. The designer might  present preliminary selections of color and materials to be looked at together with sketches. The goal is to gain the a client’s general approval  before moving ahead to the next step . 3. Preliminary steps
4. Design Development 1. Develop detailed design  The designer develops and refines it in more  detailed design drawings, plans, elevations, sections, and, possibly, perspectives . These will be  carefully drawn in black and white . Such drawings can be reproduced as prints – which convey a quality of authority – suitable for mounting, pinup display, or mailing for client review.
2. Make material selections  It is advisable to collect samples of materials as they are considered. 4. Design Development
3. Select purchased items   Items such as  furniture ,  light fixtures , and  appliances . Illustrations from  catalogs or brochures  can be assembled, using folders to group items that will be in particular spaces. 4. Design Development
4. Select colors and finishes  Color studies may take the form of  drawings or charts . 4. Design Development
4. Select colors and finishes  Samples of paint colors, colored materials  (such as the wood, stone, or tile) and textiles and carpets must be assembled and grouped according to spaces where they will be used. 4. Design Development
4. Design Development 4. Select colors and finishes  Color may be  added to original drawings  or  prints with colored pencil or marker.
4. Select colors and finishes  Another way to combine color scheme and design is to  make a kind of color collage on the plan , pasting down swatches of actual materials or colored paper slips to furniture or other items pictured in the plan. 4. Design Development
5. Estimates costs Preliminary estimates can be obtained from contractors. 4. Design Development
6. Prepare final design  With all the decisions made in the preceding steps, final design can now be completed. 4. Design Development
7. Prepare a detailed budget  Cost estimates that can also be refined and incorporated into a budget for presentation to the client. 4. Design Development
8. Prepare presentation The term presentation describes  a formal showing of design proposals to a client for approval . Preparations may be a  simple  matter of collecting drawings and samples or it may involve  considerable special effort. 4. Design Development
9. Make presentation to client The  skill  of a designer and  verbal communication  is an important part of any presentation. Many clients have trouble understanding drawings  and rely on explanations offered in words. Notes should be taken on any  suggestions or requests for revisions . 4. Design Development
Drawings of the designed development stage  are usually suitable for presentation. Some  rendered color perspectives , possibly the work of a specialist, may be added. Color and material charts are usually carefully organized and assembled for showing . Large  samples of actual materials , even examples of  actual pieces of furniture , may also be shown. 4. Design Development
Architects frequently use  models  as presentation elements; interior models can be effective presentation tools. Elaborate models can be very costly. Some designers make their own models, others commission special model-making craftsman. Designers have come to make the increasing use of  audio-visual techniques for presentation . 4. Design Development
Slides, films, and videotapes  all aid the viewer in understanding complex drawings and models. Photographs of models  create an illusion of reality that often helps to convince clients of a design proposal’s success.  4. Design Development
10. Review budget with client  “ What will all this cost ?” 4. Design Development
11. Make revisions as necessary Revisions may be requested even if the presentation has met with general approval. Concerns over budget frequently produce  requests for changes  that will reduce the total expenditure considered excessive.  4. Design Development
12. Obtain clients approval of design and budget   Is important to obtain a clear and affirmative approval. Given that approval, possibly with some minor adjustments, the remaining steps can proceed. 4. Design Development
5. Working Drawings and Bidding 1. Prepare construction drawings   Working drawings (blueprints) will be used first to obtain  final cost figures  and then by contractors and workmen constructing the project. Working drawings include  scale plans ,  elevations , and  sections , using  notes and symbols  together with large-scale details. The  specifications give details of materials and methods of workmanship  that drawings cannot fully show .
5. Working Drawings and Bidding
Architectural and interior drawings are often combined. Coordination  between designer, architects, and engineer is vital to avoid duplication and conflict. This cooperative efforts extends to all of the  specialists  involved – lighting, acoustical, electrical plumbing , heating and air conditioning. The Interior designer must now prepare  special  charts of color chips and plans marked to show color locations for the painting contractor. 5. Working Drawings and Bidding
The way in which the project is to be contracted somewhat influences how complete the working drawings must be. If  competitive bids  are to be taken , and  drawings and specifications must be very complete and as precise as possible  to assure that all bidders will be figuring on an identical set of requirements . If a contractor (or several contractors) is employed on a time materials (or cost-plus) basis, drawings can be somewhat less inclusive, leaving details to be resolved later with a designer giving instructions on the job, verbally or in sketches. 5. Working Drawings and Bidding
Good drawings can protect against later misunderstandings . The process of making working drawings by hand, with  pencil and instruments , is gradually being replaced by computer-based the techniques known as  CAD or CADD 5. Working Drawings and Bidding
2. Prepare detailed drawings  Construction drawings often do not include details of such items as  special furniture ,  cabinets work , or other items that was the separately contracted for. 5. Working Drawings and Bidding
2. Prepare detailed drawings  5. Working Drawings and Bidding
3. Prepare specifications  Specifications  are written descriptions of materials, workmanship, and other details not be easily made clear in drawings. Contract documents  on which bids are to be based. 5. Working Drawings and Bidding
4. Make cost estimates and obtain bids   Taking bids involves  sending drawings and specifications to possible contractors  (usually at least three) who  submit bid prices ,  which are amounts for which the bidder  guarantees to perform the work  specified. One general contractor  may bid on all aspects of the work, or  separate bids  may be taken from different trades. The bidder who offers the  best price  usually wins the contract. 5. Working Drawings and Bidding
For small projects  and projects with tight deadlines, it is increasingly common to select one contractor without bidding and to enter into a  cost-plus contract  in which payment is made on the cost of materials and workmanship plus a  fixed percentage  for overhead and profit. This basis  facilitates the marking additions and changes  in the project as work progresses. While many people  fear that an open-ended arrangement leads to higher costs  than a  fixed-price arrangement, experienced designers know that this is not necessarily true. 5. Working Drawings and Bidding
5. Make time schedule for construction and installation  The designer must make firm schedules to ensure that construction work proceeds without delays or conflicts. Clients sooner forgive cost overruns than a late completion date. Trades must work in a  logical sequence , and  purchase items must arrive  when needed for the job to go smoothly . 5. Working Drawings and Bidding
6. Select contractors and Issue work orders  Selected bidders are now asked to sign contracts or except work orders to proceed with work. 7.  Prepare and issue purchase orders  Many of the elements that go into a typical interior are purchased from manufacturers or dealers as standard items. These include  rugs and carpets , wallpapers,  light fixtures and lamps , and various accessories, even antiques and unique works of arts. 5. Working Drawings and Bidding
Making  catalog selections ,  checking prices  and  delivery schedules  and  issuing written orders  for these purchases form  a significant part of the interior designer’s work. Coordinating delivery schedules usually remains a design responsibility. 5. Working Drawings and Bidding
6. Supervision 1. Supervise construction  Projects require  on-site supervision  to ensure  the  proper following of drawings and specifications  and the quality of workmanship, as well as to resolve any unanticipated problems they may arise. Frequent visits It may be wise to make arrangements with a  local designer to provide regular supervision. Supervision becomes crucial in  the final phase  of a job, when  paint colors  need to be checked, when  furniture is being delivered  and needs to be put in place, and when small details require constant attention.
2. Coordinate and expedite construction and deliveries  Careful efforts must be made to ensure that the  phases of construction and deliveries of purchased items are scheduled to avoid delays and conflicts. 6. Supervision
3. Supervise installation and completion   This extension of the preceding step requires coordination of all worked to bring about project completion on or before the scheduled date. 6. Supervision
4. List defects and errors and supervise correction  Any project of any size will include various unfortunate mistakes that must be corrected . A  punch list  is usually prepared listing all such issues, to be crossed off as each is dealt with. 6. Supervision
5.  Supervise move-in  The designers should take a role in assuring that all goes smoothly and that confusion and errors are kept to a minimums. 6. Supervision
7. Post-completion  1. Make needed adjustments and changes  Every project includes the some problems that surfaced only after the completed project is put in to use.
7. Post-completion  2.  Prepare post-move-in evaluation  Responsible designers carry out  follow-up evaluation  of complete a job at reasonable intervals – for example, six months, one year, and two years – to determine how well the project is serving its users and meeting at goals. This may be one reason  why some well known projects that photograph well and win praise from critics and the users with major dissatisfactions . Honest evaluation provide revisions and corrections.
It often seems that  design  as the term is usually understood  turns out to be a minor part of the total performance of the interior designer  . It is important to be sure that the demands of  project management  never all overwhelm design creativity.  Conclusions
Design success  combined with  poor  management  can leave behind an  unhappy client and dissatisfied users . Poor design  and  good management  is far more likely to  satisfy clients . Excellent  design  and  good project management  together express the designer’s concern for delivering high-quality design work.  Conclusions
END


Pile Chapter 5 Design Process Ym

  • 1.
    INTERIOR DESIGN by John F. Pile Chapter 5: Design Process
  • 2.
    The Design ProcessUntil the 19 th century , formal training for designers scarcely existed – designers were either trained by apprenticeship or entirely self-taught. The apprentice learned every step of the design process by working closely with a master . The self-taught designer learned from experiment and mistake .
  • 3.
    In the mid19 th century, design and architecture became subjects for formal training at the famous École des Beaux-Arts in Paris . It is based on the simulation of an actual projects as it might present itself in professional practice. A written problem is prepared, describing the specific requirements that a client might bring to a designer. The Design Process
  • 4.
    The design process All of the students in a class are given the problem and asked to develop a solution in a limited period of time. Students work under the direction of an instructor or critic , who offers advice and suggestions as sketches are made and developed into formal presentations of finished drawings , which are then evaluated and graded by a jury .
  • 5.
    This remarkably successful method of teaching is the basis for the skills of almost all currently practicing design professionals. It has some obvious limitations . Each project begins with a written problem that must substitute for a relationship with an actual client. The space to be worked on may be real or imaginary. There is no interaction with a real client . The student project ends with the presentation and response. The Design Process
  • 6.
    There is noway to carry through the steps that would be involved in moving forward to execution of the projects in the school setting. As a result, the graduating student is fully trained in a key stage of the design process yet has an early general knowledge of the many steps that come before and after the central phase. It is the total process of design projects that is the subjects of the following discussion. The Design Process
  • 7.
    Sequential Outline One of the striking differences between the amateur interior designer and a skilled experts is that the amateur tends to approach the project without any work plan . It is nevertheless useful to consider a listing of typical steps and to examine what each step involves in some detail.
  • 8.
  • 9.
  • 10.
  • 11.
  • 12.
  • 13.
  • 14.
  • 15.
  • 16.
    1. Project Beginnings 1. Establish contact with client Designers find clients in various ways, including: reputation from previous projects, recommendations of satisfied clients, social contacts, and aggressive sales efforts . The best situation is when a prospective client approaches a designer do with it desire to design a project. The making of sketches or design proposals as a means of attracting a client is generally regarded as a unethical .
  • 17.
    2. Outline scope of projects While it is the prospective client who must tell the designer what work is contemplated, designer very often has an active role in helping the client define what is called for. Clients often have only a vague idea of what a project calls for and what possibilities exist. 1. Project Beginnings
  • 18.
    3. Outline time schedule and budget It is important that designer and client have a a shared a understanding of what is desired and what is possible in these important areas. Clients are frequently quite unrealistic in their expectations . 1. Project Beginnings
  • 19.
    4. Determineneed for specialized consultants . Most larger projects and smaller ones, call for the involvement of various professionals . There may be an architect already enlisted before an interior designer is selected, or the services of an architect or engineer may be required to deal with aspects of the interior project. Consultants in the specialized fields of lighting , acoustics , and code compliance may be necessary as a project progresses. It is best to reach an understanding about how these services will be obtained and paid for at the beginning of a project. 1. Project Beginnings
  • 20.
    5. Agree ondesigner-client contract relationship. Whether a standard form of contract or a simple letter of agreement is used, it is important to negotiate fees , schedule of payment , and other business matters at the beginning of a project. 1. Project Beginnings
  • 21.
    6. Schedule designwork Scheduling is the responsibility of the designer. Target dates need to be set for beginning and ending each step. Charts are often helpful in showing the relationship of steps that may overlap or be dependant on one another. PERT (Project Evaluation and Review Technique) CPM (Critical Path Method) 1. Project Beginnings
  • 22.
    6. Schedule designwork PERT (Project Evaluation and Review Technique) 1. Project Beginnings
  • 23.
    6. Schedule designwork PERT (Project Evaluation and Review Technique) 1. Project Beginnings
  • 24.
    6. Schedule designwork CPM (Critical Path Method) 1. Project Beginnings
  • 25.
    7. Select space(s) to be dealt with The selection of a particular space is, a necessary step before more detailed design can begin. 1. Project Beginnings
  • 26.
    2. Programming 1.Obtain or prepare a survey of space(s) Architectural plans may be available for either an existing space or a space not yet constructed . It is necessary to check plans of existing space against the actual reality, since built space often does not comply with available plans as a result of changes made during construction or later alterations .
  • 27.
    1. Obtain orprepare a survey of space(s) If no plans for existing space are available, designer must make a carefully measured survey so that drawings can be prepared. Even small projects that involve only furniture and color selection require accurate plans for intelligent design decisions. Taking photographs 2. Programming
  • 28.
    2. Conduct interviewsand collect data on requirements For simple projects information on requirements can often be obtained from a client in some of the earlier meetings listed above. For complex projects it is usually necessary to interview many individuals , department heads, managers, workers, or typical users. 2. Programming
  • 29.
    3. Develop preliminaryprogram The preliminary program is a draft describing the general requirements of the project and listing the spaces called for, with their functions and specific needs. 2. Programming Entrance 5 m2 Living/Dining Space 40 m2 2 Bedrooms 25 m2 each Kitchen 10 m2 Bathroom 8 m2
  • 30.
    4. Review Preliminaryprogram with client At this time the client has an opportunity to add or subtract information, make changes, and correct errors. When the client is a large organization, this review may be done by a committee or by a number of individuals . 2. Programming
  • 31.
    5. Preparefinal program The program becomes a guide to all further design work. Specialized consultants offer programming services independent of the work of a designer. 2. Programming
  • 32.
    6. Obtain programapproval from client Confirmation of full agreement between the designer and client regarding the program requirements must be secured before work progresses. 2. Programming
  • 33.
    7. Develop spaceallocation A graphic chart or block diagram makes space allocations visually accessible. 2. Programming
  • 34.
    8. Prepare adjacencystudies The relationship of spaces is studied and charted using matrix charts , link-value charts , and bubble diagrams . 2. Programming
  • 35.
    3. Preliminary steps1. Develop preliminary design This is the most crucial point in the design process. Creativity , comes into play and the efforts to find approaches that will be original , aesthetically satisfying , valid solutions to the problems defined through programming.
  • 36.
    Even experienced andhighly skilled designers often find it difficult how this aspect of the design process works. They will say that they “ think about “the problem until they are “hit by an idea”. 3. Preliminary steps
  • 37.
    “ The designerholds in memory a stock of data consisting of innumerable bits of information, abstract shapes, forms, colors, awareness of historical materials, places seen, experiences, and philosophical concepts that the mind searches in an unconscious efforts to find elements that can be combined into a new construct, a proposed solution to the problem at hand.” 3. Preliminary steps
  • 38.
    Education , canbe viewed as a matter of building up this store of data held in the mind , the vocabulary from which fragments of ideas can be drawn to create a new set of relationships. “ Fit and misfit variables “ The problem is viewed as a set of demands that call for related elements that will fit the requirements, much as one piece of a jigsaw a puzzle fits into the matching forms of adjacent pieces. 3. Preliminary steps
  • 39.
    One assembles thepuzzle picture by searching for fits; piece after piece is picked up, tried, and found to be a misfit until, finally, the right piece steps into place. The designers mind searches memory to find elements that meet their needs of the given problem. A designer will spread out the accurate, scale plans of the space in question and overlay these with thin yellow tracing paper on which sketches of the interior and plan form can be drawn. 3. Preliminary steps
  • 40.
  • 41.
    Test alternatives provide an ideal way to study allocations, placement of walls and a openings, and locations of major furniture elements with generally fixed locations. Movable furniture can be shown . Plans make it easy to see patterns of movement or circulation, using overlay diagrams to analyze these patterns to find ways to make them orderly, simple, and non-conflicting. 3. Preliminary steps
  • 42.
    At least one elevation or section at the same scale as a plan creates a sense of the three dimensional proportion of the space being worked on. Move toward specific proposals. Feedback 3. Preliminary steps
  • 43.
    Each sketch orgroup of sketches suggesting a preliminary design can be regarded as an effort to fit a maximum number of variables to the requirements of the problem. The proposal can be criticized by designer alone or with coworkers in an effort to retain and develop the aspects that work best and to identify ways in which improvements can be made. 3. Preliminary steps
  • 44.
    This feedback or evaluation will attempt to find an even better fit to the problem requirements. That idea of solving a problem through successive approximations helps to describe the way in which successive sketches, each improved through the feedback of evaluation, can approach the goal of a best solution. 3. Preliminary steps
  • 45.
    In design thereis no one “best” or “perfect” solution to a problem. Many different approaches can lead to a high level of success. A designer will often pursue different directions for a time in order to make a choice through compassion of various proposals , anyone of which could lead to an excellent conclusion. 3. Preliminary steps
  • 46.
    2. Review preliminarydesign with client Some people may find design sketches hard to understand and become confused at seeing alternatives. Others may enjoy being included in the design process and indicate preferred directions to follow. The designer should assemble sketch plans that will give the client a clear idea of the design approach being taken. 3. Preliminary steps
  • 47.
    3. Revise andfinalize preliminary design This step may also include many cycles of revision as ideas develop and, in larger design firms, as colleagues discuss design ideas with one another informally or in meetings and reviews. 3. Preliminary steps
  • 48.
    4. Obtain clientapproval of preliminary design An affirmative approval is needed at this point. The designer might present preliminary selections of color and materials to be looked at together with sketches. The goal is to gain the a client’s general approval before moving ahead to the next step . 3. Preliminary steps
  • 49.
    4. Design Development1. Develop detailed design The designer develops and refines it in more detailed design drawings, plans, elevations, sections, and, possibly, perspectives . These will be carefully drawn in black and white . Such drawings can be reproduced as prints – which convey a quality of authority – suitable for mounting, pinup display, or mailing for client review.
  • 50.
    2. Make materialselections It is advisable to collect samples of materials as they are considered. 4. Design Development
  • 51.
    3. Select purchaseditems Items such as furniture , light fixtures , and appliances . Illustrations from catalogs or brochures can be assembled, using folders to group items that will be in particular spaces. 4. Design Development
  • 52.
    4. Select colorsand finishes Color studies may take the form of drawings or charts . 4. Design Development
  • 53.
    4. Select colorsand finishes Samples of paint colors, colored materials (such as the wood, stone, or tile) and textiles and carpets must be assembled and grouped according to spaces where they will be used. 4. Design Development
  • 54.
    4. Design Development4. Select colors and finishes Color may be added to original drawings or prints with colored pencil or marker.
  • 55.
    4. Select colorsand finishes Another way to combine color scheme and design is to make a kind of color collage on the plan , pasting down swatches of actual materials or colored paper slips to furniture or other items pictured in the plan. 4. Design Development
  • 56.
    5. Estimates costsPreliminary estimates can be obtained from contractors. 4. Design Development
  • 57.
    6. Prepare finaldesign With all the decisions made in the preceding steps, final design can now be completed. 4. Design Development
  • 58.
    7. Prepare adetailed budget Cost estimates that can also be refined and incorporated into a budget for presentation to the client. 4. Design Development
  • 59.
    8. Prepare presentationThe term presentation describes a formal showing of design proposals to a client for approval . Preparations may be a simple matter of collecting drawings and samples or it may involve considerable special effort. 4. Design Development
  • 60.
    9. Make presentationto client The skill of a designer and verbal communication is an important part of any presentation. Many clients have trouble understanding drawings and rely on explanations offered in words. Notes should be taken on any suggestions or requests for revisions . 4. Design Development
  • 61.
    Drawings of thedesigned development stage are usually suitable for presentation. Some rendered color perspectives , possibly the work of a specialist, may be added. Color and material charts are usually carefully organized and assembled for showing . Large samples of actual materials , even examples of actual pieces of furniture , may also be shown. 4. Design Development
  • 62.
    Architects frequently use models as presentation elements; interior models can be effective presentation tools. Elaborate models can be very costly. Some designers make their own models, others commission special model-making craftsman. Designers have come to make the increasing use of audio-visual techniques for presentation . 4. Design Development
  • 63.
    Slides, films, andvideotapes all aid the viewer in understanding complex drawings and models. Photographs of models create an illusion of reality that often helps to convince clients of a design proposal’s success. 4. Design Development
  • 64.
    10. Review budgetwith client “ What will all this cost ?” 4. Design Development
  • 65.
    11. Make revisionsas necessary Revisions may be requested even if the presentation has met with general approval. Concerns over budget frequently produce requests for changes that will reduce the total expenditure considered excessive. 4. Design Development
  • 66.
    12. Obtain clientsapproval of design and budget Is important to obtain a clear and affirmative approval. Given that approval, possibly with some minor adjustments, the remaining steps can proceed. 4. Design Development
  • 67.
    5. Working Drawingsand Bidding 1. Prepare construction drawings Working drawings (blueprints) will be used first to obtain final cost figures and then by contractors and workmen constructing the project. Working drawings include scale plans , elevations , and sections , using notes and symbols together with large-scale details. The specifications give details of materials and methods of workmanship that drawings cannot fully show .
  • 68.
  • 69.
  • 70.
    Architectural and interiordrawings are often combined. Coordination between designer, architects, and engineer is vital to avoid duplication and conflict. This cooperative efforts extends to all of the specialists involved – lighting, acoustical, electrical plumbing , heating and air conditioning. The Interior designer must now prepare special charts of color chips and plans marked to show color locations for the painting contractor. 5. Working Drawings and Bidding
  • 71.
    The way inwhich the project is to be contracted somewhat influences how complete the working drawings must be. If competitive bids are to be taken , and drawings and specifications must be very complete and as precise as possible to assure that all bidders will be figuring on an identical set of requirements . If a contractor (or several contractors) is employed on a time materials (or cost-plus) basis, drawings can be somewhat less inclusive, leaving details to be resolved later with a designer giving instructions on the job, verbally or in sketches. 5. Working Drawings and Bidding
  • 72.
    Good drawings canprotect against later misunderstandings . The process of making working drawings by hand, with pencil and instruments , is gradually being replaced by computer-based the techniques known as CAD or CADD 5. Working Drawings and Bidding
  • 73.
    2. Prepare detaileddrawings Construction drawings often do not include details of such items as special furniture , cabinets work , or other items that was the separately contracted for. 5. Working Drawings and Bidding
  • 74.
    2. Prepare detaileddrawings 5. Working Drawings and Bidding
  • 75.
    3. Prepare specifications Specifications are written descriptions of materials, workmanship, and other details not be easily made clear in drawings. Contract documents on which bids are to be based. 5. Working Drawings and Bidding
  • 76.
    4. Make costestimates and obtain bids Taking bids involves sending drawings and specifications to possible contractors (usually at least three) who submit bid prices , which are amounts for which the bidder guarantees to perform the work specified. One general contractor may bid on all aspects of the work, or separate bids may be taken from different trades. The bidder who offers the best price usually wins the contract. 5. Working Drawings and Bidding
  • 77.
    For small projects and projects with tight deadlines, it is increasingly common to select one contractor without bidding and to enter into a cost-plus contract in which payment is made on the cost of materials and workmanship plus a fixed percentage for overhead and profit. This basis facilitates the marking additions and changes in the project as work progresses. While many people fear that an open-ended arrangement leads to higher costs than a fixed-price arrangement, experienced designers know that this is not necessarily true. 5. Working Drawings and Bidding
  • 78.
    5. Make timeschedule for construction and installation The designer must make firm schedules to ensure that construction work proceeds without delays or conflicts. Clients sooner forgive cost overruns than a late completion date. Trades must work in a logical sequence , and purchase items must arrive when needed for the job to go smoothly . 5. Working Drawings and Bidding
  • 79.
    6. Select contractorsand Issue work orders Selected bidders are now asked to sign contracts or except work orders to proceed with work. 7. Prepare and issue purchase orders Many of the elements that go into a typical interior are purchased from manufacturers or dealers as standard items. These include rugs and carpets , wallpapers, light fixtures and lamps , and various accessories, even antiques and unique works of arts. 5. Working Drawings and Bidding
  • 80.
    Making catalogselections , checking prices and delivery schedules and issuing written orders for these purchases form a significant part of the interior designer’s work. Coordinating delivery schedules usually remains a design responsibility. 5. Working Drawings and Bidding
  • 81.
    6. Supervision 1.Supervise construction Projects require on-site supervision to ensure the proper following of drawings and specifications and the quality of workmanship, as well as to resolve any unanticipated problems they may arise. Frequent visits It may be wise to make arrangements with a local designer to provide regular supervision. Supervision becomes crucial in the final phase of a job, when paint colors need to be checked, when furniture is being delivered and needs to be put in place, and when small details require constant attention.
  • 82.
    2. Coordinate andexpedite construction and deliveries Careful efforts must be made to ensure that the phases of construction and deliveries of purchased items are scheduled to avoid delays and conflicts. 6. Supervision
  • 83.
    3. Supervise installationand completion This extension of the preceding step requires coordination of all worked to bring about project completion on or before the scheduled date. 6. Supervision
  • 84.
    4. List defectsand errors and supervise correction Any project of any size will include various unfortunate mistakes that must be corrected . A punch list is usually prepared listing all such issues, to be crossed off as each is dealt with. 6. Supervision
  • 85.
    5. Supervisemove-in The designers should take a role in assuring that all goes smoothly and that confusion and errors are kept to a minimums. 6. Supervision
  • 86.
    7. Post-completion 1. Make needed adjustments and changes Every project includes the some problems that surfaced only after the completed project is put in to use.
  • 87.
    7. Post-completion 2. Prepare post-move-in evaluation Responsible designers carry out follow-up evaluation of complete a job at reasonable intervals – for example, six months, one year, and two years – to determine how well the project is serving its users and meeting at goals. This may be one reason why some well known projects that photograph well and win praise from critics and the users with major dissatisfactions . Honest evaluation provide revisions and corrections.
  • 88.
    It often seemsthat design as the term is usually understood turns out to be a minor part of the total performance of the interior designer . It is important to be sure that the demands of project management never all overwhelm design creativity. Conclusions
  • 89.
    Design success combined with poor management can leave behind an unhappy client and dissatisfied users . Poor design and good management is far more likely to satisfy clients . Excellent design and good project management together express the designer’s concern for delivering high-quality design work. Conclusions
  • 90.
  • 91.
  • 92.