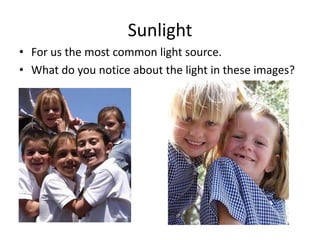
Leisure Photography
                  Course outline
•   Every Thursday 6-8pm, with Gareth Hill
•   Students to bring own camera and equipment
•   Don’t forget to charge batteries, USB leads etc
•   Areas of study include:
    Lighting
    Composition
    Portraits
    Black and White
    Montage
    Aperture, Shutter Speeds, ISO
Course content overview
• Try to create a democratic content which suits
  all learners – not easy!
• We will cover basics of practical photography
  plus some more advanced areas such as photo
  manipulation.
• Art and Science combine in Photography!
• Your input is valued both by bringing in
  material for review and in your comments.
Leisure Photography

     Photography 1
   Painting with Light
Week one - Light
Sources of Light
• Photography is all about light, the amount and
  the direction.
• Main light sources are:
• The Sun
• Artificial light such as lamps, household lighting
  etc.
• You need to manipulate the scene to create the
  effect you want, this might mean moving a light
  on a stand or moving your subject relative to the
  sun, or waiting for a better time of day to get the
  effect you want.
Intensity of light
• The first property of light to deal with is intensity or
  brightness. The light meter in our cameras measures this and
  converts it into f-stops and shutter speeds.
• F-stops are aperture settings
• Shutter speed is how fast the shutter opens and for how long.
  (More on this later...)

• The only key to intensity is making sure that there is enough to
  make an image on the film. The light that enters our camera lens is
  either direct light from a light source such as the sun or light bulb
  OR it is reflected light that has come from light that has bounced off
  of people or things.

• What happens to our images without enough light?
Quality of Light
• Light Quality is the most important characteristic of light for the
  photographer for it sets the mood of a shot. Quality of light breaks
  down into two types -- hard or soft light.
• Hard light
• distinct shadows
• It comes from a point light source
• It is a harsh light.
• Soft light is the opposite
• from a reflected source or a broad source.
• indirect light
• frequently found in the shade

• Light quality is affected mostly by change in subject or camera
  position or the use of reflectors or fill flash.
Sunlight
• For us the most common light source.
• What do you notice about the light in these images?
Time of Day
• If you are able to choose the time of day to
  shoot your pictures, try to pick a time when
  the sun is low in the sky, either shoot in the
  early morning or late afternoon.
• A nice side effect of shooting in the early
  morning or late afternoon is that the colour of
  the light is 'warmer', reds and yellows are
  stronger which generally gives a more pleasing
  effect.
Direction of light
• Front light eliminates shadows but also flattens a
  subject, losing depth and texture.
• Side light makes the subject stand out from the
  background, giving it a more 3D appearance.
• Backlight softens the quality of the light as the
  subject gets mostly reflected light on its surface.
• The direction of the light falling on your subject -
  you need to look at your subject carefully and
  watch how the shadows fall.
Front light example
Side light example
Backlight example
Homework!
• Read the resources on lighting from today by
  visiting the online blog
• http://kecdrparts.blogspot.com
• Try to take some examples of different types of
  lighting that we have looked at this evening.
• Next week we will begin by having a short
  slideshow of your images.

• Next weeks topic is Composition.

Photography 1 Light

  • 1.
    Leisure Photography Course outline • Every Thursday 6-8pm, with Gareth Hill • Students to bring own camera and equipment • Don’t forget to charge batteries, USB leads etc • Areas of study include: Lighting Composition Portraits Black and White Montage Aperture, Shutter Speeds, ISO
  • 2.
    Course content overview •Try to create a democratic content which suits all learners – not easy! • We will cover basics of practical photography plus some more advanced areas such as photo manipulation. • Art and Science combine in Photography! • Your input is valued both by bringing in material for review and in your comments.
  • 3.
    Leisure Photography Photography 1 Painting with Light
  • 4.
  • 5.
    Sources of Light •Photography is all about light, the amount and the direction. • Main light sources are: • The Sun • Artificial light such as lamps, household lighting etc. • You need to manipulate the scene to create the effect you want, this might mean moving a light on a stand or moving your subject relative to the sun, or waiting for a better time of day to get the effect you want.
  • 6.
    Intensity of light •The first property of light to deal with is intensity or brightness. The light meter in our cameras measures this and converts it into f-stops and shutter speeds. • F-stops are aperture settings • Shutter speed is how fast the shutter opens and for how long. (More on this later...) • The only key to intensity is making sure that there is enough to make an image on the film. The light that enters our camera lens is either direct light from a light source such as the sun or light bulb OR it is reflected light that has come from light that has bounced off of people or things. • What happens to our images without enough light?
  • 7.
    Quality of Light •Light Quality is the most important characteristic of light for the photographer for it sets the mood of a shot. Quality of light breaks down into two types -- hard or soft light. • Hard light • distinct shadows • It comes from a point light source • It is a harsh light. • Soft light is the opposite • from a reflected source or a broad source. • indirect light • frequently found in the shade • Light quality is affected mostly by change in subject or camera position or the use of reflectors or fill flash.
  • 8.
    Sunlight • For usthe most common light source. • What do you notice about the light in these images?
  • 9.
    Time of Day •If you are able to choose the time of day to shoot your pictures, try to pick a time when the sun is low in the sky, either shoot in the early morning or late afternoon. • A nice side effect of shooting in the early morning or late afternoon is that the colour of the light is 'warmer', reds and yellows are stronger which generally gives a more pleasing effect.
  • 10.
    Direction of light •Front light eliminates shadows but also flattens a subject, losing depth and texture. • Side light makes the subject stand out from the background, giving it a more 3D appearance. • Backlight softens the quality of the light as the subject gets mostly reflected light on its surface. • The direction of the light falling on your subject - you need to look at your subject carefully and watch how the shadows fall.
  • 11.
  • 12.
  • 13.
  • 14.
    Homework! • Read theresources on lighting from today by visiting the online blog • http://kecdrparts.blogspot.com • Try to take some examples of different types of lighting that we have looked at this evening. • Next week we will begin by having a short slideshow of your images. • Next weeks topic is Composition.