This slide about presentation of Object Oriented Programing or OOP contains Fundamental of OOP
Encapsulation
Inheritance
Abstract Class
Association
Polymorphism
Interface
Exceptional Handling
and more.
OOP with Java - Abstract Classes and InterfacesRatnaJava
In this session you will learn:
Overview of OOP continued…
Abstraction – using Abstract Classes and Interfaces.
For more information: https://www.mindsmapped.com/courses/software-development/become-a-java-developer-hands-on-training/
Interface in java ,multiple inheritance in java, interface implementationHoneyChintal
multiple inheritance in java, interface implementation, abstraction,
multiple inheritance in java using interface, how to use interface,
how to use java, how to execute a java code
Lecture 8 abstract class and interfacemanish kumar
Abstract class and Interface both are used to achieve the concept of abstraction and using the interface we can implement the concept of multiple inheritance in java.
OOP with Java - Abstract Classes and InterfacesHitesh-Java
In this core java training session, you will learn OOPs with Java & Exception Handling. Topics covered in this session are:
• Overview of OOP continued…
• Abstraction – using Abstract Classes and Interfaces.
For more information about this course visit on this link: https://www.mindsmapped.com/courses/software-development/learn-java-fundamentals-hands-on-training-on-core-java-concepts/
Object Oriented Concepts required to know about the Android Application Programming are discussed over here. Get the most of the details about each and every concept of OO paradigm so you can use them very well in Android Application Programming.
Interface in java By Dheeraj Kumar Singhdheeraj_cse
In Java,
An interface is a way through which unrelated objects use to interact with one another.
Using interface, you can specify what a class must do, but not how it does it.
It is not a class but a set of requirements for classes that implement the interface.
Introduction of Object Oriented Programming Language using Java. .pptxPoonam60376
The slide contains the Introduction of Object Oriented Programming Language using Java. It covers basics of OOP, Inheritance,Polymorphism, Exception etc.
To better understand the behavior of servlets, let’s take a look at the life cycle of servlets.
A servlet is basically a small Java program that runs within a Web server. It can receive requests from clients and return responses. The whole life cycle of a servlet breaks up into 3 phases:
• Initialization: A servlet is first loaded and initialized usually when it is requested by the corresponding clients. Some websites allow the users to load and initialize servlets when the server is started up so that the first request will get responded more quickly.
• Service: After initialization, the servlets serve clients on request, implementing the ap- plication logic of the web application they belong to.
• Destruction: When all pending requests are processed and the servlets have been idle for a specific amount of time, they may be destroyed by the server and release all the resources they occupy.
More specifically, the behavior of a servlet is described in javax.servlet.Servlet interface, in which the following methods are defined:
• public void init(ServletConfig config) throws ServletException
This method is called once when the servlet is loaded into the servlet engine, before the servlet is asked to process its first request.
The init method has a ServletConfig parameter. The servlet can read its initialization arguments through the ServletConfig object. How the initialization arguments are set is servlet engine dependent but they are usually defined in a configuration file.
A typical example of an initialization argument is a database identifier. A servlet can read this argument from the ServletConfig at initialization and then use it later to open a connection to the database during processing of a request:
private String databaseURL;
public void init(ServletConfig config) throws ServletException { super.init(config);
databaseURL = config.getInitParameter("database");
}
• public void service(ServletRequest request, ServletResponse response) throws ServletException, IOException
This method is called to process a request. It can be called zero, one or many times until the servlet is unloaded.
Once a servlet is loaded, it remains in the server’s memory as a single object instance. Thereafter, the server invokes the servlet to handle a request using a simple, lightweight method invocation. Unlike with CGI, there’s no process to spawn or interpreter to invoke, so the servlet can begin handling the request almost immediately. Multiple, concurrent requests are handled by separate threads, so servlets are highly scalable.
Servlets are naturally enduring objects. Because a servlet stays in the server’s memory as a single object instance, it automatically maintains its state and can hold on to external resources, such as database connections, that may otherwise take several seconds to establish. The following servlet presents information about how many times it has been accessed:
To better understand the behavior of servlets, let’s take a lo
4. Use the AM for posting within scientific collaboration networks (SCNs). For a detailed description of our policy on posting to SCNs, please see our Web Posting Guidelines (https://publishing.aip.org/authors/web-posting-guidelines).
5. Reprint the Version of Record (VOR) in print collections written by the Author, or in the Author’s thesis or dissertation. It is understood and agreed that the thesis or dissertation may be made available electronically on the university’s site or in its repository and that copies may be offered for sale on demand.
6. Reproduce copies of the VOR for courses taught by the Author or offered at the institution where the Author is employed, provided no fee is charged for access to the Work.
7. Use the VOR for internal training and noncommercial business purposes by the Author’s employer.
8. Use the VOR in oral presentations made by the Author, such as at conferences, meetings, seminars, etc., provided those receiving copies are informed that they may not further copy or distribute the Work.
9. Distribute the VOR to colleagues for noncommercial scholarly use, provided those receiving copies are informed that they may not further copy or distribute the Work.
10. Post the VOR to their personal web page or their employer’s web page 12 months after publication by AIP Publishing.
11. Deposit the VOR in an institutional or funder-designated repository 12 months after publication by AIP Publishing.
12. Update a prior posting with the VOR on a noncommercial server such as arXiv, 12 months after publication by AIP Publishing.
Author Warranties
Each Author and Copyright Owner represents and warrants to AIP Publishing the following:
1. The Work is the original independent creation of each Author and does not infringe any copyright or violate any other right of any third party.
2. The Work has not been previously published and is not being considered for publication elsewhere in any form, except as a preprint on a noncommercial server such as arXiv, or in a thesis or dissertation.
3. Written permission has been obtained for any material used from other sources and copies of the permission grants have been supplied to AIP Publishing to be included in the manuscript file.
4. All third-party material for which permission has been obtained has been properly credited within the manuscript.
5. In the event that the Author is subject to university open access policies or other institutional restrictions that conflict with any of the rights or provisions of this License, such Author has obtained the necessary waiver from his or her university or institution.
This License must be signed by the Author(s) and, in the case of a Work Made for Hire, also by the Copyright Owners. One Author/Copyright Owner may sign on behalf of all the contributors/owners only if they all have authorized the signing, approved of the License, and agreed to be bound by it. The signing Author and, in the case of a Work Made for Hire, the signing Copyright Owne
The Roman Empire A Historical Colossus.pdfkaushalkr1407
The Roman Empire, a vast and enduring power, stands as one of history's most remarkable civilizations, leaving an indelible imprint on the world. It emerged from the Roman Republic, transitioning into an imperial powerhouse under the leadership of Augustus Caesar in 27 BCE. This transformation marked the beginning of an era defined by unprecedented territorial expansion, architectural marvels, and profound cultural influence.
The empire's roots lie in the city of Rome, founded, according to legend, by Romulus in 753 BCE. Over centuries, Rome evolved from a small settlement to a formidable republic, characterized by a complex political system with elected officials and checks on power. However, internal strife, class conflicts, and military ambitions paved the way for the end of the Republic. Julius Caesar’s dictatorship and subsequent assassination in 44 BCE created a power vacuum, leading to a civil war. Octavian, later Augustus, emerged victorious, heralding the Roman Empire’s birth.
Under Augustus, the empire experienced the Pax Romana, a 200-year period of relative peace and stability. Augustus reformed the military, established efficient administrative systems, and initiated grand construction projects. The empire's borders expanded, encompassing territories from Britain to Egypt and from Spain to the Euphrates. Roman legions, renowned for their discipline and engineering prowess, secured and maintained these vast territories, building roads, fortifications, and cities that facilitated control and integration.
The Roman Empire’s society was hierarchical, with a rigid class system. At the top were the patricians, wealthy elites who held significant political power. Below them were the plebeians, free citizens with limited political influence, and the vast numbers of slaves who formed the backbone of the economy. The family unit was central, governed by the paterfamilias, the male head who held absolute authority.
Culturally, the Romans were eclectic, absorbing and adapting elements from the civilizations they encountered, particularly the Greeks. Roman art, literature, and philosophy reflected this synthesis, creating a rich cultural tapestry. Latin, the Roman language, became the lingua franca of the Western world, influencing numerous modern languages.
Roman architecture and engineering achievements were monumental. They perfected the arch, vault, and dome, constructing enduring structures like the Colosseum, Pantheon, and aqueducts. These engineering marvels not only showcased Roman ingenuity but also served practical purposes, from public entertainment to water supply.
Welcome to TechSoup New Member Orientation and Q&A (May 2024).pdfTechSoup
In this webinar you will learn how your organization can access TechSoup's wide variety of product discount and donation programs. From hardware to software, we'll give you a tour of the tools available to help your nonprofit with productivity, collaboration, financial management, donor tracking, security, and more.
Operation “Blue Star” is the only event in the history of Independent India where the state went into war with its own people. Even after about 40 years it is not clear if it was culmination of states anger over people of the region, a political game of power or start of dictatorial chapter in the democratic setup.
The people of Punjab felt alienated from main stream due to denial of their just demands during a long democratic struggle since independence. As it happen all over the word, it led to militant struggle with great loss of lives of military, police and civilian personnel. Killing of Indira Gandhi and massacre of innocent Sikhs in Delhi and other India cities was also associated with this movement.
Unit 8 - Information and Communication Technology (Paper I).pdfThiyagu K
This slides describes the basic concepts of ICT, basics of Email, Emerging Technology and Digital Initiatives in Education. This presentations aligns with the UGC Paper I syllabus.
How to Create Map Views in the Odoo 17 ERPCeline George
The map views are useful for providing a geographical representation of data. They allow users to visualize and analyze the data in a more intuitive manner.
This is a presentation by Dada Robert in a Your Skill Boost masterclass organised by the Excellence Foundation for South Sudan (EFSS) on Saturday, the 25th and Sunday, the 26th of May 2024.
He discussed the concept of quality improvement, emphasizing its applicability to various aspects of life, including personal, project, and program improvements. He defined quality as doing the right thing at the right time in the right way to achieve the best possible results and discussed the concept of the "gap" between what we know and what we do, and how this gap represents the areas we need to improve. He explained the scientific approach to quality improvement, which involves systematic performance analysis, testing and learning, and implementing change ideas. He also highlighted the importance of client focus and a team approach to quality improvement.
Read| The latest issue of The Challenger is here! We are thrilled to announce that our school paper has qualified for the NATIONAL SCHOOLS PRESS CONFERENCE (NSPC) 2024. Thank you for your unwavering support and trust. Dive into the stories that made us stand out!
How to Make a Field invisible in Odoo 17Celine George
It is possible to hide or invisible some fields in odoo. Commonly using “invisible” attribute in the field definition to invisible the fields. This slide will show how to make a field invisible in odoo 17.
How to Split Bills in the Odoo 17 POS ModuleCeline George
Bills have a main role in point of sale procedure. It will help to track sales, handling payments and giving receipts to customers. Bill splitting also has an important role in POS. For example, If some friends come together for dinner and if they want to divide the bill then it is possible by POS bill splitting. This slide will show how to split bills in odoo 17 POS.
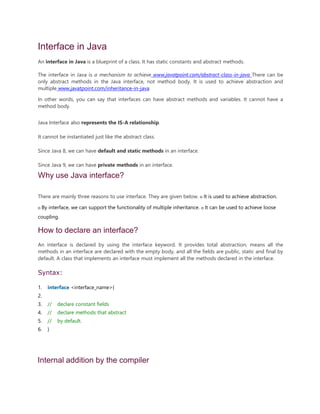
1. Interface in Java
An interface in Java is a blueprint of a class. It has static constants and abstract methods.
The interface in Java is a mechanism to achieve www.javatpoint.com/abstract-class-in-java There can be
only abstract methods in the Java interface, not method body. It is used to achieve abstraction and
multiple www.javatpoint.com/inheritance-in-java
In other words, you can say that interfaces can have abstract methods and variables. It cannot have a
method body.
Java Interface also represents the IS-A relationship.
It cannot be instantiated just like the abstract class.
Since Java 8, we can have default and static methods in an interface.
Since Java 9, we can have private methods in an interface.
Why use Java interface?
There are mainly three reasons to use interface. They are given below. o It is used to achieve abstraction.
o By interface, we can support the functionality of multiple inheritance. o It can be used to achieve loose
coupling.
How to declare an interface?
An interface is declared by using the interface keyword. It provides total abstraction; means all the
methods in an interface are declared with the empty body, and all the fields are public, static and final by
default. A class that implements an interface must implement all the methods declared in the interface.
Syntax:
1. interface <interface_name>{
2.
3. // declare constant fields
4. // declare methods that abstract
5. // by default.
6. }
Internal addition by the compiler
2. The Java compiler adds public and abstract keywords before the interface method. Moreover, it adds public,
static and final keywords before data members.
In other words, Interface fields are public, static and final by default, and the methods are public and
abstract.
+ compiler-►
interface Pnntable{ interface Pnntable{
nt M N=5 public static final int MIN=5
void print): public abstract void printn:
Prints blejava Printable .class
The relationship between classes and interfaces
As shown in the figure given below, a class extends another class, an interface extends another interface,
but a class implements an interface.
class interface interface
ik
extends
4
1 implements
ii
extends
class class interface
Java Interface Example
In this example, the Printable interface has only one method, and its implementation is provided in the A6
class.
1. interface printable{
2. void print();
3. }
4. class A6 implements printable{
3. 5. public void
print(){System.out.println(MHelloM);}
6.
7. public static void main(String args[]){
8. A6 obj = new A6();
9. obj.printO;
10. }
11. }
Multiple inheritance in Java by interface
If a class implements multiple interfaces, or an interface extends multiple interfaces, it is known as multiple
inheritance.
1. interface Printable{
2. void print();
3. }
4. interface Showable{
5. void show();
6. }
7. class A7 implements Printable,Showable{
8. public void print(){System.out.println("Hello");}
9. public void
show(){System.out.println(MWelcomeM);}
10.
11. public static void main(String args[]){
12. A7 obj = new A7();
13. obj.print();
4. 14.
obj.show();
15. }
16. }
Multiple inheritance is not supported through class in java, but it is possible by an
interface
As we have explained in the inheritance chapter, multiple inheritance is not supported in the case of
www.javatpoint.com/object-and-class-in-javabecause of ambiguity. However, it is supported in case of an
interface because there is no ambiguity. It is because its implementation is provided by the
implementation class. For example:
1. interface Printable{
2. void print();
3. }
4. interface Showable{
5. void print();
6. }
7.
8. class TestInterface3 implements Printable, Showable{
9. public void print(){System.out.println("Hello");}
10. public static void main(String args[]){
11. TestInterface3 obj = new TestInterface3();
12. obj.print();
13. }
14. }
Interface inheritance
A class implements an interface, but one interface extends another interface.
1. interface Printable{
2. void print();
3. }
4. interface Showable extends Printable{
5. void show();
6. }
7. class TestInterface4 implements Showable{
8. public void print(){System.out.println("Hello");}
9. public void show(){System.out.println("Welcome");}
10.
11. public static void main(String args[]){
7. Object Oriented Programming
Concepts in Java
Object oriented Programming is a paradigm
or organizing principle for software, where
the program is structured according to the
information it manipulates, rather than the
operations it does. Data, not procedures,
shape the program.
8. What is an Object ?
An Object is defined as a software
package that incorporates a set of
related data and all the functions
needed to manipulate this data. The
related set of data, the data members,
captures the state of an object.
9. Defining Objects : STATE (Attributes)
Encompasses all of the properties of an
object. Each property has a value. All
objects of the same type have same
properties ( although they may have
different values).
Properties are implemented with Object
Variables or instance variables .
10. A motorcycle class might include the
following attributes and have these typical
values:
• color : red, green, silver, brown
• style : cruiser, sport bike, standard
• Make : Honda, BMW, Bultaco
Here color, style, make are the instance
variables.
Example :
11. Defining Objects : BEHAVIOR
Is how an object reacts, in terms of state
changes and interaction with the other
objects.
Behavior is the only way objects can do
anything to themselves or have anything
done to them.
12. A motorcycle class might have some
behavior like:
• Start the engine
• Stop the engine
• Speed up
• Change gear
• Stall
Example :
13. Defining Objects : BEHAVIOR
The behavior is defined by the use of
functions which are confined to a Class and
are called member functions or Methods.
14. Classes
A class is a set of objects that share the same
properties and behavior.
Its where state and behavior of objects is
defined through Variables and Methods.
Example:
Every Motorcycle is defined in the
Motorcycle class.
15. class Motorcycle {
String make;
String color;
boolean enginestate = false;
void startEngine() {
if (enginestate = = true)
Example of the Motorcycle Class
16. System.out.println (“The engine is
already on”)
else {
enginestate = true;
System.out.println ( “The engine is
now on”);
}
}
}
17. public static void main (String args[] )
{
Motorcycle m = new Motorcycle();
m.make = “Yamaha RZ350”;
m.color = “Yellow”;
System.out.println(“Calling
showAtts…”);
m.showAtts();
The main() method for Motorcycle
class
19. class Motorcycle {
String make;
String color;
boolean enginestate = false;
void startEngine() {
if (enginestate = = true)
System.out.println (“The engine is
already on”)
The final version of Motorcycle.java
file
20. else {
enginestate = true;
System.out.println ( “The engine is now
on”);
}
}
void showAtts () {
System.out.println (“This motorcycle is a”
+color+ “ ” +make);
21. if (engineState = = true)
System.out.println (“The engine is on.”);
else System.out.println (“The engine is
off.”);
}
public static void main (String args[] ) {
Motorcycle m = new Motorcycle();
m.make = “Yamaha RZ350”;
m.color = “Yellow”;
24. The three major concepts in OOP
are:
• Encapsulation
• Inheritance
• Polymorphism
25. Encapsulation
Embedding both data and code into a
single entity.
•Allows us to use data hiding which is a
way to prevent direct access to the
variables in an object.
• Separates the interface to the class from
its implementation.
26. Class Flight
{
int altitude;
private int heading;
int speed;
float latitude;
float longitude;
// change the flight’s heading by angle
degrees
void turnFlight (int angle) {
heading = (heading + angle) % 360;
// make sure angle is in the range 0-359
degrees
if (heading < 0) heading = heading + 360;
}
27. void setHeading (int angle) {
heading = angle % 360;
// make sure angle is in the range 0-359
degrees
if (heading < 0) heading = heading + 360;
}
int getHeading( ) {
return heading;
}
// print information about the flight
void printFlight () {
System.out.println(altitude + “ / ” +
heading + “ / ” + speed);
}
}
30. Benefits of Inheritance
•Subclasses provide specialized behaviors from the
basis of common elements provided by the
superclass. Through the use of inheritance,
programmers can reuse the code (in the superclass)
many times.
• Programmers can implement superclasses called
abstract classes that define “generic” behaviors. The
abstract superclass defines and may partially
implement the behavior but much of the class is
undefined and unimplemented. Other programmers
fill in the details with specialized subclasses.
31. Example of Inheritance
class CommercialFlight extends Flight {
// extra members in CommercialFlight
int flightNumber;
int passengers;
}
33. Polymorphism
Polymorphism is the ability of a single
function name to be used to operate on
many different types. It is a feature that
allows one interface to be used for a general
class of actions. The specific action is
determined by the exact nature of the
situation.
34. Polymorphism
• We can deal with objects without the
need to know what exact class they belong
to.
• This is an extension of the inheritance
concept.
35. JAVA - PACKAGES:
What is package:
Packages are used in Java, in-order to avoid name conflicts and to control access of
class, interface and enumeration etc. A package can be defined as a group of similar
types of classes, interface, enumeration or sub-package.
Using package it becomes easier to locate the related classes and it
also provides a good structure for projects with hundreds of classes and other files.
Benefits of using package in java:
1) Java package is used to categorize the classes and interfaces so that they can be
easily maintained.
2) Java package provides access protection.
3) Java package removes naming collision.
4) This packages can be provide reusability of code.
5) We can create our own package or extend already available package.
Java Packages: Types:
• Built-in Package: Existing Java package for
example java.lang, java.util ,java.io etc.
• User-defined-package: Java package created by user to categorize their
project's classes and interface.
How to Create a package:
Creating a package in java is quite easy. Simply include a package command
followed by name of the package as the first statement in java source file.
package mypackage;
public class student
{
Statement;
}
36. The above statement will create a package name mypackage in the project directory.
Java uses file system directories to store packages. For example the .java file for any
class you define to be part of mypackage package must be stored in a directory
called mypackage.
Additional points about package:
• A package is always defined as a separate folder having the same name as the
package name.
• Store all the classes in that package folder.
• All classes of the package which we wish to access outside the package must be
declared public.
• All classes within the package must have the package statement as its first line.
• All classes of the package must be compiled before use (So that they are error
free)
Example of Java packages:
Package mypack; public class Simple {
public static void main(String args[])
{
System.out.println("Welcome to package");
}
}
How to compile Java packages:
This is just like compiling a normal java program. If you are not using any IDE, you
need to follow the steps given below to successfully compile your packages:
1. java -d directory javafilename For example javac -d . Simple.java
The -d switch specifies the destination where to put the generated class file. You can
use any directory name like /home (in case of Linux), d:/abc (in case of windows) etc. If
you want to keep the package within the same directory, you can use . (dot).
How to run java package program:
You need to use fully qualified name e.g. mypack.Simple etc to run the class.
To Compile: javac -d . Simple.java To Run: java mypack.Simple
Output: Welcome to package
The -d is a switch that tells the compiler where to put the class file i.e. it represents
destination. The . represents the current folder.
37. How to access package from another package:
There are three ways to access the package from outside the package.
1. import package.*;
2. import package.classname;
3. fully qualified name.
1) Using packagename.*:
If you use package.* then all the classes and interfaces of this package will be
accessible but not subpackages.
The import keyword is used to make the classes and interface of another package
accessible to the current package.
Example of package that import the packagename.*:
//save by A.java package pack; public class A
{
public void msg()
{
System.out.println("Hello java");}
}
//save by B.java package mypack; import pack.*; class B
{
public static void main(String args[])
{
A obj = new A(); obj.msg();
}
}
Output: Hello java
2) Using packagename.classname:
If you import package.classname then only declared class of this package will be
accessible.
Example of package by import package.classname:
//save by A.java
package pack; public class A
38. {
public void msg()
{
System.out.println("Hello");}
}
//save by B.java package mypack; import pack.A;
class B
{
public static void main(String args[])
{
A obj = new A(); obj.msg();
}
}
Output: Hello
3) Using fully qualified name:
If you use fully qualified name then only declared class of this package will be
accessible. Now there is no need to import. But you need to use fully qualified name
every time when you are accessing the class or interface.
It is generally used when two packages have same class name e.g. java.util and
java.sql packages contain Date class.
Example of package by import fully qualified name:
//save by A.java package pack; public class A
{
public void msg()
{
System.out.println("Hello");}
}
//save by B.java package mypack; class B
{
public static void main(String args[])
{
pack.A obj = new pack.A(); //using fully qualified name obj.msg();
}
39. }
Output: Hello
Note: If you import a package, subpackages will not be imported.
If you import a package, all the classes and interface of that package will be imported
excluding the classes and interfaces of the subpackages. Hence, you need to import the
subpackage as well.
Subpackage in java:
Package inside the package is called the subpackage. It should be created to
categorize the package further.
Let's take an example, Sun Microsystem has definded a package named java that
contains many classes like System, String, Reader, Writer, Socket etc. These classes
represent a particular group e.g. Reader and Writer classes are for Input/Output
operation, Socket and ServerSocket classes are for networking etc and so on. So, Sun
has subcategorized the java package into subpackages such as lang, net, io etc. and
put the Input/Output related classes in io package, Server and ServerSocket classes in
net packages and so on.
package com.javatpoint.core; class Simple{
public static void main(String args[]){
System.out.println("Hello subpackage");
}
}
To Compile: javac -d . Simple.java
To Run: java com.javatpoint.core.Simple Output: Hello subpackage
How to send the class file to another directory or drive:
There is a scenario, I want to put the class file of A.java source file in classes folder of
c: drive.
For example:
//save as Simple.java package mypack; public class Simple {
public static void main(String args[])
{
System.out.println("Welcome to package");
}
40. }
To Compile:
e:sources> javac -d c:classes Simple.java To Run:
To run this program from e:source directory, you need to set classpath of the directory
where the class file resides. e:sources> set classpath=c:classes;.; e:sources> java
mypack.Simple
Another way to run this program by -classpath switch of java:
The -classpath switch can be used with javac and java tool.
To run this program from e:source directory, you can use -classpath switch of java that tells
where to look for class file. For example:
e:sources> java -classpath c:classes mypack.Simple
Output: Welcome to package
41. Basics of a thread
As with the Java concepts, everything about thread are defined in a class Thread. The Thread
class encapsulates all of the control one will need over threads. The Thread class is our only
link to manage how threads behave. In this Section, we will learn about : how to create and run
a thread, the life cycle of a thread, and the thread controlling methods.
Creating and Running a Thread
There are two ways to define a thread: one is sub classing Thread and other is using the
Runnable interface.
Using the sub classing thread : With this method, we have to define a class as a sub class of
the Thread class. This sub class should contain a body which will be defined by a method run().
This run() method contains the actual task that the thread should perform. An instance of this
sub class is then to be created by a new statement, followed by a call to the thread's start()
method to have the run() method executed. Let us consider the Illustration 6.1 which includes a
program to create there individual threads that each print out their own " Hello World !" string.
Illustration 6.1 // Creating and running threads using sub
classing Thread //
/* Creating three threads using the class Thread and then running them concurrently.
*/
class ThreadA extends Thread{ public void run( ) {
for(int i = 1; i <= 5; i++) {
System.out.println("From Thread A with i = "+ -1*i);
}
System.out.println("Exiting from Thread A ...");
}
}
class ThreadB extends Thread { public void run( ) {
for(int j = 1; j <= 5; j++) {
System.out.println("From Thread B with j= "+2* j);
}
42. System.out.println("Exiting from Thread B ...");
}
}
class ThreadC extends Thread{ public void run( ) {
for(int k = 1; k <= 5; k++) {
System.out.println("From Thread C with k = "+ (2*k-1));
}
System.out.println("Exiting from Thread C ...");
}
}
public class Demonstration_111 {
public static void main(String args[]) {
ThreadA a = new ThreadA();
ThreadB b = new ThreadB();
ThreadC c = new ThreadC();
a. start();
b. start();
c. start();
System.out.println("... Multithreading is over ");
}
}
OUTPUT:
From Thread A with i = -1
From Thread A with i = -2
From Thread A with i = -3
From Thread B with j= 2
From Thread A with i = -4
43. From Thread A with i = -5
Exiting from Thread A
... Multithreading is over
From Thread C with k = 1
From Thread B with j= 4
From Thread B with j= 6
From Thread B with j= 8
From Thread B with j= 10
Exiting from Thread B
... From Thread C with k
= 3 From Thread C with k
= 5 From Thread C with k
= 7 From Thread C with k
= 9 Exiting from Thread
C ...
In the above simple example, three threads (all of them are of some type) will be executed
concurrently. Note that a thread can be directed to start its body by start() method.
Using the Runnable interface : A second way to create threads is to make use of the
Runnable interface. With this approach, first we have to implement the Runnable
interface.[Runnable interface is already defined in the system package java.lang with a single
method run() as below :
public interface Runnable {
public abstract void run( );
} ]
When we will create a new thread, actually a new object will be instantiated from this Runnable
interface as the target of our thread, meaning that the thread will look for the code for the run( )
method within our object's class instead of inside the Thread's class. This is illustrated with an
example where two processes Brother and Sister will be executed simultaneously.
Illustration 6.2
/* Creating three threads using the Runnable interface and then running them
concurrently. */
44. class ThreadX implements Runnable{ public void run( ) {
for(int i = 1; i <= 5; i++) {
System.out.println("Thread X with i = "+ -1*i);
}
System.out.println("Exiting Thread X ...");
}
}
class ThreadY implements Runnable { public void run( ) {
for(int j = 1; j <= 5; j++) {
System.out.println("Thread Y with j = "+ 2*j);
}
System.out.println("Exiting Thread Y ...");
}
}
class ThreadZ implements Runnable{ public void run( ) {
for(int k = 1; k <= 5; k++) {
System.out.println("Thread Z with k = "+ (2*k-
1));
}
System.out.println("Exiting Thread Z ...");
}
}
public class Demonstration_112 {
public static void main(String args[]) {
ThreadX x = new ThreadX();
Thread t1 = new Thread(x);
ThreadY y = new ThreadY();
Thread t2 = new Thread(y);
45. //ThreadZ z = new ThreadZ();
//Thread t3 = new Thread(z);
Thread t3 = new Thread(new ThreadZ());
t1.start();
t2.start();
t3.start();
System.out.println("... Multithreading is over ");
}
}
OUTPUT:
Thread X with i = -1
Thread X with i = -2
Thread Z with k = 1 Thread
Z with k = 3 Thread Z with
k = 5 Thread Z with k = 7
Thread Z with k = 9
Exiting Thread Z ...
... Multithreading is over
Thread Y with j = 2 Thread
Y with j = 4 Thread Y with
j = 6 Thread Y with j = 8
Thread Y with j = 10
Exiting Thread Y ...
46. Thread X with i = -3
Thread X with i = -4
Thread X with i = -5
Exiting Thread X ...
Note : Note in the above example, how after implementing objects, their thread is created and
their threads start execution. Also note that, a class instance with the run( ) method defined
within must be passed in as an argument in creating the thread instance so that when the start()
method of this Thread instance is called, Java run time knows which run() method to execute.
This alternative method of creating a thread is useful when the class defining run() method
needs to be a sub class of other classes; the class can inherit all the data and methods of the
super class.
Life cycle of threads
Each thread is always in one of five states, which is depicted in Figure 6.1
Figure 6.1 : Five states of a thread
Newborn : When a thread is created (by new statement ) but not yet to run, it is called in
Newborn state. In this state, the local data members are allocated and initialized.
Runnable : The Runnable state means that a thread is ready to run and is awaiting for the
control of the processor, or in other words, threads are in this state in a queue and wait their
turns to be executed.
Running : Running means that the thread has control of the processor, its code is currently
being executed and thread will continue in this state until it get preempted by a higher priority
thread, or until it relinquishes control.
Blocked : A thread is Blocked means that it is being prevented from the Runnable ( or Running)
state and is waiting for some event in order for it to reenter the scheduling queue.
Dead : A thread is Dead when it finishes its execution or is stopped (killed) by another thread.
Threads move from one state to another via a variety of means. The common methods for
controlling a thread's state is shown in Figure 6.1. Below, we are to summarize these methods :
start ( ) : A newborn thread with this method enter into Runnable state and Java run time create
a system thread context and starts it running. This method for a thread object can be called
once only
stop( ) : This method causes a thread to stop immediately. This is often an abrupt way to end a
thread.
suspend( ) : This method is different from stop( ) method. It takes the thread and causes it to
stop running and later on can be restored by calling it again.
resume ( ) : This method is used to revive a suspended thread. There is no gurantee that the
thread will start running right way, since there might be a higher priority thread running already,
but, resume()causes the thread to become eligible for running. sleep (int n ) : This method
causes the run time to put the current thread to sleep for n milliseconds. After n milliseconds
have expired, this thread will become elligible to run again. yield( ) : The yield() method causes
the run time to switch the context from the current thread to
47. the next available runnable thread. This is one way to ensure that the threads at lower priority
do not get started.
Other methods like wait(), notify(), join() etc. will be discussed in subsequent discussion. Let
us illustrate the use of these method in a simple Application.
Illustration 6.3
/* Demonstration of thread class methods : getID() */
/* Java code for thread creation by extending the Thread class */
class ThreadId extends Thread { public void run() { try {
// Displaying the thread that is running
System.out.println ("Thread " + Thread.currentThread().getId() + "
is
running");
}
catch (Exception e) {
// Throwing an exception
System.out.println ("Exception is caught");
}
}
}
public class Demonstration_113{
public static void main(String[] args)
{
int n = 8; // Number of threads for (int i=0; i<8; i++)
{
ThreadId object = new ThreadId(); object.start();
}
48. }
}
OUTPUT:
Thread 21
Thread 22
Thread 23
Thread 25
Thread 26
Thread 27
Thread 24
Thread 28
s running
s running
s running
s running
s running
s running
s running
s running
Illustration 6.4
/* Demonstration of thread class methods : getID() */
/* Java code for thread creation by implementing the Runnable Interface */
class ThreadId implements Runnable {
public void run() { try {
// Displaying the thread that is running
System.out.println ("Thread " + Thread.currentThread().getId() + "
is
running");
}
catch (Exception e)
{
49. // Throwing an exception
System.out.println ("Exception is caught");
}
}
}
// Main Class
class Demonstration_114 {
public static void main(String[] args)
{
int n = 8; // Number of threads for (int i=0; i<8; i++){
Thread object = new Thread(new
ThreadId()); object.start();
}
}
}
OUTPUT:
Thread 21
Thread 23
Thread 24
Thread 25
Thread 22
Thread 27
Thread 26
Thread 28
s running
s running
s running
s running
s running
s running
s running
s running
50. Illustration 6.5
/* Use of yield(), stop() and sleep() methods */
class ClassA extends Thread{ public void run() {
System.out.println("Start Thread A ...."); for(int i
= 1; i <= 5; i++) { if (i==1) yield();
System.out.println("From Thread A: i = "+
i);
}
System.out.println("... Exit Thread A");
}
}
class ClassB extends Thread{ public void run() {
System.out.println("Start Thread B ...."); for(int j
= 1; j <= 5; j++) {
System.out.println("From Thread B: j = "+
j); if (j==2) stop();
}
System.out.println("... Exit Thread B");
}
}
class ClassC extends Thread{ public void run() {
System.out.println("Start Thread C ...."); for(int k
= 1; k <= 5; k++) {
System.out.println("From Thread B: j = "+
k); if (k==3){
try{
51. sleep(1000);
}catch(Exception e){}
}
}
System.out.println("... Exit Thread C");
}
}
public class Demonstration_115{
public static void main (String args[]) {
ClassA t1 = new ClassA();
ClassB t2 = new ClassB();
ClassC t3 = new ClassC(); t1.start();
t2.start(); t3.start();
System.out.println("... End of executuion
");
}
}
52. From Thread A: i = 3
From Thread A: i = 4
From Thread A: i = 5
... Exit Thread A
From Thread B: j = 2
From Thread B: j = 3
From Thread B: j = 4
From Thread B: j = 5
... Exit Thread C
Illustration 6.6
/* Use of suspend() and resume() methods */
class Thread1 extends Thread { public void run( ) { try{
System.out.println (" First thread starts running" );
sleep(10000);
System.out.println (" First thread finishes running" );
}
catch(Exception e){ }
}
}
class Thread2 extends Thread { public void run( ) { try{
System.out.println ( "Second thread starts running");
System.out.println ( "Second thread is suspended itself
"); suspend( );
53. }
System.out.println (" Second thread runs again" );
catch(Exception e){ }
}
}
class Demonstration_116{
public staticvoid main (String args[ ] ){
try{
i.e. in Newborn state
Thread1 first = new Thread1( ); // It is a newborn thread
Thread2 second= new Thread2( ); // another new born thread
first.start( ); // first is scheduled for running
second.start( ); // second is scheduled for running
is suspended
System.out.println("Revive the second thread" ); // If it
second.resume( );
" );
System.out.println ("Second thread went for 10 seconds sleep
second.sleep (10000);
running" );
System.out.println ("Wake up second thread and finishes
System.out.println ( " Demonstration is finished ");
}
catch(Exception e){ }
}
}
54. OUTPUT:
Revive the second thread First thread
starts running Second thread starts
running Second thread is suspended itself
Second thread went for 10 seconds sleep
Status of a Thread
It is some time essential to know some information about threads. There are number of methods
defined in Thread which can be called for getting information about threads. Some of the most
commonly used methods for thread's status are listed here :
currentThread( ) : The CurrentThread() is a static method returns the Thread object which is the
currently running thread.
setName( String s) : The SetName() method is to assign a name s for a thread prior its
execution. This, therefore, identifies the thread with a string name. This is helpful for debugging
multi-threaded programs.
getName( ) : This method returns the current string value of the thread's name as set by
SetName().
setPriority (int p) : This method sets the thread's priotity to an integer value p passed in. There
are several predefined priotiry constants defined in class Thread : MIN-PRIORITY, NORM-
PRIORTY and MAX-PRIORITY, which are 1, 5, and 10 respectively.
getPriority ( ) : This method returns the thread's current priority, a value between 1 and 10.
isAlive ( ) : This method returns true if the thread is started but not dead yet.
isDaemon ( ) : This method returns true if the thread is a daemon thread.
Following is the Illustration 6.7 to give an idea how the above mentioned method may be
utilized.
Illustration 6.7 // Status information of threads //
/* Setting priority to threads */
class ClassA extends Thread{ public void run() {
System.out.println("Start Thread A ...."); for(int i = 1; i
<= 5; i++) {
System.out.println("From Thread A: i = "+ i);
}
55. System.out.println("... Exit Thread A");
}
}
class ClassB extends Thread{ public void run() {
System.out.println("Start Thread B ...."); for(int j
= 1; j <= 5; j++) {
System.out.println("From Thread B: j = "+
j);
}
System.out.println("... Exit Thread B");
}
}
class ClassC extends Thread{ public void run() {
System.out.println("Start Thread C ...."); for(int k
= 1; k <= 5; k++) {
System.out.println("From Thread B: j = "+
k);
}
System.out.println("... Exit Thread C");
}
}
class Demonstration_117{
public static void main (String args[]) {
ThreadA t1 = new ThreadA();
ThreadB t2 = new ThreadB();
ThreadC t3 = new ThreadC();
t3.setPriority(Thread.MAX_PRIORITY);
t2.setPriority(t2.getPriority() + 1);
56. t1.setPriority(Thread.MIN_PRIORITY);
t1.start(); t2.start(); t3.start();
System.out.println("... End of executuion
");
}
}
OUTPUT:
Start Thread A ....
From Thread A: i = 1
From Thread A: i = 2
From Thread A: i = 3
From Thread A: i = 4
From Thread A: i = 5
... Exit
Thread
A
... End of executuion
Start Thread B ....
Start Thread C ....
From Thread B: j = 1
From Thread B: j = 2
From Thread B: j = 3
From Thread B: j = 4
From Thread B: j = 5
... Exit
Thread
B
From Thread B: j = 1
From Thread B: j = 2
From Thread B: j = 3
From Thread B: j = 4
From Thread B: j = 5
57. ... Exit Thread C
Illustration 6.8
/* Data race example. */
public class Demonstration_118 extends Thread {
public static int x; public void run() {
for (int i = 0; i < 100; i++) { x = x +
1;
}
x = x - 1;
}
}
public static void main(String[] args) { x
= 0;
for (int i = 0; i < 1000; i++){ new
Demonstration_118().start();
System.out.println(x);
}
}
// x not always 0!
Synchronization and Inter-Thread Communication
It is already mentioned that threads in Java are running in the same memory space, and hence
it is easy to communicate between two threads. Inter-thread communications allow threads to
talk to or wait on each other. Again, because all the threads in a program share the same
memory space, it is possible for two threads to access the same variables and methods in
object. Problems may occur when two or more threads are accessing the same data
concurrently, for example, one thread stores data into the shared object and the other threads
reads data, there can be synchronization problem if the first thread has not finished storing the
data before the second one goes to read it. So we need to take care to access the data by only
one thread process at a time. Java provides unique language level support for such
58. synchronization. in this Section we will learn how synchronization mechanism and inter-thread
communications are possible in Java.
Synchronization
To solve the critical section problem, one usual concept is known what is called monitor. A
monitor is an object which is used as a mutually exclusive lock ( called mutex). Only one thread
may own a monitor at a given time. When a thread acquires a lock it is said to have entered the
monitor. All other threads attempting to enter the locked monitor will be suspended until the
owner thread exits the monitor. But in Java, there is no such monitor. In fact, all Java object
have their own implicit monitor associated with them. Here, the key word synchronized is used
by which method (s) or block of statements can be made protected from the simultaneous
access. With this, when a class is designed with threads in mind, the class designer decides
which methods should not be allowed to execute concurrently. when a class with synchronized
method is instantiated, the new object is given its own implicit monitor. The entire time that a
thread is inside of a synchronized method, all other threads that try to call any other
synchronized method on the same instance have to wait. In order to exit the monitor and
relinquish control of the object to the next waiting thread the monitor owner simply needs to
return from the method.
Let us illustrate this mechanism with a simple example.
Suppose, we want to maintain a bank account of customers. Several transactions, such as
deposite some amount to an account and withdraw some amount from an account etc. are
possible. Now, for a given account, if two or more transactions come simultaneously then only
one transaction should be allowed at a time instead of simulataneous transaction processing so
that data inconsistency will never occur. So, what we need is to synchronize the transaction.
Illustration 6.9 is to implement such a task.
Illustration 6.9
/* The following Java application shows how the transactions in a bank can be carried
out concurrently. */
class Account {
public int balance;
public int accountNo;
void displayBalance() {
System.out.println("Account No:" + accountNo + "Balance: " +
balance);
}
synchronized void deposit(int amount){
balance = balance + amount;
59. System.out.println( amount + " is deposited");
displayBalance();
}
synchronized void withdraw(int amount){
balance = balance - amount;
System.out.println( amount + " is
withdrawn"); displayBalance();
}
}
class TransactionDeposit implements Runnable{ int
amount;
Account accountX;
TransactionDeposit(Account x, int amount){
accountX = x; this.amount =
amount; new Thread(this).start();
}
}
public void run(){
accountX.deposit(amount);
}
class TransactionWithdraw implements Runnable{
int amount;
Account accountY;
TransactionWithdraw(Account y, int amount) {
accountY = y; this.amount = amount;
new Thread(this).start();
60. }
public void run(){
accountY.withdraw(amount);
}
}
class Demonstration_119{
public static void main(String args[]) {
Account ABC = new Account();
ABC.balance = 1000;
ABC.accountNo = 111;
TransactionDeposit t1;
TransactionWithdraw t2; t1 = new
TransactionDeposit(ABC, 500); t2 =
new TransactionWithdraw(ABC,900);
}
}
In the above example, the keyword synchronized is used for the methods void deposite(..) and
void withdraw(^) so that these two methods will never run for the same object instance
simultaneously.
61. Alternatively, if one wants to design a class that was not designed for multi-thread access and
thus has non-synchronized methods, then it can be wrapped the call to the methods in a
synchronized block. Here is the general form of the synchronized statement :
synchronized (Object ) { block of statement(s) }
where Object is any object reference. For example, make all the methods in Account class as
non-synchronized (remove the synchronized key word). Then modify the code for run( ) in class
TransactionDeposite and class TransactionWithdraw are as under :
public void run( ) { // in TransactionDeposite
synchronized (accountX ) {
accountX.deposite(amount );
}
}
public void run( ) { //
synchronized (accountY ) {
accountY.withdraw(amount
in TransactionWithdraw
);
}
}
You will get the same output.
Interested reader may try to run the program without using synchronization and observe the
result.
Note: In a class, non-synchronized methods are concurrently executable.
Inter-thread Communication
There are three ways for threads to communicate with each other. The first is through commonly
shared data. All the threads in the same program share the same memory space. If an object is
accessible to various threads then these threads share access to that object's data member and
thus communicate each other.
The second way for threads to communicate is by using thread control methods. There are such
three methods by which threads communicate for each other :
suspend ( ): A thread can suspend itself and wait till other thread resume it.
resume ( ): A thread can wake up other waiting thread (which is waiting using suspend() )
through its resume() method and then can run concurrently.
join ( ) :This method can be used for the caller thread to wait for the completion of called thread.
The third way for threads to communicate is the use of three methods; wait(), notify(), and
notifyAll(); these are defined in class Object of package java.lang. Actually these three
62. methods provide an elegant inter-process communication mechanism to take care the deadlock
situation in Java. As there is multi-threading in program, deadlock may occur when a thread
holding the key to monitor is suspended or waiting for another thread's completion. If the other
thread is waiting for needs to get into the same monitor, both threads will be waiting for ever.
The uses of these three methods are briefed as below :
wait ( ):This method tells the calling thread to give up the monitor and make the calling thread
wait until either a time out occurs or another thread call the same thread's notify() or notifyAll()
method.
Notify ( ): This method wakes up the only one (first) waiting thread called wait() on the same
object.
notifyAll( ): This method will wake up all the threads that have been called wait( ) on the same
object.
Now, let us demonstrate the classical use of these methods. Illustration 6.6 is for this purpose.
Illustration 6.10 : // Inter thread communication : Producer & Consumer
problem //
class Q {
processes
// Q is a class containing two parallel
int n;
boolean flag = false;
//PRODUCER
synchronized void put( int n) { // Produce a value
if(flag) {
try wait( ); catch(InterruptedException e);
// to the
}
// critical section
this.n = n;
System.out.println( "Produce :" + n);
// Critical Section
flag = true;
// Exit from the
notify( );
// Entr
// crit
}
//CONSUMER
63. started
synchronized int get( ) { // Consume a value
if(! flag) {
// Entry
try wait( ); catch(InterruptedException e);
// to the
}
// critical section
System.out.println( "Consume :" + n);
// Critical Section
flag = false;
// Exit from the
notify( ); return( n );
}
// crit
class Producer implement Runnable {
Q q;
Producer ( Q q ) {
this.q =q;
new thread (this).start ( )
;
// Thread for Producer process
// constructor
// Producer process is
}
public void run( ) { // infinite running thread for Producer
int i = 0; while (true )
q.put ( i++ );
}
}
class Consumer implement Runnable { // Thread for consumer process
Q q;
64. Consumer (Q q ) { // Constructor
this.q = q;
new Thread (this).start ( );
}
public void run( ) { // infinite running thread for Consumer
while (true)
q.get ( );
}
}
class PandC {
public static void main( String args[ ] ) {
Q q = new Q( ); // an instance of parallel processes is
created
producer new Producer(q) ;
new Consumer (q);
// Run the thread for
// Run consumer thread
}
}
To understand this critical section problem in operating system design, user may be referred to :
Operating system concept by Peterson and Sylberchotze, Addiction Wesley Inc.
Note : All three methods i.e. wait(), notify(), and notifyAll() must only be called from the inside of
synchronized methods.
Thread Groups and Daemon
There are two other variation in thread class known : ThreadGroup and Daemon. ThreadGroup,
as its name implies, is a group of threads. A thread group can have both threads and other
thread groups as its member elements. In Java, there is a default thread group called
SystemThreadGroup, which is nothing but the Java run time itself. When a Java application is
started, the Java run time creates the main thread group as a member of the system thread
group. A main thread is created in the main thread group to run the main( ) method of the
Application. In fact, every thread instance is member of exactly one thread group. By default, all
new user created threads and thread groups) will become the members of the main thread
65. group. All the threads and thread in an application form a tree with the system thread group as
the root.
Daemon threads are service threads. They exist to provide service threads. They exist to
provide services to other threads. They normally run in an infinite loop and attending the client
threads requesting services. When no other threads exist daemon thread is automatically
ceased to exist.
A new thread group can be created by instantiating the thread group class. For example,
Threadgroup TG = new ThreadGroup ( ) ;
Thread T = new Thread ( TG) ;
These two statements creates a new thread group TG which contains a thread T as the only
member.
To create a daemon thread, there is a method setDaemon() can be called just after the creation
of a thread and before the execution is started. For example, following two statement is to make
a thread as demon thread.
Thread T = new Thread ( ) ;
T setDaemon (true);
The constructor of the thread is a good candidate for making this method call, Also, by default,
all the threads created by a daemon thread are also daemon thread.
Some commonly used methods for handling thread groups and daemon are listed below :
getName ( ) :Returns the name of the thread group .
setName ( ) :Sets the name of the thread group .
geParent ( ) :Returns the parent thread group of the thread group .
getMaxPriority :Returns the current maximum priority of the thread group.
activeCount ( ) :Returns the number of active threads in the thread group.
activeGroupCount :Returns the number of active threads groups in the
thread group.
isDaemon ( ) :Returns true if the thread is a daemon thread. setDaemon ( ) :
Set the thread as a daemon thread prior its starting
execution.